In this section, we will explore various cool and new features in the costume editor. We will create costumes in the Vector Mode. Vector graphics look much smoother in games, especially in the full-screen mode. Moreover, vector graphics can be reshaped easily. The Vector Mode is very flexible and is my preferred mode of creating costumes.
You may wonder why vector graphics appear smoother than bitmap graphics. It's because in vector, the edges of lines and objects become more transparent gradually, fading into the background or layer behind. This effect is called antialiasing.
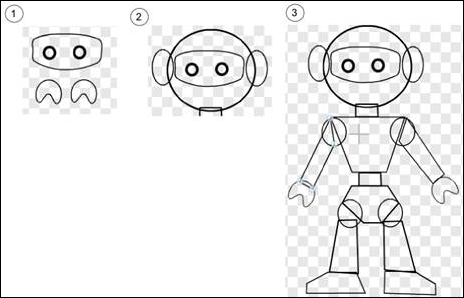
We are going to create a robot costume for our player. The first thing I usually do when creating a detailed costume is start from a simple wireframe, then add color and shade.
Let's create the new costumes and a new project by performing the following steps:
- To create a new project, navigate to File | New.
- Create a new costume by clicking on the Paint new costume icon.
- On the Paint Editor page, switch to the vector mode by clicking on the Convert to vector button.
The Vector Mode tools include Select, Reshape, Pencil, Line, Rectangle, Oval, Paint Bucket, Stamper, Layer, and others. We will demonstrate the use of some of these tools.
Click on the costume tab of the new sprite and then click on the black color to change the primary shade to black. Next, create the parts for the robot costumes using the following steps:
Next, create the parts for the robot costumes using the following steps:
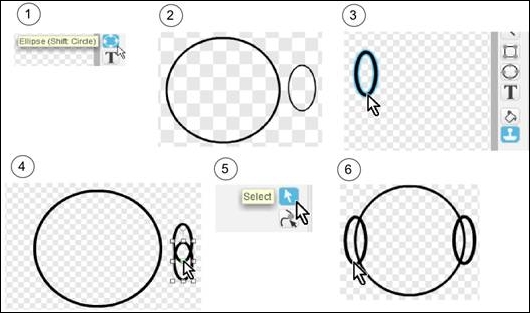
- Click on the Oval tool button.
- Click and drag on it to make a circle to be the head and a small oval to be one ear.
- Click on the Stamper tool button and click on the ear to make a copy.
- Drag the copied ear away.
- Click on the Select tool button.
- Position both ears to the head, as shown in the following screenshot:
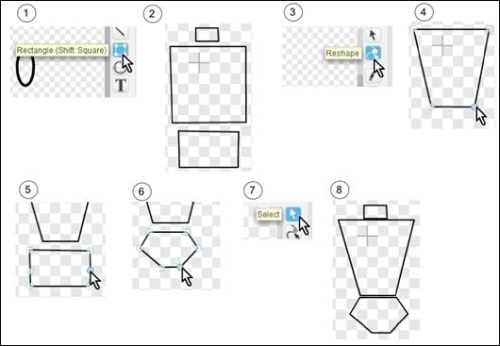
To create the robot's torso, perform the following steps:
- Click on the Rectangle tool button.
- Drag it to make three rectangles to be the neck, the upper body, and the lower body.
- Next, click on the Reshape tool button.
- Shape the upper body by moving the vertices.
- To shape the lower body, still in reshaping mode, click on the lines to add one vertex on each side. To remove a vertex, simply click on it.
- Move the vertices to shape the lower body like a diamond.
- Click on the Select tool button.
- Move the three pieces to form the torso, as shown in the following screenshot:
To create arms and legs, perform the following steps:
- First, use the Rectangle tool to make three rectangles; one for an arm, one for a leg, and one for the feet; then use the Ellipse tool to create a circle to be a joint.
- Then, click on the Reshape tool button.
- Click on each vertex to move it and adjust each shape.
- Next, select all the parts, duplicate (Ctrl + C and then Ctrl + V), and flip horizontally.
- Repeat for all other symmetric parts. Then, add each part to the body as shown in the following screenshot:
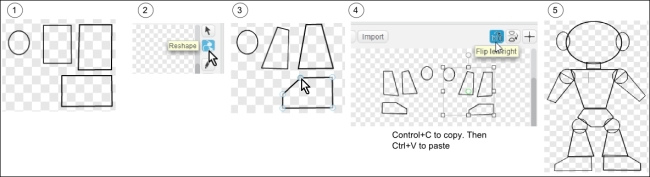
- Add eyes and hands using the Rectangle, Ellipse, Reshape, and Select tool with the technique covered in previous steps. Refer to the following screenshot:
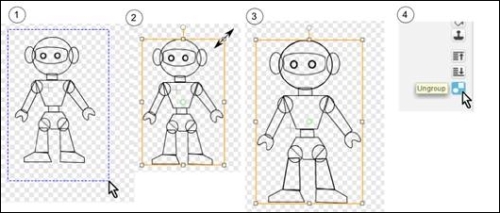
You may want to resize the whole costume. To do so, perform the following steps:
- Click on the Select tool button, and draw a dotted blue rectangle around the whole costume.
- The selected costume should be inside a white box.
- Click on any of the corners of the white box to see a double-arrowed icon for resizing.
- Then, adjust the size of your choice, as shown in the following screenshot: