To increase the sense of movement and depth, we are going to use a technique called parallax scrolling. This means that objects will move at different speeds based on their distance from the viewer. In real life, you can see this phenomenon when you are riding in a train or a car. When looking out of the side window, you will notice that objects that are close to the vehicle seem to be moving past a lot faster than objects that are further in the distance. Objects on the horizon hardly seem to move at all.
This relative movement is what we perceive as depth or distance. It allows us to guess the three-dimensional proportions of a space. We are going to simulate that 3D effect with our 2D sprites to make the scene a bit more realistic and engaging.
First we need some more sprites to use as objects moving past the viewer. Let's create some rocks and seaweed that we can place along the floor of the scene.
- Choose a new sprite from the Scratch library. Let's use the Rocks sprite.
- We need a few different costumes for the sprite. Go to the Costumes tab, right-click on the costume, and choose duplicate.
- Click on the flip left-right button to mirror the second costume.
- Make two more duplicates of these costumes. Scale both down a bit with the Select tool.
- Make sure to set the center point at the bottom middle of each costume with the Set costume center tool. This will make sure we have better control over the height position of each sprite.
- There is no library image for seaweed, so we will have to draw those ourselves.
- Click on paint new costume to create a new empty costume canvas.
- In Vector Mode, we draw a circular outline using the Ellipse tool.
- We fill the ellipse with a lighter shade of green.

- Then, we switch to the Reshape tool as shown in the preceding screenshot. Some draggable circles show up along the edge of the shape.
- Let's move the circles around to twist and stretch the shape until it resembles seaweed. We can also add more circles by dragging the edge where there is no circle yet. Dragging the outline will cause a new circle to be created. Double-clicking on a circle will remove it.
The result should look something like the following screenshot:
Once we are happy with our first seaweed drawing, we will create another with a slightly different shape and color.
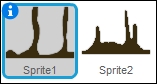
Six different costumes should be enough to create a nicely varied background as shown in the following screenshot:

Let's move on to the scripting. We will use the cloning method again to create multiple objects from a base sprite shown as follows:
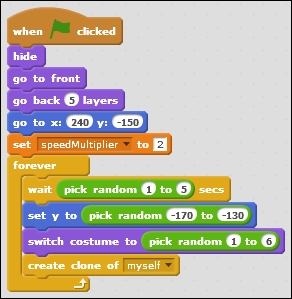
- As usual we start with a when <green flag> clicked block.
- First, we click on hide to hide the original sprite from view.
- Then, we make it go to front to place it on top of everything else using the go to front block.
- Next, we make it go back five layers by entering
5in the go back () layers block. This is to make sure that the sprite will be at the depth where we want it to be. If the sprites are not layered properly, the parallax effect will look weird. - We position the sprite at its starting place with a go to x: () y:() command; enter
240and-150respectively. - This sprite also needs its personal
speedMultipliervariable, just like the background images. - After creating the variable, we set its value to
2. - After this, we will start the forever loop, which will spawn the clones.
- We add the wait () secs block.
- For the empty slot, we pick the random numbers
1and5. These values give good results. - We also change the height to a random number between
-170and-130. - Also, we switch to a random costume, numbered
1to6. - After all these randomized choices are made, we can create our clone by using the create a clone of <myself> block.
That concludes the base sprite script. Next we will create a clone script. This will control how the clones will move, just like in the previous examples.
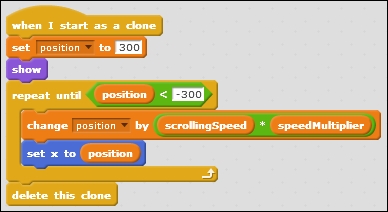
- We first need to define a variable called
positiononly for this sprite. This variable will store a virtual x position value. We use this method to allow a value to go beyond the borders of the stage. - We will start a new script by using the when I start as a clone block.
- We will set the position to
300in the set <position> to() block. This is beyond the right border of the stage. - Then, enable the show block to show the cloned sprite.
- We will move the clone inside a repeat until () loop.
- We first change the position variable by scrollingSpeed * speedMultiplier.
- Then, we set x to position using the set x to () block.
- To fill the condition slot, we check when the position is less than -300 by entering
-300in the position < () block. - When that happens, we can delete this clone by using the delete this clone block as it is beyond the left edge of the stage.
Our first scrolling sprite is now finished. Test the script and we will see that the rocks and seaweed move a lot faster than the background image.
To make full use of the effect, we need a few more layers of objects though. We will create a few more background objects moving at different speeds:
- Let's copy the Rocks sprite twice.
For the first copy, we edit the script in a few places.
- We make the sprite go back 10 layers instead of 5 by entering
10in the go back () layers block. - We enter
80in the set size to () % block to make the sprites a bit smaller. These objects are a bit further in the distance. - We will emphasize by placing them a bit higher on the stage. We change its starting y value to
-100. - These objects will also move a bit slower because they are more distant, so we change the value of
speedMultiplierto1.5. - We also need to change the random height range to correspond with the new basic height. A value between
-90and-110should be okay.
For the second copy, we make similar changes with the following values:
- Enter
15in the go back () layers block - Enter
60in the set size to () block - Change the starting value of y to
70 - Change the value of
speedMultiplierto1 - Enter the values
-60and-80for the height range
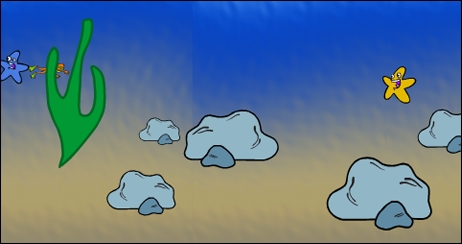
The parallax background is now ready to go as shown in the following screenshot:
We added a lot of graphical spectacle in this project, but after the initial effort it took to create the sprites, the scripting is fairly simple. All sprites behave the same. They just use different values based on where they are on the screen. You could even add more layers if you wish. Just keep in mind that all those clones require the computer's attention. When there are too many, you will notice that the game starts slowing down and skipping frames.
Something you might want to try is adding to or changing the costumes. The intensity of the effect depends a lot on the kind of images used. More horizontal images can increase the perception of depth in the scene while vertical objects in the foreground will increase the sense of speed.
A nice add-on is to create large silhouette shapes in the foreground. These objects should use a script similar to the scrolling background images. Like those background images, they will also need two identical sprites to scroll seamlessly.
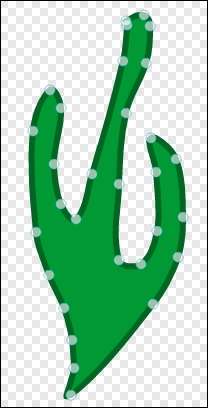
First, we need to create the image. This will be a hand-drawn image as big as the stage. Let's draw a rocky floor in the Bitmap mode. The floor can contain a few outcrops and spires that obscure a part of the stage. This makes the complete scene more interesting. But we need to be careful about not obscuring too much of the important stuff like the diver and the starfish.
After creating the foreground images, we can drag-copy the script from the background to the new sprite.
We make a few additions to this script that we take from the parallax scrolling script:
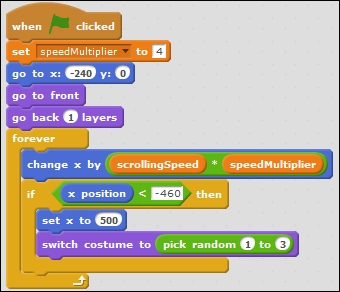
- The images should be in the front layer.
- The
speedMultipliervalue should be quite high, somewhere between 2.5 and 4 works well; enter4. - Check whether the starting x positions for both foreground images are correct; enter
-240and240respectively. - It's also possible to add multiple costumes that are chosen randomly on each loop. We can add a switch costume to () block inside the if () statement, after the x position in the x position < () block is reset. This functionality is taken from the parallax scrolling objects.
The following screenshot shows the final script: