
Now that we have enemies running around our game, we need to find a way to stop them. To do this, let's use the tried and tested way of shooting them to bits. In our last game, we already made something to shoot with—the cannon and the cannonball. We can easily reuse these sprites in this game and write new scripts for them.
To transfer sprites and scripts from one project to another easily, we can use the new Backpack feature. Look at the bottom of the Scratch window and you will see a narrow bar with the word Backpack on it and a small arrow pointing up. Click on the bar to open your backpack. If you haven't used this feature before (or aren't logged into your account), your backpack will be empty.
We will get the sprites from the previous project and place them in the backpack as shown in the following steps:
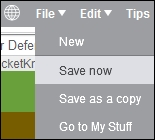
- First, save your active project so you won't lose any progress that you've made.
- To save, click on the File drop-down menu, and select Save now.
- Look to the right of the menu bar and find the folder image with an S on it. This leads to the page with all your Scratch projects. Click on the folder image to go to this page.

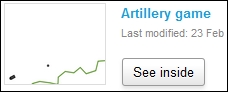
- Find the Artillery game project and open it. You can go directly into the edit mode if you click on the See inside button instead of the project title.
- Once inside the project, open your backpack again by clicking on the Backpack bar.
- Drag-and-drop both the cannon and the cannonball sprite into your backpack. Copies of the sprites, including their scripts, will be saved to the backpack.
- Click on the folder image again to go back to your project page.
- Find and open the Tower Defense project.
- Open the backpack.
- Drag-and-drop the cannon and cannonball sprites into the Sprites window of this project. These sprites are now copied as part of this project.
The backpack feature gives you easy access to often-used sprites and scripts. Over time, you will probably collect a standard set of objects to place in your backpack and carry with you at all times. Think of standard movements and keyboard control scripts; for example, if you build a series of games or animations, you might also reuse the same character sprites often.
Now that we have a cannon and some ammo, we can start doing something about those enemies running free. In this game, we will place cannons on the stage with a mouse click. The cannons will aim towards the cursor point. So contrary to most Tower Defense games, you will have to aim at the enemies manually by pointing the mouse at them. The cannons will fire cannonballs automatically.
Like with the targets in the Artillery Game and the enemies in this one, we will script a base object that spawns clones to multiply the cannons and cannonballs as shown in the following steps:
- Click on the cannon sprite in the Sprites view and open the Script tab.
- Throw away the script from the previous game by right-clicking and choosing delete, or drag-and-drop the entire script back into the script block menu.
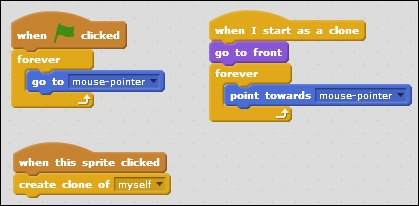
- Start a new script with a when <green flag> clicked block.
- Attach a forever loop.
- Place a go to <mouse-pointer> block inside. This will cause the cannon sprite to always be where the mouse cursor is pointing. If your cannon seems to be offset from the mouse pointer, check whether its center point is aligned properly.
- Start another script with a when this sprite clicked block.
- Attach a create clone of <myself> block.
- That's all you need to start placing cannons on the stage.
- Start a third script with a when I start as a clone block to script the created clones.
- Attach a go to front block to make sure the cannons are placed on top of the other graphics.
- Add a forever loop.
- Inside the loop, place a point towards <mouse-pointer> block to aim the clones at the mouse cursor position at all times. That finishes our cannon scripts for now.
You can now place as many cannons as you want all over the stage. We will refine these scripts later to improve the game challenge. But let's script the cannonballs first so we can actually shoot enemies instead of just pointing at them menacingly.
We want to fire all the cannons we place. So the clones of the cannonball have to be placed at all cannon positions repeatedly. How do we turn one cannonball into many? And how do we keep track of what all of them will do? This might seem like a challenging problem, but actually it isn't too difficult. Moving the clones will be very similar to the Artillery Game example, minus the gravity. The challenge here is to start all clones at the right spot, this being the position of all the cannons. Because the number of cannons will increase as we place more on the stage, the number of positions to remember is variable. So the obvious conclusion is to use a variable to store the positions. But a regular variable won't suffice because that can only store one thing at a time. We will have an increasing list of things to store, so instead of using a regular variable, we will use a list to store the cannon coordinates.
We will create two lists for ease of use. One will store all the x coordinates in order. The other will store all the y coordinates. We will use these lists as a combined pair. Keep that in mind and be careful that you don't switch around the sorting order of either of them, because that will make a mess of your stored data and cause unpredictable results. The following are the steps required to create the lists:
- Select the Data category in the Scripts tab.
- Use Make a List and call it
cannon-x. - Use Make a List again and call it
cannon-y.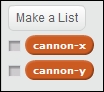
- The lists should be empty at the start of the game. To ensure this is the case, we will add a script to the Stage that empties the list.
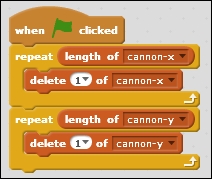
- Start a new script in the Stage with a when <green flag> clicked block.
- Add a repeat … loop for a limited number of repeated actions.
- Place a delete … of <cannon-x> block inside the repeat loop.
- Select 1 or the first item in the list to be deleted. This way, the first item in the list will be stripped and the second item will become the first for the next repeat in the loop.
- We want to repeat the loop as many times as there are items in the list. So in the number slot, place the length of <cannon-x> variable. This variable stores the number of items stored in the list.
- Right-click on the repeat loop and choose duplicate to make a copy of the actions.
- Attach the copied loop to the first one.
- Change all references from cannon-x to cannon-y to perform the same actions on the other list.
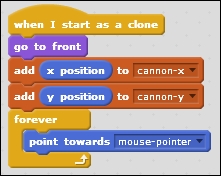
These loops will make sure both lists are emptied when we start a new game. Now we are ready to fill the lists with new coordinates. We will store the cannon coordinates when a clone is created. Then we will use these saved coordinates to place cannonball clones at all the cannon locations. To do this, follow the given steps:
- Click on the cannon in the Sprites view and look at its Scripts tab.
- In the clone script, before the forever loop, place two add thing to … blocks.
- Replace the word thing with the built-in x-position and y-position variables of the cannon.
- Click on the small black arrows and change the selectors to <cannon-x> and <cannon-y> respectively. Make sure you connect the variables to the correct list. Switching them around will cause unpredictable results. The finished script should look as follows:
If the lists are shown on your stage (remember to select the box in front of the variable block), you can see how they are filled with coordinates as you place cannons on the stage. Try this a few times to get familiar with how lists are constructed and reset.
Now that we are properly saving the cannon coordinates, let's use them to create some cannonballs as shown in the following steps:
- Go to the Scripts tab of the cannonball sprite.
- Start a script, as usual, with a when <green flag> clicked block.
- First make sure you hide the original sprite so it won't be shown when not needed.
- Add a forever loop to place cannonballs for as long as the game is running.
- Create a new variable named
i. This is a temporary variable that we will use as a counter to step through our lists. Using the letter i (and j, k, l, and so on for <> temporary variables) is a programming standard. - Set <i> to
0to start counting from 0. - Add a repeat …loop, and in the slot, place the length of <cannon-x> variable. In this case, it won't matter which list variable you use because both lists are of equal length.
- Then, inside the repeat loop, change the value of change <i> to
1to start counting up. - Attach a go to x:... y:... block.
- In the empty slot behind the x slot, place an item
1of <cannon-x> block. - Place the same block in the y slot, but change the referenced list to cannon-y.
- Replace the fixed numbers with the i variable. This will cause the script to step through the list with each repeat and increase the i variable.
- Finish this script with the important step create clone of myself. This should still be placed inside the repeat loop.
- Create another script for the created clones starting with a when I start as a clone block.
- Just like we did with the cannon clones, add a go to front block to make sure the cannonballs are placed above the other sprites.
- Then, we show the clone to make it visible on the stage.
- Let them point towards the mouse pointer by using the point towards <mouse-pointer> block.
- Add a repeat loop. The default number of
10is fine. - Inside the repeat loop, place a move
10steps block. You can leave the default number here as well. - At the end of the script, outside the repeat loop, place a delete this clone block.
- Let's not forget to save the project again. The scripts for the cannonballs allow the them to be placed and moved across the stage.

The clone script will cause the clones to face the mouse cursor. Then, they will start moving for a limited number of steps before being destroyed. This will cause the cannons to have a limited range. If you would like a longer or shorter range, you can change the default numbers. The repeat number determines how long the cannonball will be on the stage. The move number will determine how fast the cannonball moves. Keep in mind that very fast moving cannonballs might skip over enemy positions and therefore miss, even though it will look like the cannonball moves straight through them.
It's generally a good idea to collect all the initialization scripts that aren't tied to a specific object in the Stage object. That way you will always know where to find these variables and you don't have to search through many objects and scripts. You will see that in many cases, this is used to reset the global variables such as lives, points, power-ups, and in this case, object coordinates.
Lists are a type of variable that can contain more than one value. I compared a variable to a jar containing one thing. You can compare a list to a shopping list. The list can contain things that belong together, like all of the groceries we want to get from the shop. Not only do we want to get pickles but we also need bread, butter, cheese, tomatoes, and so on. Those all go on the list. When we get an item, we can strike it from the list; thus, deleting it. Oh, we also need onions. We can add that to the list. You can add and remove things from lists as required. You can even add things in between other things by writing between the lines. But in the case of a computer, all the things that follow will just move down a bit to make room for the things that were added.
There are two types of variables. They work essentially in the same way, but their scope is different. Scope is a word that means how far their influence reaches. You have global variables that can be seen and used by all objects in a project. In Scratch, you can set this with the For all Sprites option, which is the default. You can change this option to For this sprite only to change the variable to local. That means this variable is only known to the sprite that it was created for. You can't use this variable in other sprites. This can be useful if you have similar variables that need to have a different value for each object, like a personal speed value for each enemy we use in this project.