
We will quickly create an enemy sprite to make use of the background we just drew. These enemies will follow the path drawn in the background. Because the background image is fixed, we can determine exactly where the turns are. We will use a simple movement script that sends the enemies along the path from one end of the stage to the other. Like with the targets in the previous project, we will use a base object that creates clones of itself that will actually show up on stage.
We will first draw an enemy sprite. Let's keep this simple for now. We can always add to the visual design later. The steps to draw it are as follows:
- Click on the paintbrush icon to create a new sprite.
- Choose a red color and draw a circle. Make sure the circle is a proper size compared to the path in the background.
- Fill the circle with the same color.
- We name the new sprite
enemy1.
That's all for now! We will add more to the appearance of the enemy sprite later. The enemy sprite appears as a red circle large enough to fit the path.

Let's make it functional first with a script. We will place the base enemy sprite at the start of the path and have it create clones. Then we will program the clones to follow the path as shown in the following steps:
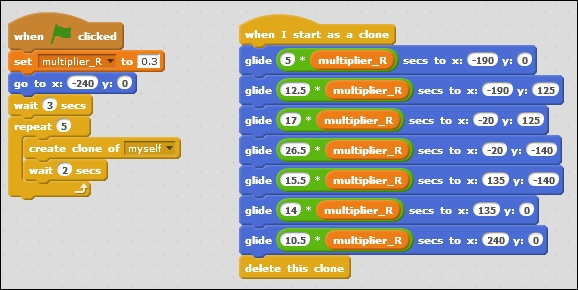
- The script will start when the when <green flag> clicked block is clicked.
- Place the sprite at the start of the path with a go to x:
-240y:0block. - Wait for three seconds by using the wait ... secs block to allow the player to get ready for the game.
- Add a repeat … block.
- Fill in
5to create five clones per wave. - Insert a create clone of <myself> block.
- Then wait for two seconds by using the wait ... secs block so the enemy clones won't be spawned too quickly.
Before we start moving the clones, we have to determine what path they will follow. The key information here are the points where the path bends in a new direction. We can move the enemies from one bend to another in an orderly manner.
Be warned that it may take some time to complete this step. You will probably need to test and change the numbers you are going to use to move the sprites correctly. If you don't have the time to figure it all out, you can check and copy the image with the script blocks at the end of this step to get a quick result.
Do you remember how the xy-coordinate system of the stage worked from the last project? Get a piece of paper (or you can use the text editor on your computer) and get ready to take some notes. Examine the background you drew on the stage, and write down all the xy-coordinates that the path follows in order. These points will serve as waypoints.
Look at the screenshot to see the coordinates that I came up with. But remember that the numbers for your game could be different if you drew the path differently.
To move the enemy sprites, we will use the glide … secs to x: … y: ... blocks. With this block, a sprite will move fluidly to the given point in the given amount of time as shown in the following steps:
- Start the clone script with a when I start as a clone block.
- Beyond the starting point, there will be seven points to move to. So stack together seven glide … blocks.
- In the coordinate slots, fill in the coordinates you just wrote down in the correct order. Double-check this since filling in a wrong number will cause the enemies to leave the path.
Deciding how long a sprite should take to complete a segment depends on the length of that segment. This requires a bit of guesswork since we didn't use an exact drawing method. Your most accurate information is the differences between the coordinates you used from point to point.
- Between the starting point (-240,0) and the first waypoint (-190,0), the enemy sprite will have moved 50 pixels. Let's say we want to move 10 pixels per second. That means the sprite should move to its new position in 5 seconds.
- The difference between the first (-190,0) and the second (-190,125) waypoint is 125. So according to the same formula, the sprite should move along this segment of the path in 12.5 seconds.
- Continue calculating the glide speeds like this for the other blocks. These are the numbers I came up with: 5, 12.5, 17, 26.5, 15.5, 14, and 10.5, but remember that yours may be different.
- To finish off, delete the clone when it reaches the end of the path.
Test your script and see the enemies moving along the path. You might notice they are very slow and bunched together because they don't travel enough distances between spawns. Let's fix that by adding a variable speed multiplier. Not only can we easily tweak the speed of the sprites, but we can also use this later to have other enemy sprites move at different speeds, as shown in the following steps:
- Create a variable and make sure it is for this sprite only.
- Name it
multiplier_R. TheRstands for red, the color of this enemy. - Place set <multiplier_R> to … at the start of the <green flag> script.
- Fill in
0.3as a number for the basic enemy. - Take the speed numbers you filled in previously and multiply them with the multiplier.
- Use a ...*... operator block.
- Place the multiplier_R variable in one slot.
- Type the correct number in the other slot.
- Place the calculation in the glide block instead of the fixed number. The completed scripts for enemy movement will look as follows:
Test the game again and see how the enemies move much faster, about three times as fast if you have used 0.3 for the multiplier. You can play with the variable number a bit to see the effect. If you decrease the multiplier, the enemies will move even faster. If you increase the number, the enemies will become slower.