
To create a better sense of movement, we will make a scrolling background. This requires two identical background images that will be sliding horizontally across the stage. As we want to move these backgrounds around, we won't be creating them as actual background images but as sprites instead. Sprites can be moved with scripts, while background images cannot be moved.
Let's create the image first. What we need is something that looks like an underwater view. So the main color should be blue, with a lighter shade of blue to the top resembling sunlight shining on the water surface. I also added a light brown strip to the bottom to resemble sand.
To create this image, I used Photoshop. However, if you don't have an external image editor, you can also create a similar image in Scratch. The most important thing to take note of is to make the image as big as the stage, that is, 480 pixels wide and 360 pixels high.
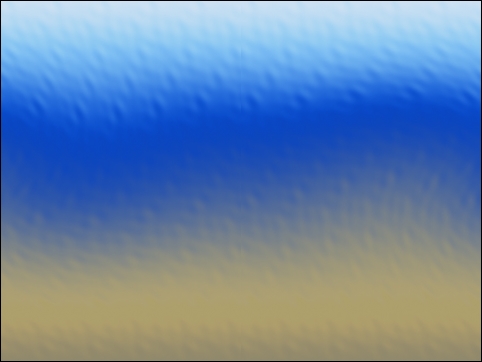
It's also worthwhile to spend some time lining up the left and right edges of the image, so you won't see the break line when the image starts scrolling. Most image editors like Photoshop have a useful offset option that allows you to slide a set amount of pixels in the image horizontally and/or vertically. It will be very easy to fix the edge line this way.
Unfortunately, the Scratch editor doesn't have this option. In this case, you may want to keep the image simple, using only straight horizontal shapes, so there won't be any height differences. You could also try to cut the image in half and switch the halves around. This way, you can put the edges together and fix them. The cut you made should already be properly lined up.
This step can take some time but mostly relies on your own creative freedom and experience with editing images. Don't worry about it too much and do the best you can. It's not a big problem if you still see an edge at the end. Actually, it would be pretty useful to see the script that we write in action. You could also use the resource file that comes with this project.
For the scrolling background, we will need two identical images with slightly different scripts. The easiest way to create this is to write one script first. Then, copy the image including the script and make the necessary changes.
- Start with a when <green flag> clicked block.
- Define a variable called
speedMultiplier. Remember that the button to do this is in the Data category. This variable should be for this sprite only. - Enter
0.5in the set <speedMultiplier> to () block. - Make the image go back 100 layers by entering
100in the go back () layers block. We just use a suitably high number so that the image is placed behind all other sprites on the stage. - Then, we position the image to its starting point with the go to x: () y: () block; enter
-240and0respectively. So the center of the image is at the left edge of the stage. - We add a forever loop, which will contain the movement script.
- First we need another variable called
scrollingSpeed. This variable should be for all sprites. We will use it as a base speed value. - At each step of the loop, change x by (). The blank slot will take a value that still has to be determined.
- Here we include a calculation—scrollingSpeed * speedMultiplier. We use the multiplier to slow down the background image compared to the scrolling speed of the base. Remember we set it to
0.5so the background will move at half of the speed.
When the image has scrolled completely out of view, we have to reset it to the right of the stage so that it can scroll in again. To do this, we check where the image is. Also, if it has reached a certain limit, we move it to the right of the stage.
- We place an if () then condition check underneath the change x by () block.
- Inside the condition, we check whether x position (from the Motion category) is less than -460 by entering
-460in the x position < () block. - If so, then we set x to 500 by entering
500in the set x to () block.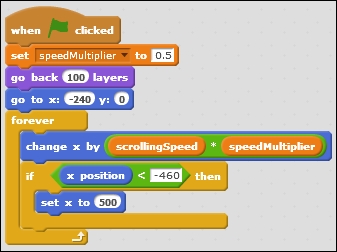
That concludes the first background script. Click on it to test and you will see that nothing happens. We didn't set the scrolling speed yet, so its value is zero, which means there will be no movement. As this variable is universal, we will set it in the stage object. We will use the stage object as a referee, controlling basic values and actions like we did in earlier examples.
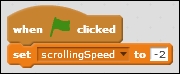
- Click on the Stage object and go to the Scripts editor.
- Start with a when <green flag> clicked block.
- Then, we set the scrolling speed to
-2in the set <scrollingSpeed> to () block. We use a negative value because we want the background (and all other objects still to come) to scroll left.
The following screenshot shows the final script:
That was all we needed to add to make the script work. Let's test it again. We'll see that the background sliding towards the left until it is out of view. Then it comes sliding in from the right again.
The only thing left to do is copy the background sprite and make a change to the script. We'll do this using the following steps:
- Right-click the background sprite and choose duplicate.
- Change the starting value of x from
-240to240in the go to x: () y: () block. This will cause the second background to start with its center at the right edge of the stage.
The following screenshot shows the finished script:
As the two background images start at the opposite edges of the stage and as they are each as big as the stage, they will each cover half of the stage area. The other half of both images is out of view beyond the stage edges.
When both the images are activated simultaneously with the <green flag> action, they will start moving, following behind each other. Both images are 480 pixels wide. The first image will start with its center point on the left edge (x: -240), showing only the right half of the image. The second image will start with its center point on the right edge (x: 240), showing only the left half of the image. Their borders line up perfectly in the middle when the program starts. Also, as they use the same scrolling speed, they will remain that way, as if glued together. When the image disappears completely out of view, it jumps to the right of the stage, ready to scroll in for another pass. This creates the illusion of a continuously scrolling background.