
We will add a script to the sprite we just created that selects a costume at random and copies it onto the stage. With a double for loop, we will make sure the tile generator steps around the entire stage, so no space is left blank.
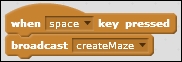
To set up this game, we will create a small control script in the Stage object to set everything in motion as follows:
- Start a new script with the when <space> key pressed block.
- Attach a broadcast message to this.
- For the message, type createMaze:
This message will trigger when a new maze should be generated. It can be activated by pressing the Spacebar key and at a later stage, through the script when the player completes a level.
With the basics out of the way, we can start with the fun stuff; drawing levels automatically. We will draw the level from the lower-left to the upper-right of the screen using the following steps:
- Go to the script tab of the tileGenerator sprite.
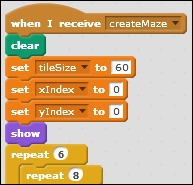
- Start a new script with a when I receive <createMaze> block.
- When the script receives this message, click on the clear option to clear the stage.
- Next, we need a few variables. These are available to all sprites.
- Create tileSize to save the width and height of the tiles.
- Create xIndex to save the column in which we are drawing.
- Create yIndex to save the row in which we are drawing:

- Then, set the size and index by selecting set <tileSize> to <60>, set <xIndex> to <0>, and set <yIndex> to <0>.
- Then, we have the show block to show the sprite, so it can start stamping its costumes on Stage.
- Add the repeat <6> loop to repeat the stamping operation for each row on the stage (360/60 = 6).
- Inside the first loop, immediately place another one, repeat <8>, to repeat eight times. This one is for each column. (480/60 = 8):
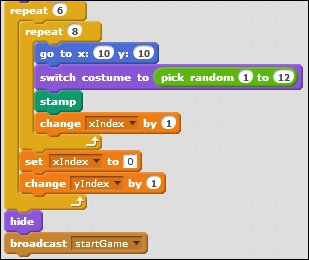
Basically, we make the tileGenerator sprite go to a new position on the stage repeatedly. What should be filled in on the blanks requires some calculations. We will leave those until the end of this step, so we can test the results while working on that formula as follows:
- Insert a go to x:() y:() block inside the innermost repeat block.
- When the sprite is positioned correctly, pick a random costume with switch costume to pick random <1> to <12>.
- Then, we are ready to make a stamp on the stage.
- After this, set the change <xIndex> by <1> block to count the first loop.
- After the closure of the first loop, but before the second, reset the set <xIndex> to <0>.
- Also, set the change <yIndex> by <1> block to count the iterations of the second loop.
- When that's all done, we can add the hide block to safely hide the sprite again.
- As a final step, add the broadcast block with a new message saying <startGame> as follows; this message will notify all other game objects to get ready for a playthrough:
With the basic structure of the script done, we still have to figure out where to place the tileGenerator sprite before we stamp an image. This requires some calculations based on the number of repeats the loops are currently at. To save these values, we use the xIndex and yIndex variables as counters. Perform the following steps:
- First, we can assume that tileSize * xIndex shifts the sprite right across the width of the stage without leaving gaps between stamps. The tileSize * yIndex formula shifts the sprite up across the height of the stage.
- However, 0 * 60 = 0 would be the center of the stage. We don't want to start at the center. We need to start at the lower-left corner. So we have to adjust the starting value. We need to subtract half the stage width or height from the coordinate value. So, the formulas will become
- Complete the formula and test this. The tiles will be placed nicely beside each other; but when the drawing completes, we still see a problem. The entire map is offset to the lower left and a wide blank strip is showing along the top and right-hand side of the stage.
- This offset is caused because the center point of the sprite is placed in the middle of it, and this is the point that gets aligned to the coordinates in the calculation. So we have to add an offset for half the width or height of the tile to shift all the tiles towards the upper right a bit. The complete formulas will be as follows:
tileSize * xIndex – 240 – tileSize / 2
tileSize * yIndex – 180 – tileSize / 2
The following screenshot shows the formulae:
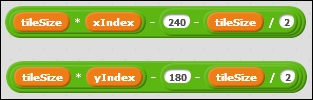
This fixes our offset problem. The maze is now correctly aligned with the stage boundaries.
This one script is all that is needed to create a new interesting level each time the Space bar key is pressed. Try it a few times to see what kind of designs the computer comes up with. Due to the randomized costume selection, you'll notice that the paths through the maze will be different each time.
You might notice that in many cases, the paths will be relatively short with walls blocking the passage at fairly short distances. This is because each tile has an equal chance of being selected by the randomizer. However, some tiles, the straight corridors especially, contain more wall segments than open passageways.
We can manipulate the random selection of tiles to favor the ones that are more open. We already made sure that the more closed tiles are at the front of the costume list while the more open paths are towards the end with the open square closing the list.
We use this knowledge to perform a calculation on the random selection which favors higher numbers over lower ones. We calculate this using the following steps:
- Instead of pick random (1) to (12), set the value from
1to144. - From the resulting number, take the square root.
- As a final step, use the round block to round the number to a whole, so it points to a specific costume again:
Why does this work? This is because the square root of the higher numbers in the extended range resolve to a higher value more often. For example, only square root of 1 and 2 rounded off will resolve as 1. But all the numbers from 133 up to 144 will resolve as 12. That means 12 chances to come up with costume 12 and only 2 chances to come up with costume 1.