Now that the mallet moves, we are going to make it interact with a puck. When the mallet touches the puck, we are going to apply a force to it in the opposite direction.
You can click the Play button in the toolbar and see how the mallet moves based on the mouse position. You will notice that it collides with the walls, follows the mouse cursor smoothly, and changes its movement speed based on how fast and far you move your mouse.
- Create another cylinder called Puck and place it in (
-3,0.85,0). Set its scale to (1,0.7,1). - Add a Rigidbody component to it (Component | Physics | Rigidbody). Set the Mass property to
0.1, uncheck Use Gravity, open the Constraints section, and check Freeze Position Y and Freeze Rotation X, Y and Z. - Make a new dark grey (
65,60,60) material (Assets | Create | Material) called PuckMaterial and assign it to the puck's Mesh Renderer. - Now that the puck is all set, we will make the mallet push it. Go to the mallet's Move state in FSM and add an action called Collision Event (under Physics) to it. Set the Collision property to On Controller Collider Hit.

- Open TagManager by selecting the Puck game object and choosing Add Tag... from the Tag drop-down menu in Inspector. Create a tag called Puck by adding a new tag the same way you did with a layer for the background. Tags are situated near the top of TagManager. You can have as many as you want if you modify the Size variable. Set the Puck game object's tag to Puck.
- Go back to the Move state in Mallet's FSM. Set the Collide Tag property of the Collision Event action to Puck.
- Open the Events tab in the playMaker panel, enter
Pushin the Add Event field near the bottom of the tab, and press Return on your keyboard. - Open the State tab again and set the Send Event property of the Collision Event action to Push.
- Now we have to tell the FSM what will happen once the event is called. Create a new state in the Mallet's FSM by right-clicking anywhere in the FSM view and selecting Add State from the context menu. Name the new state
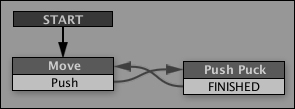
Push Puck. Right-click on the Move state in the FSM view and select Add Transition | Push from the contextual menu. A new light label saying Push should appear below the Move state. Click on it and drag the line that appears to the Push Puck state. This line is the transition that will happen once the Push event is called in the Move state. Add a FINISHED event to the Push Puck state the same way. You do not need to create it, because it is a default Playmaker event. - Make a transition from the FINISHED event to the Move state to make sure that when the puck is pushed the mallet will remain under the player's control. The following figure shows what your FSM is supposed to look like:
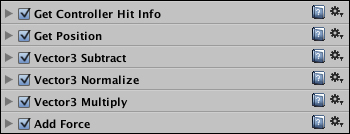
- Add the following actions to the Push Puck state in Mallet's FSM one-by-one: Get Controller Hit Info, Get Position, Vector3 Subtract, Vector3 Normalize, Vector3 Multiply, and Add Force. Keep in mind that the order of the actions matters, because the ones higher on the list will get executed earlier. The following screenshot shows the correct order of the actions.
- Create the following variables using the Variables tab of the playMaker panel: hitPos (Vector3), pushDir (Vector3), pushMag (Float). Select pushMag and set its Float Value to
20. This value will determine how hard the mallet pushes the puck. - Back in the State tab, set the Contact Point property of Get Controller Hit Info action to hitPos.
- Drag the Puck game object from Hierarchy to the Game Object slot of the Get Position action, then set Vector to pushDir.
-
In Vector3 Subtract action, set Vector3 Variable to
pushDir. Click on the small option ( ) icon next to Subtract Vector. This will allow you to pick a variable from the list instead of using a numeric value. Set Subtract Vector to
 hitPos. - In Vector3 Normalize action, set Vector3 Variable to pushDir.
- In Vector3 Multiply action, set Vector3 Variable to pushDir and Multiply By to pushMag. Click on the small option icon to show the FSM variables if needed.
- Finally, in Add Force, set the Game Object property to Specify Game Object and drag the Puck game object into the slot that will appear below. Set Vector to pushDir. Click on the option icons next to X, Y, and Z and leave them at None to make sure they are not reset to
0and are simply not assigned instead. Click the small option icon to show the None option if needed. Then set Space to World.
Your puck should now become interactive if you click on play and make the Mallet collide with it. I realize that the last bit was a lot of actions at once, so we will discuss what exactly happens in those actions in the next chapter. This is an example of some complex logic that we will look into when we talk more about game mechanics. For now consider it an exercise to familiarize yourself with actions and variables and the way they are added and assigned in the playMaker panel.
As another exercise, save your scene, create a few new game objects with FSMs, and try to experiment with different actions and variables, see how they are added and assigned. Don't worry if your actions do not do much. Try to familiarize yourself with the Playmaker interface and remember how to add, move, and remove actions, create new variables and events, and assign them.
Once you feel like you are comfortable with these actions, you can delete the objects you used for practice or simply reload the scene without saving it by double-clicking the Scene1 file in the Project panel.