There are a few game objects that have to be synchronized in our game, including the goals, the puck, and the mallets. We also need to make a few adjustments to the scene and set up matchmaking.
We are going to use the Photon Playmaker example as a template for our game, using the scenes from there and modifying them to suit our purposes. This is generally a good idea if you want to set up multiplayer quickly, because these examples feature numerous and complex FSMs that would take quite a lot of time to set up, while most of the things you will need have already been implemented.
You can download the demo scenes here: http://www.hutonggames.com/samples.php. Simply click on the link Download PlayMaker Photon Demo (requires Unity 3.5+ Playmaker 1.6.1+). Then you will need to find the downloaded unitypackage file on your computer and double-click on it. This will prompt the import window. Click on the Import button in the bottom-right corner of it.
Tip
The warning on the example download page advises against importing the example into existing projects. We can ignore this warning, because none of our files are named in the same way the ones in the example are. As a general rule, you should always make sure that this is the case before importing new packages into new empty projects. Otherwise you might find yourself losing important assets in your projects.
Save the Multiplayer scene, and let us add the demo scenes to our project. They should be under Photon Unity Networking/PlayMaker/Demo/Separated Scenes Demo. Open the demo_lobby scene by double-clicking on its file.
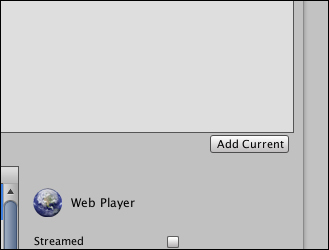
The first thing we need to do is add the new scenes to our project. Open Build Settings by pressing Shift + command + B (Shift + Ctrl + B in Windows), then click on the Add Current button shown in the following screenshot. This will add the currently open scene to the project. Do this for demo_lobby and demo_room. Then close Build Settings.
These two scenes are going to be responsible for two states of the game: the matchmaking state where players can find and create servers and the match state where the game itself takes place. You can test how it works by opening two instances of your game at once: one in the Unity Editor, one in your web browser.
- To make a browser build, select File | Build & Run from the main menu and save the build files wherever you want on your computer when the file browser appears. You might want to create a special
Buildfolder to make sure that you can always find your build. This should automatically open the game in your browser.Tip
Please note that your platform has to be set to Web Player as described in Chapter 1, Getting Started with Unity and Playmaker. If it is not, open Build Settings, select Web Player from the list on the left, and click on the Switch Platform button. Then close the Build Settings window.
- Specify your nickname, and the name of the room next to CREATE ROOM, then click on GO on the right from the room name text field.
- A new scene should load, where you control a construction worker that can walk around on a plane.
- Keeping the game open in your web browser, go back to the Unity Editor; make sure that demo_scene is open and click on play.
- Click on the GO button next to EXISTING ROOMS. This will join a random exiting room. Since we only created one room, both of the game instances will now be connected to the same game session. This way you can test how networking works by looking at your scene from the points of view of two players.
Now that you have seen how multiplayer works in the example project, it is time to modify its scenes to work with our game. We are going to keep the matchmaking intact (in fact, it can be kept this way for almost any multiplayer game). The only thing that needs changing is the maximum number of players that can join a single room. You may have noticed that the example project allows for 100 players. We need to change it to 2.
- In the demo_lobby scene, select the Menu game object.
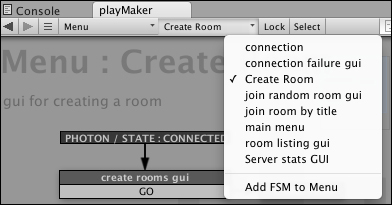
- Open the Create Room FSM from the second drop-down list from the left in the menu on top of the playMaker FSM view.
- In the Photon Network Create Room action of the create room state, set the Max Number Of Players property to
2. Now up to two players will be able to join one room. - Save the scene.
Now that the lobby is all set, it is time to set up the game itself to work via the network.
- Make a copy of the demo_room scene as backup to be able to go back to if something goes wrong. Open the original demo_room scene. You should have an unnamed game object with four children as well as Chat, Game, and the PlayMaker Photon Proxy game objects.
- You can delete everything except the Game game object. This is where most of the initial multiplayer logic (such as instantiating players) takes place.
- Save the scene and go back to the Multiplayer scene.
- Select all the objects in this scene's Hierarchy by either pressing command + A (Ctrl + A in Windows) or clicking on the first item in the list and then Shift-clicking on the last one.
- Copy the selected objects by pressing command + C (Ctrl + C in Windows), then open the demo_room scene again and press command + V (Ctrl + V in Windows) to paste them.
- Create empty prefabs called
Goal,Mallet, andPuckunder Prefabs/Resources. Create the folders if you don't have them yet. - Drag the GoalLeft game object into the
Goalprefab, MalletLeft game object into theMalletprefab, and Puck game object into thePuckprefab. - Delete the following objects from the scene: MalletLeft, MalletRight, and Puck. They are going to be instantiated from prefabs that you just created when players join the room.
- Make GoalLeft and GoalRight invisible by deactivating their Mesh Renderer components. These objects will be instantiated from prefabs as well, but not right away, so we need to keep them in the scene for their colliders to make sure that no mallets can get out of the table. You can also rename both of them
Blocker, since they are needed to block the mallets. - Select the Game game object and open its Game Manager FSM in the playMaker panel.
- In the Variables tab, make sure you have three GameObject variables: goalRef, player prefab, and puck prefab, as well as an Int variable player count. Drag the
Malletprefab into the GameObject slot of player prefab and thePuckinto the the GameObject slot of puck prefab. - In the Events tab, create a new event called
Two Players. - In the Photon Network Instantiate action of the instantiate player state, make sure that Rotation is set to (
0,0,0). - Add another Photon Network Instantiate action to the same state. Set its Game Object property to Goal by dragging the
Goalprefab from the Project panel. Set the Position property to(-7.98,2,0) and the Rotation property to (0,90,0). Set Store Object to goalRef. - Make a new state called
How many players?and add Photon Network Get Room Properties and the Int Compare actions to it. Make sure the former is before the latter in the list. If an error saying that PlayMakerPhotonGameObjectProxy component is required appears, click on it, and the component in question will be added automatically. - Set the Player Count property of the Photon Network Get Room Properties action to the player count variable.
- In the Int Compare action, set the Integer 1 property to the player count variable and the Integer 2 property to
2. Set Equal to Two Players. Check the Every Frame box. If you see an error about an event, ignore it for now; it will be fixed later on. - Make a new state called
Create Puck. - Add a FINISHED event to the instantiate player state. Drag a transition from it to How many players?
- Add a Two Players event to How many players? and drag a transition from it to Create Puck.
- In the Create Puck state, add two actions: Photon Network Instantiate and Set Position. Make sure that Set Position is the last in the list. If an error saying that a PlayMakerPhotonGameObjectProxy component is required appears, click on it, and the component in question will be added automatically.
- Set the Game Object property of Photon Network Instantiate to the
Puckprefab variable. Set Position to (0,0.3,0) and Rotation to (0,0,0). - In the Set Position action, set Game Object to Specify Game Object and select the goalRef variable from the drop-down list. Make sure that Vector is None, X is
7.98, and Y and Z are None. - Save your scene.
This state machine is responsible for spawning objects that should be unique to different players: players' mallets and goals are spawned as soon as the players connect to the room, while the puck is spawned once the second player connects to make sure that player 1 does not win while alone in the room.
Now we are going to set the individual parameters and synchronization of each of the prefabs we created, starting with Goal.
- Select the
Goalprefab in the Project panel and add three components to it using the Inspector panel: PlayMaker FSM (Script), Photon View, and Play Maker Photon Game Object Proxy. You can find these components by clicking on the Add Component button in Inspector and typing their names in the search field. - Drag the Transform component of
Goalprefab into the Photon View component's Observe property. - Name the state machine
ColorSyncusing the FSM tab of the playMaker panel. - Rename the starting state to
is mine?and add two events to it: YES and NO. - Create two new states: Green and Red. Then make transitions from YES to Green and from NO to Red.
- In the is mine? state, add a Photon View Get Is Mine action. Set Is Mine Event to YES and Is Not Mine Event to NO.
- In the Green state, add a Set Material action. Set Material to the material you created for the green goal.
- Do the same for the Red state, but choose the red material instead.
This state machine makes sure that goals change color in the beginning of the game. Verify that you still have the PlayMaker Photon Proxy game object in the scene. If you don't copy it from the Multiplayer scene. At this point you may want to build and launch two instances of the game to test that everything works well.
Now let us change the color of the mallets to match the goals' colors. We will also make sure that only the owner of the Mallet can move it.
- Find the
Fsm Photon playerprefab underPhoton Unity Networking/PlayMaker/Demo/Resourcesin the Project panel and select it. - Copy Play Maker Photon Game Object Proxy and the Photon View components over to the
Malletprefab by right-clicking the components' headers ofFsm Photon playerand selecting Copy Component from the drop-down menu and then right-clicking one of the components' headers in theMalletprefab and selecting Paste Component As New from the drop-down menu. - Do the same for three of the
Fsm Photon playerprefab's Play Maker FSM components: the ones called GameObject naming, Position synch, and variable synch repository. - Now the Mallet should have four FSMs. Rename the one called FSM to
Movementto make sure we remember what it does. - Drag the Play Maker FSM called variable synch repository into the Observe slot of Photon View. Set the Observe option property to Reliable Data Compressed.
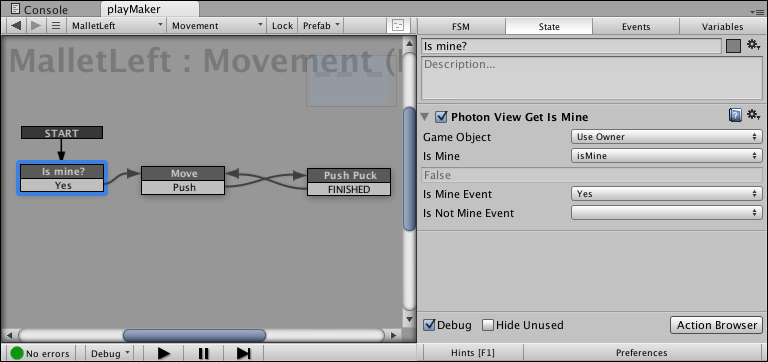
- In the playMaker panel, open the Movement FSM and add a
Boolvariable to it called isMine. - Set up the FSM as shown in the following screenshot, making sure that both the Move and Push Puck states stay unchanged. If you don't have the Push Puck state (you probably have it) confirm that the Move state has the Push Puck action attached to it. In order to set a state as a start state, right click on it and select Set as Start State from the contextual menu.
- Select the Is mine? state and add the Photon View Get Is Mine action to it. Set its parameters as shown in the following screenshot, then add a transition from the Yes event to the Move state:
- Switch to the GameObject naming FSM.
- In the add "me" to the gameObject name state, add a Set Material action and set its Material property to the green material you created for one of the mallets. Don't worry if it is no longer green, just make sure that each player's Goal material matches his/her Mallet material.
- In the add player to gameObject name state, add a SetMaterial action as well. This time set the Material property to the material that matches the red goal's material.
- Switch to the Position synch FSM, and select the Set player position with lerp state.
- In the Set Position action, set X to None, Y to
0.85, and Z to None.
Now the mallets should be good to go, their positions synched over the network and colors set on startup. Save your scene and confirm that mallets' positions are synced by building the game and launching two instances of it while connecting to the same match.
All that is left is to sync the Puck's position over the network.
- Select the
Puckprefab and add the Photon View and Play Maker Photon Game Object Proxy components to it. - Copy the Position synch and variable synch repository FSMs to it from the
Fsm Photon playerprefab. - Drag the variable synch repository component of Play Maker FSM into the Observe slot of Photon View and set its Observer option to Reliable Data Compressed.
- Switch to the Position synch FSM and select the Set player position with lerp state.
- In the Set Position action, set X to None, Y to
0.3, and Z to None. - Save your scene.
The last thing that you need to do is make sure that one of the players leaves the room instead of just reloading the level once the puck hits a goal. To do that, select the GoalTriggerLeft game object and, in the LoadLevel state of its FSM, replace the Load Level action with Photon Network Leave Room. Do the same for GoalTriggerRight.
Now your multiplayer should be set up. Before testing everything, confirm that you have copied all of the files over from the Multiplayer scene correctly. Make sure that there is a game object called PlayMakerPhotonProxy in both demo_lobby and demo_room scenes. If it is missing in one of the scenes, add it by going to PlayMaker | Addons | Photon Networking | Components | Add Photon proxy to scene from the main menu, then save the scene.
You can test it by making a build and opening it in your browser while launching the game in the Editor. Make sure you always start from the demo_lobby scene, because otherwise the matchmaking will not work.
You will see that the mallets' and the puck's positions are synched over the network. That is, they move simultaneously in both Editor and web browser. You will also notice that the movement of the remote object is somewhat jerky and imprecise (especially the puck on the host's client). This is due to the inevitable network delay and physics data being calculated more often than Photon packages are being sent. At the moment the only real solution to this problem is switching to Unity native networking, which, however, requires that you have your own server if you want the game to work over the Internet.
The place where the objects' movement is smoothed out is the Position synch FSM of Puck and Mallet prefabs. If you look at the get player position and Set player position with lerp states of these state machines, you will see that, if the object was first created on the local machine, its position gets saved in a variable every frame and synched over the network. If the object does not belong to the player's client, the variable is read, and then the position of the local copy of the object is interpolated.
Tip
You could try changing the Amount property of the Vector3 Lerp 2 action in the Set player position with lerp state. This variable determines the precision of the interpolation. If you want to know more about the way PUN works under the hood, make sure you consult its online documentation that explains every state machine in the demo scenes in great detail: https://hutonggames.fogbugz.com/default.asp?W927
As you can see, Photon networking is quite easy to set up, but is not a very good solution for games that require physics simulation. This is mostly due to cloud server limitations and limited integration with the Unity engine. Most simple games that don't rely on physics so heavily can benefit from Photon greatly. In other cases, Unity native networking should be used. More information about it can be found in the Network Reference Guide section of the Unity documentation: http://docs.unity3d.com/Documentation/Components/NetworkReferenceGuide.html
Playmaker is capable of working with native Unity networking as well. You can check the Network section of the Actions panel for the list of available Playmaker actions and compare them with the actions described in the reference material.