In order to create multiple instances of a game object with the same components and properties, or access the same game object from different scenes, you can save it as a file in your Assets folder. These files are called prefabs in Unity and act like game object templates. To create an empty prefab, right-click on the empty space in the Project panel, then select Create | Prefab from the contextual menu. A new file called New Prefab should appear in the Project panel. Call this prefab Wall. Now create an empty folder called Prefabs and put the Wall prefab in this folder.
Right now the prefab is empty.
- In the Hierarchy panel, select the Wall game object that you created in Chapter 2, Unity's and Playmaker's User Interface. Click and drag it into the
Wallprefab in the Project panel. - The name of the Wall game object will become blue in Hierarchy, and when you select the
Wallprefab, you will see all of the components that the original Wall game object had in the Inspector panel.
Now, if you drag-and-drop the Wall prefab into the scene, a new object called Wall will be created with exactly the same properties as those defined in the prefab.
Moreover, if you change some of the components and/or properties in the prefab using the Inspector panel, these changes will be automatically applied to all the instances of the prefab in the scene. This can save you a lot of time if you have multiple objects of the same type (that is, walls, monsters, trees, and so on) as you do not have to select them one-by-one in the Hierarchy and make the same changes multiple times.
You can also modify your prefab (and, by extension, all of its instances in the scene) by selecting one of the instances in Hierarchy, making your changes, and clicking the Apply button near the top of the Inspector panel. You can also undo all of the changes by clicking on the Revert button. This will reset the currently selected instance to the way its prefab was set up.
This works because, in fact, all the components and properties of an instance are linked to the ones of the prefab. Only when you change them in the instance they become unlinked, which means that further updates of that property on the prefab won't be applied to this instance. These unlinked properties can be distinguished because their name becomes bold in the Inspector panel. If you want to re-link a specific unlinked property you can right-click on it and select Revert value to Prefab.
Besides the Apply and Revert buttons, all prefab instances also have a Select button. This button lets you select and highlight the prefab corresponding to the currently selected instance in the Project panel, so you can access it more easily. Moreover, as we saw earlier, a prefab instance can be easily identified by its blue tinted name in the Hierarchy panel. The alternative way of creating a prefab is even simpler: you can simply drag-and-drop a game object from the Hierarchy panel into the Project panel. An appropriately named file will be created in the Assets folder.
Another very important thing to know about prefabs is that they can be copied and shared on the Web, since they are little more than the files recognized by Unity that contain information about components and properties. Now, follow these steps to modify the Wall prefab to suit our needs better:
- Create a new folder in the Project panel and call it
Materials. It will contain material files that contain information about textures, shaders, and colors of your game objects. - Create a new material file by clicking on the Create button in the top-left corner of the Project panel and selecting Material from the drop-down list.
- Name the new material
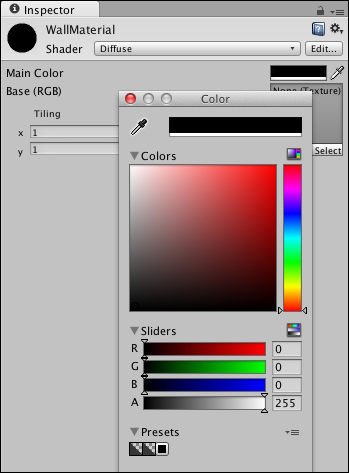
WallMaterialand put it inside theMaterialsfolder. - Select WallMaterial in the Project panel, then in Inspector, click on the rectangle next to the text that says Main Color. In the Color window that appears, select the black color and close the Color window. The following screenshot shows the Material modification interface as well as the Color window:
- Now that you have this new material set up, select the
Wallprefab, then drag-and-drop WallMaterial into the Element 0 element of the Materials property of the prefab's Mesh Renderer component. It should replace Default Diffuse. The following screenshot shows what the Mesh Renderer component should look like once your are done assigning the new material.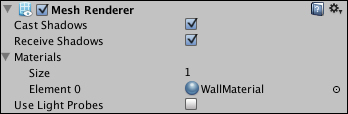
- Now all of the instances of the
Wallprefab will be black. - Also, set the X scale property of the Transform component to
15. This will make all the new walls longer. - Select the Main Camera game object and set its Projection property of the Camera component to Orthographic using the Inspector panel. This will make the view of the camera flat; the game view will now appear two-dimensional.
- Set the Size property to
5. You can adjust the look later, but for now this will help us focus on gameplay.
Tip
It is often a good idea to restrict yourself to simple primitives, color-coded untextured materials, and orthographic projection cameras in the beginning of the design process, because it will let you focus on gameplay. This way, if your game is fun, you will know about it, and if it is not, you will not get distracted by fancy visuals.
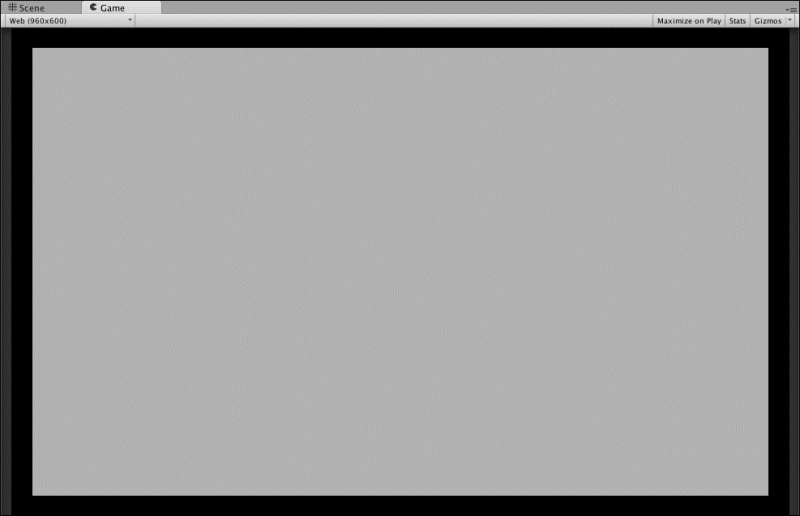
Make four walls and arrange them in the scene so that what you see in the Game view looks like the following screenshot. If this is not the case, you can go back to the table in Chapter 2, Unity's and Playmaker's User Interface, and see if your Main Camera game object is positioned and rotated correctly. Its position should be set to (0, 10, 0) and rotation to (90, 0, 0). Don't forget that you can rotate the objects to precise values such as 90 and 180 degrees by changing their rotation angle in the Transform component. Also make sure that the Y position of all the walls remains equal to 0.5.