Photon Unity Networking is a free Unity plugin with an optional paid subscription that allows you to outsource most of the heavy lifting for building multiplayer games. The free version has full functionality but is limited by the number of players that can be online at the same time. This is not a problem, because all you need for testing is to be able to connect as many players as your game requires for being playable (so two for air hockey).
- First of all, we will need to set up PUN. In the main menu, navigate to PlayMaker | Addons | Photon Networking | Set up Photon Networking. This should open the Photon Setup Wizard window. Click on the orange Setup button.
- If this is the first time you are using Photon, you are going to need an account, so enter your e-mail in the appropriate field and click on the Send button.
- After that you can finish the registration process by clicking on the link that you will have received by e-mail. Sign in to your account on http://cloud.exitgames.com/, click on the New App button on your account page, enter the game's name and description, and then click on Create. You should be redirected back to your account page. In the Details section, copy the code under AppID and go back to Unity.
- In the Photon Setup Wizard, click on the Setup button, paste your AppID into the Your AppId text field, and choose your region by pressing one of the Cloud Region buttons. Make sure you choose the region that is closer to you geographically as this will affect the connection speed of your game's multiplayer.
- Once you have pasted the AppID and chosen the region, click on the Save button below. A window should pop up saying that your settings have been saved. Click on OK. The following screenshot shows what the setup window is supposed to look like once you do:
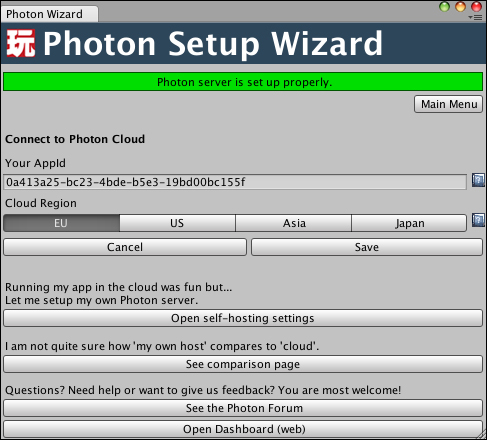
- Make sure that the green label saying Photon server is set up properly appears near the top of the window. Press the Main Menu button right below it. It should take you back to the first screen of Photon Setup Wizard.
- Make a copy of your main game scene and call it
Multiplayer, load it by double-clicking it in the Project panel, and then go back to Photon Setup Wizard window and click on Add Photon System to the scene. The button should disappear, and you should see the second green label saying The scene is set up properly. - At this point Photon Cloud is set up, and you can feel free to close the wizard window. Save the Multiplayer scene, making sure that the PlayMaker Photon Proxy game object was added to Hierarchy.
You can modify the settings any time you want. You can also change your AppID if you choose to do so.
Now that we have added Photon to the project and made a scene dedicated to multiplayer, it is time to synchronize objects over the network and set up matchmaking.
..................Content has been hidden....................
You can't read the all page of ebook, please click here login for view all page.