
While there are games where win/lose conditions are not necessary, air hockey is definitely not one of them. In classic air hockey, there are two goal slots on the opposite sides of the table. If the puck gets into the goal of player 1, then player 2 gets a point and vice versa. The game ends when one of the players has 7 points.
There is the short-term win condition (score once) and the long-term win condition (score seven times before your opponent does). We will only implement the short-term win condition, although you are highly encouraged to try and implement the long-term one once you are done with this chapter.
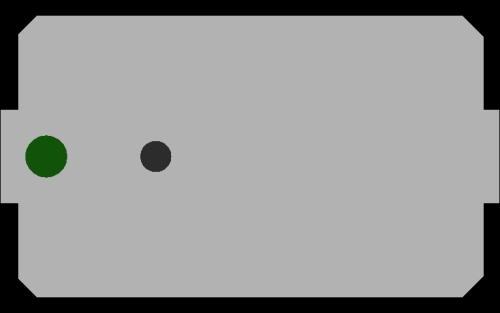
Before we start implementing the win/lose conditions, let us make sure that the puck cannot get stuck in the corner, because this kind of behavior will prevent the win/lose condition from being triggered. Make four new walls, rotate them 45 degrees on the Y axis, and place them in the corners so as to get rid of the straight angles there, as shown in the next figure. This should solve the problem.
Now that this is taken care of, let us make the goal slots. Change the puck's Scale property to (1, 0.7, 1) and place it in (-3, 0.3, 0).
- Make one more wall on the left and one more wall on the right. The walls should be placed as shown in the following figure:
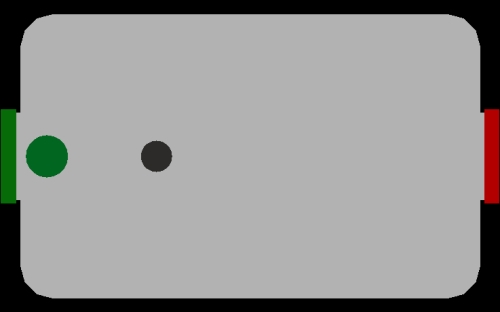
- Make two new cubes (GoalLeft and GoalRight) and place them in the gaps on the left and on the right, as shown in the next figure. Make the cube on the left green (
0,255,0) and the cube on the right red (255,0,0) by making new materials for them. Both of them should be in2.5on the Y axis. These are there to block the mallet, but not the puck. - Make two more cubes. Call them
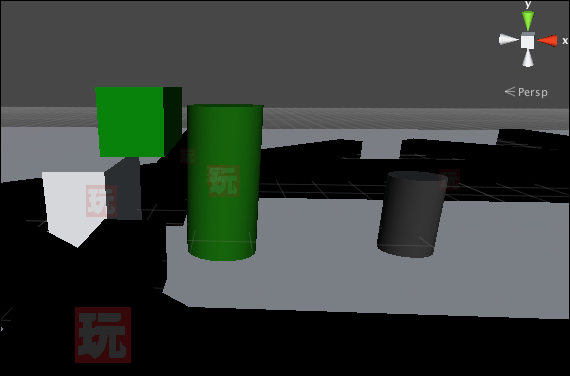
GoalTriggerLeftandGoalTriggerRight. Place them just behind the game field on either side of the table. These objects will act as triggers to detect which goal the puck has scored. Check the Is Trigger property of these game objects' Box Collider component. This property of the collider component makes sure that the object does not do any physics collisions (as opposed to the puck or the walls), but instead acts as a trigger, detecting when rigidbodies enter, stay inside, and exit it. These objects are the actual goals that will trigger the win/lose conditions. - Your Scene view should look something like the following screenshot at this point:
- Select the GoalTriggerLeft game object and add an FSM to it. Make two states and rename State1 to
Scoredand State2 toLoadLevel. - Right-click the Scored state and go to Add Transition | System Events | TRIGGER ENTER from the contextual menu.
- Make a transition from TRIGGER ENTER to LoadLevel. When something enters the trigger (and it should only be the puck, because of the way things are placed in the scene), this event will get called, and the transition will be made.
- Select the LoadLevel state and add a Load Level action to it. It should be located under the Level category.
- In the Level Name property of the Load Level action, type the name of your game scene. It should be called
Scene1if you haven't changed anything. To make sure, look at the top of the Unity Editor window. It always says[SceneName].unity - [ProjectName] - [Platform], where the things in the brackets are Scene1, UPMTutorial, and Web Player for me, but can differ for you. - Do the same thing for GoalTriggerRight. For now, keep the FSM exactly the same.
Now, we can add some finishing touches to our scene by importing a 3D model:
- Make sure that you have downloaded the project archive from the Packt Publishing website. If you haven't, do it now and unpack the archive.
- Right-click in the empty space under the file list in the Project panel and select Import New Asset... from the contextual menu. A file browser should pop up.
- Locate the
WallVisual.fbxfile in theUnityPlaymakerTutorialdirectory and click on Import. The file browser will close and aWallVisualfile will appear in the Project panel. Create aModelsfolder and drag it there. - Select the
WallVisualfile and have a look at Inspector. There are three tabs in this Inspector: Model, Rig, and Animations. These are all responsible for changing import settings of your model. - Since the model that we have imported is not an animated one, only the Model tab is of interest to us. Set Scale Factor to
1.05and uncheck Import Materials. Leave the rest of the properties at their default values. Scale Factor changes the scale of the model on import, meaning that the Transform Scale property will be equal to (1,1,1) while the actual size in 3D space may change. This is needed because the working scale in the 3D modeling software (such as Maya or 3DS Max) may differ from that in Unity. To make the model appear bigger, increase the scale factor. See the following screenshot to confirm that your import settings are set correctly: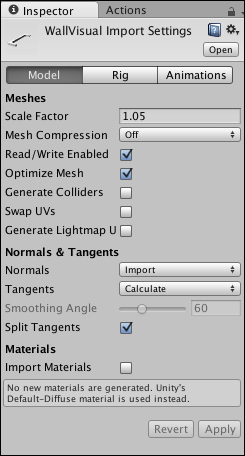
- Drag WallVisual into Hierarchy twice. Position the first instance in (
0,0.5,-3.5) and the second one in (0,0.5,3.5). Set the first one's Rotation to (0,0,0) and the second one's to (0,180,0). - Set the material of both WallVisual game objects to WallMaterial that you created previously to be used on walls. Select all of the Wall objects and deactivate their Mesh Renderer components. The following figure shows what you should see in the Game view if you did everything right:
Now, when you hit play, you should be able to score in both goals. Doing so will reload the currently loaded level. We also made sure that the puck does not get stuck in the corners of the table and imported a model that covers our cubic walls and makes the game look more like an actual air hockey table. This means that the game is finally playable, if, admittedly, not very fun yet.