In previous chapters, you learned how to make a game using Playmaker's in-built actions. Unfortunately, their capabilities are limited, and sooner or later you will find yourself in need of something that Playmaker does not know how to do out-of-the-box. In this case, you can try and find a ready-made solution on the Internet, but to make sure that there is an answer to every one of your questions, you will certainly have to learn how to write scripts. These are the topics that we will discuss in this chapter:
- Programming in Unity JavaScript (sometimes also called UnityScript) and C#
- Common Unity classes, variables, and functions
- Writing a script and using it as component
- Transforming a script into a Playmaker action
Explaining how programming works in general is beyond the scope of this book, so I am going to assume that you already know what variables, functions, classes, and operators are. If, however, you do not know these things, it should not take you too long to pick up the basics using either Code Academy (http://www.codecademy.com/tracks/javascript) or Unity's own starting level tutorials (http://unity3d.com/learn/tutorials/modules/beginner/scripting).
We are going to start with JavaScript (JS) in this section, because it is much simpler to use and does not require any understanding of object-oriented programming beyond the component-based approach to development that we already discussed in Chapter 3, Components and State Machines. Besides, you will end up writing significantly less code.
Both JS and C# use the same Unity classes and functions, and the difference in syntax is not very significant at all. However, for more complex things it is generally a good idea to use C# (for one thing, it is currently impossible to write a Playmaker action in JavaScript). We will start with a JS script and then translate it into C#, explaining the differences. You can later choose whichever language works better for you.
We are going to create a script that replaces all the Playmaker actions in the Push Puck state of both mallets' FSMs. When you see that you have to make a chain of five or more actions, it is generally easier to combine them in a single custom action, especially if you are planning to use this compound action on multiple objects.
Let us start by creating a new script. First of all, create a new folder named Scripts using the Project panel. Then, right-click on the newly created folder and navigate to Create | Javascript. Name the file PushPuck. Double-click on the file. The standard Unity programming environment, MonoDevelop, should open. Select everything there is in that script and replace it with the following code:
// Automatically added, compiler =directive
// that makes JavaScript more explicit
#pragma strict

// Global variables available from Inspector
var pushMag : float = 20f;

var collisionTag : String = String.Empty;

// Function that will detect the collision with
// controller and apply force in point of the collision
function OnControllerColliderHit (hit : ControllerColliderHit)
{
  if (hit.gameObject.tag == collisionTag)
  {
    // Get the position of the object we collided with
    var hitObjectPos : Vector3 = hit.transform.position;

    // Get the position of the collision
    var hitPointPos : Vector3 = hit.point;

    // Calculate the direction of the force,
    // multiply it by magnitude
    var pushForce : Vector3 = Vector3.Normalize(hitObjectPos - hitPointPos) * pushMag;

    // Finally, apply force in position
    hit.rigidbody.AddForceAtPosition(pushForce, hitPointPos);

    // Print a message in Console saying that
    //the collision did happen and force was indeed applied
    Debug.Log("Detected hit with " + collisionTag + ", applying force of " + pushForce + " in " + hitPointPos + ".");
  }
}
@script RequireComponent(CharacterController)
Tip
You can download the example code files for all Packt Publishing books you have purchased from your account at http://www.packtpub.com. If you purchased this book elsewhere, you can visit http://www.packtpub.com/support and register to have the files e-mailed directly to you.
Press command + S (Ctrl + S in Windows) in MonoDevelop to save the changes to the script.
Let us examine this code line-by-line. The first line is #pragma strict. This is a preprocessor directive. If you have some previous programming experience, you have probably seen something similar before. It does not participate in script logic; what it does is make JavaScript more explicit by imposing more strict error handling in the compiler. What it means for you is that you have to explicitly define the types of your variables, which is something you would not normally do in standard JavaScript.
After that there are two lines of variable declaration: pushMag and collisionTag are declared as float and String. Once you attach this script to an object, these variables will be displayed in the Inspector, because they are both public and serialized. Since a script in Unity is treated as a component, variables appear as parameters in the Inspector once you attach the script to a game object.
If you want to declare a variable that does not appear in the Inspector, but want other scripts to still have access to it, you should put [System.NonSerialized] before it. If you want to both hide it and close all access to it, you just need to put private before the var keyword. Finally, if you want to expose a private variable in Inspector, you should put [System.SerializableAttribute] before its declaration.
Next goes the function declaration: function OnControllerColliderHit (hit : ControllerColliderHit). OnControllerColliderHit is one of the standard Unity functions that are responsible for detecting collisions. Other such functions are OnCollisionEnter, OnCollisionStay, OnCollisionExit, OnTriggerEnter, OnTriggerStay, and OnTriggerExit.
The OnControllerColliderHit function gets called automatically if the object that the script is attached to has a Character Controller component and that Character Controller collides with a collider. The hit variable of type ControllerColliderHit gets assigned and can be used inside the function. By typing hit and a dot, one can access all kinds of information about the collision.
For instance, inside the function there is an if condition: if (hit.gameObject.tag == collisionTag). We access the gameObject that our Character Controller has collided with, using the dot operator, and then we use it again to access that tag in gameObject. Then we compare that tag with the collisionTag string variable that is assigned in the Inspector. If the tag matches the string we specified, the code inside the curly brackets is executed.
In this script, we reproduced the exact sequence of actions in the Push Puck state of the mallets' FSMs. You can consult it for reference. First, we get the position of the puck and store it in a Vector3 variable called hitObjectPos. Then we get the point of the hit and store it in another Vector3 variable called hitPointPos. We then calculate the force of the push in one step instead of three that we used in Playmaker. Finally, the force is applied to the puck's rigidbody.
After that there is a line with Debug.Log that prints information about every hit in the Console. You can comment this line out by typing // in front of it. Keep it uncommented for now to make sure that the script works.
The very last line of the script is @script RequireComponent (CharacterController). It is there to make sure that there is a Character Controller component attached to the game object that this script is attached to. If you attach this script to a game object that does not have a Character Controller, it will be attached automatically. If you try to remove the Character Controller without removing PushPuck first, Unity will display a warning dialog window and not allow you to do it.
Now it is time to see if our newly created script works. Go back to Unity and open the Console panel. If there are no red errors, this means that the script was compiled correctly and is ready to be used. If there is some kind of error in a script, double-clicking on it in the Console will open the script in MonoDevelop and direct you to the line where the error has occurred.
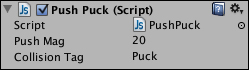
If everything is okay, select MalletLeft, open the playMaker panel and in the Move state disable the Collision Event action by unchecking the box next to its name. If you start the game now, colliding with the puck will not push it. Now it is time to use our brand-new PushPuck script. Drag and drop the PushPuck file from the Project panel to the Inspector panel while having MalletLeft selected. It will attach to it as a component. Set its parameters as shown in the following screenshot:
Open the Console panel and launch the game. Note how messages appear in the Console every time you hit the puck with your mallet. If you stop the game and double-click on one of the Debug.Logs, MonoDevelop will open and point you to the Debug.Log line of the PushPuck script. Now that you know the script works, you can comment that line out in order to prevent it from spamming the console.
Also, now you can apply it to the AI opponent as well. Remember to deactivate the Collision Event action first.