
We have talked about game objects and components. Now it is time to have a look at Playmaker FSMs, states, and actions in them.
An FSM in Playmaker is a graph that consists of states and transitions between them, attached to a game object. It allows for a way of visual programming using different states of the graph and events that trigger transitions to other states.
If you select the Wall prefab and open the playMaker panel, you will see that its FSM has two states: the default Start state where everything begins and another one called State 1 by default, with an arrow connecting the former to the latter. The arrow is a transition. You cannot remove the Start state or the one it is connected to, because if you could you would not need the FSM attached to the object. However, you can create new states and define transitions to them.
Tip
You can navigate the FSM view almost exactly the same way you would do the Scene view. Use the middle mouse button to drag the view. Use the left mouse button to move the states around. This does not change anything in the logic of the state machine, but lets you organize everything the way that makes sense to you, as well as look at the parts of the graph that you are most interested in at the moment if the whole state machine is too big to be shown at once.
A state in FSM is empty by default and does not do anything, a lot like an empty game object without any components attached to it. In order to make a state do something, you need to attach actions to it.
As we have seen in Chapter 2, Unity's and Playmaker's User Interface, you can add an FSM to an object by selecting the latter, right-clicking in the FSM view of the playMaker panel, and then selecting Add FSM from the contextual menu. You can remove an object from the Playmaker control by right-clicking the header of the Playmaker FSM (Script) component in Inspector and selecting Remove Component from the contextual menu. This will remove the FSM and erase all of the changes you made to it, including added states and transitions. An object has an FSM attached to it if there is a red Playmaker hieroglyph icon (![]() ) next to its name in the Hierarchy panel.
) next to its name in the Hierarchy panel.
As an example for this book, we will be making a version of the classic air hockey game. In order to begin, we will need to add a puck and a mallet. In this chapter, you will make the mallet move based on the mouse position and push the puck as you would expect it to do in real life.
Right now in your scene there are four walls, a background quad, a camera, and a directional light (created in Chapter 2, Unity's and Playmaker's User Interface). Now it is time to make things interactive. Let us start with a mallet.
- Create a new cylinder primitive by selecting GameObject | Create Other | Cylinder in the main menu.
- Rename this game object to
Malletand make a dark green (RGB color set to10,155,10in the Color window) material called MalletMaterial for it, then assign the material to it, as you did for theWallprefab before. - Set the scale of Mallet to (
1.35,1.35,1.35) and its position to (-6.5,1.45,0). - Now we are going to make the mallet move. First of all, we need to add a component called Character Controller to it. This component is in charge of character physics. Select Mallet, then click on the Add Component button near the bottom of the Inspector panel. Type
Character Controllerin the search bar, and then double-click on the Character Controller item in the list (as shown in the following screenshot). When Unity asks you if you want to replace the existing CapsuleCollider component, click on Replace.
- In the Character Controller component, set the Skin Width property to
0(it will be set to the minimum possible value, which is0.0001). We are doing this to make sure that our mallet's collisions look precise. - Add an FSM to Mallet by selecting it, right-clicking in the FSM view of the playMaker panel, and selecting Add FSM from the contextual menu.
- Select State 1, then in the State tab on the right of the playMaker panel enter
Movein the first text field from the top. It is responsible for the name of the currently selected state. When you enter the new name, you should see the state change in the FSM view as well. - Keeping the Move state selected, open the Actions panel (it should be attached to the same area of the Editor window as the Inspector panel; alternatively, click on the Action Browser button on the bottom-right of the State tab) and find the Mouse Pick action under the Input category. Click on it, then click on the Add Action To State button in the bottom-right corner of the panel. You should notice that the Mouse Pick action appeared in the State tab of the playMaker panel.
This action gets the cursor position in 3D space when you hover an object. Under the hood it draws an invisible ray (this action is called raycast) from the mouse position on the camera's near clipping plane (you can see it as one of the white gizmo rectangles in the Scene view when you select Main Camera). If there is something in the way of the ray, a ray hit gets detected, and Unity finds out where exactly it happened. In our case, we will use the background quad to get the position of the mouse cursor, and then make the mallet follow it.
- In order to pick a correct ray-hit position, we need to make sure that nothing else gets in the way of the ray. To do this, we will tell the ray to interact only with the background quad. Select the Quad game object and rename it
Backgroundfor clarity. Then find the Layer drop-down menu in the top-right corner of the Inspector panel, click on the drop-down button that says Default by default, and press Add Layer… in it. The appearance of Inspector should now change to reveal a list of tags and layers as shown in the following screenshot: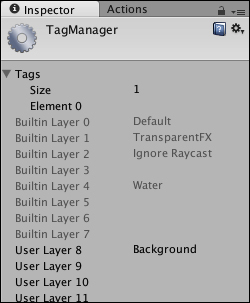
This menu is called TagManager. Click on the right of User Layer 8 and enter
Backgroundin the edit field that appears, then press Return on your keyboard. Select the Background object again and set its layer to Background by choosing the appropriate element from the drop-down Layer list you used to access the TagManager before. - Select Mallet again. In the Mouse Pick action of the Move state, set the Layer Mask parameter to
1. This determines how many layers you will set to interact with the raycast. Element 0 should appear below. In the drop-down list to its right, select the Background layer you created before. - From now on, the raycast in the Mouse Pick action will ignore all objects that are not in the Background layer. Now we need to store the ray-hit position in a variable. Go to the Variable tab of the playMaker panel and enter
mousePosin the New Variable field on the bottom. Click on the Add button. Set the Variable Type to Vector3. A Vector 3 variable contains three numbers: X, Y, and Z. - Go back to the State tab and set the Store Point property of the Mouse Pick action to mousePos. This will save the position of the ray hit in the Vector3 type variable that you just created. Finally, check the Every Frame property checkbox on the bottom of the Mouse Pick action to make sure that the mouse position is updated continuously as opposed to just once in the beginning of the game.
- Add the action called Controller Simple Move located under the Character category of the Actions panel to your Move state. It should appear just below the Mouse Pick action. If it appears above it, you can move it down by clicking and dragging it by its header.
It is important to note that the order of actions in the state matters: the actions mentioned earlier will be executed before the ones that are mentioned later, so if you want to use a variable set in the Mouse Pick action, you must make sure that Mouse Pick is above whatever action is going to use it (in our case it is Controller Simple Move).
- Set the Move Vector property of the Controller Simple Move action to mousePos. Leave the rest of the properties at their default values.