
In the previous chapter, we learned about Unity's interface, and the way things are organized and displayed in the Editor. You added a FSM to a game object and briefly looked at the interface elements related to Playmaker. You also manipulated game objects and components using such interface elements as the Hierarchy and Inspector panels, as well as the Scene view. In this chapter we will cover:
- The Component-based approach to game development that Unity relies on
- Game objects, components, and their properties in more detail
- The interchangeable nature of game objects when using components to define appearance and behavior
- Finite state machines, actions, and transitions
- Making simple game mechanics using Playmaker
Unity works using a popular and common approach for game development, which is called the component-based architecture. This approach is widely used in software development to make things more reusable and easier to manage.
Let us talk about the way things are organized in Unity. Some of them have already been mentioned in previous chapters, but I will repeat them briefly so that you can see the game objects, components, and their properties in the larger context.
First of all, you have a project, which is essentially a folder that contains all of the files and information about your game. Some of the files are called scenes (think of them as levels). A scene contains a number of game objects that you have added to it. The contents of your scenes are determined by you, and you can have as many of them as you want. You can also make your game switch between different scenes, thus making different sets of game objects active.
On a smaller scale, you have game objects and components. A game object by itself is simply an invisible container that does not do anything. Without adding appropriate components to it, it cannot, for instance, appear in the scene, receive input from the player, or move and interact with other objects. Using components, you can easily assemble powerful game objects while reusing several small parts, each responsible for a simple task or behavior—rendering the game object, handling the input, taking damage, playing an audio effect, and so on—making your game much simpler to develop and manage. Unity relies heavily on this approach, so the better you grasp it, the faster you will get good at it.
The only component that each and every game object in Unity has attached to it by default is Transform. It lets you define the game object's position, rotation, and scale. Normally, you can attach, detach, and destroy components in any given game object at will, but you cannot remove Transform.
Each component has a number of properties that you can access and change: these can be integer or floating point numbers, strings of text, textures, scripts, references to game objects or other components. They are used to change the way a certain component behaves, to influence its appearance or interaction. Some of the properties that you have already encountered in Chapter 2, Unity's and Playmaker's User Interface, include the position, rotation, and scale properties of the Transform component. There are others that you have seen, including FSM, that we will talk about later in this chapter.
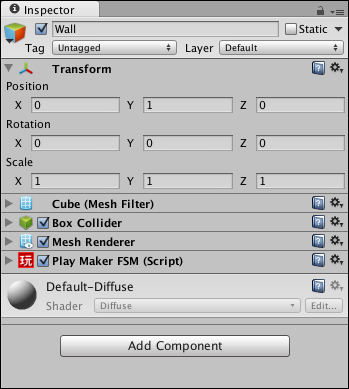
The following screenshot shows the Wall game object with the Transform, Mesh Filter, Box Collider, Mesh Renderer, and Script components attached to it. the properties of Transform are displayed. In order to reveal or hide a component's properties you need to left-click on its name or on the small arrow on the left of its icon.
Unity has a number of predefined game objects that already have components attached to them, such as cameras, lights, and primitives. You can access them by choosing GameObject | Create from the main menu. Alternatively, you can create empty game objects by pressing command + Shift + N (Ctrl + Shift + N in Windows) and attach components to them using the Components submenu.
The following figure shows the project structure that we have discussed. Note that there can be any number of scenes within a single project, any number of game objects within a single scene, any number of components attached to a single game object, and finally, any number of properties within a single component.

One final thing that you need to know about components right now is that you can copy them by right-clicking on the name of the component in the Inspector panel and selecting Copy Component from the contextual menu shown in the following screenshot. You can also reset the properties of the components to their default values, remove components, and move them up or down for your convenience.
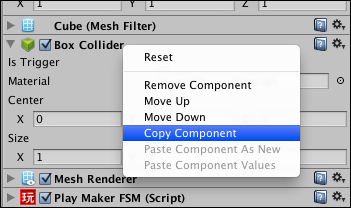
The copied component can be pasted by right-clicking any component's name in the Inspector panel and selecting either Paste Component As New or Paste Component Values from the same contextual menu. The difference between these two commands is that the former will add a new component identical to the one that you have copied, while the latter will simply transfer the values of all the properties. These commands become active once you have copied a component.