In Chapter 3, Components and State Machines, you made your first game mechanic for the air hockey game, which we are going to keep improving for the rest of this book. You made a puck and a mallet that is controlled using the mouse pointer and pushes the puck. The pushing mechanic was rather complex and requires some in-depth analysis, which will be the first thing we talk about in this chapter. This chapter is going to cover the following topics:
- Using vector geometry and physics
- Win/lose conditions
- Creating artificial intelligence
- Playmaker debugging
In the end, I will give you a couple of exercises that you will be able to complete with skills and knowledge you will have acquired by the end of this chapter, as well as some advice on how to look for answers to your questions if you have any.
If you are anything like me, you found the title of this section intimidating. However, before you decide to skip it or start looking for a new book about Unity, I assure you that it will not expose you to a single mathematical formula. Instead, it will use the Playmaker actions and explain what each of them does, which, in turn, will lead us to a conclusion about the science behind it.
Practically no 3D video game is possible without vector geometry and physics of some kind, and naturally both are instrumental in explaining how the mallet-puck interaction works in your new air hockey game.
To begin, let us select the Push Puck state in the Mallet FSM by clicking on it in the FSM view of the playMaker panel and open the Variables tab on the right. There are three variables of type Vector3 and one of type Float in the list. The following variables are of interest to us, since they are used for the calculation of push force and direction:
- hitPos is a Vector3 variable in which we store the X, Y, and Z coordinates of the collision point between the mallet and the puck
- pushDir is a Vector3 variable we store the X, Y, and Z direction in which the puck is going to be pushed when it collides with the mallet
- pushMag is a Float variable that is currently equal to 20 and corresponds to the magnitude of the push
To understand how things work in video games, you will have to be comfortable using Vector3 variables, because much of everything you will do is going to happen in 3D space. Each Transform component has three Vector3 properties: Position, Rotation, and Scale, each of which has its own X, Y, and Z values.
Each point in 3D space has coordinates that can be written down in the form of three Float variables: a position on the X axis, a position on the Y axis, and a position on the Z axis. A Vector3 variable can store these three position values at the same time.
You can perform various actions over Vector3, you can add it to another vector, you can multiply it by a float (or an integer), you can store its X, Y, and Z in separate Float variables or write separate float values into its X, Y, and Z. Most of these actions are under the Vector3 category of the Actions panel.
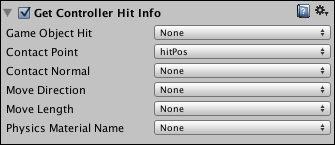
The first action that we use is called Get Controller Hit Info, and it gets the position of the last collision that happened to a game object. If you look at the Collision Event action in the Move state that triggers the Push event, you will see that this only happens when the mallet collides with the puck, so we do not have to worry about weeding out false collisions once we are already in the Push Puck state. All we have to do is save the contact point in a variable, which is exactly what happens.
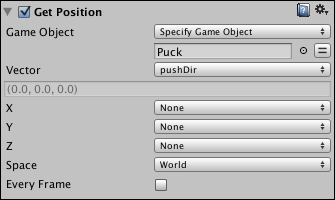
Next, we simply get the current position of the mallet and store it in the pushDir variable, for the time being using the GetPosition action. This variable is called pushDir, because later it will contain the direction in which the mallet will be pushed. We get this position simply by accessing the Position property of the mallet's Transform component.
If these are all positions, how do you get a direction? What is a direction and how can you write it down in Vector3? The answer is quite simple. A direction is the relative position of one point with respect to another point in space, which is another way of saying that it is the difference between Position A and Position B. The following figure shows two points and their relative directions.
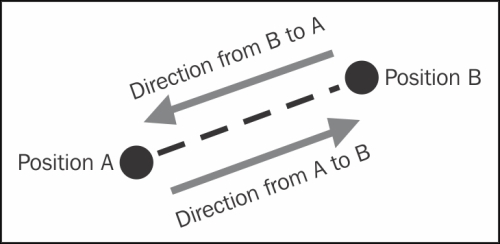
So, in order to find the direction in which point B lies in relation to point A, you will have to subtract the position of point B from the position of point A. Then you need to normalize the result, which means writing it down as a Vector3 variable that has its X, Y, and Z properties as numbers between 0 and 1 (that is, without a magnitude).
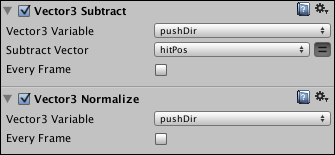
For example, if the original result of subtraction was (-1, 27, 350), the normalized vector of direction will be (-0.00284867, 0.076914, 0.997034), and the best part of it is that you do not need to know how this happens, because there is a Playmaker action that does it automatically for you. The following screenshot shows the two actions that are used to get the direction from the center of the mallet to the hit point:
Let us go through the things we have covered so far:
- We need the position of the mallet, because this is where we are going to push the puck from
- We need the point of the impact between the mallet and the puck in order to find where the puck lies in space in relation to the mallet when the mallet hits it
- Both of these values are saved as Vector3 variables, each of which contains an X, Y, and Z position
- We can find out in which direction the puck lies in relation to the mallet by subtracting the position of the impact from the position of the mallet and normalizing the resulting vector, that is, writing down its X, Y, and Z properties as numbers between
0and1
Now that we know how to find the direction in which the puck lies in relation to the mallet, we want to push it in that direction, so this is exactly what we are going to do. However, we cannot just assign the direction vector as the puck's velocity, because the direction vector does not have a magnitude, which means that the velocity of the puck will be way smaller than we want it to be.
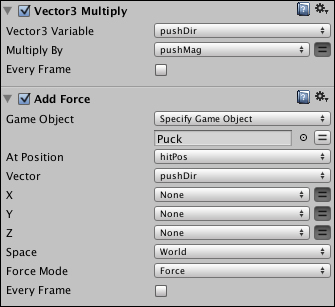
In order to control the force with which the puck is being pushed, we have to multiply the direction by a magnitude, which is stored in the pushMag variable. This variable determines how fast the puck will move in the opposite direction once it meets the mallet.
The following screenshot shows the Vector3 Multiply action that multiplies the pushDir direction vector by pushMag magnitude as well as the Add Force action that applies the force to the puck at the impact point.