Chapter 11. BusyBox
The man page for BusyBox declares that BusyBox is “The Swiss Army Knife of Embedded Linux.” This is a fitting description, for BusyBox is a small and efficient replacement for a large collection of standard Linux command-line utilities. It often serves as the foundation for a resource-limited embedded platform. This chapter introduces BusyBox and provides an excellent starting point for customizing your own BusyBox installation.
Previous chapters referred to BusyBox. This chapter presents the details of this useful package. After a brief introduction to BusyBox, we explore the BusyBox configuration utility. This is used to tailor BusyBox to your particular requirements. We then discuss the requirements for cross-compiling the BusyBox package.
BusyBox operational issues are considered, including how it is used in an embedded system. We examine the BusyBox initialization sequence and explain how it departs from the standard System V initialization. This chapter also presents a sample initialization script. After seeing the steps for installing BusyBox on a target system, you will learn about some of the BusyBox commands and their limitations.
11.1 Introduction to BusyBox
BusyBox has gained tremendous popularity in the embedded Linux community. It is remarkably easy to configure, compile, and use. In addition, it has the potential to significantly reduce the overall system resources required to support a wide collection of common Linux utilities. BusyBox provides compact replacements for many traditional full-blown utilities found on most desktop and embedded Linux distributions. Examples include the file utilities such as ls, cat, cp, dir, head, and tail; general utilities such as dmesg, kill, halt, fdisk, mount, and umount; and many more. BusyBox also provides support for more-complex operations, such as ifconfig, netstat, route, and other network utilities.
BusyBox is modular and highly configurable and can be tailored to suit your particular requirements. The package includes a configuration utility similar to the one used to configure the Linux kernel and therefore will seem quite familiar.
The commands in BusyBox generally are simpler implementations than their full-blown counterparts. In some cases, only a subset of the usual command-line options are supported. In practice, however, you will find that the BusyBox subset of command functionality is more than sufficient for most general embedded requirements.
11.1.1 BusyBox Is Easy
If you can configure and build the Linux kernel, you will find BusyBox quite straightforward to configure, build, and install. The steps are similar:
- Execute a configuration utility and enable your choice of features.
- Run
maketo build the package. - Install the binary and a series of symbolic links1 on your target system.
You can build and install BusyBox on your development workstation or your target embedded system. BusyBox works equally well in both environments. However, you must take care when installing on your development workstation that you keep it isolated in a working directory, to avoid overwriting your system’s startup files or primary utilities.
11.2 BusyBox Configuration
To initiate the BusyBox configuration, the command is the same as that used with the Linux kernel for the ncurses library-based configuration utility. Note that, in a similar fashion to the Linux kernel, make help produces much useful information on available make targets. The command to configure is:
$ make menuconfig
Figure 11-1 shows the top-level BusyBox configuration.
Figure 11-1. Top-level BusyBox Configuration menu
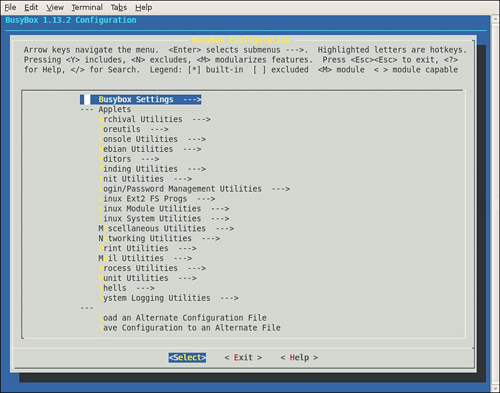
Space does not permit coverage of each configuration option. However, some of the options deserve mention. Some of the more important BusyBox configuration options appear under Busybox Settings ---> Build Options. Here you will find configuration options necessary to cross-compile the BusyBox application. Listing 11-1 details the options found under Build Options in a recent BusyBox snapshot. Select Build Options from the top-level BusyBox configuration utility to navigate to this screen.
Listing 11-1. BusyBox Build Options

The first option is useful for building very minimal embedded systems. It allows BusyBox to be compiled and linked statically so that no dynamically loaded libraries (libc-*, for example) are required at runtime on the target system. Without this option, BusyBox requires various libraries so that it can run. We can easily determine what libraries BusyBox (or any other binary) requires on our target system by using the ldd command. Listing 11-2 is the output of ldd cross-compiled for ARM xscale.
Listing 11-2. BusyBox Library Dependencies

Notice that the BusyBox utility, as compiled using the default configuration, requires the four shared libraries shown in Listing 11-2. Had we elected to build BusyBox as a static binary, ldd would simply issue a message telling us that the BusyBox binary is not a dynamic executable. In other words, it requires no shared libraries to resolve any unresolved dependencies in the executable. Static linking yields a smaller overall footprint on a root file system because no shared libraries are required. However, building an embedded application without shared libraries means that none of the familiar C library functions are available to your applications. To give you an idea of the relative size difference between a statically linked BusyBox and the same configuration compiled against shared libraries, a statically linked busybox is about 1.5MB versus 778KB for a dynamically linked image for a recent version of BusyBox.
11.2.1 Cross-Compiling BusyBox
As mentioned at the beginning of the chapter, the authors of BusyBox intended the package to be used in a cross-development environment, so building BusyBox in such an environment is quite easy. In earlier versions of BusyBox the only requirement was to specify the prefix to the cross-compiler by selecting the option to build BusyBox with a cross-compiler. This has been superseded by the more standard method of specifying an environment variable similar to building other packages such as the Linux kernel. To cross-compile with a specific cross-compiler on your development workstation, simply define CROSS_COMPILE in your environment. Some examples of CROSS_COMPILE values are arm5vt_le-, xscale_be-, and ppc_linux-. Note that you can also specify the cross-compiler prefix in the configuration utility just described. We cover compiler prefixes related to cross-compiling in more detail in the next chapter when we examine the embedded development environment.
11.3 BusyBox Operation
When you build BusyBox, you end up with a binary called—you guessed it—BusyBox. BusyBox can be invoked from the binary name itself, but it is usually launched via a symlink. When BusyBox is invoked without command-line parameters, it produces a list of the functions that were enabled via the configuration. Listing 11-3 shows such an output (it has been formatted to fit the page width).
Listing 11-3. BusyBox Usage
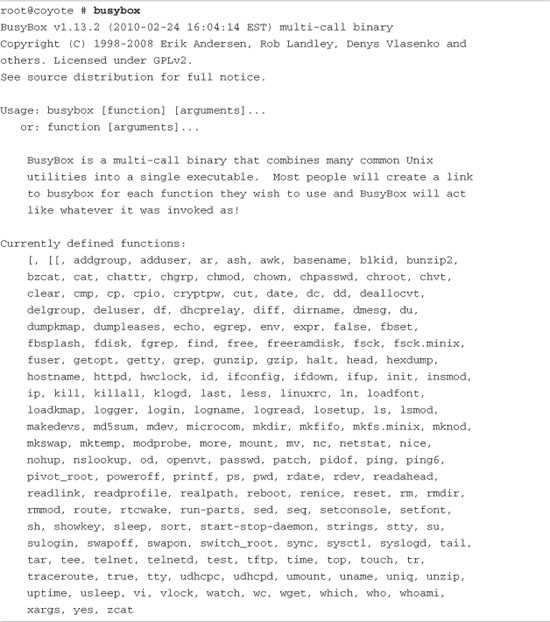
From Listing 11-3, you can see the list of functions that are enabled in this BusyBox build. They are listed in alphabetical order (ignoring the shell scripting [ and [[ operators) from addgroup to zcat, a utility used to decompress the contents of a compressed file. This list represents the set of utilities enabled in this particular BusyBox build.
To invoke a particular function, execute busybox with one of the defined functions passed on the command line. For example, to display a listing of files in the root directory, execute this command:
[root@coyote]# busybox ls /
Another important message from the BusyBox usage message shown in Listing 11-3 is the short description of the program. It describes BusyBox as a multicall binary, combining many common utilities into a single executable. This is the purpose of the symlinks mentioned earlier. BusyBox was intended to be invoked by a symlink named for the function it will perform. This removes the burden of having to type a two-word command to invoke a given function, and it presents the user with a set of familiar commands for the similarly named utilities. Listings 11-4 and 11-5 should make this clear.
Listing 11-4 shows the target directory structure as built by the BusyBox package via the make install command in the busybox source tree.
Listing 11-4. BusyBox Symlink Structure from make install

The executable busybox file is found in the /bin directory, and symlinks have been populated throughout the rest of the structure pointing back to /bin/busybox. Listing 11-5 expands on the directory structure of Listing 11-4.
Listing 11-5. BusyBox Symlink Structure: Tree Detail
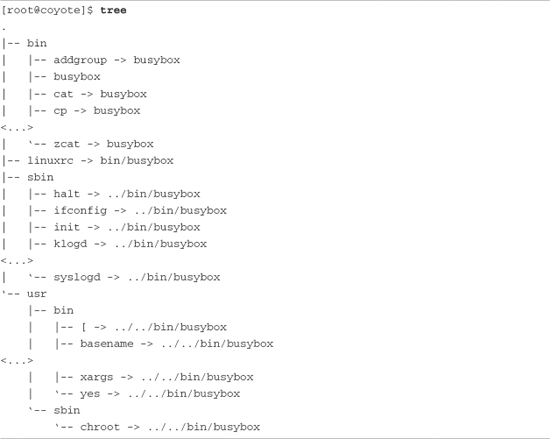
The output shown in Listing 11-5 has been significantly truncated for readability and to avoid a three-page listing. Each line containing an ellipsis (...) indicates where this listing has been pruned to show only the first few and last few entries of that given directory. In actuality, more than 100 symlinks can be populated in these directories, depending on what functionality you have enabled using the BusyBox configuration utility.
Notice the BusyBox executable itself, the second entry from the /bin directory. Also in the /bin directory are symlinks pointing back to busybox for addgroup, cat, cp, and so on, all the way to zcat. Again, the entries between cp and zcat have been omitted from this listing for readability. With this symlink structure, the user simply enters the actual name of the utility to invoke its functionality. For example, to configure a network interface using the BusyBox ifconfig utility, the user might enter a command similar to this:
$ ifconfig eth1 192.168.1.14
This would invoke the BusyBox executable through the ifconfig symlink. BusyBox examines how it was called. In other words, it reads argv[0] to determine what functionality is being requested.
11.3.1 BusyBox init
Notice the symlink in Listing 11-5 called init. In Chapter 6, “User Space Initialization,” you learned about the init program and its role in system initialization. Recall that the kernel attempts to execute a program called /sbin/init as the last step in kernel initialization. There is no reason why BusyBox can’t emulate the init functionality, and that’s exactly how the system illustrated in Listing 11-5 is configured. BusyBox handles the init functionality.
BusyBox handles system initialization differently from standard System V init. A Linux system using the System V (SysV) initialization as described in Chapter 6 requires an inittab file accessible in the /etc directory. BusyBox also reads an inittab file, but the syntax of the inittab file is different. In general, you should not need to use an inittab if you are using BusyBox. Consider the advice in the BusyBox man page: If you need runlevels, use System V initialization.2
Let’s see what this looks like on an embedded system. We have created a small root file system based on BusyBox. We configured BusyBox for static linking, eliminating the need for any shared libraries. Listing 11-6 is a tree listing of this root file system. We built this small file system using the steps outlined in Chapter 9, “File Systems,” in Section 9.11, “Building a Simple File System.” We do not detail the procedure again here. The files in our simple file system are shown in Listing 11-6.
Listing 11-6. Minimal BusyBox Root File System
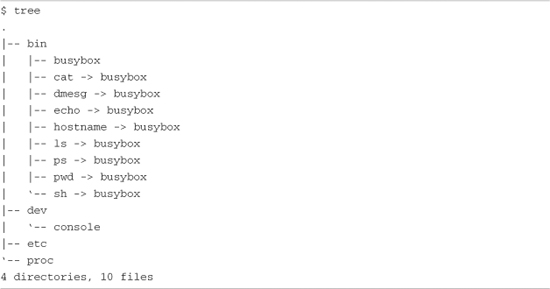
This BusyBox-based root file system occupies little more than the size needed for busybox itself. In this configuration, using static linking and supporting nearly 100 utilities, the BusyBox executable comes in at less than 2MB:
![]()
Now let’s see how this system behaves. Listing 11-7 captures the console output at power-up on this BusyBox-based embedded system.
Listing 11-7. BusyBox Default Startup
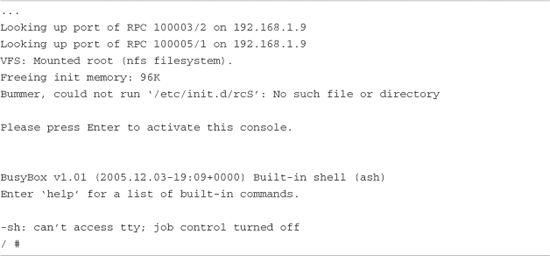
Listing 11-7 was run on an embedded board configured for NFS root mount. We export a directory on our workstation that contains the simple file system image detailed in Listing 11-6. As one of the final steps in the boot process, the Linux kernel on our target board mounts a root file system via NFS. When the kernel attempts to execute /sbin/init, it fails (by design) because there is no /sbin/init on our file system. However, as we have seen, the kernel also attempts to execute /bin/sh. In our BusyBox-configured target, this succeeds, and busybox is launched via the symlink /bin/sh on our root file system.
The first thing BusyBox does is complain that it can’t find /etc/init.d/rcS. This is the default initialization script that BusyBox searches for. Instead of using inittab, this is the preferred method to initialize an embedded system based on BusyBox.
When it has completed initialization, BusyBox displays a prompt asking the user to press Enter to activate a console. When BusyBox detects the Enter key, it executes an ash shell session waiting for user input. The final message about job control is a result of the fact that, in this particular example (and on most typical embedded systems), we are creating the system console on a serial terminal. The Linux kernel contains code to disable job control if it detects the console on a serial terminal.
This example produced a working system, with nearly 100 Linux utilities available, including core utilities, file utilities, network support, and a reasonably capable shell. You can see that this simple package provides a powerful platform upon which to build your own system applications. Of course, it should be noted that without any support for libc and other system libraries, you would face a formidable task implementing your applications. You would have to provide support for all the usual standard C library calls and other library functions that a typical C program relies on. Alternatively, you could statically link your applications against the libraries they depend on, but if you have more than a couple applications using this method, your applications will likely exceed the combined size of linking dynamically and having the shared libraries on your target.
11.3.2 Sample rcS Initialization Script
Before BusyBox spawns an interactive shell, it tries to execute commands from a script called /etc/init.d/rcS, as shown in Listing 11-7. It is here where your applications come to life in a BusyBox system. A simple rcS initialization script is provided in Listing 11-8.
Listing 11-8. Simple rcS BusyBox Startup Script
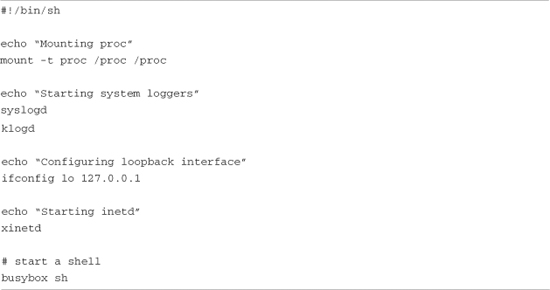
This simple script is mostly self-explanatory. First, it is important to mount the /proc file system on its reserved mount point, /proc. This is because many utilities get their information from the /proc file system. This is explained more fully in Chapter 9. Next we launch the system loggers as early as possible, to capture any startup problems. Following the system log daemons, we configure the local loopback interface for the system. Again, a number of traditional Linux facilities assume that a loopback interface is present, and if your system has support for sockets configured, you should enable this interface. The last thing we do before starting a shell is launch the Internet superserver xinetd. This program sits in the background, listening for network requests on any configured network interfaces. For example, to initiate a telnet session to the board, xinetd intercepts the request for telnet connection and spawns a telnet server to handle the session.
Instead of starting a shell, your own applications can be launched from this rcS initialization script. Listing 11-8 is a simple example of a telnet-enabled target board running basic services such as system and kernel loggers.
11.3.3 BusyBox Target Installation
The discussion of BusyBox installation can proceed only when you understand the use and purpose of symlinks. The BusyBox makefile contains a target called install. Executing make install creates a directory structure containing the BusyBox executable and a symlink tree. This environment needs to be migrated to your target embedded system’s root directory, complete with the symlink tree. As explained earlier, the symlink tree eliminates the need to type busybox command for each command. Instead, to see a listing of files in a given directory, the user simply types ls. The symlink executes BusyBox as described previously and invokes the ls functionality. Review Listings 11-4 and 11-5 to see the symlink tree. Note that the BusyBox build system creates links only for the functionality that you have enabled via the configuration utility.
The easiest way to populate your root file system with the necessary symlink farm is to let the BusyBox build system do it for you. Simply mount your root file system on your development workstation and pass CONFIG_PREFIX to the BusyBox makefile. Listing 11-9 shows the procedure.
Listing 11-9. Installing BusyBox on the Root File System
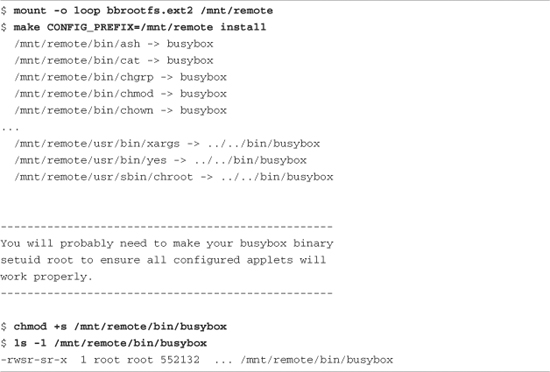
First we mount the root file system binary image on our desired mount point—in this case, /mnt/remote, a favorite of mine. Then we invoke the BusyBox make install command, passing it CONFIG_PREFIX, specifying where we want the symlink tree and BusyBox executable file to be placed. Although it isn’t obvious from the listing, the makefile invokes a script called applets/install.sh to do the bulk of the work. The script walks through a file containing all the enabled BusyBox applets and creates a symlink for each one on the path we have specified using the CONFIG_PREFIX. The script is very chatty; it outputs a line for each symlink created. For brevity, only the first few and last few symlink announcements are displayed in Listing 11-9. The ellipsis in the listing represents those that have been eliminated.
The message about setuid is also displayed by the install script to remind you that it might be necessary to make your BusyBox executable setuid root. This allows BusyBox functions that require root access to function properly even when invoked by a nonroot user. This is not strictly necessary, especially in an embedded Linux environment, where it is common to have only a root account on a system. If this is necessary for your installation, the required command (chmod +s) is shown in Listing 11-9.
The result of this installation step is that the BusyBox binary and symlink tree are installed on our target root file system. The end result looks very similar to Listing 11-4.
It is useful to note that BusyBox also has an option to enable creation of this symlink tree on the target system at runtime. This option is enabled in the BusyBox configuration and is invoked at runtime by executing BusyBox with the -install option. You must have the /proc file system mounted on your target system for this support to work.
11.3.4 BusyBox Applets
In a recent BusyBox snapshot, 282 commands (also called applets) were documented in the man page. Sufficient support exists for reasonably complex shell scripts, including support for Bash shell scripting. BusyBox supports awk and sed, frequently found in Bash scripts. BusyBox supports network utilities such as ping, ifconfig, traceroute, and netstat. Some commands are specifically included for scripting support, including true, false, and yes.
Spend a few moments perusing Appendix C, “BusyBox Commands,” where you can find a summary of each BusyBox command. After you have done so, you will have a better appreciation of the capabilities of BusyBox and how it might be applicable to your own embedded Linux project.
As mentioned at the beginning of this chapter, many of the BusyBox commands contain a limited subset of features and options compared to their full-featured counterparts. In general, you can get help on any given BusyBox command at runtime by invoking the command with the --help option. This produces a usage message with a brief description of each supported command option. The BusyBox gzip applet is a useful example of a BusyBox command that supports a limited set of options. Listing 11-10 displays the output from gzip -help on a BusyBox target.
Listing 11-10. BusyBox gzip Applet Usage
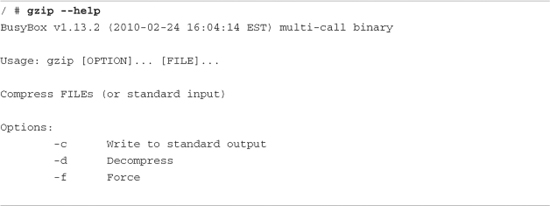
The BusyBox version of gzip supports just three command-line options. Its full-featured counterpart supports more than 15 different command-line options. For example, the full-featured gzip utility supports a --list option that produces compression statistics for each file on the command line. No such support exists for BusyBox gzip. This is usually not a significant limitation for embedded systems. We present this information so that you can make an informed choice when deciding on BusyBox. When the full capabilities of a utility are needed, the solution is simple: Delete support for that particular utility in the BusyBox configuration, and add the standard Linux utility to your target system. In this way you can mix BusyBox utilities and the standard Linux utilities on the same embedded system.
11.4 Summary
This chapter described BusyBox, one of the most popular utilities in the embedded Linux landscape. BusyBox has also found a place in desktop and server distributions, as part of a rescue image as well as the initial ramdisk typically found in these distributions. This chapter covered how to configure, build, and install this important utility. We also examined the differences in system initialization when using BusyBox-based systems.
• BusyBox is a powerful tool for embedded systems that replaces many common Linux utilities in a single multicall binary.
• BusyBox can significantly reduce the size of your root file system image.
• BusyBox is easy to use and has many useful features.
• Configuring BusyBox is straightforward, using an interface similar to that used for Linux configuration.
• BusyBox can be configured as a statically or dynamically linked application, depending on your particular requirements.
• System initialization is somewhat different with BusyBox; those differences were covered in this chapter.
• BusyBox has support for many commands. Appendix C itemizes all the available BusyBox commands from a recent release.
11.4.1 Suggestions for Additional Reading
BusyBox Project home
www.busybox.net/
BusyBox man page
www.busybox.net/downloads/BusyBox.html