Chapter 12. Embedded Development Environment
In This Chapter
![]() 12.1 Cross-Development Environment 306
12.1 Cross-Development Environment 306
![]() 12.2 Host System Requirements 311
12.2 Host System Requirements 311
The configuration and services available on your host development system can have a huge impact on your success as an embedded developer. This chapter examines the unique requirements of a cross-development environment and some of the tools and techniques that an embedded developer needs to know to be productive.
We begin by examining a typical cross-development environment. Using the familiar “Hello World” example, we detail the important differences between host-based applications and those targeted for embedded systems. We also look at differences in the toolchains for native versus embedded application development. We then present host system requirements and detail the use of some important elements of your host system. We conclude this chapter with an example of a target board being hosted by a network-based host.
12.1 Cross-Development Environment
Developers new to embedded development often struggle with the concepts of and differences between native and cross-development environments. Indeed, a system often has three compilers and three (or more) versions of standard header files (such as stdlib.h). Debugging an application on your target embedded system can be difficult without the right tools and host-based utilities. You must manage and keep separate the files and utilities designed to run on your host system from those you intend to use on your target.
When we use the term host in this context, we are referring to the development workstation that is sitting on your desktop and running your favorite Linux desktop distribution.1 Conversely, when we use the term target, we are referring to your embedded hardware platform. Therefore, native development denotes the compilation and building of applications on and for your host system. Cross-development denotes the compilation and building of applications on the host system that will be run on the embedded system. Keeping these definitions in mind will help you stay on track throughout this chapter.
Figure 12-1 shows the layout of a typical cross-development environment. A host PC is connected to a target board through one or more physical connections. It is most convenient if both serial and Ethernet ports are available on the target. Later, when we discuss kernel debugging, you will realize that a second serial port can be a valuable asset.
Figure 12-1. Cross-development setup
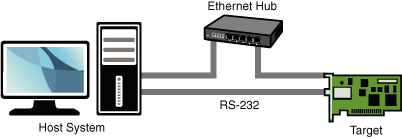
In the most common scenario, the developer has a serial terminal on the host connected to the RS-232 serial port, possibly one or more telnet or SSH terminal sessions to the target board, and potentially one or more debug sessions using Ethernet as the connection medium. This cross-development setup provides a great deal of flexibility. The basic idea is that the host system provides the horsepower to run the compilers, debuggers, editors, and other utilities, and the target executes only the applications designed for it. You can certainly run compilers and debuggers on the target system, but we assume that your host system has more resources available, including processor horsepower, RAM, disk storage, and Internet connectivity. In fact, it is not uncommon for a target embedded board to have no human-input devices or output displays.
12.1.1 “Hello World” Embedded
A properly configured cross-development system hides a great deal of complexity from the average application developer. Looking at a simple example will help uncover and explain some of the mystery. When we compile a simple “Hello World” program, the toolchain (compiler, linker, and associated utilities) makes many assumptions about the host system we are building on and the program we are compiling. Actually, they are not assumptions, but a collection of rules that the compiler references to build a proper binary.
Listing 12-1 reproduces a simple “Hello World” program.
Listing 12-1. Hello World Again

Even the casual application developer will realize some important points about this C source file. First, the function printf() is referenced but not defined in this file. If we omit the #include directive containing the prototype for the printf() function, the compiler emits this familiar message:
hello.c:5: warning: implicit declaration of function 'printf'
This introduces some interesting questions:
• Where is the file stdio.h located, and how is it found?
• Where is the printf() function object code stored on your system, and how is this reference resolved in the binary executable?
Somehow it seems that the compiler just knows how to put together a proper binary file that can be executed from the command line. To further complicate matters, the final executable contains startup and shutdown prologue code that we never see but that the linker automatically includes. This prologue deals with details such as the environment and arguments passed to your program, startup and shutdown housekeeping, exit handling, and more.
To build the “Hello World” application, we can use a simple command-line invocation of the compiler, similar to this:
$ gcc -o hello hello.c
This produces the binary executable file called hello, which we can execute directly from the command line. Defaults referenced by the compiler provide guidance on where include files will be found. In a similar fashion, the linker knows how to resolve the reference to the printf() function by including a reference to the library where it is defined. This, of course, is the standard C library.
We can query the toolchain to see some of the defaults that were used. Listing 12-2 is a partial listing of the output from cpp when passed the -v flag. You might already know that cpp is the C preprocessor component of the GNU gcc toolchain. We have added some formatting (white space only) to improve readability.
Listing 12-2. Default Native cpp Search Directories

This simple query produces some useful information. First, we can see how the compiler was configured using the familiar ./configure utility. The default thread model is posix, which determines the thread library your application gets linked against if you employ threading functions. Finally, you see the default search directories for #include directives.
But what if we want to build hello.c for a different architecture, such as Power Architecture? When we compile an application program for a Power Architecture target using a cross-compiler on our host machine, we must make sure that the compiler does not use the default host include directories or library paths. Using a properly configured cross-compiler is the first step, and having a well-designed cross-development environment is the second.
Listing 12-3 is the output from a popular open-source cross-development toolchain known as the Embedded Linux Development Kit (ELDK), assembled and maintained by Denx Software Engineering. This particular installation was configured for the Power Architecture 82xx toolchain. Again, we have added some white space to the output for readability.
Listing 12-3. Default Cross-Search Directories

Here you can see that the default search paths for include directories are now adjusted to point to your cross versions instead of the native include directories. This seemingly obscure detail is critical to being able to develop applications and compile open source packages for your embedded system. It is one of the most confusing topics to even experienced application developers who are new to embedded systems.
12.2 Host System Requirements
Your development workstation must include several important components and systems. First, you need a properly configured cross toolchain. You can download and compile one yourself or obtain one of the many commercial toolchains available. Building one yourself is beyond the scope of this book; however, several good references are available. See the last section of this chapter for recommendations.
The next major item you need is a Linux distribution targeted for your embedded system architecture. This includes hundreds to potentially thousands of files that will populate your embedded system’s file system(s). Again, the choices are to build your own or to obtain one of the commercial ones. One of the more popular open source embedded system distributions is the aforementioned ELDK. The ELDK is available for many Power Architecture, ARM, and other embedded targets. The topic of building an embedded Linux distribution from scratch would require a book of this size in itself; therefore, it’s beyond the scope of our discussion. We introduce open source build systems in Chapter 16, “Open Source Build Systems.”
In summary, your development host requires four separate and distinct capabilities:
• Cross toolchain and libraries
• Target system packages, including programs, utilities, and libraries
• Host tools such as editors, debuggers, and utilities
• Servers for hosting your target board, as covered in the next section
If you install a ready-built embedded Linux development environment on your workstation, either a commercial variety or one freely available in the open source community, the toolchain and components have already been preconfigured to work together. For example, the toolchain has been configured with default directory search paths that match the location of the target header files and system libraries on your development workstation. The situation becomes much more complex if your requirements include support for multiple architectures and processors on your development workstation. This is the reason that commercial embedded Linux distributions exist.
12.2.1 Hardware Debug Probe
In addition to the components just listed, you should consider some type of hardware-assisted debugging. This consists of a hardware probe connected to your host (often via Ethernet) and connected to your target via a debug connector on the board. Many solutions are available. The de facto standard in the Linux community remains the Abatron BDI-3000. This topic is covered in detail in Chapter 14, “Kernel Debugging Techniques.”
12.3 Hosting Target Boards
Referring to Figure 12-1, you will notice an Ethernet connection from the target-embedded board to the host-development system. This is not strictly necessary; indeed, some smaller embedded devices do not have an Ethernet interface. However, this is the exception rather than the rule. Having an Ethernet connection available on your target board is worth its cost in silicon! This enables the NFS root mount configuration, which can save you days or weeks of development time.
While developing your embedded Linux kernel, you will compile and download kernels and root file systems to your embedded board many times. Many embedded development systems and bootloaders support TFTP and assume that the developer will use it. TFTP is a lightweight protocol for moving files between a TFTP server and TFTP client over Ethernet, similar to FTP.
Using TFTP from your bootloader to load the kernel will save you countless hours waiting for serial downloads, even at higher serial baud rates. And loading your root file system or ramdisk image can take much longer, because these images can grow to many tens of megabytes or more, depending on your requirements. The investment in your time to configure and use TFTP will definitely pay off and is highly recommended. Very few designs can’t afford the real estate to include an Ethernet port during development, even if it is depopulated for production.
12.3.1 TFTP Server
Configuring TFTP on your Linux development host is not difficult. Of course, the details might vary, depending on which Linux distribution you choose for your development workstation. The guidelines presented here are based on popular desktop Linux distributions.
TFTP is a TCP/IP service that must be enabled on your workstation. To enable the TFTP service, you must instruct your workstation to respond to incoming TFTP packets. The easiest way to do this is to run a TFTP server daemon. Most modern desktop Linux distributions have multiple packages available to provide this service. HPA’s TFTP server will be used as the basis for the examples here. It can be obtained from ftp://ftp.kernel.org/pub/software/network/tftp.
On modern Ubuntu and other Debian-based systems, the HPA TFTP server can be installed as follows:2
$ sudo apt-get install tftpd-hpa
Configuring this TFTP server is easy. There is a single configuration file on Ubuntu and other distributions called /etc/default/tftpd-hpa. This file needs to be customized to your particular requirements. Listing 12-4 shows a typical example of this configuration file.
Listing 12-4. TFTP Configuration

The first thing you must do is enable the service. When you first install the tftpd-hpa package, RUN_DAEMON defaults to "no". To enable the service, you must change the default "no" to "yes", as shown in Listing 12-4.
The second line defines the command-line options to the daemon itself, usually /usr/sbin/in.tftpd. The -s switch tells in.tftpd to switch to the specified directory (/tftpboot) upon startup, which causes this directory to be the root of your TFTP server. The -c flag allows the creation of new files. This is useful to write files to the server from the target. The BDI-3000 (covered later in this book) has such a capability, and it will not work without the -c. The -l argument instructs the TFTP daemon to run in the background and listen on the TFTP port for incoming TFTP packets.
Once the changes are made to this configuration file, you must restart the TFTP server so that they take effect:
$ sudo /etc/init.d/tftpd-hpa restart
In any case, consult the documentation that came with your distribution for options on how to enable the TFTP server on your specific distribution.
12.3.2 BOOTP/DHCP Server
Having a DHCP server on your development host simplifies the configuration management for your embedded target. We have already established the reasons why an Ethernet interface on your target hardware is a good idea. When Linux boots on your target board, it needs to configure the Ethernet interface before the interface will be useful. Moreover, if you are using an NFS root mount configuration on your target board, Linux needs to configure your target’s Ethernet interface before the boot process can complete. We covered NFS in detail in Chapter 9, “File Systems.”
In general, Linux can use two methods to initialize its Ethernet/IP interface during boot:
• Hard-code the Ethernet interface parameters either on the Linux kernel command line or in the default configuration, such as a static IP configuration.
• Configure the kernel to automatically detect the network settings at boot time.
For obvious reasons, the second choice is more flexible. DHCP or BOOTP is the protocol your target and server use to accomplish the automatic detection of network settings. For details on the DHCP and BOOTP protocols, see the last section of this chapter.
A DHCP server controls the IP address assignments for IP subnets for which it has been configured, and for DHCP or BOOTP clients that have been configured to participate. A DHCP server listens for requests from a DHCP client (such as your target board) and assigns addresses and other pertinent information to the client as part of the boot process. A typical DHCP exchange (see Listing 12-5) can be examined by starting your DHCP server with the -d debug switch and observing the output when a target machine requests configuration.
Listing 12-5. Typical DHCP Exchange

The sequence starts with the client (target) transmitting a broadcast frame attempting to discover a DHCP server. This is shown by the DHCPDISCOVER message. The server responds (if it has been so configured and enabled) by offering an IP address for the client. This is evidenced by the DHCPOFFER message. The client then responds by testing this IP address locally. The testing includes sending the DHCPREQUEST packet to the DHCP server, as shown. Finally, the server responds by acknowledging the IP address assignment to the client, thus completing the automatic target configuration.
It is interesting to note that a properly configured client will remember the last address it was assigned by a DHCP server. The next time it boots, it will skip the DHCPDISCOVER stage and proceed directly to the DHCPREQUEST stage, assuming that it can reuse the same IP address that the server previously assigned. A booting Linux kernel does not have this capability and emits the same sequence every time it boots.
Configuring your host’s DHCP server is not difficult. As usual, our advice is to consult the documentation that came with your desktop Linux distribution. On a Red Hat or Fedora distribution, the configuration entry for a single target might look like Listing 12-6.
Listing 12-6. Sample DHCP Server Configuration
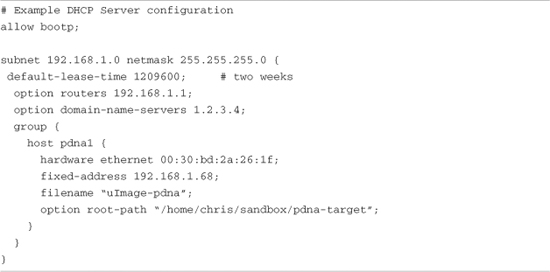
This is a simple example, meant only to show the kind of information you can pass to your target system. A one-to-one mapping of the target MAC address to its assigned IP address is defined by this host definition. In addition to its fixed IP address, you can pass other information to your target. In this example, the default router and DNS server addresses are passed to your target, along with the filename of a file of your choice, and a root path for your kernel to mount an NFS root file system from. The filename might be used by your bootloader to load a kernel image from your TFTP server. You can also configure your DHCP server to hand out IP addresses from a predefined range, but it is very convenient to use a fixed address such as that shown in Listing 12-6.
You must first enable the DHCP server on your Linux development workstation. This is typically done through your main menu or at the command line. Consult the documentation for your Linux distribution for details suitable for your environment. For example, to enable the DHCP server on a Fedora Core Linux distribution, simply type the following command from a root command prompt:
$ /etc/init.d/dhcpd start
or
$ /etc/init.d/dhcpd restart
You must do this each time you start your development workstation, unless you configure it to start automatically. Consult the documentation associated with your distribution for instructions on how to do this. You will usually find a reference to enabling services or something similar. In this example, dhcpd is considered a system service.
Many nuances are involved with installing a DHCP server, so unless your server is on a private network, it is advisable to check with your system administrator before going live with your own. If you coexist with a corporate LAN, it is very possible that you will interfere with its own DHCP service.
12.3.3 NFS Server
Using an NFS root mount for your target board is a very powerful development tool. Here are some of the advantages of this configuration for development:
• Your root file system is not size-restricted by your board’s own limited resources, such as Flash memory.
• Changes made to your application files during development are immediately available to your target system.
• You can debug and boot your kernel before developing and debugging your root file system.
The steps for setting up an NFS server vary depending on which desktop Linux distribution you are using. As with the other services described in this chapter, you must consult the documentation for your Linux distribution for the details appropriate to your configuration. The NFS service must be started from either your startup scripts, a graphical menu, or the command line. For example, the command to start NFS services from a root command prompt for a Fedora Core Linux desktop is as follows:
$ /etc/init.d/nfs start
or
$ /etc/init.d/nfs restart
Note that on later Ubuntu and other distributions this command has been changed to /etc/init.d/nfs-kernel-server.
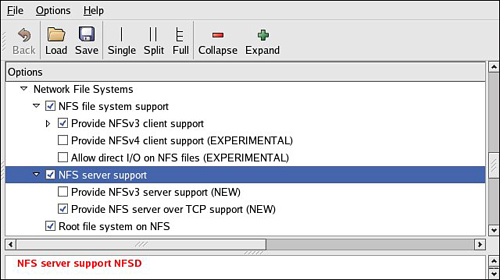
You must do this each time you start your desktop Linux workstation. (This and other services can be started automatically on booting. Consult the documentation for your desktop Linux distribution.) In addition to enabling the service, your kernel must be compiled with support for NFS. Although DHCP and TFTP are both user space utilities, NFS requires kernel support. This is true on both your development workstation and your target board. Figure 12-2 shows the configuration options for NFS in the kernel. Notice that there are configuration options for both NFS server and client support. Note also the option “Root file system on NFS.” Your target kernel must have this option configured for NFS root mount operation.
Figure 12-2. NFS kernel configuration
The NFS server gets its instructions from an exports file located on your development workstation. It is commonly found in /etc/exports. Listing 12-7 is an example of a simple exports entry.
Listing 12-7. Simple NFS exports File

These entries allow a client to remotely mount any of the three directories shown. The attributes following the directory specification instruct the NFS server to allow connections from any IP address (*) and to mount the respective directories with the given attributes (read/write with no_root_squash). The latter attribute enables a client with root privileges to exercise those privileges on the given directory. It is usually required when working with embedded systems because they often have only root accounts.
The no_all_squash attribute ensures that the uid and gid of an incoming NFS request are honored, instead of being mapped to a default anonymous account. The no_subtree_check attribute disables subtree checking on your server. This can improve performance and reliability in some circumstances. Consult your NFS server documentation and the man page describing the exports file for more details.
You can test your NFS configuration right from your workstation. Assuming that you have NFS services enabled (which requires that both the NFS server and client components are enabled), you can mount a local NFS export as you would mount any other file system:
# mount -t nfs localhost:/home/chris/workspace /mnt/remote
If this command succeeds and the files in .../workspace are available on /mnt/remote, your NFS server configuration is working.
12.3.4 Target NFS Root Mount
Mounting your target through NFS root mount is not difficult, and, as mentioned elsewhere, it is a very useful development configuration. However, a set of details must be correct before it will work. The steps required are as follows:
- Configure your NFS server, and export a proper target file system for your architecture.
- Configure your target kernel with NFS client services and root file system on NFS.
- Enable kernel-level autoconfiguration of your target’s Ethernet interface.
- Provide your target Ethernet IP configuration using the kernel command line or static kernel configuration option.
- Provide a kernel command line enabled for NFS.
We presented the kernel configuration in Figure 12-2 when we explained the NFS server configuration. You must make sure that your target kernel configuration has NFS client services enabled, and, in particular, you must enable the option for Root file system on NFS. Specifically, make sure that your kernel has CONFIG_NFS_FS=y and CONFIG_ROOT_NFS=y. Obviously, you cannot configure NFS as loadable modules if you intend to boot via NFS root mount.
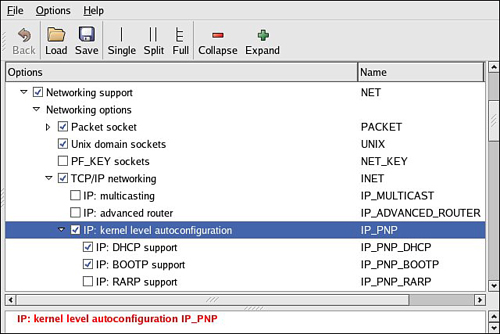
Kernel-level autoconfiguration is a TCP/IP configuration option found under the Networking tab in the kernel configuration utility. Enable CONFIG_IP_PNP on your target kernel. When this is selected, you are presented with several options for automatic configuration. Select either BOOTP or DHCP, as described earlier. Figure 12-3 illustrates the kernel configuration for kernel-level autoconfiguration.
Figure 12-3. Kernel-level autoconfiguration
When your server and target kernel are configured, you need to provide your target Ethernet configuration using one of the methods described earlier. If your bootloader supports a kernel command line, that is the easiest method. Here is what a kernel command line to support NFS root mount might look like:
![]()
12.3.5 U-Boot NFS Root Mount Example
U-Boot is a good example of a bootloader that supports a configurable kernel command line. Using U-Boot’s nonvolatile environment feature, we can store our kernel command line in a parameter specially named for this purpose. To enable the NFS command line in U-Boot, we do the following (all on one line in our serial terminal):
![]()
Then we load a kernel using our TFTP server. Listing 12-8 shows what this might look like on a Power Architecture embedded target.
Listing 12-8. Loading a Kernel Using the TFTP Server
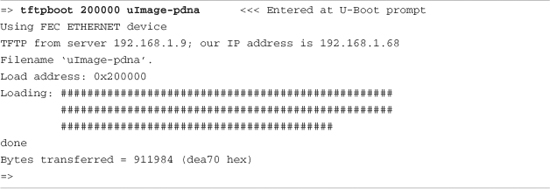
When we boot the kernel, we see specific evidence of our NFS root mount configuration. Listing 12-9 reproduces selected output from the kernel boot messages to demonstrate this. This output has been formatted (with many lines omitted and white space added) for readability.
Listing 12-9. Booting with NFS Root Mount

In Listing 12-9, first we see the kernel banner, followed by the kernel command line. We specified four items in this kernel command line:
• Console device (/dev/console)
• Root device (/dev/nfs)
• NFS root path (/home/chris/sandbox/pdna-target)
• IP kernel-level autoconfiguration method (dhcp)
Shortly thereafter, we see the kernel attempting kernel-level autoconfiguration via DHCP. This begins with the “Sending DHCP requests” console message. When the server responds and the DHCP exchange completes, the kernel displays the detected configuration in the following lines. You can see from this listing that the DHCP server has assigned the target the IP address 192.168.1.68. Compare the settings obtained via autoconfiguration with the DHCP server configuration in Listing 12-6. You can use a similar server configuration to assign the IP address and NFS root path to your target.
When the kernel has completed the IP autoconfiguration, it can mount the root file system using the supplied parameters. You can see this from the three lines ending with the VFS (virtual file subsystem) message announcing that it has mounted the NFS root file system. After the NFS root file system has been mounted, initialization completes as described in Chapter 5, “Kernel Initialization.”
It is also possible to pass target IP settings to the kernel in a static fashion instead of having the kernel obtain IP settings from a DHCP or BOOTP server. IP settings can be passed using the kernel command line directly. In this case, the kernel command line might look similar to this:

12.4 Summary
This chapter provided the background to build and configure a development workstation suitable for embedded development work. Several key servers were introduced, along with information on how to install and configure them. We concluded this chapter by looking at one of the most powerful tools available to the embedded developer: the NFS server.
• Many features of a development environment greatly facilitate efficiency for embedded cross-development. Most of these fall under the category of tools and utilities. We cover this aspect in detail in the next chapter, where we describe development tools.
• A properly configured development host is a critical asset for the embedded developer.
• Toolchains employed for cross-development must be properly configured to match your host system’s target Linux environment.
• Your development host must have target components installed that your toolchain and binary utilities can reference. These components include target header files, libraries, target binaries, and their associated configuration files. In short, you need to assemble or obtain an embedded Linux distribution.
• Configuring target servers such as TFTP, DHCP, and NFS will greatly increase your productivity as an embedded Linux developer. This chapter introduced configuration examples for each.
12.4.1 Suggestions for Additional Reading
GCC online documentation
http://gcc.gnu.org/onlinedocs/
Building and testing gcc/glibc cross toolchains
http://kegel.com/crosstool/
“The TFTP Protocol, Version 2”
RFC 1350
www.ietf.org/rfc/rfc1350.txt?number=1350
“Bootstrap Protocol (BOOTP)”
RFC 951
www.ietf.org/rfc/rfc0951.txt?number=951
“Dynamic Host Configuration Protocol”
RFC 2131
www.ietf.org/rfc/rfc2131.txt?number=2131