Chapter 16. Open Source Build Systems
Software build systems have been around for a long time. Historically, they have taken many forms, from simple script-driven or make-based systems to complex and often proprietary software programs designed to build a particular project. Several open source build systems have come and gone, while a few have survived the test of time.
This chapter presents some of the more popular build systems and takes a detailed look at one build system that has emerged as a leading contender for building embedded Linux systems: OpenEmbedded.
16.1 Why Use a Build System?
There are many sources of complete, embedded Linux distributions. Embedded Linux distributions can be found online, obtained through free download, or purchased from commercial embedded Linux suppliers. Often these embedded Linux distributions are fixed in their functionality and difficult to change. They often come with binary-only solutions, such as important toolchains and critical packages, without instructions for actually generating these elements from source.
A capable embedded Linux build system helps you create an embedded Linux distribution tailored to your unique requirements. This must include a cross toolchain and all the packages required for your project. Your build system should be able to generate root file systems in your choice of binary formats, your embedded Linux kernel image with your configuration, a bootloader image, and any other necessary files and utilities so that these can be properly deployed.
It is absolutely nontrivial to build an embedded Linux distribution—or, for that matter, any Linux distribution—from scratch. Just imagine trying to assemble all the components that make up your desktop Linux distribution. Don’t forget to include the toolchain, because for embedded applications, contrary to popular belief, obtaining commercial-quality toolchains for non-x86 architectures is quite difficult without dedicated knowledge of and experience in cross-toolchain development and testing for your chosen architecture.
Compiling the list of components you need can be your first challenge. Where will your toolchain come from? What about required system libraries and bootloaders? Where will you get these? What packages will you need to support the various hardware devices and software applications you are planning for your product? What are the dependencies for each of the packages you plan to use? Which file systems will you use, and how do you build them? How will you track package versions and their dependencies? How can you determine which versions of packages and tools are compatible with one another? How will you manage updates and upgrades to your embedded Linux distribution and resulting embedded product? How are patches integrated after the fact?
These and other questions face the embedded systems developer as the project plans take shape. A well-designed and easily supported embedded Linux build system is a perfect tool to help answer these questions and lead to a rapid project deployment that is readily maintainable.
The next few sections introduce several of the more popular build systems. We will spend considerable time describing one of the most promising and popular embedded Linux build systems—OpenEmbedded.
16.2 Scratchbox
Scratchbox is a cross-compilation toolkit that became popular during its use in the Maemo project targeting the Nokia N770 handheld computer. The Maemo project has since been merged with Moblin to become MeeGo (www.meego.com).
According to the Scratchbox website, ARM and X86 targets are supported, with experimental support for PowerPC and MIPS. The latest installation manual claims support for PowerPC targets.
16.2.1 Installing Scratchbox
Installation is straightforward following the instructions on the Scratchbox website. For Debian-based systems such as Ubuntu, add this line to the /etc/apt/sources.list file:
deb http://scratchbox.org/debian stable main
Then perform an update, install the required packages, and add your username1 to Scratchbox. This sequence is shown in Listing 16-1.
Listing 16-1. Scratchbox Installation

Note that this sequence of instructions requires root access. This is not a huge problem so long as you have root access to your build machine. Many developers at larger enterprises do not, according to IT policy. You should consider whether this is an issue for your application.
Also note that after you use sb-adduser to add your username to the Scratchbox infrastructure, you must log out and then log in again with a new shell to pick up the changes in group membership. This is described fully in the Scratchbox documentation.
16.2.2 Creating a Cross-Compilation Target
After you have installed Scratchbox, you must follow several steps before a build can begin. First, you must install a toolchain and qemu (a popular processor emulator) for target emulation. Then you must log into Scratchbox and perform an initial setup using a Scratchbox menu-driven utility. Scratchbox toolchain installation is not difficult if you are using a Debian-based distribution such as Ubuntu. Several toolchains are available from Scratchbox. Check its website, under the Download tab, for current versions. For this example, we chose an ARM compiler:
![]()
Next, log in as a Scratchbox user and create a target for cross-compilation. Use the Scratchbox login program to log in:
$ /scratchbox/login
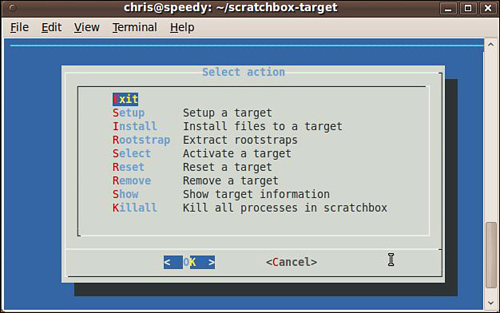
After you are logged in as a Scratchbox user, invoke the configuration utility. You do this using a menu-based utility called sb-menu. Invoke the configuration menu as follows:
$ [sbox-NO-TARGET: ~] > sb-menu
Figure 16-1 shows the main configuration screen that results from this command.
Figure 16-1. Scratchbox menuconfig
Using the installation documentation found on the Scratchbox website (installdoc.pdf) as your guide (www.scratchbox.org/documentation/docbook/installdoc.html), set up your Scratchbox environment by following these steps:
- Create a new target under Setup called
mytarget. - Select a cross-compiler when prompted after target selection.
- Select devkits, and then select qemu.
- Select CPU transparency, and then select qemu-arm-sb.
With these steps completed, exit the sb-menu utility. Now you are ready to explore the Scratchbox environment.
For our brief demo, we will use a simple Hello World program. Using your favorite editor from within the Scratchbox shell, create a simple Hello World program similar to Listing 16-2.
Listing 16-2. Simple Hello World Example
Now compile the program within the Scratchbox environment:
[sbox-mytarget: ~] > gcc -o hello-arm hello.c
This uses the Scratchbox ARM toolchain you just installed to compile the hello.c file. This command invokes the ARM toolchain through a Scratchbox wrapper. You can see the toolchain wrappers in /scratchbox/compilers/bin. The wrapper determines which compiler to call based on the target specifications you just created. Then you can verify that the resulting file is an ARM binary, and you can run it in the Scratchbox shell using the qemu emulation technology provided by the Scratchbox environment:

While this is a trivial example, it illustrates the Scratchbox environment and methodology. The Scratchbox model is to provide the developer with a development environment that looks like the target. The advantage of this approach is that many open source packages that are difficult to cross-compile are made easier by the use of target emulation.
Of course, the actual use cases for Scratchbox are much more complex than this example, but the architecture and approach are apparent. In actual practice, you would have numerous packages and other software programs that are compiled under the Scratchbox environment, perhaps by a series of makefiles or a custom build script that you generate particular to your requirements.
Scratchbox includes a remote shell feature that allows the developer to perform certain actions (both interactive and noninteractive) directly on real target hardware. It works similar to the familiar remote shell (rsh). It is called sbrsh and is available as part of the Scratchbox installation. More details about sbrsh can be found in the Scratchbox documentation.
Scratchbox has good documentation. If you want to learn more about Scratchbox, install it on your system and follow the documentation found on its website (www.scratchbox.org).
16.3 Buildroot
Buildroot is a set of makefiles and patches in a system designed to build a complete embedded Linux distribution. According to the Buildroot website, its major features include the following:
• It can build all the required components for your embedded Linux product, including cross-compiler, root file system, kernel image, and bootloader.
• It allows for simple configuration using the familiar Linux kernel menuconfig and related utilities.
• It supports several hundred packages for user space applications and libraries, including GTK2, Qt, GStreamer, and many network utilities.
• It supports uClibc or glibc, among other target libraries.
• It has a simple structure based on the makefile language that is well understood.
16.3.1 Buildroot Installation
The first thing you need to do is locate and download a Buildroot snapshot. The easiest way to do this is using git. Of course, using git without specifying a tag means that you are getting the latest top of tree, which, in any open source project, has its risks of instability. For the less bold, stable snapshots are available for download. They are listed on the downloads page at the Buildroot website at http://buildroot.uclibc.org/downloads/buildroot.html. For these examples, we will use git:
$ git clone git://git.buildroot.net/buildroot
16.3.2 Buildroot Configuration
After the snapshot (or git repository) is installed, you can begin the configuration. Enter the directory where you installed Buildroot, and issue the familiar configuration command:
$ make menuconfig
This brings up a configuration utility that by now should be very familiar. You saw a similar configuration menu with Linux kernel configuration, as well as with Scratchbox. Figure 16-2 shows what this looks like.
Figure 16-2. Buildroot configuration
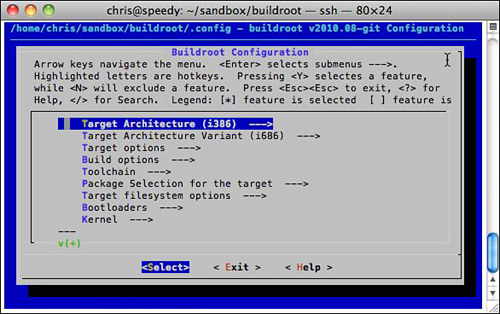
Buildroot’s configuration is extensive. You have many options to choose from to configure the properties of your embedded Linux distribution that Buildroot creates. Here are some of the more important attributes you must select:
• Target architecture
• Architecture variant, such as PowerPC 603e or ARM 920t
• Target options, such as board devices and serial ports
• Build options, which define build-related options such as the location of build and download directories, parallelism (the number of simultaneous jobs), and other build attributes
• Toolchain options, including library type (uClibc or glibc) and compiler version.
• Package selection, such as what software packages will be on your target
16.3.3 Buildroot Build
After you have performed a simple configuration, you kick off the build simply by typing make. If your configuration is good and you are lucky,2 you will end up with a complete embedded Linux distribution. The build is likely to take some time, because it is downloading and building many software components and performing a number of steps to achieve that goal. A lot of output will stream up your serial terminal while the build is under way. Buildroot is performing the following general steps:
• Download source files for all the configured packages and toolchains
• Build the cross-compilation toolchain
• Using the cross-toolchain, configuring and compiling all the requested packages
• Building a kernel image if configured to do so
• Creating a root file system in the format of your choosing
When the build has finished, the results can be seen in the .../output directory. This is shown in Listing 16-3.
Listing 16-3. Buildroot Output Directory Structure

The proper root file system is found in .../output/images. Because we specified the ext2 file system when we configured the build, we find a rootfs.ext2 image in the images subdirectory:

Buildroot is quite flexible and has many configuration options. Buildroot can build U-Boot for a specific board, simply by specifying the board name from the U-Boot makefile (without the _config suffix) during Buildroot configuration. For this example, ap920t was specified, and a U-Boot image (u-boot.bin) was also generated. The Buildroot documentation has more details on this.
The other directories in Buildroot’s output subdirectories, as shown in Listing 16-3, include directories to hold intermediate build targets. The staging subdirectory is used to hold the build targets of packages that are themselves dependencies of other packages. The toolchain directory contains components necessary for cross-toolchain compilation. The host directory contains host-specific tools that were built to support Buildroot’s operation. These include programs such as fakeroot (used to build the root file system without root privileges) and programs for image generation. The target directory is a near-replica of the root file system image, but it cannot be used directly as the root file system. The user, group, permissions, and device nodes are incorrect. Fakeroot uses this target directory to build the final image. Finally, the build directory is where all the components (except for the cross-toolchain) are built.
Buildroot is a powerful build system that can build a complete embedded Linux distribution. Consult the Buildroot documentation at http://buildroot.uclibc.org/docs.html for full details.
16.4 OpenEmbedded
There is much debate about evolution, but when it comes to OpenEmbedded, it becomes quickly obvious that OpenEmbedded evolved from several technologies that came before it. OpenEmbedded shares some of its conceptual origins with the Portage build system from Gentoo, but it also builds on some concepts from other build systems, including Buildroot.
The OpenEmbedded home page (www.openembedded.org) claims that OpenEmbedded “...offers a best-in-class cross-compile environment.” Given the limitations of other open source build systems, and the flexibility of OpenEmbedded, this might just be accurate. The website also lists the following as OpenEmbedded advantages:
• It supports many hardware architectures.
• It supports multiple releases for those architectures.
• It contains tools for speeding up the process of re-creating the base after changes have been made.
• It’s easy to customize.
• It runs on any Linux distribution.
• It cross-compiles thousands of packages, including GTK+, Qt, X Windows, Mono, and Java.
OpenEmbedded has gained significant traction in both commercial and open source projects. Many commercial development organizations have adopted OpenEmbedded as their preferred build system. Indeed, some commercial suppliers of Embedded Linux, including Mentor Graphics and MontaVista Software, have adopted OpenEmbedded as the basis for their commercial embedded Linux offerings.
16.4.1 OpenEmbedded Composition
OpenEmbedded is composed of two primary elements, as shown in Figure 16-3. BitBake is the build engine, which is a powerful and flexible build tool. Metadata is the set of instructions that tell BitBake what to build.
Figure 16-3. BitBake and metadata
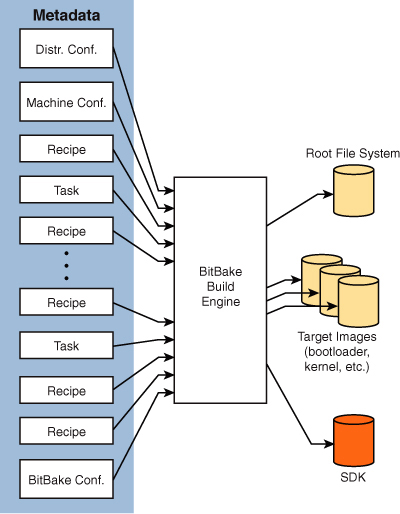
BitBake processes the metadata, which provides instructions that describe what to build. At the end of the build process, BitBake produces all the requested images, including the root file system, kernel, bootloader, and intermediate images such as device tree binary (in the case of Power Architecture). One of the more powerful features of OpenEmbedded is its ability to create software development kits (SDKs). These SDKs can contain toolchains, libraries, and header files for application developers to use in a self-contained development environment.
16.4.2 BitBake Metadata
Metadata can be roughly grouped into four categories, each of which fulfills a specific role:
• Recipes
• Classes
• Tasks
• Configuration
The most common type of metadata is a recipe file. Recipes usually contain the instructions for BitBake to build a single package. Recipes describe the package, its dependencies, and any other special action that might be required to build a package.
Classes perform a role similar to that of classes in an object-oriented programming language such as C++ or Java. They are used to encapsulate common functionality used across a large number of recipes.
Tasks are usually used to group packages for use in building a root file system. They are usually simple files, often containing little more than a few lines of package dependencies.
Configuration metadata plays an important role in defining the overall behavior of BitBake. Configuration data provides global build variables such as build paths, default image construction commands, and specifics of a particular machine. It also defines characteristics of the distribution under construction, such as which toolchain and C library (uClibc, glibc, and so on) to use.
16.4.3 Recipe Basics
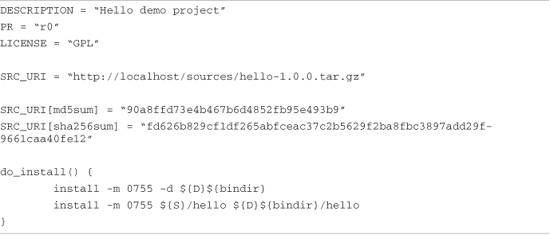
The most common unit of OpenEmbedded metadata is the recipe. A recipe is usually a single file or small collection of files that build a single package. Examining a simple recipe is a good way to begin understanding the OpenEmbedded metadata language. Listing 16-4 is the OpenEmbedded version of Hello World. This recipe builds a simple Hello World application and prepares it for inclusion in the final root file system. It is called hello_1.0.0.bb on the file system.
Listing 16-4. Simple OpenEmbedded Recipe: hello_1.0.0.bb
The first few fields are little more than administrative:
• DESCRIPTION—Descriptive information about the package itself
• PR—Package (recipe) version number
• LICENSE—The package license
SRC_URI must be present in every recipe. It defines the method (http in this example) and location (localhost/sources/hello-1.1.0.tar.gz) that BitBake will use to locate and obtain the files that make up the package. Source code can be fetched 3 in many forms using a variety of methods. For example, source can be fetched from a git, svn, or cvs repository, either local or remote. Source can be fetched from a file or tarball either locally or on an Internet server.
SRC_URI[md5sum] is one method of specifying a checksum that can be used to validate proper fetching of a source archive. If a remote md5 or sha256 signature file is available, it is tested against these values to ensure correct download.
The do_install method is a function override of BitBake’s default install method. In this sample recipe, the do_install method defines two steps using the Linux install command: It creates an output directory in which to place the build artifact (our hello binary), and it places that binary in the directory just created. The directories are specified using a syntax commonly found in autotools configuration scripts and build files. {bindir} refers to /bin on the target. The S and D are OpenEmbedded metadata convenience variables that refer to the source and destination directories, respectively. You can read more about the install command on your favorite Linux desktop on its man page, man install.
Recipes in OpenEmbedded can contain directives in either Python language or bash shell script language. Our example in Listing 16-4 contains only bash shell script language. Discussion of Python is beyond the scope of this section.
You may be wondering how this simple recipe can result in building the Hello World application. We saw an install step defined in the recipe, but there was little else in the way of build instructions. BitBake processes each recipe using a default set of steps, defined in OpenEmbedded classes. BitBake classes are files ending in .bbclass. Most of the default processing steps come from a special base class called base.bbclass. It is here that the default commands to fetch, unpack, configure, compile, and install are defined.
Listing 16-5 shows the BitBake output while building the hello package. BitBake can accept any recipe or task4 as a target for building.
Listing 16-5. BitBake Hello Recipe Processing

Note that this listing has been reformatted for easier reading. Each line has been truncated to remove the full path to the hello_1.0.0.bb recipe file, and several lines not relevant to the discussion have been removed.
From Listing 16-5, we can see the individual steps that BitBake uses to build the package defined by the hello_1.0.0.bb recipe. The first step (fetch) downloads the hello tarball from the server. Unpack untars the tarball into a working directory defined by the configuration metadata. We saw in Listing 16-4 that this working directory can be referenced by a metadata variable called S. The do_patch step applies any required patches that are present in the metadata.
Configure follows patch. In this simple recipe, it is a null method. It does nothing, because there is nothing to configure. The next task is the compile step. Here is where a generic make command is issued in the hello source working directory, expecting a package makefile to do the work of building the package. Following this is the install step. Notice from Listing 16-5 that we have overridden the default install stage with our own definition for install. Our version of install takes precedence. It installs the hello binary as described in the discussion of Listing 16-4.
The next few steps related to packaging result in building a binary package containing the files we populated with our install method. A detailed discussion of packaging is beyond the scope of this section, but realize that every recipe creates a binary package, of the form specified by the metadata. Usually this is the .ipk package format—a compact, lightweight packaging technology designed especially for embedded Linux applications. The resulting package is placed in a special output directory that BitBake created for the purpose.
The populate and staging steps move any required files to a special staging location so that if other subsequent packages depend on artifacts from this build, they will be available. Also, the root file system is ultimately compiled from the contents of special recipe-specific directories where the build artifacts are collected. This is the work of the do_build method.
After BitBake has completed processing this recipe successfully, the package is built. Then the build artifacts (usually a binary or library or a set of these) are placed in a special recipe-specific directory so that other programs can refer to them during the build. Subsequent image-building recipes can gather the build artifacts from these recipe-specific directories for inclusion in a final root file system.
The next few sections discuss the other major categories of metadata—tasks, classes, and configuration.
16.4.4 Metadata Tasks
A task is a recipe that is used to group packages together, usually for the purpose of building root file systems. Tasks do not produce output packages with artifacts in them, because they would be empty. They may or may not have “task” in their name.
Note that the term task in OpenEmbedded terminology is overloaded. We speak of BitBake tasks, which are the steps that BitBake performs, such as do_compile, or we refer to tasks as these special recipes. Beware of the terminology!
Listing 16-6 shows a simple task from a recent snapshot of OpenEmbedded. This task specifies the required packages for generic Java support. When the root file system is finally assembled, it will contain the packages specified in task-java.bb.
Listing 16-6. task-java.bb
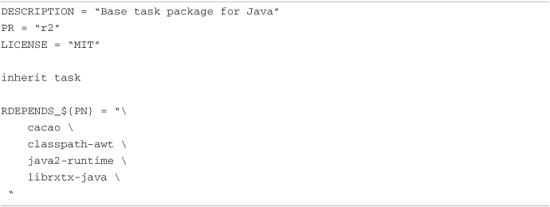
Some tasks can be complex, but this task is relatively simple and illustrates the basic idea behind a task. The obligatory header fields are present, including DESCRIPTION, PR, and LICENSE. The inherit keyword illustrates the use of the next metadata type we will discuss—classes and their role in inheritance. You can think of this directive as similar to #include in C. It specifies that the variables and methods defined in task.bbclass should be incorporated into this recipe as it is processed by BitBake.
The RDEPENDS_${PN} variable in Listing 16-6 is the syntax used to define runtime dependencies. PN evaluates to the package name, basically just the basename of the recipe filename—in this example, task-java. When this task-java.bb recipe is included in an image build, the runtime dependencies listed under its RDEPENDS cause these packages to be built and included in the final image. If you have followed along with these examples and downloaded an OpenEmbedded snapshot, you can see this task in action in the image recipe x11-gpe-java-image.bb.
16.4.5 Metadata Classes
A class in OpenEmbedded is similar to classes in object-oriented languages such as C++ and Java. It is used to encapsulate common functionality that can be shared by many other recipes. Classes are used in OpenEmbedded for many common functions.
We saw an example of the use of a class in the task-java.bb recipe in Listing 16-6. This task class can be found in a file called task.bbclass in a subdirectory of the openembedded repository called classes. It performs some housekeeping for functions required by all tasks. Among them are directives to tell BitBake that this recipe does not itself produce any build artifacts that require packaging or incorporation into the final root file system. It also includes logic that produces -dbg and -dev versions of the packages that are incorporated by the task itself.
One of the more commonly used classes is autotools.bbclass. This class provides the familiar autotools functionality around which many common Linux packages are built. You are probably familiar with autotools-based packages. If you have ever downloaded source code and unpacked and compiled it on a Linux desktop using the familiar sequence of ./configure, make, and make install, you have built an autotools-based project.
The autotools.bbclass class provides this functionality. If you have a source package that uses autotools, the recipe can be quite simple, even if the package itself is not.
Listing 16-7 displays a simple autotools-based recipe. It has been slightly reformatted for readability with no loss of functionality.
Listing 16-7. Simple Autotools-Based Recipe: rdesktop_1.5.0.bb

It hardly gets any simpler than this. This recipe provides build instructions for rdesktop, an rdp client for X. The standard header is present, including DESCRIPTION, LICENSE, PR, and so on. Next comes the autotools functionality from autotools.bbclass, incorporated via the inherit keyword. The SRC_URI tells BitBake where and how to obtain the source code.
The last item illustrates one of the key features of autotools-based projects. If you’ve ever passed commands to ./configure while building an autotools-based project, you will find this familiar. The EXTRA_OECONF variable is simply passed to rdesktop’s ./configure when the configure step is executed. This particular example passes the --with-openssl flag to the rdesktop ./configure script. This causes rdesktop to be configured with openssl functionality and tells it where to find the openssl support files needed to compile with this feature enabled.
Classes are used in OpenEmbedded for a wide variety of purposes. You can see all the current classes defined in the .../openembedded/classes directory.
16.4.6 Configuring OpenEmbedded
One of the most difficult aspects of using OpenEmbedded is to get a working configuration. Many things need to be defined in order to build an embedded Linux distribution. Here are some of the more obvious attributes that must be defined:
• Target architecture
• Processor type
• Machine features such as serial port and baud rate and Flash organization
• Choice of C library, such as glibc or one of the several embedded-optimized alternatives
• Toolchain and binutils version and source (external or built by BitBake)
• Root file system image type
• Kernel version
Of course, there is much more to the configuration than what is listed here. Configuration metadata can be generalized in four broad categories: BitBake, machine, distribution, and local. BitBake configuration (bitbake.conf) is in many ways like BitBake’s plumbing. It defines system-wide variables such as system paths, target file system layout, and many architecture-dependent build variables. Unless you are doing something peculiar, you should not have to edit this file.
Machine configuration is placed in a configuration file named for the machine it describes. Recent OpenEmbedded snapshots contain configuration files describing more than 250 machines.5 This is the proper place to define machine-specific features such as serial port configuration and any specific requirements for image format, kernel version, and bootloader version. Target architecture is usually specified in the machine file.
Distribution configuration defines aspects of the entire embedded Linux distribution that you are building. Current versions of OpenEmbedded have distribution configuration files for over 35 different named distributions. Angstrom and OpenMoko are two examples that have received a lot of attention from OpenEmbedded developers.
Attributes of the distribution that are defined in a distribution configuration file include toolchain type, C library type, and distribution version. You will often place a minimum specification for your base root file system within this configuration file. See the many examples in the OpenEmbedded metadata for more details.
The last category of configuration is local.conf. This is where you tune and customize a distribution to your liking. Your local.conf can be simple or complex, depending on your needs. At a minimum, your local.conf must define your machine type and distribution choice, which ties together the machine and distribution configurations for your custom embedded Linux distribution. OpenEmbedded metadata contains a sample local.conf with many comments that makes a good starting point. There are also specific examples of local.conf online. OpenEmbedded instructions can be found for the BeagleBoard on the BeagleBoard wiki at http://elinux.org/BeagleBoard#OpenEmbedded.
16.4.7 Building Images
The most powerful recipes in OpenEmbedded are image recipes. You can build an entire embedded Linux distribution using a properly constructed image recipe. The OpenEmbedded collection of metadata contains nearly one hundred image recipes. You can either use them as is or modify them to suit your particular requirements.
Some of the more common image recipes include console-image and x11-image. The former builds a basic bootable image that boots to a command prompt. The latter produces an image designed to drive a graphics display, including the required graphics libraries for X11 support.
It is easy to build these images using BitBake:
$ bitbake console-image
This simple command builds a root file system that contains a collection of packages sufficient to boot your embedded device to a command prompt. There is nothing to prevent you from adding other outputs to your image recipe. For example, you could construct a recipe that will produce your root file system, kernel image, bootloader image, and any other files required for your target board.
We could devote an entire book to the subject of OpenEmbedded. Hopefully this short introduction will help you get started with this powerful build system. There is no substitute for diving in and getting your hands dirty with the technology.
16.5 Summary
Several open source build systems are available. We have provided introductory coverage of three of the most popular. OpenEmbedded is the latest build system to gain wide adoption and significant numbers of developers working on the project. Any one of these build systems can help you with the significant challenge of building a custom embedded Linux system for your product:
• Scratchbox is an environment that emulates the target architecture to ease the process of cross-compilation.
• Buildroot has enjoyed popularity in a number of projects and has a good following of developers and users in its development community.
• OpenEmbedded builds on the state of the art and represents the latest technology in embedded Linux build systems.
16.5.1 Suggestions for Additional Reading
Scratchbox website and documentation
Buildroot home page
OpenEmbedded home page