
Chapter 19. udev
In This Chapter
![]() 19.3 Default udev Behavior 525
19.3 Default udev Behavior 525
![]() 19.4 Understanding udev Rules 527
19.4 Understanding udev Rules 527
![]() 19.5 Loading Platform Device Drivers 538
19.5 Loading Platform Device Drivers 538
![]() 19.6 Customizing udev Behavior 540
19.6 Customizing udev Behavior 540
![]() 19.7 Persistent Device Naming 541
19.7 Persistent Device Naming 541
Like many Linux kernel subsystems, udev has evolved over time based on a variety of input from users, developers, and distribution maintainers, as well as historical experience from earlier attempts to solve a similar problem. udev replaces devfs, which was an attempt to solve the problem of the runaway /dev directory and to address the requirement to create the /dev directory dynamically based on discovery of the hardware present in a system.
As with many topics in this book, a thorough treatment of udev would take a small book of its own. This chapter takes a quick look at udev, what it can do for you, and how it works.
19.1 What Is udev?
As a brief review, /dev is the Linux system directory that contains special file system entries called device nodes. Device nodes were introduced in Chapter 8, “Device Driver Basics,” Section 8.3.3, “Device Nodes and mknod.” These special files can be thought of as “pointers” to actual device drivers that control and give applications access to the device. A device node creates an association between a human-readable name and a kernel device major and minor number pair. A device node also contains an attribute marker that specifies the type of device it references, such as block or character devices.
In the not-so-distant past, Linux systems came with thousands of device nodes, statically created, usually by a script such as MAKEDEV. Chances are, if you have Linux running on your home or work machine, you still can find the MAKEDEV script on your system.
Without some automated method of determining what devices are present on a system, Linux distribution maintainers simply used MAKEDEV to populate /dev with virtually every possible device that could be encountered. It is not difficult to understand that this brute-force approach was not ideal.
udev is the latest and greatest subsystem designed to populate the /dev directory dynamically, based on information provided by the kernel as devices are discovered. It has evolved into a very flexible and powerful way to invoke policy upon the detection of a piece of hardware in the system. Notice that I did not say “load a device driver” or “create a device node” upon the detection of a piece of hardware. Indeed, udev often performs these actions by default, but you can customize the actions that take place when a particular device is discovered. udev’s default behavior is to create a device node with the name of the device as supplied by the kernel.
There are many ways a device can suddenly appear in your Linux system long after it has been booted. Some obvious examples are plugging a USB device into a USB port or enabling the wireless interface using a switch found on many laptops. Hot-plugging a hard drive into a fault-tolerant chassis might be another.
19.2 Device Discovery
When the kernel discovers a new device, it creates a uevent that is delivered to a listener on a netlink socket1 in user space. That listener is udev. Listing 19-1 shows a typical uevent as delivered by the kernel. It was captured using the udevadm utility as follows and then plugging a USB four-port hub into the USB host port on a BeagleBoard:
# udevadm monitor --environment
(Note that earlier versions of udev use separate commands, such udevmonitor or udevtrigger. Newer versions have rolled all these tools into one admin program, udevadm, as shown here. Check which version you are running if this command isn’t recognized.)
Listing 19-1. Typical uevent: USB Device

Listing 19-1 shows the first kernel uevent that is emitted upon detection of a USB four-port hub when plugged into the USB port on a BeagleBoard. The first line signifies that this uevent is an “add” operation, meaning that the kernel detected the USB device. Its kernel name is
/devices/platform/musb_hdrc/usb1/1-1
When the kernel detects a new device, one of the default actions it takes is to create an entry in the sysfs file system, nearly always mounted on /sys. The DEVPATH attribute represents its location within the /sys directory hierarchy and is referenced in many places in udev rules and utilities. Other attributes indicate device type, device, product (vendor and/or device ID), and some information on where the device physically exists hierarchically on the USB bus. The DEVICE attribute is the kernel’s idea of a device node for this device. This device was detected on USB bus number 001 and has been assigned device number 002 by the kernel.
In Listing 19-1, the product vendor code is 5e3, and the device is 608. Referring to the list maintained at www.linux-usb.org/usb.ids, vendor 05e3 is Genesys Logic, Inc., and product ID 0608 is a USB 2.0 four-port hub.
A uevent sequence number is incremented for every uevent emitted. Finally, the major and minor numbers for a device driver are included in the uevent. The major number of 189 has been assigned in this case, with a minor number of 1.
When udev receives the uevent, it scans its rules database (described in Section 19.4). udev looks for matches with the attributes of the device that prescribe the actions to take based on those attributes. In the absence of any matching rule, udev’s default behavior is simply to create the device node with the name supplied by the kernel, having the major and minor numbers specified in the kernel uevent. In this case, the behavior would be to create the following device node, as displayed by ls -l:
crw-rw---- 1 root root 189, 0 Jun 4 16:37 usbdev1.1
Rules exist in udev to allow the system designer or distribution maintainer to apply custom actions suitable for specific applications. Most often, the default rules specify the creation of an appropriate device node in /dev. They typically also include the creation of a symlink pointing to this newly created device node, which may be a well-known shorthand name that applications use to access the device. We will look at udev rules in detail in a moment.
19.3 Default udev Behavior
You might be surprised to know that the uevent detailed in Listing 19-1 is the first of many kernel uevents to be delivered. Listing 19-2 details every uevent generated by the kernel upon insertion of this four-port hub. This listing was generated with the following udev command:
# udevadm monitor --kernel
Listing 19-2. Kernel uevents on a Four-Port Hub Insertion

Note that the timestamp has been removed and replaced with ts to help this listing fit on the page and make it easier to read. Every uevent has a timestamp like the one shown in Listing 19-1. You can see that five events were generated by the insertion of the four-port USB hub. These represent the various components of the USB device hierarchy. USB and its architecture was described in Chapter 18, “Universal Serial Bus.”
Listing 19-3 shows the device nodes that udev has created up to this point. These device nodes are created in /dev. These device nodes represent udev’s default behavior. For this introductory exercise, no rules have been supplied to udev to customize its behavior.
Listing 19-3. Initial USB Devices Created by udev

Figure 19-1 shows the hardware configuration that produced the devices shown in Listing 19-3.
Figure 19-1. USB four-port hub setup
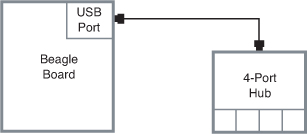
The first line in Listing 19-3 represents the host controller on the BeagleBoard. As we learned in Chapter 18, we can see what it is by looking at its attributes in /sys. It is the high-speed dual-rate USB controller (generically referred to as the USB host controller) that is part of the Texas Instruments OMAP3530 chip on the BeagleBoard. This is how we examine the device attributes using /sys:
# cd /sys/devices/platform/musb_hdrc/usb1
# cat idVendor idProduct product
1d6b
0002
MUSB HDRC host driver
The next three lines in Listing 19-3 represent the internal one-port hub that is always architecturally associated with the USB host controller. This is the root hub, as discussed in Chapter 18. You can think of the physical connector as that one-port hub. As discussed in Chapter 18, the USB device consists of logical entities called interfaces and endpoints. The device named usbdev1.1 represents the USB interface, and the devices named usbdev1.1_ep00 and usbdev1.1_ep81 represent the logical endpoints in the hub—the actual logical entities that communicate across the USB bus.
After we plugged the four-port hub into the BeagleBoard’s USB port, the last three device nodes in Listing 19-3 were generated by udev using its default behavior. Notice the numbering of the device nodes, with the .2 representing the second hub in a connected hierarchy of USB hubs.
You might wonder if different names might better represent devices of this type. If the device were meant directly for use by application programs, such as a USB mouse, a name such as usbdev1.3_ep002 wouldn’t be very user-friendly. This is where udev’s rules come in.
19.4 Understanding udev Rules
The real power of udev comes from its rules engine. System designers and distribution maintainers use udev rules to organize the /dev hierarchy and assign user-friendly names to the device nodes it creates. More often than not, the default device name is created, and a symlink with a user-friendly name is created alongside it, associating the kernel name with a user-friendly name.
udev’s rules engine can also be used to load device drivers (modules). In fact, using udev rules, you can perform just about any action you can imagine upon detection of insertion or removal of a device. However, the most common use of udev rules is device renaming—creating symbolic links with human-readable names—and device driver loading.
Let’s look at a typical set of rules that udev uses to decide what action(s) to take after receiving a uevent from the kernel. In recent versions of udev, the default location for udev rules is /lib/udev/rules.d. We will use this as the default location throughout the rest of this discussion. Many distributions place udev rules in /etc/udev/rules.d. Rules files typically are customized by distribution maintainers. They often are grouped according to functionality to make them easier to maintain. If you are sitting near a Linux machine while reading this, you might take a moment to browse its rules files.
Although the default directory in which udev looks for rules is /lib/udev/rules.d, udev also looks in /etc/udev/rules.d. Any rules files found there override rules files with the same name in /lib/udev/rules.d, allowing you to override the default rules.
In modern Linux distributions, the rules files taken together form the road map for actions to be taken upon device discovery or removal. My laptop distribution has 31 rules files with almost 1,400 lines and almost 700 individual rules! If you scan through these rules files, you begin to appreciate the flexibility and power of udev.
When udev is first started, it reads all the rules found in /lib/udev/rules.d/ and builds an internal rules table. When a device is discovered, udev matches the actions and attributes passed by the kernel in the uevent against the global table of rules it maintains. When a match is found, the action(s) determined by that rule (or set of rules) are carried out. Let’s look at an example.
Continuing with the previous BeagleBoard example, let’s see what happens when we plug an ordinary mouse into the USB port. With no rules, udev creates the obligatory device nodes using the raw name supplied by the kernel in the uevent:
root@beagle:~# ls -l /dev/usbdev1.2*
crw-rw---- 1 root root 189, 1 Jan 1 00:21 /dev/usbdev1.2
crw-rw---- 1 root root 253, 3 Jan 1 00:21 /dev/usbdev1.2_ep00
crw-rw---- 1 root root 253, 2 Jan 1 00:21 /dev/usbdev1.2_ep81
These devices represent the basic USB infrastructure. No other devices were created. If you are at all familiar with input devices in Linux, you might expect to find a device called mouse-something. Many common applications expect to find a mouse with such a device name. Furthermore, no device drivers were loaded to handle the newly inserted mouse. In a properly configured desktop system, assuming a modern and properly functioning Linux distribution, you would find a device with a common name (such as mouse*), and you would expect the input device driver and mouse driver to have been loaded.3
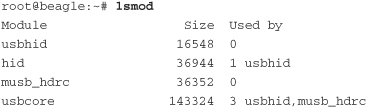
Recall from Chapter 8 that we can check which modules are loaded using the lsmod command:
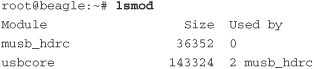
Remember, this is a bare-bones system with no udev rules. Only the host controller driver (musb_hdrc) and USB core subsystem (usbcore) are currently loaded, and they were loaded by hand for this example. We’ll see later how udev can load these platform drivers automatically. The interesting point here is that no device drivers were loaded to handle a mouse (input) device!
Now let’s add a couple of rules for udev to process, as detailed in Listing 19-4.
Listing 19-4. Simple udev Rules

These two rules are placed in a randomly named file ending in .rules located in /lib/udev/rules.d.4 The first rule contains the magic that loads the device driver. This rule matches if the kernel uevent attribute DRIVER is not set (indicating that the kernel does not know or supply a driver name). The rule instructs udev to RUN the modprobe program, passing it the contents of the MODALIAS environment variable. We will examine MODALIAS shortly, but for now, assume it is a “clue” that modprobe uses to load the appropriate device driver.
After the device driver is loaded, the mouse device is recognized beyond just a generic USB device. The driver recognizes the mouse functions and registers itself as a mouse driver. When the driver is loaded, another series of kernel uevents is generated, which causes further rules processing to begin. This is where the second rule comes in.
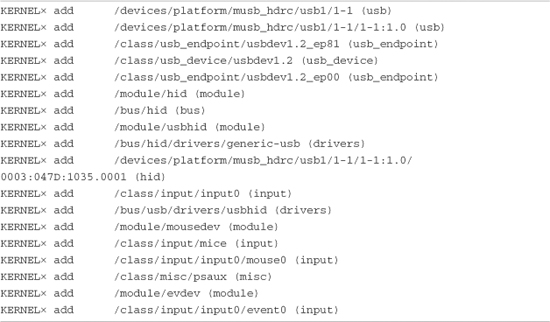
The second rule matches for any kernel uevent with the device named mouse* or mice or event*. When a match is found, this rule instructs udev to create a device node in a subdirectory called input. udev assumes that /dev is the root path of device nodes unless otherwise overridden—but this should almost never be done on a production system. The device node assumes the name of the kernel device, as specified here by the %k substitution operator. The device node is created with mode 0640, meaning read/write for user, read-only for group, and no access for other. Listing 19-5 shows the resulting device nodes after the drivers are loaded, and Listing 19-6 displays the modules that are loaded and active after this mouse insert event and udev rules processing. Notice that the usbhid, mousedev, and evdev modules have been loaded and are ready to be used by application devices. You can double-check on your system that the modules have been properly loaded by entering the following command:
# cat /dev/input/mouse0
If you move the mouse with this command active, you see control characters received on that device. Of course, they are not human-readable characters, and your terminal device might complain! The screen program on ttyUSB0 displays this data quite nicely on my Ubuntu 80.4 host.
Listing 19-5. /dev Entries for the Mouse Device

The device named event0 represents the first event stream, which is a high-level description of an input event. The device named mice represents a mixed input from all mouse devices—hence the plural form of mouse! The device named mouse0 is the low-level mouse device itself.
Listing 19-6. lsmod After udev Processing

You might be wondering how all the modules in Listing 19-6 were loaded by the two simple rules presented in Listing 19-4. These device drivers were located and loaded through the magic of a modalias.
19.4.1 Modalias
When a device is detected, such as the USB mouse we have been using here as an example, the kernel sends out a series of uevents reporting the addition of the device. Listing 19-7 details the kernel uevents emitted when the USB mouse is plugged into the USB port on a BeagleBoard. Listing 19-7 was produced using the following command:
# udevadm monitor --kernel
Listing 19-7. Kernel uevents on a USB Mouse Insert
Timestamps have been shortened to ts for readability. Each kernel event would contain a timestamp similar to the one shown in Listing 19-1. You may be surprised to see 18 events emitted upon insertion of a simple USB mouse. The first five events report the addition of the raw USB devices themselves and represent the architectural components of the USB implementation. These are the USB device, interface, and endpoints. Let’s look at the full text of the uevent emitted for USB interface 1-1:1.0.5 Listing 19-8 contains the full text of that kernel uevent as reported by udevadm:
# udevadm monitor --environment
Listing 19-8. Kernel uevent for USB Interface 1-1:1.0
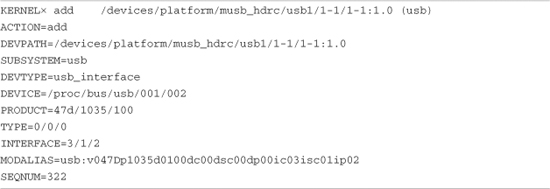
Notice the MODALIAS field. At first glance, it looks like gibberish. The string can be parsed into individual elements that are attributes that the USB device exposes to the device driver. Some of the fields are obvious:
v047D Vendor ID (047D stands for Kensington)
p1035 Product ID (1035 is the Kensington product ID for a wireless mouse)
Other fields are device-, class-, and subsystem-specific. They may include attributes such as device, device class, and subclass. These attributes provide low-level hardware details to the driver. It is beyond the scope of this discussion to get into these details. The important part of this discussion is to realize that the modprobe utility can load a module from this MODALIAS. Let’s see how this works.
From the command line of a BeagleBoard, the following command causes two device drivers to be loaded. This assumes that you have already loaded the platform USB driver (musb_hdrc) and usbcore and that udevd is not running:
# modprobe usb:v047Dp1035d0100dc00dsc00dp00ic03isc01ip02
Executing this modprobe command causes two new modules to be loaded—hid and usbhid. You can see this by executing the lsmod command again:
This modprobe invocation causes modprobe to attempt to load usbhid. Because hid is a dependency of usbhid, it is loaded first. When modprobe is invoked, it consults a file called modules.alias, which lives in /lib/modules/`uname -r`. This file is created by a utility called depmod, whose purpose is to create a database of module dependencies. If you look at the contents of modules.alias, you will find many lines that look very similar to the MODALIAS string of Listing 19-8. modprobe matches the alias passed on the command line with a line in the modules.alias file. If a match is found, the module in the alias file is loaded. Here is what the matching line in modules.alias contains:
alias usb:v*p*d*dc*dsc*dp*ic03isc*ip* usbhid
Looking at this line from modules.alias, it becomes clear what the ic field is. The USB interface class 0x03 defines human input devices (HIDs). This line basically says to accept any values (because of the wildcard, *) for all fields, and if the interface class (ic) field contains a 0x03, load usbhid. Voilà!
The modalias entries that are compiled in your modules.alias file come from the device drivers themselves. In the example here, you will find the following line in the kernel’s hid.mod.c source file:
MODULE_ALIAS("usb:v*p*d*dc*dsc*dp*ic03isc*ip*");
When the modules are compiled and placed on your system, the depmod utility gathers all these strings and builds the modules.alias file for reference by modprobe. Take a look at the modules.alias file on your Linux box, and then look at the drivers subdirectory of any recent Linux kernel, and you can match up the entries. This is how udev causes modules to be automatically loaded—via MODALIAS. In the sample rule shown in Listing 19-4, the second line containing the modprobe directive actually says the following: If the DEVICE environment variable is not set, and there is text in the MODALIAS environment variable as passed in the kernel uevent, pass the MODALIAS to modprobe to load the module. Any module dependencies, such as hid in our example, are also loaded. This is a very powerful feature of udev.
19.4.2 Typical udev Rules Configuration
As mentioned, the set of rules that governs udev behavior on your embedded Linux box is the responsibility of the system designer or embedded Linux distribution provider. In some cases, a package provider adds rules to support its specific functionality. Any recent mainstream Linux distribution provides a good example to follow. Listing 19-9 shows the list of default rules found in a recent snapshot of the Moblin distribution.
Listing 19-9. Default udev Rules from the Moblin Linux Distribution

Notice the grouping of rules files. In a fashion similar to system V initscripts, numbers are used to fix the read order. The rules files are processed in the same order as Listing 19-9. A few of these are worth peeking into.
The rules file 50-udev-default.rules is part of the udev package (from a current udev snapshot) and is provided by the udev team as an example. As it turns out, the Moblin version is very close to this default version found in the udev package. This rules file establishes a set of defaults for many common Linux devices, including character devices such as ttys, ptys, serial devices, memory devices such as /dev/null and /dev/zero, and many other devices commonly found on any Linux system.
Other rules files provide distribution-specific attributes and actions for specific classes of devices. In the Moblin rules file collection, these include ALSA rules for sound devices, CD-ROM rules definitions, and several sets of rules designed to provide persistent device names for several categories of devices. You can find much more detail in the udev documentation, which is referenced at the end of this chapter.
Another comment about udev rules is worth mentioning. Unless you use a specific syntax to cause other behavior, udev rules are cumulative. In other words, you may have several rules for a single device, spanning multiple rules files, each matching on different attributes. Each of the actions defined by those rules is applied to the device or subsystem in question. For instance, you can separate rules that give names to devices from rules that apply permissions. Recent Ubuntu distributions have an example of this idea in rules files named 20- names.rules and 40-basic-permissions.rules.
Looking at 20-names.rules and 40-basic-permissions.rules easily illustrates the “stacking” nature of udev rules. A single device can match multiple rules, and these rules taken together define the actions taken for a specified subsystem or device. For example, consider common sound devices such as controlC0, the sound card interface. A rule in 20-names.rules might look like this:
KERNEL=="controlC[0-9]*", NAME="snd/%k"
This rule simply matches the kernel devices called controlC0, controlC1, and so on and assigns the device name snd/%k. %k refers to the actual name that the kernel passes to udev—in this case, controlC. The snd/ prepended to the device name instructs udev to create that device node under a subdirectory in /dev called snd. So you end up with /dev/snd/controlC0 as the device node for the first sound card interface.
The next rule from 40-permissions.rules might look like this:
KERNEL="controlC[0-9]*", MODE="0666"
This rule, when scanned by udev, is basically concatenated to the preceding rule and causes the device node to be created with read/write permissions for all (user, group, and other).
In this way, Linux distributions can create clean rule sets that separate functionality for easy maintenance. In this discussion, you can see that the rules for assigning device names to categories (such as subdirectories under /dev) are maintained in one rules file, and the rules to set permissions for these devices are maintained in a separate file dealing exclusively with permissions. This is very clean and easy to maintain.
To be an expert, you should study the excellent document referenced at the end of this chapter, “Writing udev Rules,” by Daniel Drake.
One final note about rules: udev is event-driven. It doesn’t do anything unless an event is triggered. For example, even though udev monitors its rules directory using inotify and rescans the rules if you modify a rules file, no action is taken on a recently edited rule until a device that uses that rule is removed and reinstalled.6
19.4.3 Initial System Setup for udev
udev is a user space process. As such, it doesn’t get to run until the kernel has completed the boot process and mounted a root file system. The vast majority of Linux systems, embedded or not, run init as the very first process, as described in Chapter 6, “User Space Initialization.” In a system where udev is in charge of creating device nodes, we must provide some mechanism for init and its child processes to access the most commonly required devices before udev is run. These usually include the console device; input/output devices including stdin, stdout, and stderr; and a few others.
The simplest and most common method for small embedded systems is simply to have a few static device nodes already created on /dev, and then to mount a tmpfs on top of /dev for use by udev before starting udev. Listing 19-10 is an example of a simplified startup script for udev-based systems.
Listing 19-10. Simple udev Startup Script
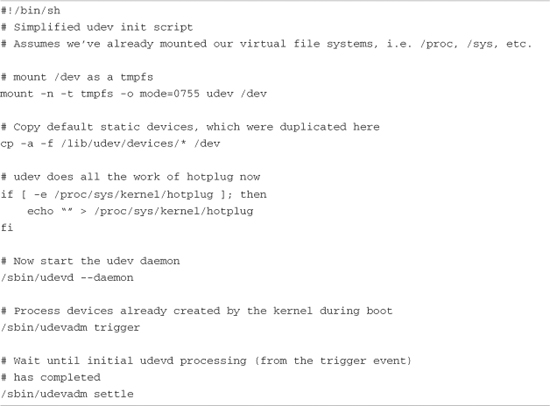
This script is the minimum required functionality to configure your system for dynamically created device nodes using udev. The first thing it does is mount a tmpfs (temporary RAM-based file system utilizing virtual memory) on top of /dev. When the mount command succeeds, any previous contents of /dev are gone, and /dev shows up as an empty directory.
The next action is to copy a small set of static device nodes to replace the collection you need for boot, such as console, standard input/output, and a few others. Listing 19-11 is an example of such a collection, which was placed in /lib/udev/devices during file system creation. The original location is up to you; it is not particularly important.
The last action of the script in Listing 19-10 is to make sure no hotplug agent is specified in /proc. The kernel delivers uevents to this user space agent it specified. However, we want udev to receive these messages over the netlink socket, as described earlier, so we null this entry.
Listing 19-11. Default Static Device Nodes

Now that we’ve set up everything, it’s time to start the udevd daemon. You can see this in Listing 19-10 on the line calling /sbin/udevd. If you’ve studied this startup script, you may be wondering what the last actions are all about.
19.4.3.1 Coldplug Processing
During the kernel boot process, various subsystems are initialized, and many devices are discovered and registered, along with their corresponding entries in /sys. On the BeagleBoard used for the examples in this chapter, nearly 200 devices are reported in /sys that ordinarily would be processed by udev for possible device node creation, or device driver load. The problem is that udev is not started until some time after init runs; therefore, those nearly 200 devices remain unprocessed by udev. This is the reason the trigger facility exists in udev.
Take a look at the last two shell commands in the script of Listing 19-10. udevdadm trigger causes udev to process all the entries in /sys by playing back the kernel uevents and processing them in the normal fashion. To illustrate the scope of this processing without taking up the next 12 pages in this book, we’ll show the count of devices in /dev before and after the trigger event, using the following command:
root@beagle:~# find /dev -type c -o -type b -o -type l | wc -l
6
Note that the three device nodes found in this find command match exactly the contents of Listing 19-11. Our initial set of static devices has exactly three character devices, and three symbolic links, for a total of six entries. The final two entries in Listing 19-11 are directories we filtered out with the find command just shown.
After running the udevadm trigger command in our sample startup script of Listing 19-10, which causes udev to play back all the kernel uevents, we see that more than 100 new devices and over 400 symbolic links have been created. This is illustrated by the following sequence of commands:
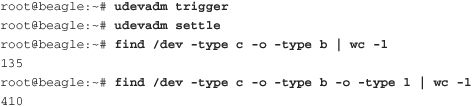
Now that udev has processed all the devices that the kernel found during boot, we find 132 new device nodes, for a total of 135 (including the original three from our static collection). Adding in the symbolic links, we now have a total of 410 files in /dev that can reference a device. This is how udev “post-processes” the devices that the kernel creates during boot. From now on, as long as the udevd daemon remains running, the kernel reports to udev any devices that are added or removed, and udev processes them according to its rules set.
19.5 Loading Platform Device Drivers
Platform device drivers are easy to load dynamically using udev. A default rule found in the udev package can be installed on your embedded system. This rule should look like the first rule in Listing 19-4. It is reproduced here for convenience:
![]()
This rule says to run modprobe, passing the value of MODALIAS to modprobe under the following conditions: MODALIAS is set by the driver, and the DRIVER environment variable is not. As long as your driver contains a MODULE_ALIAS macro with the proper format, this is passed to modprobe to be matched with the information collected in the modules.alias file produced by depmod. This is explained in detail in Section 19.4.1.
As an example, let’s look at the platform driver for the Inventra dual-role USB controller driver found on the OMAP3530 on the BeagleBoard. Listing 19-12 shows a few lines from this USB host controller driver from a recent Linux kernel. The last line contains the magic that translates to an entry to the modules.alias file, which modprobe uses to select which driver to load.
Listing 19-12. Portion of musb_hdrc.c
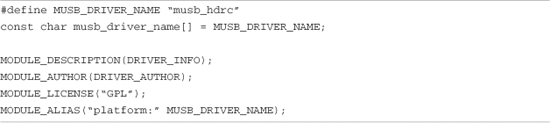
The macro MODULE_ALIAS effectively creates a char string (const char) that is placed in a special section of the device driver (module) object file. This string is similar to an environment variable and exists in the form alias="string". This special section is named .modinfo and contains attributes describing various aspects of the driver. You can see this section header using your cross version of readelf. Recall that we covered the details of readelf in Chapter 13, “Development Tools.” The .modinfo section can be seen using the following command:
![]()
To see the human-readable contents of the .modinfo section, use the modinfo command, which comes from the module-init-tools package:
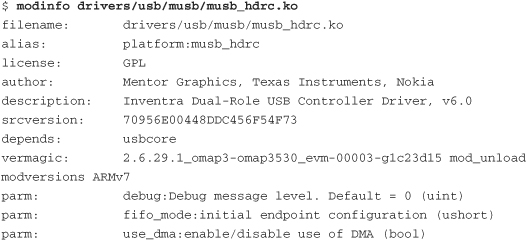
Notice the module alias—platform:musb_hdrc. As soon as you have all the pieces in place, you should be able to manually load your device driver using the modalias string, as it would be passed from udev:
# modprobe platform:musb_hdrc
Of course, if udev is configured correctly, with a rule similar to the one shown in Listing 19-4, udev loads this module for you using the modalias string. The module is loaded after the call to udevadm trigger found in the sample udev startup script shown in Listing 19-10. That’s all there is to it!
19.6 Customizing udev Behavior
Your own imagination might be the limit of what you can do with udev. For one thing, you can run your own programs upon device add or remove. For example, a rule such as the following might be used to kick off a software upgrade process when someone plugs a USB storage device into your embedded Linux appliance:
ACTION="add", KERNEL=="sd[a-d][0-9]", RUN+="/bin/myloader"
Your program /bin/myloader is handed a copy of the udev environment related to this device. Next, your program can validate the contents of the newly installed device and initiate any actions that might be required. This is one way to automate the process of installing a new software image on your embedded Linux box.
If you choose this approach, it might be wise to fork and detach, allowing the udev parent process to complete and return. This action avoids any unpleasant surprises in case udev decides now or in future revisions to kill any child processes it deems to be taking too much time to complete. Also, consider the unique execution environment. When your program runs, it inherits a minimal execution environment provided by udev. This may be insufficient for your needs. You might need to create your own environment for your special handler program to complete its tasks.
19.6.1 udev Customization Example: USB Automounting
Listing 19-13 demonstrates a set of rules that can automatically mount a USB Flash drive inserted into your embedded Linux box.
Listing 19-13. USB Automounting Rules

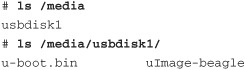
Upon device detection, udev creates a symbolic link to the actual device called usbdiskn, where n is the device number. For example, consider usbdisk0: after udev processing is complete. You would have a symbolic link called /dev/usbdisk0 pointing to the actual device. Next, the RUN directive would create a directory under /media with the same name. Notice that because the -p option is passed to mkdir, all entries along this new path are created if they don’t already exist. The final action on add is to mount the newly found device on the new mount point created in /media. When the device is later removed, umount is executed, and the directory is removed.
Inserting the USB Flash drive into a BeagleBoard with the preceding rules located in /lib/udev/rules/99-usb-automount.rules results in the following:
19.7 Persistent Device Naming
Persistent device naming is implemented in udev by default, using a scheme originally proposed by Hannes Reinecke. The persistent naming rules are in the rules files containing the string "persistent". Let’s examine how this all works.
If you look at your /dev directory in your udev-based system, you can see this in action for disk-based devices.
Listing 19-14 shows the files in the /dev/disk directory on my BeagleBoard after two USB Flash drives have been inserted into a hub attached to the BeagleBoard USB port.
Listing 19-14. Symlink by-id in /dev/disk

The output of ls -l has been trimmed here to avoid the clutter of uninteresting data. Seven symlinks in this directory are called by-id. Each symlink points back to a device node created by udev for the device in question. Here we see, from top to bottom, an SD card, a generic USB Flash drive, and a Cruzer Mini USB Flash drive. In each case, first is the disk device, and then each partition found on the device is enumerated. You can see two partitions on the SD card (the mmcblk0 is the disk device, and the mmcblk0p1 and mmcblk0p2 are the partitions) and, in similar fashion, one partition each on the USB Flash drives.
The symlink is the persistent name. You can now remove the USB Flash drives and reinsert them into different hub ports. udev, through its helper utility usb_id, assigns the same names (symlinks) to the device pointing to the correct device node, which is not necessarily the same raw device node as the first time you plugged them in.
19.7.1 udev Helper Utilities
The unique ID strings shown in Listing 19-14 were produced either by reading the raw device in question or by querying attribute data in /sys. This is done by a small collection of helper utilities found in the extras directory of the udev git tree. There are several, including scsi_id, cdrom_id, path_id, and volume_id. See the udev git tree under the subdirectory extras for all of them. We will look at the usb_id utility to gain an understanding of how they work.
The rule that generates the persistent name (unique ID) comes from 60-persistent-storage.rules in the udev source tree:
![]()
This rule says that for any kernel device with an ACTION of add or change,7 where the kernel device name is sd* or sr* and does not contain a device number (the base disk device itself, not a partition), call the program usb_id and capture its output from stdout as environment variables. %p is a udev string substitution operator and refers to the DEVPATH—the device path in /sys. Let’s see what this looks like if we execute it manually on the console:
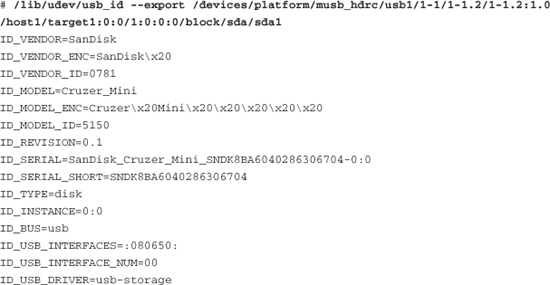
When this usb_id command is executed as part of a rule, the output is imported as part of the environment for this particular udev event. Later in the same rules file (60-persistent-storage.rules), you find this rule:
![]()
This rule actually creates the persistent name, which was produced by usb_id. This rule says for a kernel uevent where ACTION is either add or change, and the kernel device name is sd* or sr* (a SCSI-type disk device), and the udev environment variable DEVTYPE is set to disk, and the udev environment variable ID_SERIAL is a non-null string, create the symlink with the concatenation of ID_BUS and ID_SERIAL joined by a dash (-). That is the resulting symlink, as shown in Listing 19-14.
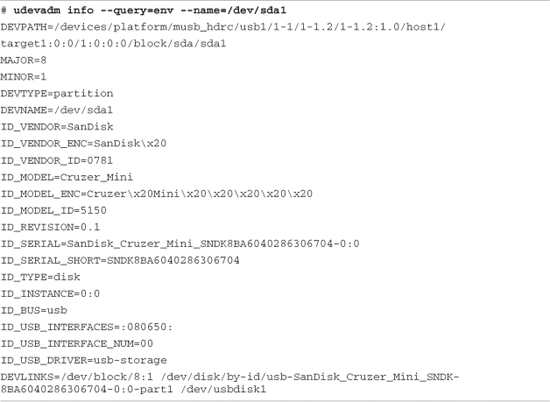
These utilities are not necessarily meant to be used by the end user. It is much easier to use the udevadm info command to get information you might need to make use of persistent device names. Listing 19-15 has an example of the output of udevadm info for the same device we’ve been discussing here, the Cruzer Mini USB Flash drive. This utility is easier to use and is meant to be used by a system admin or developer. We will pass it the device name from /dev—in this example, the first partition of the sda device.
Listing 19-15. Device Query Using udevadm
So how can we use this data? We saw earlier a method to mount USB Flash disks using udev rules. We can use the unique identifier as produced here by udevadm info to build rules in a udev rules file. Note that we can use any of these attributes if it makes sense to do so.
The most common way to use this infrastructure is to provide human-readable or easily recognizable names for devices in a persistent manner. Consider the following rule, for example:
![]()
This would cause a new symlink to be added to your /dev directory, pointing at whatever device name the kernel and udev created for this device:
![]()
Revisiting our USB automounting rules from Listing 19-13, we can create rules that will always mount this particular Cruzer Mini USB Flash disk on a mount point of our choice, regardless of which order it is inserted in or where it ends up in the USB device hierarchy:

Using these rules, in the sample case installed in a file called 99-usb-automount.rules, each time you insert your Cruzer Mini USB Flash drive (no matter in what order or on what hub port), it will always be mounted and the contents made available on /media/cruzer. That’s the magic of udev and persistent device naming!
19.8 Using udev with busybox
Look back at the first rule in Listing 19-4. This rule causes modprobe to be invoked with the -b flag. This flag is used to check against a modules blacklist, if present. Currently this is incompatible with the busybox implementation of modprobe.8 When modprobe is run without modification, you simply don’t see any drivers loaded when that is the expected action. The error invoking modprobe will not be apparent, because the udev daemon is the recipient of messages on stdout and stderr while executing programs in its context. Therefore, error messages are not displayed on the console.
The simplest way around this is to use the real version of modprobe—that is, include the module-init-tools package in your embedded system. This package provides the full versions of modprobe, lsmod, and insmod. You need to compile busybox with support for depmod disabled or, at a minimum, remove the busybox symbolic links pointing the module-init-tools utilities back to busybox. Depending on how you have configured your busybox, you may have either links or scriptlets—simple script wrappers that invoke busybox for each supported function. See Chapter 11, “BusyBox,” for more details on these installation options.
19.8.1 busybox mdev
busybox has tiny versions of many popular and useful Linux utilities, so why not a udev implementation? Simply stated, mdev is busybox’s answer to udev. mdev exists to dynamically create device nodes in /dev upon device discovery. Because it is a simplified implementation, it does not possess the richness and flexibility of the stand-alone udev package.
As with udev, busybox mdev requires sysfs support in the kernel, as well as being hotplug-enabled. It is hard to imagine a modern embedded Linux system without these kernel subsystems enabled!9
mdev uses the older hotplug infrastructure to receive kernel uevents. Recall from Listing 19-10 that for udev, we made sure that the /proc file for the hotplug agent name was nulled (disabled), so the kernel would not pass uevents to this agent. busybox mdev requires the hotplug agent to be itself, called through /bin/mdev. So the first order of business in a startup script is to set this /proc file to point to mdev:
echo "/bin/mdev" > /proc/sys/kernel/hotplug
Of course, this must be done after mounting /proc in your startup script. Not so obvious is the requirement to have /sys mounted as well. When these steps are complete, you start the utility. Listing 19-16 is a sample startup script using busybox mdev.
Listing 19-16. Sample Startup Script for busybox mdev

mdev’s default behavior is simply to create a device node in /dev with the same name as the kernel device name passed in the uevent. This is quite useful if you don’t need the flexibility of the stand-alone udev. It usually results in a well-known device name for the device in question.
In Listing 19-16, the -s flag passed to mdev upon its invocation is similar to the udevadm trigger action. It causes mdev to scan /sys and create device nodes for devices found there. In this way, device nodes are created for initial devices that have already been discovered by the kernel, before init gets to run (or, in the busybox case, busybox init).
Booting a busybox configured system, with udev removed and before mdev is started, we have this:
# find /dev -type b -o -type c | wc -l
3
Executing /bin/mdev (which is a busybox link or scriptlet pointing to /bin/busybox itself) results in this:
# find /dev -type b -o -type c | wc -l
130
19.8.2 Configuring mdev
busybox mdev can be customized by an optional configuration file called /etc/mdev.conf. It is largely used to customize the permissions of device nodes created by mdev. By default, mdev creates device nodes with uid:gid set to root:root, and permissions of 0660. Entries in /etc/mdev.conf are simple and take this form:
device uid:gid octal permissions
device is a simple regex of the device name, similar to udev’s device name specification. The rest of the fields are self-explanatory, with the note that uid and gid are numeric, and not the ASCII user/group name.
Some examples follow. The following mdev rule changes the default permissions to 777, leaving the default user:group at root:root. You can use this to change the default user and/or group as well:
.* 0:0 777
You also can rename (and relocate) device nodes using /etc/mdev.conf. This rule moves all mouse devices to a subdirectory called input in dev:
mouse* 0:0 660 input/
You can learn more about busybox mdev in its documentation files contained in the busybox source tree.
19.9 Summary
This chapter presented the details of udev, a Linux utility that adds a great deal of value to any Linux distribution. Correct use of udev helps create a very user-friendly system that can discover and configure devices without human intervention.
• We started this chapter by introducing udev and describing its purpose.
• udev’s default behavior was presented as a foundation for understanding how to customize it.
• We examined a typical system setup to demonstrate the complexities of using udev.
• Customizing udev was discussed to allow system designers and distribution maintainers to build systems tailored to specific use cases.
• For busybox users, we examined the busybox mdev utility, a lightweight alternative to udev.
• We concluded by looking at some examples of busybox mdev configuration.
19.9.1 Suggestions for Additional Reading
“Udev: A Userspace Implementation of devfs”
Greg Kroah-Hartman
www.kroah.com/linux/talks/ols_2003_udev_paper/Reprint-Kroah-Hartman-OLS2003.pdf
Linux Allocated Devices
Torben Mathiasen, maintainer
www.lanana.org/docs/device-list/devices.txt
Linux Device Drivers, 3rd Edition
(especially Chapter 14, “The Linux Device Model”)
Jonathan Corbet, Alessandro Rubini, and Greg Kroah-Hartman
O’Reilly, 2005
“Writing udev Rules”
Daniel Drake
http://reactivated.net/writing_udev_rules.html
Persistent Device Names in Linux 2.6.x
Hannes Reinecke
July 12, 2004