
Chapter 5. Kernel Initialization
In This Chapter
![]() 5.1 Composite Kernel Image: Piggy and Friends 100
5.1 Composite Kernel Image: Piggy and Friends 100
![]() 5.2 Initialization Flow of Control 109
5.2 Initialization Flow of Control 109
![]() 5.3 Kernel Command-Line Processing 115
5.3 Kernel Command-Line Processing 115
When the power is applied to an embedded Linux system, a complex sequence of events is started. After a few tens of seconds, the Linux kernel is operational and has spawned a series of application programs as specified by the system init scripts. A significant portion of these activities are governed by system configuration and are under the control of the embedded developer.
This chapter examines the initial sequence of events in the Linux kernel. We take a detailed look at the mechanisms and processes used during kernel initialization. We then describe the Linux kernel command line and its use to customize the Linux environment on startup. With this knowledge, you will be able to customize and control the initialization sequence to meet the requirements of your particular embedded system.
5.1 Composite Kernel Image: Piggy and Friends
Upon power-on, the bootloader in an embedded system is the first software to get processor control. After the bootloader has performed some low-level hardware initialization, control is passed to the Linux kernel. This can be a manual sequence of events to facilitate the development process (for example, the user types interactive load/boot commands at the bootloader prompt), or it can be an automated startup sequence typical of a production environment. We have dedicated Chapter 7, “Bootloaders,” to this subject, so we defer any detailed bootloader discussion to that chapter.
In Chapter 4, “The Linux Kernel: A Different Perspective,” we examined the components that make up the Linux kernel image. Recall that one of the common files built for every architecture is the ELF binary named vmlinux. This binary file is the monolithic kernel itself, or what we have been calling the kernel proper. In fact, when we looked at its construction in the link stage of vmlinux, we pointed out where we might look to see where the first line of code might be found. In most architectures, it is found in an assembly language source file called head.S or a similar filename. In the Power Architecture (powerpc) branch of the kernel, several versions of head.S are present, depending on the processor. For example, the AMCC 440 series processors are initialized from a file called head_44x.S.
Some architectures and bootloaders can directly boot the vmlinux kernel image. For example, platforms based on Power Architecture and the U-Boot bootloader usually can boot the vmlinux image directly1 (after conversion from ELF to binary, as you will see shortly). In other combinations of architecture and bootloader, additional functionality might be needed to set up the proper context and provide the necessary utilities to load and boot the kernel.
Listing 5-1 details the final sequence of steps in the kernel build process for a hardware platform based on the ADI Engineering Coyote Reference Platform, which contains an Intel IXP425 network processor. This listing uses the quiet form of output from the kernel build system, which is the default. As pointed out in Chapter 4, it is a useful shorthand notation, allowing more of a focus on errors and warnings during the build process.
Listing 5-1. Final Kernel Build Sequence: ARM/IXP425 (Coyote)
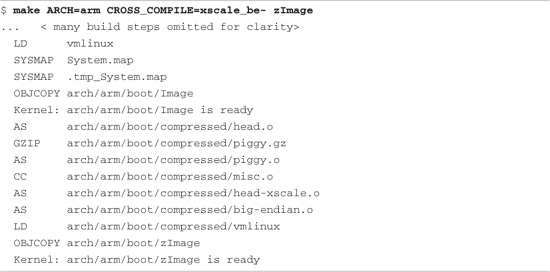
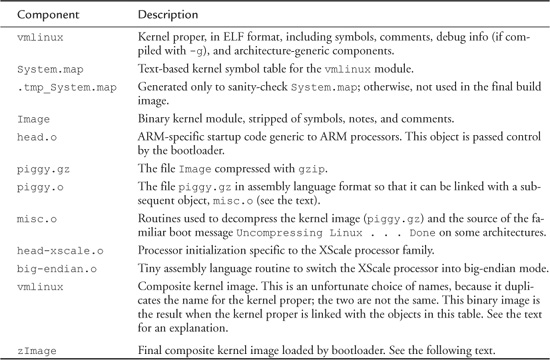
In the third line of Listing 5-1, the vmlinux image (the kernel proper) is linked. Following that, a number of additional object modules are processed. These include head.o, piggy.o,2 and the architecture-specific head-xscale.o, among others. (The tags identify what is happening on each line. For example, AS indicates that the assembler is invoked, GZIP indicates compression, and so on.) In general, these object modules are specific to a given architecture (ARM/XScale in this example) and contain low-level utility routines needed to boot the kernel on this particular architecture. Table 5-1 details the components from Listing 5-1.
Table 5-1. ARM/XScale Low-Level Architecture Objects
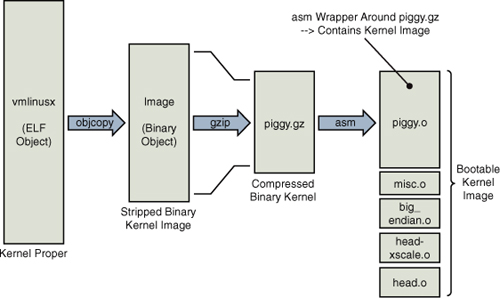
An illustration will help you understand this structure and the following discussion. Figure 5-1 shows the image components and their metamorphosis during the build process leading up to a bootable kernel image. The following sections describe the components and process in detail.
Figure 5-1. Composite kernel image construction
5.1.1 The Image Object
After the vmlinux kernel ELF file has been built, the kernel build system continues to process the targets described in Table 5-1. The Image object is created from the vmlinux object. Image is basically the vmlinux ELF file stripped of redundant sections (notes and comments) and also stripped of any debugging symbols that might have been present. The following command is used for this purpose:
![]()
The -O option tells objcopy to generate a binary file; the -R option removes the ELF sections named .note, .note.gnu.build-id, and .comment; and the -S option is the flag to strip debugging symbols. Notice that objcopy takes the vmlinux ELF image as input and generates the target binary file called Image. In summary, Image is nothing more than the kernel proper converted from ELF to binary form and stripped of debug symbols and the aforementioned .note* and .comment sections.
5.1.2 Architecture Objects
Following the build sequence further, a number of small modules are compiled. These include several assembly language files (head.o, head-xscale.o, and so on) that perform low-level architecture and processor-specific tasks. Each of these objects is summarized in Table 5-1. Of particular note is the sequence creating the object called piggy.o. First, the Image file (binary kernel image) is compressed using this gzip command:
cat Image | gzip -f -9 > piggy.gz
This creates a new file called piggy.gz, which is simply a compressed version of the binary kernel Image. You can see this graphically in Figure 5-1. What comes next is rather interesting. An assembly language file called piggy.S is assembled, which contains a reference to the compressed piggy.gz. In essence, the binary kernel image is being piggybacked as payload into a low-level assembly language bootstrap loader.3 This bootstrap loader initializes the processor and required memory regions, decompresses the binary kernel image, and loads it into the proper place in system memory before passing control to it. Listing 5-2 reproduces .../arch/arm/boot/compressed/piggy.S in its entirety.
Listing 5-2. Assembly File Piggy.S

This small assembly-language file is simple yet produces a complexity that is not immediately obvious. The purpose of this file is to cause the compressed binary kernel image to be emitted by the assembler as an ELF section called .piggydata. It is triggered by the .incbin assembler preprocessor directive, which can be viewed as the assembler’s version of an #include file, except that it expects binary data. In summary, the net result of this assembly language file is to contain the compressed binary kernel image as a payload within another image—the bootstrap loader. Notice the labels input_data and input_data_end. The bootstrap loader uses these to identify the boundaries of the binary payload—the kernel image itself.
5.1.3 Bootstrap Loader
Not to be confused with a bootloader, many architectures use a bootstrap loader (or second-stage loader) to load the Linux kernel image into memory. Some bootstrap loaders perform checksum verification of the kernel image, and most decompress and relocate the kernel image. The difference between a bootloader and a bootstrap loader in this context is simple: The bootloader controls the board upon power-up and does not rely on the Linux kernel in any way. In contrast, the bootstrap loader’s primary purpose is to act as the glue between a bare metal bootloader and the Linux kernel. It is the bootstrap loader’s responsibility to provide a proper context for the kernel to run in, as well as perform the necessary steps to decompress and relocate the kernel binary image. It is similar to the concept of a primary and secondary loader found in the PC architecture.
Figure 5-2 makes this concept clear. The bootstrap loader is concatenated to the kernel image for loading.
Figure 5-2. Composite kernel image for ARM XScale

In the example we have been studying, the bootstrap loader consists of the binary images shown in Figure 5-2. The functions performed by this bootstrap loader include the following:
• Low-level assembly language processor initialization, which includes support for enabling the processor’s internal instruction and data caches, disabling interrupts, and setting up a C runtime environment. These include head.o and head-xscale.o.
• Decompression and relocation code, embodied in misc.o.
• Other processor-specific initialization, such as big-endian.o, which enables big endian mode for this particular processor.
It is worth noting that the details we have been examining are specific to the ARM/XScale kernel implementation. Each architecture has different details, although the concepts are similar. Using an analysis similar to that presented here, you can learn the requirements of your own architecture.
5.1.4 Boot Messages
Perhaps you’ve seen a PC workstation booting a desktop Linux distribution such as Red Hat or SUSE Linux. After the PC’s own BIOS messages, you see Linux display a flurry of console messages as it initializes the various kernel subsystems. Significant portions of the output are common across disparate architectures and machines. Two of the more interesting early boot messages are the kernel version string and the kernel command line, which is described shortly. Listing 5-3 reproduces the kernel boot messages for the ADI Engineering Coyote Reference Platform booting Linux on the Intel XScale IXP425 processor. The listing has been formatted with line numbers for easy reference.
Listing 5-3. Linux Boot Messages on IPX425

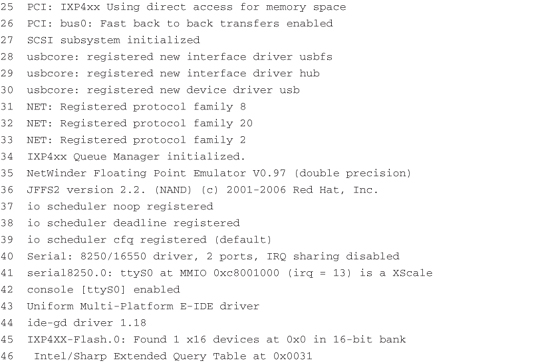


The kernel produces much useful information during startup, as shown in Listing 5-3. We study this output in some detail in the next few sections. Line 1 is produced by the Redboot bootloader on the board. Line 2 is produced by the bootstrap loader we presented earlier in this chapter. This message was produced by the decompression loader found in .../arch/arm/boot/compressed/misc.c, in a function called decompress_kernel().
Line 3 of Listing 5-3 is the kernel version string. It is the first line of output from the kernel itself. One of the first lines of C code executed by the kernel (in .../init/main.c) upon entering start_kernel() is as follows:
printk(KERN_NOTICE "%s", linux_banner);
This line produces the output just described—the kernel version string, line 3 of Listing 5-3. This version string contains a number of pertinent data points related to the kernel image:
• Kernel version: Linux version 2.6.32-07500-g8bea8674
• Username/machine name where the kernel was compiled
• Toolchain info: gcc version 4.2.0, supplied by MontaVista Software
• Build number
• Date and time the kernel image was compiled
This is useful information both during development and later in production. All but one of the entries are self-explanatory. The build number is simply a tool that the developers added to the version string to indicate that something more substantial than the date and time changed from one build to the next. It is a way for developers to keep track of the build in a generic and automatic fashion. You will notice in this example that this was the twelfth build in this series, as indicated by the #12 on line 3 of Listing 5-3. The build number is stored in a hidden file in the top-level Linux directory and is called .version. It is automatically incremented by a build script found in .../scripts/mkversion. In short, it is a numeric string tag that is automatically incremented whenever anything substantial in the kernel is rebuilt. Note that it is reset to #1 on execution of make mrproper.
5.2 Initialization Flow of Control
Now that you understand the structure and components of the composite kernel image, let’s examine the flow of control from the bootloader to the kernel in a complete boot cycle. As we discussed in Chapter 2, “The Big Picture,” the bootloader is the low-level component that resides in system nonvolatile memory (Flash or ROM). It takes control immediately after the power has been applied. It is typically a small, simple set of routines designed primarily to do low-level initialization, operating system image loading, and system diagnostics. It might contain memory dump and fill routines for examining and modifying the contents of memory. It might also contain low-level board self-test routines, including memory and I/O tests. Finally, a bootloader contains logic for loading and passing control to another program, usually an operating system such as Linux.
The ARM XScale platform used as a basis for the examples in this chapter contains the Redboot bootloader. When power is first applied, this bootloader is invoked and proceeds to load the operating system (OS). When the bootloader locates and loads the OS image (which could be resident locally in Flash, on a hard drive, or via a local area network or other device), control is passed to that image.
On this particular XScale platform, the bootloader passes control to our head.o module at the label start in the bootstrap loader, as shown in Figure 5-3.
Figure 5-3. ARM boot control flow
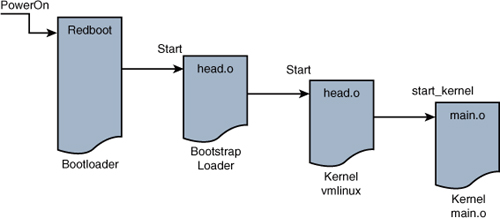
As discussed earlier, the bootstrap loader prepended to the kernel image has a single primary responsibility: to create the proper environment to decompress and relocate the kernel and pass control to it. Control is passed from the bootstrap loader directly to the kernel proper, to a module called head.o for most architectures. It is an unfortunate historical artifact that both the bootstrap loader and the kernel proper contain a module called head.o, because it is a source of confusion for the new embedded Linux developer. The head.o module in the bootstrap loader might be more appropriately called kernel_bootstrap_loader_head.o, although I doubt that the kernel developers would accept this patch! In fact, a recent Linux 2.6 source tree contains more than 25 source files named head.S and almost 70 named head*.S This is another reason why you need to know your way around the kernel source tree.
Refer to Figure 5-3 for a graphical view of the flow of control. When the bootstrap loader has completed its job, control is passed to the kernel proper’s head.o, and from there to start_kernel() in main.c.
5.2.1 Kernel Entry Point: head.o
The intention of the kernel developers was to keep the architecture-specific head.o module very generic, without any specific machine5 dependencies. This module, derived from the assembly language file head.S, is located at .../arch/<ARCH>/kernel/head.S, where <ARCH> is replaced by the given architecture. The examples in this chapter are based on the ARM/XScale, as you have seen, with <ARCH>=arm.
The head.o module performs architecture- and often CPU-specific initialization in preparation for the main body of the kernel. CPU-specific tasks are kept as generic as possible across processor families. Machine-specific initialization is performed elsewhere, as you will discover shortly. Among other low-level tasks, head.o does the following:
• Checks for valid processor and architecture
• Creates initial page table entries
• Enables the processor’s memory management unit (MMU)
• Establishes limited error detection and reporting
• Jumps to the start of the kernel proper, start_kernel() in main.c
These functions contain some hidden complexities. Many novice embedded developers have tried to single-step through parts of this code, only to find that the debugger becomes hopelessly lost. Although a discussion of the complexities of assembly language and the hardware details of virtual memory is beyond the scope of this book, a few things are worth noting about this complicated module.
When control is first passed to the kernel’s head.o from the bootstrap loader, the processor is operating in what we used to call real mode in x86 terminology. In effect, the logical address contained in the processor’s program counter6 (or any other register, for that matter) is the actual physical address driven onto the processor’s electrical memory address pins. Soon after the processor’s registers and kernel data structures are initialized to enable memory translation, the processor’s MMU is turned on. Suddenly, the address space as seen by the processor is yanked from beneath it and replaced by an arbitrary virtual addressing scheme determined by the kernel developers. This creates a complexity that can really be understood only by a detailed analysis of both the assembly language constructs and logical flow, as well as a detailed knowledge of the CPU and its hardware address translation mechanism. In short, physical addresses are replaced by logical addresses the moment the MMU is enabled. That is why a debugger can’t single-step through this portion of code, as with ordinary code.
The second point worth noting is the limited available mapping at this early stage of the kernel boot process. Many developers have stumbled into this limitation while trying to modify head.o for their particular platform.7 One such scenario might go like this. Let’s say you have a hardware device that needs a firmware load very early in the boot cycle. One possible solution is to compile the necessary firmware statically into the kernel image and then reference it via a pointer to download it to your device. However, because of the limited memory mapping done at this point, it is quite possible that your firmware image will exist beyond the range that has been mapped at this early stage in the boot cycle. When your code executes, it generates a page fault, because you have attempted to access a memory region for which no valid mapping has been created inside the processor. Worse yet, a page fault handler has not yet been installed at this early stage, so all you get is an unexplained system crash. At this early stage in the boot cycle, you are pretty much guaranteed not to have any error messages to help you figure out what’s wrong.
You are wise to consider delaying any custom hardware initialization until after the kernel has booted, if at all possible. In this manner, you can rely on the well-known device driver model for access to custom hardware instead of trying to customize the much more complicated assembly language startup code. Numerous undocumented techniques are used at this level. One common example of this is to work around hardware errata that may or may not be documented. A much higher price will be paid in development time, cost, and complexity if you must make changes to the early startup assembly language code. Hardware and software engineers should discuss these facts during early stages of hardware development, when often a minor hardware change can lead to significant savings in software development time.
It is important to recognize the constraints placed on the developer in a virtual memory environment. Many experienced embedded developers have little or no experience in this environment, and the scenario just presented is but one small example of the pitfalls that await the developer new to virtual memory architectures. Nearly all modern 32-bit and larger microprocessors have memory-management hardware used to implement virtual memory architectures. One of the most significant advantages of virtual memory machines is that they help separate teams of developers writing large, complex applications, while protecting other software modules, and the kernel itself, from programming errors.
5.2.2 Kernel Startup: main.c
The final task performed by the kernel’s own head.o module is to pass control to the primary kernel startup file written in C. We spend a good portion of the rest of this chapter on this important file.
Each architecture has a different syntax and methodology, but every architecture’s head.o module has a similar construct for passing control to the kernel proper. For the ARM architecture, it looks as simple as this:
b start_kernel8
For Power Architecture, it looks similar to this:
lis r4,start_kernel@h
ori r4,r4,start_kernel@l
lis r3,MSR_KERNEL@h
ori r3,r3,MSR_KERNEL@l
mtspr SRR0,r4
mtspr SRR1,r3
rfi
Without going into the details of the specific assembly language syntax, both of these examples result in the same thing. Control is passed from the kernel’s first object module (head.o) to the C language routine start_kernel() located in .../init/main.c. Here the kernel begins to develop a life of its own.
The file main.c should be studied carefully by anyone seeking a deeper understanding of the Linux kernel, what components make it up, and how they are initialized and/or instantiated. main.c does the bulk of the post-assembly-language startup work for the Linux kernel, from initializing the first kernel thread all the way to mounting a root file system and executing the very first user space Linux application program.
The function start_kernel() is by far the largest function in main.c. Most of the Linux kernel initialization takes place in this routine. Our purpose here is to highlight the particular elements that will prove useful in the context of embedded systems development. It is worth repeating that studying main.c is a great way to spend your time if you want to develop a better understanding of the Linux kernel as a system.
5.2.3 Architecture Setup
Among the first few things that happen in .../init/main.c in the start_kernel() function is the call to setup_arch() found in .../arch/arm/kernel/setup.c. This function takes a single parameter—a pointer to the kernel command line (introduced earlier and detailed in the next section):
setup_arch(&command_line);
This statement calls an architecture-specific setup routine responsible for performing initialization tasks common across each major architecture. Among other functions, setup_arch() calls functions that identify the specific CPU and provides a mechanism for calling high-level CPU-specific initialization routines. One such function, called directly by setup_arch(), is setup_processor(), found in .../arch/arm/kernel/setup.c. This function verifies the CPU ID and revision, calls CPU-specific initialization functions, and displays several lines of information on the console during boot.
An example of this output can be found in Listing 5-3, lines 4 through 6, reproduced here for your convenience:

Here you can see the CPU type, ID string, and revision read directly from the processor core. This is followed by details of the processor cache and machine type. In this example, the IXP425-based Coyote board has an XScale-IXP42x revision 1 processor, ARMv5TE architecture, virtually indexed, virtually tagged (VIVT) data, and instruction caches.
One of the final actions of the architecture setup routines is to perform any machine-dependent initialization. The exact mechanism for this varies across different architectures. For ARM, you will find machine-specific initialization in the .../arch/arm/mach-* series of directories, depending on your machine type. MIPS architecture also contains directories specific to supported reference platforms. With Power Architecture, a platforms directory contains machine-specific routines.
5.3 Kernel Command-Line Processing
Following the architecture setup, main.c performs generic early kernel initialization and then displays the kernel command line. Line 9 of Listing 5-3 is reproduced here for your convenience:
Kernel command line: console=ttyS0,115200 root=/dev/nfs ip=dhcp
In this simple example, the kernel being booted is instructed to open a console device on serial port device ttyS0 (usually the first serial port) at a baud rate of 115Kbps. It is being instructed to obtain its initial IP address information from a DHCP server and to mount a root file system via the NFS protocol. (We cover DHCP in Chapter 12, “Embedded Development Environment,” and NFS in Chapter 9, “File Systems,” and Chapter 12. For now, we limit the discussion to the kernel command-line mechanism.)
Linux typically is launched by a bootloader (or bootstrap loader) with a series of parameters that have come to be called the kernel command line. Although you don’t actually invoke the kernel using a command prompt from a shell, many bootloaders can pass parameters to the kernel in a fashion that resembles this well-known model. On some platforms whose bootloaders are not Linux-aware, the kernel command line can be defined at compile time and becomes hard-coded as part of the kernel binary image. On other platforms (such as a desktop PC running Red Hat Linux), the user can modify the command line without having to recompile the kernel. The bootstrap loader (Grub or Lilo in the desktop PC case) builds the kernel command line from a configuration file and passes it to the kernel during the boot process. These command-line parameters are a boot mechanism to set the initial configuration necessary for proper boot on a given machine.
Numerous command-line parameters are defined throughout the kernel. The .../Documentation subdirectory in the kernel source contains a file called kernel-parameters.txt containing a list of kernel command-line parameters in dictionary order. Remember the previous warning about kernel documentation: The kernel changes far faster than the documentation. Use this file as a guide, but not a definitive reference. Hundreds of distinct kernel command-line parameters are documented in this file, but it cannot be considered a comprehensive list. For that, you must refer directly to the source code.
The basic syntax for kernel command-line parameters is fairly simple and mostly evident from the example in line 9 of Listing 5-3. Kernel command-line parameters can be either a single text word, a key=value pair, or a key=value1,value2,.... key and multivalue format. It is up to the consumer of this information to process the data as delivered. The command line is available globally and is processed by as many modules as needed. As noted earlier, setup_arch() in main.c is called with the kernel command line as its only argument. This is to pass architecture-specific parameters and configuration directives to the relevant portions of architecture- and machine-specific code.
Device driver writers and kernel developers can add additional kernel command-line parameters for their own specific needs. Let’s take a look at the mechanism. Unfortunately, some complications are involved in using and processing kernel command-line parameters. The first of these is that the original mechanism is being deprecated in favor of a much more robust implementation. The second complication is that you need to comprehend the complexities of a linker script file to fully understand the mechanism.9
5.3.1 The __setup Macro
As an example of the use of kernel command-line parameters, consider the specification of the console device. We want a console initialized early in the boot cycle so that we have a destination for messages during boot. This initialization takes place in a kernel object called printk.o. The C source file for this module is found in .../kernel/printk.c. The console initialization routine is called console_setup() and takes the kernel command-line parameter string as its only argument.
The challenge is to communicate the console parameters specified on the kernel command line to the setup and device driver routines that require this data in a modular and general fashion. Further complicating the issue is that typically the command-line parameters are required early, before (or in time for) the modules that need them. The startup code in main.c, where the main processing of the kernel command line takes place, cannot possibly know the destination functions for each of hundreds of kernel command-line parameters without being hopelessly polluted with knowledge from every consumer of these parameters. What is needed is a flexible and generic way to pass these kernel command-line parameters to their consumers.
A special macro defined in .../include/linux/init.h is used to associate a portion of the kernel command-line string with a function that will act on that portion of the string. We now demonstrate how the __setup macro works using the kernel command line from Listing 5-3 as an example.
From the previous kernel command line (line 9 of Listing 5-3), this is the first complete command-line parameter passed to the kernel:
console=ttyS0,115200
For the purposes of this example, the actual meaning of the parameters is irrelevant. Our goal here is to illustrate the mechanism, so don’t be concerned if you don’t understand the argument or its values.
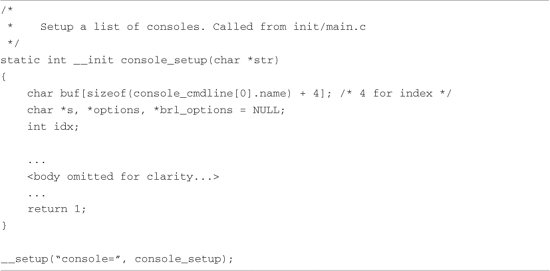
Listing 5-4 is a snippet of code from .../kernel/printk.c. The body of the function has been stripped because it is not relevant to the discussion. The most relevant part of Listing 5-4 is the last line, the invocation of the __setup macro. This macro expects two arguments; in this case, it is passed a string literal and a function pointer. It is no coincidence that the string literal passed to the __setup macro is the same as the first eight characters of the kernel command line related to the console: console=.
Listing 5-4. Console Setup Code Snippet
You can think of the __setup macro as a registration function for the kernel command-line console parameter. In effect, it says: When the console= string is encountered on the kernel command line, invoke the function represented by the second __setup macro argument—in this case, the console_setup() function. But how is this information communicated to the early setup code, outside this module, which has no knowledge of the console functions? The mechanism is both clever and somewhat complicated, and it relies on lists built by the linker.
The details are hidden in a set of macros designed to conceal the syntactical tedium of adding section attributes (and other attributes) to a portion of object code. The objective is to build a static list of string literals associated with function pointers. This list is emitted by the compiler in a separately named ELF section in the final vmlinux ELF image. It is important to understand this technique; it is used in several places within the kernel for special-purpose processing.
Let’s now examine how this is done for the __setup macro case. Listing 5-5 is a portion of code from the header file .../include/linux/init.h defining the __setup family of macros.
Listing 5-5. Family of __setup Macro Definitions from init.h

Listing 5-5 is the author’s definition of syntactical tedium! Recall from Listing 5-4 that our invocation of the original __setup macro looked like this:
__setup("console=", console_setup);
With some slight simplification, here is what the compiler’s preprocessor produces after macro expansion:
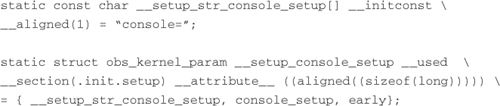
To make this more readable, we have split the lines, as indicated by the UNIX line-continuation character ().
Several macros are in use here, which we will describe only briefly. The __used macro tells the compiler to emit the function or variable, even if the optimizer determines that it is unused.10 __attribute__ ((aligned)) tells the compiler to align the structures on a specific boundary—in this case, sizeof(long). If we remove these for simplification, we are left with this:
![]()
What we have left after simplification is the heart of the mechanism. First, the compiler generates an array of characters (a string pointer) called __setup_str_console_setup[] initialized to contain the string console=. Next, the compiler generates a structure that contains three members: a pointer to the kernel command-line string (the array just declared), a pointer to the setup function itself, and a simple flag. The key to the magic here is the section attribute attached to the structure. This attribute instructs the compiler to emit this structure into a special section within the ELF object module, called .init.setup. During the link stage, all the structures defined using the __setup macro are collected and placed in this .init.setup section, in effect creating an array of these structures. Listing 5-6, a snippet from .../init/main.c, shows how this data is accessed and used.
Listing 5-6. Kernel Command-Line Processing

Examination of this code should be fairly straightforward, with a couple of explanations. The function is called with a single argument, the kernel command line, parsed in .../kernel/params.c. In the example we’ve been discussing, line would point to the string "console=ttyS0", which is part of the kernel command line. The two external structure pointers __setup_start and __setup_end are defined in a linker script file, not in a C source or header file. These labels mark the start and end of the array of obs_kernel_param structures that were placed in the .init.setup section of the object file.
The code in Listing 5-6 scans all these structures via the pointer p to find a match for this particular kernel command-line parameter. In this case, the code is searching for the string console= and finds a match. From the relevant structure, the function pointer element returns a pointer to the console_setup() function, which is called with the balance of the parameter (the string ttyS0,115200) as its only argument. This process is repeated for every element in the kernel command line until the kernel command line has been exhausted.
The technique just described, collecting objects into lists in uniquely named ELF sections, is used in many places in the kernel. Another example of this technique is the use of the __init family of macros to place one-time initialization routines into a common section in the object file. Their cousin __initconst, used to mark one-time-use data items, is used by the __setup macro. Functions and data marked as initialization using these macros are collected into specially named ELF sections. Later, after these one-time initialization functions and data objects have been used, the kernel frees the memory occupied by these items. You might have seen the familiar kernel message near the final part of the boot process saying Freeing init memory: 296K. Your mileage may vary, but a third of a megabyte is well worth the effort of using the __init family of macros. This is exactly the purpose of the __initconst macro in the earlier declaration of __setup_str_console_setup[].
You might have been wondering about the use of symbol names preceded with obsolete_. This is because the kernel developers are replacing the kernel command-line processing mechanism with a more generic mechanism for registering both boot time and loadable module parameters. Currently, hundreds of parameters are declared with the __setup macro. However, new development is expected to use the family of functions defined by the kernel header file .../include/linux/moduleparam.h—most notably, the family of module_param* macros. These are explained in more detail in Chapter 8, “Device Driver Basics,” when we introduce device drivers.
The new mechanism maintains backward compatibility by including an unknown function pointer argument in the parsing routine. Thus, parameters that are unknown to the module_param* infrastructure are considered unknown, and the processing falls back to the old mechanism under control of the developer. This is easily understood by examining the well-written code in .../kernel/params.c and the parse_args() calls in .../init/main.c.
The last point worth mentioning is the purpose of the flag member of the obs_kernel_param structure created by the __setup macro. Examination of the code in Listing 5-6 should make it clear. The flag in the structure, called early, is used to indicate whether this particular command-line parameter was already consumed earlier in the boot process. Some command-line parameters are intended for consumption very early in the boot process, and this flag provides a mechanism for an early parsing algorithm. You will find a function in main.c called do_early_param() that traverses the linker-generated array of __setup-generated structures and processes, each one marked for early consumption. This gives the developer some control over when in the boot process this processing is done.
5.4 Subsystem Initialization
Many kernel subsystems are initialized by the code found in main.c. Some are initialized explicitly, as with the calls to init_timers() and console_init(), which need to be called very early. Others are initialized using a technique very similar to that described earlier for the __setup macro. In short, the linker builds lists of function pointers to various initialization routines, and a simple loop is used to execute each in turn. Listing 5-7 shows how this works.
Listing 5-7. Sample Initialization Routine

This code snippet comes from .../arch/arm/kernel/setup.c. It is a simple routine designed to provide a customization hook for a particular board.
5.4.1 The *__initcall Macros
Notice two important things about the initialization routine shown in Listing 5-7. First, it is defined with the __init macro. As we saw earlier, this macro applies a section attribute to declare that this function gets placed in a section called .init.text in the vmlinux ELF file. Recall that the purpose of placing this function in a special section of the object file is so that the memory space it occupies can be reclaimed when it is no longer needed.
The second thing to notice is the macro immediately following the definition of the function: arch_initcall(customize_machine). This macro is part of a family of macros defined in .../include/linux/init.h. These macros are reproduced here as Listing 5-8.
Listing 5-8. initcall Family of Macros
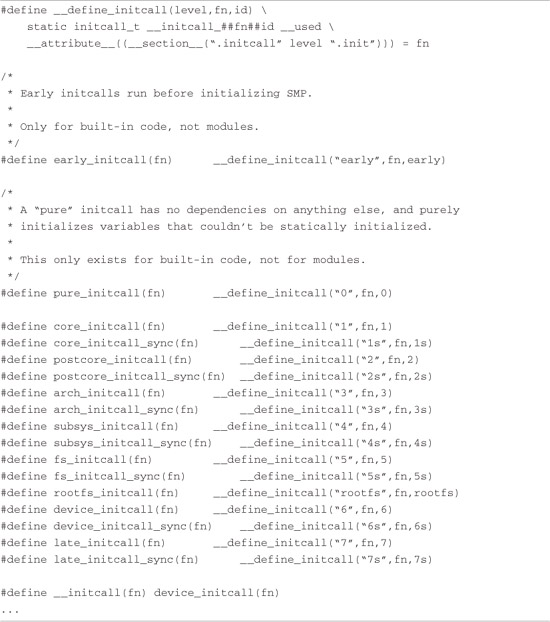
In a similar fashion to the __setup macro described earlier, these macros declare a data item based on the function’s name. They also use the section attribute to place this data item in a uniquely named section of the vmlinux ELF file. The benefit of this approach is that main.c can call an arbitrary initialization function for a subsystem that it has no knowledge of. The only other option, as mentioned earlier, is to pollute main.c with knowledge of every subsystem in the kernel.
You can derive the section names from Listing 5-8. The name of the section is .initcallN.init, where N is the level defined, between 1 and 7. Notice also that there is a section named for each of the seven levels with an s appended. This is intended to be a synchronous initcall. The data item is assigned the address of the function being named in the macro. In the example defined by Listings 5-7 and 5-8, the data item would be as follows (simplified by omitting the section attribute):
static initcall_t __initcall_customize_machine = customize_machine;
This data item is placed in the kernel’s object file in a section called .initcall3.init.
The level (N) is used to provide an ordering of initialization calls. Functions declared using the core_initcall() macro are called before all others. Functions declared using the postcore_initcall() macros are called next, and so on, and those declared with late_initcall() are the last initialization functions to be called.
In a fashion similar to the __setup macro, you can think of this family of *_initcall macros as registration functions for kernel subsystem initialization routines that need to be run once at kernel startup and never used again. These macros provide a mechanism for causing the initialization routine to be executed during system startup and a mechanism to discard the code and reclaim the memory after the routine has been executed. The developer is also provided up to seven levels of when to perform the initialization routines.11 Therefore, if you have a subsystem that relies on another subsystem’s being available, you can enforce this ordering using these levels. If you grep (search) the kernel for the string [a-z]*_initcall, you will see that this family of macros is used extensively.
One final note about the *_initcall family of macros: The use of multiple levels was introduced during the development of the 2.6 kernel series. Earlier kernel versions used the __initcall() macro for this purpose. This macro is still in widespread use, especially in device drivers. To maintain backward compatibility, this macro has been defined to device_initcall(), which has been defined as a level 6 initcall.
5.5 The init Thread
The code found in .../init/main.c is responsible for bringing the kernel to life. After start_kernel() performs some basic kernel initialization, calling early initialization functions explicitly by name, the very first kernel thread is spawned. This thread eventually becomes the kernel thread called init(), with a process ID (PID) of 1. As you will learn, init() becomes the parent of all Linux processes in user space. At this point in the boot sequence, two distinct threads are running: that represented by start_kernel(), and now init(). The former goes on to become the idle process, having completed its work. The latter becomes the init process. This is shown in Listing 5-9.
Listing 5-9. Creation of Kernel init Thread
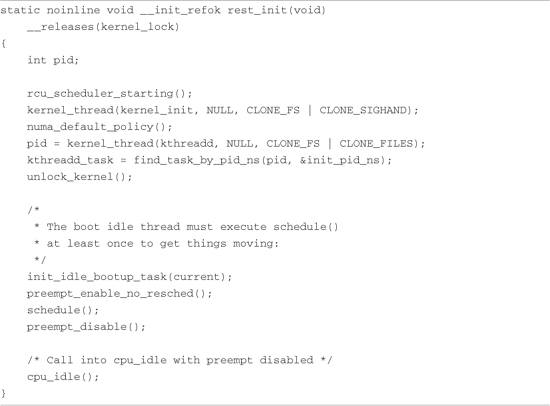
The start_kernel() function calls rest_init(), reproduced in Listing 5-9. The kernel’s init process is spawned by the call to kernel_thread(), with the function kernel_init as its first parameter. init goes on to complete the rest of the system initialization, while the thread of execution started by start_kernel() loops forever in the call to cpu_idle().
The reason for this structure is interesting. You might have noticed that start_kernel(), a relatively large function, was marked with the __init macro. This means that the memory it occupies will be reclaimed during the final stages of kernel initialization. It is necessary to exit this function and the address space it occupies before reclaiming its memory. The answer to this is for start_kernel() to call rest_init(), shown in Listing 5-9, a much smaller piece of memory that becomes the idle process.
5.5.1 Initialization Via initcalls
When kernel_init()is spawned, it eventually calls do_initcalls(), which is the function responsible for calling most of the initialization functions registered with the *_initcall family of macros. The code is reproduced in Listing 5-10.
Listing 5-10. Initialization Via initcalls

Note that two similar blocks of code exist. Earlier in the initialization process, a similar function called do_pre_smp_initcalls() processes part of the list, from __initcall_start to __early_initcall_end. This code is self-explanatory, except for the two labels marking the loop boundaries: __initcall_start and __initcall_end. These labels are not found in any C source or header file. They are defined in the linker script file used during the link stage of vmlinux. These labels mark the beginning and end of the list of initialization functions populated using the *_initcall family of macros. You can see each of the labels by looking at the System.map file in the top-level kernel directory. They all begin with the string __initcall, as shown in Listing 5-8.
5.5.2 initcall_debug
A very interesting kernel command-line parameter allows you to watch these calls being executed during bootup. It is enabled by setting the kernel command-line parameter initcall_debug. Simply start your kernel with the kernel command-line parameter initcall_debug to enable this diagnostic output.12
Here is an example of what you will see when you enable these debug statements:

Here you see the USB Universal Host Controller Interface driver being called. The first line announces the intention to call the function uhci_hcd_init, which is a device driver initialization call from the USB driver. After this announcement is made, the call to the function is executed. The second line is printed by the driver itself. The trace information on the third line includes the return result and the call’s duration.
This is a useful way to see the details of kernel initialization, especially the order in which various subsystems and modules get called. More interesting is the call’s duration. If you are concerned with system boot time, this is an excellent way to isolate where time is being consumed on boot.
Even on a modestly configured embedded system, dozens of these initialization functions are invoked in this manner. This example is taken from an ARM XScale embedded target, compiled with a default configuration. The default configuration results in 206 such calls to various kernel initialization routines.
5.5.3 Final Boot Steps
Having spawned the kernel_init() thread, and after all the various initialization calls have completed, the kernel performs its final steps in the boot sequence. These include freeing the memory used by the initialization functions and data, opening a system console device, and starting the first user space process. Listing 5-11 reproduces the last steps in the kernel’s init process from main.c.
Listing 5-11. Final Kernel Boot Steps from main.c
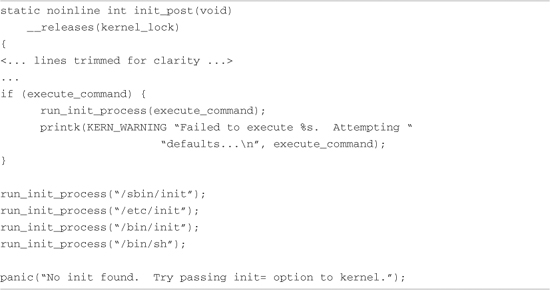
Notice that if the code proceeds to the end of this function (init_post()), a kernel panic results. If you’ve spent any time experimenting with embedded systems or custom root file systems, you’ve undoubtedly encountered this very common error message as the last line of output on your console. It is one of the most frequently asked questions (FAQs) on a variety of public forums related to Linux and embedded systems.
One way or another, one of these run_init_process() commands must proceed without error. The run_init_process() function does not return on successful invocation. It overwrites the calling process with the new one, effectively replacing the current process with the new one. It uses the familiar execve() system call for this functionality. The most common system configurations spawn /sbin/init as the userland13 initialization process. We’ll study this functionality in depth in the next chapter.
One option available to the embedded system developer is to use a custom userland initialization program. That is the purpose of the conditional statement in the preceding code snippet. If execute_command is non-null, it points to a string containing a custom user-supplied command to be executed in user space. The developer specifies this command on the kernel command line, and it is set via the __setup macro we examined earlier in this chapter. A sample kernel command line incorporating several concepts discussed in this chapter might look like this:
initcall_debug init=/sbin/myinit console=ttyS1,115200 root=/dev/hda1
This kernel command line instructs the kernel to display all the initialization routines as they are invoked, configures the initial console device as /dev/ttyS1 at 115Kbps, and executes a custom user space initialization process called myinit, which is located in the /sbin directory on the root file system. It directs the kernel to mount its root file system from the device /dev/hda1, which is the first IDE hard drive. Note that, in general, the order of parameters given on the kernel command line is irrelevant. The next chapter covers the details of user space system initialization.
5.6 Summary
• The Linux kernel project is large and complex. Understanding the structure and composition of the final image is key to learning how to customize your own embedded project.
• Many architectures concatenate an architecture-specific bootstrap loader onto the kernel binary image to set up the proper execution environment required by the Linux kernel. We presented the bootstrap loader build steps to differentiate this functionality from the kernel proper.
• Understanding the initialization flow of control will help deepen your knowledge of the Linux kernel and provide insight into how to customize it for your particular requirements.
• We found the kernel entry point in head.o and followed the flow of control into the primary kernel initialization logic, main.c. We looked at a booting system and the messages it produced, along with an overview of many of the important initialization concepts.
• The kernel command-line processing and the mechanisms used to declare and process kernel command-line parameters were presented. This included a detailed look at some advanced coding techniques for calling arbitrary unknown setup routines using linker-produced tables.
• The final kernel boot steps produce the first user space processes. Understanding this mechanism and its options will enable you to customize and troubleshoot embedded Linux startup issues.
5.6.1 Suggestions for Additional Reading
GNU Compiler Collection documentation
http://gcc.gnu.org/onlinedocs/gcc14
Using LD, the GNU linker
http://sourceware.org/binutils/docs/ld/index.html
Kernel documentation
.../Documentation/kernel-parameters.txt