
The development work is over and it is time to deploy our application to the production server. If only it were so simple! Enterprise applications require formal processes to be followed, customer or business owner sign-offs, internal testing, User Acceptance Testing (UAT), and many more such hurdles to be overcome before an application is ready for production deployment. This chapter will explore the following two key areas:
- Using Maven to build and compile Ext JS 4 applications for production use
- GlassFish 4 deployment and configuration concepts
We will start by examining the Sencha Cmd compiler.
In Chapter 9, Getting Started with Ext JS 4, we went through the process of using Sencha Cmd to generate the Ext JS 4 application skeleton and to create basic components. This section will focus on using Sencha Cmd to compile our Ext JS 4 application for deployment within a Web Archive (WAR) file. The goal of the compilation process is to create a single JavaScript file that contains all of the code needed for the application, including all the Ext JS 4 dependencies.
The index.html file that was created during the application skeleton generation is structured as follows:
<!DOCTYPE HTML>
<html>
  <head>
    <meta charset="UTF-8">
    <title>TTT</title>
    <!-- <x-compile> -->
        <!-- <x-bootstrap> -->
            <link rel="stylesheet" href="bootstrap.css">
            <script src="ext/ext-dev.js"></script>
            <script src="bootstrap.js"></script>
        <!-- </x-bootstrap> -->
        <script src="app.js"></script>
    <!-- </x-compile> -->
  </head>
<body></body>
</html>
The open and close tags of the x-compile directive enclose the part of the index.html file where the Sencha Cmd compiler will operate. The only declarations that should be contained in this block are the script tags. The compiler will process all of the scripts within the x-compile directive, searching for dependencies based on the Ext.define, requires, or uses directives.
An exception to this is the ext-dev.js file. This file is considered to be a "bootstrap" file for the framework and will not be processed in the same way. The compiler ignores the files in the x-bootstrap block and the declarations are removed from the final compiler-generated page.
The first step in the compilation process is to examine and parse all the JavaScript source code and analyze any dependencies. To do this the compiler needs to identify all the source folders in the application. Our application has two source folders: Ext JS 4 sources in webapp/ext/src and 3T application sources in webapp/app. These folder locations are specified using the -sdk and -classpath arguments in the compile command:
sencha –sdk {path-to-sdk} compile -classpath={app-sources-folder} page -yui -in {index-page-to-compile}-out {output-file-location}
For our 3T application the compile command is as follows:
sencha –sdk ext compile -classpath=app page -yui -in index.html -out build/index.html
This command performs the following actions:
- The Sencha Cmd compiler examines all the folders specified by the
-classpathargument. The-sdkdirectory is automatically included for scanning. - The
pagecommand then includes all of the script tags inindex.htmlthat are contained in thex-compileblock. - After identifying the content of the
appdirectory and theindex.htmlpage, the compiler analyzes the JavaScript code and determines what is ultimately needed for inclusion in a single JavaScript file representing the application. - A modified version of the original
index.htmlfile is written tobuild/index.html. - All of the JavaScript files needed by the new
index.htmlfile are concatenated and compressed using the YUI Compressor, and written to thebuild/all-classes.jsfile.
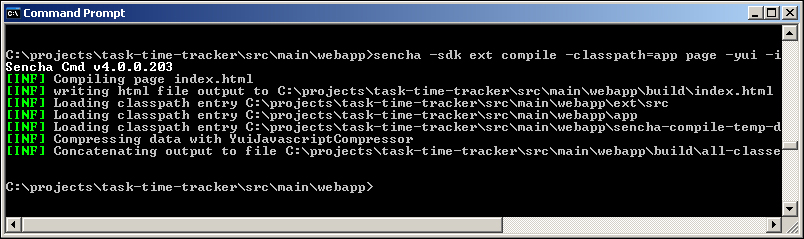
The sencha compile command must be executed from within the webapp directory, which is the root of the application and is the directory containing the index.html file. All the arguments supplied to the sencha compile command can then be relative to the webapp directory.
Open a command prompt (or terminal window in Mac) and navigate to the webapp directory of the 3T project. Executing the sencha compile command as shown earlier in this section will result in the following output:
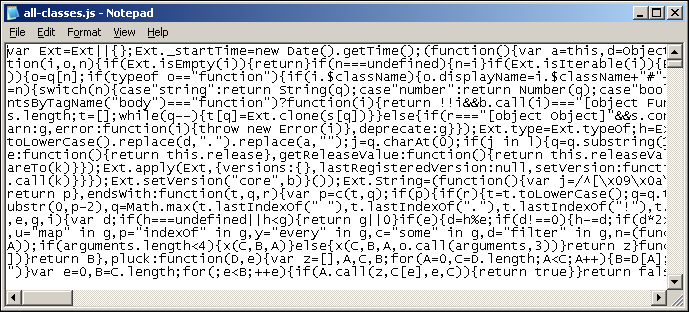
Opening the webapp/build folder in NetBeans should now show the two newly generated files: index.html and all-classes.js. The all-classes.js file will contain all the required Ext JS 4 classes in addition to all the 3T application classes. Attempting to open this file in NetBeans will result in the following warning: "The file seems to be too large to open safely...", but you can open the file in a text editor to see the following concatenated and minified content:
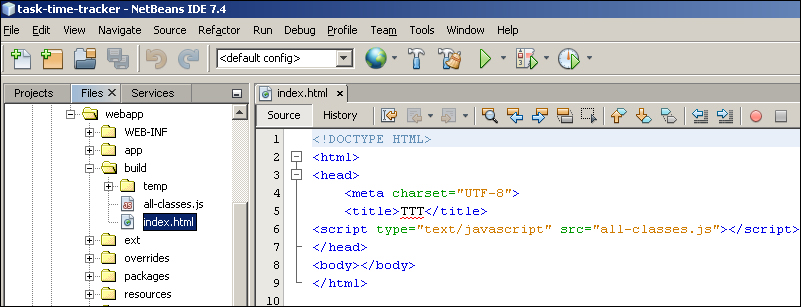
Opening the build/index.html page in NetBeans will display the following screenshot:
You can now open the build/index.html file in the browser after running the application, but the result may surprise you:
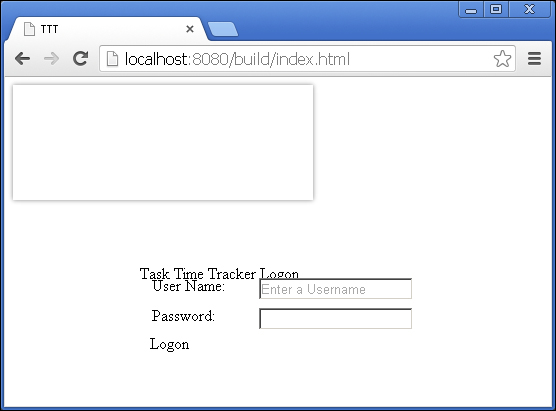
The layout that is presented will depend on the browser, but regardless, you will see that the CSS styling is missing. The CSS files required by our application need to be moved outside the <!-- <x-compile> --> directive. But where are the styles coming from? It is now time to briefly delve into Ext JS 4 themes and the bootstrap.css file.