
12. Implementing Security
Approaching Security
Security is a primary concern for all database developers and a significant factor in an organization’s requirements for both the internal workings of a database system and the technology used to build it. IT departments in particular pay close attention to security issues and often have specific needs that go beyond those of the users of your database solution.
FileMaker’s security architecture was completely overhauled in the FileMaker 7 product line, and it offers a robust set of features for managing security. It meets the common standards for security and account administration most IT organizations require of modern server-based technologies.
Regardless of how you plan to deploy a solution (you might not even have an IT department), we strongly urge all developers to learn about security and choose appropriate levels of safeguards for their FileMaker solutions. This might be as simple as locking down the capability to modify the database schema or as complex as deploying your solution on a network with ties to an external authentication server. Whatever your specific needs for security, three primary concerns bear consideration:
• Physical access—The first issue for security is making sure that you protect the database file itself. No matter how robust a security architecture is for any kind of software or server application, you will face risks if a malevolent person gets direct access to your database file or server. You have to protect your backups, including offsite copies, just as much as your live database.
• Network access—The second area for security is the network traffic between a FileMaker hosting computer and the client computers connected to it. If you are working on an open network, you might want to consider encrypting the data stream between FileMaker Server and its clients.
• Internal data-level security—The third area for security has to do with the internal logic of your specific database solution when someone is legitimately logged in. Who has rights to delete records, who can make programming changes to the database, and who can view various layouts in the system? These details are internal to the workings of a FileMaker solution and deal with ensuring that your data remains both secure and reliable.
Every database solution should address these three areas. They might be addressed by the facts that your database will never leave your personal hard drive or be available to the network at large, but what happens if your computer is stolen or if a colleague sits down at it while you are away from your desk? We encourage all developers to consider security issues and make deliberate choices that are appropriate to the sensitivity of their information and the consequences they might face if it were compromised.
Together with version control, security is very difficult to retrofit. You can plan a security mechanism that you do not implement at the beginning, but the planning and any necessary database design changes should be present from the start.
Identifying Risks
Security concerns are not all targeted at the clichéd image of a sophisticated hacker sitting in a dark room somewhere surrounded by Mountain Dew cans and pizza boxes. Most FileMaker systems will never be exposed to that level of threat. If you have a reasonably secure network and keep access to your server (or hosting computer) controlled, you have addressed many of the concerns that an extreme case such as hacking represents.
The biggest security threat a database system faces is actually from the legitimate users of the system itself and often has most to do with data integrity. Let’s use an example to illustrate: Consider a system for managing invoices that a company depends on for reporting monthly revenue. If every user of the system (including perhaps a temporary employee there to answer phones for a few days) has the capability to delete records, the chances that someone would inadvertently delete invoice records are quite high.
Or let’s take a less clear-cut example: What if someone duplicated a record, intending to use the new record to create a similar invoice, but miskeyed the command and duplicated it twice? In those situations, the database could not be reliably depended on to deliver accurate revenue totals. Although these sorts of issues are not the result of intended harm to a database, they are a risk to the system, and its security architecture and data validation mechanisms have to address them.
The second general threat developers face is data sensitivity: In the examples given previously, would it be appropriate for everyone in the system to be able to run the monthly invoice summary report and see the financial performance of the organization? Or in the case of a database that tracks, say, human resources information, which users should have the ability to view the layouts on which people’s salary history appears? Security plans need to include an assessment of what data users can access (see and manipulate) in a given solution in addition to what they can do to that data. We find it useful to work with two general categories of risks to data within a database:
• Data integrity—Define the actions various users can perform on the data in your solution. Often revolving around the creation and deletion of records, risks can also include the capability to edit certain fields or run specific scripted routines.
• Data sensitivity—Define the degree to which information should be visible and accessible after a user legitimately logs in to a system. Risks include inappropriate access to private and proprietary information.
When you’re approaching security for a given solution, it is important to identify the risks the organization faces in terms of both of these areas. We advocate the creation of a risks document in project planning that identifies these issues and the planned means of addressing them.
Your starting point in working with security must be any relevant laws, rules, and best practices you must adhere to in a specific business. In recent years, laws protecting privacy and identity theft have proliferated. In revising old databases, you might encounter data you would never put in a new database (credit card numbers, identification numbers such as Social Security numbers, and the like). Today, sensitive data requires a more than cursory review before its inclusion in a database. In the United States, legislation such as the Sarbanes-Oxley Act (officially the Public Company Accounting Reform and Investor Protection Act of 2002), HIPAA (the Health Insurance Portability and Accountability Act of 1996), and many other rules and statutes can enter into your security needs. In most cases, the client is responsible for letting you know what the needs are; a consultant can perform a valuable service by asking about these matters, but interpretation of the law is generally not the consultant’s job.
Planning Security
When you’re approaching a new system, it’s important to identify the security issues you face and include a plan for your security architecture early in your development process. For example, you will have to plan ahead if some users of your system should not be allowed to view or work with some set of fields, records, or layouts. Security, like reporting, is often left until last when building a system, and, as with reporting, this tends to be a mistake. You will need to interweave access issues throughout your database solution (considering security when placing objects on layouts, writing scripts, and so on), and it is best to have this mapped out before building a solution.
Using a Security Matrix
To make sense of the myriad security issues many systems face, we recommend the use of a security matrix. Table 12.1 shows a simple example. It identifies parts of the system such as access, account control, data tables, scripts, and layouts (commonly known as assets) and specifies the type of access for each type of user.
Table 12.1. Security Matrix Example
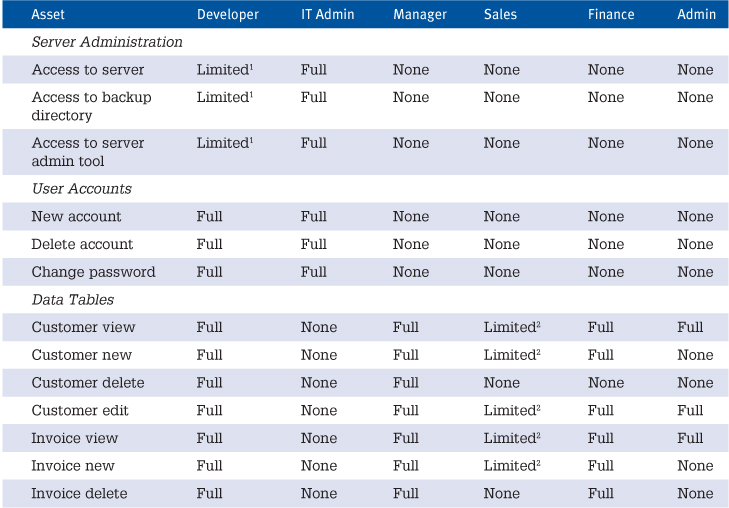
Note in Table 12.1 that managers have full access to create and delete data records, that salespeople have limited access to do so for customer records, and that people in the Admin role cannot make any changes to invoices (however, they can view invoice information).
An additional distinction to note is that although people in the Admin role can view invoice information, they do not have access to the Invoice List or Invoice Detail layouts. This suggests that other layouts might display invoice information, perhaps as related fields or within a portal. It is important to consider both the capability to view data globally throughout a system and the capability to make use of specific layouts. In most cases, it is not enough simply to limit access to specific layouts; you also need to limit access to the data itself.
Security grids such as the example in Table 12.1 need to be as detailed as they need to be; in other words, they depend on the circumstances you face. If you don’t have six different roles in your organization, clearly you won’t need the distinctions made in the example. If you want to grant some development privileges to people other than developers (say, the capability to modify certain layouts), you would need to add a subsection for that. This table should be taken as an instructional example and is not a comprehensive representation of a real-world system.
Finally, be sure to grasp the use of the phrase “to view” (both in this book and within FileMaker itself). In this context, we mean the ability to consume the data in various ways; a user can see the data onscreen, can choose to print (if printing is enabled for the user’s account), can export that data (if exporting is enabled for the user’s account), and can email data.
Planning Implementation
Implementing security is done largely in the Manage Security dialog, but before we walk through the mechanics of setting up security, you have to plan where and how to implement it from an overall perspective.
A significant part of your planning must include user interface considerations. If a user shouldn’t have access to run a script, for example, she should be presented with a graceful message to that effect if she inadvertently attempts to do so (as opposed to the script simply not doing anything). Likewise, if someone doesn’t have access to a layout, your navigation system should reliably prevent him from ever being left on that layout, or at least you should provide a way to get back to the part of the system to which he does have access.
Another consideration is the aesthetics of seeing <no access> displayed in various places throughout the system. FileMaker displays <no access> when a user isn’t allowed to view field data, record data, or a layout. If you do not want to remind your users of their own limited privileges, you might choose to hide away restricted areas by controlling navigation or window access.
FileMaker 8 introduced the Custom Menus feature, allowing you to deal with many security considerations by simply removing access to certain menu items. For example, if you want to restrict users from being able to delete all records, you can choose to remove that menu item. It is critical to note, however, that this is simply a user interface mechanism. If users have some other means of deleting records (say, through a custom script you’ve written or some other aspect of FileMaker’s interface), the only way to ensure that they cannot perform the restricted action is to control their ability to perform the fundamental action in their security settings.
![]() For more detail on custom menus, see “Working with Custom Menus,” p. 396.
For more detail on custom menus, see “Working with Custom Menus,” p. 396.
Here’s another example of how security plays a role in your planning: If you want to prevent people from having to see fields to which they have no access, you can choose to place them on their own layout. You can control access to specific layouts; however, you cannot prevent users from accessing a Tab Control pane if they have access to the layout on which it sits. Given this, you might choose to create separate layouts where a Tab Control object might have served had you not considered security issues.
Your solution’s scripts are another area where you will want to plan for different levels of access. If a user has a means of running a restricted script (say, by clicking a button that is present on all layouts), you will need to present him with a message that he is not permitted to use that function. A more subtle issue is what to do with scripts internal to the database operations; for example, you might write a script that allows users to choose different printer settings. If you restrict access to this script for some users, but then reference the script from all your reporting and printing routines, you will need to address that conflicting dependency. Likewise, if a script takes the system to a layout tied to a data table to establish context but the current user doesn’t have access to that layout, your script might deliver unexpected results.
However you choose to approach security in your system, thinking through the user experience will be an important part of the overall plan. You should note in your layout designs and scripting where security considerations have to be taken into account.
Maintaining Security
The best planned security can deteriorate over time in many ways. User IDs might be reused as employees come and go, passwords might be posted on the sides of computer displays, and a variety of other compromises can occur.
Much of security maintenance can be managed if you have a robust password policy in place. For many organizations, use of someone else’s user ID can be grounds for dismissal. You really need that type of clout to keep people from destroying audit trails and otherwise appearing to be someone they are not (with all the privileges set up for the other person). For this to work, your security mechanism must allow for quick ad hoc adjustments to security. If someone is away, no one else should use that user ID; rather, the security administrator should be able to create a temporary user ID on demand.
A set of issues involves passwords: How often should they be changed, and how complex should they be? The proliferation of passwords is one of the biggest nuisances for computer users. Some passwords must have special characters in them; others must not. Some must be a certain minimum length, whereas others cannot be more than a specified length. The rules vary enough that a single individual might need a half-dozen passwords to comply with the rules of various systems. If you add to that a rule that passwords must be changed frequently, you quickly wind up with passwords taped to the display because otherwise no one can remember them. There is no simple answer to this problem other than the use of nonpassword security (which is generally biometric).
Yet another password issue has to do with who knows the passwords. In some organizations, a password is assigned to a new user of a system, and the user must then change it (perhaps periodically). After the initial password is changed, the administrator has no control over the password except to reset or delete it. This allows people to reuse passwords that they can remember.
In other cases, passwords are administered and changed by the administrator. (This is common with passwords for email at some ISPs.) Thus, the administrator has access to all the organization’s passwords; that document is clearly one of the most important security vulnerabilities. For this reason alone, it is often a good idea not to allow anyone except each user to know a password. This solution means less centralized control, but more security in the end.
User-Level Internal Security
The mechanics of implementing security begin with the database file (or files) within your solution itself. Generally, security is first a development task (first planning and then implementation) and is then followed by issues of deployment. This chapter follows that same approach by first discussing how to grant individual users access to your database.
User Accounts
If you select File, Manage, Security, you are taken to the Manage Security dialog. This dialog has a good deal of depth, and it is through this dialog that you will implement much of your security architecture.
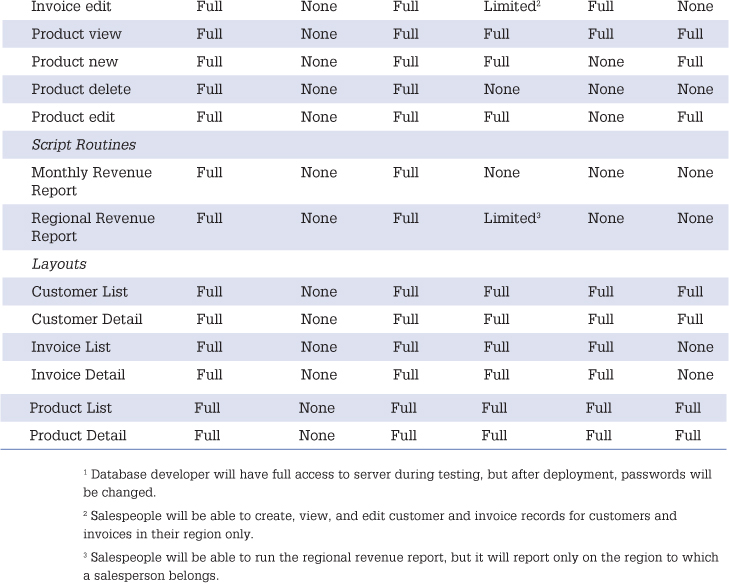
On the first tab of the dialog, Accounts, you create individual user accounts and assign a privilege set to each. It’s important to grasp that various security settings in FileMaker are not controlled at the user account level, but rather are assigned with privilege sets. Accounts are associated with a privilege set, and this association determines the functionality a given user has access to, as shown in Figure 12.1. This allows you to define a privilege set for each role in your system and assign individual users to the corresponding set that matches their role for the database.
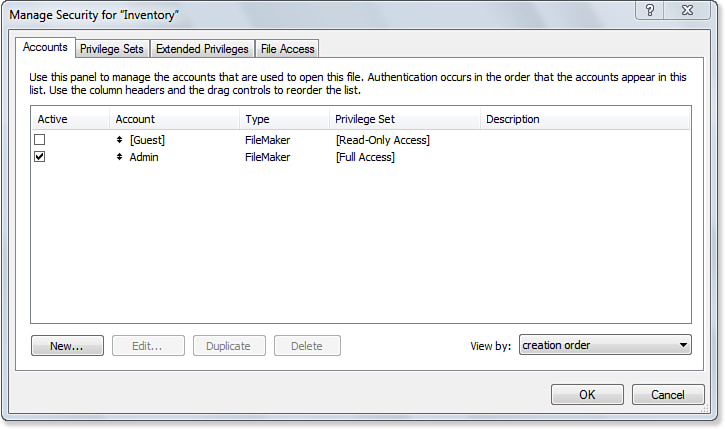
Figure 12.1. The Accounts tab of the Manage Security dialog enables you to see which accounts are active and what their respective privilege sets are.
Default Accounts and Automatic Login
By default, any new FileMaker file is created with an account named Admin with a blank password, and it is set to log in to that account. The Admin account is assigned full access privileges, so in effect the file is created with no restrictions whatsoever, but will have an account and privilege set in place. If you choose to lock down your database, either give the Admin account a password, mark it as inactive in the Accounts tab of Manage Security, or delete it. You should also disable the File Options setting that first tries the Admin account and password on login.
In addition to the Admin account, FileMaker provides a [Guest] account with each new database. The [Guest] account cannot be deleted and is set to be inactive by default. You can choose to enable this [Guest] account in cases in which you want to restrict the development functions of a database but want to open the rest of the system to any user.
To set a file to a default state in which users are not prompted to log in, create an account with the appropriate access level you prefer and then turn on the Log In Using option in the File Options dialog shown in Figure 12.2. Users can override the Log In Using option by holding down the Option key (OS X) or Shift (Windows).
Figure 12.2. A system can automatically log in users with a default account via the File Options dialog.
Account Management
The settings in Figure 12.3 are more typical for a small workgroup application: The Admin account has been marked as inactive and there are four individual users with three privilege sets (Staff is shared). Note the full list of accounts (some of which are disabled) and the assignment of privilege sets.
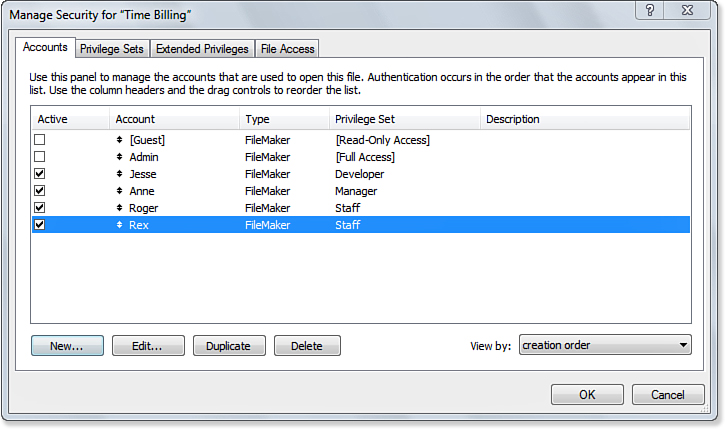
Figure 12.3. On the Accounts tab of the Manage Security dialog, you can review which accounts are active and to what privilege sets they belong.
The Type column shows the means by which authentication is set to occur. It shows either FileMaker, in which case a user’s password is stored within FileMaker (in a fully encrypted, reliably secure form), or External Server, in which case authentication is managed by a separate authentication server. We cover external authentication later in the chapter.
When editing an individual account via the Edit Account dialog shown in Figure 12.4, you can control settings specific to that user. The setting to prompt users to change their password on their next login allows developers and database administrators to reset passwords without having to know the private passwords of their users. To administer a FileMaker database, we recommend creating temporary passwords for people and requiring them to change passwords on their next login.
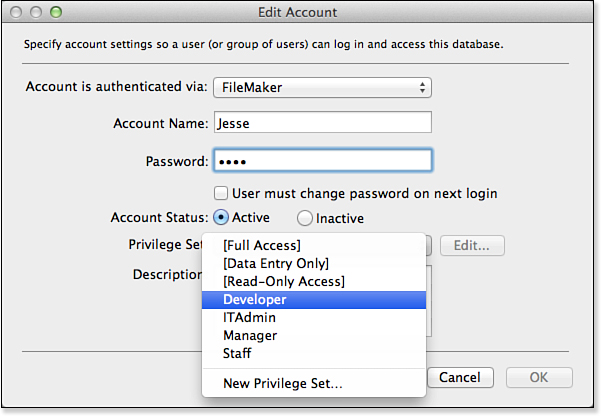
Figure 12.4. The Edit Account dialog enables you to control the authentication and active status for each user.
![]() Note that this practice of creating temporary passwords is not recommended for Instant Web Publishing or for external authentication. Both topics are covered in “Setting Other Feature Privileges,” p. 353.
Note that this practice of creating temporary passwords is not recommended for Instant Web Publishing or for external authentication. Both topics are covered in “Setting Other Feature Privileges,” p. 353.
Note also that you can disable an account from the Edit Account dialog. This capability allows a database administrator to mark an account inactive without having to delete it. Having the capability to mark an account inactive is useful if some users are gone for extended periods or if you want to preserve the fact that an account exists with that specific name. You can also simply toggle the check box on the leftmost side of the Accounts tab (unchecking it to disable an account).
Finally, you can assign a user’s privilege set. An account can have only one privilege set assigned, and that privilege set determines the specific rights and privileges the user will have.
Privilege Sets
Privilege sets compose the bulk of security control in FileMaker. With a privilege set, you can set various access levels, restrict functions and areas within a database, and control who can do development work within a given file. Privilege sets are associated (one to many) with accounts, and they can be thought of as analogous to groups. It is common to see privilege sets established for developers, managers, and so on.
![]() If you need help with the testing process for privilege sets, see “Closing and Reopening File for Testing” in the “Troubleshooting” section at the end of this chapter.
If you need help with the testing process for privilege sets, see “Closing and Reopening File for Testing” in the “Troubleshooting” section at the end of this chapter.
The Privilege Sets tab of the Manage Security dialog, shown in Figure 12.5, enables you to see at a glance which accounts are assigned to which privilege set.
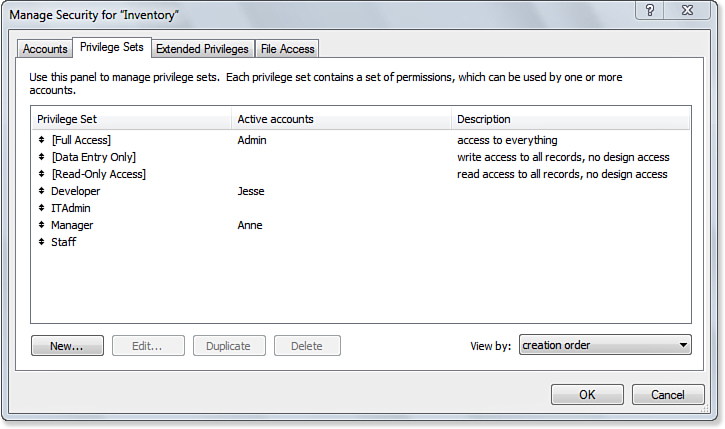
Figure 12.5. The three sets in brackets are defaults created for each new FileMaker file; those below are custom sets created for a specific database solution.
Notice the three sets at the top of the dialog: [Full Access], [Data Entry Only], and [Read-Only Access] are the default sets that FileMaker creates for a new FileMaker file. You cannot delete these sets.
The [Full Access] privilege set is a unique set: It is the single set that has complete access to the file including all development functionality. It cannot be duplicated, and your file must have at least one FileMaker-authenticated account associated with the [Full Access] privilege set. Without [Full Access], you wouldn’t be able to get in and modify your database. Therefore, although you can temporarily create the configuration that was shown in Figure 12.3, you have to provide one account with Full Access before closing the window. (Although the default account is Admin, you can create another one to use Full Access.)
By using the Remove Admin Access feature of the Developer Utilities features in FileMaker Pro Advanced, you can remove the administrative/full access accounts associated with a file and prevent any future development. This is most frequently done with runtime solutions.
![]() To learn more about the Developer Utilities features, see “Removing Admin Access,” p. 631.
To learn more about the Developer Utilities features, see “Removing Admin Access,” p. 631.
If you select a privilege set from those listed and double-click (or click the Edit button), you are taken to the Edit Privilege Set dialog shown in Figure 12.6. It enables you to control both the features within FileMaker that assigned users can access and the degree to which members of a privilege set can perform additional development work on your database file.
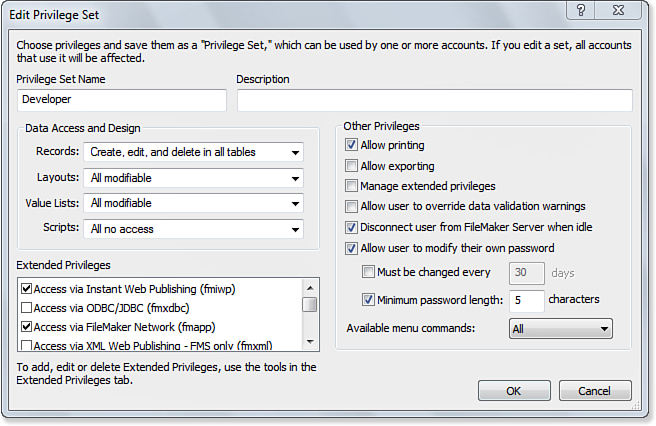
Figure 12.6. The Edit Privilege Set dialog allows you to define the security access for all accounts associated with a given privilege set.
The Edit Privilege Set dialog is divided into three areas: Data Access and Design, Other Privileges, and Extended Privileges. We look more closely at each area in the sections that follow.
Controlling Data Access
The actual data of your file is protected by the Records drop-down list in the Edit Privilege Set dialog. It is important to remember that although you can hide fields from users in various ways (for example, by not placing any field layout objects on layouts), the only way to fully protect your data is through the Records drop-down list.
The menu enables you to apply global permissions where a privilege set can have full access to all tables, no access at all, only the capability to create and edit records, or view-only access. View-only access means that users with this privilege set can see data but cannot make changes or create new records.
By choosing the fifth option, Custom Privileges, you open the Custom Record Privileges dialog, shown in Figure 12.7. Within this dialog, you can control on a table-by-table basis, or even a field-by-field basis, what data a given set of users can view, edit, create, and delete. Each table in your file is listed. You can select multiple tables by Shift-clicking for contiguous selections or Control-clicking for noncontiguous selections. Any changes made to the settings below are applied to each selected table.
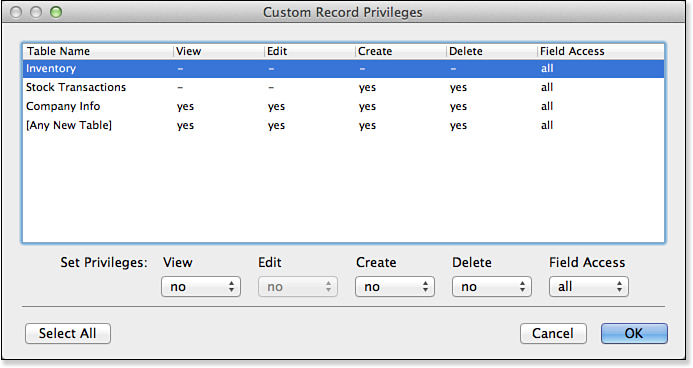
Figure 12.7. These settings show that access to this database has been restricted to a significant degree. The hyphen indicates no access.
Notice the settings for [Any New Table] at the bottom of your table listings. This privilege controls tables added to the file after your security settings have been defined. In other words, if you were to add a TeaPackage table to the database shown, this privilege set would initially have no access to the records in that table. The settings at the bottom of the dialog are listed here:
• View—Controls whether a set of users can consume the information stored in a selected table. By consume, we mean see in Browse mode, search for in Find mode, export, print, email, and so on. Users with View access can perform such actions as clicking into a given field and copying data to their Clipboard.
• Edit—Allows users to make changes to data within a given table. Note that if you set View to No, Edit automatically shows as No as well.
• Create—Controls whether users can create new records in a selected table.
• Delete—Determines whether users can delete records from a given table.
• Field Access—Allows developers to apply view or edit privileges to individual fields rather than to an entire record. In cases in which you have applied settings to the View, Edit, and Field Access settings, the most restrictive setting takes precedence. In other words, if you set a table’s View privileges to Yes but Field Access to None, users will not be able to see or edit any of the fields within that table. Likewise, if you set Field Access to All and View privileges to No, users will not be able to view any records in the given table.
The first four privileges listed offer Yes, No, and Limited options (with the exception of Create, which offers only Yes and No). We cover limited privileges shortly. Field Access controls have more granularity than the other record privileges. The All and None options should be self-explanatory, but the Limited option presents a list of all the fields in a given table, as shown in Figure 12.8.
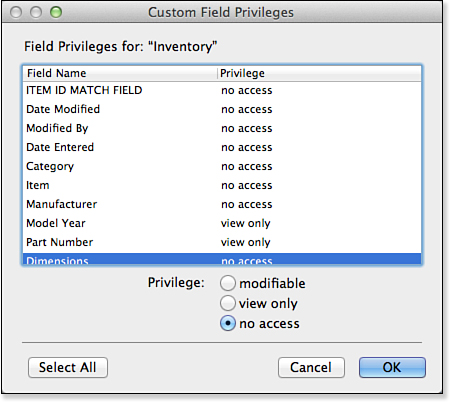
Figure 12.8. Field-level access enables you to control individual fields for a given privilege set.
By setting a field to View Only, you are ensuring that users logged in with this privilege set will be able to see data but not to be able to make changes to those fields.
Conditional Privileges
For record privileges except Create, you also have the option to choose limited privileges. By doing so for View, Edit, and Delete, you open a calculation dialog and can create conditional circumstances by which you can control access on a record-by-record basis.
![]() For a review of the calculation dialog and working with formulas, see Chapter 8, “Getting Started with Calculations.”
For a review of the calculation dialog and working with formulas, see Chapter 8, “Getting Started with Calculations.”
One common conditional privilege calculation is used to govern the deletion of records. If you are storing the creation date or last modification date of a record in a field, you can create a calculation that checks if the date is today. If it is, deletion is allowed; if not, deletion is not allowed. If you are storing the creator or last modifier name, you can further refine the test so that deletion is allowed today only for records that the user created (or modified).
Controlling Layout Use and Development
In the Edit Privilege Set dialog, the next setting after Records is the Layouts drop-down list for controlling layout privileges. With it, you can set the following:
• All No Access—This setting ensures that people associated with the privilege set you’re defining will have no access to any layouts within the current file.
• All View Only—The term view, again, really means consume or use. Users assigned this privilege will not be able to make changes to a layout in Layout mode, but they will be able to use the layout and (assuming that the developer hasn’t omitted the layout from that menu) see it in the menu of layouts offered via the Status toolbar.
• All Modifiable—This option enables you to change to Layout mode and to then edit all the layouts within a file.
• Custom Privileges—Choosing this option takes you to a dialog similar to the one shown previously in Figure 12.7 except that this one controls layouts rather than records (see Figure 12.9).
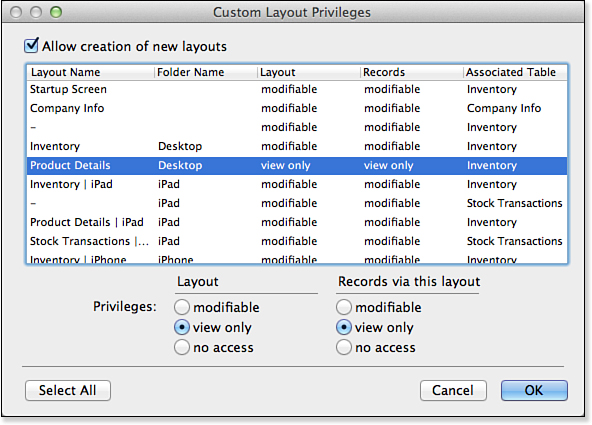
Figure 12.9. This dialog enables you to control who can modify which layouts.
The Custom Layout Privileges dialog enables you to set only specific layouts as modifiable or to turn off access to selected layouts. Furthermore, you can control how users interact with records via the layout in question. You can choose to lock down record access on a layout-by-layout basis. Be aware of the Allow Creation of New Layouts option with the check box in the upper left of the dialog. With it, you can enable someone to add layouts to a file without giving them access to the layouts you, as a developer, created. Imagine the possibility of allowing users to add columns to report layouts, for instance, without having to give them unfettered access to the entire system. In general, modification is safer than creation when it comes to layouts.
One important note about layout access: Just because you lock down access to a certain layout does not mean your users cannot get access to the data in your file. They might be able to pull information via export, might be able to create another FileMaker file and create their own layouts, and so on. The best way to control your data is to lock down both record access and layout access as appropriate.
Controlling Access to Value Lists
The drop-down list for controlling value list privileges in the Edit Privilege Set dialog is similar in function to that of layouts. You can enable all value lists to be modifiable, view (or use) only, and all no access. Likewise, you can choose Custom Privileges and will be presented with the Custom Value List Privileges dialog shown in Figure 12.10.
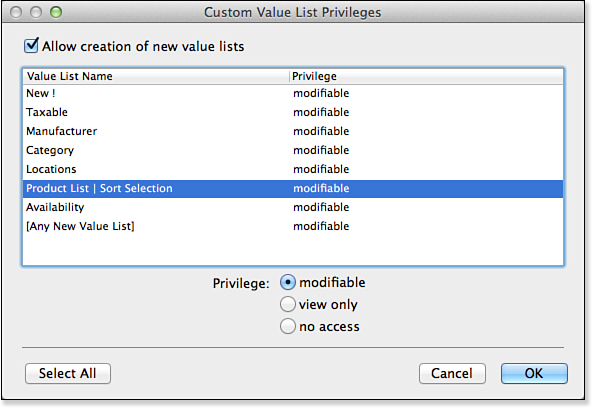
Figure 12.10. The Custom Value List Privileges dialog enables you to, among other things, enable others to edit value lists.
The dialog shown in Figure 12.10 can be used to prevent value lists from being edited or, indeed, from being used at all. If a field has a value list associated but a given user doesn’t have access to use it, that user will be presented with <No Access> messages for radio buttons or check boxes. In the case of a pop-up menu, the user will be able to see an already selected value but will not be able to select a new one. And, last, for a drop-down list, the list will simply not appear (nor will the down arrow, if present, do anything), and the field will behave as though no value list were associated with it.
Note that, as with layouts, you can control the capability to create new value lists. If you’ve given some users limited capabilities to create layouts, it’s somewhat likely that they will need to create value lists as well. The two settings often go hand in hand.
Controlling the Capability to Run Scripts
Developers can often control access to scripts by controlling where in a database’s interface scripts are executed: by button, via the Scripts menu, or as associated with a custom menu. However, in cases in which you simply do not want a class of users to run scripts, the fourth drop-down list in the Data Access and Design area of the Edit Privilege Set dialog controls the capability to execute scripts. As with the other menus, you can quickly set permissions so that all scripts are executable, all modifiable, or all disabled (no access) for a given privilege set. In addition to the global menu choices, you can choose Custom Privileges, which presents the dialog shown in Figure 12.11.
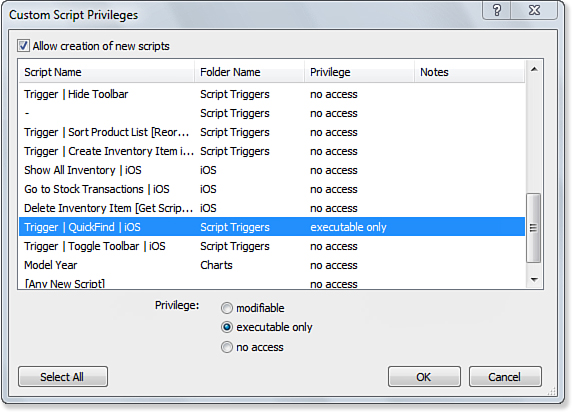
Figure 12.11. The Custom Script Privileges dialog enables script-by-script control over access.
The dialog shown in Figure 12.11 lets you set scripts to be modifiable, executable only, or to allow no access for the current privilege set.
The Notes column will indicate if a script has been set to run with full access. It also reminds you that only people logged in with the [Full Access] privilege set can modify scripts set to run in full access. This is also true for the capability to enable running scripts with full access: If someone is not logged in with [Full Access] privileges, she will not be presented with the Run Script with Full Access check box in ScriptMaker.
![]() For more discussion of running scripts with full access, see “Full Access Privileges,” p. 259.
For more discussion of running scripts with full access, see “Full Access Privileges,” p. 259.
It is important to understand that a script set to run with full access will do exactly that: A user’s security privileges will be overridden, and the script will execute as though it were run by a user with [Full Access] privileges. This dialog, then, is useful in making sure that you can prevent users from executing a script, even if it is set to run with full access privileges.
Setting Other Feature Privileges
The area on the right of the Edit Privilege Set dialog controls access to a few of FileMaker’s interface commands and offers some specific settings related to security.
The Allow Printing and Allow Exporting options should be somewhat obvious, but be sure to note that they also control the functions to Save as PDF (tied to the capability to print) and Save as Excel (tied to the capability to export). If you want to prevent your users from taking data elsewhere, you will need to turn off printing and exporting. Note, too, that the only way to prevent users from making use of the Email command is to use a custom menu to remove that menu item. There is no security setting that controls whether someone can use the Email command in the File menu.
Allowing users to override data validation warnings should be obvious as well. When a validation error occurs, users with this privilege will not be presented with the capability to accept an invalid entry into a validated field, regardless of whether Allow User to Override Data Validation Warnings is turned on for the field. This provides you with a means of taking away the capability to override validation warnings from some users.
![]() For more detail on validation, see “Field Validation,” p. 102.
For more detail on validation, see “Field Validation,” p. 102.
The option Disconnect User from FileMaker Server When Idle (the time interval is defined in FileMaker Server’s settings) should almost always be enabled. When it’s disabled, the server will never disconnect idle users who have this privilege set. One occasion to disable this setting is if you need a client computer set up to perform automated tasks.
We recommend using the Allow User to Modify Their Own Password feature and requiring users to change their passwords, but remember that Instant Web Publishing and external authentication do not support this capability. Recommended best practices suggest that passwords should be changed regularly and should be of a certain minimum length. (There is no capacity in FileMaker to set rules about the content of a password, only its length.) Note, though, that these settings can get you in trouble: If you don’t allow someone to change his own password, but on the Edit Account dialog require that he do so on the next login, the user can get trapped and be unable to log in to the database.
The last setting, Available Menu Commands, allows you to disable FileMaker’s menu items, leaving just those to open and close a file, run scripts, and so on, or additionally the Clipboard and spelling items in the Edit menu. This option is often used to completely lock down a FileMaker solution. When you disable all menu items here, it’s an all-or-nothing proposition that will then require that you re-create all the functionality you want users to be able to have. We often recommend instead using a custom menu set that doesn’t contain the items you’re trying to hide from users.
Note that the feature to change passwords is not supported by Instant Web Publishing. Do not enable it for users who will exclusively access your database via IWP.
![]() To learn about custom menus, see “Working with Custom Menus,” p. 396.
To learn about custom menus, see “Working with Custom Menus,” p. 396.
Extended Privileges
Extended privileges comprise the third area of security within FileMaker files. Think of extended privileges as nothing more than on/off switches. A privilege set has a specific extended privilege either enabled or disabled. There are no other settings or logic to extended privileges.
Note that if you choose Minimum or Edit Only, these settings will disable custom menus just as they will standard FileMaker menu items.
Default Extended Privileges
FileMaker Pro ships with some extended privileges already in place, as shown in Figure 12.12. These privileges are used to enable access into FileMaker by various means; the behaviors of these privileges are controlled by FileMaker itself.
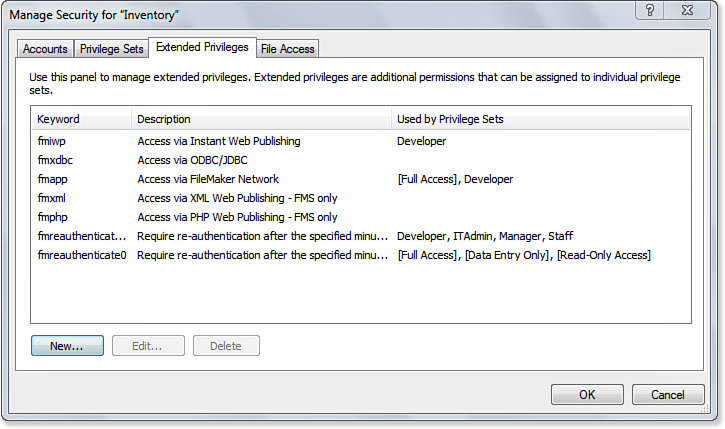
Figure 12.12. FileMaker ships with a set of existing extended privileges.
The default extended privileges are as follows:
• Access via Instant Web Publishing—This privilege enables users to access the file via a web browser using Instant Web Publishing.
![]() To learn about Instant Web Publishing, see Chapter 24, “Instant Web Publishing.”
To learn about Instant Web Publishing, see Chapter 24, “Instant Web Publishing.”
• Access via ODBC/JDBC—Access via ODBC/JDBC needs to be enabled if you want an ODBC or JDBC client to use SQL to converse with FileMaker.
![]() To learn more about xDBC connectivity, see Chapter 22, “Importing Data into FileMaker Pro,” and Chapter 23, “Exporting Data from FileMaker.”
To learn more about xDBC connectivity, see Chapter 22, “Importing Data into FileMaker Pro,” and Chapter 23, “Exporting Data from FileMaker.”
• Access via FileMaker Network—This privilege allows users to access the file remotely, across a network, using FileMaker Pro (or Advanced) client connections. This is true for both peer-to-peer sharing and hosting files on FileMaker Server.
![]() To learn about hosting FileMaker via FileMaker Server, see Chapter 27, “FileMaker Server and Server Advanced.”
To learn about hosting FileMaker via FileMaker Server, see Chapter 27, “FileMaker Server and Server Advanced.”
• Access via XML Web Publishing—As noted in the dialog, this extended privilege works with files hosted by FileMaker Server Advanced. It allows users (or other systems) access to your data via XML.
• Access via PHP Web Publishing—This features enables you to publish files hosted by FileMaker Server Advanced using the FileMaker PHP API.
• Require re-authentication after the specified minutes—There are two privileges in this category: fmreauthenticate10 and fmreauthenticate0. For FileMaker Go, they require reauthentication after it has been asleep or in background for the designated number of minutes. A 10-minute grace period might be right for trusted users, whereas casual users might need a 0-minute grace period. Figure 12.13 shows details of this extended privilege.
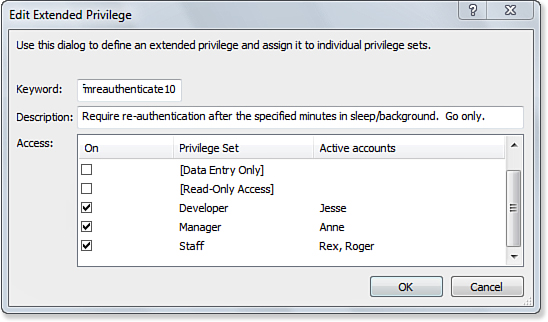
Figure 12.13. You can control re-authentication in FileMaker Go with extended privilege sets.
![]() To learn about Custom Web Publishing, PHP, and XML, see Chapter 25, “Custom Web Publishing with PHP and XML.”
To learn about Custom Web Publishing, PHP, and XML, see Chapter 25, “Custom Web Publishing with PHP and XML.”
![]() If you are having trouble getting your database files to appear on FileMaker Server and are sure that your authentication is correct, see “Database Doesn’t Appear on FileMaker Server” in the “Troubleshooting” section at the end of this chapter.
If you are having trouble getting your database files to appear on FileMaker Server and are sure that your authentication is correct, see “Database Doesn’t Appear on FileMaker Server” in the “Troubleshooting” section at the end of this chapter.
Custom Extended Privileges
Beyond the six extended privileges included with FileMaker, you can add your own. After creating the extended privileges, you can use the Get (ExtendedPrivileges) function to see what extended privileges have been granted to the current user. This gives you the capability of modifying your solution’s logic to take these extended privileges into account; script branching, calculation results, field validation, and even custom menu loading could all take the current extended privileges into account. The options are nearly endless.
One of the advantages of extended privileges is that you can grant users the ability to manage them. On the right of the Edit Extended Privilege dialog, as shown in Figure 12.14, you can give users access to a security dialog devoted only to extended privileges. You might choose to do this if you want to expose some security control in your system without granting someone [Full Access].
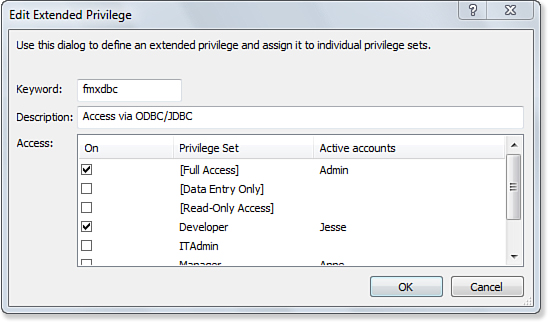
Figure 12.14. Users can assign which privilege sets are associated with an extended privilege when the Manage Extended Privileges security setting is enabled.
Another advantage to extended privileges is that they are not session specific: If you enable an extended privilege for a privilege set, it is immediately available to all users logged in with that privilege set. If, for example, you want to disable access to a file via the Web while you complete some development, you can simply turn off the extended privilege for all the associated privilege sets.
As an example of putting extended privileges to use, consider a database with a series of reports that many, but not all, users will need to have access to. You could certainly control whether users could execute the individual scripts and navigate to the layouts in question, but creating an extended privilege for these reports will allow you to enable them across your various privilege sets in one central place. You can also disable them when it would perhaps be inappropriate to run them before some full set of data is input. A portion of the script you might use to begin the reporting procedure could look like this:
If [PatternCount (Get (ExtendedPrivileges); "yearendReports")]
Perform Script ["Goto Report Menu"]
Else
Show Custom Dialog ["Reports Access"; "Access not allowed."]
End If
Extended privileges are a useful way to extend FileMaker’s security model into the logic of your solutions.
File Access
The last tab on the Security dialog lets you control which files can access the file in which you are working. This provides a new dimension of security beyond that of accounts and privileges. As you see in Figure 12.15, by default this tab is blank. No external files have been authorized, which means that any file can access this one subject to the security settings for the accounts defined in this file.

Figure 12.15. Blank file access means all files have access.
Use the check box to flip this setting; when it is checked, only listed files have access. Once you have turned the check box on, the Authorize button at the lower left of the dialog is enabled. You can use it to navigate to a file that you want to authorize, as shown in Figure 12.16.
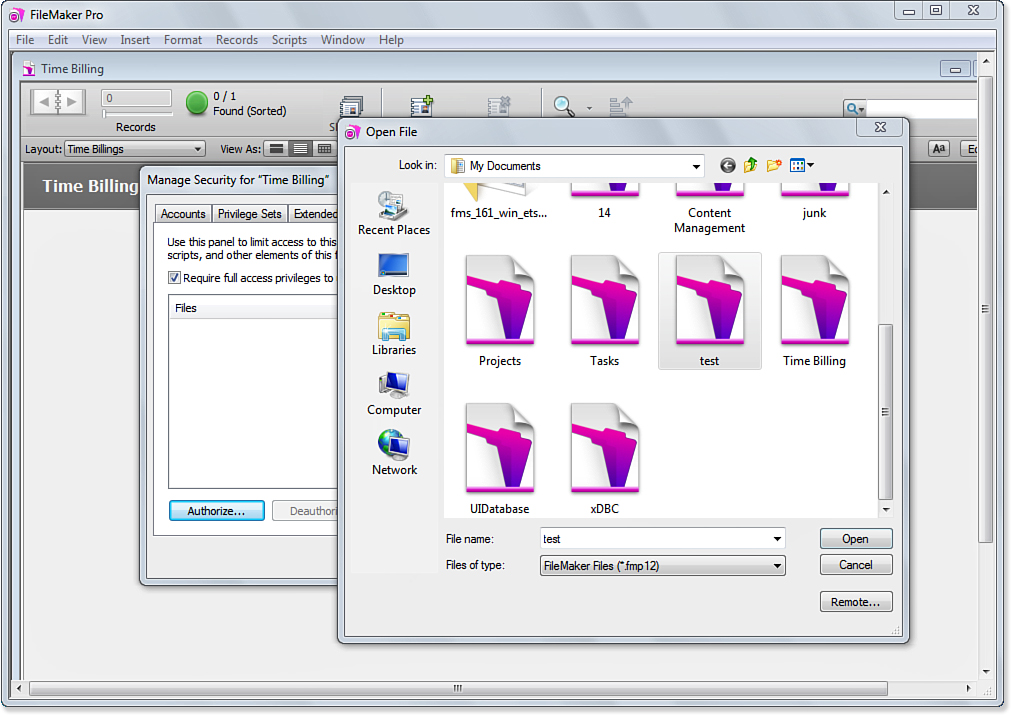
Figure 12.16. Authorize a file to access the current one.
When you click Open, that file will be added to the list of authorized files, as shown in Figure 12.17. Also note that a record is created of who authorized that file and when.
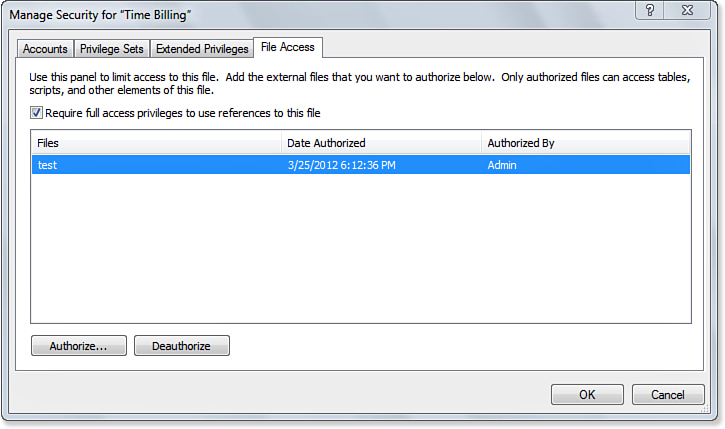
Figure 12.17. A record of authorizations is kept.
This level of security works together with account security: Both the account and the external file must have access.
File-Level Access Security
After you have a FileMaker database properly secured from a development standpoint, you need to consider how people will gain access to the file itself and log in. If you are hosting the file peer-to-peer, FileMaker’s internal file security is your only option. FileMaker Server, on the other hand, has additional security settings and capabilities that can better safeguard your solutions.
![]() If you’ve forgotten your Admin-level password to a database (and mostly just need sympathy), see “Forgotten Admin Password” in the “Troubleshooting” section at the end of this chapter.
If you’ve forgotten your Admin-level password to a database (and mostly just need sympathy), see “Forgotten Admin Password” in the “Troubleshooting” section at the end of this chapter.
Server Administration Security
To protect the files and access to your databases properly, you will need to consider the physical makeup of your server and its environment. Is it in a locked room? Is it properly situated behind a firewall? The actual hardware configuration for FileMaker Server from a security standpoint requires that you follow the best practices of IT organizations in general. Although this is not an exhaustive list, here are some guidelines:
• Place your physical server in a controlled, locked room.
• Make certain that the server is situated behind a firewall and that as few ports as possible allow traffic, especially incoming, to it.
• Do not turn on file sharing for the server. Putting files on the server should be something you do on the server or from another computer using Admin Console.
• Do not allow file sharing on your backup directory, or at least secure it from your organization’s general network.
• Make certain to secure the server with OS-level accounts and passwords, and set it to lock automatically after a short period of idle time.
As stated previously, this list is hardly comprehensive. The intent here is that you consider the environment in which you place FileMaker files as carefully as you’ve considered the development of your files internally. If you spend effort to lock away data from certain accounts but then leave backup files within easy reach of everyone on your network, your exposure to risk increases.
The first step in securing your server is to establish a password for administering the server itself. You will need to use the FileMaker Server Admin Console to configure these settings.
![]() To understand how to configure FileMaker Server using the FileMaker Server Admin Console, see “Using Admin Console,” p. 657.
To understand how to configure FileMaker Server using the FileMaker Server Admin Console, see “Using Admin Console,” p. 657.
Even when your server is physically secure, we recommend setting a password for administering FileMaker Server. Good security is a case of rainy-day thinking, and the more precaution you take, the better you’ll avoid unanticipated problems.
You also have the option of enabling remote administration and setting an additional password for such. This will allow you to open the FileMaker Server Admin Console from any computer and, using a network address, connect to your server to perform tasks such as opening and closing databases as well as running backup routines.
Security over the Network
In addition to the administration of the server, you will have to consider securing the data stream that passes from FileMaker clients and FileMaker Server. FileMaker uses TCP/IP as its network protocol, and when you either host a file via FileMaker Server or share it via peer-to-peer connections, information passes from host to client in a near-constant exchange. To secure this stream of data from possible threats such as network packet sniffing software, you should minimally use firewall and VPN technologies to prevent outsiders from gaining access to your internal network. To provide the most secure environment possible, you can also choose to encrypt the data passing from FileMaker Server to clients. You begin by going into FileMaker Server Admin Console, as shown in Figure 12.18.
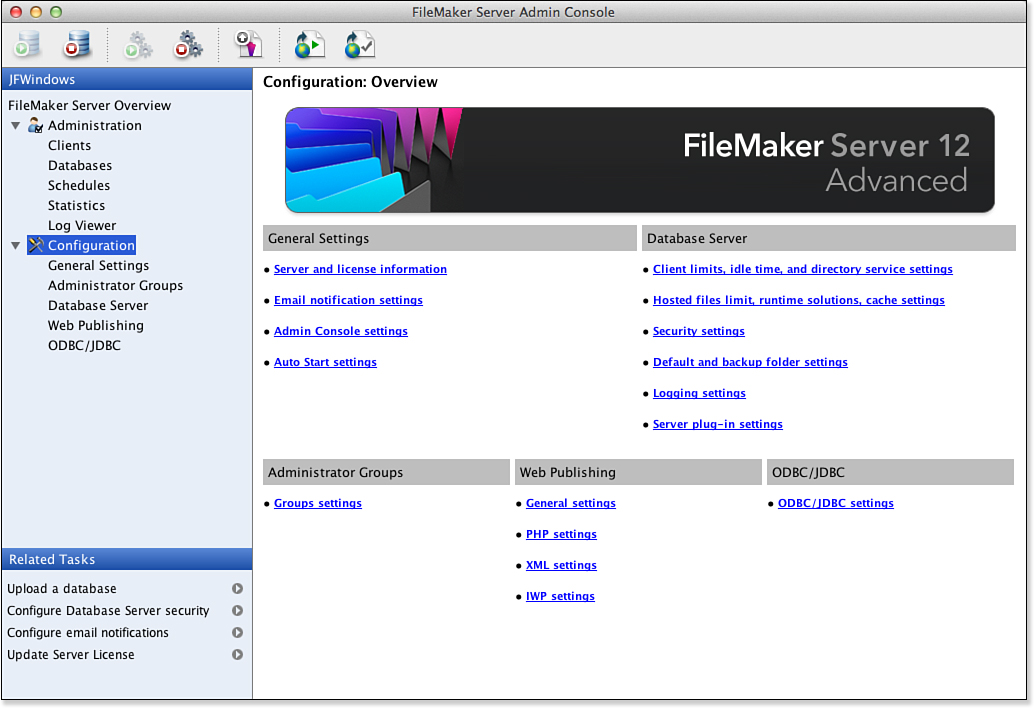
Figure 12.18. Use Server Admin Console to adjust security.
In the Database Server section at the upper right, choose Security Settings to open the dialog shown in Figure 12.19.
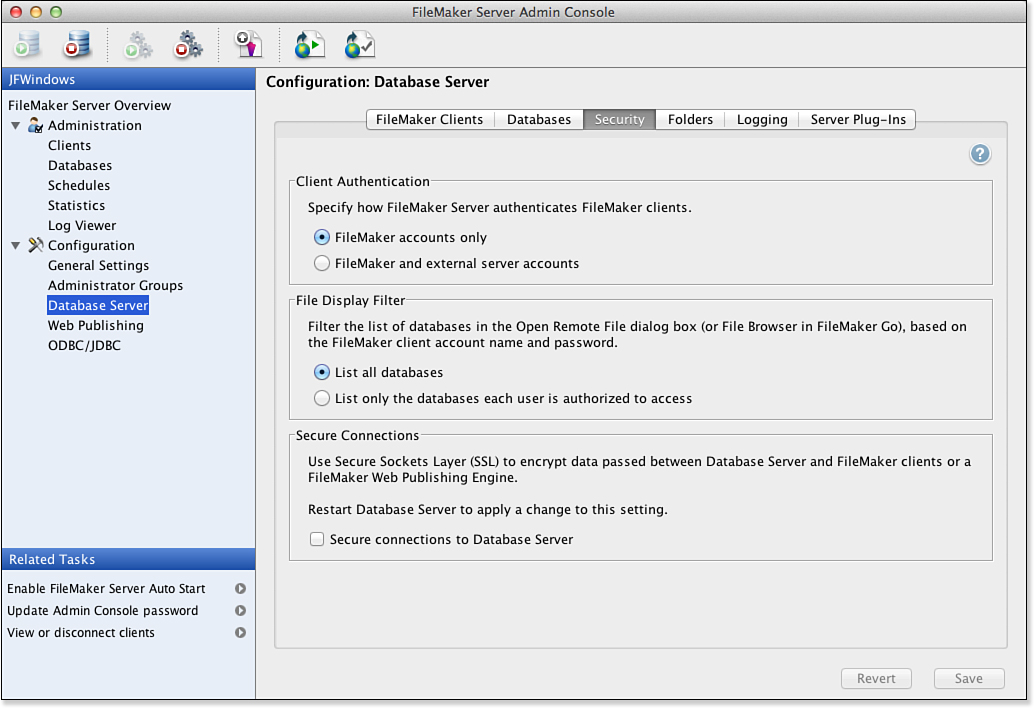
Figure 12.19. Adjust security settings in Server Admin Console.
FileMaker client computers decrypt encrypted information before displaying it. The setting is at the bottom of the dialog shown in Figure 12.18: Secure Connections to Database Server.
User Authentication
After your server is secure and you protect your network traffic by either isolating your network itself or encrypting your data (or both), you need to establish a means for each individual user to authenticate to your databases. An account can be authenticated either internally or externally. In the Edit Account dialog, if you set the authentication method to FileMaker, the account names will be stored within the file. Passwords are not actually stored in the file; they are encrypted every time they are used or changed with a one-way hash algorithm (based on respected industry-standard security methods). Each time your password is used, its encrypted hash changes. If someone were to gain access to your FileMaker file and crack the file somehow, he would be able to decipher only the last used hash algorithm. If you take the added precaution of securing your FileMaker files on FileMaker Server, you will remove even the opportunity to manipulate the physical database file.
External Authentication
External authentication is the other means by which users’ credentials can be tested before they gain access to a database file. When you designate an account as externally authenticated, in the Edit Account dialog shown previously in Figure 12.4, the dialog changes to be slightly different in that no password or individual user account is specified. Instead, a group name is associated with a privilege set (just as accounts are), as shown in Figure 12.20.
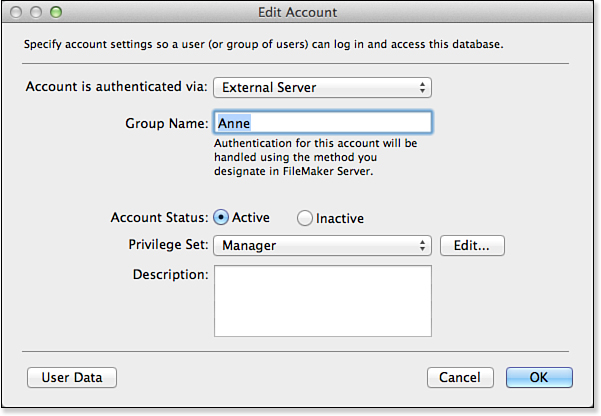
Figure 12.20. External authentication passes credentials to an external server and expects a list of valid groups in return.
Instead of creating an account name and password, with external authentication, you designate just the account name. Most often this name will correspond to a group created on the external authentication server. For example, consider a user of your system, Merzal Gold, with an Active Directory account of mgold and a password of c0pp3r. His Active Directory administrator assigned him to the companywide groups Sales and Marketing. When he logs in with mgold/c0pp3r, FileMaker Server passes these credentials to the Active Directory server. That external server then verifies that he’s logged in correctly according to his credentials and returns a list of groups—Sales and Marketing—to FileMaker. FileMaker scans its accounts list for externally authenticated accounts with either of those names and logs Merzal in to the first match it finds.
Note that within FileMaker an account can be associated with only one privilege set; however, in an externally authenticated scenario, a single user might belong to multiple groups. It is the first group, from top to bottom (when sorted by authentication order), to which a user will be associated when externally authenticated.
This then means that you will need to coordinate the naming of groups between your authentication server and accounts within FileMaker. We recommend adopting a naming convention that reminds your server administrator that the groups established are there to serve your FileMaker databases.
It is important to understand that, for an externally authenticated account, individual user accounts and their passwords are managed and stored not by FileMaker itself, but by your server’s operating system (hence, external to FileMaker). If your FileMaker Server is part of an Active Directory (on Windows) or Open Directory (on OS X) domain, your users will be authenticated by the server that controls access to your domain. This authentication server could be the same computer on which FileMaker Server is hosted or a different computer. If your server instead makes use of local users and groups, FileMaker Server uses those accounts for authentication.
This external authentication is used solely to determine whether someone should have access to a FileMaker file and to what groups that person belongs. The only thing FileMaker relies on in external authentication is to have the operating system verify a person’s password and return the group names to which she belongs. Those names are compared to the externally authenticated accounts within FileMaker and a user’s privileges determined by the first valid match.
Keep in mind that authentication is determined on an account-by-account basis. You can combine externally authenticated accounts with internal FileMaker accounts as needed. In fact, FileMaker requires that you keep at least one internally authenticated account associated with the [Full Access] privilege set to ensure that you will still be able to access the file if the external authentication server is unavailable.
Note that you can opt to have an internal account name and externally authenticated account name be identical. You, as a developer, might have credentials on the external server but also want internal authentication. The first account listed by authentication order in the Manage Security dialog will be used if duplicates are present.
By default, FileMaker Server is set to allow only internal authentication. To enable both external and internal authentication, you will have to use Server Admin Console and check the FileMaker and External Server Accounts check box shown at the top in the Client Authentication section, which was shown in Figure 12.20.
A few words of caution regarding external authentication: It is theoretically possible for someone to gain access to the physical file of your database, host it on his own FileMaker Server, and then manage to rightly determine what group names were used in its security scheme to grant himself access. This multistep process is fairly unlikely, and you can protect against it by securing your server and keeping your [Full Access] accounts tightly controlled. Note, too, that external authentication requires FileMaker Server. It is not supported in peer-to-peer hosting.
File List Filtering
The last element in security is a final bit of protection and convenience: Users can’t break into databases they don’t know are there. Using FileMaker Server, you can limit the list of databases users see to only those to which they have access. In the FileMaker Server Admin Console, enable the Display Only the Databases Each User Is Authorized to Access setting.
When a user uses the Open Remote File dialog and chooses a server, FileMaker first tries the credentials the person used to log in on her computer (based on operating system). If that fails, the user is asked for a username and password. On Windows, you can go directly to the username and password prompt by holding down the Shift key when selecting a server.
The process is similar in OS X, but the credentials used are stored in the keychain. To override the keychain, hold down the Option key when selecting a server.
After users are authenticated, they are shown a list of databases within which they have valid accounts or group memberships. In the case of external authentication, this is a seamless process. In the case of internally authenticated databases, users may have to enter their login information twice: once to get a list of databases and a second time when logging in to the specific database they then choose. However, if you have set an auto-enter login in File Options, that will be used and there is no two-step login.
Troubleshooting
Forgotten Admin Password
What can I do if I forget my Admin password and no longer have [Full Access] privileges?
Unfortunately, you’re out of luck. In the past, FileMaker was able to open its own databases and provide access again, but this is no longer technically possible given the encryption used.
We recommend that you create two accounts with [Full Access] privileges and make sure that you (or a single person in your organization) aren’t the only one who can gain full access into a database file.
Database Doesn’t Appear on FileMaker Server
I am hosting a file on FileMaker Server. It’s open and I know my [Full Access] admin account information, but the file doesn’t show up in the list of databases available on that server.
Remember that to access a FileMaker file remotely through the network, you will need to turn on the extended privilege for FileMaker Network Access (fmapp) from a computer other than the server. Even though you have a [Full Access] account, by default no extended privileges are enabled for any accounts within FileMaker.
Closing and Reopening File for Testing
I’m trying to enable security settings, and I have to keep closing and reopening the file to do proper testing. Is there some better way to test other accounts?
We strongly recommend that you create a logout script and button for your users to use. Then, after that’s available via whatever interface you choose, we recommend folding some conditional logic in for you as a developer. If, for example, you hold down the Shift key in the following script, it performs a re-login step without forcing the user to close and reopen the file:
Logout
# purpose: Logout with relogin for testing
# Shift key performs relogin
If [ Get ( ActiveModifierKeys ) = 1 ]
Re-Login [ ]
Else
Close File [ Current File ]
End If
#
FileMaker Extra: Working with Multiple Files
Throughout this chapter we have been careful to note that security settings are specific to a single file within FileMaker. If you have a solution that spans multiple files, you will have to duplicate your account and privilege settings across those multiple files. This task can become onerous when you have more than a handful of accounts or groups.
Privilege sets within FileMaker cannot be programmatically controlled. In other words, you cannot use a script to define a privilege set. You will have to create the appropriate privilege sets in each file of your solution. This is as expected; by definition, each privilege set should be specific to the file in which it sits.
Accounts, on the other hand, can be managed by script, and there are some techniques you can use to simplify the management of accounts within your suite of files. The following are the Accounts script steps available to you:
• Add Account—Using this script step, you can add an account to your file. Note that the script step dialog shown in Figure 12.21 requires that it be associated with a specific privilege set. You will need to create as many Add Account scripts as you have privilege sets. Note that this script step works only for internally authenticated accounts.
• Delete Account—This script step enables you to permanently remove an account (by name) from your file.
• Reset Account Password—Resetting the account password allows you to change it to a default of some sort without knowing the prior password.
• Change Password—Change Password requires the current password followed by the new password.
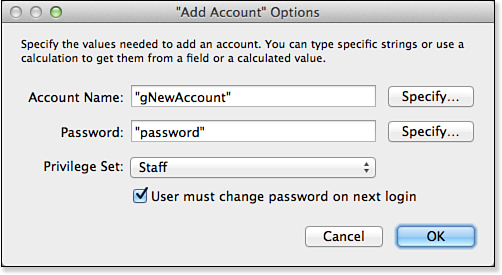
Figure 12.21. The Add Account script step allows you to add internally authenticated users to a file.
• Enable Account—This script step enables you to activate and deactivate an account. This is a nonpermanent way to deny someone access.
• Re-login—FileMaker prompts the user to log in again, or you can store credentials in this script step to do so without a dialog.
To use these script steps to support work in multiple files, you will need to create a user interface that allows users to create accounts and change passwords. Note that in the dialog shown in Figure 12.21, which you complete as you are building the script in ScriptMaker, there is a Specify button next to both the Account Name and the Password boxes.
First, create a layout (or dialog) that asks a user for a new account name and password she wants to add to your multifile solution. You can also, by default, set all new passwords to “password” and require the user to change them immediately. You should have the user enter that information into two fields set with global storage. You will also need a pop-up menu of privilege sets available within your solution, and certainly you should feel free to omit those that are sensitive, such as [Full Access].
Second, write a script that calls subscripts in each of your solution files. The subscript should use the Add Account script step to create the new user account. Where you have to provide an account name and password, simply reference the two global fields you had set up previously. Note that with global fields, you can add an external table occurrence from a different file and gain access to the fields as you need. You can follow similar techniques for changing passwords, deleting accounts, and enabling them.