
21. Connecting to External SQL Data Sources
ODBC Basics
Initially developed by Microsoft in 1991 as Open Database Connectivity interface, ODBC provides a way of accessing ODBC-compliant databases without your knowing anything about the internal workings of the database. ODBC is an API you can call from a variety of programming languages on a variety of operating systems. JDBC is a set of Java classes that allows access to the ODBC database. (Sometimes the two concepts are referred to collectively as xDBC.)
SQL
FileMaker’s ODBC implementations convert internal FileMaker concepts to SQL both when sending and receiving data. You never see the SQL, but it is there, making the connections work. SQL is sometimes considered an acronym for Structured Query Language, but it is not. Its original name was Structured English Query Language (SEQUEL), but it turned out that SEQUEL was a trademark already in use.
SQL is what is called a declarative language: It describes what the data is and what its relationships are. Specific databases process the SQL declarations in their own ways. The other style of programming, imperative programming, specifies how a process is to be carried out, not what its final state should be, although that is contained in the imperative instructions.
In FileMaker terms, the Manage Database dialog in which you specify tables, fields, and relationships is declarative, as are layouts and value lists. Scripts are imperative.
FileMaker Architecture
FileMaker files contain a variety of items: scripts, layouts, value lists, accounts, privileges...and data. One of the main benefits of FileMaker is that everything is in one place and works seamlessly together, even if you are working with multiple copies of FileMaker Pro or a shared copy of FileMaker Server.
Database systems such as Oracle and SQL Server typically separate the data from the interface elements. In fact, although these products can have interface elements, programming, and scripting features, other products that access the data in the database directly can replace them (usually by using SQL).
FileMaker can interact with databases such as SQL Server, Oracle, and MySQL; it brings its own nondatabase elements (scripts, layouts, and so forth), and interacts with the external database using ODBC, an industry standard. Many databases use SQL internally, but FileMaker does not.
ODBC Architecture
The ODBC architecture is very simple; understanding it will make it easier for you to use FileMaker’s various ODBC features. There are four basic concepts in ODBC:
• Applications are programs that need to access ODBC data.
• Databases are repositories of data. They can be traditional databases such as Oracle, DB2, FileMaker, and Access; but they can also be other repositories of data, such as Excel spreadsheets.
• Drivers interact with databases and driver managers.
• Driver managers mediate between drivers and applications.
This structure means that applications and databases can talk to one another without either one knowing the inner workings of the other. Drivers must know about their specific databases, and driver managers must know about their specific applications. The ODBC API forges the critical link between drivers and driver managers, and that link requires nothing specific to either the application or the database. It frequently is a link between computers. The database and its driver run on one computer, while the driver manager and the application run on another.
Driver managers can be distributed or even built into applications. The necessary components to implement driver management functionality are installed as part of standard FileMaker installations. This allows FileMaker to connect to ODBC drivers and through them to other databases. Applications that want to use ODBC to connect to FileMaker as a database provide their own driver managers.
This section describes the standard architecture. In most cases, there are a few notes and exceptions. Sometimes an application supports a subset or superset of ODBC commands; likewise, a database can support a subset or superset of ODBC commands. Drivers can come from the database vendor or from a third party. A company such as FileMaker often tests drivers and recommends specific drivers that it knows will work. This applies both to the application side and the database side.
The specific driver required depends on the operating system on which the database is running—that is, the database in ODBC terms. It could be FileMaker, or it might be Oracle, SQL Server, or MySQL. They, too, can be built into the database code. In the case of FileMaker functioning as a database (an ODBC data source), the necessary code is built into FileMaker Server Advanced for up to 50 connections and into FileMaker Pro for up to five connections on the same computer on which FileMaker Pro is running.
Setting Up FileMaker Databases for ODBC
ODBC can work with FileMaker as a data source or as a consumer. If you are going to be using FileMaker as a data source, there is one essential step to setting up your FileMaker databases to be shared, and there are several optional steps. The essential step is to enable the ODBC/JDBC extended privilege for the database, as shown in Figure 21.1.

Figure 21.1. Enable the ODBC/JDBC extended privilege.
Included with the electronic documentation for FileMaker Pro and FileMaker Server (along with their Advanced versions) you will find the ODBC and JDBC Guide. It outlines the optional steps.
![]() If you have more questions, searching the FileMaker Knowledge Base for “external SQL” will provide the latest updates. In addition, for issues such as this, the TechNet area on Filemaker.com is an excellent resource to search for information and to pose questions.
If you have more questions, searching the FileMaker Knowledge Base for “external SQL” will provide the latest updates. In addition, for issues such as this, the TechNet area on Filemaker.com is an excellent resource to search for information and to pose questions.
Because there are some differences in field types and the way in which ODBC functions, as opposed to FileMaker, you might have to make some adjustments in these areas or simply be aware of them. In most cases, you can put this information in the back of your mind and deal with it only if your testing reveals problems. For the vast majority of cases, enabling the extended privilege is sufficient.
Setting Up and Administering ODBC
This section helps you understand what you have to do to set up ODBC without regard to FileMaker—that is, the steps that must be taken before you can start to use the FileMaker ODBC and SQL features described in the rest of this chapter.
ODBC enables you to access a database; it handles the technical matters. You have to handle the practical matters: You need the permission of the database administrator (DBA), and you might need a whole host of sign-offs from various owners of the data involved. Gaining access to data is sometimes difficult, particularly if you are doing something that an organization has never done before or if the data is particularly sensitive.
Neither FileMaker nor ODBC can help you out here except for the general suggestion that by using standards, you are not bypassing security but enhancing it. That is an argument that has worked on occasion. You can phrase it as, “Wouldn’t you rather I logged in under your supervision using ODBC than access the data in some other way that you won’t know about?”
Installing Drivers
You must set up a driver for each database management system (DBMS) you will access. Often, the driver is set up or installed when the DBMS is installed, and you have nothing further to do. Even if you do have to install it yourself, as you will see here, it is usually a matter of running an installer or dragging a file into a specified location. Because drivers are specific to databases, you normally have to do little configuration: It has all been done for you, which is the point of the driver.
You must set up a data source for each database you will access. Each data source will have its own data source name—a DSN. Often, the DSN will be set up for you by the database administrator and, again, you have nothing further to do.
This section of the chapter might be optional for you. It concerns setting up drivers for databases and setting up ODBC data source names (DSNs). These steps are basically done once, so if you are taking over a project that has already been configured and set up, you can skip these steps and jump right into the database.
All this is done outside FileMaker for anyone who wants to access the relevant DBMS and the specific database using ODBC. Because FileMaker itself can be used as an ODBC data source, you will see instructions for setting up drivers and DSN for FileMaker in this section, but you will not be using FileMaker to do so. In this regard, FileMaker is just another DBMS.
Here are the ways in which you can integrate FileMaker with SQL:
• Use another application to access FileMaker data—In this case, FileMaker is the data source and the other application is the ODBC client.
• Use FileMaker to access other SQL data—In this case, FileMaker is the ODBC client and the other database is the data source.
You need a driver that is compatible with the data source. The ODBC functionality for the ODBC client might be built in, or it might require another driver.
The driver used to access FileMaker data is distributed with FileMaker applications. It may be an optional install. You can also search Filemaker.com for downloadable drivers. Once the driver is installed and configured, you usually do not have to worry about it again.
Before installing new ODBC drivers, check to see whether you have older versions on the computer. If so, uninstall them. On Windows, use Add or Remove Programs from the Start menu; on OS X, you might have to physically remove them. Their most likely locations are the locations into which you will install the new drivers.
When you use FileMaker as an ODBC client to access other data sources, the driver(s) are usually provided by the other database vendor.
![]() Complete instructions are available in the Documentation folder of your installation disc. Look for “FileMaker X ODBC and JDBC Guide,” where X is your version number. The filename for the English version is fmX_odbc_jdbc_guide_en.pdf; others are similarly named. You might want to search the FileMaker Knowledge Base just before doing the installation to check whether there are updated versions.
Complete instructions are available in the Documentation folder of your installation disc. Look for “FileMaker X ODBC and JDBC Guide,” where X is your version number. The filename for the English version is fmX_odbc_jdbc_guide_en.pdf; others are similarly named. You might want to search the FileMaker Knowledge Base just before doing the installation to check whether there are updated versions.
Check for the latest version numbers on the FileMaker website. These are the certified drivers at the time the book is being written.
![]() For the latest information on drivers for external SQL data sources, see the FileMaker website at www.filemaker.com/support/technologies/sql.html.
For the latest information on drivers for external SQL data sources, see the FileMaker website at www.filemaker.com/support/technologies/sql.html.
![]() Drivers for OS X are provided by Actual Technologies. You can reach them at www.actualtechnologies.com/filemaker.php
Drivers for OS X are provided by Actual Technologies. You can reach them at www.actualtechnologies.com/filemaker.php
If you are using FileMaker Server Advanced, you can install the drivers on that computer so that it has access to the databases. Then clients connect as usual to FileMaker Server Advanced using their own copies of FileMaker. Because the server has ODBC access through its drivers, client users do not need drivers on their computers. This can be a more efficient installation than having each FileMaker user install drivers and connect individually to the SQL databases.
Oracle
• Oracle 9i Release 2 (9.2.0.1) on Windows use Oracle Database Client version 9.2.0.6.5
• Oracle 10g Release 2 (10.2.0.4) on Windows use Oracle Database Client version 10.2.0.3.0
• Oracle 11g Release 1 (11.1.0) on Windows use Oracle Database Client version 11.1.0.6.0
• For all versions of Oracle supported above on Mac OS X, use Actual Technologies, Oracle version 3.0
MS SQL Server
• MS SQL Server 2000 SP4 (8.0.2039) on Windows use Microsoft SQL Server version 2000.85.1132.00
• MS SQL Server 2005 SP3 (9.0.4035) on Windows use Microsoft SQL Native Client 2005.90.4035.00
• MS SQL Server 2008 SP1 (10.00.2531.00) on Windows use Microsoft SQL Native Client 2007.100.2531.00
• For all versions of MS SQL Server supported above on Mac OS X, use Actual Technologies, SQL Server version 3.0
MySQL
• MySQL 5.0 Community Edition (5.0.51b-community-net) and MySQL 5.1 Community Edition (5.1.24-community-nt) on Windows use MySQL Connector/ODBC version 3.51.14
• For all versions of MySQL Community Edition supported above on Mac OS X use Actual Technologies, Open Source Databases version 3.0
Administering ODBC
If you have used ODBC in the past (either with FileMaker or other applications), there might be changes for you to consider. Several years ago, ODBC shipped as a standard part of the Windows operating system, but on the Macintosh it was a third-party product. This section describes the administration process; in the next section you will see how to actually perform the tasks you need to do.
Today, ODBC management is built into both operating systems. On Windows, you set up ODBC using ODBC Data Source Administrator, which is inside Administrative Tools in Control Panel. On recent versions of Windows, Administrative Tools is inside System and Security in Control Panel. The item you are looking for inside Administrative Tools is Data Sources (ODBC), which opens the window shown in Figure 21.2.

Figure 21.2. Use ODBC Data Source Administrator on Windows.
On OS X, you use ODBC Administrator in Applications, Utilities, as shown in Figure 21.3. Note that this name is used first in OS X 10.4. If you are using an earlier version of the operating system, it is a good idea to upgrade to use ODBC.
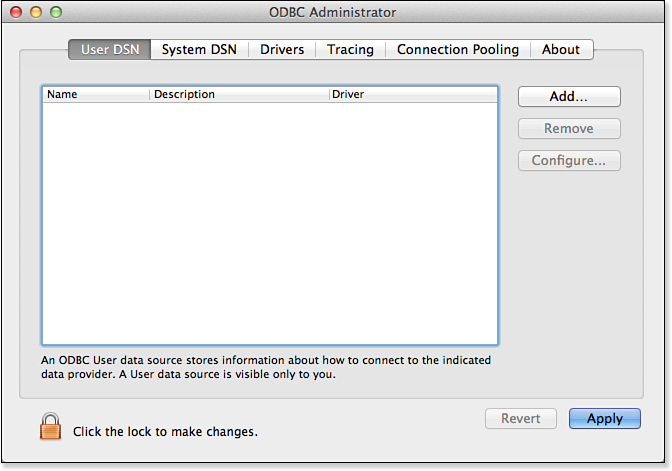
Figure 21.3. Use ODBC Administrator on OS X.
These tools typically run on the computer where the database resides. In fact, you might not have to run them; they might be administered by the DBA as part of the database management operation.
As you can see, both windows have similar tabs.
The distinction between a host and client computer is easy to grasp in a large computing environment. With small applications such as FileMaker, it is quite possible for a single computer to be both host and client. If you are using FileMaker Server, that computer is the host for the databases, so you run these applications on the FileMaker Server computer.
Data Source Names
The first tabs let you manage data source names. These are the objects that link to a driver, which in turn links to a database. Each DSN has the following information that you specify:
• Name
• Description
• Driver to use to connect to the database
• Database
• Login information (user ID and password)
• Other information required by the driver as needed
In short, a DSN has everything you need to connect to a database. There are three types of DSNs:
• A user DSN is local to a given user.
• A system DSN can be used by all users. This is the only type of DSN supported by FileMaker.
• A file DSN (Windows only) stores the information for a system DSN in a file rather than internally in the Registry.
Drivers
This tab lists the available ODBC drivers on the computer. On Windows, a large number of ODBC drivers come installed with the operating system, as you can see in Figure 21.4. Not one comes pre-installed on OS X.

Figure 21.4. ODBC drivers on Windows.
The SQL Server drivers are normally among the installed drivers on Windows. If you want to connect to Oracle or to MySQL on Windows, you have to install the appropriate drivers. On OS X, you have to install any driver you need. The next section shows you how to do this.
Tracing, Connection Pooling, and About
The Tracing, Connection Pooling, and About tabs are used to monitor performance, adjust performance, and view miscellaneous information, respectively. They are normally the province of the DBA rather than the user.
Example: Setting Up a DSN on OS X to Connect to MySQL
This example starts with the assumption that you have downloaded and installed the Actual ODBC Driver for Open Source Databases, as described previously. You must have it to access MySQL via ODBC. After you have done that, you can set up the DSN to allow FileMaker (and others) to connect to a MySQL database.
![]() This example uses a database from the Federal Election Commission (www.fec.gov). For more information on how to download that data and how to create and load the MySQL database, as well as to learn the basics of using MySQL, see Jesse Feiler’s book How to Do Everything with Web 2.0 Mashups.
This example uses a database from the Federal Election Commission (www.fec.gov). For more information on how to download that data and how to create and load the MySQL database, as well as to learn the basics of using MySQL, see Jesse Feiler’s book How to Do Everything with Web 2.0 Mashups.
Figure 21.5 shows the MySQL database and its tables.

Figure 21.5. The MySQL database for which the DSN will be built.
You launch ODBC Administrator as described previously. Select the System DSN tab and click Add (you might have to provide your administrator password). You receive a prompt to choose a driver, as shown in Figure 21.6. You want the Actual Open Source Databases driver to connect to MySQL.
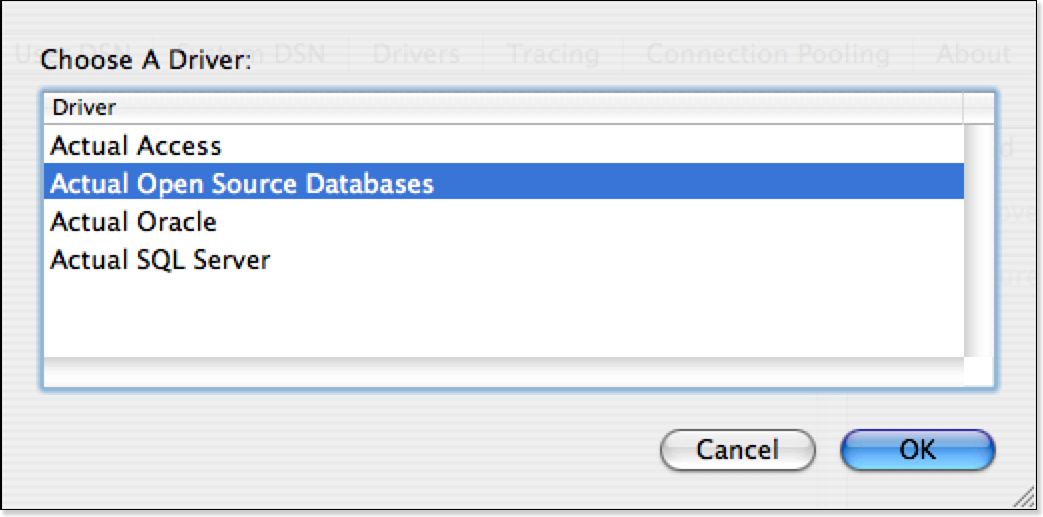
Figure 21.6. Select a driver.
When you select the Actual Open Source Databases driver and click OK, the Open Source Database DSN Configuration window, shown in Figure 21.7, opens.

Figure 21.7. Begin configuring the DSN.
If you do not see the Actual Open Source Databases driver, it is not properly installed. Review the previous section, the FileMaker documentation, and the Knowledge Base on the FileMaker website (search for “MySQL” or “ODBC”).
You can tell from the text and graphics in the lower left of this window that it is the specific driver you want to use. ODBC Administrator takes care of launching the correct interface.
Next, you specify the database you want to use, as shown in Figure 21.8.
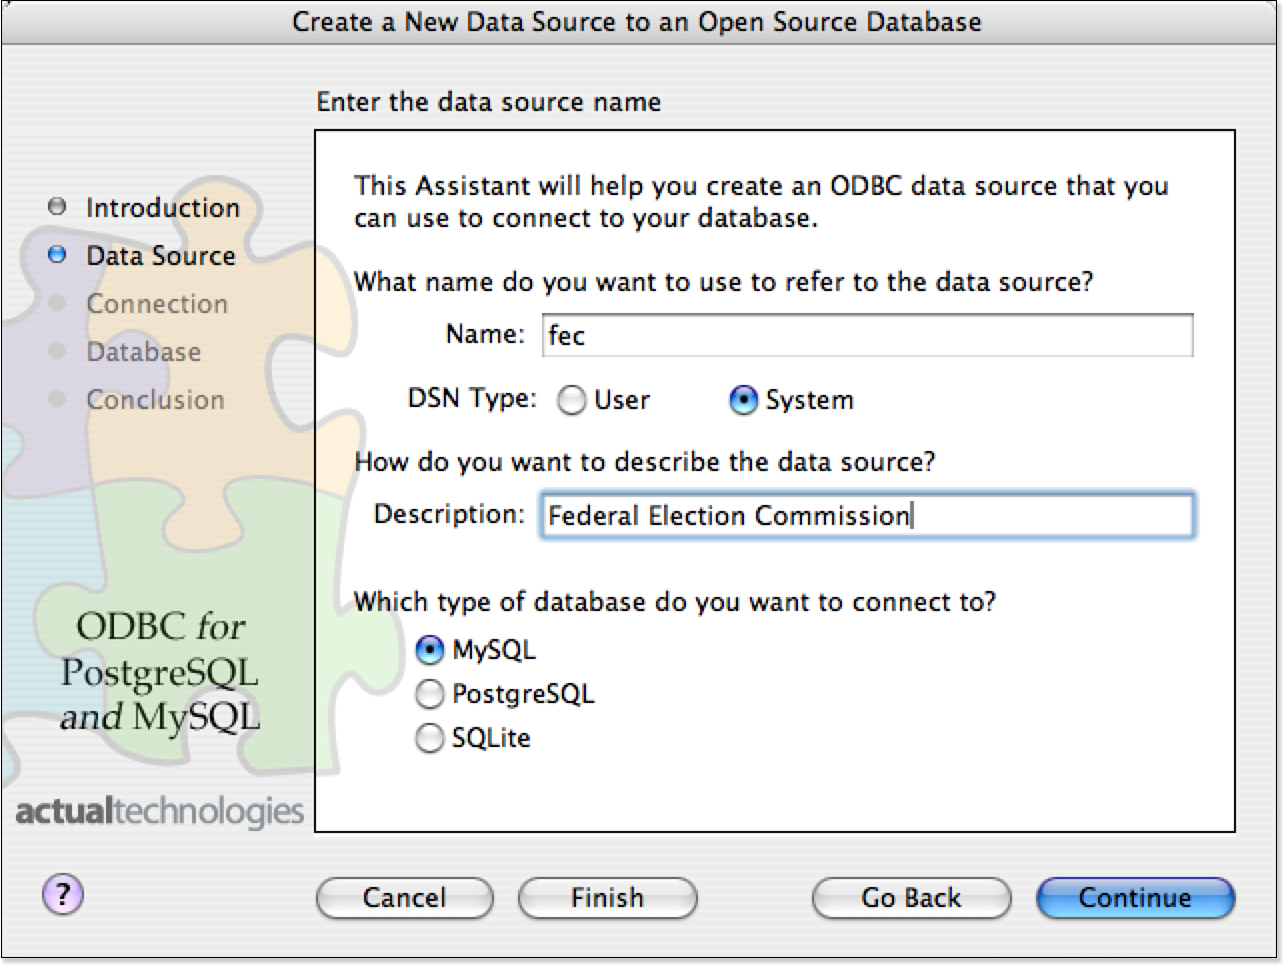
Figure 21.8. Identify the database.
You continue, as shown in Figure 21.9, by specifying the connection and the login information.
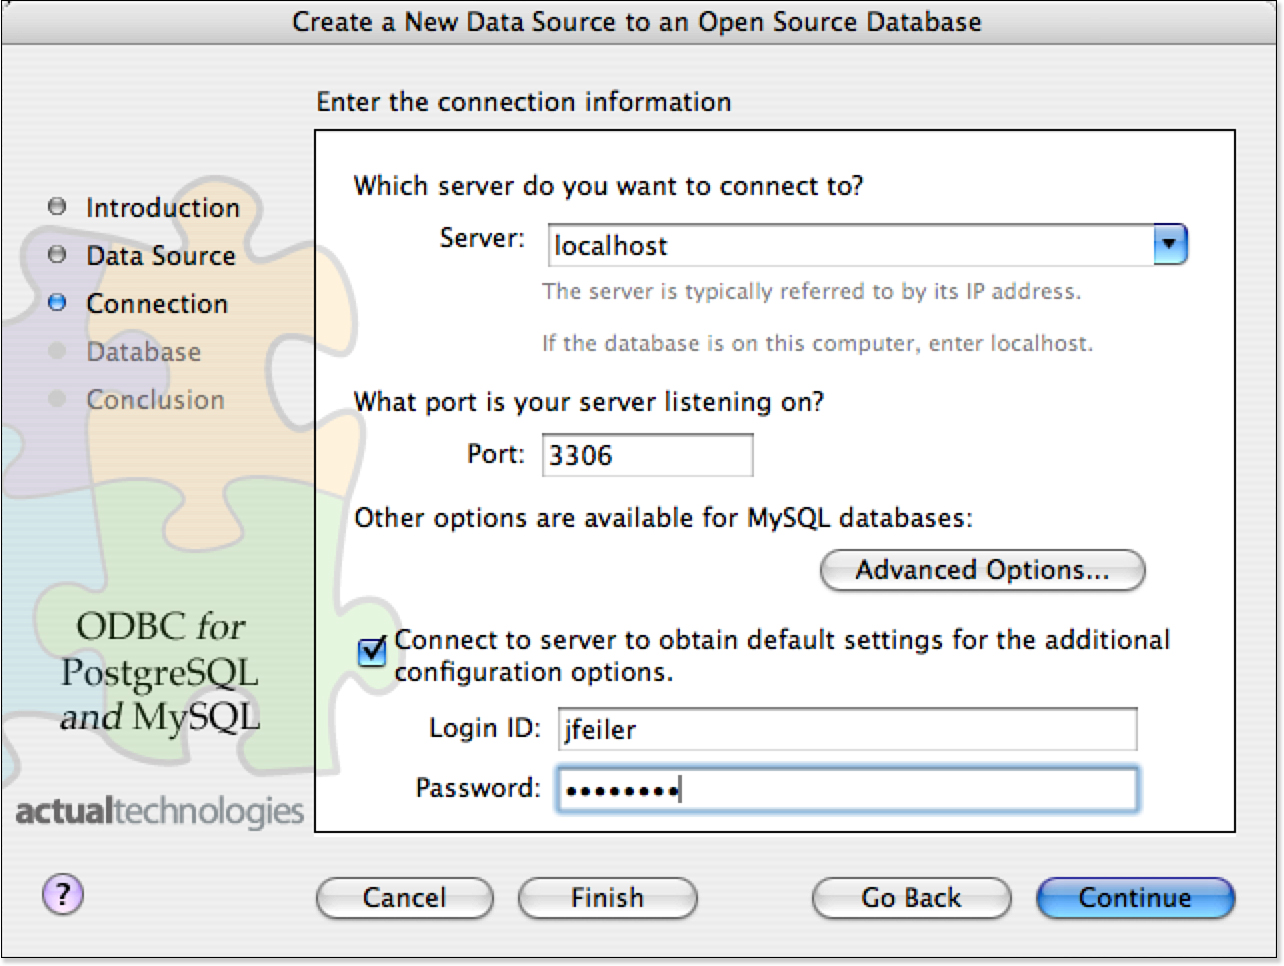
Figure 21.9. Provide connection information.
Next, for a MySQL database, you get a prompt to specify the socket. As you can see in Figure 21.10, there are two recommended defaults. Try the first one and then the next to see which works for you.
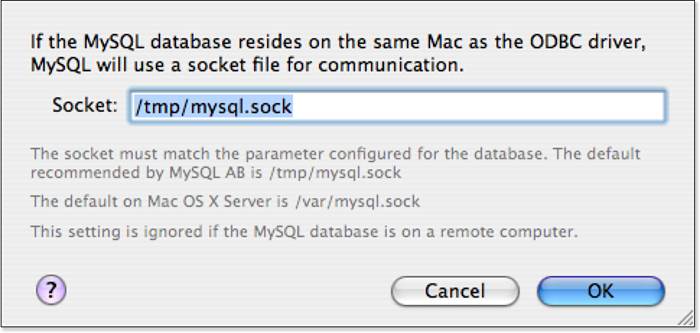
Figure 21.10. Specify the socket.
At this point, the driver attempts to connect to MySQL. If it is successful, you will be able to select the database you want to use from the pop-up menu, as shown in Figure 21.11.
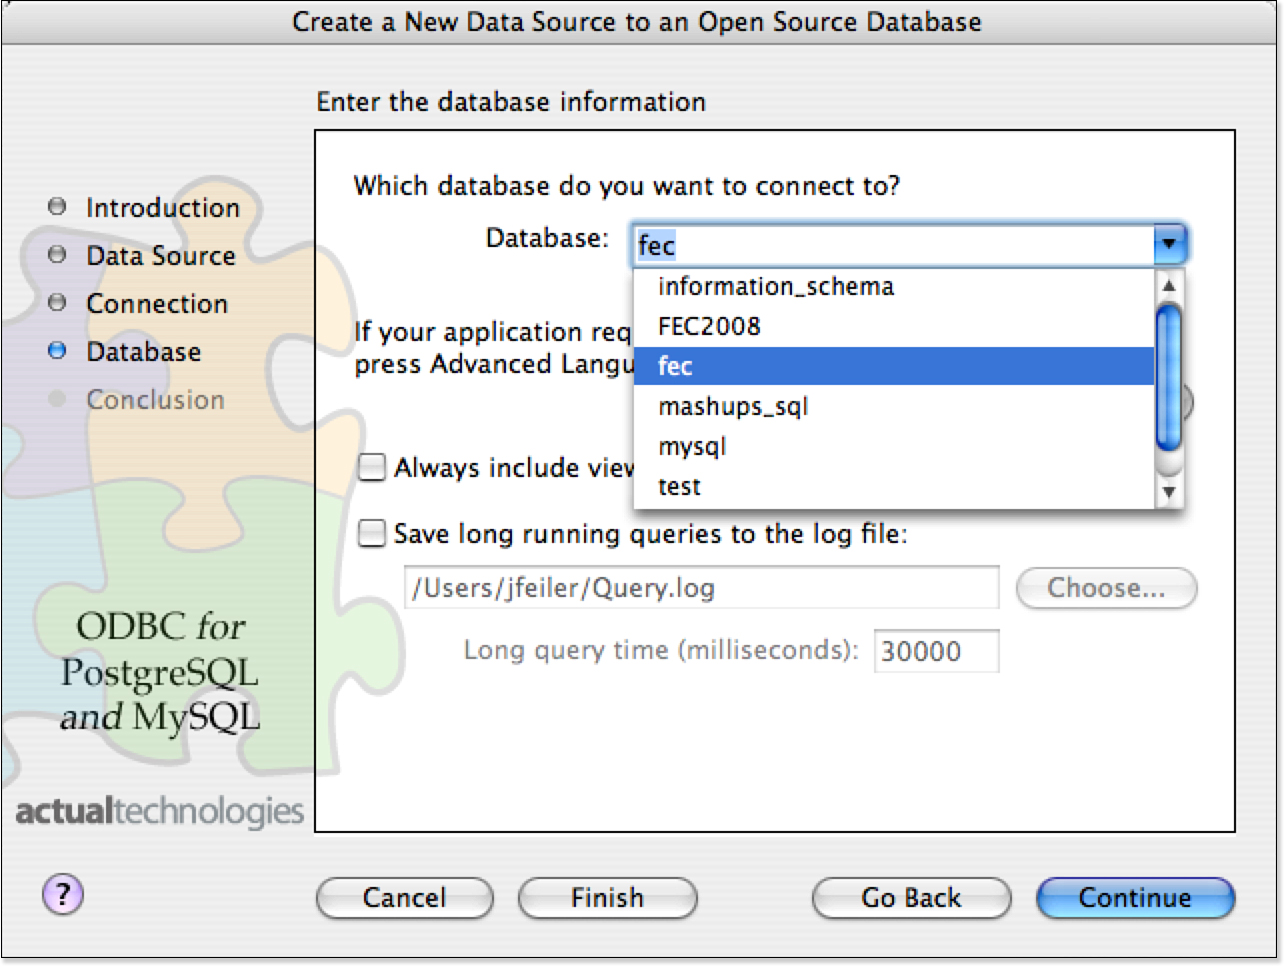
Figure 21.11. Select the database.
Finally, you see a summary of the connection, as shown in Figure 21.12. There is only one step left.

Figure 21.12. The DSN is set up.
Before exiting the DSN configuration, test the connection with the Test button at the bottom of the window. You should see the results of the test, as shown in Figure 21.13.

Figure 21.13. Test the connection.
Example: Setting Up a DSN on Windows to Connect to FileMaker
If you want to use FileMaker as a data source, you must configure a DSN for it. This section walks you through the process of doing this on Windows, but the process is the same on OS X.
Open the ODBC Data Source Administrator by choosing Start, Control Panel, Administrative Told, Data Sources (ODBC). It was shown previously in Figure 21.2. Select the System DSN tab and click Add. Select the FileMaker ODBC driver, as shown in Figure 21.14, and click Finish.
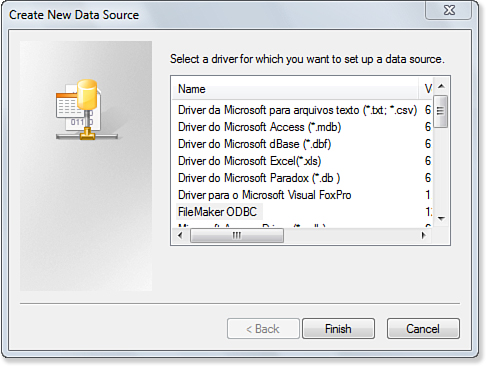
Figure 21.14. Create a new DSN.
The setup dialog shown in Figure 21.14 opens.
You might want to compare this section, including its screenshots, with the previous section. The underlying process is the same, but the details differ because you are using FileMaker here and MySQL in the previous section.
As soon as you click Finish, you enter the same sequence you saw for setting up a MySQL data source. The difference is that this time it is a FileMaker data source. The overview screen shown in Figure 21.15 outlines the process for you.

Figure 21.15. Begin the process of creating the ODBC driver and connections.
Name the data source and provide a description, as shown in Figure 21.16.

Figure 21.16. Name the data source.
Specify the host address as shown in Figure 21.17. Use localhost to connect to your own computer. If you are connecting to FileMaker Pro or FileMaker Server on another computer, use its IP address. It can be a good idea to use the check box to get a list of the sharable databases on the other computer. This tests out the connection. If you don’t see the databases you’re interested in, check the privileges, as shown previously in Figure 21.1. ODBC sharing is not on by default in new databases.

Figure 21.17. Specify the host location.
Choose your database, as shown in Figure 21.18. Note that you can change FileMaker text fields to long varchar fields so that when ODBC clients connect to your FileMaker table, they see a SQL-compliant field type. Don’t worry: In the FileMaker database, it is still a text field. The driver will take care of the conversion.

Figure 21.18. Choose the database.
You might have to provide a password and ID to actually make the connection—it depends on how the database is configured.
Figure 21.19 shows the next step—a summary of your settings. Check it out and go back if necessary to make changes. It is a good idea to click Test to make certain that it actually works.
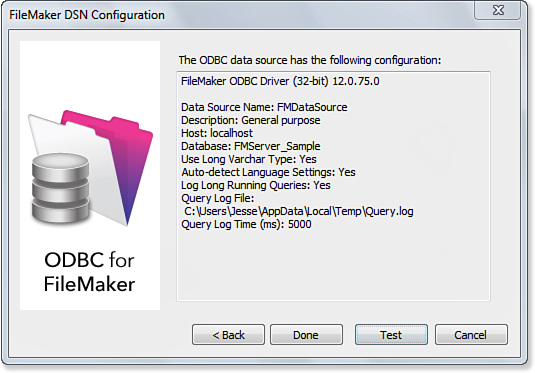
Figure 21.19. Review your settings.
If all goes well, you will see the screen shown in Figure 21.20. Your FileMaker database is now ready to be accessed via ODBC from other applications.

Figure 21.20. Test the connection.
Importing ODBC Data into FileMaker
After you have an ODBC DSN set up, you can use it to import data into FileMaker. You use exactly the same process as any other import. Choose File, Import, ODBC Data Source. This opens the window shown in Figure 21.21.
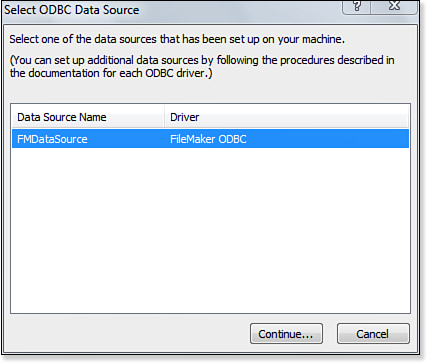
Figure 21.21. Select a data source.
You might be prompted to enter a username and password. Next, you must enter a SQL query to generate the data to be imported. The simplest query retrieves all data from all rows in a table, as shown in Figure 21.22. If you are used to SQL, you can refine your query to retrieve only the needed rows and columns.
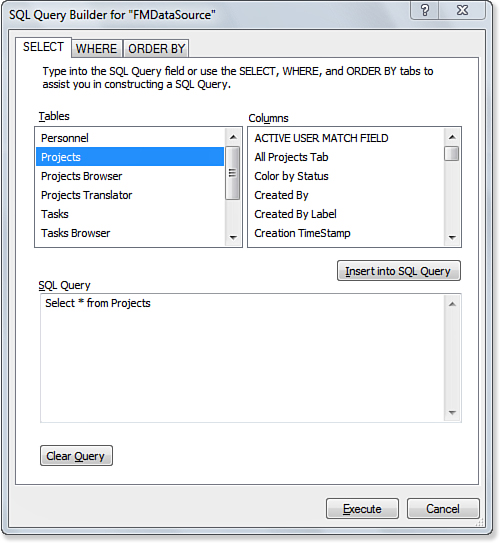
Figure 21.22. Enter a SQL query.
The query runs, and it generates a set of rows and columns. You will see the same Import Field Mapping window that you see with other data imports; simply match the imported data fields to the FileMaker fields you want to fill, and the import proceeds.
Using External ODBC Data Sources with the Relationships Graph
After you have set up the relevant DSNs on the computer where the external data source is located, incorporating the data is remarkably easy.
This section continues from the DSN that was set up previously for MySQL. It was set up on OS X, but the process here is the same whether it was set up on OS X or on Windows. If you want to review where you are, refer to Figure 21.12, which summarizes the DSN.
Specifying the Data Source
From the File menu, choose Manage, External Data Sources, just as you would to add any other data source. When you click New in the Manage External Data Sources dialog, you will see the window shown in Figure 21.23 (the window changes its contents depending on whether ODBC or FileMaker is selected). Click ODBC for the type of the data source.

Figure 21.23. Select an ODBC external data source.
You can use Windows Authentication (Single Sign-On).
Name the data source. You have to specify the DSN to use. Click Specify next to the DSN field to open the window shown in Figure 21.24. You will see the available DSNs on the host.
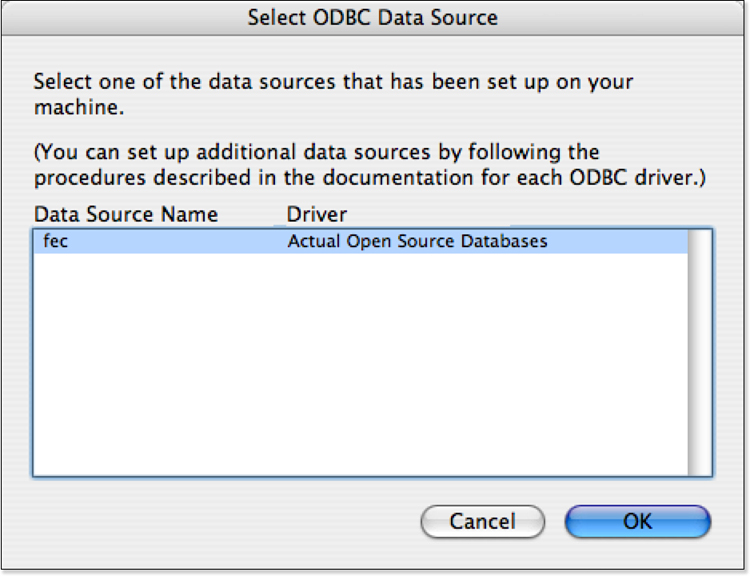
Figure 21.24. Select the DSN.
After you have selected the DSN, provide the authentication information if you want. You can choose to have a prompt every time a user logs in, or you can specify the username and password here.
That’s all there is to this process. You will now see your ODBC in the list of external data sources, and you can use it just as you would any other data source.
Adding the External Data Source to the Relationships Graph
To add an external data source to the Relationships Graph, add a table just as you normally would do. In the Specify Table dialog shown in Figure 21.25, you can select the data source and the table within it that you want to use as a base table. Note that there is absolutely no difference in this dialog between using an external FileMaker data source and an ODBC data source. FileMaker has done all the work for you, provided that you have set up the DSN and driver properly. There is a slight difference in the pop-up menu from which you select data sources: They are now organized into local data sources and external data sources grouped together by the name you specified in the Edit Data Source dialog shown previously in Figure 21.23.

Figure 21.25. Select the table to use.
The next dialog is specific to ODBC data sources. You will need a unique key in the external table. Many SQL tables do have unique keys (all FileMaker tables have an internal unique key). If your table does not have a unique key, you can construct one by selecting two or more fields that together uniquely identify each record, as shown in Figure 21.26.
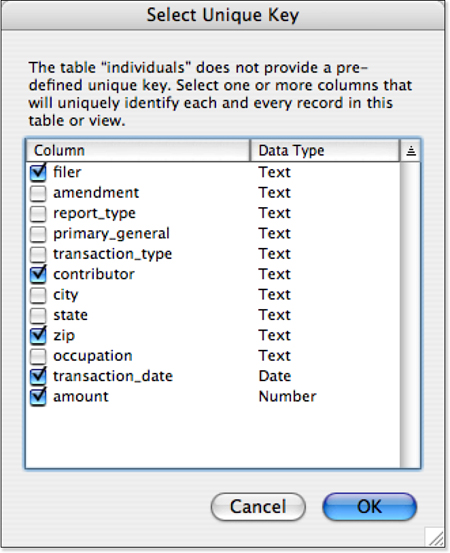
Figure 21.26. Select a unique key.
This area is one where performance might be affected. If there is no unique key in the external table, see whether you can find a database administrator to add one. If not, try using the method of selecting several fields that, together, form a unique key. It is sometimes the case that you cannot find such a combination. You will know this because when you click OK, FileMaker takes some time to read the external database to see that you have in fact specified a unique key or combination.
The external data source is now added to the Relationships Graph, just as any other table would be. Figure 21.27 shows three external data source tables in the Relationships Graph. You can create relations between them just as you normally do. The only distinction is that the external data source tables have their titles in italics. Thus, in Figure 21.27, the demo table is part of the current FileMaker database file; committees and candidates are external ODBC data sources.
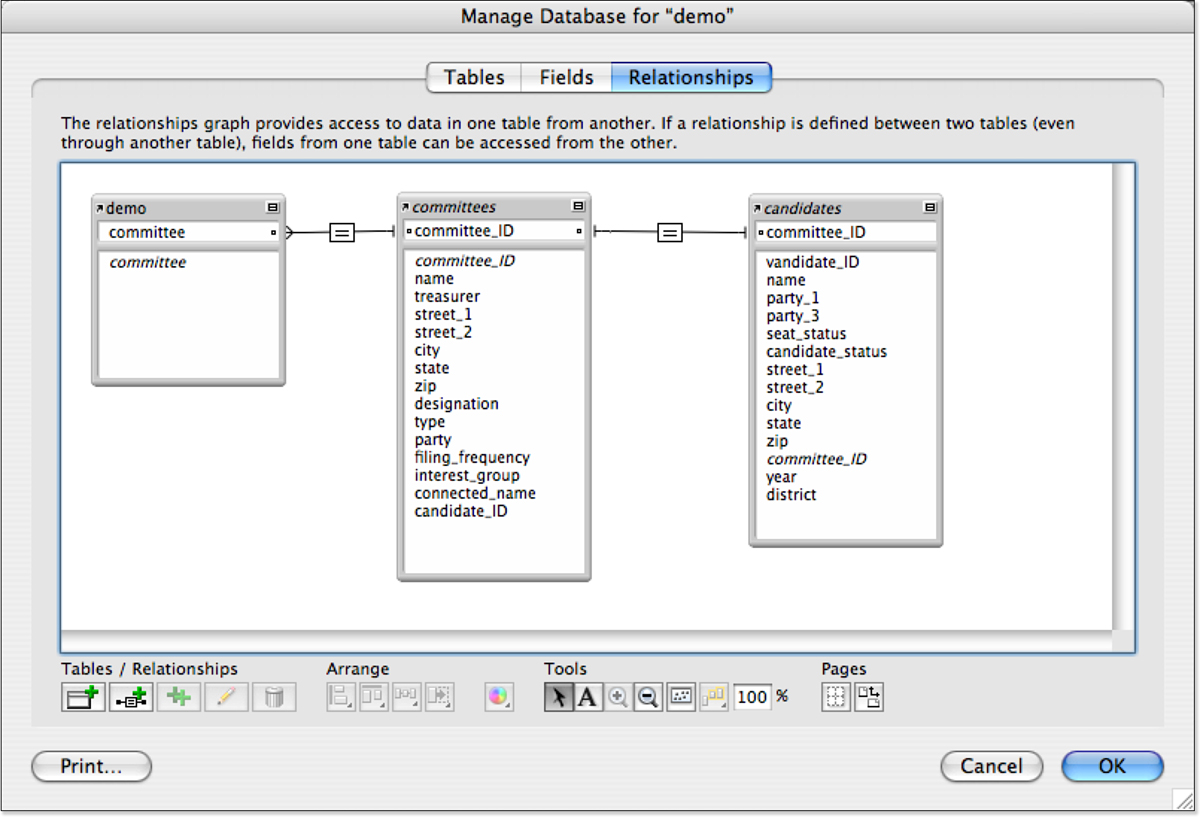
Figure 21.27. The external SQL data sources are now part of the Relationships Graph.
If you go into Layout mode, you can add fields from the external data sources to layouts. Figure 21.28 shows a simple layout in Browse mode that displays data from the external data sources.
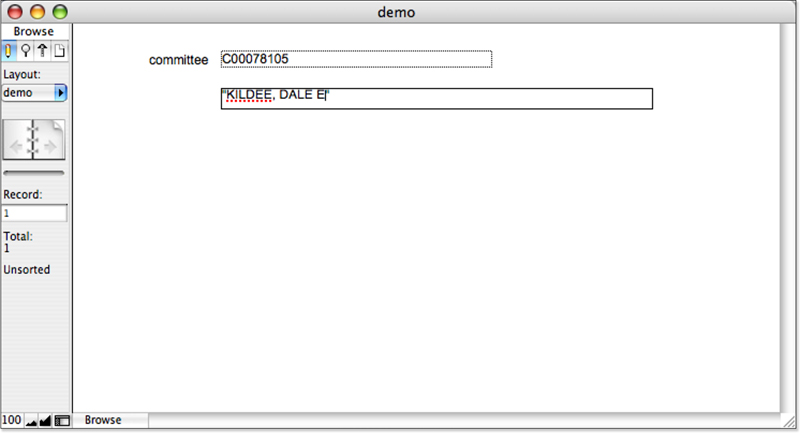
Figure 21.28. You can use fields from external data sources just as you would local FileMaker tables.
In fact, everything you do with FileMaker tables you can do with external data sources. There is very little distinction, although, as you see in Figure 21.29, field names from external data sources are italicized in the New Layout Report dialog.
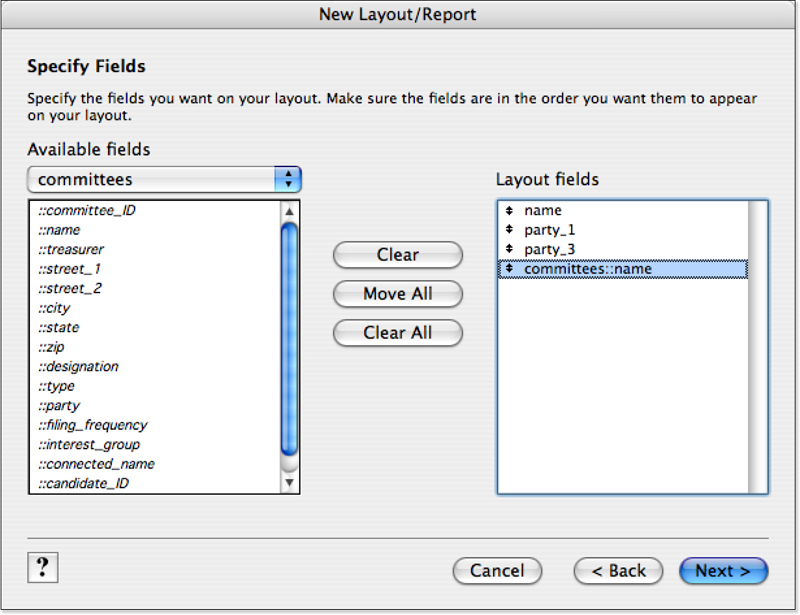
Figure 21.29. You can use fields from external data sources in new layouts.
Beginning with FileMaker Pro 10, fields from external data sources are like standard FileMaker fields in yet another way: Their values can automatically populate a value list.
Using Supplemental Fields
Just as exciting as adding external data sources to the Relationships Graph is the ability to add shadow fields to those tables. Shadow fields appear in the Relationships Graph as if they were part of the external data source, but they are stored in the FileMaker database and merged as necessary. Figure 21.30 shows a calculation field added to the candidates tables.
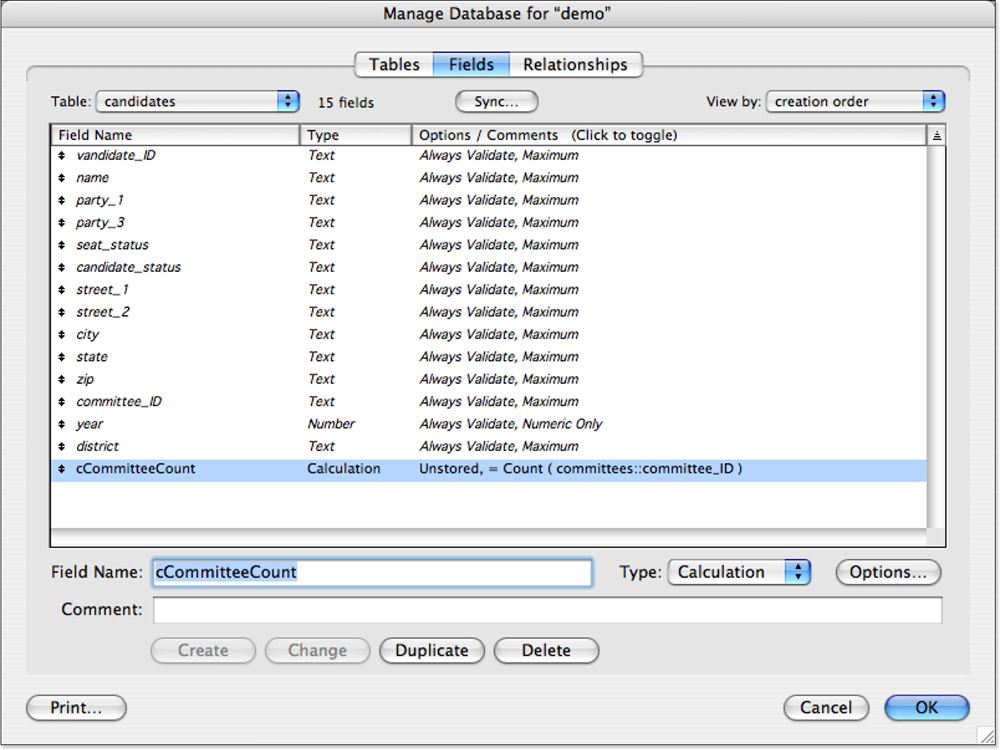
Figure 21.30. Add a shadow field.
Two points are relevant here. First, shadow fields frequently are calculation fields that modify the external data in ways that make it easier for FileMaker to use. Here, the cCommitteeCount field is the count of the number of committees for a candidate.
You also might notice the misspelled name of the first field, vandidate_ID. When you are using external data sources, you cannot control field names; they might be in a foreign language, or they might be misspelled. In this case, if you download the data, you will see that from the original data source on, this field name is misspelled. Because it is visible only (!) to programmers, no one has bothered to change it. With the calculation field that has been added, you can create a sub-summary part for a layout, as shown in Figure 21.31.
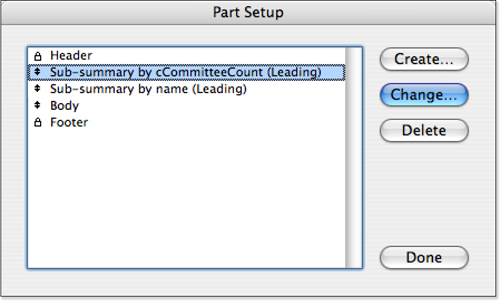
Figure 21.31. Use the shadow calculation field as a subsummary break.
You can use the field in a sort as well, as shown in Figure 21.32. This sorts the records for candidates first by descending order of the number of committees and then in ascending alphabetical order by name. The first sort field is the shadow field; the second sort field is part of the external data source.
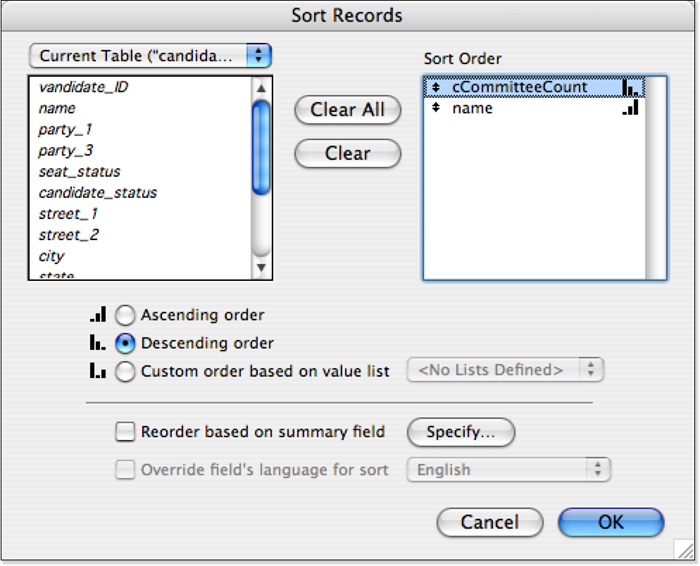
Figure 21.32. Use both shadow fields and external data source fields in sorts.
Although external data sources are treated almost exactly as local tables, you will notice that you have the option to sync them with the external data source from the Tables tab of the Manage Databases dialog, as shown in Figure 21.33. For example, if a field in the database is renamed, syncing with the database would update the table. Likewise, if you remove a field from the shadow table of the external data source, it remains in the actual SQL table. You can restore it to the shadow table in Manage Databases by clicking the Sync button.
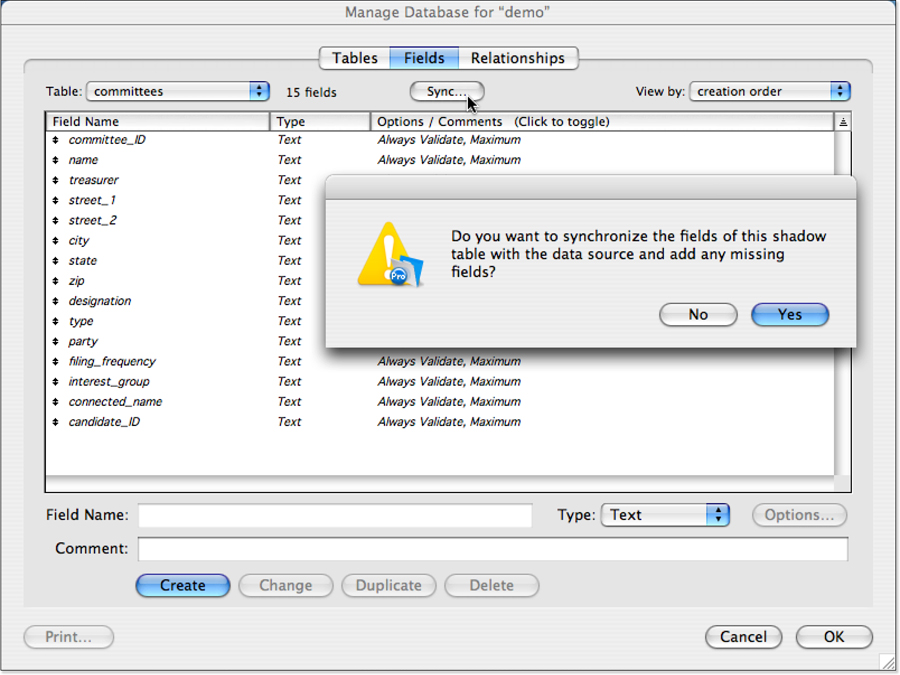
Figure 21.33. You can always sync external data sources with your tables in the Relationships Graph.
Troubleshooting
Translating SQL to FileMaker
The DBA of the SQL database to which I want to connect is asking me a lot of questions that I can’t answer and don’t understand. What should I do?
Go to the FileMaker website and look at the section for IT managers and technology professionals (http://filemaker.com/articles/guide/it_resources.html). Or, better yet, give the DBA that link. The articles and papers in this area are written in IT-ese.
Apparently FileMaker is executing many individual queries on the database; they show up in the log for the SQL database. Is this normal?
It might be. FileMaker fetches data as it is needed, typically in batches of 25–100 records. FileMaker retrieves external SQL data using primary keys, so the queries are very efficient, but they are more numerous than some other methods of accessing the database in which all the needed records are retrieved in one batch.
How can I track down performance issues on the SQL side?
Some of my queries seem to take a long time to execute in the external data source. More troubling is the fact that some do not, and I can’t seem to find the distinction.
Most databases have a query log that keeps track of the queries executed against the database. The DBA should have access to the log. In it, you will be able to see the exact queries that FileMaker is generating. Table 21.1 shows some common FileMaker find requests and the SQL fragments that they produce. SQL queries that use the % wildcard character at the beginning and end of the search string cannot use an index in MySQL; thus, they must read the entire database. If you remove the initial wildcard (using the whole word search shown in the second line of Table 21.1), you can use the index, but it is still not as efficient as the exact match query in the third row, which generates no wildcard characters in the SQL query.
Table 21.1. FileMaker Find Requests and SQL Implementations
