
23. Exporting Data from FileMaker
Getting Out What You Put In
Much of this book concentrates on tools for data entry—for getting data into a database system. But that information often needs to be extracted again. Sometimes the extraction takes the form of a report of some kind. At other times, the best choice is simply to export the data into some specific format so that another program can import that data and work with it using different tools than might be available in FileMaker. Reasons for exporting might include the following:
• Perhaps you know someone who is compiling a quarterly report in Excel and needs some numbers from your FileMaker system.
• Perhaps the payroll system needs a list of employee names that you have in FileMaker.
• Perhaps you’ve been storing images for an upcoming ad campaign in FileMaker, but you would like to make all the images available so that they can be used on a CD without FileMaker.
This chapter covers various means for getting data out of FileMaker. There are two ways of doing so: exporting and real-time sharing. Exporting is a batch or offline process. Real-time sharing of data is discussed in Chapter 21, “Connecting to External SQL Data Sources.”
![]() For more on saving and sending records as Excel or PDF files, see “Delivering Reports,” p. 309.
For more on saving and sending records as Excel or PDF files, see “Delivering Reports,” p. 309.
![]() Information on real-time sharing of data can be found in Chapter 21, “Connecting to External SQL Data Sources.”
Information on real-time sharing of data can be found in Chapter 21, “Connecting to External SQL Data Sources.”
![]() Additional information on the topic of FileMaker web publishing can be found in Chapter 24, “Instant Web Publishing,” and Chapter 25, “Custom Web Publishing with PHP and XML.”
Additional information on the topic of FileMaker web publishing can be found in Chapter 24, “Instant Web Publishing,” and Chapter 25, “Custom Web Publishing with PHP and XML.”
The Basic Mechanics of Exporting
The basic principles of exporting data from FileMaker are straightforward. You pick a single table or layout from which to export. (Although you start from a table or layout, you can reference related fields in the export process so that you can actually export from additional tables.) You then choose an output file format and file location and pick specific fields from your chosen table for export. Before you export, there are a few extra options you can choose that govern grouping and formatting of the exported data. That’s all there is to it. Let’s look at each step a bit more closely.
Choosing a Source Table
As with much else in FileMaker Pro, the starting point for a data export is determined by the user’s context in the current system—specifically by the currently active layout, which in turn is tied (via its table occurrence) to an underlying data table (a.k.a. source table). So, the currently active layout controls implicitly which table is the source table for the export.
Choosing an Output File Format
After your context is established, you have to choose File, Export to begin the export process. The next step in that process is to choose an output file format and file destination. FileMaker offers you a choice of export formats, as shown in Figure 23.1. Some of these are plain-text formats, such as tab-delimited text, that could be read in any text editor; others are binary file formats that require more specific software to open, such as FileMaker Pro. This chapter goes into greater detail on available file formats in a later section.
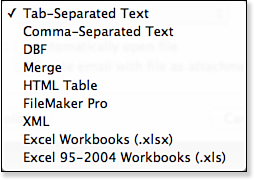
Figure 23.1. FileMaker Pro can export data to various formats.
When you chose File, Export, in addition to selecting your export format, you have the choice to automatically open the file after saving it and the choice to automatically create an email with the file attached. These choices parallel those available with the Save as Excel and Save as PDF features; the goal in all cases is to make the final delivery of the data faster and easier.
Selecting Fields to Export
After you’ve selected an output file type and destination, you’re prompted to choose some fields to export via the dialog shown in Figure 23.2.
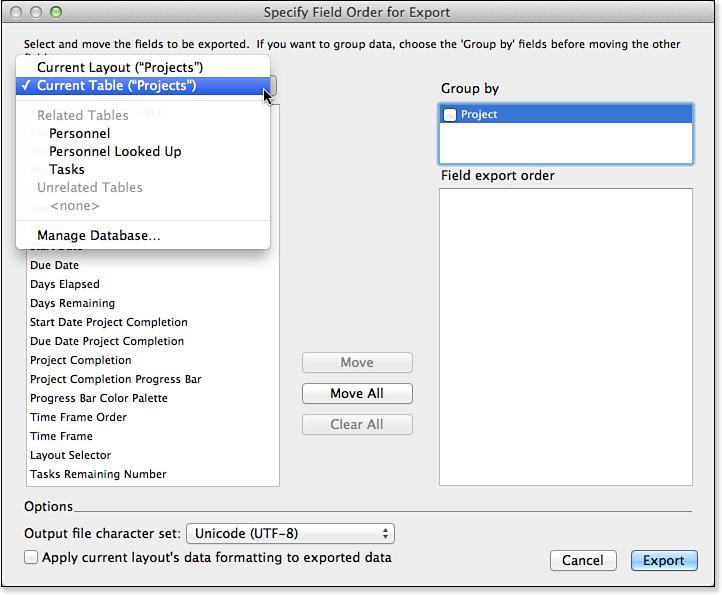
Figure 23.2. Most fields can be exported from a FileMaker database, but container fields cannot.
By default, the fields displayed in the list at the left are limited to those found on the current layout, as indicated by the Current Layout menu setting. That is always the first item in the list. It’s also possible to switch the view to show all fields in the current or related tables, as well as to select fields from any related table for export.
![]() For more information on exporting related fields, see “Exporting Related Fields,” p. 570.
For more information on exporting related fields, see “Exporting Related Fields,” p. 570.
In addition to selecting fields for export, you also can select grouping options for the fields and choose whether to format the exported data according to the current layout formats. These options, too, are discussed in more detail later in this chapter.
![]() For more information, see “Exporting Grouped Data,” p. 571, and “Formatting Exported Data,” p. 570.
For more information, see “Exporting Grouped Data,” p. 571, and “Formatting Exported Data,” p. 570.
At any point in the field-selection process, you can use the small up/down arrows beside each selected field name to change the order in which the fields are exported: Click the arrow and drag to move the field, or use (Command-up/down) [Ctrl+up/down] if you prefer the keyboard. After you have a satisfactory field list, click Export, and the data will be exported to the file format and location of your choice.
Exporting Issues to Consider
Although the basic mechanics of exporting are simple, a few key points bear remembering:
• To export data from a file, a user must have sufficient privileges to do so. This is governed by selections within the user’s privilege set. The user must have the Allow Exporting check box checked within the settings for her privilege set. Additionally, the user will not be able to export any records for which she does not have at least the capability to view the record.
![]() For more information on privileges and security in FileMaker, see Chapter 12, “Implementing Security.”
For more information on privileges and security in FileMaker, see Chapter 12, “Implementing Security.”
• Data will be exported only from records in the user’s current found set. To export data from all records in a table, the user first needs to choose Show All Records to ensure that no records are omitted from the found set. Regardless of the found set, any records that the user’s privileges prevent her from viewing cannot be exported.
• There are certain practical limits on which fields you can export. Container fields can be exported only if the target file format is a FileMaker Pro file (we discuss other strategies for exporting files in container fields later in the chapter). And there are certain fields, such as summary or global fields, for which exporting might not always make sense, even though doing so is technically possible.
![]() For more information, see “Working with Large Fields and Container Fields,” p. 572, and “Formatting Exported Data,” p. 570.
For more information, see “Working with Large Fields and Container Fields,” p. 572, and “Formatting Exported Data,” p. 570.
Export File Formats
FileMaker’s Export Records feature can create export files in various formats. Many of these are text based, and a few are binary. The following sections provide an overview of the available file types, with some specific notes on each. Each format has its own quirks and limitations. As is always the case with data import and export, you’ll need to experiment to see just how a specific data set translates to a chosen file format—not just theoretically but practically. The sooner you can test the entire route from export to import with the actual software involved, the safer you will be.
Character Transformations
When exporting data, FileMaker often performs substitutions on certain characters that tend to cause confusion when they appear embedded in field contents. For example, FileMaker permits you to embed a tab character in field data, but because the tab character is frequently used as a field separator in text-based data, FileMaker transforms these internal tabs to spaces when exporting in many cases. In the same vein, carriage returns within fields sometimes are transformed to the vertical tab character (ASCII code 11).
One other common transformation occurs when repeating fields are exported (for those formats that support it). Multiple repetitions of a field are often exported with the individual repetition data separated by the group separator character (ASCII code 29). Common transformations are listed in Table 23.1.
Table 23.1. Character Transformation Information for Exporting FileMaker Data

The specific transformations that occur depend on the output file format; see the notes on each format outlined in the following sections for further details.
![]() For more information on FileMaker’s XML grammars, see Chapter 25, “Custom Web Publishing with PHP and XML.”
For more information on FileMaker’s XML grammars, see Chapter 25, “Custom Web Publishing with PHP and XML.”
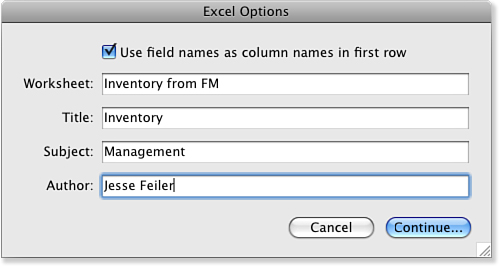
Figure 23.3. You have additional options when using the capability to export to Excel.
Formatting Exported Data
FileMaker maintains a distinction between the way data is stored in a field and the way it is displayed. For example, although all dates are stored internally as simple integers, they might be displayed in many different date formats, such as “1-3-2019.” Or a number, stored internally with 17 digits of precision, might be displayed with just three or four digits. Not one of these display options has any effect on the data stored in the field; these options simply affect the way the data is shown to the user.
On FileMaker layouts, these formatting options are governed by choices made via the Inspector, in Layout mode. Some of these formatting options can be made to carry through to data when it’s exported. To do so, when specifying fields for export, check the box labeled Apply Current Layout’s Formatting to Exported Data. When this choice is selected, any formatting options applied via the Number, Date, or Time formatting dialogs are preserved. Text formatting, even character-based formatting such as uppercase, is not preserved. Date and time formatting may both be applied to a timestamp field and will be carried through on export.
Exporting Related Fields
All exporting in FileMaker takes place from the context of a single table. In general, then, it’s not possible to export data from several tables independently in one stroke. It is possible, though, to export data from tables related to the current one, whether immediately or more distantly.
Doing so is a simple matter of choosing fields from related tables when specifying fields for export. If the related fields are in the layout you are using, they will be shown in the Specify Field Order dialog, as shown previously in Figure 23.2. When there are related records in a one-to-many relationship, you will get all the existing child records. The main record’s value will appear in the first record.
Exporting Grouped Data
A typical export outputs some data from each record in the current found set.
![]() Sometimes you might get multiple sets of information per current record if you export related fields. See “Exporting Related Fields,” p. 570, for more information.
Sometimes you might get multiple sets of information per current record if you export related fields. See “Exporting Related Fields,” p. 570, for more information.
But what if you don’t want data for each and every record? What if you want to export only data that summarizes information from the current record set, such as you might see in a subsummary report? FileMaker makes this possible as well.
![]() For more information on summary fields and summary reporting, see “Working with Field Types,” p. 87, and “Using Summarized Reports,” p. 295.
For more information on summary fields and summary reporting, see “Working with Field Types,” p. 87, and “Using Summarized Reports,” p. 295.
It now remains to use this summary field in an export. The process is similar to that required for preparing a subsummary report for display. First, isolate the transactions to be summarized (for example, to summarize across all transactions, you would perform Show All Records). Next, sort by the field that would be the break field if you were displaying the data in a subsummary report to group the data. You can sort by more than that field. As shown in Figure 23.2, the various sort fields in use at the time you export data are shown; you select the check boxes on any for which you want summarized data.
When you use more complex sorts and summary field choices, more complex summarized exports are possible.
Exporting to Fixed-Width Formats
Many computer systems exchange data in some form of fixed-width format. This term refers to formats in which an individual field always contains a certain number of characters of data. Data that’s too wide for the field width is sometimes truncated to fit. Data that takes up less space than the field width allows is padded with a padding character, such as a zero or a space, to bring it up to the specified width. For example, the number 797 in a ten-character fixed-width format might be rendered as “0000000797” (left-padded with zeros). The name Tomczak displayed in a 15-character fixed-width format might be displayed as “Tomczak” (right-padded with spaces). Fixed-width formats also sometimes simply run all the columns together into a single big fixed-width string. There’s no need for internal field separators; because the exact width of each field is known, you can easily determine where each field’s data starts and stops.
If you need to export FileMaker data to a fixed-width format, you’ll have to do a bit of work by hand; FileMaker has no built-in support for exporting to a fixed-width format. At a minimum, you’ll need to define some calculations to perform padding and concatenation. If you want to build a more permanent framework for working with fixed-width data, you can consider developing a small library of custom functions to do some of the work.
Padding data is a straightforward activity using FileMaker calculations. Say you have a number field called OrderTotal. To left-pad this number with zeros and enforce a fixed width of ten characters, you would use the following calculation:
Right( "0000000000" & OrderTotal; 10)
If you think about that for a moment, how it works should be clear. The calculation tacks ten zeros onto the left of the numeric value and then takes the rightmost ten characters of the result. Likewise, to right-pad a text field called FirstName with spaces to a width of ten characters, you would use a calculation that looks like this:
Left( FirstName & " "; 10)
Finally, if you needed to run a set of these fields together into a single fixed-width row, a calculation that concatenates all the individual padding calculations together using the & operator would suffice. You could also create a single row-level calculation without bothering with individual calculations for each field:
Calculations such as these are fine for simple or occasional fixed-width exports. FileMaker also ships with an XSL style sheet, called fixed_width.xsl, which can be applied to a FileMaker data set on export to produce a fixed-width export. The style sheet supports only a single fixed width for all output columns. For more complex needs, you can build a tool of some sort to streamline the process.
Right( "0000000000" & OrderTotal; 10) & Left( FirstName & " "; 10)
Working with Large Fields and Container Fields
Most of the formats discussed so far are predominantly text oriented; that is, either they treat exported data as text or, at the very least, they describe its attributes using text-based formats. But FileMaker has extensive capabilities for handling binary data as well, via the container field type. FileMaker can import files in batches, as discussed in the preceding chapter. FileMaker also has tools that allow you to create a batch export of binary files.
The key to most such exporting operations is the Export Field Contents command, found in the Edit menu. You can manually enter a single field on a FileMaker layout and choose Edit, Export Field Contents, and the contents of that one field are exported to a file of the appropriate type: a text file for most field types or the actual file contents of a container field. (For example, exporting from a container field containing a file called hurricanes.dbf produces exactly the hurricanes.dbf file.) The Export Field Contents option is not available for a container field unless the field contains something—either an embedded file or a reference to a file.
![]() For more information on the batch import of images, see “Importing Multiple Files from a Folder,” p. 554.
For more information on the batch import of images, see “Importing Multiple Files from a Folder,” p. 554.
When used via the menu, Export Field Contents exports the contents of one selected field from one record. It uses UTF-16 Little Endian, so all characters are preserved, including returns and horizontal tabs. To create something like a batch export of images, you need to write a script that uses the Export Field Contents script step. Using scripted exports is a powerful technique that’s covered in the next section.
Scripted Exports
All the techniques covered so far involve manual export operations, in which the user drives the process by hand, including the selection of output file type and filename as well as the selection of fields for export. Exporting, though, is often an operation you want to be able to perform repeatedly, on demand. You might have to export a membership list to a text file periodically or create a file containing information on this month’s invoices to send to an accounting system that doesn’t interact with FileMaker. In such circumstances, it’s typical that you’ll want to export the same set of fields, for different data sets at different times. In these cases, it makes sense to consider using a script to perform the export.
All aspects of exporting can be scripted, from the selection of the records to be exported; to the determination of output file type, filename, and location; to the choices of specific fields and export options.
![]() You can use the
You can use the Get ( TemporaryPath ) function to export data using schedules in FileMaker Server. For more information, see Chapter 27, “FileMaker Server and Server Advanced.”
The Export Records script step is similar to the Import Records script step: You can specify the output file and the export order, just as you could specify the input file and the import order.