
18. Advanced FileMaker Solution Architecture
This chapter focuses on a variety of architectures and techniques used in FileMaker solutions. You might encounter them as you modify and update existing FileMaker solutions; you also might adopt them in new solutions that you create. Many of these techniques involve managing windows, which, after all, are at the heart of traditional graphical user interfaces. As time and technology have changed, the role of windows in interfaces has changed. Most significantly, on mobile devices the concept of multiple windows has changed. What might have been implemented as multiple windows on a desk- or laptop computer may now be implemented by several views within a single window or even by a sequence of views. Building a solution to run on FileMaker Go means that you will not have multiple windows visible at the same time.
![]() For more information on interface design, see Apple’s iOS Human Interface Guidelines and Mac OS X Human Interface Guidelines at developer.apple.com.
For more information on interface design, see Apple’s iOS Human Interface Guidelines and Mac OS X Human Interface Guidelines at developer.apple.com.
Window Management Techniques
Among the many important features of FileMaker, the capability to have multiple windows showing data from the same table stands out as one of the most important. To aid developers with managing this feature, several window management script steps are present in ScriptMaker, including the following:
• New Window
• Select Window
• Move/Resize Window
• Adjust Window
• Set Window Title
Also, 11 Get functions return data about the active window, ranging from its size and location to its name and the mode it’s in. Another function that plays a role in window management is WindowNames, which returns a list containing the names of all the open windows, ordered according to the stacking order of the windows. (WindowNames is listed as a Design function rather than a Get function.)
These script steps and calculation functions provide you with tremendous ability to control the user experience. The amount of window management you do might vary widely from solution to solution, but having a good grounding in the options available to you is important.
When you create, move, and resize windows, you have the opportunity to specify both a location for the window and its size. The unit of measure for all window manipulation is the point. Figure 18.1 shows the options for the Move/Resize Window script step.
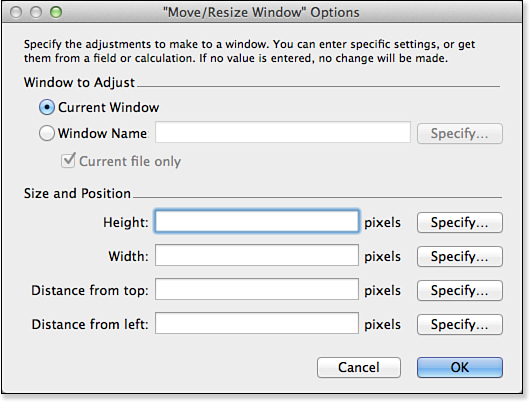
Figure 18.1. The Move/Resize Window script step enables you to specify the exact coordinates (in points) and size for any given window.
For each parameter of the Move/Resize Window script step, you can either specify a literal number or supply a calculation formula whose result determines the parameter’s value. If you leave any of the parameters empty, their values are inherited from the current active window. For instance, if you merely want to move the current window without changing its size, you don’t have to specify anything for the Height and Width parameters.
The Adjust Window script step includes a Resize to Fit option, which resizes the window to the layout in which it is displayed. If you use a script to go to the appropriate layout and immediately adjust the window with Resize to Fit, the window will be just the right size for the layout.
Multiwindow Interfaces
Opening a new window for your navigation or other button elements is only the tip of the iceberg when it comes to working with multiple windows. It is possible in FileMaker Pro to strictly control multiple windows—their positions, sizes, and titles.
The simple nuts and bolts of these features can be found in the New Window script step options. With them, you can create new windows, close windows, select (bring to front) a specific window by name, adjust and resize windows, tile and cascade multiple windows at once, and control the availability of the Status toolbar as well. Figure 18.2 shows a simple example of the script options for the New Window script step.
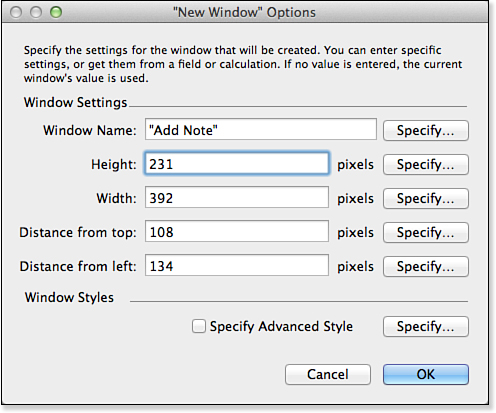
Figure 18.2. This 231-by-392 window opens with a title of Add Note.
Remember that FileMaker Go and Instant Web Publishing do not support multiple windows. If you are designing a solution that will run in those environments, you must address the issues addressed with multiple windows in this section using other techniques.
Using Window Styles
Advanced styles, which can be specified at the bottom of the dialog, let you use new interface options starting in FileMaker Pro 12, as you see in Figure 18.3.
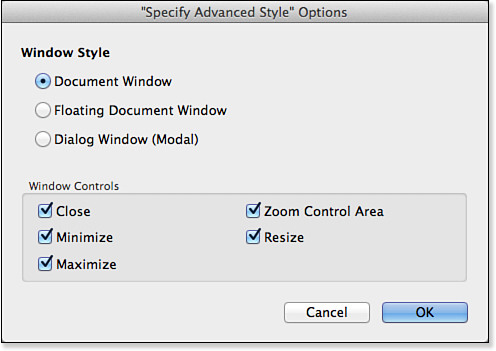
Figure 18.3. Set advanced styles for a new window.
As you can see in Figure 18.3, you can specify not only the style of a window but also which controls are available. This provides a degree of interface customization that dramatically increases your flexibility in building interfaces.
Working with Document Windows
Document windows are traditional windows that people can move and resize, although you will see ways to constrain that behavior later in this section. A floating document window is always on top of other windows even if the users activates another window. A dialog window is modal (that is, users cannot activate other windows).
The possible uses for multiple windows are quite varied:
• To view as many layouts at once as your screen real estate allows
• To create multiple List view windows of the same table, with different found sets, at once
• To use a form for editing a single record while still viewing multiple records via either List or Table view
• To create a pop-up window, similar to a dialog
• To keep navigation, function, and other palettes off to the side of your workspace
• To view reports while not having to leave the windows/
layouts in which you’re working
Remember that with FileMaker Go on iOS devices, you can create multiple windows, but only one window is visible at a time. The control at the left of the toolbar shows you how many windows are open and lets you switch among them.
Creating a Modal Dialog with a Window Style
Modal dialogs—windows that stay open in the foreground while waiting for some action to be performed by the user—are a common user interface standard that users will find familiar. Certainly, the Show Custom Dialog script step will take care of some of your basic needs, but in cases where you would like to control the look and feel of a dialog or need more than three simple text-entry fields, you will need to turn to crafting your own window dialogs.
With the window styles, it is easy to manage dialog windows. You simply use the new window script step and choose a dialog window. You can provide a layout with the required information and/or data entry fields. By omitting a Close control, you can prevent users from closing the window, and users will not be able to activate other windows. They are trapped in the modal dialog, which is actually what you want. However, you need to provide some means of escape such as an OK or Cancel button (or both) that at the very least performs the Close Window script step for the current window. Of course, you can perform other tasks with scripts for OK, Cancel, and any other interface elements you provide. It is common to use a single script with a parameter indicating whether the action is Close or OK (possibly by using the name—not the title—of the selected button. That keeps your actions together.
This “trapping” in modal dialogs has been recognized as an unfriendly user interface device, but it is a good way of stopping the action until a user clicks an OK or Cancel button in the model dialog.
Cancel buttons imply that whatever action the user has taken in the modal dialog window can be undone. That can be problematic, especially if you’ve allowed the user to add and remove records from a portal, so be careful with the use of that term. One technique for managing the undo process is to use global fields for data entry and to populate true fields only when the user clicks Submit. Other techniques involve record-level rollbacks.
![]() To learn more about rollbacks and undo operations, see Chapter 11, “Developing for Multiuser Deployment.”
To learn more about rollbacks and undo operations, see Chapter 11, “Developing for Multiuser Deployment.”
Creating a Modal Dialog Using a Script Pause State
FileMaker solutions that predate FileMaker Pro 12 did not have access to window styles. As a result, they typically use a different technique to create modal windows. You might find this code in solutions that you are maintaining or modifying. In addition, you might find this code written in new solutions either because the developer (who may be yourself) is not familiar with window styles or for one reason or another prefers not to use them.
To build a modal dialog without using window styles, follow these steps:
1. Build a layout intended to act as your dialog. You can add whatever functions and layout objects to it that you want. The layout can be as simple as a single field, or it can be as complex as one that displays a subsummary report in Preview mode.
2. Add a button that will close the window. If it is to be used like a dialog, you will need two buttons: one for Cancel and one for Submit (or whatever terms you prefer). Both will close the window, but one or the other (or both) will have additional functionality. What is important is that only the scripts behind those buttons can close the window.
3. Now place a button on your main layout to open the subsidiary window. This script assumes that the layout and window are both named Add Note, although the window name has a space in it and the layout name does not. Attach it to the following script:
Allow User Abort [ Off ]
New Window [ Name: "Add Note"; Height: 231; Width: 392; Top: 108; Left: 134 ; Style: Dialog]
//note that although the script step doesn't report it, the Close button is disabled in Window Controls
Go to Layout [ "AddNote" (Notes) ]
Adjust Window [Resize to Fit]
New Record/Request
Show/Hide Status Area [ Hide, Lock ]
Pause/Resume Script [ Indefinitely ]
Generally, it’s a bad idea to leave a script paused—users can get stuck in limbo—but in this case it is exactly the behavior you want. The script ends, leaving the user in a paused state. You need to remember that a paused state is active when performing any additional scripts or when providing other functions in your pop-up window.
It’s important to disallow user abort; otherwise, users can close your window without performing the action you’re attempting to require. It’s also a good idea to lock the Status toolbar. (For backward compatibility, the script step still refers to the Status area.) Finally, you have to hold FileMaker in a paused state so that users can’t perform any other action while attending to the dialog.
Keep in mind that your users will still be able to run scripts that are visible in the Scripts menu or elsewhere. In solutions that use this technique, developers often opt not to set scripts to display in the Scripts menu and to control or change any custom menu sets in use. Alternatively, they write their scripts such that all scripts visible in the Scripts menu take into account this paused state by either refusing to run or ending gracefully so that the user’s state in the modal dialog window is not disrupted.
4. Now write the Cancel and Submit scripts. For this example, the Cancel script is this:
Close Window [ Name: "Add Note" ; Current file]
The Submit script is as follows:
Commit Records/Requests[]
Close Window [ Name: "Add Note" ; Current file]
5. Finally, attach the script from step 3 to a button.
Adding a Pause State
You’ll notice we haven’t yet dealt with the pause state. If you add a Pause/Resume script step to the Done script, FileMaker won’t know that you want it to resume a currently paused script. The behavior it normally implements is to overlay a new pause state on top of the earlier pause state. This is entirely as it should be because this allows you to build routines with multitiered pause states.
But in the case where you want to resume a previously paused script, the solution to dealing with your pause state lies with the button options attached to each button object. Select your Done button object and either right-click or navigate to the Format menu (in Layout mode) and choose the Button Setup option. Another technique is to simply double-click the button object in Layout mode. Refer to the Current Script options shown in Figure 18.4.
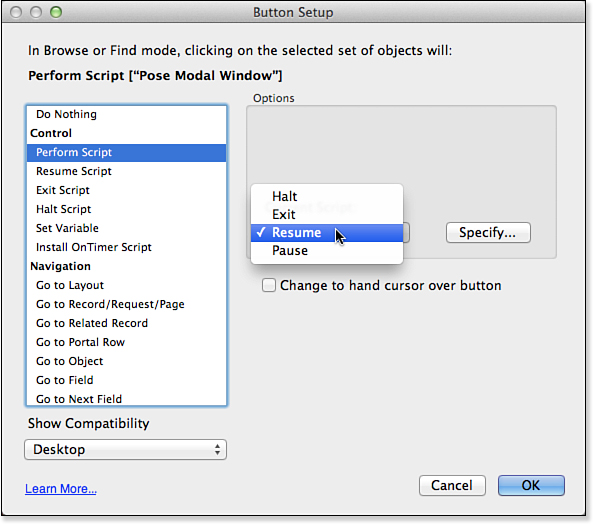
Figure 18.4. Notice the rarely used Current Script pop-up menu in the Button Setup dialog with its choices about what to do with the current script—Halt, Exit, Resume, or Pause.
The Current Script option for the Perform Script button behavior is almost never changed. Most often its default state of pausing a currently running script while performing whatever new script is necessary will meet your needs. In this case, however, you need it to resume the current script (which will simply continue from the pause state, effectively ending it) before proceeding through the Done script and closing the pop-up window.
This then closes the pause state without creating a nested second one and allows the user back into the state of using the database solution normally. This, combined with the Close Window script step, gives the user the experience of clicking Done and seeing the window close. Clicking the Open button sends users back to the layout from which they began.
![]() For another example of working with modal dialogs using script results, see “Script Results,” p. 451.
For another example of working with modal dialogs using script results, see “Script Results,” p. 451.
Go to Related Record
Go to Related Record is one of the most useful and important script steps. In this discussion of scripting, we’ve focused for the most part on categories of tasks that you can perform with scripts rather than on specific steps, but Go to Related Record, which we’ll refer to as GTRR, merits a discussion entirely its own.
Figure 18.5 shows the Go to Related Record Options dialog. Essentially, GTRR lets you navigate to one or more records related to whatever record or records you’re currently viewing. As we discuss in this section, there are several options for how and where that related set will be displayed. It might take awhile for all the nuances of GTRR to sink in, but mastery of this script step is crucial for becoming an experienced script writer.

Figure 18.5. Go to Related Record is one of the most useful script steps. It’s also one of the most complex.
GTRR Basics
It might be helpful to think of GTRR as a way to move or jump from one point on the Relationships Graph to another point. But from where and to where? In the GTRR options dialog (shown previously in Figure 18.5), the first thing you specify is the destination table occurrence for this move. The script’s context determines the starting point for the move. We use the terms origin and destination to refer to these table occurrences.
Whenever a script executes, it does so in a context determined by the active window, the active layout, the active found set, and the active record. All these things can, of course, be changed during the course of a script by using a wide variety of script steps. Whatever layout is active at the point in the script at which the GTRR occurs determines the origin for a GTRR script step. The active layout situates you at a particular point on the Relationships Graph. So, managing the origin of the jump is done not in the GTRR step itself, but rather through navigation (if necessary) to the appropriate layout beforehand.
As the destination for the GTRR, you can select any table occurrence on the graph, including table occurrences tied to external tables, table occurrences unrelated to the origin, and even the origin itself. This last option produces a special result that’s discussed in the “Jumping to Disconnected Table Occurrences” section a little later in this chapter.
The other pop-up list within the GTRR dialog is for specifying a layout to use for displaying whatever set of records the GTRR returns. Unlike the choice of a destination table occurrence, you are restricted in your choice to selecting among layouts tied to the same table (not table occurrence) as the destination table occurrence. That’s a convoluted way of saying that you’re expected to specify an appropriate layout to display the related set of records. We therefore refer to this layout as the display layout. If and only if the destination table occurrence is from an external file, you’ll have the option to select the Use External Table’s Layouts check box. The choices for the display layout consist of those layouts, in the external table, that are tied to the same table as the destination table occurrence.
Another option in the GTRR dialog enables you to specify that the related set of records will appear in a new window. If you select this option, you have access to the same setup parameters that you do when using the New Window script step (window name, location, size). If you don’t check the Show in New Window option, one of two things happens when the GTRR executes:
• If the display layout is in the current file, that becomes the active layout.
• If the display layout is in a different file, another window must be activated (windows are file specific). If there are no windows for the required file currently open, a new window is created regardless of whether you’ve checked this option. If there are windows belonging to the external file (even hidden ones), the frontmost of those in the stacking order becomes the active window.
The final option on the GTRR dialog is Show Only Related Records. Your choice here partially determines what found set the display layout contains. It’s easier to discuss the possible implications of selecting this option in the course of a specific example, which we do in the example that follows. For now, know that in most cases, you’ll want to enable this option.
If you choose the Show Only Related Records option, you also have the choice to navigate to only those records related to the current record or to records related to any record in the current found set. For example, if you’ve isolated a subset of customer records, it is now possible to use GTRR to navigate to a found set of all products ordered by any of those customers. This was possible in previous versions of FileMaker but required a complex workaround.
Predicting the Found Set
The origin and destination table occurrences must be connected on the graph for the GTRR to function. If they aren’t, the user sees an error stating, “This operation could not be completed because the target is not part of a related table.” The actual error generated is Error 103: Relationship is missing.
Assuming that there is some unique path from the origin to the destination, you really need to know just three rules to determine what found set will appear if you do a Go to Related Record script step:
• Every relationship along the path is evaluated.
• The found sets are cumulative.
• The sort setting of the final hop determines the sort order.
If any of the individual hops in a multihop GTRR yield a null set, the entire GTRR behaves the same as a single-hop GTRR that yields a null set. If you’re ever in doubt about what records would appear, or in what order, simply create a portal that displays records from the destination table occurrence. The same set of records that shows up in the portal would end up as the found set after a GTRR. Assuming that the portal itself wasn’t sorted, the order of the records would even be the same.
Jumping to Disconnected Table Occurrences
There’s one final behavior of the Go to Related Record step that’s worth noting: It can be used to move a found set from one table occurrence of a base table to another. This even works for disconnected table occurrences. In a given window, all the layouts associated with a given table occurrence share the same found set and sort order. This is good because it means that moving back and forth between, say, a list view and a form view based on the same table occurrence doesn’t require any found set manipulation.
By using the same table occurrence for both the origin and the destination of a GTRR, you can move the current found set to another layout and/or window. There’s something about this behavior that defies intuition, but it’s very handy nonetheless.
Keep in mind that if two layouts are attached to different table occurrences, their found sets and sort orders are independent of each other, even if they’re both occurrences of the same base table.
Dedicated Find Layouts
Entering Find mode and performing find requests is a crucial part of FileMaker Pro, but it’s also one of the more difficult things to manage at the user interface level. As your solutions become more complex, Find mode will not be as intuitive for users: They might not have all the fields by which they want to search on one layout, or they might want to perform find requests on related data. Although FileMaker Pro can manage this task quite easily, users might be disoriented or confused by the results.
Before launching into dedicated find layouts, remember to explore Quick Find at the right of the Status toolbar. For a great many finds, users can get to what they want just by using Quick Find without specifying the specific field(s) to search. This brute-force finding is what drives search engines, and most people are comfortable with it for basic searching.
Say you’ve created a utility relationship that displays related data based on selected criteria or some temporary condition in the database. The fields sitting on your layout are not a structural one-to-many representation of your primary data architecture. Nonetheless, human users will intuitively want to hop into Find mode and have the process act on the primary relationship rather than your utility relationship.
Here’s another example: Imagine looking at an author table with a related book-title field showing the most recent book written by that author. By definition, only one book can be the most current. Now imagine that someone is searching for an author who wrote a given book a long time ago. She is likely to click into the related book-title field in Find mode and be baffled as to why her search returned zero results—or worse yet, she might not realize her mistake and might conclude wrongly that the data doesn’t exist (the book she’s looking for is not the most recent, so the search fails). Given that the fields on the right relate to only the most current book for an author, the search would be accurate but yield undesirable results. Furthermore, there might be dozens of fields in your database, related and otherwise, but users will want to search on only a small handful of these 90% of the time.
To make the find process as intuitive as possible, you can create a separate find layout. An additional nicety is setting it up to open in a pop-up window. Your users will remain in context—in other words, they’ll see where they were in the window behind the current one—and will intuitively understand the process going on. You can build find processes generally in two ways, each of which is covered in the following sections.
Dedicated Find Mode Layouts
The first process is perhaps the simplest. Create a separate layout and populate it with all the appropriate fields specific to the table in which a find is to be performed. Take care to place primary related fields on these layouts: Using the book example again, you would place a book title from a primary-key-to-foreign-key relationship between the Book and the Author tables. The find result would then properly return authors who wrote books—any books, not just the most current—that matched the find criteria.
You can rely on users navigating to these find layouts themselves, along with entering Find mode and performing finds, or you can script the process. The scripted process would involve a button on your standard layouts to take the user to the special Find layout and enter Find mode. A second button on the Find layout itself would perform the request and return the user to the original layout and Browse mode.
This approach is a great way to give your users an intuitive process and shield them from unpredictable results. It’s also a nice way to reduce the sheer volume of fields from which they have to choose in Find mode.
Script-Driven Finds
A more complex Find routine replaces the fields in the preceding example with global fields. Providing a dedicated Find layout will likely be something you might want to deliver in Browse mode. Instead of having users work with the related fields themselves (which in Browse mode would display actual data and could potentially pose a problem if users didn’t realize they had access to actual data), you can control access and the entire process using a script and offer users empty global fields for entering find criteria.
This approach is labor intensive, and it relies on heavy scripting. As in the example in the preceding section, you have to bring users to the Find layout. This time, leave them in Browse mode. After their find criteria are entered, they have to click a Find button that then takes the system into Find mode, populates and performs the find request by using Set Field script steps, and then returns the users to some proper result layout.
The difficulty here lies in replicating all the Find functionalities: inserting omit requests, extending found sets, constraining found sets, and working with multiple requests. We recommend using this technique only in rare cases when you want to fully control the user experience.
Troubleshooting
Pop-up Window Issues on a Windows PC
Pop-up windows don’t appear in front of the current window when the current window is maximized.
On the Windows platform, when a window is maximized to fill the application window, no other windows can also be visible on the screen. That is, only a single window can be maximized, and it must be the foreground window. This means that if you try to pop up a window in front of a maximized window, the background window cannot remain maximized. It instead reverts to its reduced state.
If you plan to build a user interface that makes use of multiple windows, be aware of this potential pitfall. It would be better in such cases never to have any windows maximized, even though this means you have to work within a reduced space. Users can still manually maximize a window, so test your routines thoroughly to see what effect this action would have. You’ll likely need to add some control routines such as Adjust Window [Resize to Fit] to your navigation scripts to get the windows back to the size at which you intend them to be viewed.
Creating New Windows Loses My Found Sets
Whenever I create a new window, all the found sets of the nonvisible layouts are reset to show all records. What causes this behavior?
When a new window is created, either manually from the Window, New Window menu command or via script, it inherits many characteristics of the currently active window. Specifically, it keeps the same size (except when opened via script and specified otherwise), active layout, found set, sort order, and active record. To all appearances, it’s as if it’s an exact duplicate of the currently active window.
In fact, only the settings of the active layout are retained when a new window is created. All layouts that are not visible (except those tied to the same table occurrence as the active layout) lose any sense of the found set, active record, and sort order. All records are displayed, unsorted, and the first record in the table is the active record.
Incomplete Highlighting Rectangle
My row highlight is showing in its container field, but it doesn’t fill the entire portal row well. Where should I first look to address this problem?
If you place an image in a container field and then have a calculation display the contents of that container field in a portal row, even when Maintain Original Proportions is enabled, your rectangle might show whitespace on either side. This is further complicated if you are trying to put something more complex than just a colored rectangle in the highlight field. FileMaker’s resizing of images can be unpredictable at times. The best way around this situation in many cases is simply to make the image larger than you need it to be and set the graphic format to Crop.