
15. Advanced Calculation Techniques
Logical Functions
Chapter 8, “Getting Started with Calculations,” presented an introduction to FileMaker Pro calculation formulas. This chapter deals not only with more specialized functions than the ones presented in Chapter 8, but also deals with the more programmatic functions—those that allow you to control operations of calculations. These are often called logical functions.
Chapter 8 discussed two of them: the If and Case conditional functions. This section continues with other logical functions.
The Let Function
The Let function enables you to simplify complex calculations by declaring variables to represent subexpressions. (In programming lingo, they are very much like subroutines.) These variables exist only within the scope of the formula, and you cannot reference them in other places. As an example, here is a formula presented in Chapter 8 for extracting the last line of a text field:
Right(myText; Length(myText) - Position(myText; "¶"; 1; PatternCount(myText; "¶")))
With the Let function, you could rewrite this formula this way:
Let ([fieldLength = Length(myText) ;
returnCount = PatternCount(myText; "¶") ;
positionOfLastReturn = Position (myText; "¶"; 1; returnCount) ;
charactersToGrab = fieldLength - positionOfLastReturn];
Right (myText, charactersToGrab)
)
The Let function takes two parameters. The first is a list of variable declarations. If you want to declare multiple variables, you have to enclose the list within square brackets and separate the individual declarations within the list with semicolons. There are four variable declarations in the first parameter of the Let function shown here. The second parameter is some formula you want evaluated. That formula can reference any of the variables declared in the first parameter, just as it would reference any field value.
![]() If you experience unexpected behavior of a
If you experience unexpected behavior of a Let function, the trouble might be your variable names. For more information, see “Naming Variables in Let Functions” in the “Troubleshooting” section at the end of this chapter.
Notice in this example that the third variable declared, positionOfLastReturn, references the returnCount variable, which was the second variable declared. This capability to have subsequent variables reference previously defined ones is one of the powerful aspects of the Let function because it enables you to build up a complex formula via a series of simpler ones.
It is fair to observe that the Let function is never necessary; you could rewrite any formula that uses the Let function, without using Let, either as a complex nested formula or by explicitly defining or setting fields or variables to contain subexpressions. The main benefits of using the Let function are simplicity, clarity, and ease of maintenance. For instance, you could write a formula that returns a person’s age expressed as a number of years, months, and days, as shown here:
Year (Get (CurrentDate)) - Year(birthDate) - (DayOfYear(Get(CurrentDate)) < DayOfYear(birthDate)) & " years, " & Mod ( Month(Get(CurrentDate)) - Month (birthDate) - (Day (Get(CurrentDate)) < Day(birthDate)); 12) & " months, and " & (Get(CurrentDate) - Date (Month(Get(CurrentDate)) - (Day (Get(CurrentDate)) < Day(birthDate)); Day (birthDate); Year (Get(CurrentDate)))) & " days"
This is a complex nested formula, and many subexpressions appear multiple times. The steps in writing and debugging this formula are difficult, even when you understand the logic on which it’s based. With the Let function, you could rewrite the formula this way:
Let ( [ C = Get(CurrentDate);
yC = Year (C) ;
mC = Month (C) ;
dC = Day (C) ;
doyC = DayOfYear (C) ;
B = birthDate;
yB = Year (B) ;
mB = Month (B) ;
dB= Day (B) ;
doyB = DayOfYear (b) ;
num_years = ( yC - yB - (doyC < doyB)) ;
num_months = Mod (mC - mB - (dC <dB) ; 12) ;
num_days = C - Date (mC - (dC < dB) ; dB ; yC) ] ;
num_years & " years, " & num_months & " months, and " & num_days & " days" )
Because of the extra space in the formula, this version is a bit longer than the original, but it’s vastly easier to comprehend. If you were a developer needing to review and understand a formula written by someone else, we’re sure you would agree that you’d prefer seeing this Let version rather than the first version.
The Let function’s simplicity extends to fields that are similar to one another. For example, if you want to reformat a telephone number to insert standard symbols (parentheses and hyphens, for example), you can write a Let function to do so. You can then create calculation fields for a variety of phone numbers and simply paste the Let function into each one; all you have to do is change the first variable assignment statement to reference the particular phone number field you want to format.
In addition to simplicity and clarity, there are also performance benefits to using the Let function. If you have a complex subexpression that you refer to multiple times during the course of a calculation, FileMaker evaluates it anew each time it’s referenced. If you create the subexpression as a variable within a Let statement, the subexpression is evaluated only once, no matter how many times it is subsequently referenced. In the example just shown, for instance, FileMaker would evaluate Get(CurrentDate) eight times in the first version. In the version that uses Let, it’s evaluated only once. In many cases, the performance difference might be trivial or imperceptible. Other times, optimizing the evaluation of calculation formulas might be just the answer for increasing your solution’s performance.
The more you use the Let function, the more likely it is to become one of the core functions you use. To help you become more familiar with it, we use it frequently throughout the examples in the rest of this chapter.
The Choose Function
The If and Case functions are sufficiently robust and elegant for most conditional tests that you’ll write. For several types of conditional tests, however, the Choose function is a more appropriate option. As with If and Case, the value returned by the Choose function depends on the result of some test. What makes the Choose function different is that the test should return an integer rather than a true/false result. A number of possible results follow the test; the one chosen depends on the numeric result of the test. If the test result is 0, the first result is used. If the test result is 1, the second result is used, and so on. The syntax for Choose is as follows:
Choose (test ; result if test=0 ; result if test=1 ; result if test=2 ....)
A classic example of when the Choose function comes in handy is when you have categorical data stored as a number and you need to represent it as text. For instance, you might import demographic data in which an integer from 1 to 5 represents the ethnicity of an individual. You might use the following formula to represent it to users:
Choose (EthnicityCode; ""; "African American"; "Asian"; "Caucasian"; "Hispanic"; " Native American")
Of course, you could achieve the same result with the following formula:
Case (EthnicityCode = 1; "African American"; EthnicityCode = 2; "Asian", EthnicityCode = 3; "Caucasian"; EthnicityCode = 4; "Hispanic"; EthnicityCode= 5; "Native American")
You should consider the Choose function in several other situations. The first is for generating random categorical data. Say your third-grade class is doing research on famous presidents, and you want to randomly assign each student one of the six presidents you have chosen. By first generating a random number from 0 to 5, you can use the Choose function to select a president. Don’t worry that r isn’t an integer; the Choose function ignores everything but the integer portion of a number. The formula would be this:
Let ( r = Random * 6; // Generates a random number from 0 to 5
Choose (r, "Washington", "Jefferson", "Lincoln", "Wilson", "Truman", "Kennedy"))
Several FileMaker functions return integer numbers from 1 to n, so these naturally work well as the test for a Choose function. Most notable are the DayofWeek function, which returns an integer from 1 to 7, and the Month function, which returns an integer from 1 to 12. As an example, you could use the Month function within a Choose to figure out within which quarter of the year a given date fell:
Choose (Month(myDate)-1; "Q1"; "Q1"; "Q1"; "Q2"; "Q2"; "Q2"; "Q3"; "Q3"; "Q3"; "Q4"; "Q4"; "Q4")
The -1 shifts the range of the output from 1–12 to 0–11, which is more desirable because the Choose function is zero based, meaning that the first result corresponds to a test value of 0. There are more compact ways of determining the calendar quarter of a date, but this version is easy to understand and offers much flexibility.
Another example illustrating when Choose works well is when you need to combine the results of some number of Boolean tests to produce a distinct result. As an example, imagine that you have a table that contains results on Myers-Briggs personality tests. For each test given, you have scores for four pairs of personality traits (E/I, S/N, T/F, J/P). Based on which score in each pair is higher, you want to classify each participant as one of 16 personality types. Using If or Case statements, you would need a long, complex formula to do this. With Choose, you can treat the four tests as a binary number and then simply do a conversion back to base-10 to decode the results. The formula might look something like this:
Choose( (8 * (E>I)) + (4 * (S>N)) + (2 * (T>F)) + (J>P);
"Type 1 - INFP" ; "Type 2 - INFJ" ; "Type 3 - INTP" ; "Type 4 - INTJ" ;
"Type 5 - ISFP" ; "Type 6 - ISFJ" ; "Type 7 - ISTP" ; "Type 8 - ISTJ" ;
"Type 9 - ENFP" ; "Type 10 - ENFJ" ; "Type 11 - ENTP" ; "Type 12 - ENTJ" ;
"Type 13 - ESFP" ; "Type 14 - ESFJ" ; "Type 15 - ESTP" ; "Type 16 - ESTJ")
Each greater-than comparison is evaluated as a 1 or 0, depending on whether it represents a true or false statement for the given record. By multiplying each result by successive powers of 2, you end up with an integer from 0 to 15 that represents each of the possible outcomes. (This is similar to how flipping a coin four times generates 16 possible outcomes.)
As a final example, you also can use the Choose function any time you need to “decode” a set of abbreviations into their expanded versions. Consider, for example, a situation in which survey respondents have entered SA, A, N, D, or SD as a response to indicate Strongly Agree, Agree, Neutral, Disagree, or Strongly Disagree. You could map from the abbreviation to the expanded text by using a Case function like this:
Case (ResponseAbbreviation = "SA"; "Strongly Agree" ;
ResponseAbbreviation = "A"; "Agree" ;
ResponseAbbreviation = "N"; "Neutral" ;
ResponseAbbreviation = "D"; "Disagree" ;
ResponseAbbreviation = "SD"; "Strongly Disagree" )
You can accomplish the same mapping by using a Choose function if you treat the two sets of choices as ordered lists. You simply find the position of an item in the abbreviation list and then find the corresponding item from the expanded text list. The resulting formula would look like this:
Let ( [a = "|SA||A||N||D||SD|" ;
r = "|" & ResponseAbbreviation & "|" ;
pos = Position (a; r ; 1 ; 1) ;
itemNumber = PatternCount (Left (a; pos-1); "|") / 2];
Choose (itemNumber, "Strongly Agree"; "Agree"; "Neutral"; "Disagree";
"Strongly Disagree")
)
In most cases, you’ll probably opt for using the Case function for simple decoding of abbreviations. Sometimes, however, the list of choices isn’t something you can explicitly test against (such as with the contents of a value list), and finding one choice’s position within the list might suffice to identify a parallel position in some other list. Having the Choose function in your toolbox might offer an elegant solution to such challenges.
The GetField Function
When writing calculation formulas, you use field names to refer abstractly to the contents of particular fields in the current record. That is, the formula for a FullName calculation might be FirstName & " " & LastName. FirstName and LastName are abstractions; they represent data contained in particular fields.
Imagine, however, that instead of knowing in advance what fields to refer to in the FullName calculation, you wanted to let users pick any fields they wanted to. So, you set up two fields, which we’ll call UserChoice1 and UserChoice2. How can you rewrite the FullName calculation so that it’s not hard-coded to use FirstName and LastName, but rather uses the fields that users type in the two UserChoice fields?
The answer is the GetField function. GetField enables you to add another layer of abstraction to your calculation formulas. Instead of hard-coding field names in a formula, GetField allows you to place into a field the name of the field you’re interested in accessing. That sounds much more complicated than it actually is. Using GetField, we might rewrite our FullName formula as shown here:
GetField (UserChoice1) & " " & GetField (UserChoice2)
The GetField function takes just one parameter. That parameter can be either a literal text string or a field name. Having it be a literal text string, although possible, is not particularly useful. The function GetField("FirstName") would certainly return the contents of the FirstName field, but you can achieve the same thing simply by using FirstName by itself. It’s only when the parameter of the GetField function is a field or formula that it becomes interesting. In that case, the function returns the contents of the field referred to by the parameter.
There are many potential uses of GetField in a solution. Imagine, for instance, that you have a Contact table with the fields First Name, Nickname, and Last Name (among others). Sometimes contacts prefer to have their nickname appear on badges and in correspondence, and sometimes the first name is desired.
To deal with this, you could create a new text field called Preferred Name and format that field as a radio button containing First Name and Nickname as the choices. When doing data entry, a user could simply check off the name to use for correspondence. When it comes time to make a Full Name calculation field, one of your options would be the following:
Case ( Preferred Name = "First Name"; First Name;
Preferred Name = "Nickname"; Nickname) &
" " & Last Name
Another option, far more elegant and extensible, would be the following:
GetField (PreferredName) & " " & Last Name
When there are only two choices, the Case function certainly isn’t cumbersome. But if there are dozens or hundreds of fields to choose from, GetField clearly has an advantage.
The Evaluate Function
The Evaluate function is one of the most intriguing functions in FileMaker. In a nutshell, it enables you to evaluate a dynamically generated or user-generated calculation formula. With a few examples, you’ll easily understand what this function does. It might, however, take a bit more time and thought to understand why you would want to use it in a solution. We start by explaining the what and then suggest a few potential whys. The syntax for the Evaluate function is as follows:
Evaluate ( expression { ; [field1 ; field2 ;...]} )
The expression parameter is a text string representing some calculation formula that you want to evaluate. The optional additional parameter is a list of fields whose modification triggers the reevaluation of the expression. Often, the expression itself uses these fields; if one of them changes, you want to reevaluate the expression.
For example, imagine that you have a text field named myFormula and another named myTrigger. You then define a new calculation field called Result, using the following formula:
Evaluate (myFormula; myTrigger)
Figure 15.1 shows some examples of what Result will contain for various entries in myFormula.
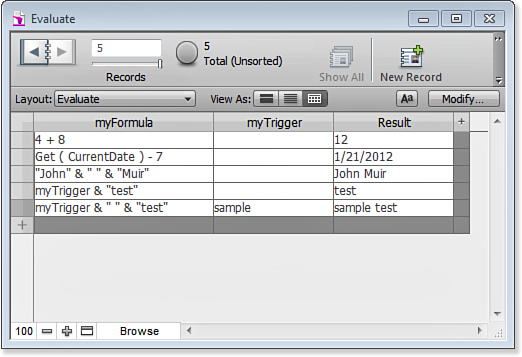
Figure 15.1. Using the Evaluate function, you can have a calculation field evaluate a formula contained in a field.
There’s something quite profound going on here. Instead of having to hard-code calculation formulas, you can evaluate a formula that has been entered as field data. In this way, Evaluate provides an additional level of logic abstraction similar to the GetField function. In fact, if myFormula contained the name of a field, Evaluate(myFormula) and GetField(myFormula) would return exactly the same result. It might help to think of Evaluate as the big brother of GetField. Whereas GetField can return the value of a dynamically specified field, Evaluate can return the value of a dynamically specified formula.
Uses for the Evaluate Function
A typical use for the Evaluate function is to track modification information about a particular field or fields. A timestamp field defined to auto-enter the modification time triggers any time any field in the record is modified. Sometimes, however, you might want to know the last time that anyone modified the Comments field, without respect to other changes to the record. To do this, you would define a new calculation field, CommentsModificationTime, with the following formula:
Evaluate ("Get(CurrentTimestamp)" ; Comments)
The quotation marks around Get(CurrentTimestamp) are important, and are apt to be a source of confusion. The Evaluate function expects to be fed either a quote-enclosed text string (as shown here) or a formula that yields a text string (as in the Result field earlier). For instance, if you want to modify the CommentsModificationTime field so that rather than just returning a timestamp, it returns something like “Record last modified at: 11/28/2012 12:23:58 PM by Lily Bart,” you would need to modify the formula to the following:
Evaluate (""Record modified at: " & Get (CurrentTimeStamp) & " by " & Get (AccountName)" ; Comments)
Because the formula you want to evaluate contains quotation marks, you must escape them by preceding them with a slash. For a formula of any complexity, this becomes difficult both to write and to read. Fortunately, a function named Quote eliminates all this complexity. The Quote function returns the parameter it is passed as a quote-wrapped text string, with all internal quotation marks properly escaped. Therefore, you could rewrite the preceding function more simply as this:
Evaluate (Quote ("Record modified at: " & Get (CurrentTimeStamp) & " by " & Get (AccountName)) ; Comments)
In this particular case, using the Let function further clarifies the syntax:
Let ( [
time = Get ( CurrentTimeStamp ) ;
account = Get ( AccountName );
myExpression = Quote ( "Record modified at: " & time & " by " & account ) ] ;
Evaluate ( myExpression ; Comments )
)
Evaluation Errors
You typically find two other functions used in conjunction with the Evaluate function: IsValidExpression and EvaluationError. IsValidExpression takes as its parameter an expression; it returns a 1 if the expression is valid, a 0 if it isn’t. An invalid expression is any expression that FileMaker Pro can’t evaluate due to syntax errors or other runtime errors. If you plan to allow users to type calculation expressions into fields, be sure to use IsValidExpression to test their input to be sure that it’s well formed. In fact, you probably want to include a check of some kind within your Evaluate formula itself:
Let ( valid = IsValidExpression (myFormula) ;
If (not valid; "Your expression was invalid" ; Evaluate (myFormula) )
The EvaluationError function is likewise used to determine whether there’s some problem with evaluating an expression. However, it returns the actual error code corresponding to the problem. One point to keep in mind, however, is that rather than testing the expression, you want to test the evaluation of the expression. So, as an error trap used in conjunction with an Evaluate function, you might have the following:
Let ( [result = Evaluate (myFormula) ;
error = EvaluationError (result) ] ;
If (error ; "Error: " & error ; result)
)
Lookup Functions
In versions of FileMaker before version 7, lookups were exclusively an auto-entry option. FileMaker 7 added two lookup functions, Lookup and LookupNext, and both are useful additions to any developer’s toolkit.
The two lookup functions operate quite similarly to their cousin, the auto-entry lookup option. In essence, a lookup copies a related value into the current table. Lookups (all kinds) have three necessary components: a relationship, a trigger field, and a target field. When the trigger field is modified, the target field is set to some related field value.
It’s important to understand the functional differences between the lookup functions and the auto-entry option. Although they behave similarly, they’re not quite equivalent. Some of the key differences include the following:
• Auto-entry of a looked-up value is an option for regular text, number, date, time, or timestamp fields, which are subsequently modifiable by the user. A calculation field that includes a lookup function is not user modifiable.
• The lookup functions can be used anywhere—not just in field definitions. For instance, they can be used in formulas in scripts, record-level security settings, and calculated field validation. Auto-entering a looked-up value is limited to field definition.
• The lookup functions can be used in conjunction with other functions to create more complex logic rules. The auto-entry options are comparatively limited.
Lookup
The syntax of the Lookup function is as follows:
Lookup ( sourceField { ; failExpression} )
sourceField is the related field whose value you want to retrieve. The optional failExpression parameter is returned if there is no related record or if sourceField is blank for the related record. If the specified relationship matches multiple related records, the value from the first related record is returned.
There are two main differences between using the Lookup function and simply referencing a related field in a formula. The first is that calculations that simply reference related fields must be unstored, but calculations that use the Lookup function to access related fields can be stored and indexed. The other difference is that changing sourceField in the related table does not cause the Lookup function to retrigger. Just as with auto-entry of a looked-up value, the Lookup function captures sourceField as it existed at a moment in time. The alternative, simply referencing the related field, causes all the values to remain perfectly in sync: When the related value is updated, any calculations that reference it are updated as well. The downside is that, as with all calculations that directly reference related data, such a calculation cannot be stored.
LookupNext
The LookupNext function is designed to allow you to map continuous data elements to categorical results. It has the same effect as checking the Copy Next Lower Value or Copy Next Higher Value option when specifying an auto-entry lookup field option. Here is its syntax:
LookupNext ( sourceField ; lower/higherFlag )
The acceptable values for the second parameter are Lower and Higher. These are keywords and shouldn’t be placed in quotation marks.
An example should help clarify what we mean about mapping continuous data to categorical results. Imagine that you have a table containing information about people, and that one of the fields is the person’s birth date. You want to have some calculation fields that display the person’s astrological information, such as a zodiac sign and ruling planet. Having birth dates mapping to zodiac signs is a good example of continuous data mapping to categorical results: A range of birth dates corresponds to each zodiac sign.
In practice, two small but instructive complications arise when you try to look up zodiac signs. The first complication is that the zodiac date ranges are expressed not as full dates, but merely as months and days (for example, Cancer starts on June 22 regardless of what year it is). This means that when you set up your zodiac table, you’ll use text fields rather than date fields for the start and end dates. The second complication is that Capricorn wraps around the end of the year. The easiest way to deal with this is to have two records in the Zodiac table for Capricorn—one that spans December 22–December 31, and the other that spans January 1–January 20.
Figure 15.2 shows the full data of the Zodiac table. The StartDate and EndDate fields, remember, are actually text fields.

Figure 15.2. The data from the Zodiac table is looked up and is transferred to a person record based on the person’s birth date.
In the Person table, you need information such as the name of the person as well as the birth date—a true date field (you can call it BirthDateAsDate). Create a calculation formula for a separate BirthDate field that generates a text string containing the month and date of the person’s birth date from the BirthDateAsDate field. The BirthDateAsDate field is defined this way:
Month (BirthdateAsDate) & "/" & Day (BirthdateAsDate)
Next, create a relationship between the Person and Zodiac tables, matching the BirthDate field (the text field) in Person to the StartDate field in Zodiac. Figure 15.3 shows this relationship.
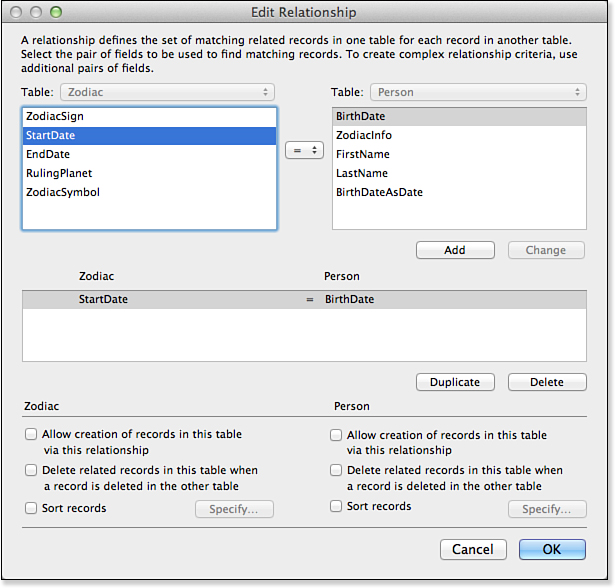
Figure 15.3. By relating the Person table to Zodiac, you can look up any information you want based on the person’s birth date.
Obviously, many birth dates aren’t start dates for one of the zodiac signs. To match to the correct zodiac record, you want to find the next lower match when no exact match is found. For instance, with a birth date of February 13 (2/13), there is no matching record where the StartDate is 2/13, so the next lowest StartDate, which is 1/21 (Aquarius), should be used.
In the Person table, therefore, you can grab any desired zodiac information by using the LookupNext function. Figure 15.4 shows an example of how this date might be displayed on a person record. The formula for ZodiacInfo is as follows:
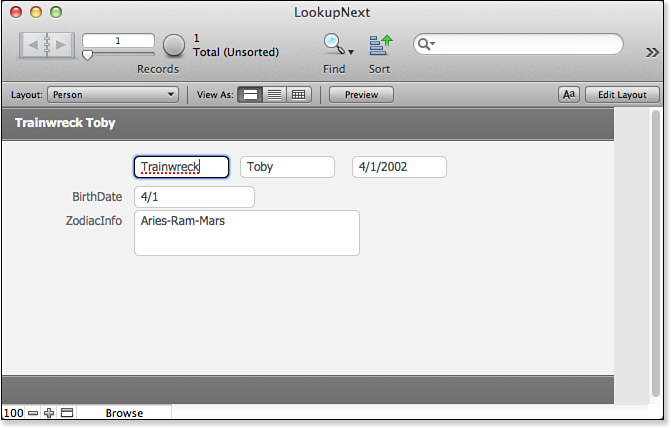
Figure 15.4. Using the LookupNext function, you can create a calculation field in the Person table that contains information from the next lower matching record.
"Sign: " & LookupNext (Zodiac::ZodiacSign; Lower) & "¶" &
"Symbol: " & LookupNext (Zodiac::ZodiacSymbol; Lower) & "¶" &
"Ruling Planet: " & LookupNext (Zodiac::RulingPlanet; Lower)
An entirely different but perfectly valid way of approaching the problem would have been to define a more complex relationship between Person and Zodiac, in which DateMatch is greater than or equal to StartDate and less than or equal to EndDate. Doing this would allow you to use the fields from the Zodiac table as plain related fields; no lookup would have been required. There are no clear advantages or disadvantages of this method over the one discussed previously.
It would have been possible in the previous examples to match to EndDate instead of StartDate. In that case, you would simply need to match to the next higher instead of the next lower matching record.
Other typical scenarios for using LookupNext are for finding shipping rates based on weight ranges, determining price discounts based on quantity ranges, and defining cut scores based on continuous test score ranges, for example.
Text Formatting Functions
In versions of FileMaker Pro before version 7, there was no way to affect the display of a field (that is, color, size, font, style) via calculation formulas. Developers had to come up with workarounds for seemingly simple tasks, such as having the contents of a field change color based on some conditional test. For example, a typical workaround was stacking two calculation fields on top of one another, each formatted with a different text color on the layout, and then having a conditional test in each to turn it “on” or “off” to simulate the effect of the text changing color. Beginning with FileMaker Pro 8, nine text formatting functions obviate the need for many of these old workaround options.
Text Color, Font, and Size
The TextColor, TextFont, and TextSize functions are quite similar. The first parameter of each function is the text string you want to act on; the second parameter contains the formatting instructions you want to apply.
For example, perhaps you have a Tasks table, and you want any tasks due within the next week to display in red. To accomplish this task, you would define a calculation field named TaskDisplay with the following formula:
Case (DueDate <= Get (CurrentDate) + 7;
TextColor (TaskName; RGB (255; 0; 0)); // Red
TextColor (TaskName; 0)) // Black
The TaskDisplay field displays the task name in either red or black, depending on the due date.
The second parameter of the TextColor function must be an integer from 0 to 16777215 (which is 2563 – 1), which represents a unique RGB color. If you know the integer value of the color you want (for example, black is 0), you can simply use that integer. More typically, you’ll use the RGB function, which returns the integer representation of the color specified. Each of the three parameters in the RGB function must be an integer between 0 and 255. The first parameter represents the red component of the color; the second, the green component; the third parameter represents the blue component. The RGB function determines the integer representation by the following formula:
((255^2) * Red) + (255 * Green) + Blue
Text Style
The next two text formatting functions are TextStyleAdd and TextStyleRemove. Each of these functions takes two parameters. The first is a text string to act on; the second is a style or styles to apply to the text string. If listing multiple styles, you have to separate them with a plus sign (+). The style names are keywords and should not appear in quotation marks. They also must be hard-coded in the formula; you can’t substitute a field that contains style instructions. Here is a list of the valid styles for both TextStyleAdd and TextStyleRemove:
Plain
Bold
Italic
Underline
Condense
Extend
Strikethrough
SmallCaps
Superscript
Subscript
Uppercase
Lowercase
Titlecase
WordUnderline
DoubleUnderline
AllStyles
To remove all styles from a chunk of text, you can either add Plain as a style or remove AllStyles. Additionally, there are numeric equivalents for each of the text style keywords. Unlike the keywords themselves, the numeric equivalents can be abstracted as field values.
Removing Text Formatting
In addition to functions for selectively adding formatting to text strings, FileMaker has functions for removing formatting from text. In addition to TextStyleRemove, mentioned previously, there are functions named TextFontRemove, TextColorRemove, TextSizeRemove, and TextFormatRemove. The first three of these remove some specific styling attribute from the designated text. TextFormatRemove removes all formatting from the selected text in one operation.
For most of these functions, you can specify an optional second parameter that specifies exactly what value you want to remove. For example,
TextSizeRemove( text )
removes all text sizing from text, causing all of text to return to whatever text size was specified for the field in Layout mode, whereas
TextSizeRemove( text; 14 )
removes only the 14-point size from text, causing any characters in a 14-point size to revert to the field default size.
TextFormatRemove, as mentioned, is the exception to this pattern. TextFormatRemove takes just one parameter, the text string to be reformatted, and strips all formatting from the field.
![]() You might have difficulty applying text formatting functions within calculations that return something other than plain text. See “Text Formatting in Nontext Calculations” in the “Troubleshooting” section at the end of this chapter.
You might have difficulty applying text formatting functions within calculations that return something other than plain text. See “Text Formatting in Nontext Calculations” in the “Troubleshooting” section at the end of this chapter.
Array Functions
Arrays are a powerful and extremely useful programming concept. If you’ve done any programming in languages such as C++, Perl, PHP, or Visual Basic, you’re probably familiar with both the concept of arrays and some uses for them. We think it likely, however, that most FileMaker Pro developers out there haven’t had much experience with arrays and will benefit from both a formal and a practical discussion of them.
Abstractly, an array is essentially a structure that can hold multiple values. The values are ordered within the structure and can be referenced by their position or index number. Figure 15.5 shows a representation of a simple array. The array has been defined to hold up to seven values, but only four values are present. The first element in the array is the value red.
Figure 15.5. An array is a structure that can hold multiple values. Each value can be identified and referenced by an index number.
Arrays are useful for a wide variety of tasks, including storing lists of data, efficiently moving multiple values through a system, and dealing with variable-size data structures where it’s impossible to define separate fields for each individual data element. FileMaker Pro doesn’t have an explicit “array” data type, but fields defined to hold multiple repetitions can be regarded as arrays. More commonly, if you want to use arrays in FileMaker, you can create your own by placing into a text field multiple values separated by some delimiter.
Return-delimited lists pop up all over the place in FileMaker Pro. Many functions and operations in FileMaker generate return-delimited lists, including most of the Design functions and the Get (ExtendedPrivileges) function. When a user selects multiple values in a check box–formatted field, FileMaker stores that data as a return-delimited list of the selections. Additionally, the Copy All Records script step generates a return-delimited list of the data elements on the current layout for the current found set (the tab character separates elements within a record).
In FileMaker Pro, you can use “array notation” to refer to data in a repeating field. myField[3], for instance, refers to the data in the third repetition of myField. It’s really just a shorthand notation for GetRepetition(myField, 3), but it makes formulas much easier to read.
Working with Return-Delimited Data Arrays
FileMaker Pro has five functions that greatly facilitate working with return-delimited data arrays such as the ones just described. They are ValueCount, LeftValues, MiddleValues, RightValues, and GetValue. Syntactically, they are similar to the four “word” functions (WordCount, LeftWords, MiddleWords, and RightWords) as well as to the four “character” functions (Length, Left, Middle, and Right).
Briefly, the syntax of these functions is as described here:
• ValueCount (text)—Returns the number of items in a return-delimited list. Unlike its cousin the WordCount function, which interprets sequential word delimiters as a single delimiter, if you have multiple carriage returns in a row, even at the beginning or end of a list, ValueCount treats each one as a delimiter. For example, ValueCount ("++Red+Blue+Green++White+") returns 7. It’s immaterial whether the list contains a single trailing return; the ValueCount is unaffected by this. Multiple trailing returns affect the ValueCount.
• LeftValues (text; numberOfValues)—Returns a list of the first n elements of a return-delimited text string. The list always has a trailing return, even if you are requesting only the first item of the array.
• MiddleValues (text; startIndex; numberOfValues)—Returns a list of n elements from the middle of a return-delimited array, starting from the position specified in the second parameter. As with LeftValues, the output of this function always contains a trailing return.
• RightValues (text; numberOfValues)—Returns a list of the last n elements from a return-delimited array. This function, too, always generates a trailing return at the end of its output.
• GetValue (listOfValues; valueNumber)—Returns a single value from a return-delimited list of values. This value will not contain a trailing carriage return. This function is useful when you want to loop through a set of values and perform some operation using each value in turn.
![]() If you ever use arrays that use delimiters other than return characters, see “Working with Arrays” in the “Troubleshooting” section at the end of this chapter.
If you ever use arrays that use delimiters other than return characters, see “Working with Arrays” in the “Troubleshooting” section at the end of this chapter.
To demonstrate how you might use these functions in a solution, we present an example of iterating through a user’s selections in a check box–formatted field and creating records for each selection in another table. Imagine that you have a table containing information about kids coming to your summer camp, and that one of the pieces of information you are capturing is a list of sports in which the child wants to participate. When you originally set up the table, you simply created a check box–formatted field in the CamperInfo table for this information. You now realize that it’s impossible to run certain reports (for example, a subsummary by sport) with the data structured this way and that you should have created a separate table for CamperSport data. You’d like not to have to reenter all the data, so you want to create a script that loops through all the CamperInfo records and creates a record in the CamperSport table for each sport checked for that camper.
We can approach a challenge such as this in many ways. We might, for instance, temporarily set data from CamperInfo into variables, navigate to a layout based on the CamperSport table, create records, and populate data from the variables. We’ve chosen instead to use a portal from the CamperInfo table to the CamperSport table that allows the creation of related records. This way, we avoid having to navigate between layouts for each camper, and the CamperID field is automatically set correctly in the CamperSport table.
Stepping Through an Array
A user’s selections in a check box field are stored as a return-delimited array, in the order in which the user checked them. You can step from element to element in such an array in two ways. One method is to iteratively “lop off” the first element of the array until there’s nothing left to process. This requires first moving the data to be processed into a temporary location where it can be cut apart without harming the original data.
The other method is to use a counter to keep track of what element is being processed. You continue processing, incrementing the counter as you go, until the counter exceeds the number of elements in the array. To some extent, which method you use is personal preference. Some developers preferred the first method in earlier versions of FileMaker Pro because it was simpler syntactically, but the newer “value” functions (introduced in FileMaker 7) make the second method appealing now. Listings 15.1 and 15.2 present both versions of the script so that you can decide for yourself which approach is preferable.
Listing 15.1. Method 1: “Lop off” the Top Element of the Array
Go to Layout ["CamperInfo" (CamperInfo)]
Go to Record/Request/Page [First]
Loop
Set Variable [$sportArray; Value: CamperInfo::SportArray]
Loop
Exit Loop If [ValueCount ($sportArray) = 0]
Go to Portal Row [Select; Last]
Set Field [CamperSport::Sport; GetValue ($sportArray; 1)
Set Variable [$sportArray; Value: Let (count = ValueCount($sportArray); RightValues ( $sportArray; count-1))
End Loop
Go to Record/Request/Page [Next; Exit after last]
End Loop
Notice that in line 8, the first element of the SportArray field is pushed through the portal, where it becomes a record in the CamperSport table. In the next line, the $sportArray variable is then reset to be everything after the first line. It gets shorter and shorter with each pass through the loop, until finally there aren’t any more items to process, concluding the inner loop.
Listing 15.2. Method 2: Walk Through the Elements One by One
Go to Layout ["CamperInfo" (CamperInfo)]
Go to Record/Request/Page [First]
Loop
Set Variable [$counter; Value: 1]
Loop
Exit Loop If [$counter > ValueCount (CamperInfo::SportArray)]
Go to Portal Row [Select; Last]
Set Field [CamperSport::Sport; GetValue (CamperInfo::SportArray; $counter)
Set Variable [$counter; Value: $counter + 1]
End Loop
Go to Record/Request/Page [Next; Exit after last]
End Loop
Again, the main difference in this method is that the inner loop steps through the elements of the SportArray field based on a counter variable.
The “Filter”-ing Functions
The Filter and FilterValues functions, introduced in FileMaker 7, are nifty tools for complex text comparison and manipulation. The following sections provide an example of each.
The Filter Function
The syntax for the Filter function is as follows:
Filter (textToFilter; filterText)
The filterText parameter consists of a set of characters that you want to “protect” in textToFilter. The output of the Filter function is the textToFilter string, minus any characters that don’t appear in filterText. For example:
Filter ("This is a test" ; "aeiou") = "iiae"
Here, the filter is the set of five vowels. Therefore, the output from the function contains all the vowels from the string "This is a test". The filter is case sensitive, so if you want to include both uppercase and lowercase vowels in your output, you have to make the filterText parameter aeiouAEIOU. The output is ordered according to the order in which characters in the filter are found in the first parameter. The order of the characters in the filter itself is irrelevant.
The Filter function is useful any time you want to constrain the domain of possible characters that a user can enter into a field. The most common use of Filter, therefore, is as part of an auto-entry calculation for text fields. Figure 15.6 shows the auto-entry options dialog for a field named Phone. Note that the option Do Not Replace Existing Value of Field (If Any) has been unchecked. That means the auto-entry calculation does not trigger only when the record is created, but also when the Phone field is modified. Essentially, this means that whenever a user modifies the Phone field, the result of the specified calculation formula immediately replaces his entry.
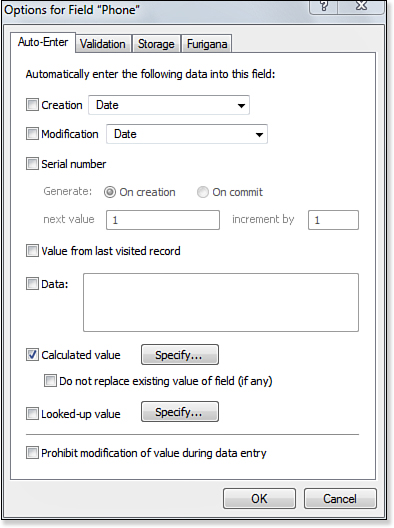
Figure 15.6. The Filter function is often used as part of the auto-entry of a calculated value.
You can use the Filter function as part of the auto-entry calculation for the Phone field to remove any non-numeric characters entered by the user. A nice thing about the Filter function is that you don’t need to anticipate all the incorrect things a user can enter (text, punctuation, spaces), but rather you can specify what the acceptable characters are. The actual function you use to reformat the user’s entry in the Phone field depends on your needs and preferences, but one option would be the following:
Let ( [
ph = Filter (Phone; "0123456789");
len = Length (ph) ;
areaCode = Case ( len = 10; Left (ph; 3); "");
exchange = Case ( len = 10; Middle (ph; 4; 3); Left (ph; 3)) ;
end = Right (ph; 4) ];
Case (
len =10 ; "(" & areaCode & ") " & exchange & "-" & end ;
len =7 ; exchange & "-" & end ;
"Error: " & TextStyleAdd ( Phone ; Bold)
)
)
The formula starts by stripping out any non-numeric characters from the user’s entry. Then, if the length of the remaining string is either 7 or 10, the number is formatted with punctuation and returned to the user. If it’s not, the function shows the user an error message, complete with the original entry presented in bold text.
The FilterValues Function
The FilterValues function is similar to the Filter function, except that it filters the elements in one return-delimited set by the elements in a second return-delimited set. When each set consists of unique elements, the FilterValues function essentially returns the intersection of the two sets. In Figure 15.7, you can see that FilterValues returns the items common to the two sets. Had the two parameters been reversed and the formula been written as FilterValues (Set B; Set A), the only difference would have been the order of the elements in the resulting list.
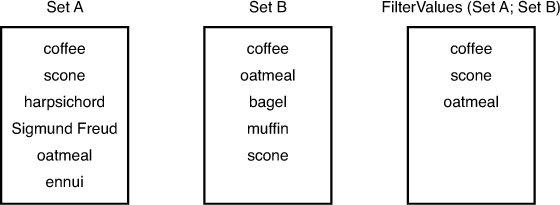
Figure 15.7. The FilterValues function returns a list of all the items of Set A that are also in Set B.
The result list always is ordered based on the first set. If an element appears multiple times in the first set, and it’s included in the filter set, it appears multiple times in the result set.
FilterValues comes in handy any time you want to see whether two lists contain any of the same elements. For instance, if you’ve defined any extended privileges as part of your security settings, you can see a list of all the privileges granted to the current user with the Get (ExtendedPrivileges) function. If you have some routine that only users with PrivSetA or PrivSetC should have access to, you can use the formula FilterValues("PrivSetA+PrivSetC"; Get (ExtendedPrivileges)). If the result is not empty, the user has at least one of those two privilege sets.
As another example, imagine that you are a third-grade teacher and that you have given your students a ten-question true/false test. Rather than setting up a related table for their answers, you’ve entered all their responses into a return-delimited text field. By also putting the answer key into a global text field, you can use the FilterValues function to determine the number of correct answers each student had. Figure 15.8 shows how this might look when you’re finished. The formula for the NumberCorrect field is the following:
ValueCount (FilterValues (TestResults; AnswerKey) )

Figure 15.8. By using the FilterValues and ValueCount functions, you can count how many items in one array are contained within some other array.
Custom Functions
In addition to all the wonderful and powerful calculation functions built into FileMaker Pro, you can create your own custom functions. To create custom functions, you must have a copy of FileMaker Pro Advanced. Any custom functions you create using FileMaker Pro Advanced remain in the database file and are fully usable when the regular FileMaker Pro client or FileMaker Go application subsequently uses that file. You just can’t edit the formula of a custom function unless you have FileMaker Pro Advanced.
As with other objects, such as scripts, tables, and user account information, custom functions live in a particular file. There is, unfortunately, no easy way to move or import custom functions defined in one file into another one. The implications of this are obvious: If you have a solution that consists of multiple files, you have to define custom functions redundantly in all the files that need to access them, thus complicating maintenance and troubleshooting. This fact shouldn’t scare you off from using custom functions—they’re really quite wonderful—but it’s certainly a constraint you must be aware of.
Alternatively, if you use several custom functions, you can add a file containing those functions and relations to the relevant tables in other files. You then just have to reconnect those tables in copies if you want.
Custom functions created for a particular file show up with all the built-in functions in the list of functions within the calculation dialog. To see only the custom functions, you can choose Custom Functions from the filter above the function list. Custom functions are used in a formula just as any other function. The person who writes the custom function defines the function name and the names of its parameters.
Uses of Custom Functions
There are several reasons for using custom functions in a solution. Custom functions enable you to abstract snippets of calculation logic so that they become reusable. Abstracting out bits of logic also makes your code easier to read and eliminates redundancy.
Simplifying Complex Formulas
The best place to begin understanding the potential uses of custom functions is with a simple example. Imagine that you need to generate a random integer from 10 to 50. Knowing, as you do from reading Chapter 8, that the Random function returns a random number between 0 and 1, you eventually conclude that the following formula solves this particular problem:
Int(Random * 41) + 10
With the problem solved, you write your formula and go on your merry way. Now, imagine that the next day you come back and discover that you need to write another function that requires a random integer from 1 to 6. After a bit more thinking, you come up with the following:
Int(Random * 6) + 1
About this time, you’d be wishing that the engineers at FileMaker, Inc., had thought to create a function that would return a random integer from x to y. Using FileMaker Pro Advanced, you can write your own custom functions for situations such as this. Rather than continuing to solve particular problems, you can solve the general case and never again need to divert your attention to the particular.
So, what would a generalized solution to the random number problem look like? First, you need to have some way of abstractly representing the “from” and “to” numbers. Let’s call these two numbers lowNumber and highNumber. Then the function that satisfies the general condition would be this:
Int (Random * (highNumber - lowNumber + 1)) + lowNumber
For any lowNumber and highNumber you feed this function, you get back an integer between the two. In a moment we’ll look at how you would go about setting this up as a custom function, but for now the important point is the concept that custom functions, just like the built-in functions you use all the time, have inputs (called parameters) and an output. Let’s say that you decide to call this function randomInRange. Now, to solve the first problem we looked at, finding a random integer from 10 to 50, you could just use the following function:
randomInRange (10; 50)
And to find a number from 1 to 6, you could use this function:
randomInRange (1; 6)
You’ve simplified your code by replacing a complex expression with a single function, thereby making it easier to read and maintain. You’ve abstracted that bit of logic out of whatever larger formula you were working on, leaving you with one fewer thing to think about.
Custom Functions as System Constants
A few different schools of thought exist regarding when you should write a custom function to abstract your programming logic and when you should use existing tools to solve the problem. Some developers hold that you should always write custom functions. Even if you use a given custom function only a single time, you made your code more modular, thus making it easier to track down and troubleshoot problems. Plus, if you ever need that function again, it’s there, ready and waiting.
Other developers find that they use custom functions more sparingly. Their attitude is this: If you find yourself solving a particular problem more than once, go ahead and write a custom function for it, and go back to change the original occurrence to reference the custom function instead. This process, often called refactoring as a general programming concept, has a certain pragmatism to it: Write a custom function as soon as it’s more efficient to do so, but not sooner.
Whatever camp you find yourself falling into, you should be aware of two other common uses for custom functions. The first is for defining system constants. As an example, imagine that the commission rate is 15% in your sales organization. In calculations where you determine commission amounts, you might find yourself writing numerous formulas that multiply sales figures by 0.15. If, heaven forbid, you ever need to change that figure to, say, 0.18, you’d need to sift through all your code to find all the instances where you had hard-coded the commission figure.
As an alternative, you might consider defining custom functions to represent systemwide constants such as these. In this example, you would simply have a custom function called CommissionRate that had no parameters and returned a value of .15. By abstracting out the hard-coded value, you’re able to quickly and easily make global changes by editing a single function. You should never refer directly to the magic number in a formula; use the custom function instead. Other examples of numbers and strings that should be abstracted out of your formulas include IP addresses, URLs, and colors.
There’s a subtle pitfall here. Note that stored values that reference custom functions do not automatically update when a custom function definition changes. For example, if you implement a system constant called commissionRate as a custom function and then go on to create one or more stored calculations that reference commissionRate, the values in those calculations do not update if you later redefine commissionRate to be 18%. The same would hold true of data that’s auto-entered into a field. If you want these stored values to take account of the new commission rate, you have to force the fields to explicitly refresh their contents—perhaps by using a field for rate.
Creating Recursive Functions
The final common situation in which custom functions are used is for making recursive functions. One of the limitations often lamented by developers over the years has been the fact that you can’t create looping constructs within calculation formulas. That is, you can’t instruct a regular calculation formula to keep doing something until some condition holds.
Custom functions, on the other hand, can contain recursive logic, which mimics the effects of a looping control structure. This means that a class of problems can be solved only by the creation of custom functions. This stands in stark contrast to the “custom functions as vehicles for abstraction” idea discussed previously. As an abstraction tool, custom functions can always be replaced in a formula by the logic they abstract. No such substitution can be made when dealing with recursive functions. In those cases, using custom functions is not a convenience; it’s a necessity. In the section that follows, we develop and discuss several recursive functions.
Creating Custom Functions
Now that you understand what custom functions are and why you might want to use them, it’s time to turn to the mundane subject of how to actually create them. First, recall that custom functions can be created and edited only with FileMaker Pro Advanced, and that custom functions live in a specific file. To see a list of custom functions defined in a particular file, and to define new ones, choose File, Manage, Custom Functions. Figure 15.9 shows the resultant Manage Custom Functions dialog.
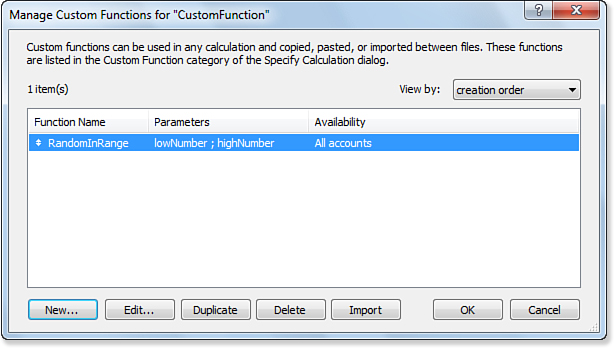
Figure 15.9. With FileMaker Pro Advanced, you have access to a Manage Custom Functions dialog.
Buttons from this dialog enable you to create, edit, and delete a custom function. The dialog shows the names of the parameters defined for each function, as well as whether a function is available to all accounts or just those with the Full Access privilege set. When you go to create or edit a custom function, you’re taken to the Edit Custom Function dialog, shown in Figure 15.10.
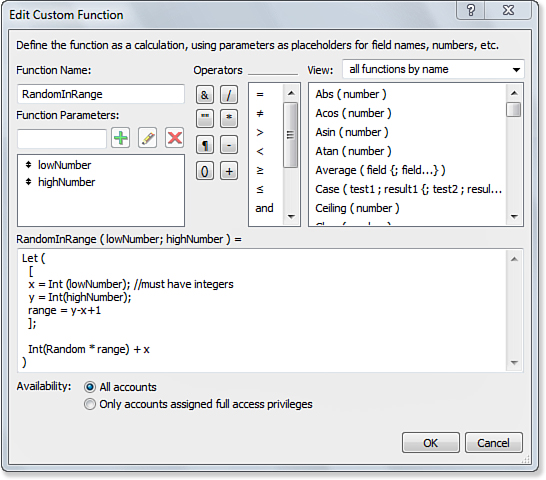
Figure 15.10. You define the parameters and formula for a custom function in the Edit Custom Function dialog.
This dialog is similar in many ways to the standard calculation formula dialogs, so it shouldn’t seem terribly unfamiliar. The main difference is the upper-left portion of the dialog where, instead of seeing a list of fields, you can instead name your function and its parameters. The restrictions for function and parameter names are the same as those for field names: They can’t contain any mathematics symbols (such as + - * / ^ =); they can’t contain the word AND, OR, XOR, or NOT; they can’t begin with a digit or period; and they can’t have the same name as an existing function or keyword.
When you are naming your custom functions and parameters, we think it’s best to follow the same naming conventions used in the built-in functions. The initial letter of each word in a function name should be capitalized, and the name should contain no spaces or other punctuation. Parameters should be in camel case, with the first letter in lowercase and the first letter of subsequent words capitalized (for example, numberOfCharacters, textString1). Some developers prefer the function name itself in camel case as well.
There is no practical limit to the number of parameters you can define for a function, but most functions require anywhere from zero to a handful. The order of the parameters is important: When you use a function and specify the input parameters, they are interpreted as being in the order in which they are listed in the Edit Custom Function dialog.
The other significantly new and different portion of this dialog is the Availability section at the bottom. By default, a function is available to all user accounts. Any time a user or developer has access to a calculation dialog, he or she will see and be able to use all the unrestricted custom functions. The other option available to you is to restrict the use of the function to only those users who have the Full Access privilege set. The latter can be referred to as private functions, and the former can be thought of as public functions.
If you find yourself writing a function that requires more than four or five parameters, that’s a pretty good signal that you should break the function down into two or more smaller functions.
If access to a function is restricted, users who don’t have full access never see that function. If those users ever view a calculation dialog that references a private function (say, in a script), <Private function> replaces the name of the function in the calculation dialog.
You might want to restrict access to a function for several reasons. As you will see in some of the examples in the section that follows, when you define recursive functions, you often need to define two functions to accomplish one goal. In those cases, the first function is often a public function, whereas the other is restricted, thereby keeping users from accidentally calling it directly.
Another reason to define a function as private is simply to keep from confusing novice developers. Your function might not be documented anywhere, and it might not contain adequate error trapping to handle improper parameter values. By making the function private, you reduce the risk that it will be used improperly.
We find it helpful to place an underscore or a z (or zz) at the beginning of the name of private functions so that they are quickly and obviously identifiable. The z or zz at the beginning of the name of a private field, table, layout, function, or other object is a FileMaker convention. The underscore at the beginning of the name of a private variable is a programming convention in many languages, including Objective-C.
Examples of Custom Functions
We think the best way to learn how to write your own custom functions is to study examples so that you can get ideas about uses in your own solutions. Some of the sample functions that follow might have intrinsic value to you, but the ideas and techniques are more important than the specific formulas. To that end, following each of the examples presented here, we provide commentary about the syntax and/or use of the function.
Declaring a function as private has no impact on what data is displayed or accessible to a user. The functions still do their jobs and work properly. It’s just the functions themselves that can’t be viewed.
Hypotenuse (leg1Length ; leg2Length) =
Let ( [
a2 = leg1Length * leg1Length;
b2 = leg2Length * leg2Length;
c2 = a2 + b2] ;
Sqrt (c2)
)
Although FileMaker Pro provides built-in functions for many common mathematical formulas and operations, a number of common equations are missing. The preceding Hypotenuse function uses the Pythagorean Theorem (a2 + b2 = c2) to find the length of the hypotenuse of a right triangle given the lengths of the two legs.
Hypotenuse (3 ; 4) = 5
Hypotenuse (5 ; 12) = 13
NthRoot (number ; root) =
Exp (Ln (number) / root )
This is another example of creating a custom function to provide an abstraction for a mathematical formula. There is a built-in function that returns the square root of a number but no function that returns the nth root of a number. The NthRoot function uses logarithms to find this number.
Examples:
NthRoot (8 ; 3) = 2
NthRoot (64; 4) = 4
Quarter (myDate) =
Ceiling ( Month (myDate) / 3)
This function returns the calendar quarter (1–4) of myDate. This function exemplifies the idea of using custom functions to substitute for code chunks, making your code easier to read and maintain. The Month function returns a number from 1 to 12, so taking the ceiling of that number divided by 3 yields an integer from 1 to 4.
Examples:
Quarter ("12/11/08") = 4
Quarter ("4/1/10") = 2
WeekEndingFriday (myDate) =
myDate + Mod (6 - DayOfWeek(mydate); 7)
Given a date, this function returns the date of the following Friday. This sort of functionality is often necessary in time-tracking systems so that you can summarize records by week. It would be easy to alter or extend this function to be referenced to some day other than Friday. To extend it, you would just specify a second parameter in the function and replace the hard-coded 6 (which is the DayOfWeek of any Friday) with a value derived from the parameter.
WeekEndingFriday ("3/30/2013") = "4/5/2013 // the 30th is a Saturday
WeekEndingFriday ("3/24/2013") = "3/29/2013 " // the 24th is a Sunday
RepeatText (text ; numberOfRepetitions) =
text & Case (numberOfRepetitions>1; RepeatText (text; numberOfRepetitions - 1))
This is the first example of a recursive function. The RepeatText function returns n repetitions of the text string passed in the first parameter. For instance, RepeatText ("t"; 3) returns the string ttt. If the concept of recursive functions isn’t clear to you, this is a good place to begin experimenting. Figure 15.11 traces through exactly what the function is asked to do when it evaluates this simple example. RepeatText ("t"; 3) is first evaluated as t and the result of RepeatText ("t"; 2).
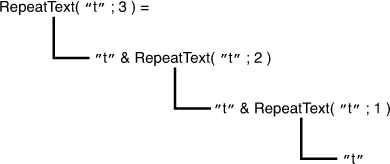
Figure 15.11. This diagram shows how the recursive custom function RepeatText ("t" ; 3) is evaluated.
Of course, the latter is then evaluated as t and the result of RepeatText ("t" ; 1), which is simply t. The iteration stops at this point because numberOfRepetitions is not greater than 1. This is known as the function’s exit condition; without one, you have endless recursion (picture a dog endlessly chasing its tail), which fortunately FileMaker Pro is smart enough to recover from after some large number of iterations.
Be sure that any recursive function you write has some exit condition that is guaranteed to be reached.
Possible uses of the RepeatText function include creating progress bars or bar graphs. If you ever tried to do this sort of thing in previous versions of FileMaker, you know what a kludgy workaround was required to get a repeating string of characters. Another use is for padding out spaces when generating fixed-length data formats. Say that you need to pad out a FirstName field to 15 characters by adding spaces at the end. In previous versions of FileMaker, you would have used this formula:
Left (FirstName & " " ; 15)
Using RepeatText, you could simply use this:
FirstName & RepeatText (" " ; 15 - Length(FirstName))
Of course, if you have a lot of padding to do, you might decide to abstract this one more layer and build the PadCharacters function shown next.
Examples:
RepeatText ("|" ; 10) = "||||||||||"
RepeatText ("hello"; 3) = "hellohellohello"
PadCharacters (text ; padLength; characterToPad; side) =
Let ( [
padString = RepeatText (characterToPad; padLength - Length(text));
] ;
Case (
Length (text) > padLength ; Left (text; padLength);
side = "start"; padString & text;
side = "end"; text & padString
)
)
Building on the preceding example, the PadCharacters function pads either leading or trailing characters onto a string. We used four parameters here to gain flexibility. The third and fourth parameters specify, respectively, the pad character and whether the padding should be at the start or end of the string. If you knew you always wanted to pad leading zeros, you could define this function with just two parameters and then hard-code the location and character within the formula.
Notice that this function makes a call to the RepeatText function to generate the padString. We could have included the formula for RepeatText, but by abstracting it out, we centralize the code for RepeatText (making it easier to troubleshoot) and also make the formula easier to read.
Examples:
PadCharacters ("foo"; 8 ; "x"; "end") = "fooxxxxx"
PadCharacters ("123"; 10; "0"; "start") = "0000000123"
TrimChar (text; removeCharacter; location) =
// valid locations are "start", "end", "all"
Let ( [
leftChar = Left (text; 1);
rightChar = Right (text; 1);
remainderLength = Length(text) -1
] ;
Case (
(location = "start" or location = "all") and leftChar = removeCharacter;
TrimChar (Right(text; remainderLength) ; removeCharacter; location) ;
(location = "end" or location = "all") and rightChar = removeCharacter;
TrimChar (Left(text; remainderLength) ; removeCharacter; location) ;
text
)
)
FileMaker Pro’s built-in Trim function removes any leading and trailing spaces from a text string. Sometimes, however, you might need a more generalized way of removing a specific leading or trailing character from a string. The TrimChar function does just this. The first parameter is the string you want trimmed; the second is the character you want removed. The third parameter, location, specifies whether you want the character removed from the start or the end of the string, or from both. Valid inputs are start, end, and all.
This function works by checking whether the first or last character in the string needs to be lopped off. If so, the remainder of the string is fed back recursively to itself. Each iteration removes at most a single character; the “loop” continues until no more characters have to be removed, at which point the shortened text string is simply returned.
Examples:
TrimChar ("xxThis is a testxxx", "x", "all") = "This is a test"
TrimChar ("Another test¶¶¶", "¶", "end") = "Another test"
CrossProduct (array1; array2) =
_CrossProductGenerator (array1; array2; 1)
This, the final custom function example, looks at a more complex recursive function. In the recursive examples shown previously, the exit condition for the recursion was based on either an explicitly passed parameter reaching a certain value (RepeatChar) or a condition no longer being true (TrimChar). Other situations exist in which you want to be able to increment a counter with every iteration and base the exit condition for the loop on that counter reaching some threshold. The interesting part is that because the counter has to be passed along from iteration to iteration, it must be defined as a parameter. This means, however, that anyone using the function must initialize the counter for you, most likely setting it to 1.
The other solution is that you have a private function with a counter parameter called by a public function without one. In this case, the public function CrossProduct takes only two parameters, both expected to be return-delimited arrays. The function is defined merely to call another function, _CrossProductGenerator, which has three parameters. The first two inputs to _CrossProductGenerator are simply passed along based on the user’s input. The third, however, is hard-coded to 1, hence initializing a counter used there.
The syntax for the private function is as follows:
_CrossProductGenerator (array1; array2; counter)
It has the following formula:
Let ( [
array1count = ValueCount (array1);
array2count = ValueCount (array2);
limit = array1count * array2count;
pos1 = Ceiling (counter / array2count) ;
pos2 = Mod (counter - 1; array2count ) + 1;
item1 = TrimChar (MiddleValues (array1; pos1; 1); "¶" ; "end");
item2 = TrimChar (MiddleValues (array2; pos2; 1); "¶" ; "end")
] ;
Case ( counter <= limit ;
item1 & item2 & "¶" & _CrossProductGenerator (array1; array2; counter + 1))
)
The cross-product of two sets is a set containing all the two-element sets that can be created by taking one element of each set. For example, if Set1 contains { A, B }, and Set2 contains { P, Q, R, S }, their cross-product would consist of { AP, AQ, AR, AS, BP, BQ, BR, BS }. The number of elements in the cross-product is the product of the number of elements in each of the two sets.
The _CrossProductGenerator function “loops,” incrementing a counter as it goes, until the counter is no longer less than the number of elements expected in the result set. Each time it iterates, it figures out what element number to grab from each list. With Set1 and Set2 of the example, the function would iterate eight times. If you were on iteration 5, the function would realize that it needed to grab the second item from the first list (because Ceiling (5 / 4) = 2), which is B, and the first item from the second list (because Mod (4; 4) + 1 = 1), which is P. That’s how BP becomes the fifth element of the result set.
Notice also that this function, in addition to recursively calling itself, also calls the TrimChar function created earlier in this section. From the section on working with arrays, you’ll remember that the LeftValues, MiddleValues, and RightValues functions return a trailing return after the item list; that trailing return has to be removed before the item is processed.
Examples:
CrossProduct ("A¶B¶C" ; "1¶2¶3¶4") =
"A1¶A2¶A3¶A4¶B1¶B2¶B3¶B4¶C1¶C2¶C3¶C4¶"
CrossProduct ("Red¶Yellow¶Blue" ; "-fish") = "Red-fish¶Yellow-fish ¶Blue-fish¶"
GetNthRecord
GetNthRecord merits its own discussion. In general, in FileMaker, if you are situated on one record and you want to see data from some other record, you need a relationship of some kind. This is intuitive; if you are on, say, a customer record and want to see data from an invoice, you need some kind of relationship between Customer and Invoice to accomplish this task. But this has also been true if you want to see data from somewhere else in the same table.
However, relational access has never covered all the possible scenarios in which you might want to access data from other records. What about when you’re situated on a customer record, and you also want to know the names of the customers immediately before and after the current record? Or what if, when you’re looking at a set of related invoices from the viewpoint of a customer, you want to get some specific information from the second related invoice record, or the third? It has always been possible to do these things in previous versions of FileMaker, but it has sometimes involved some cumbersome techniques. GetNthRecord solves these problems as well as a number of others. Its syntax looks like this:
GetNthRecord( fieldName; recordNumber )
Here, fieldName is the name of a field in the current table or a related table, and recordNumber is the number of the specific record from which to fetch data. Let’s look at some examples:
GetNthRecord( CustomerName; 17 )
returns the value of the CustomerName field in the seventeenth record in the found set in the current table. The two expressions
GetNthRecord( CustomerName; Get(RecordNumber) + 1 )
and
GetNthRecord( CustomerName; Get(RecordNumber) - 1 )
return the value of the CustomerName field from the records immediately succeeding and preceding the current record, respectively.
GetNthRecord( InvoiceLineItem::ProductName; 3 )
returns the product name from the third line item related to a given invoice.
These applications are useful enough, but when you use some other advanced calculation techniques, some very interesting things are possible. For example, you’ll often see cases in which you want to collect or aggregate non-numeric data from some set of records. Say, for example, you wanted to extract the personal names from a found set of records and present them in a comma-separated list. In the past, it would have been necessary to write a looping script to run through all the records and collect the results into a list. In FileMaker, a recursive custom function that invokes GetNthRecord can accomplish the same thing more economically. Consider a function that looks like this:
allNames( recordNum, currentList)
Consider its definition as shown here:
Case( recordNum > Get ( FoundCount ); currentList;
allNames( recordNum + 1; currentList &
Case( recordNum > 1; ", "; "" ) & Evaluate( "GetNthRecord ( name ;" & recordNum & ")" ) ) )
Initially, you’d need to call this function with a recordNum value of 1 and a currentList value composed of an empty string. From there, the function keeps calling itself until recordNum is equal to the current found count. With each fresh function call, the value of the name field returned by GetNthRecord is appended to the list, and the list is passed back into the function again for the next iteration.
Note that it was necessary to use the Evaluate function here. The reason is that a custom function cannot directly access record data, such as the name field. Without the Evaluate function, when you attempt to save the function definition, FileMaker warns you that the name name is unknown. As a result, you have to build up the call to GetNthRecord as a text string, incorporating the current value of recordNum, and then pass that entire text string off to the Evaluate function.
As written, the function is designed to operate on data within the current table. It’s rather limited in that sense, and we could certainly recast the function to be more extensible. It might be better to determine the total count of records from somewhere outside the function and pass that in along with the name of the field to be aggregated. Such a function might be called like this:
aggregateRecords( field; start; end )
And it might be defined something like this:
Case (start <= end ; GetNthRecord (field ; start ) & Case (start < end; "¶"; "" ) & GetRelated (field ; start+1 ; end) ; "")
In this case, you need to decide for yourself what the end value would be; this is simply the total number of records you’re trying to aggregate, and it could be the result of a Get(FoundCount) on the current file or a Count() operation against a related file. The function needs to be called with a start value of 1, unless you want to begin aggregating from a later record for some reason. So, a call to this function would look like this:
aggregateRecords( firstName; 1; Get(FoundCount) )
This would aggregate the firstName field across all the records in the current found set of the current table.
A recursive custom function, with or without an Evaluate, is probably one of the more complex pieces of coding you would need to do in FileMaker, but the results can be quite striking.
Troubleshooting
Text Formatting in Nontext Calculations
I want some of my dates to come out in red. I created some calculations that apply text formatting to certain dates, but they just don’t work.
For a calculation containing text formatting functions to work correctly, the calculation must have an output type of Text or Number. Calculations defined to output a data type of Date, Time, or Timestamp will not show the effects of text formatting calculations.
However, if you use conditional formatting and the Self function, you can perform the necessary manipulation regardless of the field type.
Naming Variables in Let Functions
Can I use spaces in the names of variables used in Let functions? Are the variable names case sensitive? What happens if I give a Let variable the same name as an existing field name, variable name, or function name?
First off, yes, you can use spaces in the names of variables used in Let functions. Variable names can’t begin with numbers, nor can they contain certain reserved characters (such as ;, / + - * = ( ) [ ] < > & and ). You can, however, use characters such as $ and % in variable names.
Some complexity arises when we look at the possible use of script variables (variables beginning with $ or $$) within Let statements. We explore this complex topic in the following chapter. For now, suffice it to say that because various parts of a Let statement can work with script variables, you should avoid using $ or $$ in naming any of your Let variables.
Variable names within Let statements are not case sensitive. You can use a particular name several times within a function, and names can also be reused in separate functions.
There are no restrictions against giving variables the same names used for fields and functions. Be aware that any subsequent use of the name within the function refers to the local variable, not the field or function. With most functions, you don’t need to worry about this, but names of functions that don’t take parameters, such as Random, WindowNames, and Pi, should not be used for variables within a Let function. For instance, the formula Let (Pi = "Hello"; Pi) would return the string Hello, not the trigonometric constant pi that you might expect. As a rule, it’s wise to avoid any overlap of names with reserved FileMaker names or names of objects elsewhere in the system. Even if the logic works, it might be confusing and hard to read.
Working with Arrays
I use arrays that have pipe characters as delimiters. Can I use the “values” functions to extract elements from these arrays?
The five “values” functions (ValueCount, LeftValues, MiddleValues, RightValues, and GetValue) operate only on return-delimited lists of data. If you have lists delimited by other characters, such as pipes or tabs, you would first need to do a substitution to change your delimiter into a return. For example, if myArray is a pipe-delimited array, you could count the number of values in it with the following formula:
Let (tempArray = Substitute (myArray; "|"; "¶"); ValueCount (tempArray))
Of course, one of the reasons you might not have used returns as your delimiter in the first place is that your data elements could possibly contain return characters. If that’s the case, you can’t swap in returns as your delimiters and expect the structure of the array to remain unchanged. Before turning pipe characters into carriage returns, turn any existing carriage returns into something else—something that’s guaranteed not to be found in an element and that’s easy to turn back into a return character if necessary. You might, for instance, use the Substitute function to turn returns into the string ***RETURN***.
FileMaker Extra: Creating a Custom Function Library
If you or your organization uses custom functions across several solutions, you’ll likely want to create some sort of centralized library of the functions you develop. That way, when you find yourself in need of a particular function, you won’t have to rack your brain remembering where you used that function before. In addition, centralizing the function library is one way to create a knowledge base that can help your organization leverage its past work and can aid in the training of new developers.
Your library can take many forms. One option, of course, is to create a FileMaker Pro file for your function library. Minimally, you’ll want to include fields for the function name, its parameters, its formula, and a brief description. You might also use a container field to store a sample file for a particular function. Another “nice to have” is a related table for storing information about where you used the function.
As of the time of this writing, there’s no way to move custom functions from one file to another using tools in the FileMaker product line, although cutting and pasting formulas to and from the library isn’t terribly time-consuming. Custom functions are, however, part of the Database Design Report (DDR) that you can produce with FileMaker Pro Advanced. If you’re handy with XML or are looking for a fun first XML project, you might want to use the XML output of the DDR to create your function library.
Finally, if you always want to have a particular set of custom functions in your files, create a sparse template file that has them in it. Then, rather than creating new files from scratch, you can just duplicate and develop on top of your template.
Matching Multiple Values
As you saw in Chapter 2, “Using FileMaker Pro,” the Quick Start screen lets you filter the various Starter Solutions by typing in the field at the upper right. This feature is useful, and it can be implemented in a number of ways; the following is one of them.
First, create a field (it is usually a global) in a table to contain what is typed into the filter field. This can be a field in the table itself, and you can use a self-relationship, but it could be a field in another table. Now you need to create a relationship between the filter field and the field containing the words you want to filter. The problem is, what operator do you use?
One way to do this is to create a calculation field that contains each word separated by a carriage return. Because an equijoin matches based on any of the values in a field, this will do the trick. For example, if the value of the field containing the data is computer furniture, it will match computer furniture in an equijoin. However, if the data in the field is
computer
furniture
it will match either computer or furniture.
If the field containing the data is called thing, here is the calculation:
thing & ¶ &
MiddleWords ( thing ; 1 ; 1 ) & ¶ &
If ( WordCount ( thing ) >= 2; MiddleWords ( thing ; 2 ; 1 ) ; "" ) & ¶ &
If ( WordCount ( thing ) >= 3; MiddleWords ( thing ; 3 ; 1 ) ; "" ) & ¶ &
If ( WordCount ( thing ) >= 4; MiddleWords ( thing ; 4 ; 1 ) ; "" ) & ¶ &
If ( WordCount ( thing ) >= 5; MiddleWords ( thing ; 5 ; 1 ) ; "" )
This example creates a calculation, each value of which has something to match: the whole name, the first word, and then, for each of the next words, a value for each word.