
IN THIS CHAPTER
In the spring of 2007, Adobe released a public preview of a new technology code-named Apollo. About a year later in February 2008, Adobe released the final version, which had been renamed Adobe Integrated Runtime (AIR).
AIR, put simply, allows Web designers and developers to leverage their existing skill sets in Flex and Flash, or even HTML, CSS, and JavaScript to develop applications for the desktop.
Prior to AIR's release, desktop application development was done solely by high-end programmers using languages such as Java or C# that required years of training.
Currently, anyone with knowledge of HTML, CSS, and JavaScript or anyone designing or developing in the Flash platform can create an application that users can install on their computers and run without a browser. Better yet, they can now develop applications that will run on any desktop, regardless of the operating system.
AIR works by providing a universal runtime. That is, AIR is an application that must be installed by users before they can install your application.
Most of the complexity of building traditional desktop applications had to do with the challenges of interfacing with operating systems and hardware; drastic differences between the ways in which operating systems work further complicated matters.
AIR, however, masks those difficulties. By providing a layer between your application and the operating system and hardware, AIR allows you to develop in much the same way that you develop Web applications. AIR is available free from Adobe's Web site (www.adobe.com). According to the company, it has been downloaded and installed more than 100 million times.
Note
The idea of a universal runtime that provides a layer between the application and the operating system is neither new nor radical. Sun Microsystems, the manufacturer of very high-end computer systems and the company responsible for Java, released the first version of the Java Runtime Environment (JRE) long before Adobe developed the idea for AIR. What makes AIR unique is the ease with which applications can be developed.
AIR contains a Web browser built on the open-source Webkit engine, the same browser engine that runs Apple's Safari browser and Google's Chrome browser. It includes an SQLLite database engine for local data storage, as well as Flash Player and Adobe Reader for playing SWFs and reading PDF files.
AIR applications can either be:
Disconnected
Completely self-contained and able to run without an Internet connection
Connected and thus require an active link to the Internet to access information
Semiconnected, going online to collect information when a connection is available but functioning off-line when the computer is disconnected
Flash movies that run in a browser have many of the same capabilities as an AIR application. However, Flash Player, when run in the browser, has a set of key limitations imposed for security purposes. For example, it cannot directly read and write files on the local user's computer, nor does it have hardware access.
Alternately, an AIR application runs at the same level of security as any other installed application, giving it file system and hardware access. AIR 2.0, a beta that was released in the fall of 2009, even includes hardware detection. This feature detects and responds to events such as a USB drive being plugged into the computer.
Flex-based AIR projects require slightly different code than Web-based projects. Thus, when you create a project in Flash Builder, you must designate from the beginning whether you will be creating a project for the Web or for AIR. Catalyst does not have a method for designating a project to be deployed for AIR instead of the browser. Therefore, you will not need to do anything special in Catalyst when you design a project that is intended for AIR.
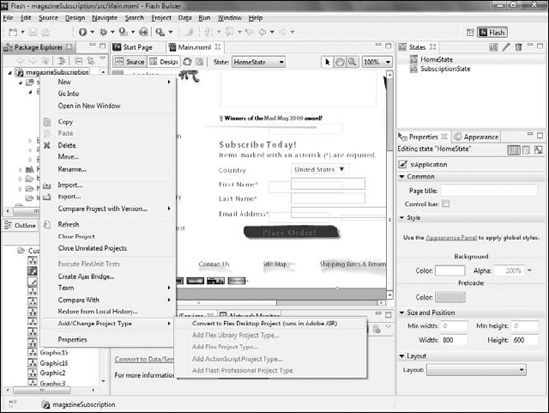
Once you import the project into Flash Builder, you must convert it to an AIR project before commencing any other work. To do so, follow these steps:
Right-click (

Choose Add/Change Project Type

You can have Flash Builder make the necessary change to the root element of your main file from Application to WindowedApplication. Should you choose to not have the conversion done automatically, you need to do so manually before your project can be exported to AIR.
You can do a significant amount of work within Flash Builder to have your project take advantage of AIR's unique capabilities. However, this additional work may not be necessary, depending on the requirements of the project. It is possible to take a project from Catalyst once the project conversion is complete and simply publish directly to AIR. Flash Builder includes a wizard that steps you through the process of finalizing the project for AIR:
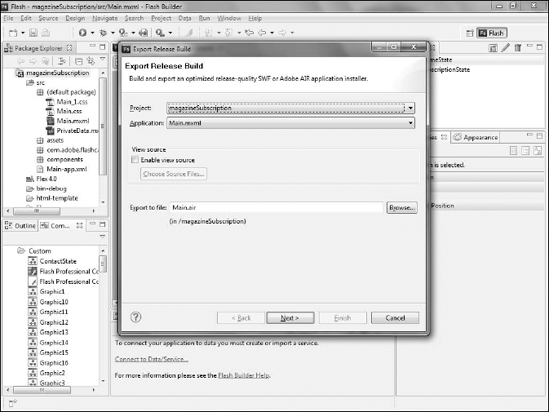
Choose Project
Confirm that the correct project and application file are selected.
Enable the option to allow users to view the project's source code.
Select the name of the project's AIR file, which will be the file that the user selects to install the application.
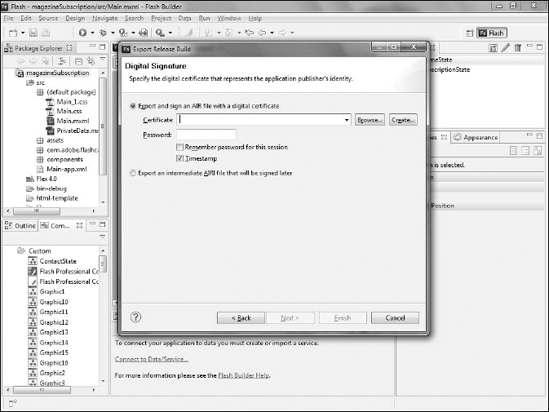
Attach a digital certificate to the project at the wizard's prompt (see Figure 18.3). Certificates assure users that the application was actually delivered from the company they expect, rather than a malicious user merely posing as a company.
Hiding or Showing Your Source Code
Web designers are accustomed to allowing users to view their source code, but for application designers, the same is not true. By default, the source MXML and ActionScript code behind a Flex project is hidden.
However, in certain situations you may decide that you want users to view your code from the completed project. If enabled when exporting the build, users can right-click (
For example, anyone could claim that an application was developed by Adobe. However, only Adobe has access to its digital certificate, so only applications signed by Adobe are guaranteed as coming from Adobe.
If you are developing a project that will only be distributed within a closed network environment, use a certificate issued by your network administrator from the network's own servers. Applications that will be distributed publicly via the Internet can only be trusted if the certificate is issued by a trusted third party, such as VeriSign. VeriSign and its competitors thoroughly investigate individuals and companies before issuing a certificate. The companies offer a variety of certificate products covering a range of prices.
If you do not have a certificate, you can create your own. Ideally, this would only be used for local testing of the project; any application distributed with a self-signed certificate is not likely to be trusted or installed as much as one with a verified certificate. The process of creating a certificate is simple: Click Create and follow the steps outlined in the dialog boxes.
You can also create an intermediate AIR project that is not signed, but will be later. You will not be able to install this project until it is signed. However, this will allow you to publish the project if you are waiting for approval of a certificate from VeriSign.
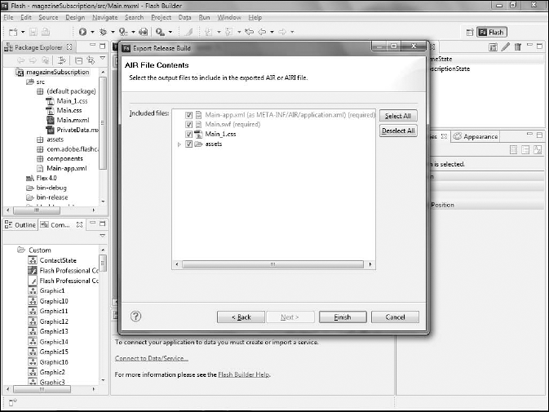
Ensure that all required files are going to be included in the AIR package. There may be rare occasions when files within the project are not needed by the AIR application. If this is the case, you can deselect them to minimize the project's file size.
Click Finish (see Figure 18.4). The AIR project is exported and ready to install.
Once you export the project, you can install the AIR application to test and ensure that it works properly. AIR applications are installed in much the same way as any other application:
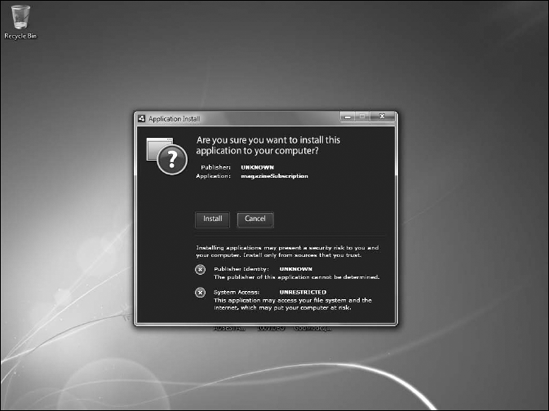
Double-click the project file, either from within the operating system or directly from the Package Explorer in Flash Builder. The installer will launch beginning with a screen that provides details about the project and its certificate.
Click Install (see Figure 18.5). The project will install onto your computer.
Launch the application by selecting it in the All Programs directory in the Windows Start menu or from the Applications folder in Finder on a Mac. When launched, the program should behave just as any other locally installed program, including display of an icon on the Windows taskbar (see Figure 18.6).
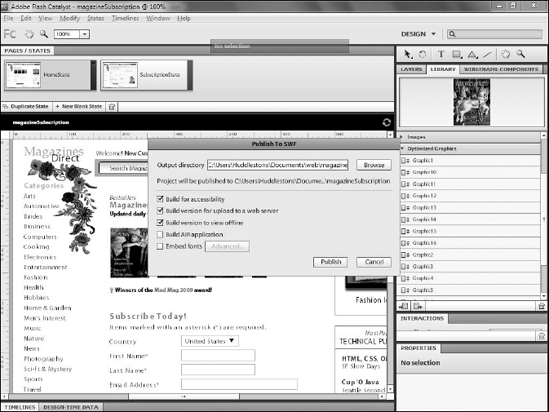
If no modifications need to be made to the project in Flash Builder, it is possible to deploy an AIR application directly from Catalyst. The Publish as SWF command in the Catalyst File menu includes the option to create an AIR application (see Figure 18.7).
Note
See Chapter 17 for more details on the Publish to SWF dialog box and a discussion of its other options.
Selecting the AIR option in the dialog box creates an AIR package along with the Web-specific packages normally produced.
In the folder specified in the dialog box, you will find an AIR folder which in turn includes the AIR file. You can double-click this file to launch the installer (see Figure 18.8), which follows the same steps as an AIR file created in Flash Builder.
Note
Catalyst does not provide a means by which AIR applications can be digitally signed. If you have a digital certificate and want to use it to sign your application, thus avoiding the warning screen at the start of the installation process, you need to import the project into Flash Builder and package it for AIR from there.
