Pixels and resolution are the heart and soul of working with digital photographs, art, and scanned images. It’s somewhat similar to buying bed linens. At higher thread counts the sheets feel good; at lower counts they feel rough. With the proper resolution, images look good; with the wrong resolution, images look blurry or jagged.
There are two ways to determine the correct resolution. One is to memorize a set of numbers and rules and follow them by rote. That’s okay until a project comes up that has slightly different requirements—then you’re lost.
The other way is to understand why the numbers and rules were set. Then if a project comes up that’s different, you’ll know what to do.
This chapter covers the details of resolution for scanning and printing images. The goal is that by the end of this chapter you’ll understand how to determine the correct resolution for any type of image for any project. (Of course, I’ll also give you some numbers and rules to follow.)
Before we get into how to set the resolution for printing images, it’s important to understand what the monitor is doing with pixels. After all, you’re looking at the computer screen that holds the image for printing.
First, you need to understand the concept of pixels. Pixels are the “picture elements,” or rectangles that create the images on a computer screen. If you hold a strong magnifying glass up to the monitor, you can actually see the rectangles and how a single color pixel fills up each rectangle.
If you look at the display preferences for your monitor, you can choose from the list of the recommended monitor resolutions. You can change the number of pixels the monitor displays. Now here’s where it gets tricky. A low monitor resolution such as 800 pixels across and 600 pixels down gives you a total of 480,000 pixels (800 times 600). These pixels are rather big which is why it’s hard to fit lots of windows and documents on the screen. The lower the resolution, the larger the pixels.
But if you choose a high monitor resolution, such as 1600 by 1200, the pixels get smaller. This means everything on your screen is smaller but you can fit more stuff on the screen. It also means that old-timers such as me can’t read the type on the controls and menus. The pixels are just too damn small!

A low monitor resolution (left) displays larger pixels and larger screen items.
A high monitor resolution (right) displays smaller pixels and small screen items.
This is similar to the resolutions for high-definition flat panel televisions. An HD television screen with a resolution of 720p (pixels) has fewer pixels and less details than an HD television with a resolution of 1080p.
If you understand monitor resolution, you’re well on your way to understanding image resolution. The same principles apply.
The lower the resolution, the larger the pixels.
The higher the resolution, the smaller the pixels.
Remember the kitchen floor analogy from the previous chapter? Imagine you’re laying out a kitchen floor and you want to have the most beautiful, most detailed design. Which would you use: big, clunky tiles that are 1 square foot or smaller tiles that are only 1 square inch?
Obviously you’d choose the smaller tiles—the smaller the tile, the better the detail in the art. Now consider each of the tiles as the resolution of the floor. But instead of pixels per inch you have tiles per foot. Some tiles are larger at 1 tile per foot. Other tiles are smaller at 12 tiles per foot—the higher the resolution the smaller the tile.
That’s the situation with pixels. Each pixel is a tile—the smaller the pixel the better the detail of your image. In the early days of computer graphics it was very easy to find artwork that had been created at the wrong resolution. Artwork—especially hand drawings—looked blocky or jagged. Designers would complain that their images had the “jaggies.” Those jaggies were simply the large pixels on the edges of the art.
Common image resolution can be as low as 72 pixels per inch (ppi) to as high as 300 pixels per inch. Most Web graphics are created at 72 PPI. Most print graphics are created at 300 PPI. But, as with all good rules there are exceptions to these numbers.
So why would anyone ever worry about pixel resolution? Why not take photos with the highest resolution the camera can provide? Why not scan images at insanely high quality?
Well, consider the floor tiles. What if each tile costs a dollar (or a yen or pound or euro)? It doesn’t matter how big or small the tiles are, they all cost 1 unit each.
If you’re rich and don’t care about the cost of the tiles, you can buy as many as you want at the floor care center. But reality says you need to worry about the cost of each pixel. And in terms of resolution, the cost of each pixel is an increase in file size.
Now, I’m not going to get into the mathematics of resolution as it pertains to file size. But suffice it to say, the only thing you need to know is the more pixels in a raster image, the higher “cost” (file size).
Back when designers first started using computers, file size was a very important constraint. We constantly needed to keep the file size low to fit on the small hard drives. But today hard drive space is huge.
So is there any good reason to still worry about the size of print graphics? Large file sizes could slow down a desktop printer that processes your files if they’ve got more resolution than necessary. I’ll cover that later in this chapter.
Just as there’s a resolution for images there’s also a resolution for your printer (technically called an output device). The resolution for an output device is similar to image resolution: The higher the resolution, the greater the detail.
However, unlike the resolution for images, an ordinary office inkjet or laser printer has an output resolution of anywhere from 600 dots per inch (DPI) to 1200 dots per inch. Obviously the higher the resolution, the better the quality. (The first laser printer I ever owned had a resolution of 300 DPI which I thought was a humongous amount!)
You may notice that image resolution is expressed as pixels per inch (PPI) whereas output resolution is expressed as dots per inch (DPI). The distinction comes from the fact that pixels are electronic elements whereas dots are little bits of printing such as laser toner or inks.
All right, now that you understand what resolution is, what’s the correct resolution for images that will be printed? The answer is very simple, but first you need to know the linescreen of the final reproduction process. Once you know the linescreen, there’s a simple formula to determine the proper scanning resolution.

Here you can see an enlargement of the pattern of dots called a linescreen.
Linescreen, also known as “frequency” or “lines per inch” (LPI), is not computer jargon—the term has been around for many years. Printing presses print with dots of ink, so when a grayscale image like a Hollywood photo is converted for printing, the different shades of gray in the image must be converted into black or white dots. Dark gray areas are converted into large black dots, close together; light gray areas become small dots spaced farther apart; white areas have no dots.
In a full-color photograph, the cyan, magenta, yellow, and black channels of a color image are converted into dots that will be printed with transparent inks that overlap each other to form all the other colors. The smaller the dots, the higher the linescreen.
Different jobs, such as magazines, books, newspapers, or brochures, are printed with different linescreens. Find the strongest magnifying glass you can, or borrow a loupe from a designer or a print shop (a loupe is a powerful magnifying glass used by printers to see the dot patterns in images). With the magnifying glass or loupe, look at the photos in different printed pieces.
You’ll notice that the size of the dots differs between each piece. Images in newspapers are printed with big, coarse dots—you may not even need a magnifying glass to see them. Images in slick magazines are printed with much finer dots.
As I mentioned, linescreen is measured in lines per inch, or LPI. In an 85-line (LPI) screen there are 85 lines of dots in one inch, both horizontally and vertically; in a 200-line screen, there are 200 lines of dots in one inch. Obviously, the higher the linescreen, the smaller the dot pattern; the smaller the dot pattern, the more detail can be printed. However, linescreen is not the same as output resolution. See the sidebar above for an explanation of this.
This book was printed with a linescreen of 150 LPI. Most magazines are printed with a linescreen of 150 LPI. High-end art books may be printed with linescreens of 200 or higher.
As computers and scanners became more common in printing and production, people started running tests. They looked at how an image printed after it was scanned at various resolutions. They also looked at different linescreens and what different printed resolutions looked like at different linescreens. And they came up with this general rule:

Images tend to look their best on paper when their image resolution is twice the linescreen of the finished, printed piece.
Using a resolution higher than two times the linescreen doesn’t increase the quality of the printed image, but creates an unnecessarily large digital file and can slow down the time it takes to print the image. That’s why I don’t recommend using super-high resolutions for images.
So the following mathematical formula has become the rule to determine the correct resolution.
Image resolution equals twice the linescreen.
Simply multiply the linescreen by 2. The result is the image resolution. If you plan to print an image in a newspaper that uses a linescreen of 85 LPI, you don’t need more image resolution than 170 PPI. If you plan to print an image in a magazine that uses a linescreen of 150 LPI, you don’t need more than 300 PPI. Because so many print jobs are output at 150 LPI, 300 PPI has become a “standard” for resolution.
Yes, this means you must know the linescreen of the final reproduction process before you scan or create an image. How? Ask the right person. Or see the Linescreen and resolution chart on the following page.
The linescreen formula has become a guide for setting resolution; however, it’s not a hard and fast rule. Many times you can get away with lower resolutions, depending on the type of image, the press, the type of paper, and many other considerations. If you want to play it safe, follow the rule.
Sometimes in the frantic pace of the production process, though, you need to resize your image in the page layout program, which essentially changes the resolution. Or you may need to work with images that were scanned for a different linescreen, or perhaps you need to reduce the physical size of an image (like from 4 inches to 3.5 inches).
Well, no one will send you to jail because you didn’t have the perfect resolution. Your images will print. The worst that might happen if you enlarge an image is it will appear jaggy in the final printed piece, and if you reduce an image, the file can take longer than necessary to output.
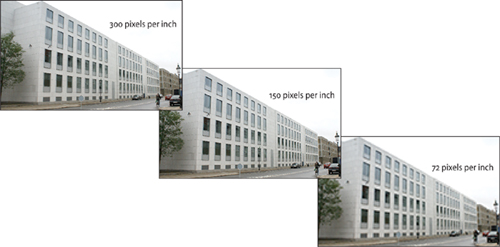
Take a look back on page 85 at the three images of the building. As you can see the image at 150 PPI doesn’t have all the detail of the first and the one at 75 PPI is a complete mess.
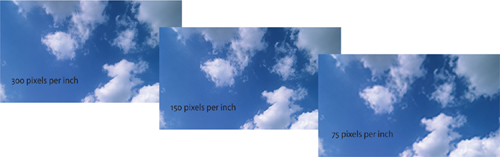
But other images are much more forgiving of the twice the linescreen rule. The clouds in the image on the next page don’t look quite so bad even at 75 PPI. There just isn’t much detail in the sky to lose at the lower resolution.
Use the following chart as a guide for the image resolution of grayscale or color images to be reproduced with different processes. This is just a guide! You really should call the print shop and ask them what they want you to use, especially if you’re setting an advertisement or other project in a newspaper or magazine where there can be a wide range of linescreens.
Reproduction Process | Linescreen | Resolution |
|---|---|---|
Laser printer, copy machine | 65 or 85 | 130 or 170 |
Newspaper | 85 to 120 | 170 to 240 |
Quick-print shop, copy shop | 100 to 120 | 200 to 240 |
Newsprint magazines | 100 or 120 | 200 or 240 |
Glossy magazines | 150 | 300 |
Offset printing | 150 | 300 |
Display books | 175 | 350 |
Museum-quality art book | 200 | 400 |
Inkjet and other non-laser printers work differently from laser printers. Because the ink is wet, it tends to spread out as it hits the paper. For this reason, the resolution of graphics for an inkjet printer can be much lower than the resolution for laser printers. The exact numbers are vague. Different inkjet printers require different resolutions. Printing onto coated paper requires a higher resolution than newsprint.
Epson, which makes a wide variety of inkjet printers, recommends a resolution of no greater than one-third the resolution of the printer. So an inkjet printer with a 720-PPI resolution doesn’t need more than 240-PPI resolution. Your mileage may vary. If you don’t like the results at a low resolution, use a higher one.
If you output onto a dye sub, thermal wax, or other specialty printer, check with the shop that will be making the print. Each manufacturer has their own specific formula for the proper resolution for their type of device. So read the advice in this chapter, then adjust it to fit the actual printer that will be outputting and/or reproducing your file.
The resolution for grayscale and color images is found by looking at the linescreen. A low (coarse) linescreen requires less resolution than a high one. But 1-bit artwork (line-art) doesn’t have any screens. Each pixel of a 1-bit image becomes one dot in the printed image on the page.
This means that 1-bit artwork requires a higher resolution than grayscale or color artwork. For most office printers that means that the 1-bit image should be the same resolution as the output device. If the inkjet printer has a resolution of 720 DPI, then scan your line art at 720 PPI. If the laser printer has a resolution of 1200 DPI, scan your art at the same setting.
You don’t need to scan a 1-bit image any higher than the output of the printer.
If your project is going to be reproduced on a commercial printing press, you’ll most likely have your digital files output to an imagesetter, an extremely high-resolution PostScript printer. Even though the final destination is the printing press, the imagesetter is the final output device.
Most imagesetters output at resolutions around 2400 DPI or 2540 DPI. So if you were paying attention in the previous section, you might expect to scan a 1-bit image at a resolution of 2400 PPI or 2540 PPI. Well, it was nice that you were paying attention, but it’s not necessary or even advantageous to use such a high resolution because the imagesetter software throws away any data in the image that exceeds 1200 DPI, so 1200 PPI is the highest image resolution you need.
Changing resolution is probably the most misunderstood part of working with raster images. Unlike the analogy of the kitchen floor tiles that stay one size on the floor, raster images are often scaled (resized) up or down to change the dimensions of the image (like from 3 inches to 4 inches wide). As soon as you change the dimensions of a raster image, you change its resolution. Some resolution changes are unavoidable and work out okay, but others can mean that a file that was scanned at the right resolution no longer looks so good.
Let’s go back to our kitchen floor. What if we double the size of the kitchen, but we don’t have more tiles to cover the space. We might have to stretch each of those tiles to twice its size. (I know it’s hard to stretch tiles, but stay with me.) The pattern of the tiles enlarges to twice its size. But does the pattern have any more detail? No, the tiles are bigger, but the details stay the same. An image that looked fine at its original size doesn’t look so good when stretched; it loses detail.
That’s what happens when you enlarge a raster image, whether you do it in the image editing program or in the page layout application. When you originally scan or create a new file, it creates a set number of pixels. If you later increase the physical dimensions of the file (like the rubber being stretched), the pixels have to stretch and the image looks bad.
But what if you could add more pixels instead of stretching them as you scale an image? In Photoshop, the term for changing the number of pixels as you change the size of an image is called resampling. When you resample up, the resolution stays constant as you increase the dimensions of the file.
You might see this resampling feature and say, “Aha! I have found a way to avoid the jaggies! I’ll just resample the image as I increase the dimensions and thus it will keep the detail and look great.” Unfortunately, resampling up doesn’t work as well as getting the right resolution to begin with.
The program doesn’t know what detail it’s supposed to insert as it creates the new pixels. So it guesses. Unfortunately, its guesses result in a fuzzy image rather than a detailed one. If you understand what’s going to happen when you increase the dimensions of an image, you can sometimes get away with it, but it’s never a good idea to double or triple the physical size of a raster image.
If it’s a scanned image, rescan the original art at a larger size as discussed in the next section. If it’s an image from a digital camera that can’t be retaken, try the sharpening technique described later in this chapter.
Let’s say you have an old high-school yearbook photo that’s only 1 inch wide. But you want to print it at 8 inches wide. How do you scan the image so that you get the correct resolution? The simple formula for scanning with “extra” resolution is this:
Divide the final width by the width of the original image and then multiply it by the desired final resolution. The result is the resolution at which you should scan the image.

In the case of the yearbook photo this becomes (8/1) × 300 PPI = 2400 PPI. This gives you enough pixels to resize the image to the correct resolution. (There are also controls in the scanning software that will do all the necessary math for you.)
But what if you just want to scale something ever so slightly? Like you’re putting in a photograph in your brochure and you need the photo just a bit bigger. Do you really have to rescan the original?
No, says the ever-practical person. (We won’t ask the purists.) For continuous-tone images like photographs, that tiny little bit of scaling won’t make much of a difference at all. In fact, it’s hard to see any difference in an image that is scaled less than 10 percent.
Obviously there are problems with increasing the dimensions of a raster image, but what about decreasing the dimensions? It’s no problem at all if you do it in the image editing program.
But if you place a raster image into a page layout program and then reduce its dimensions on the page, you do have a potential problem because even though you resize the dimensions, the file size stays the same. This means the computer may still send all the image data to the printer.
For instance, let’s say you place a 4-inch wide photo on your newsletter page and realize you really need it 2 inches wide. The 4-inch photo is 2.3 MB; when you resize it on the page to 2 inches, there’s still 2.3 MB of information in the file.
Unless you set the print controls in the page layout program to throw away any extra pixels, the computer will send 2.3 MB of data to the print processor. If you’re sending the job to the office desktop printer, this could tie the machine up for a while. Fortunately, the professional print processors at large print shops can usually handle this type of excess information.
In today’s world of mega-bigga-supa-pixel cameras, it’s hard to imagine you would ever not have enough resolution in an image.
But it could happen. Perhaps you forgot and set your camera to the lowest image size. Or you only had the camera in your cell phone to capture that once-in-a-lifetime moment. Is there any way to fix an image that doesn’t have enough resolution? You can try resampling up or sharpening as described below.
A program like Adobe Photoshop or Photoshop Elements can help you enlarge an image that doesn’t have enough resolution to begin with. Use the option to Resample Image and then choose the Bicubic Smoother (best for enlargements). You can then enter the settings for a new document size.
As shown below, Bicubic Smoother does avoid the jaggies associated with enlarging images, but it leaves your image a bit soft or blurry. The Nearest Neighbor option results in jagged edges. For images that require lots of details, resampling up is not a good option. But if it’s just a simple photo of the family Christmas dinner, a little resampling up won’t annoy Uncle Nathan.

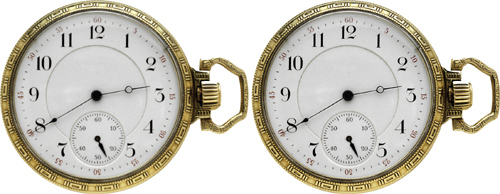
An example of what happens when the small image is resampled up. In this case the small image of the pocket watch was scaled up 400%. In the middle image, the resampling option was set for Bicubic Smoother. This added the soft blur around the edges. In the far right image, the resampling option was set for Nearest Neighbor. This creates jagged edges in the image.
You can fix the softening of an image by applying a filter such as the Unsharp Mask in Photoshop. This gives the illusion of better details by sharpening the edges between the dark and light pixels. However, sharpening can’t add details that aren’t there to begin with. One of the ways that I was taught to use sharpening was whenever I was about to increase the contrast on an image, I should switch to apply a small amount of sharpening instead.
An example of how the Unsharp Mask filter can enhance details in a “soft” image. Here enlarging the watch on the left has blurred some of the details. A slight sharpening on the right gives the illusion of more detail.
Will a raster image look any better if you double its resolution? No—scanning at anything higher than twice the linescreen is just a waste of your hard disk space. And does take longer to save when editing the file.
However, it’s a good idea if you have an ad that you’re sending to a publication to make sure you send them the file at the right resolution for their linescreen. It’s only polite not to take up too much space on their hard disk.