At first, digital cameras were limited to only professional photographers working in studios. However, as the technology developed (and prices dropped) digital cameras became popular, not just with professional photographers, but with consumers as well.
Today, it’s hard to find anyone who doesn’t own some type of digital camera. It may be a simple point-and-shoot camera that slips into a shirt pocket. It may be a sophisticated SLR camera that can take a wide variety of lenses. Or it could just be the tiny camera built into a cell phone.
What makes digital cameras so useful is that the images can be quickly transferred into a computer, viewed instantly on the monitor, adjusted electronically, and then placed into an electronic layout.
If you’re old enough to remember film cameras, you probably know that those cameras captured images by opening a small hole (called an aperture) and letting light into the camera. The light then focused onto the camera film which captured the image with a chemical reaction.
Digital cameras substitute an electronic image sensor for film. The electronic sensor passes the light onto individual pixels for each of the red, green, and blue colors in the light. If this seems similar to the description of RGB images covered back in Chapter 5, it’s because they are the same. The images created by digital cameras are captured as RGB files.

Some digital cameras store their images on small electronic cards that can be removed from the camera. Other cameras store their images on internal hard disks that can’t be removed. This affects how many images you can store on the camera before they need to be transferred to a computer. For instance, if you fill up an electronic card, you can just swap it out for an empty one. If the camera stores images on an internal hard disk you will need to remove the images when the camera is full.
There are many different ways to get the images from your digital camera into the computer. You can attach a cable from the camera to the computer. You can take the card out of the camera and use an image adapter to plug it into the computer. You can use email to send the image to yourself or others. Finally, there are even ways to automatically transfer each photo as you click the shutter using a bluetooth or a wifi network.
It doesn’t matter what method you choose. Once your images are in the computer, you have all the features of image editing applications to modify the photos. You can convert the files to CMYK and then add them to your page layout program for publishing.
There are no hard-and-fast rules for these categories of cameras. What may seem like a professional camera to one person will seem less to another.
The most common professional digital cameras are the single lens reflex (SLR) digital cameras. These cameras look similar to traditional 35mm cameras. The single lens of these cameras refers to the single lens that is used to both compose the shot as well as let light into the camera. Then, as you press the shutter control, a mirror inside the camera body flips and instead of the light going into the viewfinder, the light is sent directly to the back of the camera. Professional photographers feel that the single lens is a more accurate view of how the final image will look.
As any professional photographer will tell you, the most important part of a camera is its lens. The professional SLR cameras all have the ability to swap out one type of lens for another. This is what makes those cameras so professional. You can exchange a telephoto lens that shoots long distances with a macro lens for closeup work. Most professional photographers will have two or three lenses that they swap on a camera.
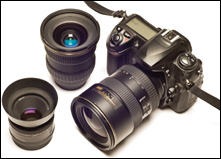
An example of a professional single lens reflex camera with exchangeable lenses.
Here are some of the other features that are necessary for a camera to be considered of professional quality:
Aperture control. The aperture is the opening that allows light into the camera. Professional cameras allow you to control the aperture manually.
Shutter speed. When the aperture opens to let light into the camera, it closes after a certain amount of time. The longer the aperture stays open, the more light enters the camera. Professionals manually adjust the shutter speed to let more or less light in.
Working with depth of field. The depth of field is the range of distance within which objects appear to be in focus. Professional cameras use a combination of the aperture and the length of the camera lens to control the depth of field.
Bracketing images. Most photographers don’t rely on just one setting for shutter speed and aperture. So they use a technique called bracketing where they take three pictures of the image at the same time with one click. One image is adjusted to be slightly underexposed, one is slightly overexposed, and the other is normal. These three images allow the photographer more choices for the final shot.
Additional file formats. In addition to the common JPEG file format, most professional cameras allow you to save your images as RAW files. Unlike JPEG files that apply a slight amount of compression, raw files are captured with no compression or other enhancements. They are considered the most pure form of the image you can work with. However, RAW files must be processed into other formats to be used in page layouts.
These are the most basic features for professional cameras. However, don’t let the word professional fool you. I know plenty of people who insist on buying a professional camera, but they then turn on all the automatic controls and just point and click. They may own a professional camera, but they use it in a most un-professional manner.
Lower-priced digital cameras are consumer digital cameras, which are sometimes called point-and-shoot cameras. These cameras are much smaller than professional SLR cameras and can easily be carried in a shirt pocket.

An example of a consumer digital camera. Notice the fixed lens and small, compact size.
The two main differences between these cameras and SLR ones is that the consumer cameras have one lens that is not removable. Also, they have a separate viewfinder from the actual camera lens.
What these cameras lack in sophisticated lenses, they make up with special features that make the cameras incredibly easy to use. These include automatic focusing, exposure controls, and image stabilizing. These cameras also let you take very simple videos complete with sound.
Point-and-shoot cameras are excellent for capturing images for Web pages, for printing on photographic-quality inkjet printers, adding images to video presentations, or for projects that will be output to desktop printers and reproduced on copy machines.
There are some instances where consumer digital cameras can be used for journalism or even advertising. However, you should understand how they work before you try to use them for your own print projects.
It’s hard to find a cell phone that doesn’t have a camera built into it. Does that mean that there is no need for digital cameras? Can’t everyone just use their cell phones to take pictures for advertising or publishing? Hardly! Even though some of the newer camera phones have very high resolutions, their camera sensors aren’t high quality, and their lenses are too primitive to take excellent pictures. You wouldn’t even want to trust your family holiday photos to the camera in your cell phone.
So what good are they? They are spur-of-the-moment memory savers. For instance, if you’re looking for a new house, they are an excellent way to record the layout of each room. And because the images are often tied to email, they can be easily sent to your spouse for his or her approval.
Once you’ve decided on the type of digital camera, the next consideration is resolution. This is expressed as the total number of pixels in the area that is captured. For instance, if the area that is captured is 3,000 pixels across by 2,000 pixels down, the total number of pixels is 6,000,000 pixels. Every million pixels is called a megapixel. So six million pixels is 6 megapixels.
Once these pixels have been captured, the pixels-per-inch (PPI) value can be changed, depending on how you plan to use the images (see Chapter 6 to understand how the print area of an image changes as the resolution changes).
It was only a few years back when the top resolution for a professional digital camera was 6 megapixels. Today, you can find camera phones with 12.1 megapixels! However, resolution doesn’t always indicate a good output. You also need to look at the type of image sensors.
There are two types of image sensors that are used in digital cameras. Most use a charged coupling device (CCD). Others use a complementary metal oxide semiconductor (CMOS). You don’t have to learn the physics behind each type of sensor. Just know that each type has its pros and cons.
CCD sensors create higher-quality images with less noise in the image. (Noise is the term used for pixels that are in an image that shouldn’t be there. These noisy pixels tend to make the image look splotchy.) CMOS sensors are more likely to have areas with visible noise.
CMOS sensors are more energy efficient and use less power. They are better for cameras that have smaller batteries.
CMOS sensors are less expensive than CCD ones. This makes CMOS sensors popular for cheaper cameras.
CCD sensors have higher-quality pixels and can pack more of them in a smaller area.
Just because a camera comes with 12 megapixels doesn’t mean you have to save your work with all 12 million pixels. Most cameras let you choose to shoot your images at lower resolutions. If I know I will only be using my photos as demo images on screen, I usually lower the resolution of the images in the camera. This lets me save more images onto the camera’s storage card.
Digital cameras also let you save your files in different file formats. Professional cameras use lossless formats (see page 114) such as TIFF or RAW that do not change the quality or details in the file. These formats take up more room in the camera, but provide the highest quality in the image.
High-end cameras also let you save as JPEG files with very low compression. This the quality of the image very slightly.
Consumer digital cameras generally save their images only as JPEG files. These cameras usually let you choose the quality setting for the image with the labels: good, better, or best. The best quality applies the least amount of compression; better quality applies a little more compression; and good applies the greatest amount of compression.
If you’ve ever been on a professional photo shoot, you know that photographers don’t just point and click to take one photo. They click, click, click to take hundreds of photos to cover every conceivable angle, view, and exposure. After the shoot, it is a chore to wade through hundreds of files to find the good ones.
When photographers took 35 MM photos, they needed a way to view hundreds of photos without developing each picture on a separate piece of photographic paper. The photographers would place strips of developed film on a piece of photographic paper. The paper was then exposed to light.

An example of how a portion of a contact sheet of images would appear. A magnifying glass was required to view the images.
When the paper was developed, the photos were displayed as a series of small images inside the panels of the film. (The term contact sheet came from how the negative was in contact with the photographic paper.) The photographer and client would use a magnifying glass to view the images on the paper and mark the ones they liked.
Photographers would also arrange individual 35 mm slides on special types of lamps, called lightboxes, that allowed light to pass through the slides. They would again use magnifying glasses to view and choose the images they liked.
With digital cameras, it’s very easy to take thousands of photographs without changing the image card. Fortunately, there are software applications that work like the traditional contact sheets and lightboxes. These applications let you view, sort, arrange, adjust, and edit digital images without opening hundreds of files.
Adobe® Bridge®, Adobe® Photoshop® Lightroom®, Apple® iPhoto®, and Apple® Apperture® all allow you to easily sort through hundreds of images. iPhoto is the most basic product. Bridge comes with any of the Adobe applications. Lightroom and Apperture are professional products with very specialized controls for processing thousands of images at a time.

Adobe Bridge is an electronic version of a contact sheet or the old lightbox thats let you view, sort, adjust, and modify digital images.
These projects require using a wide variety of digital cameras. You’re not expected to own all of them yourself. Find a buddy and you can both use each other’s cameras.
Find a digital camera that lets you change the amount of pixels in the image. Change the pixel size of the images from the smallest to largest. Notice how the number of pictures the camera can take changes.
On the same camera as project #1, change the quality of the JPEG compression. Does that change how many images you can store on the camera?
Find a high-end camera that lets you work in the RAW format. See how many images can be stored in that format.
Find a camera phone and see if there are any controls for taking pictures. Is there a flash? Is there a focus control? Can you change how many pixels are captured? Can you change the JPEG compression? Is there anything you can do?
Take some pictures with a camera phone. Download them to your computer and see how large they are. Then, email the photos from the camera phone to the computer. Are the emailed photos the same size as the downloaded ones? (They’re not from my iPhone.)
Go into a very low light condition. (A romantic candle-lit restaurant is fine.) Take some photos. Later on, download the images to your computer. Look at the shadow areas of the photo. Do you see any splotchy areas? That’s the noise from the lower-quality image sensors.
Take a few different digital cameras on a photo shoot. Take the same scene with the various cameras. Download the photos to your computer and compare them. Can you see the difference between the photos?