You can’t buy oranges in a hardware store. It doesn’t matter how diligently or how long you search. Hardware stores don’t sell oranges. That’s just not what they do.
It’s the same with software programs. You can’t make applications do things that they were never intended to do.
The difference between computer applications and hardware stores is that the people who run the hardware store will tell you they don’t sell oranges. But when you’re all alone working in front of your computer, there’s no one there to tell you that a certain application can’t do what you want it to.
Worse, it may look like the application can do what you want, but you won’t find out till later that you wasted hours and hours of work using the wrong type of program.
This chapter is a guide to choosing the right types of applications, or programs, to do different jobs.
Computers are very limited machines when you first take them out of the box. They are one of the few tools that have no specific function—a computer can’t do anything all by itself. Well, I guess a tower computer could be a doorstop and a laptop could be a cafeteria tray. But you have to add software applications to a computer to make it truly useful.
So first you buy the computer, then you add applications for creating graphics, page layouts, etc., and then you have a desktop publishing tool. But even if you have the right tool, you can still use it the wrong way.
Let’s look at the various applications (also known as “programs”) you will come across and what they are best used for—and not used for.
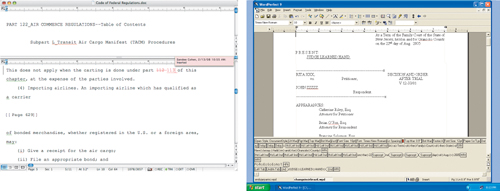
Microsoft Word (left) and WordPerfect (right) are two popular word processing applications.
A word processing application, such as Microsoft Word or Corel WordPerfect, is very good at working with basic text. If you want to type fast, check your spelling and grammar, automate repetitive typing tasks, create outlines, track changes to the text, write reports with footnotes, make and organize tables of data, and print to desktop printers, then you should choose a word processor as your application.
What word processing applications are not good at is working with colors or creating high-end graphics. The drawing features found in word processors should be used only to create artwork for documents that will be printed directly from the word processing program onto desktop printers. Don’t ever take your word processing document to a service bureau (see Chapter 16) for professional, high-end output. If they don’t flatly refuse to do the job, they may charge you extra for recreating the job using a professional page layout program.
Word processors are also not very good at professionally formatting text—they just don’t have the sophisticated features for adjusting the spacing and position of text characters, controlling hyphenation, or wrapping text around an image. If you want truly fine and beautiful type, insert your word-processed text into a page layout application such as Adobe InDesign or QuarkXPress.
The software vendors try to delude you into thinking you can create entire newsletters and brochures in word processors. Technically, you can, sort of, but it’s so much trouble and there are so many limitations that believe me, you’ll have much more fun creating your newsletter in a page layout application. The internal structure of a word processing page just doesn’t allow you the freedom you need to make something like a newsletter, fancy brochure, advertisement, or other designed piece.
Most people start off typing their text in a word processing program and then importing or placing it into a page layout application. If you are preparing text in a word processor that you or someone else is going to insert into a page layout application, here are some guidelines to follow. (If you receive text that is typed by others, you should make a copy of this list and give it to that person.)
If you use tabs to separate colums of information, insert only one tab character between each column. Even if the text doesn’t line up correctly, don’t add any extras tabs. Those extra tabs are going to cause huge gaps and uneven columns in the page layout application. If you find it difficult to read the columns, use the tab stops to even out your columns.
Use only one space after periods. The old rule of two spaces after a period applies only to typewriters.
Don’t hit the paragraph return several times to make spaces between paragraphs. Those extra lines are only going to cause problems later on. If you need space between paragraphs, you should create it using the “Space Before” and “Space After” paragraph formatting. You can find these commands in your word processing program.
Before you use tables in the word processor, find out if your layout program can import them. However, don’t apply fancy colors or borders to the table in the word processor. That formatting will have to be removed in the page layout program.
Don’t use the built-in drawing or graphics features of word processing programs. They don’t print as well as professional graphics and can cause all sorts of problems if you output your file using a professional process. The same thing applies to the clip art that ships with word processing programs.
Don’t insert graphics or photographs from other applications into a word processing document. Instead, make a note in the text that the graphic or photo goes into that spot. Then, the person doing the layout can add the graphic in the correct position.
Check before using automated formatting such as drop caps, numbered lists, footnotes, endnotes, and indexes. You want to make sure that the page layout software will be able to import these features correctly. If not, the formatting will have to be removed and reapplied using other techniques.
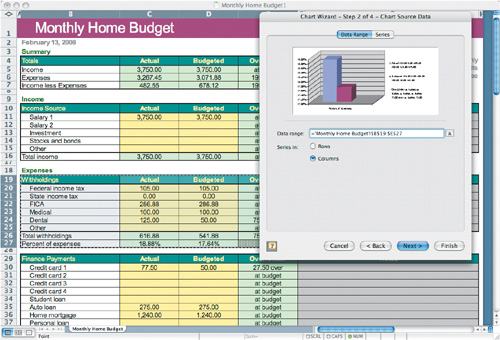
Spreadsheet applications, such as Microsoft Excel or Lotus 1-2-3, are used by number crunchers to do all sorts of statistical analyses, invoices, budgets, grading sheets, simple and complex forms, and more. You can use a spreadsheet to create exceptional tables to organize information into easy-to-read columns. You can convert information into charts and graphs that can be colored and formatted for presentations and printed directly from the spreadsheet application onto desktop printers. Charts and graphs from a spreadsheet can be imported into word processing documents and printed to desktop printers.
However, the information in spreadsheets does not import easily into professional page layout programs. This means you may need to convert your tables to plain text or recreate them as tables in other software to get professional-level results.
Here are some other guidelines to follow if you want to insert information from a spreadsheet into a page layout application:
Don’t copy and paste charts and graphs from spreadsheet files into page layout software. Although you may get something that looks okay on the screen, it will often cause problems when printing.
Try to use a dedicated illustration program such as Adobe Illustrator or CorelDraw to create charts and graphs instead of a spreadsheet application. These programs have better control for colors, lines, and professional output. They are also much less likely to cause printing problems later on. One way to accomplish this is to export the data from the document as ordinary text and then import it into a program that creates tables and graphs.
If you don’t have access to a professional illustration program, look for an export feature in the spreadsheet program that allows you to export charts and graphs as PDF files. (PDF stands for “Portable Document Format” and is covered in Chapter 17.) This PDF can then be placed into the layout program.
Presentation programs, such as Microsoft PowerPoint, are the electronic equivalents of the old slide shows I used to work on. Back then we filled two slide carousels and alternated between the two slide projectors. Today, with software such as a presentation program, I can create stunning slide shows with incredible extras that I can get only from computer software.

You can import graphics, as well as do some basic drawing. You can put special backgrounds on each page that blend from one color to another, add interesting textures, and create other effects that add to the impression of the presentation. You can add sounds and movies and create limited animations, like text and graphics moving in and out.
Each page of a presentation program becomes an electronic presentation slide. The computer is then hooked up to a projector that displays the presentation. You use the computer to move between the pages in the presentation.
One of the most common questions I get from designers is how to convert their company’s PowerPoint files into illustrations that can be used in annual reports, ads, and other printed documents.
Unfortunately, the files in presentation programs should not be used for professional output as part of printed designs. The backgrounds and textures are not in the proper format for color separations (see Chapters 9 and 10 for lots of information about separating colors), nor are the graphics.
PowerPoint files can be directly printed onto office printers. However, if you want those PowerPoint files to be reproduced on a commercial, high-quality press, there are two different techniques. The first way is easy; the second way is best.
The easiest way to professionally output from PowerPoint is to convert the presentation into a PDF file (covered in Chapter 17). This doesn’t control all the colors and elements in the file, but it will create a file that can be printed at a print shop.
The best way to recreate your presentation takes a little more work, but the results are worth it.
Export all the text from the presentation into a plain text file.
Convert a presentation page that doesn’t have any text on it into a picture format, or reproduce the backgrounds in an image editing program.
Insert the background image into the page layout program.
Insert the presentation text into the page layout program, creating one page per “slide.”
Take this new file to the print shop for output.
After you scan an image into a computer or take a photo with a digital camera, most likely you will want to make some changes to the image. You may need to clean up some dust and scratches; change the brightness, contrast, or colors; or take out the background and add other images. Whatever you plan to do, you need an image editing or photo retouching program. The most popular image editing program is Adobe Photoshop. However, there are others, such as Photoshop Elements, MetaCreations Painter, Corel Photo-Paint, and Jasc Paint Shop Pro that have similar features.
This kind of application creates images using pixels, the tiny dots on the screen, so the images are bitmapped graphics (information is “mapped” to each pixel on the screen with “bits” of electronic messages). The combination of all those pixels can hold thousands or sometimes millions of colors, and you can edit files in an image editing program pixel by pixel. You can use paintbrushes, erasers, spraypaint, and other similar tools to create or edit graphics.
Image editing programs have hundreds of features, far too many to list here—but what is just as important is what they don’t do. The following are a few things you shouldn’t do in an image editing program.
Don’t include unnecessary, large areas of solid white. For instance, if images have a lot of white space between them, it may be better to separate the images into separate files rather than make them one large graphic.

The two stacks of coins on the left started out as one Photoshop document. However, if I need to separate them into two different images, they will print faster, and take up less space, if they are split into separate files.
Don’t increase the size of your finished artwork. For instance, don’t place the graphic in your page layout program and then enlarge it. And don’t try to drag an image from one document into another and then resize it up. Because of the way a graphic is created in these programs, increasing its physical size could make it blurry or chunky. (For more information on this, see Chapter 6.)
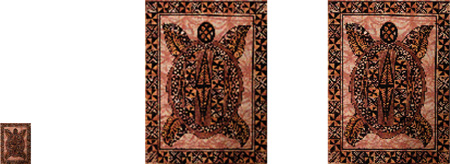
An example of what can happen when you scale an image up in size. The image on the left was scaled up to become the two larger images. In one case the scaling made the image blurry; in the other the image looks jagged.
Don’t set text and effects in a page layout program if you need the text to appear as if it is part of the image. For instance, if you want to set text to spell out a custom license plate on a photograph or a sign on a building, you do want to set the text in the image editing program. If you set it in the layout program, the text will seem to float above the image.

The text on the left is an example of text that you want to blend into the image. The text on the right was set in the page layout program and doesn’t feel like it’s part of the image.
Don’t use an image editing program to set large amounts of text. A program such as Adobe Photoshop even lets you check the spelling in text. But image editing programs don’t have nearly the same features for formatting, searching, and working with text that a page layout program has (see the chart at the end of this chapter). You’re much better off setting text in the page layout program.
Don’t set text with effects in an image editing program if you can apply the same effect in a page layout program. As a general rule (and this is a very general rule and can be easily broken, if you need to), you should try to apply text and special effects at the last stage of your layout process. For most people, this is their page layout software.
Vector drawing programs are the most versatile and the most challenging programs to use. Some of the most popular vector applications are Adobe Illustrator, CorelDraw, and Deneba Canvas.
Image editing programs work with pixels; vector drawing programs work in mathematical boundaries called vectors. Instead of a bitmapped image made of thousands of individual pixels, the separate parts of a vector graphic are each individual objects.
An advantage of working with vectors is that you can make changes constantly to entire objects without having to make the changes pixel by pixel. For instance, if you draw a box in a vector program, you can continue to change, as often as you like, the pattern or the color inside the box, as well as the pattern, color, and thickness of its border, and you can do it with the click of a button. You can do this because each part of the box, the inside and the border, are separate objects that you can manipulate endlessly with the drawing tools.
In a bitmapped graphic (like those created in an image editing application), you would have to select all the individual pixels inside the box or in the border before you could change it, and the sorts of changes you could do are limited. In fact, if you wanted to change the thickness of the border, you would have to redraw it.
Unlike pixel images, which should not be enlarged, there are no restrictions on enlarging or reducing vector images because you’re not resizing pixels—you are just changing the mathematical formula that defines the object. This makes drawing programs ideal for creating artwork such as logos that need to be used at different sizes.
Some vector-drawing drawing programs also have “page layout” features. This means you can create artwork in the drawing program and also import text and other graphics to lay out pages, package designs, or posters. You can then print the page directly from the vector program.
But you should never use a vector drawing program to create long document projects such as books and magazines—not even with a multi-page program such as Illustrator. Nor would you try to edit something like a photograph in a vector drawing program because a photograph cannot be separated into individual objects.
Just as some drawing programs can do page layout, page layout programs have vector drawing tools that let you create vector effects directly in the page layout program. But don’t bother to use the limited shapes in a page layout program for highly complex graphics or illustrations.
What makes the more sophisticated vector drawing programs so challenging is that it can be frustrating at first to learn how to manipulate the control points (discussed in Chapter 7) that create the boundaries of objects. However, taking time to learn them can help you create many important types of graphics.
Here are the sort of projects that lend themselves to vector artwork.
Special type effects. You can bend, warp, distort, and otherwise apply special effects to text. You can also set type to move along a path.
Charts and graphs. Most vector applications let you take the raw data from spreadsheet programs and convert it into compelling charts and graphs. Look at the financial pages of your local newspaper and you’ll see examples of vector charts.
Logos. One of the most important uses for vector applications is to create crisp logos for all sorts of companies. The primary reason for this is that the logo can be scaled up or down to whatever size is needed.
Precision and symmetrical illustrations. The mathematics behind vector illustrations makes it a logical choice for creating perfectly symmetrical art. The objects in a vector drawing can be easily rotated and duplicated in precise amounts. This is not as easily done with pixel-based software.
Technical illustrations. Along the same lines as precision illustrations, vector applications are the best choice for any sort of technical illustrations such as assembly instructions, blueprints, and schematics. Many of these illustrations are handled by computer-aided-design (CAD) software which are much more complicated than design and illustration programs such as Adobe Illustrator.
Maps. Cartographers (map makers) need the precision to create their maps as close to reality as possible. In addition to working with vector artwork, they often download raw data from satellites that is converted into vectors.
Repeating patterns. The fashion industry uses vector artwork to quickly mock up the look of next year’s hot styles. Although there are specialized programs that convert the artwork into woven fabric, many designs originate in programs like Adobe Illustrator.

Some of the types of artwork that you should create in a vector illustration program. From left to right: logo, precision drawing, signage and iconography, maps and cartography, fashion repeating patterns, 3D effect.
This doesn’t mean that you can’t achieve similar results in a page layout program. It’s just that you could find yourself working too hard in one program, when another would be much easier. Remember, you don’t want to get stuck looking for oranges in a hardware store.
Page layout programs are the backbone of desktop publishing. The two most popular programs are Adobe InDesign and QuarkXPress. However, there are others—some, like Adobe FrameMaker, are used mostly for technical documents. Others, like Microsoft Publisher, are more basic and are designed for low-end jobs that will be printed onto desktop printers.
A page layout program is the assembly area where all the parts of a project are put together. You can write text directly in the program, but you can also import it from any word processor. You can style and format the text professionally, and import graphics, then resize and position them.
One of the most important features that separates page layout software from word processing applications is the ability to create a bleed area around the page. A bleed is the area outside the trim that artwork extends into. The reason why you need to set a bleed has to do with how the pages of a document are cut to size.
Consider the triangles at the top corner of this book. When I set those triangles in my page layout software, I didn’t stop exactly at the edge of the page. I extended the artwork off to a bleed margin outside my page.
This extra area of color ensures that if the page is not trimmed exactly right, there won’t be any white area along the edge. Any time you lay out a color or photo right to the edge of a page, you need to set a bleed so the document looks right when it is trimmed. Most bleeds are set to one-eighth inch (.125”).

This is an example of why you need to set a bleed area. Illustration A shows the artwork, with a bleed outside the trim (black rectangle). When this artwork is trimmed as shown in illustration B, the artwork extends right up to the edge of the trim. Illustration C shows what happens if the trim area is cut off center. The artwork doesn’t have any white gaps next to the trim. Illustration D shows what happens if there isn’t any bleed. If the trim is off center there are gaps in the color at the edge of the page.
In addition to a bleed, you may want to specify a safety area inside the page. This area is usually a one-eighth inch margin where important text and graphics do not appear. The safety area is set so that if the knife that cuts the page comes inside of the trim area, nothing important gets cut off.
Once you bring text into a page layout program (or write it directly on the page), you can do many of the same tasks you would in a word processor:
Style and format text, either manually or using style sheets
Check your spelling
Find-and-change to replace text phrases or formatting
However, because you are working in a page layout program there are other things you can do with text:
Rotate and overlap text for special effects
Use justification controls to fine-tune the spaces between letters, words, and lines
Lock the text to a baseline grid so it automatically lines up across columns and pages
Change the horizontal or vertical scale sizes of the text
Convert text to paths (sometimes called outlines) so that it can be used for graphic elements
Some word processing features such as grammar checking, editorial revision tracking, and automatic footnotes are not found in most page layout programs. This means that the bulk of text entry should be done in a word processor and only minor or simple text entry should be done in the page layout program. However, there are programs that act like editorial partners to page layout software. Those programs let you add sophisticated editorial corrections to page layout programs.
If you work in a large organization, you may have a special editorial program that works with your page layout software. For instance, Adobe InDesign has an editorial program called InCopy that lets editors and writers make changes to text right within the InDesign layout. QuarkXPress has Quark Copy Desk.
These editorial programs add many word processing features to the page layout software. This allows you to use macros to automate text entry and formatting, track the changes to text, revert the text to previous entries, and view how many lines of text need to be cut in order to fit the copy on the page.
In the early days of page layout programs, all you could do was import images from other programs. If you wanted to make changes to the size, rotation, color, brightness, or other aspects of the graphic, you had to go back to the original image program.
Even when it became possible to resize, rotate, apply colors, and make other changes to the images on a page, many people were afraid to make those changes in the page layout document. They were afraid that doing so would cause problems when the document was printed. It might add to the print time or cause the image to turn out wrong.
So, what about today? Software such as QuarkXPress and InDesign allows you to apply all sorts of incredible transformations to images. You can change their colors, brightness, contrast, sharpness, transparency, and much more. So what’s the deal? Do the old rules still apply?
No—almost every rule that was true back in the early days of desktop publishing has been changed by newer software and more powerful hardware. Unfortunately you may find a copy shop or print shop that will tell you not to use some special feature in a program. Some of them are just stuck in their old ruts and don’t realize that their newer software and equipment can handle the tasks easily.
Other times they may have ancient equipment that truly can’t handle the newer features in the software. In those instances, you may want to investigate working with a different print shop.
In my experience, I have broken almost every one of the old rules for laying out pages. And none of my jobs have ever been bounced back from a print shop!
The following are some of the effects that your grandmother might have told you you couldn’t do in a page layout program. For the most part there is nothing that wrong with doing it today.

Resizing graphics. There’s nothing wrong with changing the size of an image ten percent bigger or smaller. That kind of change isn’t noticeable in the final output.
Scaling graphics down. Way back when I started, we were warned not to scale images way down in the page layout program. The printer processor couldn’t handle that much information. Today’s processors are much more powerful and scaling images down won’t tax the final output.
Rotating graphics. The thought years ago was that it would take too much time to do all that rotating as part of the print processing. Instead you were supposed to rotate the image in the image editing program to save print time. It’s no longer a big deal. Rotate as much as you want.
Changing the colors of graphics. Page layout programs allow you to colorize grayscale images. Although there are more professional ways to do this, there really isn’t anything wrong with doing it. (See Chapter 10 for more details on these techniques.)
Every time you press a key on your keyboard to type a character, you are actually accessing other software—the fonts that are in your computer. It’s not enough just to copy the fonts onto your hard disk. In order to use your fonts, they need to be installed as part of your computer operating system. (See Chapter 15 for more information on working with fonts within the software.)

There are several different ways to install fonts. You can use the controls that are built into your operating system or you can use font management software.
The easy way to install fonts is to use the controls that are part of your computer’s operating system. On Windows xp and Vista, that is done by using the Fonts Control Panel. On Mac OS X it’s done by using Font Book or manually adding fonts to the Library > Fonts folders. Using the operating system controls works best for those who don’t need to open or close a lot of fonts each day. That’s the way I work. I have a few fonts that I like and use all the time. I don’t need to open and close others very often.
Many designers and print shops need to open a wide variety of fonts for each document they work on. Instead of using the operatiing system to install fonts, they use third-party font management software such as Extensis Suitcase Fusion or Bitstream Font Navigator. Font management has these advantages over working with the operating system:
Auto activation. When you open a document that uses fonts that you don’t have open, the font management software will automatically open the correct fonts—assuming you have access to them on your hard disk or network.
Sets. Font management software lets you organize your fonts into sets that you can assign to specific jobs, clients, or other categories. Then, when you know you’re going to work on a specific project, you can open the entire set of fonts with a single command.
Font diagnostics. Perhaps it’s because they hang around street corners smoking cigarettes, but font files can become corrupted. Corrupted fonts can cause problems in documents. Font management software alerts you if you’re working with a corrupted font.
This chart should help you quickly decide which type of program you should use for different projects.
|
|
| ||||
|---|---|---|---|---|---|---|
TEXT HANDLING | IMAGES AND PHOTOS | TABLES | CHART’S | LOGOS AND TECHNICAL DRAWINGS | SLIDES | |
WORD PROCESSING |
|
|
|
|
|
|
SPREADSHEETS |
|
|
|
|
|
|
PRESENTATION |
|
|
|
|
|
|
IMAGE EDITING |
|
|
|
|
|
|
VECTOR DRAWING |
|
|
|
|
|
|
PAGE LAYOUT |
|
|
|
|
|
|
