Creating a PDF document is similar to packing for a trip. When I go on a trip I put everything I need—clothes, shoes, toiletries, computer cables—neatly into a suitcase. I may use a list to make sure I haven’t forgotten anything. I put a tag on the bag in case it gets lost in transit. Finally I zip up all the compartments to make sure no one opens the bag and that nothing falls out.
The process is similar when you create a PDF file that you want to send to a print service provider. (PDF stands for portable document format.) When you create a PDF document, you have packed all the pages, layout, images, and even fonts into the PDF suitcase (wrapper) that holds all the information needed to print the document. There’s even some compression (like those roll-up travel vacuum bags) that makes sure everything takes up the smallest possible space.
There are so many different terms associated with Acrobat and PDF documents. This little glossary will help you sort them out.
Acrobat: The software sold by Adobe Systems that allows you to open, edit, and save PDF documents.

Acrobat Distiller: The software module, sold as part of the Acrobat bundle, that creates PDF files. This is the actual software that is used when the Adobe PDF printer driver is chosen to create a PDF file. (See the section on creating PDF files, in this chapter.)
Adobe PDF printer: The printer driver that appears when the Acrobat software is installed. Choosing this option lets you create a PDF using Acrobat Distiller in the background.
Adobe Reader: The free software that allows you to open and view PDF documents. Depending on how the original PDF was saved, you may be able to fill in forms and/or add comments using Adobe Reader (also called Reader). This application was originally called Acrobat Reader but the name was changed to avoid confusion with the commercial product.
PDF: The file format of documents created by Acrobat and other software. The PDF file format is now an internationally recognized file format standard and can be created by both Adobe and non-Adobe software.
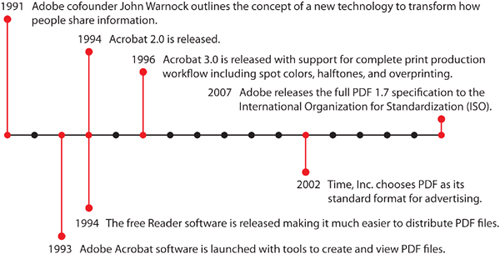
First released in 1993, Acrobat and PDF documents didn’t really gain wide acceptance as a file format for print service providers until around 1999. That’s when a robust set of print production features was added to the PDF document format.
Suddenly print service providers had a way to print a document without worrying about missing elements or text reflowing. Instead of asking for the native application files, they began asking for PDF documents. And the rest is the success of PDF.
There were three primary reasons why PDF became so popular with designers and print service providers.
Perhaps the most important reason people use PDF documents is that they take all the elements needed to print a document and compact them into a single file. All the images, fonts, color information, and page information necessary to print the file are all contained in the single PDF file. In addition, you can send a PDF to anyone and they can open it with the free Adobe Reader software. You don’t have to worry that they might not have the same layout program that you used to create the file.

Another reason why PDF files are popular is the file compression that is applied. A PDF file is smaller than all the individual elements added together.
The very act of creating a PDF is a form of printing. Therefore, if there is a problem that might cause a file to fail to print, you will most likely see it when you try to create the PDF. This becomes an important troubleshooting guide.
However, the opposite is also true. If you can convert your file into the PDF format, most likely it will output correctly at the print service provider. PDF files will also print slightly faster than native files because part of the print processing has already been done.
As the PDF file format has become more popular, there have been many more ways to create PDF documents. Some are from Adobe; others are from third-party software companies. One important thing to remember, though: Not all PDF documents are created the same. Your print service provider may not want you to create a PDF using certain techniques.

Over the years, creating PDF files has gotten simpler and simpler. Originally we had to create a PostScript file, then take that file and send it to the Acrobat Distiller software. Distiller would then create the PDF document according to its settings.
You young’uns have it much easier. As long as you have installed the Adobe Acrobat software, all you have to do is choose Print from the menu for your software. You can then pick the Adobe PDF driver from the print dialog box. You use that dialog box to select all the proper options. And then click the Print button.
As you go back to work, or read your email, or feed the cat, Acrobat Distiller works with the printer driver to create the PDF file.
If you work with programs such as InDesign, QuarkXPress, Illustrator, Photoshop, or other professional layout and illustration programs, you will find the options to create PDF files by choosing Export or Save As. These commands don’t use Distiller to create the PDF file.
For the most part you should use the Export or Save As commands from the native software. Unless you have found some esoteric reason, the PDF documents created by exporting are just fine. (See the sidebar below for a comment on this process.)
If you use a Macintosh running OS X, you may have found the Print dialog box command to Save as PDF. If you’ve tried it, you’ll agree it’s pretty amazing. No extra steps, no settings, and definitely no waiting around for Distiller to launch and do its thing.
So what’s with the command? Why doesn’t everyone just use the Macintosh Save as PDF command? Why bother with buying Acrobat and Distiller? Why wade through all the steps in InDesign or QuarkXPress?
The reason is that as handy as that command is, it was never intended to create professional, production-ready PDF documents. It was added to OS X to give Macintosh users a quick and free way to send copies of their documents to friends who might not have the same Macintosh software (i.e, Windows users).
But the way the Mac operating system creates the PDF may not be up to the latest PDF specifications. (Remember the timeline on page 223? The specifications that were certified by the ISO—the International Organization for Standardization?) This won’t cause any problems when you want to send a Holiday PDF to everyone in your family. But it could cause a print service provider to reject your file.

So why doesn’t everyone just buy Adobe products and make PDF files using Distiller or the built-in PDF commands? Two reasons: First, not everyone can afford Distiller. Second, companies such as Quark Inc. may not want to pay Adobe for the license to use the Acrobat electronic controls to make PDF documents.
So there are many third-party (non-Adobe) products that let you create PDF files. Some are quite professional, such as the Global Graphics’ Jaws PDF Creator. This product was based on the technology used in the Harlequin RIP, software that prepress veterans recognize as an all-time classic for reliability and fidelity. (This is the underlying software used by QuarkXPress when it creates PDF files.) Another is the Nuance PDF Converter, which offers a tool bar that can be used with Microsoft Word.
However, there are also many freebie, ad-driven, or cheap PDF-creation products out there. (I won’t mention their names—they don’t need any publicity from me.) These products may or may not do a good job in creating production-ready PDF documents.
The only way to tell if a non-Adobe PDF application is worth using is to try it yourself. If you get good results, congratulations. If not, well, don’t say I didn’t warn you.
You may feel a little overwhelmed when you first look at the controls for creating PDF files. There are literally hundreds of different combinations. However, once you understand what those controls do, you’ll see it’s not really that complicated. And fortunately, almost all the different programs that create PDF files use the same sets of controls.
If you’re lucky, you can use one of the presets that ships with Acrobat or other applications that create PDF documents. Adobe has provided settings such as Press Quality or High Quality Print. Both of these presets automatically adjust all the other controls to the proper settings for professional print output.
Adobe has also included a group of presets with the label PDF/X. PDF/X is a collection of settings that various magazines, newspapers, and print shops have agreed on as a standard for print publishing. If you get a request for one of the PDF/X presets, you just choose it and export or create your PDF file. You don’t have to worry about the specific settings.
The General settings are the options for the entire document. It’s where you can specify the pages you want and what things should be included in the document. It’s very easy to remember what should be included in a PDF for print publishing: Don’t include anything extra!
Thumbnails, tags, layers, and interactive elements (covered later in this chapter) are only going to cause your print provider to get upset and could possibly keep the job from printing properly.

The general settings from InDesign (left) and Distiller (right).
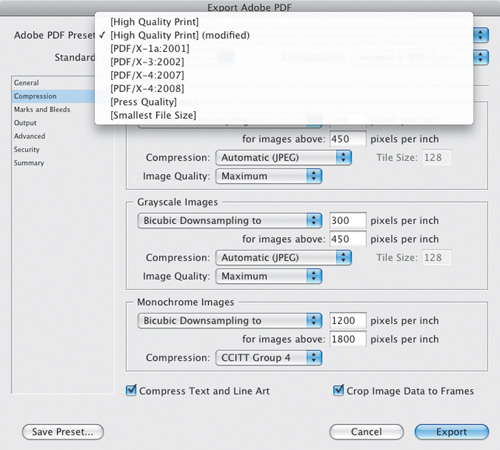
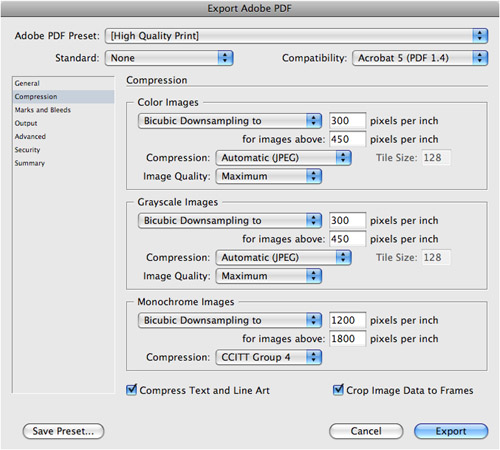
The options for compression may appear daunting at first. But here’s a general idea of what they do. (Trust me, I’m only covering the very basics in this chapter. A full discussion would take an entire book.)
The point of compression is to make the PDF file size smaller than it would be if you just shipped the layout, the images, and the fonts together in a folder. The place where compression does the most work is in the size of the images.
You can set the compression options individually for color, grayscale, and monochrome (1-bit) images. (See Chapter 5 for descriptions of each of these types of images.) The reason for this is that some people need better quality in their color images than they do for the others. Having three settings of compression options gives you flexibility in how the various images are handled.
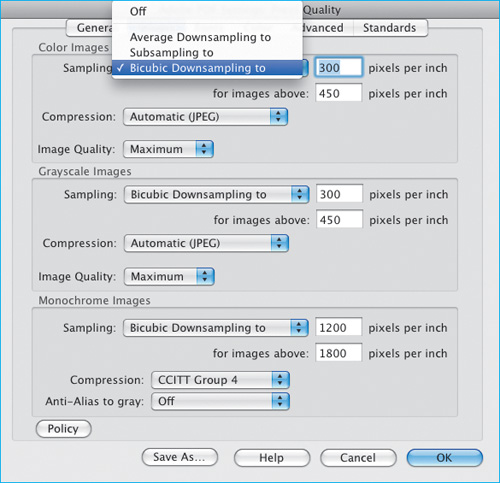
In order to understand the compression options, you need to look at the Downsampling and Subsampling controls. The first thing to understand is that sampling means throwing away pixels. There are three different ways those pixels are thrown away. Bicubic Downsampling is the most sophisticated, but takes more time. Average Downsampling is a little faster but not as smooth. Subsampling is the fastest, but creates the roughest results.
The Sampling menu with the resolution settings for downsampling.
The next thing to understand are the settings for what pixels should be thrown away. Let’s say you’ve taken a photo that is 3872 pixels wide and 2592 pixels tall. (I covered pixels way back in Chapter 6.) If you scale that image down to an effective resolution of 300 pixels per inch (PPI), the image’s dimensions are about 13 inches by 8½ inches. But if you scale the image down further, to about 6 inches by 4 inches, the effective resolution goes up to 645 PPI.
Now, that higher resolution isn’t going to hurt the document or the image or the printing process. But it is going to add to the file size of the PDF document. That’s when it makes sense to apply some downsampling. The numbers in the sampling options are you telling Acrobat, “If an image is over a certain number of pixels per inch, please throw away those extra pixels so that the resolution of the image is a lower amount.” For most professional printing, these settings consist of the following rule: For images over 450 PPI, lower the resolution to 300 PPI.

The final setting is the actual compression that will be applied to the image. This is different from throwing away pixels. It is applying electronic changes to the actual image to make the file smaller. There are several different types of compression. The most common is JPEG compression. This is the compression that creates the blocky images you may have seen on Web pages (and which I illustrated back on in Chapter 8).
The Automatic (JPEG) setting is used for color and grayscale images and automatically applies the best quality for the type of image. If you’re going to apply compression, this is the easiest way to apply it. The JPEG setting uses the specific image quality that has been chosen. Both of the JPEG compression settings are lossy. This means they will result in some loss of the original image data. That is when you need to choose how much of the original image is retained. Choosing a lower quality results in an image that looks less perfect. However, a lower quality image creates a smaller file. The ZIP compression option can be lossy or lossless (no information lost). When you work with images that have large solid areas of color, such as charts and graphs, choose zip compression.
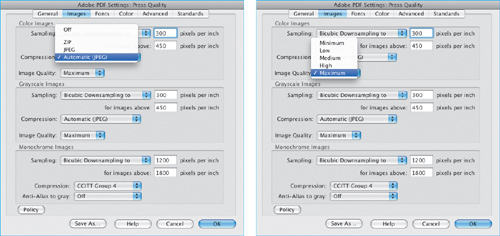
The Compression menu (left) and Image Quality menu (right).
Things are a little different with monochrome or bitmapped images. First, the amount of resolution is much higher. This is because monochrome (1-bit) images are output at a minimum of 1200 PPI. So you throw away pixels (subsample) only when the resolution is above 1800 PPI.
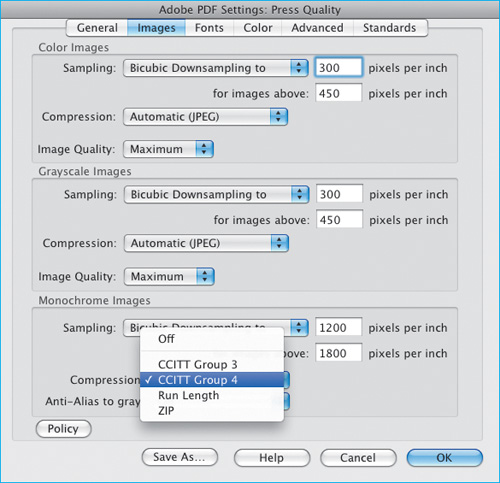
The monochrome Compression menu.
Also, the compression options are different. The CCITT Group 3 option is best for fax images. The CCITT Group 4 setting is the all-purpose setting for print output. Run Length is the best setting for images that contain large areas of solid black or white.
So what’s the best setting for print? That’s easy. Just choose one of the PDF/X presets and you’re good to go. Of course, if your print provider wants other settings, you should always use those options.
As covered in Chapter 18, professional print output will often apply special marks and information around the print area of a file. You may also need to set a bleed for artwork that touches the trim. (See Chapter 4 for an explanation of the a bleed amount.) These settings are controlled using the options in the Marks and Bleeds category of the Save As PDF dialog box.
You should consult with your print provider as to which marks and bleed settings they require. This is one of those areas where the presets for PDF/X won’t help you as they don’t set any marks and bleeds.

The Marks and Bleed and Slug options in InDesign.
In most cases the fonts are automatically embedded in the PDF. Some font designers set an option in their font that prevents it from being embedded. If you use this type of font, tell your your print service provider. As long as they have the font loaded on their computer, they can output your file with no problems.
One of the terms that confuses people is the concept of subsetting fonts. As I mentioned earlier, one of the reasons people use PDF documents is that the font is packaged inside the document. Most likely, you have not used every character contained in the font. For instance, I doubt that you would use the characters for the Japanese yen (¥), a pilcrow (¶), and a double dagger (‡) all in one document.
So do you want to include all the characters in the font, which would add to the file size, or do you want to include just the actual characters that you have used? The actual characters you have used is called the subset of the font.
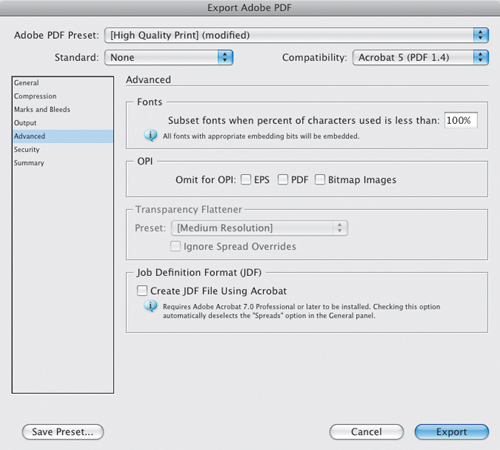
The setting for subsetting fonts in a PDF from InDesign.
When the subset field is set for 100% it means you’d have to use every single character in the font in order to have the entire font embedded in the PDF. Since it’s unlikely you’ve used every single character in the font, the PDF will embed just those characters you’ve used—the subset. This keeps the file size small. If the subset field is set to 0%, you are forcing the PDF to include all the characters in the font. This will make the file size larger.
Why would you want to include every character in the font? Let’s say you subset your fonts, and later need your output provider to edit the PDF. Perhaps they need to change a price from dollars to yen. If you haven’t used the yen sign elsewhere in the document, they won’t be able to make the edit unless they have the font installed on their system.
Most of the other settings for PDF files are far too advanced to go into in this book. However, the best way to apply those options is to ask your print service provider what they require. If you are working all by yourself, choose one of the PDF/X settings or the preset for Press Quality Output. That will give you a setting that shouldn’t mess up your file.

There are many other features and attributes that are possible to include in PDF files. Most of them are not used in professional print production. The following are elements that you shouldn’t include in a PDF that will be output by a print service provider:
Hyperlinks
Movies
Sounds
Annotations
Layers
Tags
Bookmarks
Thumbnails
Layers
Comments