When you go to a print service provider’s Web site or visit them in person, they give you a job form to fill out. If you have never done it before, filling out this form can be intimidating because there are all sorts of strange terms you may not understand. Fortunately, if you’ve read this far in this book, you should be somewhat familiar with the terms.
But since I can’t be with you all the time, let’s fill out a sample form to see what the various topics are all about !

Completing an output specifications form doesn’t have to be a frightening experience. All you’re doing is asking them to print your electronic files in a certain way.
The form is usually divided into two types of information: information about you and information about the job. You should know the information about you, so you’ve already got some of the form filled out!
Although each print service provider has its own particular set of specifications, the following form is fairly standard and should help you understand what is being requested.
Not all print providers will ask for all the following items. Similarly, some print providers may ask for other information. Just remember, you won’t look stupid if you don’t know the answer to a certain item.
Ask questions! Print providers love it when designers ask them questions. It lets them know that you’re willing to work to make sure your job prints correctly.
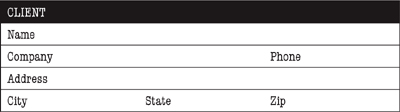
Who’s the client? This simple question is tricky: You may be working for someone you call your client, but as far as the print service provider is concerned, you are their client. So the client information the form is asking for is your name, company, address, etc. Some shops may ask for an office phone number and a cell number because they will most likely be working on your job overnight. So if there are any problems with the file, they would like to be able to contact you after you’ve left your office.
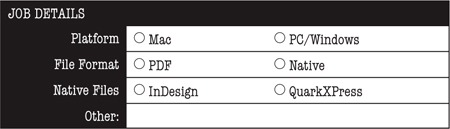
This is simple: The print service provider needs to know what type of files you’re sending them. They want to know the platform that created the file (important for working with fonts), what type of file (native or pdf), and if it’s a native file, what program you used.
The print service provider will also want to know what programs, including version numbers, you used to create the graphics in the file in case there are any problems that require them to open those files.
I’ve seen instructions from one place where they flat out refuse to take anything but the very latest versions of the page layout software. This is astonishing because most designers complain that their print service provider won’t take files from the latest application because they haven’t gotten around to upgrading their software. These are two reasons why you should just send PDF files!
Be aware that some providers won’t take certain programs. For instance, Microsoft Publisher isn’t accepted by many shops. In those cases, you should submit a PDF of your job.
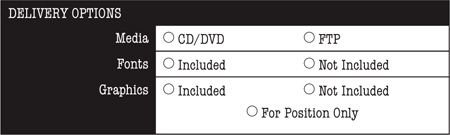
The shop may want to know how the file is coming into their office. For instance, they don’t want to be looking for a CD-ROM disk if you’ve sent the file electronically.
They also need to know if you’ve supplied fonts to go with a native file. If you have, someone will have to load those fonts into their system. Read the license that came with the fonts. If permitted, you can send the fonts along with the file. If not, you’ll need to alert the service provider that you’re using those fonts.
Finally, they may want to know if you’ve sent the graphics separately from the file itself or have embedded them so that they are part of the PDF or native file.
Some shops may ask if your graphics are FPO (For Position Only). What this means is that you have placed low-resolution versions of the scanned images. The print service provider has the high-resolution versions, which they will swap for your FPO placeholders. This is a somewhat outdated workflow, but may still be used by some catalog publishers.

It may seem obvious to you which file you want output, but you might have a page layout file, graphics, illustrations, fonts, and other files in the same folder, and the service bureau has no clue exactly which file (or files) you want output. Write down the exact name of the file. If you need several files output, you should fill out a separate form for each individual file.
The page range is more interesting. If you have a document with several pages, you might not want all those pages to be output. My own opinion is not to send extra pages along with the job. It’s only going to slow down the production people to have to specify exactly which pages you want. Delete the pages you don’t need.
Similarly, if you have certain layers that you don’t want to print, you should delete those layers before you send the job to be output. I wish I could send a multi-layered document to the print shop and have them simply turn on and off the layers I want to hide or show. But I can’t trust the operators to follow my instructions exactly. It is much safer to create multiple versions of a file with just the layers you want to be output.

This is where you start specifying your job. The size of the page is obvious. Remember, this is the size of the trim.
You should remember our discussion of resolution (DPI) as well as the linescreen (LPI) back in Chapter 6. Be aware that there are many different linescreen values. But not all linescreens are available for some resolutions. Check with your print service provider if you are uncertain about filling in these values.
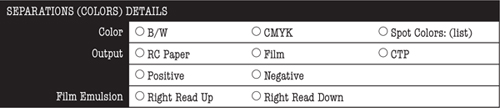
This is where you specify the number and type of colors in your document.
B/W stands for a black-and-white or a one-color job. CMYK is a four-color job. If you have spot colors, you need to indicate them as well as list which colors you expect to see on a separate spot color plate.
The output medium is the material you want the print service provider to give you as output. For instance, you might want your job output onto special paper if you are taking it somewhere else for reproduction.
RC paper: RC stands for resin coated. RC paper is similar to photographic paper. It gives the most consistent black images and crisp edges. It’s beautiful. Many local magazines and newspapers accept black-and-white ads on RC paper.
Film output: Film looks like a sheet of clear acetate. Full-color jobs are almost always output to film. Each color has its own separate piece of film, so a four-color job (cmyk) prints four pieces of film per page; these are the separations. Not many print providers use film. (Seeing it on an order form may just be a leftover from years ago.) If you choose film, you may have to specify whether you want it positive or negative, and whether the emulsion should be up or down (see below).
CTP: CTP stands for computer-to-plate. This process skips creating RC paper or film and goes directly to making a plate. (This is also called direct-to-plate.)
Film is basically transparent until it is exposed. Most film output is exposed as a negative image—the white areas of your document are black in the negative film; the black areas of the document are clear. The print shop needs negatives because of the way plates are made for the press. You might find a print shop that requests positive film, but it’s rare.
The emulsion is the surface of the film that contains the chemicals that react to create the image. Because film is basically transparent and can be viewed from either side, the emulsion is the only way to tell which is the “front.” The emulsion is the dull side; the other side of the film is shiny. Ask your print provider which one they prefer.

The term printer’s marks describes many different types of marks and bits of information that are printed outside the “live” image area. This means the marks will show up on the oversized film or paper output, but they are located outside the “live” area that will be seen in the finished product. The most common of these marks are crop marks and registration marks.
The print service provider does not output your job onto 8½-×-11-inch pieces of paper. They output your pages onto rolls of paper or film that are much bigger than the final size of your project. Because the output is bigger than your document, you can’t tell where the edges are anymore. So we put crop marks at the corners.
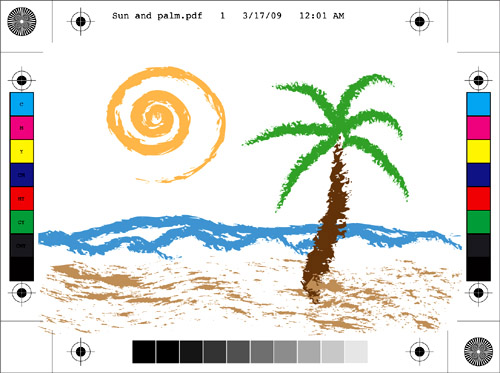
A page with crop marks, registration marks, color bars, and page information. Notice how late it was when I created this art.
It’s unnecessary to draw the crop marks in yourself if the page size of your document is the size of the trim; that is, if your final designed document is 5 × 7 inches and you made a 5 × 7 inches document in your page layout software, then crop marks will automatically be added where they belong. You simply tell the service bureau that you want them and they shall appear. But if your designed document is 5 × 7 inches and the layout page is 8½-×-11-inches, the crop marks will appear at the corners of the 8½-×-11-inch size, not the 5 × 7 inches size! You’ll have to add the 5 × 7 inch crop marks by hand. This is why it is important to create the size of the page as the final trim size.
Registration is the process of aligning each of the separate pieces of film for color projects. The marks look like crosshairs in a rifle scope (shown on the previous page). All four pieces of film are laid over each other, and small pins are placed through the center of the marks to ensure that all the pieces line up correctly and exactly. Some software lets you define registration marks as centered or not centered between the crop marks. Your print shop can tell you which setting they prefer.
Color bars are rectangles of different percentages of the different colors. They are used when the job is on the press to judge the correct percentages of the colors in the file.
The page information adds a line of text with information such as the name of the file and when it was printed. In the case of a PDF, the information shows when the document was created. Without the page information, it would be difficult to tell what the little bits of film are for.
On the off chance that you have applied your own trapping to the document, this setting lets you specify that the traps have already been applied. The alternative to doing the traps yourself is to let the print service provider apply the trapping as part of the print processing. This is called inRIP trapping.
I hope I made it very clear in Chapter 16: You really shouldn’t try to apply trapping yourself. Really!
Way back in Chapter 4, I covered why you set a bleed area around a document. This setting in the output form simply instructs the print service provider if you forgot to set the bleed and would like them to do it for you.

You may request some sort of color proof along with your output. The different types of proofs are described in detail in Chapter 20.

This is simple: The print service provider needs to know if you’re going to come and pick up the job or if you want it sent to you. If you need it sent, they need your address; if you’re going to come pick it up, they’ll hold it for you. You can also ask them to call you when the job is complete.