
Chapter 5
Working with Views
In This Chapter
![]() Adding speed and movement with Views
Adding speed and movement with Views
![]() Creating a Room to work with Views
Creating a Room to work with Views
![]() Moving the View with a controller Object
Moving the View with a controller Object
![]() Checking when the Object reaches the top of the Room
Checking when the Object reaches the top of the Room
![]() Placing a score display in a Room with a View
Placing a score display in a Room with a View
![]() Keeping your player’s plane from flying off the boundaries of the View
Keeping your player’s plane from flying off the boundaries of the View
![]() Destroying an Instance when it leaves a Room
Destroying an Instance when it leaves a Room
![]() Guiding bullets toward a target
Guiding bullets toward a target
![]() Creating enemy planes in a Room with a View
Creating enemy planes in a Room with a View
![]() Arranging enemy planes in a Room
Arranging enemy planes in a Room
![]() Moving on to the next Room
Moving on to the next Room
In this chapter, I introduce the concept of working with Views in your game. The basic concept of working with Views is that only a portion of the Room is seen at any given time. You set it up so that the Room actually moves down the screen along with Objects that you manually place in the Room.
For an example on how to use Views, I refer to the in-software tutorial Scrolling Shooter. In this tutorial, you begin by creating a background that moves down the screen to give an appearance of a scrolling background. All the enemies, islands, and so forth are randomly generated in the initial version of the game. In contrast, while working with Views, the Room itself actually moves down the screen, and the enemies and islands are manually placed in the Room instead of being randomly generated. This chapter focuses on creating a game with a View.
Using Speed and Movement with Views
When working with Views, keep in mind that it is the View that has speed and moves, which affects what the player sees on his screen. Therefore, some Objects, such as the planes from the Scrolling Shooter tutorial, will have a vertical speed (to stay in view and not be dragged off the screen as the View moves), and other Objects, such as the islands, will not have speed (so that they move along with the View, and are dragged off the screen).
 The Room doesn’t move; it’s the View that moves. In that sense, the Room coordinates are absolute, while the View coordinates for Instances are relative to their position within the Room.
You may want to complete the first part of the in-software Scrolling Shooter tutorial so that you have all the Objects mentioned in the following procedures ready to go.
To add speed to an Object, follow these steps:
- Create an Object, such as the plane from the Scrolling Shooter tutorial, by choosing Resources⇒Create Object (see Chapter 2).
- Choose Add Event⇒Create.
The Choose the Event to Add menu appears.
- Choose Create from the Choose the Event to Add menu.
The Create Event appears in the Events section.
 Drag and drop the Vertical Speed Action from the Move tab into the Actions section (see Chapter 4).
The Speed Vertical window, shown in Figure 5-1, appears.
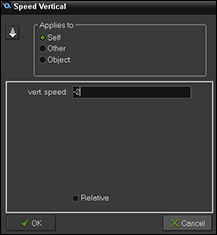
Figure 5-1: The Speed Vertical window.
- In the Speed Vertical window, enter –2 in the Vert. Speed field.
A negative speed allows the Object to move up the Room; a positive speed allows the Object to move down the Room.
- Click OK to save and close the Speed Vertical Action.
Rooms, Views, and the screen are separate entities. For example, the View can rotate, so an Instance can still move down the Room, but it will appear to be moving across the screen (because the View was rotated).
Now that the plane has some speed, you need to add speed to the Object you’re using for the bullet. You do this in a similar fashion as you did with the Vertical Speed Action. To add speed to the player’s bullets, follow these steps:
- Open obj_mybullet (the Object you want to use for the bullet) from the Resource tree (see Chapter 2).
This Object was created as part of the Scrolling Shooter tutorial.
The Object Properties window opens.
- Choose Add Event⇒Create (if the Create Event doesn’t already exist).
The Create Event appears in the Events section of the Object Properties window.
 Drag and drop the Vertical Speed Action from the Move tab into the Actions section.
The Vertical Speed window appears.
- Enter –16 in the Vert. Speed field.
You want the bullet to move much faster than the plane.
- Click OK in the Vertical Speed window.
The Vertical Speed window saves and closes.
- Click OK in the Object Properties window.
The Object Properties window saves and closes.
Creating a Room with a View
When you create a Room to work with Views, you should do some planning ahead of time. Here are some questions to consider:
- How long and wide do you want the Room to be?
- How long do you want this level of the game to be?
For example, you can have several Rooms in each game, and each Room can represent a level of your game. Therefore, each Room needs to be sized so that it’s big enough (plays long enough) so that you can incorporate each aspect of the level that you want.
Think of it this way: The Room can be a long, skinny column that appears to move down the screen. Only a certain portion of the Room — say, the bottom one-tenth — is seen at any one time. You then place Instances of Objects into the Room. For example, you can place a squadron of enemy planes directly outside the visible portion of the Room, so that they appear shortly after the start of the game.
To create a Room, follow these steps:
- Right-click Rooms from the Resource tree.
A submenu appears.
- From the submenu, choose Create Room.
The Room Properties window appears.
- Click the Settings tab, shown in Figure 5-2.
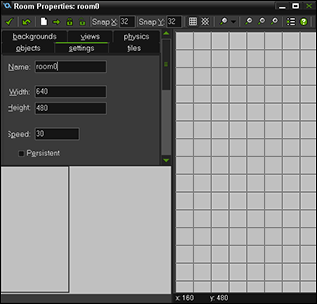
Figure 5-2: The Settings tab.
- In the Name field, enter the name you want for the Room.
For example, you may enter Level_1.
- In the Width field, enter 640; in the Height field, enter 4800; and in the Speed field, enter 30.
- Click the Backgrounds tab, shown in Figure 5-3.

Figure 5-3: The Backgrounds tab.
- Deselect the Draw Background Color check box.
- Select a background image, such as Background 0, from the Scrolling Shooter tutorial.
- Select the Tile Hor. and Tile Vert. check boxes.
- Click the Objects tab, shown in Figure 5-4.
- Select an Object, such as the player’s plane (refer to Figure 5-4).
- Click near the bottom of the Room, for example, where you see the plane in Figure 5-4.
An Instance of the Object appears in the Room.
- Click the Views tab, shown in Figure 5-5.
- Select the Enable the Use of Views check box.
- Select the Visible When Room Starts check box.
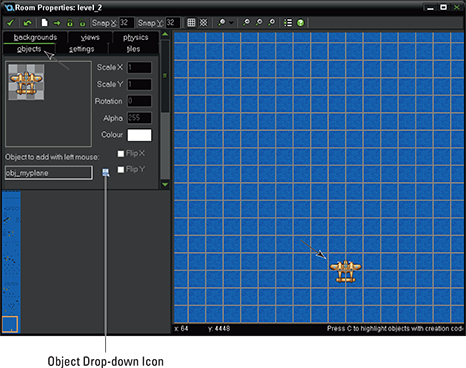
Figure 5-4: The Objects tab.
- In the View in Room area, enter 4320 in the Y field.
You can leave the default settings for X, W, and H.
These fields indicate the dimensions of the Room that is visible: Y for the top border; X for the left border; W for the right border; and H for the bottom border.
When you have your View configured, you can see the area of the View as indicated by a thin, white border that appears on the Room grid (refer to Figure 5-5). - Click the green check mark from the icon menu.
The Room Properties window saves and closes.
If you want to see what you just created, you can run the game now to watch your plane fly up and leave the play area (I show you how to stop the plane from leaving the view later in this chapter).
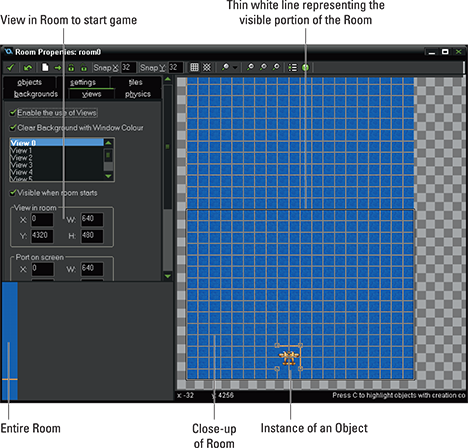
Figure 5-5: The Views tab.
Using a Controller Object to Move the View
You come back later to the Room to add in the enemy planes and the islands. But first, you need to create a controller Object to make the View move with a constant speed.
To create the controller Object, follow these steps:
- Create a new Object by choosing Resources⇒Create Object (see Chapter 2).
The Object Properties window appears.
- In the Name field, type controller_Object.
- Choose Add Event⇒Step⇒Step.
A step Event appears in the Events section.
- Click the Control tab.
 Drag and drop the Set Variable Action from the Move tab into the Actions section (see Figure 5-6).
The Set Variable window, shown in Figure 5-6, appears.
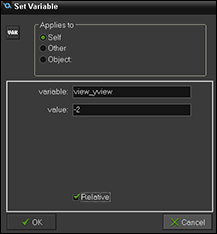
Figure 5-6: The Set Variable window.
- Enter view_yview in the Variable field and –2 in the Value field, and select the Relative check box.
You just set a variable called view_yview and set the value to –2. Now, for each step of the game, the position of the View moves 2 pixels upward, which creates a scrolling effect.
Reaching the End of the Room
Now you need to add a check to see when the Object (the player’s plane) reaches the top of the Room (Y < 0). Then the game should either stop or move on to the next level.
To add the check when an Object reaches the end of the Room, follow these steps:
 In the Step Event of the controller Object (see the previous procedure), drag and drop the Test Variable Action from the Control tab into the Actions section.
The Test Variable Action properties appear.
- In the Applies To section, select the Object radio button.
You can now choose, via a drop-down list, which Object you want this Action to apply to.
- Click the Object drop-down list and choose the Object you want to test, such as the Object for the player’s plane.
The Object field populates with the name of the Object you chose.
- In the Variable field, type y.
- In the Value field, type 1 (or where in the Room you want to end the game or move on to the next Room).
- For the Operation field, click to open the Operation drop-down list and choose Less Than.
 GameMaker uses floating point values, which means the Y position may never actually hit 0. For example, the Y position may be 0.00000015. Therefore, you want to make sure to configure the Y value to less than the value of 1.
  Drag and drop the Display Message Action from the Main2 tab into the Actions section.
The Display Message Action properties window appears.
- In the Message field, type End Room.
- Click OK to save and close the Action.
The Step Event should now look like Figure 5-7 and should provide a good test to see if everything is working. Later in this chapter, I show you how to update the Step Event so that the player moves on to another Room when he finishes the current Room.
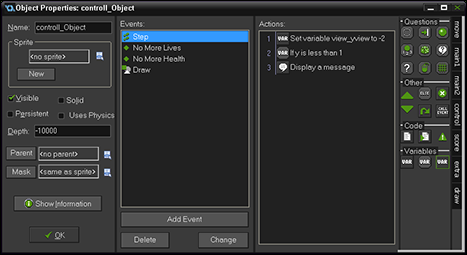
Figure 5-7: The Step Event configured to move the Room and check to see when the player reaches the end of the Room.
Positioning the Score Display in a Room with a View
To display the score in a Room with a View, follow these steps:
- Open the controller Object from the previous sections, or create a new Object by choosing Resources⇒Create Object (see Chapter 2).
- In the Name field, type controller_Object (if not already).
- Choose Add Event⇒Draw⇒Draw.
A Draw Event appears in the Events section.
 Drag and drop the Draw Sprite Action from the Draw tab into the Actions section.
The Draw Sprite Action properties window appears.
- In the Applies To section, select the Self radio button.
- For the Sprite field, click the Sprite drop-down list and choose spr_status (choose an appropriate Sprite).
- In the X field, type 0.
- In the Y field, type view_yview[0] + view_hview[0] – 76.
View variables are arrays, and as such, you should always use the View number when referring to them. However, GameMaker automatically selects view[0] when the array is not implicitly shown.
- In the subimage field, type –1.
- Click OK to save and close the Action.
Now you need to add a Draw Score Action to the controller Object, by following these steps:
 Drag and drop the Draw Score Action from the Score tab into the Actions section.
The Draw Score Action properties window appears.
- In the X field, type 230.
- In the Y field, type view_yview[0] + 417.
- Click OK to save and close the Action.
Now you need to add a Draw Life Images Action to the controller Object, by following these steps:
 Drag and drop the Draw Life Images Action from the Score tab into the Actions section.
The Draw Life Images Action properties window appears.
- In the X field, type 175.
- In the Y field, type view_yview[0] + 439.
- For the Image field, click to open the Image drop-down list and choose spr_life (or whatever Sprite you want to represent the number of lives the player has left).
- Click OK to save and close the Action.
Now you need to add Draw Health Action to the controller Object, by following these steps:
 Drag and drop the Draw Health Action from the Score tab into the Actions section.
The Draw Health Action properties window appears.
- In the X1 field, type 12.
- In the Y1 field, type view_yview[0] + 449.
- In the X2 field, type 138.
- In the Y2 field, type view_yview[0] + 459.
- For the Back Color field, click to open the Back Color drop-down list and choose None.
- For the Bar Color field, click to open the Bar Color drop-down list and choose Green to Red.
- Click OK to save and close the Action.
 Place an Instance of the controller Object in the Room. In Chapter 2, I provide more detail on how to do this, but here’s a quick refresher: Open the Room from the Resource tree. In the Room Properties window, click the Objects tab. Open the submenu with the list of Objects, and choose your controller Object. Then click anywhere in the Room to place an Instance of the controller Object in the Room (it will appear as a blue circle with a question mark inside of it).
Setting Object Boundaries for Rooms with Views
Currently, the player’s plane can fly right off the top and bottom of the screen. You probably don’t want that to happen in your game, so to prevent that, you’ll want to set up a Test Variable Action.
To set the top vertical boundary for an Object, follow these steps:
- With your Object (for example, obj_myplane) open, choose Add Event⇒Keyboard⇒<up>.
The Keyboard Event for Up appears in the Events section.
 Drag and drop the Test Variable Action from the Control tab into the Actions section.
The Test Variable Action properties window appears.
- In the Applies To section, select the Self radio button.
- In the Variable field, type y.
- In the Value field, type view_yview[0] + (sprite_height / 2).
- In the Operation field, open the submenu and choose Greater Than.
- Click OK to save and close the Action.
 Drag and drop the Jump to Position Action from the Move tab to the Actions section.
The Jump to Position Action properties window appears.
- In the Applies To section, select the Self radio button.
- In the X field, leave the default at 0.
- In the Y field, type –4.
- Select the Relative check box.
- Click OK to save and close the Action.
Now, GameMaker will run a test to see if the player moves the plane to a height greater than the relative yview of the Room. If the Instance reaches a height greater than the height of the yview, the Instance performs the next Action after the Test Variable Action, which is the Jump to Position Action. The Jump to Position Action moves the Object down by 4 pixels to keep it within view of the player.
It’s a good idea to run Test Variable Actions to see if the Instance of the Object hits the bottom, left, and right boundaries, as well as the top. The following procedure shows you how to test for the bottom boundaries.
To set the bottom vertical boundary for an Object, follow these steps:
- Choose Add Event⇒Keyboard⇒<down>.
The Keyboard Event for Down appears in the Events section.
 Drag and drop the Test Variable Action from the Control tab into the Actions section.
The Test Variable Action properties window appears.
- In the Applies To section, select the Self radio button.
- In the Variable field, type y.
- In the Value field type view_yview[0] + view_hview[0] – (sprite_height / 2) – 76.
- For the Operation field, click to open the Operation drop-down list and choose Less Than.
- Click OK to save and close the Action.
 Drag and drop the Jump to Position Action from the Move tab into the Actions section.
The Jump to Position Action properties window appears.
- In the Applies To section, choose the Self radio button.
- In the X field, leave the default at 0.
- In the Y field, type 4.
- Select the Relative check box.
- Click OK to save and close the Action.
Now, your Object should stop moving when it reaches both the top and bottom boundaries. You can also use this procedure for Left and Right Keyboard Events:
- To set the right boundary: Create a Right Keyboard Event. In the Test Variable Action, type x in the Variable field; type room_width-40 in the Value field; and in the Operation field, choose Less Than. In the Jump to Position Action, type 4 in the X field and leave Y at 0.
- To set the left boundary: Create a Left Keyboard Event. In the Test Variable Action, type x in the Variable field; type 40 in the Value field; and in the Operation field, choose Greater Than. In the Jump to Position Action, type –4 in the X field and leave Y at 0.
In Step 5 of the last two procedures, you used the code, (sprite_height / 2). This code is in relation to the Origin of the Sprite, as discussed in Chapter 2, which is the center of the Sprite. If you didn’t include this bit of code, half the Sprite would disappear before the Test Variable was triggered to run the Jump to Position Action.
Destroying Instances When They Leave a Room
If your game involves bullets, or any other Object that you want destroyed when it leaves the Room, the following procedure was made just for you!
To destroy an Instance when it leaves the Room, follow these steps:
- Open the Object you want destroyed when it leaves the Room.
You can do this from the Resource tree.
- Choose Add Event⇒Other⇒Outside Room.
The Outside Room Event appears in the Events section.
 Drag and drop the Destroy Instance Action from the Main1 tab to the Actions section.
The Destroy Instance Action properties window appears.
- In the Applies To section, you can leave the Self radio button selected.
- Click OK to save and close the Action.
Now, Instances of the Object that leave the Room will be destroyed.
Shooting Guided Bullets in a Room with Views
If you want the enemy to have bullets that can track other Instances in the Room (say, the player), and you’re using Views, you need to use certain values for the targeting to work. I call these types of bullets guided bullets. In the following procedure, I show you how to add guided bullets to an enemy plane Object.
To create a guided bullet in a Room with a View, follow these steps:
- Create a new Object by choosing Resources⇒Create Object.
The Object Properties window appears.
- In the Name field, type, say, obj_enemy_bullet.
- Choose Add Event⇒Create Event.
A Create Event appears in the Events section.
 Drag and drop the Test Instance Count Action from the Control tab into the Actions section.
The Test Instance Count Action Properties window appears.
- For the Object field, click to open the Object drop-down list and choose the Object that you want to test for.
For example, if you want the enemy to shoot at the player, choose the player Object.
- In the Number field, type 1.
This tests that there is at least one Instance of the assigned Object in the Room. You can’t have the enemy shooting at a player if an Instance of the player Object is not in the Room (for example, if it has already been destroyed).
- For the Operation field, click to open the Operation drop-down list and choose Equal To.
There needs to be one Instance of the Object in the Room. If there is, then GameMaker moves on to the next Action.
 If you tell GameMaker to reference a variable that doesn’t exist (for example, to follow an Object that doesn’t exist), an error will occur and the game could crash. That’s why it’s important to test to make sure at least one Instance of the Object exists.
  Drag and drop the Move Towards Action from the Move tab to the Actions section.
The Move Towards Action properties window appears.
- In the Applies To section, select the Self radio button.
- In the X field, type, say, obj_myplane.x.
Use the name of the Object that you want the bullet to chase after.
- In the Y field, type, say, obj_myplane.y.
Use the name of the Object that you want the bullet to chase after.
- In the Speed field, type 8.
- Click OK to save and close the Action.
You’ve now created a guided bullet Object that will track the player’s plane. To apply this bullet to an Object, such as an enemy plane that will shoot it, check out the next section.
Creating Enemy Planes in a Room with Views
In this section, I show you how to create enemy planes that work in a Room with a View. A couple of the attributes that you create include destroying the planes when they leave the Room and destroying all the bullets, such as the guided bullet described in the previous section, when they leave the Room. After you create the enemy planes, I show you how to add these planes to the Room.
To create enemy planes, follow these steps:
- Create a new Object by choosing Resources⇒Create Object.
The Object Properties window appears.
- In the Name field, type, say, enemy_plane.
- Choose Add Event⇒Step Event.
A Step Event appears in the Events section.
 Drag and drop the Comment Action from the Control tab into the Actions section.
The Comment Action properties window appears.
- In the comment field, type something such as Check in View.
This is solely for your reference as you’re working. Comments are a great reminder of the Actions that follow.
- Click OK to save and close the Action.
Now you need to add a Test Variable Action to the enemy plane Object.
 Drag and drop the Test Variable Action from the Control tab into the Actions section.
The Test Variable Action properties window appears.
- In the Applies To section, select the Self radio button.
- In the Variable field, type y.
- In the Value field, type view_yview[0]–32.
- For the Operation field, click to open the Operation drop-down list and choose Less Than.
- Click OK to save and close the Action.
You just set a Test Variable to see if an Instance of the Object is not within the View based on the Y coordinate. If it isn’t within the View, the next Action is triggered.
Now you need to add an Exit Event Action and a Test Variable Action to the enemy plane Object.
 Drag and drop the Exit Event Action from the Control tab into the Actions section.
The Exit This Event Action appears in the Actions section. There is nothing to set for this Action. This is the next Action that is performed if the Test Variable Action is triggered. If the Test Variable Action is triggered, the Exit Event Action is triggered, which means no more Actions will be triggered for this Event (until the Test Variable stops being triggered and the Exit Event Action is not triggered as a result).
 Drag and drop the Test Variable Action from the Control tab into the Actions section.
The Test Variable Action properties window appears.
- In the Applies to section, select the Self radio button.
- In the Variable field, type y.
- In the Value field, type view_yview[0]+480.
You just set a Test Variable to see if an Instance of the Object is not within the View based on the Y coordinate. If it isn’t within the View, the next Action is triggered.
- For the Operation field, click to open the Operation drop-down list and choose Greater Than.
- Click OK to save and close the Action.
 Drag and drop the Exit Event Action from the Control tab into the Actions window.
The Exit This Event Action appears in the Actions section and operates the same as in Step 1.
 Drag and drop the Comment Action from the Control tab into the Actions window.
The Comment Action properties window appears.
- In the Comment field, type something such as In View, so do the next Action.
- Click OK to save and close the Action.
You just created a comment that reminds you what the following group of Actions will do when triggered, which is that the Object is currently within view and the following Actions should trigger.
Now you need to add a Speed Vertical Action to the Object.
 Drag and drop the Speed Vertical Action from the Move tab into the Actions window.
The Speed Vertical Action properties window appears. This is the Action that is triggered when the first two Test Variable Actions are not triggered due to the Instance being within view.
- In the Vert. Speed field, type 2.
- Click OK to save and close the Action.
The Instance of the Object will now have speed and movement.
Now add a Test Variable Action to the Object.
 Drag and drop the Test Variable Action from the Control tab into the Actions section.
The Test Variable Action properties window appears.
- In the Applies To section, select the Self radio button.
- In the Variable field, type y.
- In the Value field, type view_yview[0]+480.
- For the Operation field, click to open the Operation drop-down list and choose Greater Than.
You just set a test to see if the Instance leaves the visible portion of the Room. If it does, then the next Action is performed.
- Click OK to save and close the Action.
Next, add a Destroy Instance Action to the Object.
 Drag and drop the Destroy Instance Action from the Main1 tab into the Actions section.
The Destroy Instance Action properties window appears.
- In the Applies To section, select the Self radio button.
- Click OK to save and close.
The Instance will now be destroyed if it leaves the Room, based on the Test Variable Action you set earlier.
 Drag and drop the Test Chance Action from the Control tab into the Actions section.
The Test Chance Action properties window appears.
- In the Sides field, type 80.
- Click OK to save and close the Action.
You just created a chance variable that will trigger the next Action with a dice roll’s chance of 1 out of every 80. That is, for every step of the game, GameMaker will roll an 80-sided die to determine if the next Action is triggered. If you want the next Action to be triggered more often (you want the enemy to shoot more often), lower this value, from 80 to, say, 20.
Now, add a Create Instance Action to the Object.
 Drag and drop the Create Instance Action from the Main1 tab into the Actions section.
The Create Instance Action properties window appears.
- In the Applies To section, select the Self radio button.
- For the Object field, click to open the Object drop-down list and choose, say, obj_enemy_bullet (the name of the Object that you want created, such as the guided bullet described in the previous section).
- In the X field, type 0.
- In the Y field, type 0.
- Select the Relative check box.
- Click OK to save and close the Action.
You just created an Action that creates a bullet (obj_enemy_bullet).
Your Step Event for the enemy plane should look like Figure 5-8.
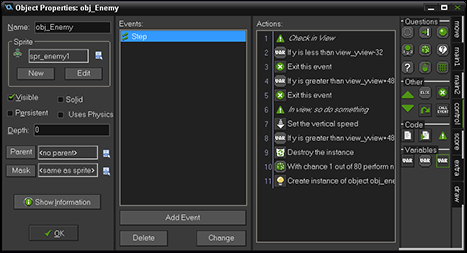
Figure 5-8: The Step Event for the enemy plane.
The enemy plane will now be destroyed if it leaves the View. Also, it won’t start to move until it enters the View. Plus, it has a sweet guided bullet tracking system set on full destruction of the player. (Insert evil laugh here.)
Creating Patterns of Enemy Planes in a Room with Views
When using Views, you place the enemy planes in the Room, one by one, to form very cool formations. This is where you can let your imagination run wild in coming up with different patterns to challenge the player. The following procedure steps you through this process.
To add the enemy planes in your Room with a View, follow these steps:
- Open (or create) the Room from the Resource tree (see Chapter 2).
The Room Properties window appears.
- Click the Objects tab.
- Select an enemy plane Object.
- Click in the Room near where the player starts.
When you click in the Room, you place an Instance of the Object that you selected.
- Scroll up the Room, outside the visible portion of the view, select a higher-level (tougher) enemy Object, and add a few Instances in the Room.
- Continue adding different enemy types in the Room so that there are plenty of targets for the player to shoot at and avoid.
- Add Instances of the different island types as well.
- Click the green check mark to save and close the Room Properties window.
You now have a Room filled with enemy planes ready for the player to shoot out of the sky.
Transitioning to the Next Room
For this section, I assume that you have at least two Rooms created. If you have two Rooms ready to go, you’re ready to create a transition between Rooms.
Earlier in this chapter, I show you how to set up a message to display End Room when the player reached the end of the Room. Here, I show you how to update those Actions to transition to the next Room after the player clicks the message box to move on to the next Room.
To transition the player to the next Room, follow these steps:
- Open the properties for your controller Object (or create a new Object by choosing Resource⇒Create Object).
The Object Properties window appears.
- In the Name field, type a name for your Object — for example, controller_object.
- Choose Add Event⇒Step⇒Step (or select the Step Event if it already exists).
A Step Event appears in the Events section.
 Drag and drop the Start Block Action from the Control tab to the Actions section so that it’s above the Display Message Action (if you have one).
The Start of a Block Action appears in the Actions section. There is nothing for you to configure here. For more information on this Action, and all Actions, see Chapter 4.
 Drag and drop the Next Room Action from the Main1 tab to the Actions section.
The Go to Next Room Action appears in the Actions section. There is nothing for you to configure here. For more information on this Action, and all Actions, see Chapter 4.
 Drag and drop the End Block Action from the Control tab to the Actions section.
The Go to Next Room Action appears in the Actions section. There is nothing for you to configure here. For more information on this Action, and all Actions, see Chapter 4.
You just set up a Step Event, with a series of Actions that will trigger when the Y coordinate of the player’s plane reaches the end of the Room. The Step Event should look like Figure 5-9.
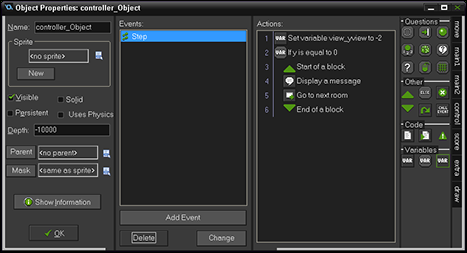
Figure 5-9: A Step Event with a code block for transitioning to the next Room.
If you want to keep the Display a Message Action (you set this up earlier, in the “Reaching the End of the Room” section) to indicate to the player that she reached the end of the Room, you can click and drag that Action, from within the Actions section, into the code block (refer to Figure 5-9).
You now have a game with two different levels that the player can advance through as she completes a Room. The player’s score carries over to the next Room because score is a global variable and will be relative no matter which Room the player is in.