
Chapter 6
Working with Time Lines
In This Chapter
![]() Creating a Time Line
Creating a Time Line
![]() Using Objects with Time Lines
Using Objects with Time Lines
![]() Placing a Time Line Object in a Room
Placing a Time Line Object in a Room
![]() Introducing a boss battle
Introducing a boss battle
In this chapter, I show you how to create a Room using a Time Line, which you can then use as a level in your game. I conclude the chapter by providing an example of how to create a boss battle.
I’m particularly proud of the boss battle tutorial, because I came up with it on my own after finishing the in-software Scrolling Shooter tutorial (you can find tutorials within GameMaker from the New Project window). As I was teaching myself how to create the boss battle, my research showed me how to perform certain Actions through code instead of using the drag-and-drop Action icons. Later, I learned that I could perform those Actions I coded by hand by using the drag-and-drop Actions. It just goes to show that there are multiple ways to perform the same Actions — by using code or by using the drag-and-drop Action icons. GameMaker is such a flexible tool that you can mix and match handwritten code (through an Execute Code Action; see Chapter 4) and the Action icons within the same Events.
When using Time Lines, you need to become familiar with how X and Y coordinates work, which is how you place Instances of Objects in the Room. At first, using Time Lines may seem like an arduous task of determining X and Y coordinates as opposed to placing the Instances in the Room by hand (as you do when using Views; see Chapter 5). However, after you’ve set up an enemy fleet of planes, the Time Line provides an extremely flexible way to quickly change when the enemy planes appear by simply updating the Step number. When you manually place the planes using Views, you have to go back and select each plane and then move them up and down the Room to change when they appear. There are trade-offs to each method — you’ll learn through experience when it’s the best time to use the different techniques.
Creating a Time Line
Using Time Lines to create and control enemy behavior gives you significant control over how your game plays. The in-software Scrolling Shooter tutorial begins by showing how to create a game using a random generator for the enemy planes. This creates a challenging game in that it continuously gets harder over time, but there are problems with that approach, such as planes overlapping each other. Time Lines can help solve that problem.
When you use Time Lines, you present the player with the same pattern of enemy planes each time they play the game. It provides players with an opportunity to learn the game, so they can play it better over time. This gives players a sense of satisfaction — which is important, because they’ll want to continue playing your game!
When working with Time Lines, you use Time Line resources; within each Time Line resource, you specify a number of Moments in time (measured in steps of the game); and for each Moment, you create an Action. In this tutorial, you create Time Line resources that control when enemy planes appear. The planes should be destroyed when they leave the Room and not reappear.
 Just like with creating a Sprite, Object, or Sound, there are multiple ways to create a Time Line. You can do so from the main menu (Resources⇒Create Time Line), from the icon menu, or by right-clicking Time Lines from the Resource tree and choosing Create Time Line.
When you create a Time Line, you work with the Time Line Properties window, which looks similar to the Object Properties window. You can name the Time Line, you can add Moments (as compared to Events when working with Objects), and to those Moments you drag and drop Actions from the tabs (see Figure 6-1).
To create a Time Line, follow these steps:
- From the main menu, choose Resources⇒Create Time Line.
The Time Line Properties window appears.
- In the Name field, type a name for this Time Line, such as level_one.
The name appears in the Name field.
- Choose Add (found directly below the Name field).
The Adding a Moment dialog box appears (see Figure 6-2).
 A Moment is measured in steps, so if you enter 1 in the Adding a Moment dialog box, the Actions you assign to this Moment will trigger at the first step of the game.
Figure 6-1: The Time Line Properties window.
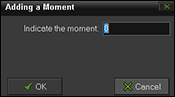
Figure 6-2: The Adding a Moment dialog box.
- In the Indicate the Moment field, leave the default value of 0.
- Click OK to save and close the Adding a Moment dialog box.
Step 0 appears in the Moments column of the Time Lines Properties window.
 From the main1 tab of the Time Lines Properties, drag and drop a Create Instance Action into the Actions section.
The Create Instance Action properties window appears (see Figure 6-3).
- In the Applies To section, select the Self radio button.
- From the Object drop-down list, select the Object you want, such as enemy_plane.
The name of the Object appears in the Object field.
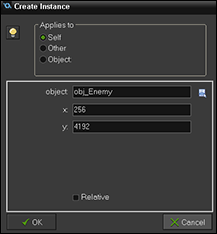
Figure 6-3: The Create Instance Action properties window.
- In the X field, type 256.
You can get the X and Y coordinates from the Room, which you create next.
- In the Y field, type 4192.
- Leave the Relative check box deselected.
- Click OK to save and close the Create Instance dialog box.
The Action is listed in the Actions section of the Time Line Properties window (see Figure 6-4).
You can have more than one Action per Moment if you want more than one thing to happen at a time during your game. In the next procedure, I show you how to create a second Moment in the Time Line that has more than a single Action.
To add more Moments in the Time Line, to trigger additional enemy planes to appear during the game, follow these steps:
- In the Time Line Properties window, click Add.
The Adding a Moment dialog box appears.
- In the Indicate a Moment field, type 50.
It takes approximately 100 steps in the game for an enemy plane to travel down the Room (based on the Scrolling Shooter tutorial).
- Click OK to save and close the Adding a Moment dialog box.
The new Moment appears in the Moments section of the Time Lines Properties window.
 From the main1 tab of the Time Lines Properties, drag and drop a Create Instance Action to the Actions section.
The Create Instance Action properties window appears.
- In the Applies To section, select the Self radio button.
- From the Object drop-down list, select the Object you want, such as, enemy_plane_2.
Try placing different types of enemies in the game, such as enemies that don’t shoot, those that do shoot, and others that can shoot bullets that track the player. You can find examples of this in Chapter 5.
The name of the Object appears in the Object field.
- In the X field, type 128.
You can get the X and Y coordinates from the Room, which you create next.
- In the Y field, type 4000.
- Leave the Relative check box deselected.
- Click OK to save and close the Create Instance Action properties window.
The Create Instance Action appears in the Actions section of the Time Lines Properties window.
 From the main1 tab, drag and drop a Create Instance Action into the Actions section of the Time Lines Properties window.
The Create Instance Action properties window appears.
- In the Applies To section, select the Self radio button.
- From the Object drop-down list, choose, for example, enemy_plane_1.
The name of the Object appears in the Object field.
- In the X field, type 544.
You can get the X and Y coordinates from the Room, which you create next.
- In the Y field, type 4000.
- Leave the Relative check box deselected.
- Click OK to save and close the Create Instance Action properties window.
The Create Instance Action appears in the Actions section of the Time Lines Properties window.
Now you should have two Moments defined in your Time Line: one Moment at Step 0, which creates an Instance of a single enemy plane, and a second Moment at Step 50, which creates two enemy planes flying on either side of the Room (see Figure 6-4). Before you can test the Time Line, you need to create a new Room and an Object for the Time Line.
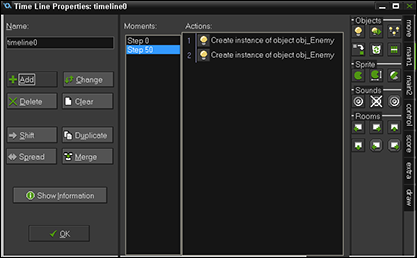
Figure 6-4: The Time Line should have two Moments, each with Actions.
Creating a Time Line Object
In this chapter, I show you how to build a Time Line that you then place in a Room. You can think of the levels in your game as a different Room that contains a different Time Line. In that sense, you can create multiple Time Lines within multiple Rooms that the player can transition to as they complete each level. I show you how to do the transitioning later, but for now, I show you how to create a new Room and an Object for a Time Line.
When making a game with multiple rooms, GameMaker makes it easy for you to duplicate a Room and then remove all Instances from that duplicated Room so that you can start fresh, but with the same Room parameters. To remove all Instances from a Room, choose the icon that looks like a white rectangle from the icon menu while in the Room Properties window, as shown in Figure 6-5.
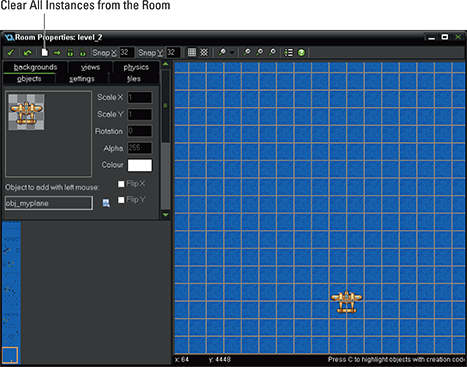
Figure 6-5: The Clear All Instances from the Room icon in the Room Properties window.
To create an Object for the Time Line, which you’ll place in the Room, follow these steps:
- From the main menu, choose Resources⇒Create Object.
The Object Properties window appears.
- In the Name field, type in, say, obj_timeline.
- Choose Add Event⇒Create.
A Create Event appears in the Events section.
 From the main2 tab, drag and drop a Set Time Line Action into the Actions section.
The Set Time Line Action properties window appears (see Figure 6-6).
- In the Applies To section, select the Self radio button.
- From the Time Line drop-down list, select, say, TimeLine0.
- In the Position field, leave the default at 0.
- From the Start drop-down list, choose Start Immediately.
- From the Loop drop-down list, choose Don’t Loop.
- Choose OK to save and close.
The Set Time Line Action properties window is saved.

Figure 6-6: The Set Time Line Action properties window.
You’ve created an Object for the Time Line you created earlier. You can place an Instance of this Object in a Room, so that your Time Line is triggered during the game. In the next section, I show you how to create a new Room in which you can place your Time Line Object.
Creating the Time Line Room
To get your Time Line to trigger during a game, you need to place an Instance of a Time Line Object (see the preceding section) into a Room. To create a Room for a Time Line Object, follow these steps:
- From the main menu, choose Resources⇒Create Room.
The Room Properties window appears.
- Select the Settings tab, and in the Name field, type a name for the Room, such as Level_One (see Figure 6-7).
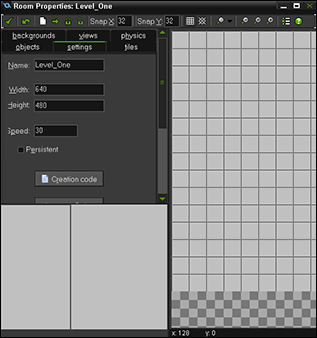
Figure 6-7: The Settings tab of the Room Properties window.
- Select the Objects tab.
- Adjust the grid so that you see the bottom of the Room, by clicking and dragging in the bottom-left section of the Room Properties window (see Figure 6-8).
The Room is represented by a square grid on a gray background (unless you replaced it with a background image), and you’ll see a transparency pattern behind that (refer to Figure 6-8).
- From the left side of the Room Properties window, click the drop-down icon indicated in Figure 6-8, and select, say, obj_timeline.
The name of the Object appears in the field.
- To place an Instance of the Object in the Room, click the grid that represents the Room.
A blue circle with a question mark appears in the Room where you clicked (refer to Figure 6-8). The blue circle is shown because you didn’t load a Sprite to the Object. This blue circle doesn’t actually appear in the game.
- Click the green check mark on the icon bar (refer to Figure 6-8).
The Room Properties window saves and closes.
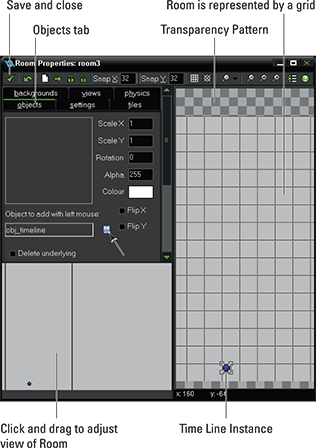
Figure 6-8: The Objects tab of the Room Properties window.
Now is an excellent time to test your game. You should see the enemy planes appear as you configured the Time Line.
At this point, you can go back to your Time Line and add more Moments with additional Objects (enemy planes and islands). Now that you have a Room set up, you can reference the X and Y coordinates to help you plan formations and so forth for the enemy planes.
If you decide you want to change when a Moment happens — say, you want more enemy planes to show up sooner — you can easily do that by changing the Step number. To change the Step number of a Moment, follow these steps:
- Select the Moment that you want to change — for example, you may want the Moment to happen sooner in your game.
The name of the Moment appears with a blue background.
- Click Change (see Figure 6-9).
The Changing a Moment dialog box appears.
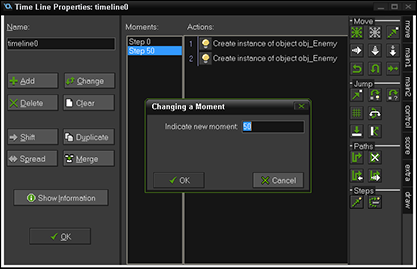
Figure 6-9: Click Change.
- In the Indicate New Moment field, type, say, 25.
Now the Actions defined for this Moment will trigger twice as quickly as when it was set to 50.
- Click OK to save and close the Changing a Moment dialog box.
The updated Step number appears in the Moments section of the Time Line Properties window.
If you’re making the Scrolling Shooter game from the in-software tutorial, don’t forget to add some Instances of the different islands to the Time Line as well.
To make new Actions for Moments quickly, follow these steps:
- From the Resource tree, in the Time Line folder, double-click a Time Line.
The Time Line Properties window appears.
- You should already have a few Moments and Actions configured; if not, see “Creating a Time Line,” earlier in this chapter, for instructions on how to do so.
- Select a Moment from the Moments section of the Time Line Properties window.
The Actions for that Moment appear in the Actions section.
- Right-click an Action, such as a Create Instance Action, and choose Copy (see Figure 6-10).
That Create Instance Action is now copied to your Clipboard.
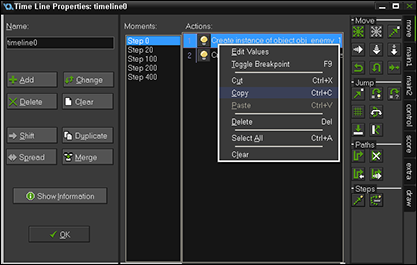
Figure 6-10: Choose Copy.
- In an empty part of the Actions section, right-click and choose Paste.
The Action, such as the Create Instance Action, you copied earlier appears.
- Open the pasted Action by double-clicking.
The Create Instance Action properties window, for example, appears.
- From the Object drop-down list, choose, say, an island Object rather than an enemy Object.
The name of the Object you chose appears in the field.
- In the X field, change the value slightly — say, from 300 to 250.
- In the Y field, change the value slightly — say, from 4400 to 4300.
- Click OK to save and close the Create Instance Action properties window (or whichever type of Action you copied and pasted).
In this way, you can quickly place Instances of Objects (such as the islands from the Scrolling Shooter tutorial) into the game. Plus, by only slightly changing the values of the coordinates, you make sure that the islands won’t appear directly beneath the planes. Unless, of course, you want to place the islands directly beneath the planes.
If you think that Views are a much easier way to place the enemy planes in the Room than using Time Lines, you aren’t necessarily wrong. However, Time Lines allow you to do much more than just create Instances. You can also end the game through a Time Line, or slow time down or speed it up. You can even pause a Time Line until a certain requirement happens. In the next section, I show you how to use the Time Line to allow the player to progress to the next Room.
Transitioning to the Next Room with Time Lines
Before you add an entire fleet of enemy planes to the Room, try adding a Moment that transitions the player to the next Room. To use the Time Line to transition to a new Room, follow these steps:
- With the Time Lines Properties window open, click Add.
The Adding a Moment dialog box appears.
- In the Indicate the Moment field, type 300 (or at whichever Step of the game you want the player to transition).
- Click OK to save and close the dialog box.
A new Moment appears in the Moments section of the Time Line Properties window.
 Drag and drop a Next Room Action from the main1 tab into the Actions section of the Time Line Properties window.
The Next Room dialog box appears.
- Click OK to save and close the Next Room dialog box.
The Next Room Action appears in the Actions section of the Time Line Properties window.
Now when you test your game, when Moment 300 happens, the game smoothly transitions to the next Room, and it’s transparent to the player. If your game is set up like mine, the player starts playing the Room with a View (see Chapter 5), which then progresses to the random generator Room, which I made from following the in-software tutorial, Scrolling Shooter.
Adding a Boss Battle to a Time Line
Boss battles typically occur at the end of a level or Room. A boss battle usually involves the player taking on a stronger-than-normal enemy. In this section, I show you how to add a boss battle in your Time Line for your Room. I was inspired to create this boss battle after I finished the in-software Scrolling Shooter tutorial.
In my boss battle, which I encourage you to improve upon, the boss is represented by the battleship image (see Figure 6-11) that you can find in the Assets folder for the Scrolling Shooter tutorial. In the Assets folder (which is created when you install the tutorial), there is an image called 1945_sprites. You can edit that image to create a new image of the Sprite that you want to use.

Figure 6-11: The battleship Sprite for a boss battle.
If you can’t find the Assets folder after you’ve saved your tutorial, start a brand-new tutorial. Then you can find the Assets folder by choosing Help⇒Open Project in Explorer.
The boss appears near the end of the Time Line and moves horizontally across the room instead of vertically. If it reaches the right edge of the Room before the player can destroy it, the boss reverses directions. The boss can take five hits from the player before it’s destroyed, and then the player earns 100 points. The boss shoots guided (tracking) missiles (see Chapter 5).
You create the boss in three main parts. First, you create the Sprite. Then you create the boss Object. Finally, you add the boss to the Time Line. The boss Object includes a Create Event, a Step Event, and a Collision Event.
Creating the boss Sprite
To create the boss Sprite, follow these steps:
- With your boss battle image ready, choose Resources⇒Create Sprite from the main menu.
The Sprite Properties window appears (see Figure 6-12).
- In the Name field, type, spr_boss, or something similar.
- Click Load Sprite.
You can then navigate to where you saved the image on your PC.
- Navigate to your saved image, select the image, and click Open.
The image appears in the Sprite Editor.
- In the X field, type 126 (use a value that places the crosshair close to the right side of the image — refer to Figure 6-12).
Setting the Origin in this way, so that the X axis is at the far right of the image, will help turn the battleship around, because the Origin of the Sprite is at the far right. When the Origin of the image reaches the edge of the Room, the battleship turns around (you configure that in the boss Object). If the Origin was in the center of the Sprite, half of the battleship would go off screen before turning around.
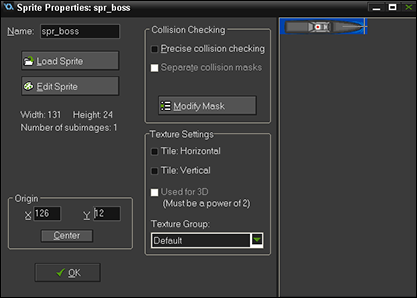
Figure 6-12: The Sprite Properties window.
- In the Y field, type 12 (use a value that places the crosshair close to the middle of the image — refer to Figure 6-12).
- Click OK to save and close the Sprite Properties window.
You’ve configured the boss Sprite.
You can click and drag on the axis points to adjust the Origin.
With the boss Sprite set up, it’s time to create an Object for the boss.
Creating the boss Object
In this section, I show you how to create the boss Object, starting with the Create Event. Within the Create Event, you give the boss motion and create a variable to give the boss health (so that it takes more than one shot to destroy the Instance).
To configure the Create Event, follow these steps:
- From the main menu, choose Resources⇒Create Object.
The Object Properties window appears (see Figure 6-13).
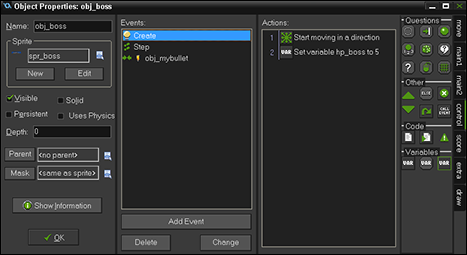
Figure 6-13: The Object Properties window.
- In the Name field, type obj_boss, or something similar.
- From the Sprite section, click to open the Sprite drop-down list and select the boss Sprite.
A thumbnail of the selected Sprite appears in the Sprite section, and the name of the Sprite appears in the field.
- Choose Add Event⇒Create.
The Create Event appears in the Events section of the Object Properties window.
 From the Move tab, drag and drop a Move Fixed Action into the Actions section.
The Move Fixed Action properties window appears (see Figure 6-14).
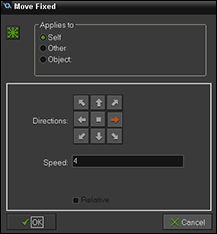
Figure 6-14: The Move Fixed Action properties window.
- In the Applies To section, select the Self radio button.
- For the Directions, choose the right arrow.
The Object will move to the right during game play.
- In the Speed field, type 4.
This determines how fast the Object moves during the game.
- Click OK to save and close the Move Fixed dialog box.
 Drag and drop a Set Variable Action from the Control tab into the Actions section.
The Set Variable Action properties window appears (see Figure 6-15).
- In the Applies To section, select the Self radio button.
- In the Variable field, type hp_boss to create a variable that represents the health of the boss Object.
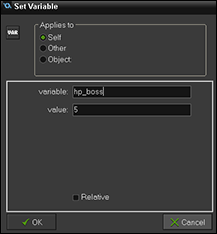
Figure 6-15: The Set Variable Action properties window.
- In the Value field, type, say, 5.
This gives the boss a health of 5, meaning it will take five hits to destroy an Instance of this Object — that is, if you set up the Collision Effect to cause –1 damage. I get to this later.
- Click OK to save and close the Set Variable dialog box.
This completes the Create Event, which should look like Figure 6-16.
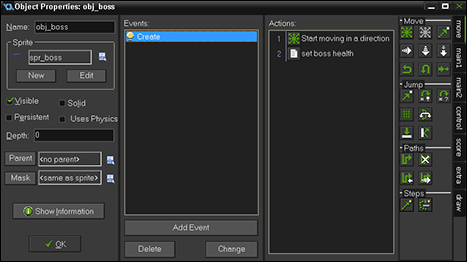
Figure 6-16: The Create Event for the boss Object.
Next, you create the Step Event. This involves setting Test Variables to check for where the Instance of the Object is in the Room, adjusting the direction of the Object, transforming the Sprite, arming the Object, and setting a block of Actions for when the boss loses all health.
To configure the Step Event, follow these steps:
- Choose Add Event⇒Step⇒Step.
A Step Event appears in the Events section.
 Select the Control tab, and drag and drop a Test Variable Action into the Actions section.
The Test Variable Action properties window appears.
- In the Applies To section, select the Self radio button.
- In the Variable field, type x.
This tests to see when the boss reaches the edge of the Room as denoted by the X axis.
- In the Value field, type room_width.
The value of room_width equals the width of the Room. So, you can test when the Object’s X variable has a value greater than or equal to the X axis of the Room. This will test to see when the Object reaches the edge of the Room.
By using room_width, you’re directly referencing the width of the Room, regardless of the value. If you typed the actual value of the width of the Room — say, 544 — and then later you change the width of the Room to 600, you have to go back and update the value in the Action. But by using room_width, that isn’t an issue. - From the Operation drop-down list, choose Greater Than or Equal To.
- Click OK to save and close the Test Variable Action properties window.
Now you need to configure the Move Fixed Action for the Step Event:
 Select the Move tab, and drag and drop a Move Fixed Action into the Actions section.
The Moved Fixed Action properties window appears.
- For the Directions, select the left arrow.
- In the Speed field, type 4.
- Click OK to save and close the Move Fixed Action properties window.
Between the Move Fixed Action and the preceding Test Variable Action, you just told GameMaker to change the direction of the Instance from moving right to moving left when it reaches the edge of the Room.
 Select the Control tab, and drag and drop a Test Variable Action into the Actions section.
The Test Variable Action properties window appears.
- In the Applies To section, select the Self radio button.
- In the Variable field, type x.
This tests to see when the boss reaches the edge of the Room, as denoted by the X axis.
- In the Value field, type 0.
The value of 0 equals the left edge the Room.
- From the Operation drop-down list, choose Less Than or Equal To.
- Click OK to save and close the Test Variable Action properties window.
Now to configure the Move Fixed Action for the Step Event:
 Select the Move tab, and drag and drop a Move Fixed Action into the Actions section.
The Moved Fixed Action properties window appears.
- For the Directions, select the right arrow.
- In the Speed field, type 4.
- Click OK to save and close the Move Fixed Action properties window.
Between the Move Fixed Action and the preceding Test Variable Action, you just told GameMaker to change the direction of the Instance from moving left to moving right when it reaches the edge of the Room.
Now to configure the Transform Sprite Action for the Step Event:
 From the Main1 tab, drag and drop a Transform Sprite Action into the Actions section.
The Transform Sprite Action properties window appears.
This Action forces the Sprite to face the direction it’s moving, so if the boss reaches the edge of the Room and needs to turn around, the front of the ship will face to the right instead of the left.
- In the Applies To section, select the Self radio button.
- In the Xscale field, type 1.
- In the Yscale field, type 1.
- In the Angle field, type direction.
- From the Mirror drop-down list, choose No Mirroring.
- Click OK to save and close the Transform Sprite Action properties window.
 Select the Control tab, and drag and drop a Test Chance Action into the Actions section.
The Test Chance Action Properties window appears.
- In the Sides field, type 30.
This determines how often the boss will shoot at the player. In this case, the boss has a 1 in 30 chance (based on a 30-sided dice roll) of performing the next Action for every step of the game.
- Click OK to save and close the Test Chance Action properties window.
Now to configure the Create Instance Action for the Step Event:
 Select the Main1 tab, and drag and drop a Create Instance Action into the Actions section.
The Create Instance Action properties window appears.
- In the Applies To section, select the Self radio button.
- From the Object drop-down list, choose obj_enemy_bullet (or whatever Object you want created).
In this case, the Object will fire a bullet 1 chance out of 30 for every Step, as determined in the Test Chance Action you previously set.
- In the X field, type 0.
In this Action, you’re going to use Relative and not a set coordinate.
- In the Y field, type 0.
In this Action, you’re going to use Relative and not a set coordinate.
- Select the Relative check box.
You want the bullet to appear from the location of the Instance — in this case, the boss battleship.
- Click OK to save and close the Create Instance dialog box.
You’re almost done with the Step Event. The next procedure shows you how to finish the Step Event by adding a Test Variable to see when the boss’s health reaches 0. When that happens, the player’s score should increase, the boss should be destroyed, and you can display a message declaring victory!
The following procedure is a continuation of the previous procedure. However, it does provide a great example of setting up a code block to trigger when a Test Variable tests positive. To create a code block for when the boss’s health reaches 0, follow these steps:
 From the Control tab, drag and drop a Test Variable Action into the Actions section.
The Test Variable Action properties window appears.
- In the Applies To section, select the Self radio button.
- In the Variable field, type hp_boss (the variable used to set the boss’s health).
- In the Value field, type 0.
You’re testing for when the boss has 0 health.
- From the Operation drop-down list, choose Less Than or Equal To.
- Click OK to save and close the Test Variable properties window.
Now, when the boss health equals 0, the Test Variable Action will trigger the following block of Actions.
 Select the Control tab, and drag and drop a Start Block Action into the Actions section.
A Start Block Action appears in the Actions section.
 Select the Score tab, and drag and drop a Set Score Action into the Actions section.
The Set Score properties window appears.
- In the new score field, type, say, 100.
The player will earn 100 points when the boss’s health reaches 0.
- Toggle Relative so that the box is selected.
You want the player’s score to increase by 100, and not remain at 100 each time the Set Score Action is triggered.
- Choose OK.
The Set Score Action properties window is saved and closed.
 From the main1 tab, drag and drop a Destroy Instance Action into the Actions section.
The Destroy Instance properties window appears.
- In the Applies To section, select the Self radio button.
- Click OK.
The Destroy Instance Action will destroy the Instance of the boss Object when the health reaches 0.
 Select the Main2 tab, and drag and drop a Display Message Action into the Actions section.
The Display Message dialog box appears.
- In the Message field, type Boss Defeated, or something similar.
- Click OK to save and close the Display Message dialog box.
 Select the Control tab, and drag and drop an End Block Action to the Actions section.
An End Block Action appears in the Actions section. Now, all the Actions within the code block will be triggered when the Test Variable Action checks that the boss’s health has reached 0. The Actions triggered include increasing the player’s score, destroying the Instance of the boss Object, and displaying a message.
That concludes the Step Event, which should look like Figure 6-17.
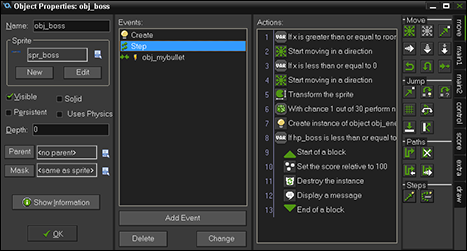
Figure 6-17: The Step Event for obj_boss.
Next, you create the Collision Event. This involves destroying the Instance, creating the explosion Sprite, adding some code for reducing the boss’s health, and increasing the player’s score if the boss is destroyed. To configure the Collision Event, follow these steps:
- From the Object Properties window, choose Add Event⇒Collision⇒obj_mybullet.
A Collision Event for when the player’s bullet hits the boss appears in the Events section.
 Select the main1 tab, and drag and drop a Destroy Instance Action into the Actions section.
The Destroy Instance dialog box appears.
- In the Applies To section, select the Other radio button.
This destroys the Instance of the player’s bullet that hit the boss (the Instance that caused the collision). Any other Instances of the player’s bullet will remain in the Room.
- Click OK to save and close the Destroy Instance dialog box.
 Select the Main1 tab, and drag and drop a Create Instance Action into the Actions section.
The Create Instance properties window appears.
- In the Applies To section, select the Self radio button.
- From the Object drop-down list, choose obj_explosion.
Choose an Object that represents an explosion.
- In the X and Y fields, type 0.
You’re going to use Relative.
- Select the Relative check box.
The explosion appears where the bullet hits the boss.
- Click OK to save and close the Create Instance properties window.
 Select the Control tab, and drag and drop a Set Variable Action into the Actions section.
The Set Variable Action properties window appears.
- In the Applies To section, select the Self radio button.
- In the Variable field, type hp_boss (the variable used to set the boss’s health).
- In the Value field, type –1.
The Instance of the boss will lose 1 health for every bullet collision.
- Select the Relative check box.
You want the boss to lose only 1 health for each collision with a bullet.
- Click OK to save and close the Set Variable Action properties window.
That concludes configuring the boss Object. The Collision Event should look like Figure 6-18. Next, you need to add the boss to the Time Line.
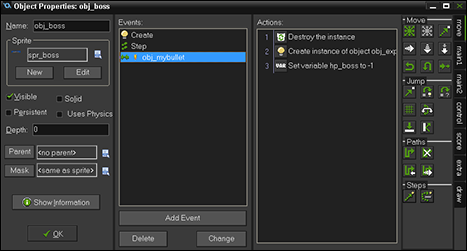
Figure 6-18: The Collision Event for obj_boss.
Adding the Boss to the Time Line
To add the boss Object to a Time Line, follow these steps:
- With a Time Line open (see “Creating a Time Line,” earlier in this chapter), click Add.
The Adding a Moment dialog box appears.
- In the Indicate a Moment field, type 200 (or whatever Step in the game you want the boss Object to appear).
- Click OK to save and close the Adding a Moment dialog box.
 Select the Main1 tab, and drag and drop a Create Instance Action into the Actions section.
The Create Instance properties window appears.
- In the Applies To section, select the Self radio button.
- From the Object drop-down list, choose, say, obj_boss.
- In the X field, type, say, 10.
- In the Y field, type, say, 3800.
- Click OK to save and close the Create Instance properties window.
You just added the boss battle to your game!
Congratulations! You’ve created a boss battle in your Scrolling Shooter game using a Time Line. Now is the time to dig into the details and refine it to meet your satisfaction. For example, what if the player doesn’t destroy the boss but instead flies past it? Then you could add another Moment in the Time Line — say, at position 300 — to either restart the room (by using the Restart Room Action) or repeat the battle (by using the Time Line Position Action — in the Position field, type 200, or wherever the boss battle is set to begin). Those are just a couple ideas to get your creative juices flowing.