
Chapter 7
Using Actions to Create Special Effects with Particles
In This Chapter
![]() Creating buttons to trigger particles
Creating buttons to trigger particles
![]() Using the Create Effect Action
Using the Create Effect Action
![]() Creating several types of fireworks effects
Creating several types of fireworks effects
![]() Coding simple and complex particles
Coding simple and complex particles
![]() Coding emitters
Coding emitters
In GameMaker, you can make some very special effects, such as explosions and fireworks. You create these effects through the use of particles. Particles are fast graphics resources that are generated based on random values. You can create special effects for your game by
- Using the Create Effect Action
- Using the 13 different Actions in the Particles section on the Extra tab
- Writing your own code
- Creating an Emitter Burst or an Emitter Stream
In this chapter, I walk you through these various methods by using the Particles tutorial that is included with GameMaker. For the coding aspect, you can go ahead and skip to the next chapter, because this chapter primarily discusses using the drag-and-drop Actions. However, I do show you how to create a button to trigger these effects in this chapter, which you can also use in Chapter 8.
As with the other chapters in this book, you can find the assets for this tutorial by choosing Help⇒Open Project in Explorer⇒Assets, from the main menu. Also, when you’re done with this tutorial, you can install the demo for using particles to compare your work.
Figure 7-1 shows an example of a special effect that you can make by following along with this chapter.
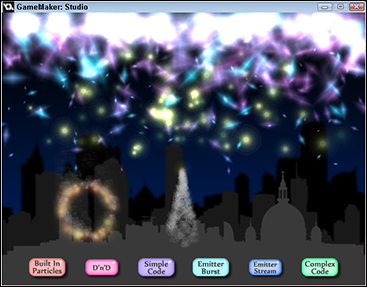
Figure 7-1: An example of using Particles.
To get started with particles, I show you how to create a fireworks display using the Create Effect Action. First, I describe how to create a button to trigger the effect.
Coding a Button to Trigger the Particles
Before you get started with creating particles, I provide a procedure from the in-software Particles tutorial on how to create a button that the player can use to control the particles. Basically, when the player presses the button, a fireworks effect will appear. You duplicate this button and use it to trigger the other methods discussed in this chapter and Chapter 8, on how to create special effects.
To create a button for triggering the particles, follow these steps:
- From the Resource tree, right-click Objects and then choose Create Object.
The Object Properties window appears.
- In the Name field, type obj_button_builtin.
- From the Sprite drop-down list, select spr_button_builtin (available from the tutorial).
A thumbnail of the image appears in the Sprite section and the field is populated with the name of the image.
- Choose Add Event⇒Create.
The Create Event appears in the Events section.
 Drag and drop an Execute Code Action from the Control tab to the Actions section.
A code window appears.
- In the code window, type the following code:
image_speed = 0;
image_index = 0;This code stops the button from animating (if you opened the Sprite, you may have noticed that the assigned Sprite is made up of three different sub-images) and tells GameMaker to display only the first indexed sub-image.
 GameMaker starts counting at 0, just as in programming. Each sub-image represents a different state of the button — image 0 is the unselected state of the button, image 1 shows the button when the player hovers over it with the mouse, and image 2 is a slightly smaller version of the image to represent when the button is actually clicked on by the player. The final result is a button that reacts when the player either hovers over it or clicks it. (You write the code for that in Step 14.)
 - Click the green check mark from the icon menu.
The code window is saved and closed.
- Choose Add Event⇒Alarm⇒Alarm 0.
The Alarm 0 Event appears in the Events section.
- Drag and drop an Execute Code Action from the Control tab to the Actions section.
The code window appears.
- In the code window, type the following code:
image_index = 0;
You just set an Alarm that when triggered, displays the first sub-image.
- Click the green check mark from the icon menu.
The code window is saved and closed.
- Click Add Event⇒Step⇒Step.
The Step Event appears in the Events section.
- Drag and drop an Execute Code Action from the Control tab to the Actions section.
The code window appears.
- In the code window, type the following code (see Figure 7-2):
if instance_position(mouse_x, mouse_y, id)
{
if image_index != 2
{
image_index = 1;
if mouse_check_button_pressed(mb_left)
{
alarm[0] = room_speed / 2;
image_index = 2;
instance_create(random(room_width), 400, obj_button_firework);
}
}
}
else
{
if image_index != 2
{
image_index = 0;
}
}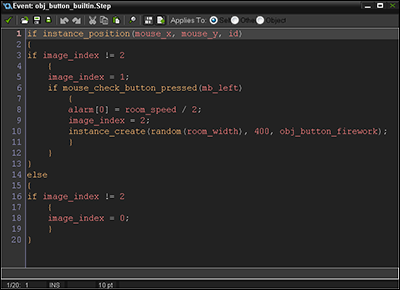
Figure 7-2: The code window for the Step Event, Execute Code Action.
This code determines which sub-image is displayed, depending on the state of the mouse (is the player hovering, is the player not hovering, or is the player clicking the button). The code also tells GameMaker to check if the mouse position is over the button, to check if the mouse button has been pressed, and if so, to create the firework Object. The player sees a hover and pressed state for the button. At the end of the code, it resets the image index back to 0 (the player is not hovering or clicking).
 The preceding code creates an Instance of the firework Object, but because you haven’t created this Object yet, the code window displays the Object text (obj_button_firework) in white. After you’ve created the object, the Object text in the code window appears in red, as shown in Figure 7-2.
 - Click the green check mark.
The code window is saved and closed.
- Click OK from the Object Properties window.
The Object Properties window is saved and closed.
Using the Create Effect Action
In the preceding procedure, you created a button that will trigger a fireworks effect. In this section, I show you how to create the effect itself by using the Create Effect Action, which does require some coding by hand. In the following procedure, you create the firework Object.
 Each Object can have its own set of sequential Alarms. For example, you created Alarm[0] for the button Object, and in the next procedure you create Alarm[0] and Alarm[1] for the firework Object.
To create the firework Object, follow these steps:
- From the Resource tree, right-click Objects and then choose Create Object.
The Object Properties window appears.
- In the Name field, type obj_button_firework.
- Choose Add Event⇒Create.
The Create Event appears in the Events section.
- Drag and drop an Execute Code Action from the Control tab to the Actions section.
A code window appears.
- In the code window, type the following code:
direction = point_direction(x, y, room_width / 2, 100);
speed = 15 + random(5);
gravity = 0.5;
gravity_direction = 270;
alarm[0] = 1;
alarm[1] = room_speed - Click the green check mark from the icon menu.
The code window is saved and closed.
The first line of this code sets the direction of the firework so that it moves toward the center of the Room, it has speed, and there’s also gravity so that it appears as if the firework’s sparkles start to fall naturally. This code also has two Alarms — one to create a smoke trail and the other to generate the actual firework. You configure the Alarms next.
- With obj_button_firework still open from the last procedure, choose Add Event⇒Alarm⇒Alarm[0].
The Alarm 0 Event appears in the Events section.
 Drag and drop a Comment Action from the Control tab into the Actions section.
The Comment window appears.
- In the Comment field, type Create smoke trail.
This is a note to yourself for easy reference later on what the Alarm entails.
- Click OK.
The Comment window is saved and closed. In the Actions section, you can now see the Comment you just wrote, as shown in Figure 7-3.
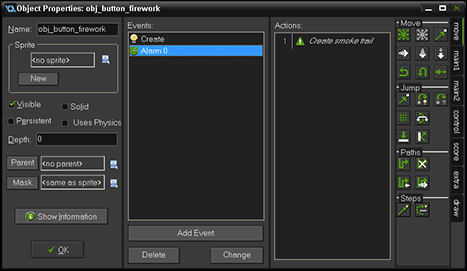
Figure 7-3: The Object Properties window with an Alarm Event and Comment Action.
Now you need to add the Create Effect Action.
 Drag and drop a Create Effect Action from the Draw tab into the Actions section.
The Create Effect properties window appears.
- In the Applies To section, select the Self radio button.
- From the Type drop-down list, select Smoke.
Smoke appears in the Type field (see Figure 7-4).
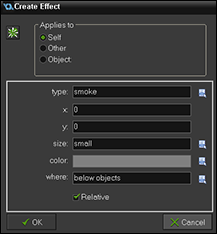
Figure 7-4: The Create Effect properties.
- Leave the X and Y fields at 0 (so that it appears Relative to the Instance with the Action).
- From the Size drop-down list, select Small.
Small appears in the Size field.
- Click the Color drop-down.
The Color window appears.
- From the Color window, select a gray color, as shown in Figure 7-5.
- Click OK.
The color gray appears in the Color field.
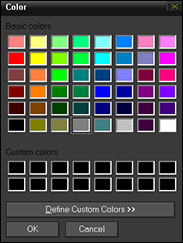
Figure 7-5: The Color window.
- From the Where drop-down list, select Below Objects.
Below Objects means that this Object will be drawn beneath other Objects at a depth of 100,000. If you choose above, then this Object would appear over other Objects at a depth of –100,000.
- Select the Relative check box.
Now the properties are relative to what is happening in the game.
- Click OK.
The Create Effect properties is saved and closed.
Now you need to set an Alarm Action.
 Drag and drop a Set Alarm Action from the Main2 tab to the Actions section.
You’re going to use this Set Alarm Action to reset Alarm 0 every step of the game. When Alarm 0 is triggered (you set this up in the last procedure), a smoke particle is created, which creates a trail as the Instance moves across the Room.
The Set Alarm Action window appears.
- In the Applies To section, select the Self radio button.
- In the Number of Steps field, type 1.
This value determines how often the Alarm is triggered. In this case, the Alarm will be triggered once for every step of the game.
- From the In Alarm No drop-down list, select Alarm 0.
This is the Alarm that will be triggered every step of the game.
- Click OK.
The Set Alarm Action window is saved and closed.
Now add the second Alarm Event.
- Choose Add Event⇒Alarm⇒Alarm[1].
The Alarm 1 Event appears in the Events section.
 Drag and drop a Comment Action from the Control tab to the Actions section.
The Comment Action window appears.
- In the Comment field, type Explode the firework.
- Click OK.
The Comment Action window is saved and closed. You can now see the Comment Action in the Actions section.
 Drag and drop a Create Effect Action from the Draw tab into the Actions section.
A Create Effect Action window appears.
- In the Applies To section, select the Self radio button.
- From the Type drop-down list, select Firework.
- Leave X and Y at 0.
The firework will appear relative to the Instance with the Action.
- From the Size drop-down list, select Large.
- Click the Color drop-down.
The Color window appears.
- From the Color window, pick a yellow color.
- Click OK.
The Color window is saved and closed. The color you picked appears in the Color field.
- From the Where drop-down list, select Below Objects.
This particle will now be drawn underneath other Instances.
- Select the Relative check box.
- Click OK.
The Create Effect Action window is saved and closed.
Now add a Set Alarm Action to the Alarm[1] Event.
 Drag and drop a Set Alarm Action from the Main2 tab to the Actions section.
The Set Alarm Action window appears.
- In the Applies To section, select the Self radio button.
- In the Number of Steps field, type –1.
- From the In Alarm No drop-down list, select Alarm 0.
- Click OK.
The Set Alarm Action window is saved and closed.
Now to add a second Set Alarm Action for the Alarm[1] Event.
- Drag and drop a Set Alarm Action from the Main2 tab to the Actions section.
A Set Alarm Action window appears.
- In the Applies To section, select the Self radio button.
- In the Number of Steps field, type room_speed * 3.
You just set this Alarm to trigger three times for every step of the game.
- From the In Alarm No drop-down list, select Alarm 2.
Your Alarm 1 Event should look like Figure 7-6.
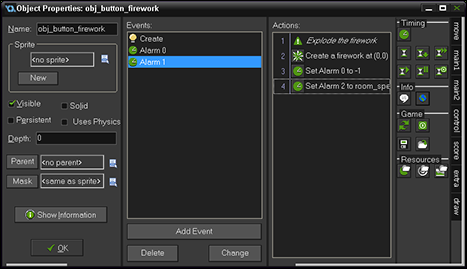
Figure 7-6: The Alarm 1 Event.
Next, you need to create an Event for Alarm[2] that destroys the Instance of the firework effect. It’s important to destroy the Instance — you don’t want anything in the Room that doesn’t do anything because it will eventually build up and slow down the game.
To destroy the firework effect, follow these steps:
- With the obj_button_firework open (see the previous procedure), choose Add Event⇒Alarm⇒Alarm 2.
The Alarm 2 Event appears in the Events section.
 Drag and drop a Destroy Instance Action from the Main1 tab to the Actions section.
The Destroy Instance properties window appears.
- In the Applies To section, select the Self radio button.
- Click OK.
The Destroy Instance window is saved and closed.
- Click OK from the Object Properties window.
The Object Properties are saved and closed.
Now it is time to add an Instance of the button to the Room. If you’re following along with the in-software tutorial, a Room was already created for you.
To add an Instance of the button to the Room, follow these steps:
- With the Particles tutorial open, from the Resource tree, in the Rooms section, double-click Room0.
The Room Properties window for Room0 appears.
- Click the Objects tab (see Figure 7-7).
- Click the drop-down icon and choose obj_button_builtin (refer to Figure 7-7).
A thumbnail of the Sprite appears and the name of the Sprite appears in the field.
- Click in the bottom-left corner of the Room.
An Instance of the Object appears in the Room (refer to Figure 7-7).
- Click the green check mark from the icon menu.
The Room Properties window is saved and closed.
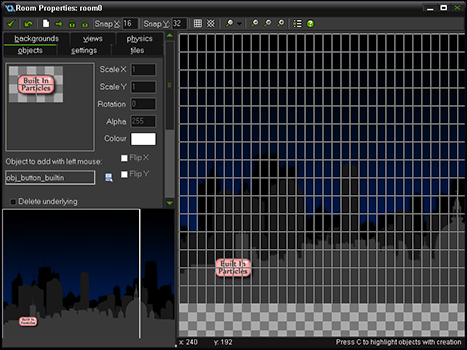
Figure 7-7: The Room Properties window.
Now test your game (choose Run⇒Run Normally from the main menu of the project window) to see your fireworks light up the sky. When you run the game, you should see the button change when you hover over it. When you click the button, you should see a trail of smoke generate from a random position in the Room that travels toward the center of the Room, and then finally you should see an explosion of yellow color. If you repeatedly press the button, you see multiple firework explosions.
Using the Particle Actions and Emitters
The Create Effect Action is great for simple special effects, but it’s limited to a single color at a time, and it lacks detailed customization. Because of this, in this section I show you how to use the Particles Actions. You can find them on the Extra tab of the Object Properties window.
The following procedures show you how to create a new Object that you can use to display a Catherine wheel firework (an effect that rotates quickly and produces a display of sparks and colored flame), complete with puffs of smoke.
Creating puffs of smoke
To create a puff of smoke, follow these steps:
- From the Resource tree, right-click Objects and choose Create Object.
The Object Properties window appears.
- In the Name field, type obj_catherine_firework.
- Choose Add Event⇒Create.
The Create Event appears in the Events section.
- Drag and drop an Execute Code Action from the Control tab to the Actions section.
A code window appears.
- In the code window, type the following code:
speed = 0;
alarm[0] = 1;
alarm[1] = room_speed * 3;This code prevents the Object from moving and sets the necessary Alarms.
- Click the green check from the icon menu.
The code window is saved and closed.
Now add a Create Particle System Action to the obj_catherine_firework Object.
 Drag and drop a Create Particle System Action from the Extra tab to the Actions section.
The Create Particle System properties window appears.
- In the Depth field, type 0, which is the default value.
- Click OK.
The Create Particle System Action window is saved and closed. You’ve now created a (necessary) container in which you place the particles and emitters that you want to use.
Now add a Create Particle Action, which is different from the Create Particle System Action from the last procedure.
 Drag and drop a Create Particle Action (you can find it directly below the Create Particle System Action) from the Extra tab to the Actions section.
- From the Type ID drop-down list, select Type 0 (because it is the first particle effect you’re creating).
Type 0 is the default value.
- From the Shape drop-down list, select Cloud.
- From the Sprite drop-down list, select No Sprite, which is the default value.
You can use a custom Sprite if you want.
- In the Min Size field, type 0.05.
- In the Max Size field, type 0.2.
These last two properties create a range of sizes between a minimum of 5 percent and a maximum of 20 percent. If you want all the particles to be the same size, use the same value for both Min and Max.
- In the Size Increment field, type 0.02.
This value determines the amount the particle will increase in size per step of the game. If you don’t want a change in size, set this to 0, or use a negative number to decrease the size of the particle.
- Click OK.
The Create Particle properties window is saved and closed.
Now add a Particle Color Action to the Object.
 Drag and drop a Particle Color Action from the Extra tab to the Actions section.
The Particle Color properties window appears.
- From the Type ID drop-down list, select Type 0.
This determines the particle you want to work with. In this case, you want to extend what you started with the Create Particle Action.
- From the Color Mix drop-down list, select Changing.
This creates a blend of color over each particle’s lifetime from Color1 to Color2, which you’ll set next.
- Click the Color1 drop-down.
The Color window appears.
- Select a light gray color from the color graph and then choose OK.
This color appears as a smoke effect.
- Click the Color2 drop-down.
The Color window appears with a color graph.
- Select a dark gray color and then choose OK.
You now have a changing color effect that blends between light gray and dark gray for the smoke effect.
- In the Start Alpha field, type 1.
- In the End Alpha field, type 0.
The Start and End Alpha properties, as configured here, allow the particles to fade out over time.
- Click OK.
The Particle Color properties window is saved and closed.
Now add a Particle Life Action to the Object.
 Drag and drop a Particle Life Action from the Extra tab to the Actions section.
This Action determines the life span of the particle.
The Particle Life properties window appears.
- From the Type ID drop-down list, select Type 0.
- In the Min Life field, type 5.
Setting a different value for the minimum length of the particle’s life and the maximum creates a range of time that the particle will exist.
- In the Max Life field, type 30.
The lifetime of a particle is calculated in steps, so these particles will be shown in the Room for a minimum of 5 steps and a maximum of 30.
- Click OK.
The Particle Life properties window is saved and closed.
Now add a Particle Gravity Action to the Object.
 Drag and drop a Particle Gravity Action from the Extra tab to the Actions section.
The Particle Gravity properties window appears.
- From the Type ID drop-down list, select Type 0.
- In the Amount field, type 0.3.
- In the Direction field, type 90.
These settings configure the smoke to rise at a 90-degree angle.
- Click OK.
The Particle Gravity properties window is saved and closed.
You’ve now completed creating the smoke effect. In the next section, I show you how to create the Catherine wheel firework effect.
Creating the Catherine wheel firework
In the preceding section, I show you how to create a smoke puff that will be attached to the firework effect that I show you how to make in this section. This time, you use Type 1 instead of Type 0, because this is the second particle effect you’re creating for this Object, obj_catherine_firework.
I highly recommend that you complete the preceding smoke trail procedure if you haven’t already done so. The following procedure builds off the smoke trail procedure and uses that effect in the firework effect.
To create the Catherine wheel firework effect, follow these steps:
 With the obj_catherine_firework Object open, drag and drop a Create Particle Action.
The Create Particle properties window appears.
- From the Type ID drop-down list, select Type 1.
You already used Type 0 in the last procedure, so now it’s time to use Type 1.
- From the Shape drop-down list, select Flare.
- From the Sprite drop-down list, select No Sprite.
- In the Min Size field, type 0.1.
- In the Max Size field, type 0.5.
- In the Size Increment field, type 0.01.
- Click OK.
The Create Particle properties window is saved and closed.
Now add a Particle Color Action to the Object.
 Drag and drop a Particle Color Action from the Extra tab to the Actions window.
The Particle Color properties window appears.
- From the Type ID drop-down list, select Type 1.
- From the Color Mix drop-down list, select Mixed.
- Choose the Color1 drop-down.
The Color window appears with a color graph.
- From the color graph, select a light red color.
- Choose OK to save and close the color graph.
- Choose the Color2 drop-down.
A window with a color graph appears.
- From the color graph, select a yellow color.
- Choose OK to save and close the color graph.
- In the Start Alpha field, type 1.
- In the End Alpha field, type 0.
You get a mix of colors between light red and yellow.
- Click OK.
The Particle Color properties window is saved and closed.
Now add a Particle Life Action to the Object.
 Drag and drop a Particle Life Action from the Extra tab to the Actions section.
The Particle Life properties window appears.
- From the Type ID drop-down list, select Type 1.
- In the Min Life field, type 15.
- In the Max Life field, type 30.
You just set the life span of the particle to last between 15 and 30 steps.
- Click OK.
The Particle Life properties window is saved and closed.
Now add a Particle Speed Action to the Object.
 Drag and drop a Particle Speed Action from the Extra tab to the Actions tab.
The Particle Speed properties window appears.
- From the Type ID drop-down list, select Type 1.
- In the Min Speed field, type 10.
- In the Max Speed field, type 10.
All the particles will travel at the same speed because you set the Min and Max Speed with the same value.
- In the Min Dir field, type 0.
- In the Max Dir field, type 359.
Setting a minimum of 0 degrees and a maximum of 359 degrees will create a circular effect when enough particles are created at one time.
- In the Friction field, type 1.
The speed of the particles will slow down at a rate of 1 pixel per step and stop when the speed reaches 0. This effectively limits the distance the particles can travel. Friction will never reduce the speed to less than 0.
- Click OK.
The Particle Speed properties window is saved and closed.
Now add a Particle Secondary Action to the Object.
 Drag and drop a Particle Secondary Action from the Extra tab to the Actions section.
The Particle Secondary properties window appears.
- From the Type ID drop-down list, select Type 1.
- From the Step Type drop-down list, select Type 0.
- In the Step Count field, type 0.
- From the Death Type drop-down list, select Type 0.
- In the Death Count field, type 1.
- Click OK.
The Particle Secondary properties window is saved and closed.
This procedure creates a number of secondary particles (Type 0, which is the smoke trail from the last section) when the particle reaches the end of its lifetime (the death count), which means you’ll see smoke when the sparking and flashing is done.
 The Particle Secondary Action can create many thousands of particles, or even an infinite loop of particle creation, which can slow down and crash your game.
Creating an emitter for the firework
Now that you’ve created a smoke trail and the firework effect, you need to create an emitter, which is used to create the particles you defined earlier. Emitters can either burst or stream particles. Bursting is a one-off explosion of particles, and streaming means that particles are generated every step of the game.
Emitters must be stored within a Particle System in the same fashion as particles are. In this case, you can use the same Particle System as you created in the previous procedures.
To create an emitter, follow these steps:
 With the obj_catherine_firework Object open, drag and drop a Create Emitter Action from the Extra tab into the Actions section.
It’s the third icon from the bottom in the left column — it looks just like the Create Particle Action.
The Create Emitter properties window appears.
- From the Emitter ID drop-down list, select Emitter 0.
- From the Shape drop-down list, select Ellipse.
- In the Xmin field, type x – 5.
- In the Xmax field, type x + 5.
- In the Ymin field, type y – 5.
- In the Ymax field, type y + 5.
The X and Y positions define the areas in which the Instances will be created. The configurations shown here provide a slight variation in the distance each particle travels.
If you want the emitter to move with an Instance, place this Action in a Step Event of the Instance so that the Emitter position is updated every step.  Drag and drop a Set Alarm Action from the Main2 tab to the Actions section.
The Set Alarm Action properties window appears.
- In the Applies To section, select the Self radio button.
- In the Number of Steps field, type 1.
- From the In Alarm No drop-down list, select Alarm 0.
You just set an Alarm Action to trigger Alarm 0 for every step. You set the Alarms in the following procedures.
At this point, your Actions for the Create Event should look like Figure 7-8.
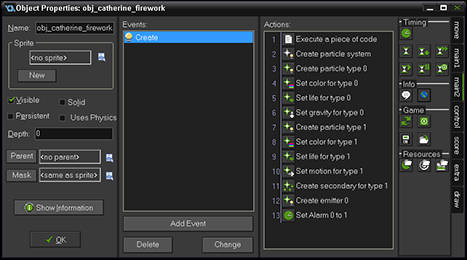
Figure 7-8: The Actions list for the Create Event.
Now you need to add an Alarm[0] Event to control the Create Event. To create the Alarm Event, follow these steps:
- With the obj_catherine_firework Object open, choose Add Event⇒Alarm⇒Alarm 0.
 Drag and drop a Burst From Emitter Action from the Extra tab to the Actions section.
The Burst From Emitter properties window appears.
- From the Emitter ID drop-down list, select Emitter 0.
- From the Particle Type drop-down list, select Type 1.
Remember that Type 1 is the Catherine wheel effect from earlier in this chapter.
- In the Number field, type 50.
This will burst 50 particles of Type 1.
- Click OK.
The Burst From Emitter properties window is saved and closed.
Now add a Set Alarm Action to the Object.
 Drag and drop a Set Alarm Action from the Main2 tab to the Actions section.
The Set Alarm properties window appears.
- In the Applies To section, select the Self radio button.
- In the Number of Steps field, type room_speed / 5.
- From the In Alarm No drop-down list, select Alarm 0.
- Click OK.
The Set Alarm properties window is saved and closed. You just set an Action to trigger Alarm 0 once for every five steps of the game.
Now add an Alarm[1] Event to the Object.
- Choose Add Event⇒Alarm⇒Alarm 1.
The Alarm 1 Event appears in the Events section.
- Drag and drop a Set Alarm Action from the Main2 tab to the Actions section.
The Set Alarm properties window appears.
- In the Applies To section, select the Self radio button.
- In the Number of Steps field, type –1.
A negative number essentially turns off the Alarm selected, which means the Event won’t be triggered.
- From the In Alarm No drop-down list, select Alarm 0.
- Click OK.
The Set Alarm Action window is saved and closed. You just set an Action to turn off Alarm 0.
Now add another Set Alarm Action to the Object.
- Drag and drop a Set Alarm Action from the Main2 tab to the Actions section.
The Set Alarm properties window appears.
- In the Applies To section, select the Self radio button.
- In the Number of Steps field, type room_speed * 2.
- From the In Alarm No drop-down list, select Alarm 2.
Now Alarm 2 will be triggered twice every step.
- Click OK.
The Set Alarm properties window is saved and closed.
Now add an Alarm[2] Event to the Object.
- Choose Add Event⇒Alarm⇒Alarm 2.
The Alarm 2 Event appears in the Events section.
 Drag and drop a Destroy Emitter Action from the Extra tab to the Actions section.
The Destroy Emitter properties window appears.
- From the Emitter ID drop-down list, select Emitter 0.
- Click OK.
The Destroy Emitter properties window is saved and closed. You just set an Action to destroy the emitter when Alarm 2 is triggered.
 Drag and drop a Destroy Particle System Action from the Extra tab to the Actions window.
The Destroy Particle System Action appears in the Actions section. There is nothing to set here — you’re essentially creating an Action to destroy the particle system when Alarm 2 is triggered.
 Drag and drop a Destroy Instance Action from the Main1 tab to the Actions section.
The Destroy Instance properties window appears.
- In the Applies To section, select the Self radio button.
This Alarm will stop the effect and destroy the Emitter, the Particle System, and the Instance.
- Click OK.
The Destroy Instance properties window is saved and closed.
- Click OK from the Object Properties window.
The Object Properties window is saved and closed.
Your Alarm 2 Event should look like Figure 7-9.
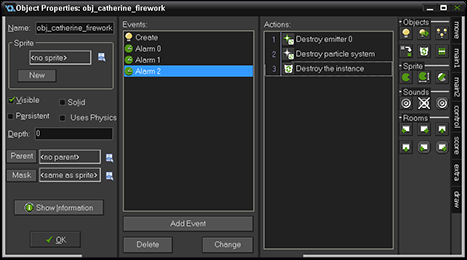
Figure 7-9: The Alarm 2 Event destroys the firework Effect.
With these procedures complete, you can move on to create a button so that the player can trigger this firework. You can duplicate the button you made for the Create Effect Action from the beginning of this chapter to create a new button quickly.
To create a button to trigger the Catherine wheel effect, follow these steps:
- From the Resource tree, in the Object section, right-click obj_button_builtin, and choose Duplicate (you made this Object earlier in the chapter).
A duplicate of the Object is created and appears in the Resource tree as Object2, or something similar. The Object Properties window also appears.
- In the Name field, type obj_button_catherine.
- From the Sprite drop-down list, select spr_Button_DnD.
A thumbnail of the Sprite appears and the name of the Sprite appears in the field.
- From the Events section of the Object Properties window, select the Step Event.
The Step Event Actions appear in the Actions section.
- Double-click the Execute Code Action.
The code window appears.
- In the code window, type the following code (see Figure 7-10):
if instance_position(mouse_x, mouse_y, id)
{
if image_index != 2
{
image_index = 1;
if mouse_check_button_pressed(mb_left) && ! instance_exists(obj_catherine_firework)
{
alarm[0] = room_speed / 2;
image_index = 2;
instance_create(random(room_width), 350, obj_catherine_firework);
}
}
}
else
{
if image_index != 2
{
image_index = 0;
}
}
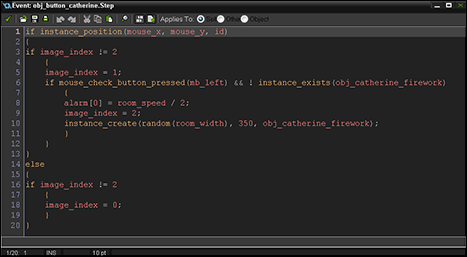
Figure 7-10: The Code window for the Step Event.
This code is basically the same code as the previous button, but it allows a single Instance of the firework at a time. Go ahead and place an Instance of the button in the Room now and run the game.
To add an Instance of the button, open the Room by double-clicking Room0 from the Resource tree in the Rooms section. In the Room Properties window, select the Objects tab. Make sure that obj_button_builtin appears and then click in the Room to place it. For more details, see Chapter 2 and earlier in this chapter.
When you test the game now, you might notice that you can only click the Catherine wheel button (labeled D’n’D) once and then you have to wait for the effect to finish before you can trigger it another time. For the Built In Particles effect, you can click that button multiple times to have the effect appear multiple times.