
Chapter 8
Coding Special Effects with Particles
In This Chapter
![]() Coding particle systems
Coding particle systems
![]() Creating a simple firework using code
Creating a simple firework using code
![]() Coding both burst and stream emitters
Coding both burst and stream emitters
![]() Putting it all together into one complex particle effect
Putting it all together into one complex particle effect
In Chapter 7, I show you how to create special effects using both the Create Effects Action and the Particles Action. In this chapter, I move on to coding particle effects, which requires more work than the drag-and-drop Actions.
Throughout this chapter, I show you how to re-create the first firework that you made using the Create Effects Action, but this time using code. You can see an example of the effect in Figure 8-1.
First, I step you through coding the particle system and the smoke trail. Then I explain how to code the firework effect itself. I move on to coding burst and stream emitters. And I wrap up the chapter by showing you how to code a complex particle effect using everything I’ve showed you so far.
 Throughout this chapter, I refer to a button that you can use to trigger your effects while playing the game. I described how to create this button at the beginning of Chapter 7. Also, this chapter is based on the in-software tutorial, Particles.
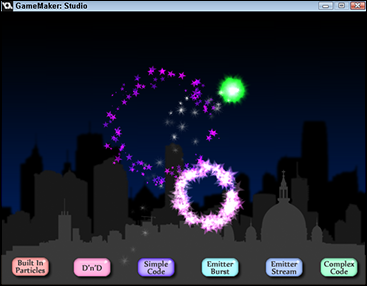
Figure 8-1: The simple code firework effect.
Coding the Particle System and the Smoke Trail
To get started coding the firework effect, which you can use for, say, explosions in your game, you need to create a particle system. The following procedure shows you how to do this through code, along with creating a smoke trail for the effect.
You may want to start by opening the in-software Particles tutorial, but it’s not necessary.
To code a firework effect, follow these steps:
- From the Resource tree, choose Object⇒Create Object.
The Object Properties window appears.
- In the Name field type, obj_simple_firework (or something along those lines).
- To start creating the particle system, choose Add Event⇒Create.
The Create Event appears in the Events section.
- Drag and drop an Execute Code Action from the Control tab to the Actions section.
A code window appears.
- In the code window, type the following code (see Figure 8-2).
///particle system
Sname = part_system_create();The first line of code is a type of comment that you can use to name the Action, so to speak. When you use three backslashes, you’re creating a comment that appears as the name of the Action in the Actions section of the Object Properties window.
The second line of code creates a particle system and assigns it an index variable of Sname, which you refer to later, when defining the particles.
When you only use two backslashes in your code, GameMaker treats it as a normal comment, which can serve as a useful reminder of what the following code does (or at least what it’s supposed to do). In the following code, you’re creating a particle type for the smoke trail and you’re assigning its index to a variable (trail)://trail
trail = part_type_create();The following code assigns a particle shape (spark) for the particle type (trail).
part_type_shape(trail, pt_shape_spark);
You can press F1 within the software to search for a full list of shapes to choose from.
The following code sets the particle scale for the trail.
part_type_scale(trail, 1, 1);
The particle scale is the base value that the particle is based on, where 1 is a 1:1 scale. So, if you want your particle (before any size is changed) to be scaled by 2 along the X axis and by half along the Y axis, you would set the scale to 2, 0.5 for the X and Y axis.
The following code sets the size of the particle:
part_type_size(trail, 0.20, 0.50, 0, 0);
You specify a minimum (for example, 0.20) and maximum (for example, 0.50) range for the particle size, and each particle will be set to a random size within that range. Also, you can apply an increment to make the size grow (positive value), shrink (negative value), or remain constant (0).
The final value is referred to as a wiggle. Wiggle adds an amount to the target function for each step, but the change lasts only for a step, so the particle will appear to jump in size (or speed or direction). You can specify a value from 0 to 20 for wiggle, and a random number will be generated from 0 to n each step. This will be added onto the final particle property. This is not necessary for this procedure, so leave it as 0 for now.
There are three functions for color with particles (straight color, two-color gradient, and three-color gradient), but for this, use the color2 function to create a gradient from one color (white) to the other (gray) over the lifetime of the particle:
part_type_color2(trail, c_white, c_gray);
There are also three alpha functions available, depending on what effect you want to use (straight alpha, alpha change from a start alpha to an end alpha, and a three-alpha fade over the particle lifetime). In the following code, you’re using the two-alpha fade (alpha2), with an alpha of 1 (opaque) at the start of the particle life that transitions to 0 (transparent) at the end.
part_type_alpha2(trail, 1, 0);
The following line of code sets the speed of the particle (trail) and is a range from a minimum (for example, 2) to a maximum (for example, 5) and can be made to move faster or slower by changing the increment (for example, –0.20).
part_type_speed(trail, 2, 5, -0.20, 0);
This function also has a wiggle, which is added to the base speed of each particle and can be from 0 to 20. This particle will have no wiggle (0). If you do want it to have wiggle, use 1.
For the direction of the Instance, you set a minimum (for example, 0) and maximum (for example, 359) direction, as well as an increment (for example, 0) and a wiggle (0). The increment will add (or subtract) an amount to the current direction, providing nice swirling and curling effects. For this effect, you’re setting a random direction from 0 degrees to 359 degrees with no increment or wiggle:
part_type_direction(trail, 0, 359, 0, 0);
The tail should be affected by gravity, so use the following function to add a small amount of gravity to pull the particles down. First, you set the force of the gravity (for example, 0.5), and then you set the direction (for example, 270).
part_type_gravity(trail, 0.5, 270);
The orientation of the particle works the same as the image angle of a Sprite, and gives the particle a rotational angle. For this effect, a random value between 0 degrees and 360 degrees is fine:
part_type_orientation(trail, 0, 359, 0, 0, 0);
The following function controls blending, which uses an additive blend mode, meaning that the light parts of the particle will have their luminosity added to that of any other particles that they may overlap with while in the Room. It gives particles a glow effect when there are many of them, and it’s very useful. But for the trail, leave it set to false (0).
part_type_blend(trail, 0);
The following function is the last one. It controls the lifetime of the trail particle. It has a random value in that all the trail particles will last from between 8 and 30 steps.
part_type_life(trail, 8, 30);
- Click the green check mark as shown in Figure 8-2.
The code window is saved and closed.
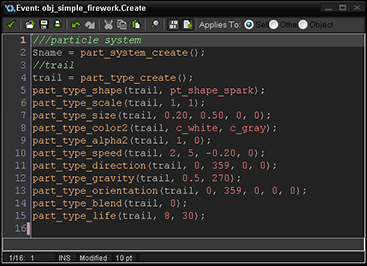
Figure 8-2: Code for the particle system and smoke trail.
Coding the Simple Firework Effect
This section continues from the previous section, in which you wrote the code to create a particle system and smoke trail for the firework. In this section, I pick up on the simple coding tutorial by showing you the code for the firework effect. This code is very similar to what you did in the last section for the trail. So, I won’t explain each function in detail like I did in the last procedure. If you want to learn about each function, see the preceding section.
The following code picks up from the last procedure; if you didn’t follow the last procedure, simply pick up by creating a new Object, adding a Create Event, and then dragging and dropping an Execute Code Action.
To code the firework effect, follow these steps:
1. Open the firework Object that you started in the last procedure (I named mine obj_simple_firework).
You should see the Create Event in the Events section and an Execute Code Action in the Actions section.
2. Double-click the Execute Code Action from the Action section (if it isn’t already open from the last procedure).
The code window appears populated with the code from the preceding section.
3. In the code window, type the following code (see Figure 8-3).
//firework (this is a comment to denote where the code for the firework starts)
stars = part_type_create();
part_type_shape(stars, pt_shape_star);
part_type_scale(stars, 1, 1);
part_type_size(stars, 0.5, 1, -0.02, 0);
part_type_color3(stars, c_lime, c_fuchsia, c_blue);
part_type_alpha3(stars, 0, 1, 0);
part_type_speed(stars, 2, 3, 0, 0);
part_type_direction(stars, 0, 359, 0, 0);
part_type_gravity(stars, 0.20, 270);
part_type_orientation(stars, 0, 359, 0, 0, 0);
part_type_blend(stars, 1);
part_type_life(stars, 50, 70);
I simply copied and pasted the trail code from the last procedure and then updated the differences (changing “trail” to “stars,” and then tweaking the values).
A key difference in this code is that the additive blend was turned on (1) in the second-to-last line of code. This causes the firework to appear brighter and more luminous than the trail. Also, you probably noticed that the color scheme got an upgrade by using color3 and alpha3 functions to provide a wider range of colors and effects.
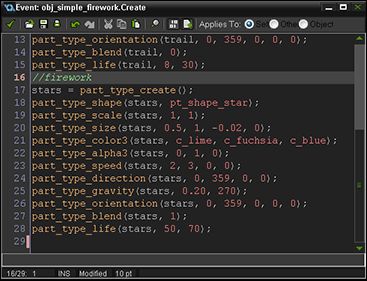
Figure 8-3: The firework code.
3. Now add in the following code to configure how the Instance moves (see Figure 8-4):
//movement
direction = point_direction(x, y, room_width / 2, 100);
speed = 15 + random(5);
gravity = 0.5;
gravity_direction = 270;
alarm[0] = 1;
alarm[1] = room_speed;
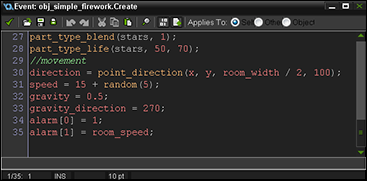
Figure 8-4: The movement code.
4. Click the green check mark.
The code window is saved and closed.
5. From the Object Properties window, choose Add Event⇒Alarm⇒Alarm 0.
The Alarm 0 Event appears in the Events section.
6. Drag and drop an Execute Code Action from the Control tab to the Actions section.
A code window appears.
7. In the code window, type the following code:
part_particles_create(Sname, x, y, trail, 1);
alarm[0] = 1;
The function, part_particles_create(), enables you to create particles at any point in the Room without using emitters. It’s fast and easy to set up (as you can see in this example). When used every step, it can create stream effects; when used once, it can create burst effects, just like an emitter. You can also use the random functions to create the particles over an area, which can simulate a rectangular emitter with a linear distribution.
When you’re working with particles, always keep in mind this function (as well as its extended function part_particles_create_color, which permits you to create particles of a specific color) due to its ease of use and small memory footprint.
8. Click the green check mark.
The code window is saved and closed.
9. Choose Add Event⇒Alarm⇒Alarm 1.
The Alarm 1 Event appears in the Events section.
10. Drag and drop an Execute Code Action from the Control tab to the Actions section.
A code window appears.
11. In the code window, type the following code:
alarm[0] = -1;
part_particles_create(Sname, x, y, stars, 200);
alarm[2] = 1;
This Alarm uses the create particles function to burst the star particles from the firework and sets Alarm 2, which destroys the Instance.
12. Click the green check mark.
The code window is saved and closed.
13. Choose Add Event⇒Alarm⇒Alarm 2.
The Alarm 2 Event appears in the Events section.
14. Drag and drop an Execute Code Action from the Control tab to the Actions section.
A code window appears.
15. In the code window, type the following code:
if part_particles_count(Sname) > 0
{
alarm[2] = 1;
}
else
{
part_type_destroy(trail);
part_type_destroy(stars);
part_system_destroy(Sname);
}
This code destroys all the Instances and adds another new function, part_particles_count. This function is extremely useful for things like timing an Instance’s destruction as it counts the number of particles currently in the Room from a given system. The preceding code checks this value, and when it returns that no particles are present, it destroys the particles and the system. It’s important to do it this way, because if you destroy the particles and system while there are particles visible in the Room, they’ll just disappear and that does not look good. It kinda takes away the “special” from the special effect.
16. Click the green check mark.
The code window is saved and closed.
At this point, you have a simple coded particle firework complete with smoke trail. Now you just need to create a button for it, place it in the Room, and test it out. The following procedure describes how to duplicate and update the button I showed you how to create in Chapter 7.
To create a button for the simple code firework, follow these steps:
- From the Resource tree, right-click obj_button_builtin (see Chapter 7) and select Duplicate.
The duplicated Object Properties window appears.
- In the Name field, type obj_button_simple.
- In the Sprite section, click the drop-down list and select spr_Simple_Button (from the Particles tutorial assets).
The thumbnail and name of the Sprite appear.
- Select the Step Event from the Events section.
The Actions for the Step Event appear in the Actions section.
- From the Actions section, double-click the Execute Code Action.
The code window appears.
- Update the code so that it creates an Instance of obj_simple_firework (most likely, line 10 of your code, see Figure 8-5).
instance_create(random(room_width), 400, obj_simple_firework);
You can now open the Room and add an Instance of the simple button Object (see Chapter 7 for details). Then save and test your game. You should now have three working special effects if you’ve been following along starting from Chapter 7.
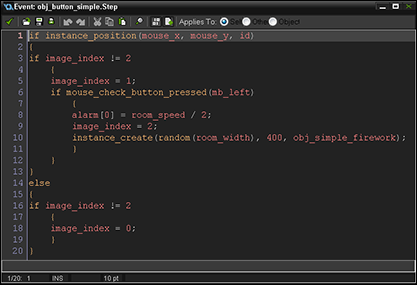
Figure 8-5: The Step Event code for the new button.
Coding Emitters
Emitters are used to create particles at specific positions and areas in the Room. In Chapter 7, I show you how to use the Create Emitter Action from the Extra tab. And, earlier in this chapter, I show you how to burst/stream particles without an emitter using the function part_particles_create. In this section, I describe how to code an emitter.
 Emitters, just like particles and particle systems, are stored in memory during gameplay and indexed into a variable, so use them carefully to prevent memory leaks or other errors. It’s always considered best practice to destroy all Instances of particles, emitters, and systems after they’re no longer a part of the Room.
Coding burst emitters
For this firework effect, the only Object you need is a button Object. You place an Instance of this button Object in the Room, and when the player presses it, the particles burst.
The following procedure is a continuation of the other procedures in this chapter and Chapter 7, so the first step has you duplicate a button that I show you how to create in Chapter 7. If you haven’t read Chapter 7 yet, skip back and follow the procedure to create obj_button_builtin there.
To code a burst emitter, follow these steps:
- From the Resource tree, right-click obj_button_builtin and select Duplicate.
The duplicated Object Properties window appears.
- In the Name field, type obj_button_burst.
- From the Sprite section, click the drop-down list and choose spr_Button_Burst (from the Particles tutorial assets).
The thumbnail and name of the Sprite appear.
- From the Events section, select the Create Event.
The Actions for the Create Event appear in the Actions section.
- From the Actions section, double-click the Execute Code Action.
The code window appears.
- In the code window, type the following code to define the particle, which will move quickly upward and then will slowly fall due to the gravity function (see Figure 8-6):
image_speed = 0;
image_index = 0;
Sname = part_system_create();
explode = part_type_create();
part_type_shape(explode, pt_shape_flare);
part_type_size(explode, 0.50, 1.50, 0.02, 1);
part_type_scale(explode, 0.25, 0.25);
part_type_color3(explode, 4227327, 8454143, 4210688);
part_type_alpha3(explode, 0, 1, 0);
part_type_speed(explode, 10, 20, -0.4, 5);
part_type_direction(explode, 45, 135, 0, 10);
part_type_gravity(explode, 0.40, 270);
part_type_orientation(explode, 0, 359, 0, 0, 0);
part_type_blend(explode,1);
part_type_life(explode, 60, 120);This code defines the colors by using absolute numeric values (such as 4227327). The code also turns on additive blending to improve the effect (part_type_blend(explode,1)). In addition to blending, the code uses the wiggle effect (the last value in the size, speed, and direction functions).
 Wiggle adds an amount to the target function for each step, but the change only lasts a step, so the particle appears to jump in size (or speed or direction). You can specify a value from 0 to 20 for wiggle, and a random number will be generated from 0 to n each step, and this will be added onto the final particle property.
 - To define the emitter, add this code to assign a variable (emitter1) to the emitter (see Figure 8-6).
emitter1 = part_emitter_create(Sname);
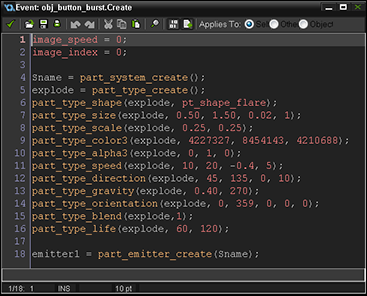
Figure 8-6: Create Event code for the burst emitter.
- Click the green check mark.
The code window is saved and closed.
- Select the Step Event from the Events section.
The Actions for the Step Event appear in the Actions section.
- Double-click the Execute Code Action.
The code window appears.
- Modify the code so that the particle bursts from the emitter as shown here and in Figure 8-7:
if instance_position(mouse_x, mouse_y, id)
{
if image_index != 2
{
image_index = 1;
if mouse_check_button_pressed(mb_left)
{
alarm[0] = room_speed / 2;
image_index = 2;
var posx, posy;
posx = choose(194, 305, 520);
if posx = 194 posy = 264 else if posx = 305 posy = 235 else posy = 292;
part_emitter_region(Sname, emitter1, posx - 64, posx + 64, posy - 32, posy + 32, ps_shape_ellipse, ps_distr_gaussian);
part_emitter_burst(Sname, emitter1, explode, 100);
}
}
}
else
{
if image_index != 2
{
image_index = 0;
}
}This code moves the emitter around the Room based on a random value of 194, 305, or 520) and will burst 100 particles. The shape of the particle is also defined (here, it’s ellipse, but you can also use rectangle, diamond, or line). The code also defines the distribution of the particle, which can be Gaussian (more in the middle), linear (equal distribution), or inverse Gaussian (more at the edges).
- Click the green check mark.
The code window is saved and closed.
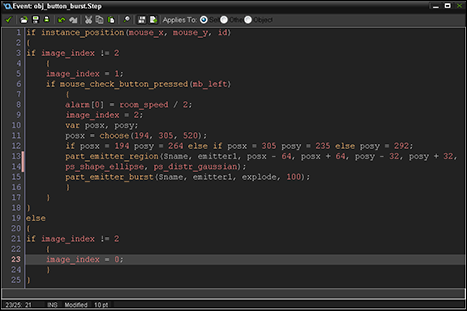
Figure 8-7: The Step Event code for the burst emitter.
- Choose Add Event⇒Other⇒Room End.
The Room End Event appears in the Events section.
- Drag and drop an Execute Code Action from the Control tab to the Actions section
A code window appears.
- In the code window, type the following code:
part_type_destroy(explode);
part_emitter_destroy(Sname, emitter1);
part_system_destroy(Sname);This code effectively destroys the particle, the emitter, and the system to help keep the game from crashing due to memory leaks and so on.
- Click the green check mark.
The code window is saved and closed.
Now you’re ready to add this button to the Room to test your newly coded emitter (see Chapter 7). When you click the Emitter Burst button, you should see a brilliant display of yellows and whites of varying degrees of color that fall slowly downward with lots of wiggle, as shown in Figure 8-8.
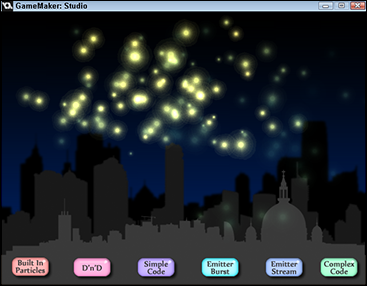
Figure 8-8: The emitter burst special effect.
This burst emitter works great for effects that need to be created for a specific moment. In the next section, I show you how to code a stream emitter, which works well for effects that need to trigger every step.
Coding stream emitters
The main difference between a stream emitter and a burst emitter is that you can use a special function in a stream emitter so that it continues to emit particles until you want it to stop. This provides a means to create excellent smoke effects, trail effects, and flame effects. In the following procedure, I show you how to code a stream emitter so that it displays a waterfall-style firework effect, as shown in Figure 8-9.
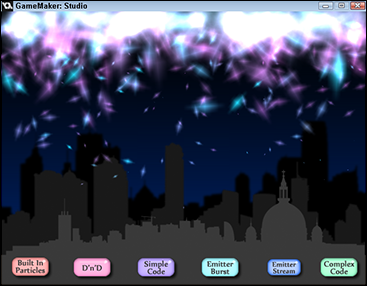
Figure 8-9: The emitter stream effect.
The following procedure is a continuation of previous procedures, in that the first step has you duplicate a button (obj_button_builtin) from Chapter 7.
To code a stream emitter, follow these steps:
- From the Resource tree, right-click obj_button_builtin and choose Duplicate.
The duplicated Object Properties window appears.
- In the Name field, type obj_button_stream.
- From the Sprite section, click the drop-down list and choose spr_Button_Stream (from the particles tutorial assets).
The thumbnail and name of the Sprite appear.
- Select the Create Event from the Events section.
The Actions for the Create Event appear in the Actions section.
- Double-click the Execute Code Action.
The code window appears.
- In the code window, update the code to match (see Figure 8-10):
image_speed = 0;
image_index = 0;
Sname = part_system_create();
waterfall = part_type_create();
part_type_shape(waterfall, pt_shape_pixel);
part_type_size(waterfall, 1, 2, -0.10, 0);
part_type_scale(waterfall, 8, 16);
part_type_color3(waterfall, 16777088, 16744703, 16776960);
part_type_alpha2(waterfall, 0, 1);
part_type_speed(waterfall, 2, 4, -0.30, 5);
part_type_direction(waterfall, 0, 180, 0, 10);
part_type_gravity(waterfall, 2, 270);
part_type_orientation(waterfall, 0, 359, 5, 0, 0);
part_type_blend(waterfall, 1);
part_type_life(waterfall, 5, 30);
emitter1 = part_emitter_create(Sname);
part_emitter_region(Sname, emitter1, 0, 640, 0, 16, ps_shape_rectangle, ps_distr_linear);Of note for this code is that the particle shape is pixel and has an X scale of 8 and a Y scale of 16. The values for the X and Y scales stretch the particle by a large amount, which will have a dramatic effect.
- Click the green check mark.
The code window is saved and closed.
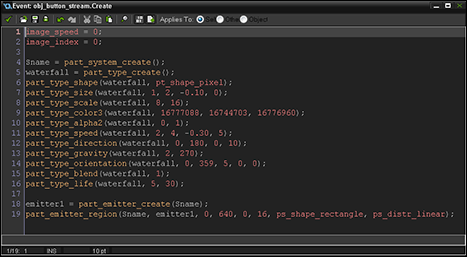
Figure 8-10: The Create Event code for the stream emitter.
- Select the Step Event from the Events section.
The Actions for the Step Event appear in the Actions section.
- Double-click the Execute Code Action from the Action section.
The code window appears.
- In the code window, update the code to match the following (see Figure 8-11):
if instance_position(mouse_x, mouse_y, id)
{
if image_index != 2
{
image_index = 1;
if mouse_check_button_pressed(mb_left)
{
alarm[0] = room_speed *3;
image_index = 2;
part_emitter_stream(Sname, emitter1, waterfall, 50);
}
}
}
else
{
if image_index != 2
{
image_index = 0;
}
} In this code, the emitter will stream 50 particles each step. That means 50 new particles are created for each step of the game. Be careful with this, though: If too many particles are created without being destroyed, the multitude of particles can slow down your game. - Click the green check mark.
The code window is saved and closed.
- Select the Alarm 0 Event from the Events section.
The Actions for the Alarm 0 Event appear in the Actions section.
- Double-click the Execute Code Action from the Actions section.
The code window appears.
- Update the code to match the following:
image_index = 0;
part_emitter_stream(Sname, emitter1, waterfall, 0);The 0 tells the emitter to not emit any particles at all. By placing this in the Alarm Event, you’re effectively stopping the emitter after a given amount of time. If you use a negative number here, you’re telling the emitter to stream particles at a random number. For example, if you use –5, you’ll have a one in five chance of emitting a particle each step.
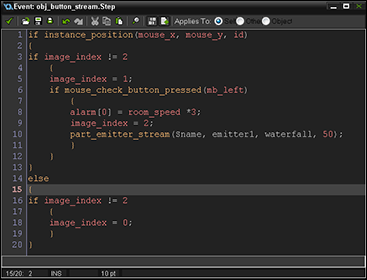
Figure 8-11: The Step Event code for the stream emitter.
 The length of time the emitter streams the particles is based on when the Alarm is triggered from the Step Event. Within the Step Event is a line of code, alarm[0] = room_speed *3;, which says, after three steps of the game, trigger the Alarm (the Alarm Event is set up to stop the emitter). If you want to test this, run the game (after you complete Step 15) and count one-one thousand, two-one thousand, three-one thousand, and then the effect should stop. Then change the code from 3 to 6. Now when you press the button, you can count up to six seconds before the particles stop emitting.
 - Choose Add Event⇒Other⇒Room End.
The Room End Event appears in the Events section.
- Drag and drop an Execute Code Action from the Control tab to the Actions section.
A code window appears.
- In the code window, type the following:
part_type_destroy(waterfall);
part_emitter_destroy(Sname, emitter1);
part_system_destroy(Sname); - Click the green check mark.
The code window is saved and closed.
You can now add obj_button_stream to the Room to test it (see Chapter 7).
Coding Complex Particle Effects
This section shows you how to put everything in this chapter into one firework with some new, advanced functions that I haven’t discussed yet.
The first procedure starts with your duplicating the button that I show you how to create in the beginning of Chapter 7.
To create a complex particle effect, follow these steps:
- From the Resource tree, right-click obj_button_builtin and choose Duplicate.
The duplicated Object Properties window appears.
- In the Name field, type obj_button_complex.
- From the Sprite section, click the drop-down and choose spr_Button_Complex (from the Particles tutorial assets).
The thumbnail and name of the Sprite appear.
- Select the Create Event from the Events section.
The Actions for the Create Event appear in the Actions section.
- Double-click the Execute Code Action from the Actions section.
The code window appears.
- Update the code in the window to match the following:
image_speed = 0;
image_index = 0;
//create particle system
Sname = part_system_create(); - Type in the following code for the smoke particle:
//create smoke particle
smoke = part_type_create();
part_type_shape(smoke,pt_shape_cloud);
part_type_size(smoke,0.10, 0.50,0.01,0);
part_type_scale(smoke,0.50,0.50);
part_type_color2(smoke,12632256,8421504);
part_type_alpha2(smoke,1,0,);
part_type_speed(smoke,1,1,0,0);
part_type_direction(smoke,0,359,0,0);
part_type_gravity(smoke,0.05,90);
part_type_orientation(smoke,0,0,0,0,1);
part_type_blend(smoke,0);
part_type_life(smoke,15,45); - Type in the following code for the firework particle:
//create firework particle
firework = part_type_create();
part_type_sprite(firework,spr_Custom_Particle, false, false, true);
part_type_size(firework,0.50,1,0,1);
part_type_scale(firework,0.5,0.5);
part_type_color3(firework,8454143,8453888,8421631);
part_type_alpha3(firework,1,0,1);
part_type_speed(firework,1,2,0,0);
part_type_direction(firework,0,359,0,0);
part_type_gravity(firework,0.03,270);
part_type_orientation(firework,0,0,0,0,1);
part_type_blend(firework,1);
part_type_life(firework,60,120); - Type in the following code for the flare particle:
//create flare particle
flare = part_type_create();
part_type_shape(flare,pt_shape_flare);
part_type_size(flare,1,1,0,0.50);
part_type_scale(flare,0.5,0.5);
part_type_color1(flare,8454143);
part_type_alpha2(flare,0,1);
part_type_speed(flare,7,9,0,0);
part_type_direction(flare,50,130,0,0);
part_type_gravity(flare,0.1,270);
part_type_orientation(flare,0,0,0,0,1);
part_type_blend(flare,1);
part_type_life(flare,50,70);You just coded three different particles into a single Create Event using functions I cover earlier in this chapter. One of the particles is going to be used as a carrier for the other two, which will take advantage of two special functions that can make your special effects truly special.
- Type the code for the special functions:
//special functions
part_type_step(flare,10,smoke);
part_type_death(flare,100,firework);These two functions are used to tell a particle to create another particle every step that it exists, and to create another particle when its lifetime is over. So, in the context of this firework, these lines of code tell the flare particle to generate 10 smoke particles every step and then, at the end of its life, it creates 100 firework particles.
These functions can quickly create many thousands of particles or even an infinite loop of particle creation, which can slow down and crash your game, so take great care with these! The firework particle uses a custom Sprite for the particle and not one of the built-in constants. You may find it very useful to use your own images to animate particles or to have random images for each particle (as is the case here). - Type in the code for the emitter:
emitter1 = part_emitter_create(Sname);
part_emitter_region(Sname,emitter1,220,420,400,400, ps_shape_rectangle, ps_distr_linear); - Click the green check mark.
The code window is saved and closed.
- Select the Step Event from the Events section.
The Actions for the Step Event appear in the Actions section.
- Double-click the Execute Code Action from the Actions section.
The code window appears.
- Update the code to match the following:
if instance_position(mouse_x, mouse_y, id)
{
if image_index != 2
{
image_index = 1;
if mouse_check_button_pressed(mb_left)
{
alarm[0] = room_speed / 2;
image_index = 2;
part_emitter_burst(Sname, emitter1, flare, 3);
}
}
}
else
{
if image_index != 2
{
image_index = 0;
}
} - Click the green check mark.
The code window is saved and closed.
- Choose Add Event⇒Other⇒Room End.
The Room End Event appears in the Events section.
- Drag and drop an Execute Code Action from the Control tab to the Actions section.
A code window appears.
- In the code window, type the following code:
part_type_destroy(flare);
part_type_destroy(smoke);
part_type_destroy(firework);
part_emitter_destroy(Sname, emitter1);
part_system_destroy(Sname);This code destroys the particles and the particle system to help prevent your game from crashing or slowing down due to many particles in the Room at once.
- Click the green check mark.
The code window is saved and closed.
Go ahead and add the button for this complex firework effect into the Room (see Chapter 7) and watch a rather spectacular display that is only partly captured in Figure 8-12.
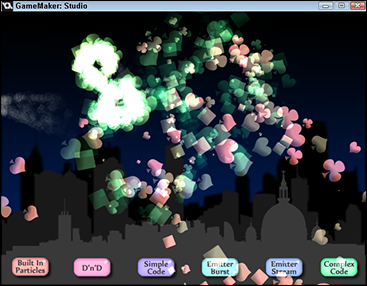
Figure 8-12: The complex code effect.
In this chapter, I show you several different ways to create special effects for your game. To further help you create impressive visual displays, particle editors are available from people who use GameMaker: Studio and like to contribute to the community. These particle editors are text files that contain the necessary code, which you can copy and paste into an Execute Code Action. Two of them are
- Particle Designer 2.5 by Alert Games: http://gmc.yoyogames.com/index.php?showtopic=290449
- Sparks by Nocturne Games: http://gmc.yoyogames.com/index.php?showtopic=539511
You can also search the Internet for more particle editors.
Be aware that particles in HTML5 are not quite as fast as they are in Windows. Also, if the player does not have WebGL switched on in her browser, she won’t have color blending. Finally, on Android/iOS devices, particles can slow down games if they involve too much overdraw of the screen.