
Chapter 2
Discovering GameMaker: Studio Features and Tools
In This Chapter
![]() Getting acquainted with the interface
Getting acquainted with the interface
![]() Adding Sounds to your game
Adding Sounds to your game
![]() Making things pretty with Sprites
Making things pretty with Sprites
![]() Bringing your game to life with Objects
Bringing your game to life with Objects
![]() Putting your Objects in Rooms
Putting your Objects in Rooms
In this chapter, I provide a broad overview of some of the most used features and tools of GameMaker. That includes the interface, Sounds, Sprites, Objects, Actions, and Events. I go into much more detail on Actions and Events in the following chapters, but here I show you how to get started with creating and loading Sprites, adding music as a resource, and creating an Object that you can place in a Room. Buckle up, folks — this ride is about to start!
Navigating the GameMaker Interface
The basic work area within GameMaker consists of several sections. These sections are laid out in an organized manner to form the interface from which you work. You see a main menu along the top and an icon menu directly below that; these two menus provide separate ways of, say, creating a Sprite, loading a Sound, creating an Object, and so on. The icon menu is where you can find the Target drop-down list, which is where you tell GameMaker which platform you want to publish to, such as HTML5, Android, iOS, and so on (see Figure 2-1).
Along the left pane, you can find the Resource tree, which contains a quick list of resources, including Sprites, Sounds, Backgrounds, Objects, Rooms, and more. The bottom pane consists of a Compile window, which blasts into life when you run the game (meaning, when you run the game, you can watch GameMaker compile the game through a series of lines of text).
 I tend to keep the Compile window closed while I’m working just to save screen space; however, if you have a large screen, you may find it useful when debugging and setting up extra Target modules, such as Android.
If you’re working from a tutorial, in the right pane you see the tutorial window. Figure 2-1 highlights the various parts of the interface.
When you create a new Object, or a Sprite, or a Room, or what have you, a new floating window appears. This floating window could contain several tabs of configurations, or it could have radio buttons, text fields, drop-down icons, drag-and-drop icons, and more. It’s within these floating windows where you do the majority of your work.
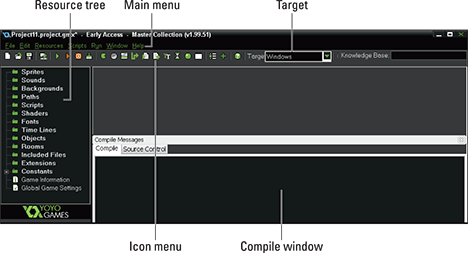
Figure 2-1: The GameMaker interface.
Pump Up the Volume: Adding Sounds to Your Game
Sounds make up a large part of games these days. Everything from moody background music that builds as the player anticipates a challenging boss battle, to explosions, bullets firing, a character jumping (sproing!), and more.
To add a Sound resource to GameMaker, follow these steps:
- Choose the icon that looks like an old-fashioned stereo speaker (see Figure 2-2).
The Sound Properties window opens.

Figure 2-2: Click this icon to create a new Sound.
- To load a sound, click the Load Sound button (see Figure 2-3).
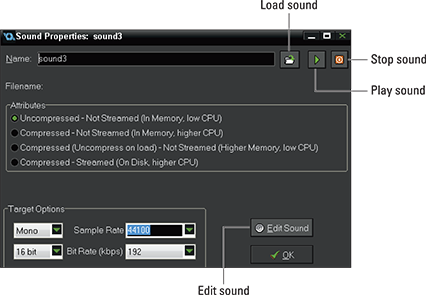
Figure 2-3: The Sound Properties window.
- Navigate to a sound file that you previously saved on your PC.
- To play and stop the Sound, click the Play and Stop buttons (refer to Figure 2-3).
You hear the Sound when you click Play and it continues to play until you click the Stop button.
- You can edit the Sound by clicking the Edit Sound button (refer to Figure 2-3).
You need to configure an external sound editor to work with GameMaker in order to edit a Sound. Read on for instructions on how to do this.
- Click OK to save and close the Sound Properties window.
You can configure external editors to work within GameMaker. This includes sound editors, image editors, and code editors. To configure an external editor to work in GameMaker, follow these steps:
- From the main menu, choose File⇒Preferences.
The Preferences window appears.
- Click the Editors tab (shown in Figure 2-4).

Figure 2-4: The Editors tab of the Preferences dialog box.
- Click the Open (...) button for the type of editor that you want to configure to work with GameMaker.
Your options are Code Editor, Image Editor, SWF Viewer, and Sound Editors (for WAV files or MP3 files).
A navigation window opens from which you can navigate to and select the editor you want on your PC.
- Click OK to save and close the Preferences window.
Making Things Sparkle with Sprites
A Sprite is an image, or a series of sub-images, that you assign to Objects. You can use Sprites to represent Objects in the game, such as the player (a ship or a character), explosions, walls, score displays, or anything you want in your game.
When a Sprite consists of a series of images, those images are known as sub-images, and they play continuously, as if they were mini-movies. That can give the appearance of a plane’s propellers rotating, an animated explosion, and so forth. Each sub-image within a Sprite is named consecutively (image 0, image 1, image 2, and so on), as shown in Figure 2-5.
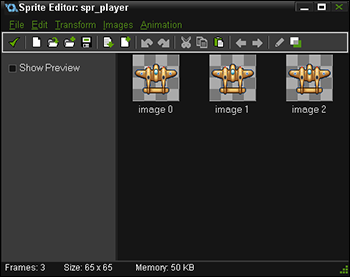
Figure 2-5: The Sprite Editor showing sub-images.
 Just as in programming, which starts counting at 0, the sub-image numbering starts at 0 as well.
If you don’t want the Sprite to play continuously, you can tell GameMaker to display a specific sub-image of your choice. You can even tell GameMaker to choose a sub-image at random (see Chapter 11).
The remainder of this section covers
- Loading and creating Sprites: You can do this a few ways, including using the main menu, the icon menu, or the Resource tree.
- Editing Sprites: You can do everything from adding the final detail to an already loaded Sprite to creating a new Sprite from scratch.
- Configuring Sprites: Sprites have their own properties, which you can set to affect their behavior during a game.
Loading and creating Sprites
To load a Sprite that already exists, follow these steps:
- Click the icon that looks like Pac-Man from the icon menu (see Figure 2-6).

Figure 2-6: Click this icon to create a new Sprite.
The Sprite Properties window appears (see Figure 2-7).
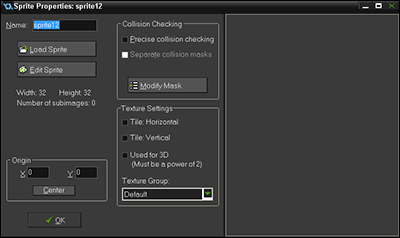
Figure 2-7: The Sprite Properties window.
- Click the Load Sprite button (refer to Figure 2-7).
A navigation menu opens from which you can find an image on your computer.
To create a new Sprite from scratch, follow these steps:
- Click the icon that looks like Pac-Man from the icon menu (refer to Figure 2-6).
The Sprite Properties window appears (refer to Figure 2-7).
- Click the Edit Sprite button in the Sprite Properties window (refer to Figure 2-7).
The Sprite Editor window appears (see Figure 2-8).
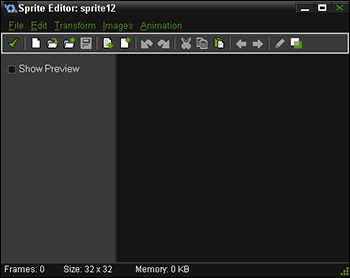
Figure 2-8: The Sprite Editor window.
- Choose File⇒New.
The Create a New Sprite dialog box appears (see Figure 2-9).
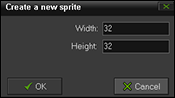
Figure 2-9: The Create a New Sprite dialog box.
- In the Width and Height fields, type in the dimensions you want the Sprite to be.
- Click OK.
A new Sprite, which consists solely of a transparent background at this point, appears in the Sprite Editor. You can now double-click this Sprite to open the image editor from which you can actually draw the Sprite.
To create a sub-image, you can choose one of the Create an Empty Image icons in the Sprite Editor (see Figure 2-10) to add the sub-image either before the current one or at the end. A new, blank sub-image appears in the Sprite Editor.
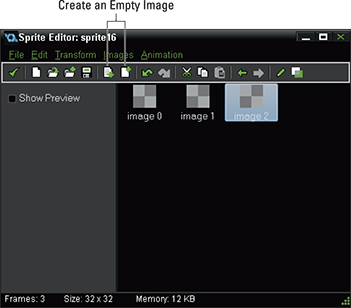
Figure 2-10: The Sprite Editor with three sub-images.
Editing Sprites
GameMaker has a built-in Image Editor (see Figure 2-11) that you can use to edit Sprites. To access the Image Editor, click Edit Sprite from the Sprite Properties window. Then double-click the image that you want to edit.
I don’t cover the Image Editor in this book, but the in-software manual goes into detail on it. Just press F1 in GameMaker to access the manual. Then choose the Index, search for “image editor,” and then choose Display at the bottom of the window.

Figure 2-11: GameMaker’s Image Editor for Sprites.
Configuring Sprites
When you have your Sprite looking the way you want it, you can configure the Sprite with different properties. This includes placing the Origin, setting the Collision Checking (which includes modifying the Mask), and using the Texture Settings. I go into detail on each of these configurations in the following sections.
Using the Origin
The default anchor point, which is considered the Origin, is the top-left corner of a Sprite. GameMaker uses the Origin as a point of reference for rotating, scaling, and so on (for example, turning the image around when it bounces off a wall).
While in the Sprite Properties window, when you click Center (see Figure 2-12), you’re telling GameMaker to use the center of the Sprite as the anchor point (that is, the Origin). Chapter 6 provides a good example of working with the anchor point, in the section on creating the boss Sprite.

Figure 2-12: Click Center to set the anchor point of the Sprite in the center.
Using Collision Checking
The Collision Checking settings are found in the middle of the Sprite Properties window (see Figure 2-13). Collision Checking refers to how the Object (an Object with the Sprite loaded) reacts when colliding with other Objects. You can select the Precise Collision Checking box (refer to Figure 2-13) for more accurate collision detection, but this could potentially slow down the game. You can also modify the Mask from the Sprite Properties window, as discussed next.
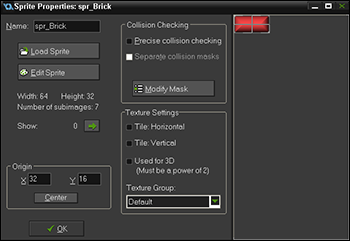
Figure 2-13: The Collision Checking settings.
If your Sprite has sub-images, you can assign a separate Mask to each sub-image. To toggle this option, select the Separate Collision Masks in the Sprite Properties window (refer to Figure 2-13).
To set the Mask, follow these steps:
- In the Sprite Properties window, click the Modify Mask button (refer to Figure 2-13).
The Mask Properties window appears (see Figure 2-14).
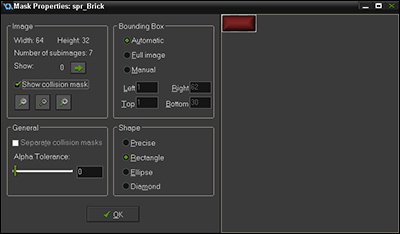
Figure 2-14: The Mask Properties window.
- In the Image section, select the Show Collision Mask check box (refer to Figure 2-14) if you want the collision Mask to show in the editor; deselect the Show Collision Mask check box if you don’t want it to show.
- In the General section, select the Separate Collision Masks check box to use a separate collision mask for each sub-image.
If you select the Separate Collision Masks check box, you can set the Alpha Tolerance. The higher you set the tolerance, the more the partially transparent pixels are not affected by the Mask. Pixels become transparent as the Sprite transitions between sub-images. It’s during these transitions that the Alpha Tolerance comes into play.
 By turning on Separate Collision Masks, you significantly increase the workload for GameMaker to run your game, which could cause performance issues.
 - In the Bounding Box section, select Automatic, Full Image, or Manual.
If you select Automatic, GameMaker does its best job of forming a Mask around the Sprite; if you select Full Image, GameMaker selects the entire image, including the transparent background; and if you select Manual, you can configure the settings yourself by typing in values in the Left, Right, Top, and Bottom fields.
- In the Shape section, set a more precise Mask shape by choosing Precise, Rectangle, Ellipse, or Diamond.
If you select Precise, GameMaker does its best to set the Mask exactly against the pixels. If you choose Rectangle, Ellipse, or Diamond, GameMaker creates a Mask based on the chosen shape.
When you select Precise, you significantly increase the workload for GameMaker to run your game (even more so than using a separate collision mask), which could cause performance issues. - Click OK to save and close the Mask Properties window.
In Chapter 8, you can find information on how to use fixtures instead of collision Masks, for when you want to make a physics-based game.
Using Texture Settings
The Texture Settings, and in particular the Texture Group, can be useful when you start making very large games and you need to keep track of many different resources. Essentially, GameMaker enables you to save Sprites, Backgrounds, and Fonts to different groups for your reference later.
To create a Texture Group, follow these steps:
- From the main menu, choose Resources⇒Change Global Game Settings.
The Global Game Settings window opens.
- Click the Texture Groups tab, as shown in Figure 2-15.
- Click the Add button near the bottom of the window (refer to Figure 2-15).
A new Texture Group appears in the Texture Groups section.
- To rename the new Texture Group, select it, and then click the Rename button (near the Add button).
The Rename Texture Page dialog box appears (see Figure 2-16).
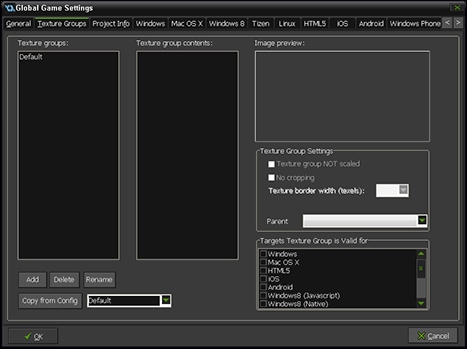
Figure 2-15: The Texture Groups tab of the Global Game Settings window.
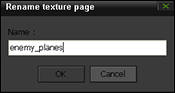
Figure 2-16: The Rename Texture Page dialog box.
- Enter a new name, and click OK.
The renamed Texture Page appears in the Texture Groups section.
- Click OK to save and close the Global Game Settings window.
Now that you have more than one Texture Group, when you’re in the Sprites Properties, you can assign that Sprite to the new Texture Group. From the Texture Group drop-down list, select the group you want (see Figure 2-17). Texture Groups do help optimize game performance.
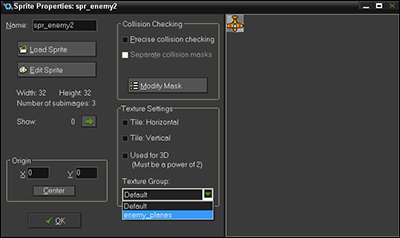
Figure 2-17: Choose the Texture Group you want from the drop-down list.
Populating Your Game with Objects
In this section, I provide a quick overview of Objects, which are what make up the different parts of the game, such as the player, the enemy, the score display, and so on. Objects can also control the game through the different Events and Actions that you add to them.
To create an Object, follow these steps:
- Choose the green ball icon from the icon menu (see Figure 2-18).

Figure 2-18: Choose the green ball to create a new Object.
The Object Properties window appears (see Figure 2-19).
- In the Name field, type a name for the Object, such as obj_plane.
- To assign a Sprite, click the drop-down icon from the Sprite section (see Figure 2-19).
A list of available Sprites appears for you to choose from. Sprites provide a visual representation of the Object — you know, so that the player has a cool-looking ship to shoot the bad guys (and the bad guys have fearsome-looking ships).
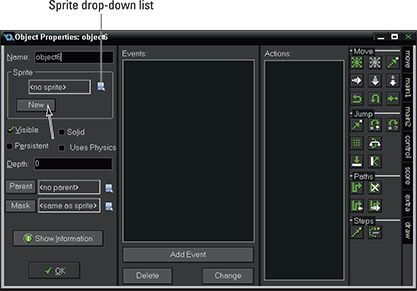
Figure 2-19: Click the drop-down icon to open a list of available Sprites.
- Click the New button from the Sprite section to open the Sprite Properties window.
You can load a Sprite or create a new one through the Editor (see “Making Things Sparkle with Sprites,” earlier in this chapter, for more information).
- Select the Visible check box if you want the Object to be visible in the game.
- Select the Solid check box so that GameMaker knows this is an Object that will likely collide with other Objects.
For example, say you have two balls in a Room and they collide. You would expect them to bounce off each other as if they were balls in real life. But if one of the balls is not Solid, then the one ball might appear to roll right through the other as if it were made of air.
- Select the Persistent check box for the Object to carry over from Room to Room.
The Object is not destroyed even if the player leaves one Room and enters another. The only way to destroy a Persistent Object is to do so explicitly through Events and Actions.
- Select the Uses Physics check box to create a physics world.
See Chapter 12 for more on using physics.
- In the Depth field, enter a numerical value (such as 10,000) to determine which layer of the Room you want the Object to reside at.
The Depth field enables you to place Objects over other Objects.
- To assign a parent to the Object, click the drop-down icon (see Figure 2-20), and select an Object.

Figure 2-20: Assign a parent Object to inherit the Events and Actions.
When you make a child Object, that Object inherits the properties of the parent Object.
- To assign a Mask to the Object, click the drop-down icon and select the Sprite with the Mask you want to use.
If you don’t do this, GameMaker uses the Mask of the Sprite you assigned to the Object.
- Click the Add Event button to select an Event to add to the Events section.
See Chapter 3 for details on Events.
- Drag and drop Actions from the tab on the right to the Actions section.
See Chapter 4 for details on Actions.
When you finish creating your Objects, you’re ready to place the Objects in the Room, so that you can create Instances of those Objects within the game. You may have a single Object that represents a bad guy, but you can create several Instances of that one Object within the game; in that way, you can create many of the same bad guy to attack the player. I go into more detail on Rooms at the end of this chapter.
If you forgot to load a Sprite before you started making your Object, you can click New from the Sprite section of the Object Properties window to open the Sprite Properties window. Then you can proceed to load a Sprite or create a new one through the Editor (refer to Figure 2-11).
Placing Objects in the Game Room
If you think the magic only happens in the, um, kitchen, then does GameMaker have a Room for you! GameMaker has a feature called Rooms. A Room is where you place all the different parts of your game. After you finish creating and refining your resources — Sounds, Sprites, Objects (configured with Actions and Events) — you’re ready to place Instances of your Objects in the Room. But first you have to create one.
Creating a Room
To create a new Room, click the Create a Room icon (which looks like a white rectangle; see Figure 2-21). The Room Properties window opens (see Figure 2-22).

Figure 2-21: The Create a Room icon.
The Room Properties window has several tabs of features:
- Backgrounds: Here, you can set the background color, or choose a background image that you can tile to fill the Room.
- Views: Chapter 5 is all about Views. There, you can find an example on how to use Views in the Scrolling Shooter game.
- Physics: Chapter 12 is a great place to get your feet wet using Physics.
- Objects: Here, you can select Objects in order to place Instances of those Objects in the Room (see the following section).
- Settings: Here, you can name the Room, set the size of the Room, and set the speed of the Room. The default speed is 30 steps, which means there are 30 steps per second. Knowing the speed of the Room is useful when it comes to setting Alarms and so forth.
- Tiles: Here, you can select and manually place different images to fill the background. This is different from the Backgrounds tab in that the Backgrounds tab can automatically fill the Room for you, while the Tiles tab is manual.

Figure 2-22: The Room Properties window.
Putting your Objects in the Room
 When you place an Object in the Room, it becomes an Instance of that Object. You can have several Instances of a single Object in your game.
To place an Object in a Room, follow these steps:
- From the Resource tree, double-click a Room.
The Room Properties window appears (refer to Figure 2-22).
- Click the Objects tab.
- Click the drop-down icon indicated in Figure 2-22 to select the Object you want to place an Instance of in the Room (for example, obj_wall).
The name of the Object appears in the field, and you see that Object’s assigned Sprite in the top corner of the window.
- Click in the Room where you want to place an Instance of the Object.
The Sprite for the Object appears where you click. If you’re placing an Object without an assigned Sprite, you see a little blue circle with a question mark in it.