
Chapter 9
Using Surfaces to Create Effects
In This Chapter
![]() Working with the Surface function
Working with the Surface function
![]() Creating shadows
Creating shadows
![]() Placing decals into the game
Placing decals into the game
![]() Using lighting effects
Using lighting effects
![]() Using Views with Surfaces
Using Views with Surfaces
In GameMaker: Studio, a Surface provides you another layer, so to speak, on which you can draw. So far in this book, I’ve only discussed using Sprites and background colors to create a background effect in a Room (see Chapter 2). Essentially, by using Surfaces, you can draw on top of your background (the screen) if you want to add effects during the game.
For example, say you have a shooter game in which the player can toss grenades. When the player tosses the grenade, an explosion occurs. When the explosion occurs, you want a portion of the screen to appear damaged. You create the damage effect by using Surfaces, in that the damage appears on the screen after the grenade explodes. Other uses for Surfaces include adding shadows and lights to complete the look and feel of your game.
Note: This chapter dives into using the GameMaker Language. Creating Surfaces requires writing code. The code examples provided in this chapter are intended to get you started with the possibilities of what you can do with Surfaces.
Understanding the Surface Function
In Chapters 3 and 4, I discuss Events and Actions, including Events and Actions for drawing. The basic drawing function draws straight to the screen. That is, if you have a draw_circle function in the Draw Event, you see a circle appear on the screen. If you want to draw an effect on top of the screen, you need to change the drawing target to be a Surface. Then all subsequent drawing will be drawn on the Surface layer instead of the screen. To change the drawing target, you can use draw_surface() functions; these functions also determine when the effect will be drawn.
The application Surface
GameMaker draws the whole game to a Surface, known as the application Surface. The application Surface is the only Surface that is not volatile and will always exist while your game is running. However, you can create your own Surface, which I discuss in this chapter.
You want to keep your Surface drawings small — the bigger they are, the more memory they’ll use. And the more memory you use, the greater the odds that your game will lag or even crash. To make Surfaces even more complex, GameMaker stores Surfaces as a power of two textures, so that a 640-x-480-pixel Surface is treated as a 1,024-x-512-pixel texture in memory. Try to keep your Surface sizes small so as not to use all the VRAM of the player’s computer or device.
 The default position for Surfaces is always at the (0,0) coordinate within the Room. If you have a large Room with Views, or if you only want a small Surface for a special effect, you need to specify the drawing coordinates, offset within the Room (as discussed in the following procedures).
Creating Shadows with Surfaces
This chapter uses examples from the in-software tutorial, Surfaces_Part 1. Before you start working on creating a Surface, take a moment to become familiar with the tutorial and how it works. In the game, you can use the arrow keys to move and the mouse to aim and shoot. The right mouse button throws a grenade.
To open the tutorial, from the New Project window, click the Tutorials tab. An expandable list of tutorials appears on the left. Click to open a list of Intermediate tutorials and then choose Surfaces_Part 1.
While playing the game, you may have noticed that the player and the enemies have subtle shadows. The following procedures show you how to add shadows to the walls to create a more 3D effect. The following procedure does not use Surfaces, but it does provide an example of how to add a shadow effect to Instances. Then I step you through how to improve this effect with Surfaces.
To add shadows to the walls, follow these steps:
- With the Surfaces tutorial open, from the Resource tree, in the Objects folder, double click obj_Wall.
The Object Properties appear.
- Choose Add Event⇒Draw⇒Draw.
The Draw Event appears in the Events section.
- Drag and drop an Execute Code Action from the Control tab to the Actions section.
A code window appears.
- In the code window, type the following:
draw_sprite_ext(sprite_index, 0, x - 16, y + 16, 1, 1, 0, c_black, 0.5);
draw_self(); - Click the green check mark.
The code window is saved and closed.
If you run the game now, you should see a very basic shadow effect on the walls, as shown in Figure 9-1. To run the game, from the main menu, choose Run⇒Run Normally.
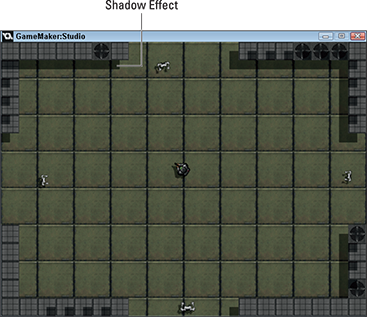
Figure 9-1: A basic shadow effect.
The problem here is that shadows don’t tend to be square with rigid lines. To fix this, go ahead and delete the Draw Event you just created for obj_Wall and proceed to the next procedure. To delete the Draw Event, right-click over the Event and choose Delete Event. Go ahead and close obj_Wall by clicking OK.
The following procedures show you how to create a Surface to draw shadows for the walls.
To create a new Object for the Surface effect, follow these steps:
- With the Surfaces tutorial open, from the Resource tree, right-click Objects and select Create Object.
The Object Properties appear.
- In the Name field, type obj_Shadow_Surface.
- In the Depth field, type –900.
This Depth will draw the shadow under the wall Instances so that you won’t ever see the shadow effect on or over the wall itself.
- Choose Add Event⇒Create.
The Create Event appears in the Events section.
- Drag and drop an Execute Code Action from the Control tab to the Actions section.
A code window appears.
- In the code window, type the following:
surf = -1;
This code creates a variable for the Surface but does not create the Surface itself.
- Click the green check mark.
The code window is saved and closed.
You’ll create the Surface effect in the Draw Event, which is triggered every step of the game.
First, though, the following procedure shows how to remove the Surface effect when you no longer need it.
- From the obj_Shadow_Surface Object Properties, choose Add Event⇒Other⇒Room End.
The Room End Event appears in the Events section.
- Drag and drop an Execute Code Action from the Control tab to the Actions section.
A code window appears.
- In the code window, type the following:
if surface_exists(surf)
{
surface_free(surf);
} - Click the green check mark.
The code window is saved and closed.
This code frees up the memory that the Surface was using.
 If the memory is not freed when the Surface is no longer needed, the game could develop a memory leak, which will eventually crash your game.
The next procedure has you add the Draw Event to check if the Surface effect exists, and if it doesn’t, GameMaker creates a surface area and draws the effect.
To create the Draw Event for the Surface effect, follow these steps:
- From the obj_Shadow_Surface window, choose Add Event⇒Draw⇒Draw.
The Draw Event appears in the Events section.
- Drag and drop an Execute Code Action from the Control tab to the Actions section.
A code window appears.
- In the code window, type the code in Figure 9-2.
The following code checks if the Surface exists.
if surface_exists(surf)
The following code is triggered if the Surface does exist. If the Surface doesn’t exist, GameMaker creates a Surface the size of the Room and assigns the unique ID, or index, of the Surface to the variable; that code is shown below.
{
draw_surface(surf, 0, 0); //the surface exists, so draw it
}The following code sets the drawing target to the surface instead of the screen. The Surface is then cleared to draw something new (more information on this follows the procedure).
else
{
surf = surface_create(room_width, room_height);
surface_set_target(surf)
draw_clear_alpha(c_black, 0);The following code draws the walls, in black, at different positions thanks to the incrementing value of i (that’s where the with (obj_Wall) function comes into play) and with a low alpha onto the Surface.
draw_set_blend_mode_ext(bm_one, bm_inv_src_alpha);
var a = 1 / 16;
for (var i = 1; i < 32; i++ ;)
{
with (obj_Wall)
{
draw_sprite_ext(sprite_index, image_index, x - i, y + i, 1, 1, 0, c_black, a);
}
}
draw_set_blend_mode(bm_normal);The following code resets the drawing target so that any other Draw Events will draw to the screen. If you don’t do this, you won’t see anything when you draw the Surface.
surface_reset_target();
}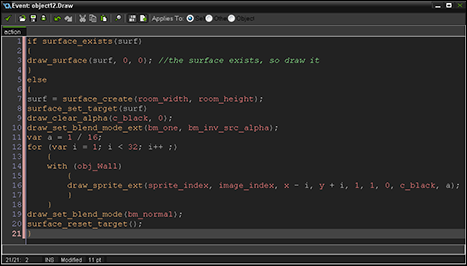
Figure 9-2: Code for drawing the shadow effect to the Surface.
- Click the green check mark.
The code window is saved and closed.
- Click OK to save and close the Object Properties.
 The code from this procedure has you clear the Surface before drawing. What this means is, you’re really clearing the VRAM to make space for the Surface code. You want to clear the VRAM of any other existing code because that code could appear when you draw to the Surface. This code also uses a blend mode, which I discuss in more detail in Chapter 8.
Now you need to add an Instance of your shadow Object to the Room. To add an Instance of the Object to the Room, follow these steps:
- With the Surfaces tutorial open, from the Resource tree, in the Rooms folder, double-click room0.
The Room Properties appear.
- Click the Objects tab.
- Click the Object to add drop-down and select obj_Shadow_Surface.
The name of the Object appears in the field.
- Click within the Room.
An Instance of the Object appears in the Room.
For more information on adding Instances of Objects to a Room, see Chapter 2.
If you run your game now, you should see a nice gradient for the shadow effect, as shown in Figure 9-3.
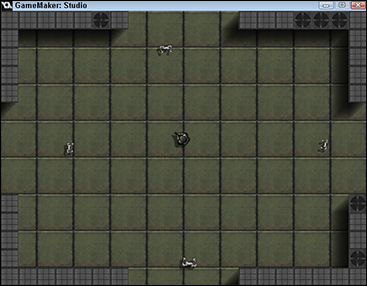
Figure 9-3: A gradient shadow effect on the walls.
Notice how there is no shadow effect on the walls in the bottom-left corner in Figure 9-3. That’s because the shadow is drawn at a depth below the walls, so those shadows don’t appear in the game (because the shadow is drawn as if the light source originates from the top right and shines at an angle toward the bottom left).
Using Surfaces to create a shadow effect eliminates the need to create multiple wall Objects and Instances, each with a different Sprite showing a different angle of shadow.
In the next section, I show you how to expand the procedures on creating a shadow effect to create a debris effect.
Using Decals with Surfaces
In the Surfaces tutorial game, there are Instances called decals. Decals can provide graphical effects but don’t interfere with the gameplay. Just as with Objects and Instances, you want to keep the number of decals that appear in the game to a minimum; otherwise, your game may run very slowly and will eventually crash. In this section, I show you how to draw decals on the Surface to help stop your game from slowing down or having issues.
The following procedure picks up from the in-software Surfaces tutorial. To start, you create an Object that draws the Sprites for the decals that will last a very short amount of time, before being destroyed. This will allow the game to appear to have a million Instances, but it will really have very few.
To draw decals on the Surface, follow these steps:
- With the Surfaces tutorial open, from the Resource tree, right-click Objects and select Create Object.
The Object Properties appear.
- In the Name field, type obj_Decal_Surface.
- Choose Add Event⇒Create.
The Create Event appears in the Events section.
- Drag and drop an Execute Code Action from the Control tab to the Actions section.
A code window appears.
- In the code window, type the following:
surf = -1;
This code creates a variable for the Surface.
- Click the green check mark.
The code window is saved and closed.
To free up the memory for when you no longer want the decal effect, follow these steps:
- From the obj_Decal_Surface Object Properties, choose Add Event⇒Other⇒Room End.
The Room End Event appears in the Events section.
- Drag and drop an Execute Code Action from the Control tab to the Actions section.
A code window appears.
- In the code window, type the following:
if surface_exists(surf)
{
surface_free(surf);
} - Click the green check mark.
The code window is saved and closed.
The code here helps with memory issues. The next procedure has you write the code to make the decals appear. To draw the decals, follow these steps:
- From the obj_Decal_Surface window, choose Add Event⇒Draw⇒Draw.
The Draw Event appears in the Events section.
- Drag and drop an Execute Code Action from the Control tab to the Actions section.
A code window appears.
- In the code window, type the following (see Figure 9-4):
if surface_exists(surf)
{
draw_surface(surf, 0, 0)
if instance_exists(obj_Decal)
{
surface_set_target(surf);
with (obj_Decal)
{
if speed < 0.1
{
if dist > 0 draw_sprite_ext(sprite_index, image_index, x - dist,y + dist, image_xscale, image_yscale, image_angle, c_black, 0.3);
draw_sprite_ext(sprite_index, image_index, x, y, image_xscale, image_yscale, image_angle, c_white, 1);
instance_destroy();
}
}
surface_reset_target();
}
}
else
{
surf = surface_create(room_width, room_height);
surface_set_target(surf)
draw_clear_alpha(c_black, 0);
surface_reset_target();
}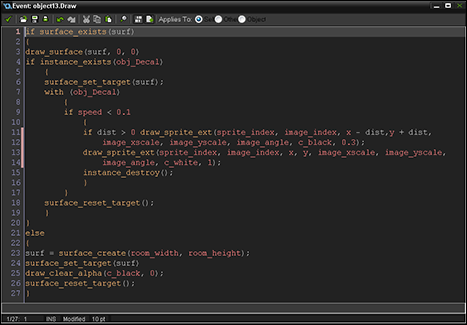
Figure 9-4: Code to display the decals on the Surface.
- Click the green check mark.
The code window is saved and closed.
This code is very similar to the code from the preceding section. One difference in this code, though, is that the code now draws to the Surface every step of the game when an Instance of obj_Decal_Surface exists, rather than when the effect is first created.
Go ahead and place an Instance of obj_Decal_Surface in the Room. For a reminder on how to do that, see earlier in this chapter or Chapter 2. Now, when you play the game, note how much debris is left behind when the player blows up the enemy. Also note how much longer that debris stays in view as compared to before without the code.
Lighting Effects with Surfaces
This section continues with the in-software tutorial on Surfaces. Here, I step you through how to add lighting effects to your game using Surfaces. In the following procedures, you see how to mix additive blending on Sprites and how to use subtractive blending on a Surface, to achieve a lighting effect. To get started, though, I show you how to create a lighting effect without using Surfaces, as shown in Figure 9-5.
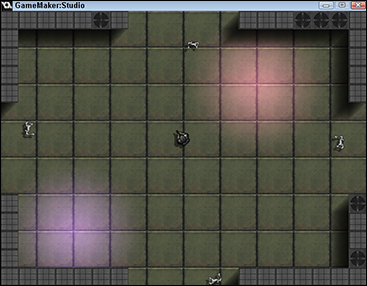
Figure 9-5: Basic lighting effects.
To create the Object for a basic light effect, follow these steps:
- With the Surfaces tutorial open, from the Resource tree, in the Objects section, right-click Objects and choose Create Object.
The Object Properties appear.
- In the Name field, type obj_Light.
- From the Sprite drop-down list, select spr_Round_Light.
The thumbnail and name of the Sprite appear.
- In the Depth field, type –1600.
This effect should be drawn on top of other Instances.
- Click Add Event⇒Create.
The Create Event appears in the Events section.
- Drag and drop an Execute Code Action from the Control tab to the Actions section.
A code window appears.
- In the code window, type the following:
image_xscale = 2;
image_yscale = 2;
image_alpha = 0.5;
image_blend = make_color_hsv(random(255), 128, 255); - Click the green check mark.
The code window is saved and closed.
This code doubles the size of the Sprite and sets the alpha at 0.5, which is a relatively low value, so the light won’t be too bright. The last line of code blends in a random color to provide a little something special to the effect, which is purely optional.
To create the Draw Event for the basic light effect, follow these steps:
- From the obj_Light properties window, choose Add Event⇒Draw⇒Draw.
The Draw Event appears in the Events section.
- Drag and drop an Execute Code Action from the Control tab to the Actions section.
A code window appears.
- In the code window, type the following:
draw_set_blend_mode(bm_add);
draw_self();
draw_set_blend_mode(bm_normal); - Click the green check mark.
The code window is saved and closed.
This code draws the Sprite at its position within the Room using an additive blend mode. Additive blend modes work great for when you want a bright effect, such as explosions and lighting.
Go ahead and place a couple Instances of obj_Light in the Room, as shown in Figure 9-6. For a reminder on how to place an Instance in the Room, see Chapter 2 or earlier in this chapter.
Note: In the Room, the Instances appear white, but in the game they appear colored. That’s because you set the code to have the light effect appear with a random color.
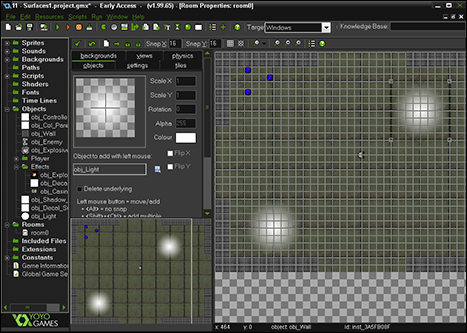
Figure 9-6: Instances of the light Object in the Room.
At this point, the light effect looks pretty cool, but you can make it look cooler. For example, in the following procedure you create some darkness to offset a light effect using a Surface.
Creating a flashlight effect
The next procedure shows how to create a flashlight effect using a Sprite. The Object you create for the flashlight will be a child Object that inherits properties from the parent obj_Light, which you created earlier in this chapter. This section continues from the in-software tutorial, Surfaces.
To create the Object for the flashlight effect, follow these steps:
- With the Surfaces tutorial open, from the Resource tree, right-click Objects and select Create Object.
The Object Properties appear.
- In the Name field, type obj_Player_Light.
- From the Sprite drop-down list, select spr_Player_Light.
The thumbnail and name of the Sprite appear.
- In the Depth field, type –1600.
This Depth will make sure this effect appears over other Instances.
- From the Parent drop-down list, select obj_Light.
See Chapters 2 and 12 for more information on parent and child Objects.
This Object will now inherit the properties of the parent Object, in this case, obj_Light.
- Choose Add Event⇒Create.
The Create Event appears in the Events section.
- Drag and drop an Execute Code Action from the Control tab to the Actions section.
A code window appears.
- In the code window, type the following:
image_xscale = 1.5;
image_yscale = 1.5;
image_alpha = 0.5; - Click the green check mark.
The code window is saved and closed.
- Choose Add Event⇒Step⇒Step.
The Step Event appears in the Events section.
- Drag and drop an Execute Code from the Control tab to the Actions section.
A code window appears.
- In the code window, type the following:
if instance_exists(obj_Player)
{
x = obj_Player.x;
y = obj_Player.y;
image_angle = obj_Player.b_angle;
}
else instance_destroy(); - Click the green check mark.
The code window is saved and closed.
- Click OK.
The Object Properties are saved and closed.
This code makes the light (represented by a Sprite) follow the player Object and always point in the direction the player is pointing (aiming); this is handled by the b_angle portion of the code. Now you need to add a Create Event in obj_Player so that an Instance of obj_Player_Light is placed in the Room.
To create the light effect, follow these steps:
- From the Resource tree, in the Player folder within the Objects folder, double-click obj_Player.
The Object Properties appear.
- From the Events section, with the Create Event highlighted, drag and drop a Create Instance Action from the Main1 tab to the Actions section.
The Create Instance properties appear.
- From the Object drop-down list, select obj_Player_Light.
- Select the Relative check box.
Now the light will be created at the same X and Y coordinates as the player.
- Click OK.
The Create Instance properties are saved and closed.
If you test the game now, you see the flashlight effect, as shown in Figure 9-7.
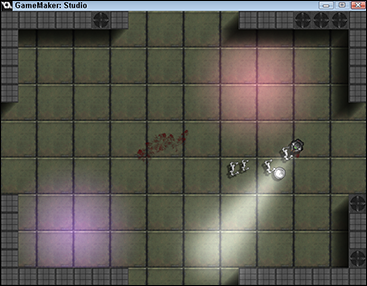
Figure 9-7: The flashlight effect using Surfaces.
To make this flashlight effect even more effective, you can add some darkness to the area surrounding the flashlight. I show you how to do this in the next section.
Adding darkness to the Surface
Earlier in this chapter, I walk you through a couple of different exercises to create some lighting effects, including stationary lights that display a random color each time the game is played and a flashlight effect that follows the player. Here, I show you how to add darkness to the Surface to make the light effects really stand out.
The following procedures continue from the in-software tutorial, Surfaces_Part1. In the next procedure, the Create Event and the Room End Event are the same as in earlier procedures, so if you haven’t completed the earlier sections, you can flip back for details and explanations.
To create an Object for the darkness, follow these steps:
- With the Surfaces tutorial open, from the Resource tree, right-click Objects and select Create Object.
The Object Properties appear.
- In the Name field, type obj_Light_Surface.
- In the Depth field, type –1600.
- Choose Add Event⇒Create.
The Create Event appears in the Events section.
- Drag and drop an Execute Code Action from the Control tab to the Actions section.
A code window appears.
- In the code window, type the following:
surf = -1;
- Click the green check mark.
The code window is saved and closed.
- Choose Add Event⇒Other⇒Room End.
The Room End Event appears in the Events section.
- Drag and drop an Execute Code Action from the Control tab to the Actions section.
A code window appears.
- In the code window, type the following:
if surface_exists(surf)
{
surface_free(surf);
} - Click the green check mark.
The code window is saved and closed.
- Choose Add Event⇒Draw⇒Draw.
The Draw Event appears in the Events section.
- Drag and drop an Execute Code Action from the Control tab to the Actions section.
A code window appears.
- In the code window, type the code in Figure 9-8.
The following code sets the Surface target.
if surface_exists(surf)
The following code clears the surface to black, but with an alpha of 0.85 (you can change this value to achieve different degrees of darkness).
{
surface_set_target(surf);
draw_clear_alpha(c_black, 0.85);The following code sets the blend mode to subtractive blending; this takes the luminosity of what’s drawn and sets the alpha relative to the brightness of individual pixels.
draw_set_blend_mode(bm_subtract);
The following code goes through the light Objects and draws them. This punches a “hole” in the darkness thanks to the subtractive blending.
with (obj_Light)
{
draw_sprite_ext(sprite_index, image_index, x / 2, y / 2, image_yscale, image_xscale, image_angle, c_white, 1);
}
draw_set_blend_mode(bm_normal);The following code resets the drawing target to the screen.
surface_reset_target();
The following code draws the surface, scaled to the size of the screen.
draw_surface_ext(surf, 0, 0, 2, 2, 0, c_white, 1);
}
else
{
surf = surface_create(room_width / 2, room_height / 2);
} - Click the green check mark.
The code window is saved and closed.
In the preceding code, you’ve created the Surface at half the Room width and height. The main reason for doing this is because the game is starting to use a few different Surface effects, and that eats up memory. By reducing the Surface to half the size of the Room, you’re reducing the amount of memory needed for storage. However, the darkness effect will still appear in the entire Room because of the draw_surface_ext() function. That function scales the effect to fit the Room.
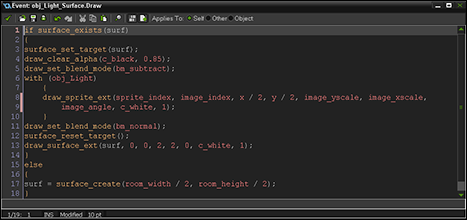
Figure 9-8: Code for the darkness effect.
Now you can add an Instance of obj_Light_Surface to the Room. For instructions on how to do that, see earlier in this chapter or Chapter 2. You should now have a darkness effect, as shown in Figure 9-9, which highlights the light effects you created earlier in this chapter.
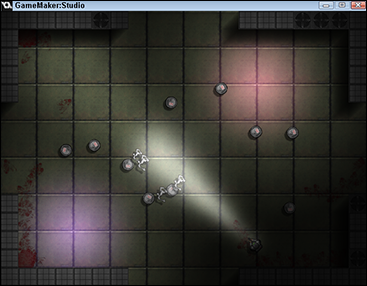
Figure 9-9: The darkness effect highlights the light effects.
Feel free to change the values for the different effects — such as scaling down the brightness of the lights, or making the darkness darker, and so on. You can fine-tune and customize the game to your liking. At this point, your game is looking more and more like a survival horror game!
Using Surfaces as a View
In this section, I show you how to create special effects that affect the entire screen. This is a radical departure from earlier in this chapter, where the effects you made with Surfaces had you drawing to the Surface to create a new visual effect. Now, you create effects that appear across the entire screen. You achieve this by assigning a View to a Surface.
Setting up the Room and an Object for Surface Views
Basically, for this effect to work, you tell GameMaker to draw to a Surface the visible parts of a View, instead of drawing the View to the screen. You can tell GameMaker to draw the whole screen or a portion of the screen to the Surface every step of the game. When you do this, you need to have two Views active simultaneously. If you don’t, then when the Surface is not drawn, the screen appears black, which is why you need the second View to display the screen.
Think of it this way: The first View appears initially, but when an Event is triggered — say, a shock wave rocks the player — the Surface effect kicks in and displays the Surface View with the shock wave effect. When the shock wave effect is finished, then the first View appears again.
The following procedure picks up with the in-software tutorial, Surfaces_Part2, found under the Advanced section of the Tutorials tab from the New Project window. To start, you set up the tutorial game to work with two different Views.
To set up two different Views, follow these steps:
- With the Surfaces tutorial open, from the Resource tree, double-click room0.
The Room Properties appear.
- Click the Views tab.
- Select the Enable the Use of Views check box (see Figure 9-10).

Figure 9-10: The Room Properties with Views enabled and visible.
- Select View 0 and make sure Visible When Room Starts is selected.
- Click to select View 1 and make sure Visible When Room Starts is selected.
- Click the green check mark.
The Room Properties window is saved and closed.
With the Views set up, it’s time to create a new Surface Object. This Surface Object checks to see if the screen surface exists, and if so, it holds the values of the screen.
To create the Surface Object, follow these steps:
- From the Resource tree, right-click Objects and select Create Object.
The Object Properties appear.
- In the Name field, type obj_Effects_Surface.
- Choose Add Event⇒Create.
The Create Event appears in the Events section.
- Drag and drop an Execute Code Action from the Control tab to the Actions section.
A code window appears.
- In the code window, type the following:
surf = -1;
- Click the green check mark.
The code window is saved and closed.
- Choose Add Event⇒Other⇒Room End.
The Room End Event appears in the Events section.
- Drag and drop an Execute Code Action from the Control tab to the Actions section.
A code window appears.
- In the code window, type the following:
if surface_exists(surf)
{
surface_free(surf);
} - Click the green check mark.
The code window is saved and closed.
- Choose Add Event⇒Draw⇒Draw.
The Draw Event appears in the Events section.
- Drag and drop an Execute Code Action from the Control tab to the Actions section.
A code window appears.
- In the code window, type the following:
if !surface_exists(surf)
{
surf = surface_create(room_width,room_height);
surface_set_target(surf);
draw_clear_alpha(c_black,0);
surface_reset_target();
surface_reset_target();
view_surface_id[0] = surf;
} - Click the green check mark.
The code window is saved and closed.
Much of the preceding code is covered in detail earlier in this chapter. However, the last line of this code block creates a variable that holds the Surface ID that GameMaker will draw to. Now, whenever view[0] is drawn, it will be drawn to the Surface and not the screen.
If you add this Object to the Room now, you won’t see anything different, because you haven’t created any effects for the Surface. You can do that in the next section.
Creating the Surface View effect
In the preceding section, you set up the Room and an Object so that you can have the View drawn on the Surface for the purpose of displaying effects. In this section, you create the effect that will be drawn on the Surface.
The following procedures continue with the in-software tutorial Surfaces_Part2. Here, you create a shock wave effect that is shown with every explosion in the game.
To create the Object for the shock wave effect, follow these steps:
- With the Surfaces tutorial open, from the Resource tree, right-click Objects and select Create Object.
The Object Properties appear.
- In the Name field, type obj_Shockring.
- In the Depth field, type –800.
The shock wave effect appears over most of the Instances in the game, but not all of them.
- Choose Add Event⇒Create.
The Create Event appears in the Events section.
- Drag and drop an Execute Code Action from the Control tab to the Actions section.
A code window appears.
- In the code window, type the following:
ww = 50; // width of the ring effect
radius = 0; // size check variable
r_max = 120; // maximum radius of the effect
spd = 1; // expansion speed
d = 360 / 15; // ring segments to be drawn
if instance_exists(obj_Effect_Surface)
{
tex = surface_get_texture(obj_Effects_Surface.surf);
srf_w = surface_get_width(obj_Effects_Surface.surf);
srf_h = surface_get_height(obj_Effects_Surface.surf);
tex_w = texture_get_width(tex);
tex_g = texture_get_height(tex);
}
else instance_destroy(); - Click the green check mark.
The code window is saved and closed.
This code checks that the Surface Object exists. Then GameMaker stores the Surface as a texture. The code also stores the width and height of the Surface in variables, as well as the texture width and height. This is necessary for the effect you’re about to create, in which you create basic polygons with a texture. For this, you need variables for the texture as well as the width and height. These variables are different from the Surface width and height because they’re always expressed as a value from 0 to 1. Next, you create the Draw Event.
To create the Draw Event for the shock wave effect, follow these steps:
- With the obj_Shockring Object Properties open, choose Add Event⇒Draw⇒Draw.
The Draw Event appears in the Events section.
- Drag and drop an Execute Code Action from the Control tab to the Actions section.
A code window appears.
- In the code window, type the following:
if radius < r_max radius += spd else instance_destroy();
var o, c, xx, yy, a, sx, sy;
o = (-radius + r_max) / 5; //Distortion offset
c = 0; //Multiplier for ring segments
a = 1 / (r_max / spd); //Alpha modifier
sx = tex_w / srf_w; //Texture x coord
sy = tex_h / srf_h; //texture y coord
//Draw the inner part of the ring
draw_primitive_begin_texture(pr_trianglestrip, tex);
repeat(16)
{
xx = x + lengthdir_x(radius, c * d);
yy = y + lengthdir_y(radius, c * d);
draw_vertex_texture_color(xx, yy, sx * (xx + lengthdir_x(o, c * d)), sy * (yy + lengthdir_y(o, c * d)), c_white, image_alpha);
xx = x + lengthdir_x(radius - ww, c * d);
yy = y + lengthdir_y(radius - ww, c * d);
draw_vertex_texture_color(xx, yy, sx * xx, sy * yy, c_white, 0);
c += 1;
}
draw_primitive_end();
c = 0
//Draw the outer part of the ring
draw_primitive_begin_texture(pr_trianglestrip, tex);
repeat(16)
{
xx = x + lengthdir_x(radius + ww, c * d);
yy = y + lengthdir_y(radius + ww, c * d);
draw_vertex_texture_color(xx, yy, sx * xx, sy * yy, c_white, 0);
xx = x + lengthdir_x(radius, c * d);
yy = y + lengthdir_y(radius, c * d);
draw_vertex_texture_color(xx, yy, sx * (xx + lengthdir_x(o, c * d)), sy * (yy + lengthdir_y(o, c * d)), c_white, image_alpha);
c += 1;
}
draw_primitive_end();
image_alpha -= a; - Click the green check mark.
The code window is saved and closed.
This code creates two separate rings from polygons. A polygon is the base block for almost all drawing and GameMaker (and most games) use polygons to draw graphics. Polygons are usually simple triangles, but here, you’re creating a series of triangles to make a more complex shape. In this example, you’re creating a 15-sided polygon to form a ring, as shown in Figure 9-11.
Even Sprites are drawn using two simple polygons to form a quad.
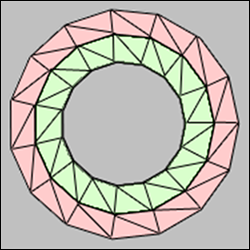
Figure 9-11: The polygon you created in the code block.
To finish this exercise, you have to create this effect in the Create Event of obj_Explosion.
To add the shock wave effect to the game, follow these steps.
- With the obj_Shockring Object Properties open, click the Create Event.
The Actions for the Create Event appear in the Actions section.
- From the Actions section, double-click the Execute Code Action.
The code window appears.
- In the code window, type the following after the existing code:
instance_create(x, y, obj_Shockring);
- Click the green check mark.
The code window is saved and closed.
The shock wave effect adds something special to when the barrels and grenades explode. The effect is shown in Figure 9-12.
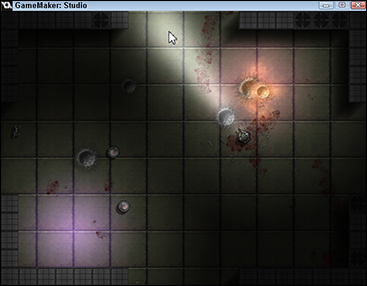
Figure 9-12: The shock wave effect from an explosion.