Desktop features
Installing the Desktop
Managing Panels
Preference for Google Desktop
Plug-ins
Google Desktop Enterprise
Create and Share
Google Update
Google offers software that you can download to your computer and use to perform searches through your files and folders on your personal computer. Google Desktop is a free software program that not only gives you the power of Google on your own hard drive but also allows you to have fun with its plug-ins and gadgets.
Google Desktop gives you the ability to search your computer for information stored there such as e-mail, Web pages you have visited, chats, and other files such as music, video, and word processing documents. Searching your desktop is just as simple as using Google to search the Web. Your search results appear using the same interface used to display Google Web search results. Google’s search technology employs a flexible, quick, and accurate indexing system that allows you to find your files wherever they exist on your computer.
You can customize your Desktop search results so that future searches provide more of what you’re looking for and fewer of the files you aren’t interested in seeing appear in your search results. By deleting files from your search results, the next time you do a similar search you won’t see them. Erasing files from the search results only erases them from the Google index. The actual file is not erased.
Adding small programs known as Gadgets and Plug-ins to Google Desktop can be fun, not only because of the games you can play, but many of them can provide important information and services. The number of Gadgets and Plug-ins grows almost every day.
With the interaction of Google Desktop with Gadgets and Plug-ins, Google Desktop can personalize the content for your Google home page. Depending on the Gadgets and/or Plug-ins you install, Google recommends new Gadgets and shows you content based on the topics on which you normally search.
To download Google Desktop, point your Web browser to www.google.com. Click the more>> link; from the pop-up menu that appears click even more>>. This launches the More Google products Web page. In the Search category of products locate the Desktop link and click it to display the Google Desktop page. You can also navigate directly to the Google Desktop page by navigating to http://desktop.google.com/.
On the Google Desktop page, you see a button called Agree and Download. You also see some of the Gadgets and Plug-Ins that Google offers. To download Google Desktop, click Agree and Download.
After clicking the button, a File Download–Security Warning window may appear. You can click Run to install the program after it downloads, click Save to place the program on your computer to install later, or Cancel to abandon the download. Because this program simply installs Google Desktop you won’t need it after the installation has completed, so it’s fine to select the Run option or choose to save it to your hard drive in case you need to start the download over again. Some people find it useful to save the installer programs.
Google Desktop may have to close some of the programs that are running on your computer. When a window appears telling you to close the programs, first save your work in any open files, then click Yes. Google Desktop continues to install on your computer.
Once Google Desktop finishes installing, a browser window opens with some of the Google Desktop preferences and features. On this initial preference page you can do the following:
Choose to create a Google Account or Sign-in to your current account after completing the preference selection process.
If you have a Gmail account you can select to index and search your Gmail messages.
Some of the Gadgets and Plug-ins have information, settings, or preferences that you can select to save in your Google Account. To save this information in your Google Account select “Backup my gadget content in my Google Account.” Selecting this means, for example, you can access your To Do list or Scratch Pad notes from any computer after logging into your Google Account.
Select Google to be your default search engine.
Once you complete setting the preferences, click “Set preferences and continue.”
The installation of Google Desktop continues after completing the preference process. Your browser loads a new page where you are given the option to personalize your Google home page. It is not important to set all these options during installation. All of these options can be changed later. While this new Web page is loading, Google Desktop starts. Once it loads, a panel, or sidebar, appears on the right of your screen. You learn more about panels and the sidebar later in this chapter. You also notice some of the Google Gadgets on your desktop. By default, the Analog Clock and Media Player Remote appear on your desktop. Another element that you see is the Google Gadget Tips, which displays tips on managing your Desktop Gadgets. Either choose to personalize your Google home page or click “No, don’t personalize my homepage” and continue the installation. Remember, you can personalize your Google home page at another time.
Continuing to the next installation Web page, the preferences allow you to enable the Google Advanced Features. These features allow Google to collect information about your search habits, which enables Google to better provide content on your Google home page or your Desktop sidebar. Additionally, other data, such as crash reports, are sent to Google to improve Google Desktop. Because no personal identifying information is sent to Google and this option improves the software, select the Enable Advanced Features option button.
The last page in the installation process is the Google Desktop home page. Google Desktop starts indexing your computer every time your computer begins to idle. The first time that you index your information, the Google Desktop home page tells you how much was indexed on your computer. After the first indexing, the message is not displayed again.
Once you install the Google Desktop software you can search for files, e-mail, Web history, and chat sessions on your computer. In addition to searching for files, you can also begin using the Google Gadgets and Plug-ins installed on your computer.
The easiest way to start using the Desktop search is by going to Google’s home page. Click the Desktop link, and you are ready to begin your search. The search page is exactly like the one you saw as you finished installing the Google Desktop software.
Begin the search through the files on your hard drive from this search page. From this page you can also go to Google Desktop preferences, Advanced search, Browse timeline, and also see the Index Status, Privacy, and About Google Desktop.
Type search terms and phrases in the search box and press Enter. The results window displays all your search results. You can scroll through your results, or to assist you in finding just the right result, Google Desktop organizes the results by the type of file in which they are found.
Your Desktop search results are divided into six major file types: All, emails, files, web history, chats, and other. Clicking any of these links that appear along the top bar of the search results page refines your search to that particular file type. The number that appears next to each file type tells you how many of those file types were found.
Clicking emails displays results found in any of the following programs: Outlook, Outlook Express, Thunderbird, Mozilla Mail, Netscape Mail, and Gmail (only if you chose to include Gmail in your index). By default, the results are sorted by date. Therefore, you will see the most recent e-mail you received containing the keyword you specified as a search term. You also have the option of viewing e-mail messages from or to a specific e-mail address or person. Only after clicking the emails link two drop-down lists appear near the top of the page containing the names of the people from which e-mail was either received or sent appearing in your results. Select addresses from one or both lists to further focus your search through e-mail messages.
Google Desktop also searches for file types including:
Text documents (
.txt)Microsoft Office documents (
.doc,.ppt,.xls)Adobe Acrobat documents (
.pdf)Web files (
.html)Images (
.jpg,.gif,.png,.bmp)Audio (wave,
.mp3,.acc)Video (
.wmv,.mpg,.avi)
Google’s Home Page
Like the difference between the new Coke and Classic Coke, there are two ways to view the Google home page. The first is called Classic Home. This is the page you normally see when you visit www.google.com. Basically, it contains a search box and a button. The second is your personalized home page containing information of your design. You can switch between the two by clicking the link at the top of the Google page. To switch to your personalized home page you must be logged in to your Google account.
Whenever you want to personalize your Google home page, point your browser to www.google.com/ig. The information that Google Desktop sends to Google about the way you interact with the software, the Gadgets, and the content on your sidebar, is used to personalize your home page. If you are not satisfied with the content that Google selects for you, feel free to change the content.
When you first see your Google home page (www.google.com/ig) it contains six panels: Google Calendar, New York Times home page, How-to of the Day, Top Stories, Date & Time, and Weather (you must type your ZIP code the first time to see your local weather).
The first time you open the page, you see a Make it your own link under the search box. This link takes you to Configure your homepage. From here you can add or delete content and configure the panels that appear on the page. When you click the Make it your own link, a box appears with 16 different topics to choose from, as shown in Figure 11.1. There are hundreds of content plug-ins you can add to your Google home page. To see all the available content plug-ins click The entire collection link.
Google divides the homepage content plug-ins into seven main categories. These are: News, Tools, Communication, Fun & Games, Finance, Sports, Lifestyle and Technology. There are two additional categories: Popular that contains a selection of the most popular content plug-ins, and New stuff where you can find the newest content plug-ins for your homepage.
Choose as many content plug-ins as you want for your homepage.
Note
If you don’t see the Make it your own link, there’s another link in the left top corner of the page called Add content>>.
Once you select to add content, you navigate to the page listing all of the content plug-ins (www.google.com/ig/directory). To learn more about each content plug-in, click its link or picture. To add a content plug-in to your home page, click the Add it now button located beneath each plug-in. When you finish adding content plug-ins, click the <<Back to homepage link located at the top-left corner of the page.
You can rearrange the content panels in your Google home page by clicking on the content title bars and dragging them to their new position on the page.
The content plug-ins come in all sizes and colors, and their contents vary. You can edit some of the content plug-ins from their panels by clicking the Edit link. Depending on the plug-in, you are presented with different options. Sometimes you change the colors or size of the plug-in. In some cases, you aren’t presented with an Edit link.
To remove a panel from your home page, click the X in the top-right corner of the panel you want to delete.
If you have not already done so, when you finish adding and editing your home page, sign in to your Google account so you can save your home page. Google saves your home page configuration in the form of a cookie. If that cookie is erased or expires you must configure the home page again. Saving the home page configuration to your Google account gives you access to your customized view from any computer after logging in to your account. You can sign in to your account from the link on the top-right corner of the home page.
You can refine your search to any of these types of files by file types from the list. Once you’ve selected a file type click Go. The search results page displays only results where the search terms are found in the file type you’ve selected.
When you visit Web pages, most Web browsers maintain a copy of the pages you visit in cache. The Web history searches these temporary Web cache files. When Google Desktop finds matches to your keyword, the results page displays them along with the date the page was visited.
Google Desktop also searches chat transcripts from programs such as MSN Messenger, AOL Instant Messenger, Trillian, and Google Talk. Chat transcripts, unless you tell your chat software you want your chat history saved, tend to be more temporary.
Clicking the other file types link returns file results found in your contacts, calendar, tasks, journals, and notes entries.
Clicking the Advanced Search link, located on the main Desktop Search page, launches a new page allowing you to choose which type of files you want to search, or select All to include all file types in the index. Some of the file types have additional advanced search options. Some of the search options common to all of the file types are: Has the words, Doesn’t have, Date within (search for files within a specific date range), and Show results from. (When you have more than one computer on your account using Desktop search, you can specify which computer or computers you want to search.) Figure 11.1 shows you the Advanced Desktop search page.
The supplementary advanced search options change with the group you select to search. Table 11.1 shows the group name and the extra advanced options for each group.
Table 11.1. Advanced Search Options
Group name | Additional Advanced Search Options | Description |
|---|---|---|
Chats | None | |
Emails | To: | |
From: | To whom the e-mail was sent. Who the e-mail was sent from. | |
Files | Enter type: | |
In the location: | ||
Include subfolders | From the drop-down list there are different options: Text, Word, Excel, PowerPoint, PDF, Music, Images, Video, and Enter other type (the extension of the files you want to search for). You can browse the computer and choose a specific folder you want to look in for the file. Check box if you want to include subfolders in your search. | |
Other | Other types | Look for Contacts, Appointments, Tasks, Notes, and Journal Files. |
Web History | In the Site | Search for a specific domain name. |
When you click the Browse Timeline link from the bottom of either the main search page or the results page, a new page displays the last files that were accessed, used, or created on your computer. Figure 11.2 shows an example of how a Timeline page appears. A date and time stamp of the exact time the file was last accessed appears before each filename, which is displayed as a link. On the right-hand side of the page is a small calendar. Each day appears as a link. When you click on a specific day (you can click only days in the past) the results page displays the results of the file search for files last accessed on the day you specify by clicking the calendar. This is particularly useful if you have an idea of when the file, e-mail, or chat was stored on your computer.
In addition, you can define your Timeline search by specifying the file type group as discussed in the last section. There is also a Remove events link where you can choose to remove events (but not the files) from the index that Google creates from the files on your computer. Once you remove the file from the index it no longer appears in any of your search results.
The Index Status link launches a Web page that displays information about your desktop indexing status, as shown in Figure 11.3. You see the percentage of files indexed and the approximate time it will take the program to complete indexing the files. Normally, indexing only occurs when the computer is idle. The indexing status is displayed for: Total searchable items, Emails, Chats, Web history, and Files with the number of files indexed displayed to the right of the file type. You will also see the file dates of the newest files in the index.
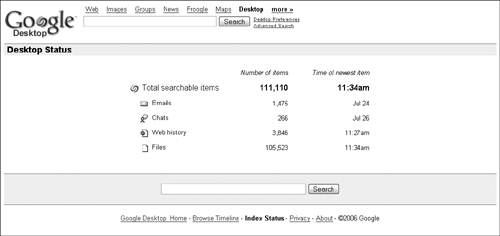
You can choose to index the computer now by clicking the Index now link. Just as the Web page warns you, this operation uses many of your computer’s resources and may slow your computer’s performance while the index is taking place.
The Privacy link contains a page where Google lets you know that it takes your privacy seriously. You are, after all, giving a search engine company access to your private files. It is Google’s intention to make your Desktop search as simple as a Web search, and in some cases your Desktop search results are mixed with those of a Web search. Be assured that Google does not give access to your files to anyone else. Neither the files nor the results are available through the Web.
Read the privacy policy at http://desktop.google.com/privacypolicy.html.
You may find additional answers by reading the Google Desktop Privacy FAQ at http://desktop.google.com/privacyfaq.html.
Caution
Anyone who has access to your computer will also have access to Google’s desktop search. He or she will be able to browse your files, see your Web history, and read your chats. If others have access to your computer you may want to remove private files from the Google Desktop index or lock the Desktop search, which is explained later in this chapter.
The last link on Google’s desktop search page is About. The About link takes you to a page that has information about the types of files that Google indexes on your computer. The About page also contains links to Plug-ins, Getting Started (more information about learning to use Google’s desktop search), Online Help, Privacy, and how to uninstall Google Desktop. You might also be interested in knowing what version of Google Desktop you currently have installed on your computer. From time to time it’s a good idea to make sure you have the latest version. The version number is displayed at the bottom of the About page.
The way Google Desktop appears on your computer is quite versatile. It can sit as a sidebar, which takes up quite a bit of screen real estate, or be nothing more than a notification icon. Here are the four ways Google Desktop software can appear on your computer:
Notification icon
Deskbar
Floating deskbar
Sidebar
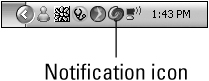
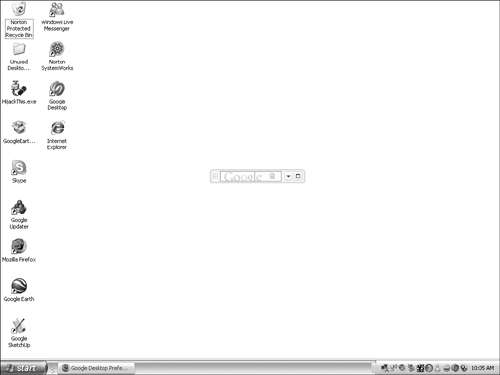
Google Desktop’s notification icon is primarily a status icon. When the icon appears, it means that Google Desktop software is working. Figure 11.4 shows the Google Desktop icon, which in this example is the second icon to the left of the Windows clock. It may appear in a different place within the taskbar icons on your computer.
Note
The notification area or system tray is part of the Windows taskbar on your desktop. When your taskbar is oriented horizontally, the icon is located on the right end of the taskbar. When your taskbar is oriented vertically it appears at the bottom of the taskbar. The desktop icon appears in the area where you can see the Windows clock and other status and event notification icons.
When you choose not to display the Google Desktop search box in the display preferences, the Google Desktop icon is the only way you can choose to perform a desktop query without first opening a Web browser.
To open the Google Desktop query window right-click the Google Desktop icon in the taskbar. Click Search Desktop in the pop-up menu that appears (see Figure 11.5).
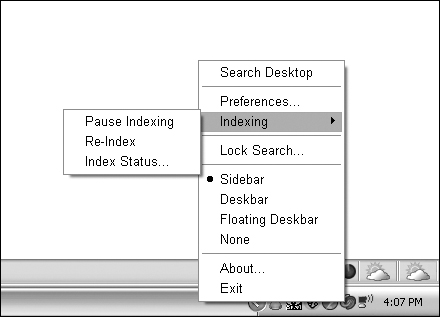
As you can see in Figure 11.5, the Google Desktop pop-up menu also has options that you can select to launch Web pages such as Preferences and About. One of the important options available from this menu is Index. There are three indexing menu options:
Pause Indexing: Google stops indexing your computer by default for 15 minutes. When you select this option a balloon notification appears that tells you about the pause, and the icon changes color to gray, and becomes unavailable. The indexing menu also changes. You no longer see the Pause Indexing option as it changes to Resume Indexing and an additional option, Pause for 15 more minutes. Once Indexing starts again, another balloon notification appears, and the icon changes to its normal colors.
Re-Index: This option causes Google Desktop to reindex your whole computer. This may take a few hours the first time Google indexes your computer. In subsequent indexes, it begins indexing every time your computer is idle for more than 30 seconds.
Index Status: Selecting this option opens a browser window that displays your computer’s indexing status.
If your computer is used by several people or is located in a place where others may have physical access to it, it’s a good idea to protect your private information. The information is still available for someone accessing your computer who is determined to find it. That’s why Google Desktop search comes with a lock.
The Lock Search option locks the Google Desktop Search so that a password is required before a search can be performed. When you access the Google Desktop Search page a message something like “Google Desktop Search is locked. To begin enter the Windows password for COMPUTERNAMEusername” appears. Your computer name and username appear in this message. To unlock and begin using the Desktop Search, type the username (it may already be entered for you) and the password you use to log into your computer. Figure 11.6 shows the Google Desktop Search page when the search feature is locked.
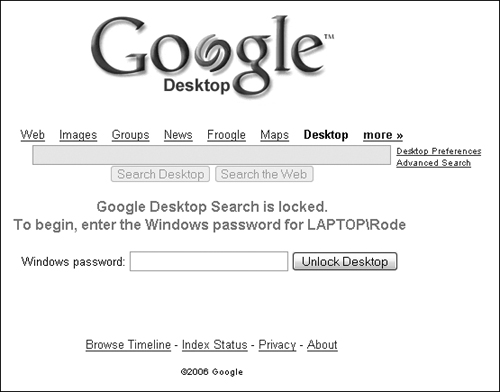
Once you type the correct password and click Unlock Desktop, the page reloads and the Desktop Search page functions normally.
The Desktop icon menu also you to configure the way Google Desktop Search appears on your computer. The configurable display options are: Sidebar, Deskbar, Floating deskbar, and None.
Selecting Exit closes Google Desktop Search. After exiting you need to restart Google Desktop before you can perform a Desktop search. Closing Google Desktop also removes the Desktop option from the selections on the Google Search page.
Google Deskbar is a search box that appears on the right side of the taskbar (see Figure 11.7). This search box is used for performing Google Web searches. Simply type keywords or phrases and press Enter and a Google results page appears in your Web browser.

Note
By default, all the Google Search boxes that appear on your desktop, whether as a sidebar, deskbar, or floating deskbar, search the Web. You can change the default search type for all search box types in the Google Desktop Search preferences.
When you begin typing a keyword in the search box, a pop-up appears above the search box displaying the results of a search through files on your local computer. Google calls this Quick Find. Quick Find shows you the results of your search as you type. You can turn Quick Find on or off and select the number of results that are displayed in the Google Desktop Preferences page. Quick Find displays only results of the Google Desktop Search through files indexed on your computer, not Web search results. Along the top of the Quick Find box you see the number of results for the keyword that Quick Find found on your desktop. If you click that number a page displaying the Desktop search results appears. When you find what you looking for in the Quick Find box, click on the result.
Along the bottom of the Quick Find box are two additional options:
Search More: With this option you can choose to Search Google Earth, Search Maps, Search Froogle, Search News, Search Groups, Search Images, or go to the I’m Feeling Lucky page result and Search Desktop.
Search Web: This option enables Google to search the Web as though you had pressed Enter after typing your search terms.
Clicking the black arrow next to the Deskbar search box gives you a menu similar to the one you get when right-clicking the Desktop icon. One exception is that where the Search Desktop and the Exit options would be, you now have a Close option. When you click Close, the Deskbar box closes but Google Desktop Search remains active. The Google Desktop Search icon remains visible in the system tray.
As you can see in Figure 11.8, there is a small window icon next to the black arrow. When you click that window icon, the Deskbar disappears and Google Desktop Search converts to a sidebar.
The Floating Deskbar is similar to the Deskbar. The only difference is that you can drag the Floating Deskbar box all over your screen and drop it wherever it is most convenient for you. To drag the Floating Deskbar box, click over the left side of the Floating Deskbar, and drag the Deskbar to a new location. Figure 11.8 shows the Floating Deskbar in the middle of the screen.
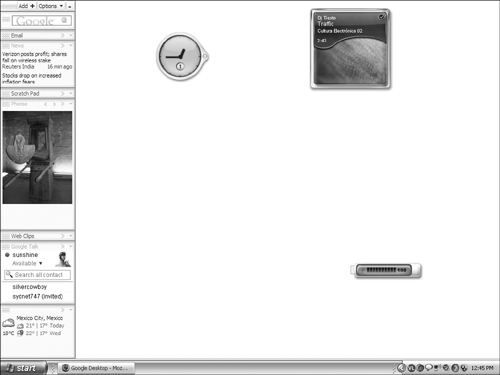
The Google Sidebar provides the richest functionality of any of the Google Desktop bars. The Google Sidebar, because of the plug-ins and gadgets, could easily become one of the most important and easy-to-use tools on your computer. The Sidebar serves as a container for other programs. It can be located on either side of your screen.
A Plug-in is a small piece of software that enhances a larger software program. In other words, it complements or gives new functionality to the main program. In Google Desktop, plug-ins add functionality to the search features. Using plug-ins enables you to perform advanced searches. For example, Google Desktop Extreme Plug-in adds functionality to make searches faster and more productive. Another example is the Google Desktop Extra Images Plug-in. This handy plug-in searches for more than 90 different types of images on your computer.
Defining gadgets is a little more difficult. A gadget is also software, but in this case, it has its own functions that may be similar or different from the functions provided by the main program. Gadgets, as a rule, do not provide additional search functionality. A Google gadget is a small program that depends on Google Desktop to run. For example, the Google Analog Clock gadget displays the time and date on your desktop. It cannot run unless Google Desktop is already running.
When you first launch the Sidebar, it opens with the following default gadgets (see Figure 11.9):
Each of the gadgets has a down arrow that launches a gadget configuration menu. Most gadgets have the following options: Expand (if the gadget is collapsed) or Collapse (when the gadget is expanded), About, Undock from Sidebar, and Remove. Different gadgets have different menu options.
All the gadgets on the Sidebar have a double arrow called Toggle Expanded View. Depending where your sidebar is located on your screen, the double arrow points to the opposite side. In Figure 11.9, the Sidebar is shown docked on the left side so the double arrows are pointing to the right. When you click these double arrows, the gadget expands and displays more of the gadgets’ features and information.
Cross-Ref
To learn more about installing Google Plug-ins and Gadgets and also about some of the other plug-ins and gadgets available, see Chapter 30.
This gadget retrieves your e-mail. It primarily works with Gmail but also works with several other mail programs. The menu has a selection called Options where you will find a link to set up e-mail indexing or configure Gmail on the Desktop Search preference software. An additional option allows you to filter e-mail that you don’t want the Sidebar to show. You can filter e-mail according to From, To, Subject, Has the words, and Does not have.
Google uses sources like Forbes, Reuters, BusinessWeek, SI.com, CNN International, PC World, ZDNet, and others to bring you the latest news from around the world. With this news gadget you see the story name, the source of the story, and how long ago the story was released. On the Menu button, you can find options that allow you to select news editions from 25 different countries.
The Scratch Pad is a very useful gadget. It allows you to write anything you want at any time, like a note creator. You can copy and paste text from the Web, chats, e-mail, Word documents and anything else because the Scratch Pad is available on the Sidebar at all times. Everything you type on the Scratch Pad is saved until you decide what to do with it. From the Menu button you can Save to File and Clear the Scratch Pad when you no longer need the text.
The Sidebar will display pictures from your computer, changing the image regularly, depending on your preference settings. By default, the Sidebar loads pictures from the My DocumentsMy Pictures folder. Clicking on the image causes it to expand displaying the file name, the image, and its location on your hard drive. You can remove the picture from the Sidebar and it will no longer be displayed. It is only removed from the Google index, not your computer.
Navigate through the photos using the Sidebar by clicking on the arrows located above the image, Choose the previous photo or move to the next image. When you select Expand View on this gadget, the main image appears in the middle, the three previously displayed images appear on top, and the three upcoming images appear beneath the main image. The Menu button has the following options: Photos on My Computer, Photos Online, and Slideshow Speed. In the Photos on My Computer option, you can select the folders that contain the images you want the Sidebar to display. From the Photos Online option, choose an online source such as RSS, Atom feeds, or regular URLs to display photos. To configure the time delay between images, click Slideshow Speed and set the value. The value is in seconds and can be set between the minimum of 1 second and the maximum of 9,999 seconds.
The Web Clips gadget is a Google News Reader in gadget form. This gadget displays updated news clips sent to you through Atom or RSS feeds. Generally the feeds are updated every 30 seconds. The Menu button has options to Find Web Clips to Add. You can also Edit your Current Web Clips and configure the number of clips you want the Sidebar to show for each site. When you have selected the option to have the Web Clips gadget automatically add feeds, each time you visit a Web page offering a feed, that feed is added. You can also choose to turn this feature off. The Web Clips gadget can be undocked from the Sidebar and placed anywhere on your desktop.
The Google Talk gadget for the Sidebar works like the regular Google Talk software except that it’s attached to the Sidebar.
Cross-Ref
To learn more about Google Talk, see Chapter 27.
The Weather gadget shows you the current weather conditions, the current weather, and tomorrow’s forecast. The Menu button allows you to configure the display of weather from 25 countries, right in your Sidebar. The Weather gadget is limited to displaying the weather from 10 different cities. You can also choose between having the temperature displayed in Fahrenheit or Celsius.
While your mouse hovers above any part of the Sidebar, three buttons appear above the Google search box. The Add button, allows you to add more gadgets. The Options button allows you to add additional gadgets and also configure the gadgets you already have installed. You can select to have the Sidebar appear on top of everything (the Sidebar will remain open). But, when you choose Auto-hide, the sidebar collapses to either the right or the left side of your screen depending on where you have it docked. You can configure the docking location. To cause a hidden sidebar to reappear, move your mouse over the edge of the screen where the sidebar is normally displayed. You can change the Font Size to Larger or Smaller than the Default size.
Tip
Use either the Windows+G or Ctrl+Alt+G keyboard shortcut to jump into the search box when Google Desktop is displayed in Deskbar, Floating Deskbar, or Sidebar mode.
Quick Search Box
The Google Desktop search box can be displayed on your computer as a Quick Search Box. The Quick Search Box must first be enabled in the Google Desktop Preferences page. When Quick Search Box is enabled, press Ctrl twice and a search box displays in the middle of your screen. The Quick Search Box works in the same manner as other Google search boxes. When you begin typing, Quick Find answers appear automatically. You have the option of searching the Web or searching while using: Search Desktop, I’m Feeling lucky, Search Images, Search Groups, Search News, Search Froogle, Search Maps, or Google Earth.
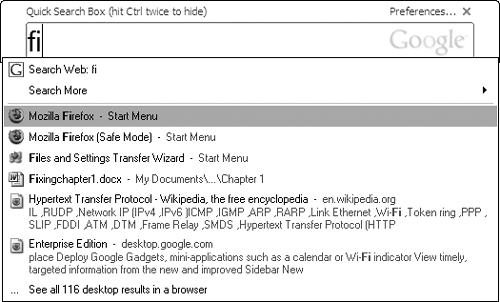
Quick Search Box appears in the middle of the screen with all search options.
When you press Ctrl twice again, the Quick Search Box disappears.
Personalize Google Desktop using the Preferences. No matter how Google Desktop is displayed on your computer, you can always find a menu option or a link that allows you to configure the Desktop Preferences. On the Google bars, launch Preferences from the Option menu button. On the Web browser’s Google bar, click the Preference link on the right side of the search box. Each of these launches the Preferences page.
Preferences are divided in four groups:
Local Indexing
Google Account Features
Display
Other
Google Desktop indexes your files and information to make it easy to find answers when you perform a desktop search. Select which types of files you want Google to index on your computer. Local Indexing options allow you to select file types by clicking the option boxes next to the desired file types. Selecting a file type causes Google Desktop to index files of that type.
File types that Google Desktop will index include: Email, Chats, Web history, Media files, Text and other files, Word, Excel, PowerPoint, PDF, Contacts, Calendar, Tasks, Notes, Journal, and Zip Files.
There are two other file types indexed by Google Desktop: Password-protected Office documents (Word, Excel) and Secure pages (HTTPS) in Web history. Password-protected Office documents are Office documents you have previously password protected. Secure pages (HTTPS) are Web pages, for example, a bank page or e-commerce checkout page where you type your credit card number, or other pages containing sensitive information. For security reasons it’s better not to have Google Desktop index HTTPS pages.
Index chat conversations from many of the popular chat programs. This includes Trillian, an instant messenger that is configured to communicate with services such as MSN Messenger, AOL Messenger, Yahoo Messenger, and ICQ. Google Desktop adds chats from these programs to its index. When you have Trillian installed and you want to have its files indexed, select the option to add Trillian to the index found in the Indexing Plug-ins section on the Preferences page.
The Search These Locations preference allows you to select files, folders, or drives on the network that Google Desktop has not indexed. By default, Google desktop indexes the all the drives on your computer, even external drives, but does not index files, folders, or drives located on other computers shared across a network.
In the Don’t Search These Items preference, you can select which files, folders, or Web sites not to index. Type the Web site address in the box and click Add URL, or click the Add file or folder to exclude link and browse your computer for that file or folder.
Google Desktop can encrypt your index and cache using the Windows Encrypted File System. When you encrypt your index and cache the information is only viewable on your local desktop.
Caution
Encrypting the index reduces the performance of Google Desktop because of the requirement to encrypt and decrypt the information.
You can only encrypt indexes stored on the New Technology File System (NTFS) and not File Allocation Table (FAT) file systems.
Encrypting the index disables the Search Across Computers feature within Google Desktop.
Searching Across Computers
Searching across computers is easy. All you need is a Google Account to have this feature configured on your Google Desktop preferences page. On the Preferences page, select the Google Account Features tab. Select Search Across Computers to activate the remote searching option. You are asked to type the name of the computer where Google Desktop is installed. In future Desktop search results, this computer name is how you will identify the files that are located on this computer within searches across multiple computers. You may also configure which file types are searchable, whether on your local computer or remote computers.
Once the feature is active, perform a search as you would any other Google Search. Simply type the keyword or phrase in the search box and click Search Desktop.
The search results page is almost identical to the Desktop Search results page. The difference is that when Google finds a file located on another computer, you see the name of the computer, in parentheses, on which the file is located. This appears to the right of the link to the file. As the following figure shows, doing a search for backgammon on this network, the first three results came back from a computer called LEU. The rest of the results on the result page came from the local computer.
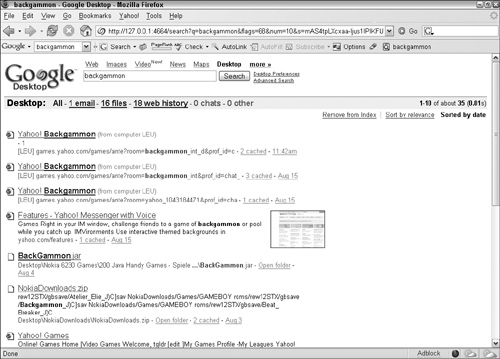
The first three results came from a remote computer named LEU.
When you select Disable Indexing any new word-processor documents, chats, Web history, and other files that Google Desktop indexes, new files of these types placed on your hard drive will no longer be included in the index, and therefore, will not appear in subsequent searches.
When you perform a desktop search, the results page displays an option to delete items. When your preference is set to Remove Deleted Items, and you choose to delete files displayed in the results, the files are removed from the index and will not appear in future searches of your desktop. The files are not removed from your computer, only the Google Desktop index.
Using a Google account to save your Google Desktop preferences enables you to access the Google Desktop gadgets on other computers in the same manner as they are installed on your primary computer. There are three Desktop preferences you can set in your Google Account:
Gmail: Configure indexing of your Gmail account. Indexing your e-mail allows you to easily search for information stored in e-mail messages using Google Desktop search.
Save my Google Gadgets Content and Settings: The settings and information for your gadgets are saved in your Google account. When you access the Google Desktop on another computer your gadgets will operate using previously set preferences. For example, you can access a note that you saved using the Scratch Pad on your computer at home from a remote computer. Also your stocks, to-do list, news, and other saved items are available remotely.
Search Across Computers: Google can index more than one more computer and assign those computers to your account. Google securely transfers your index into Google Desktop Servers so you can search these locations from any computer using your Google account. When Search Across Computers is enabled, additional preferences become available. You can change the name that appears on your computer and on other computers. You can also configure which file types are searchable between computers.
In the display group of preferences, you can set preferences for the following:
Search Box: Select how to display Google Desktop on your computer. The options are Sidebar, Deskbar, Floating Deskbar, and None.
Quick Search Box: Enables or disables Quick Search Box. You can also have the Quick Search Box appear all the time on the desktop behind any open windows.
Default Search Type: Choose which type of search your Google Desktop boxes perform when you press Enter. Choose among Search the Web, Search Desktop, I’m Feeling lucky, Search Images, Search Groups, Search News, Search Froogle, Search Maps, and Change on Each Search.
Taskbar Gadgets Button: You have the option to set how Google appears in your computer taskbar—icon and text, icon only—to have easy access to your gadgets. You can choose not to have anything displayed.
Quick Find: Enable or disable Quick Find and set how Quick Find interacts with your search. The preferences you can set are: Search text inside documents and e-mail messages (it will look for your keyword or phrase within documents and e-mails) and Show spelling correction (Quick Find has a built-in spelling check to help you with your search). Also, select how many results Quick Find returns (from 1 to 10). There are two other options that you can select. When you press Enter after typing text in the search box, you can have Google Desktop either do a search (the default) or open a program or file that Quick Find located. For example, when you select Launch Programs/Files, by default, when you type minesweeper and press Enter, the Minesweeper game opens. If you select Search, by default, when you press Enter Google performs a search on minesweeper.
Number of Results: Sets how many results per page you want Google to display. Choose from 10, 20, 30, 50, or 100.
Google Integration: If you want Google to show your Desktop Search results even when doing a Web search, select this option.
There is a single Advanced Features preference option. Find it located beneath the Other link. When you enable Advanced Features, you send information to Google about how you are using Google Desktop, what other programs you use, and which Web pages you visit. Google uses this information to personalize your Sidebar (for example, your News) and also to improve Google Deskbar with new features.
Google Desktop sends only non-personal data. This means that information such as your bank account number or credit card numbers are never sent to Google. You can feel safe having this feature enabled. To learn more about Google Privacy and Protection policy see http://desktop.google.com/en/privacypolicy.html.
In this chapter, you learned to install and configure the Google Desktop. This powerful tool indexes the files found on your computer, or other computers located across a network.
The Google Desktop software also serves as a container for other small programs called gadgets and plugins. These useful programs provide functionality that ranges from displaying an analog desktop clock to gathering information using RSS and Atom feeds. Google Gadgets are covered in much greater detail in Chapter 29.
Managing how Google Desktop indexes the files on your computer can bring about peace of mind while allowing quick access to the important information stored on your computer. As hard drives become larger and the number of applications increase, information can be more difficult to find as it is often stored in hundreds of formats and located in thousands of places. Google excels at finding distributed information. Finding your files is almost as useful as finding your way using Google Maps, covered in the next chapter.