Exploring the Red Planet
Getting around this planet with Google
Improving your Web experience with Google tools
Boosting your search capabilities
Tracking data trends
Google tools and products don’t spring forth fully-developed and ready to use. Instead, they are incubated and carefully nurtured in a development laboratory. In this final chapter, you can see some of the products currently sporting Google Labs status. Some are ready for moving into the full application world, while others are in differing states of development.
One of the neatest products for space buffs is Google Mars. Similar to Google Earth, the Google Mars product shows you in-depth maps and details of the red planet.
Google is working on some mobile Web technologies such as Google Transit for finding maps, and Google Ride Finder for finding buses and subway schedules and stops.
To enhance your browsing experience, look for Notebook and Google Web Accelerator, two tools designed to make your use of Web content easier to manage.
As you might expect, several different search features are in the works, both for browsing and for providing service to people browsing your site.
On the WEB
Check out the projects and programs in development at http://labs.google.com/.
One segment of the work being done in Google Labs is the extension of mapping products. As explained in Chapter 13, Google Earth is a feature-rich Web application that lets you work with addressing, georeferenced coordinates, 3-D models, and more.
Cross-Ref
Read about using Google Earth in Chapter 13. Check out 3-D modeling using Google SketchUp in Chapters 32 and 33.
Three projects currently in development are Google Mars, Google Transit, and Ride Finder. Google Mars is similar in design to Google Earth, although it isn’t as developed and there’s no way to plot your next vacation itinerary! Google Transit and Ride Finder are projects utilizing Google Map technology. As with other Google Labs products, the scope of both the Transit and Ride Finder programs is limited to specific locations. As the applications develop and feedback indicates the direction in which to take the products, they are sure to expand in their scope and coverage.
First stop—the red planet.
Google Mars is a fascinating Web destination. From the Google Mars site at www.google.com/mars you can view the Martian landscape composed of three types of image data.
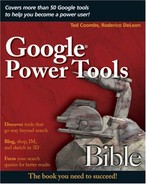
At the top right of the map, click one of the choices shown in Figure 40.1 that include the following:
Elevation: The default view is a shaded relief map in bright ice-cream colors. The color coding is shown in an Elevation key overlaying the lower left of the map, letting you estimate the height.
Visible: The visible view is composed of images taken by a digital camera. Along with the terrain, the images also show clouds and dust, just as you would have in your own camera shots.
Infrared: The sharpest images are those captured in infrared because clouds and dust are transparent to the camera. The infrared map view shows tan-colored patches that indicate an area where a high-resolution mosaic image has been constructed using the infrared data.
You don’t see the planet’s surface in true color. Mars is a dusty reddish-beige color, as you probably know from the images published from the Mars landing vehicles. The maps shown on Google Mars are grayscale images that show contrast in surface details more clearly than images in color.
Click Search the top of the Google Mars browser window to search by predefined categories, or type text in the Search field and click Search.
For example, suppose you are looking for one of the rovers that have been exploring Mars. You can type rover in the Search field, or if you can’t remember the name, click the Spacecraft link, as shown in Figure 40.2.

The search results are listed in a column at the left of the map. Click a result link to see the balloon showing information and a pin on the appropriate map location. The example in Figure 40.3 shows the location where the Mars Pathfinder Rover worked for three months a decade ago. Click the image of the spacecraft or other object that displays in the pop-up to view further information.

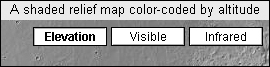
Google Mars offers a set of navigation tools for moving around the screen, as shown in Figure 40.4. Use the directional arrows at the top of the navigation tools to pan around the map view; click the center to return to a previous view. Drag the lower slider upward toward the (+) to zoom into the map, and drag the slider downward toward the (−) to zoom out of the map.
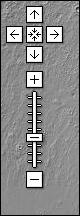
Google Mars displays the Elevation view as the default image type. Although less detailed than the Infrared view, the color represents differences in altitude on Mars quite distinctly. To help with distinguishing an extremely high mountaintop from a plain, the view displays a color key at the lower left of the map window, showing the differences in elevation. Figure 40.5 shows an area at approximately 21 km above ground level and an area at about 4 km below ground level.
In the Elevation and Visible map options, you can zoom in as far as the navigation tool allows. Not so with the Infrared map. Zooming in too far produces a tiled image displaying the message shown in Figure 40.6.
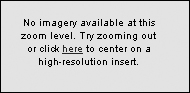
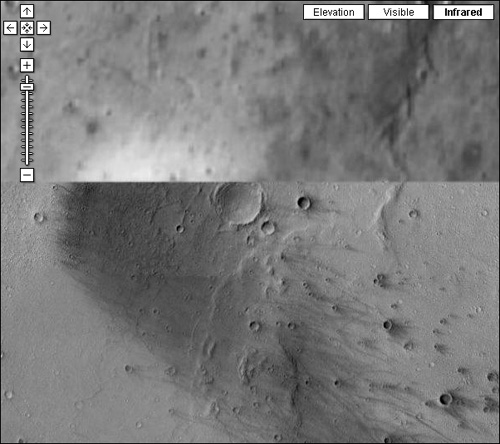
Click the link in the image to display one of the close-up areas. As explained earlier, the Infrared view shows blocks of tan-colored surface, which indicates that a high-resolution image overlays that area of the map. An example of the high-resolution image and its neighboring image are shown in Figure 40.7.
You can’t use Google Earth and its tools to examine Mars, although that is the plan for the future. Of course, you won’t be placing any images of your backyard on Alba Tholus using Picasa2 or viewing 3-D fly-through movies to the park in the Galle Crater Dunes anytime soon.
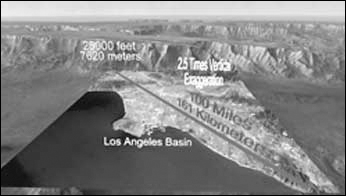
To see a fly-through on Mars built using the data that makes up Google Mars maps, check out themis.asu.edu/valles_video and select your viewer from several options. The scenes are built by the JPL (Jet Propulsion Laboratory) and make up a four-minute movie. The animated overlay shown in Figure 40.8 gives you a sense of proportion when you view the movie.
Instead of calling a cab, sitting in traffic, or missing your bus to the shopping mall again, some communities can now use Google Transit Trip Planner. Check out the service at www.google.com/transit. At the time of this writing, there are eight areas involved in the program, including Tampa, Honolulu, Eugene, Portland, Pittsburgh, and Seattle.
In areas where the service is available, simply type the information for your travel needs and receive the most efficient itinerary. The Google Transit Trip Planner functions in much the same way as Google Maps, although the directions returned are public transportation options instead of directions for driving.
Cross-Ref
Read about Google Maps in Chapter 12.
Suppose you are in Portland, Oregon, for a few days and decide to take in a Trailblazers game. To find the most efficient route from your hotel to the game and arrive in time for the opening tip-off, follow these steps:
Open Google Transit at www.google.com/transit. You can use a combination of the street address, city/town name, or intersection for the search.
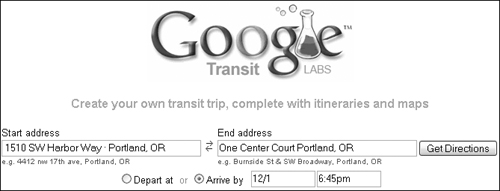
Type the Start address and the End address, as shown in Figure 40.9. If you have the addresses in the wrong field, click the double-headed arrow between the address fields to switch the addresses. Switch the addresses if you are looking for a return trip as well.
Select either Depart at or Arrive by, and type the date and time in the respective fields.
Click Get Directions to perform the search.
The search returns appear in the browser window. As you can see in Figure 40.10, the directions for walking and public transport are listed in sequence. Click any of the links in the returns to change the data, such as change the addresses, edit the times, or review reverse directions. You also can map the numbered points in the directions.
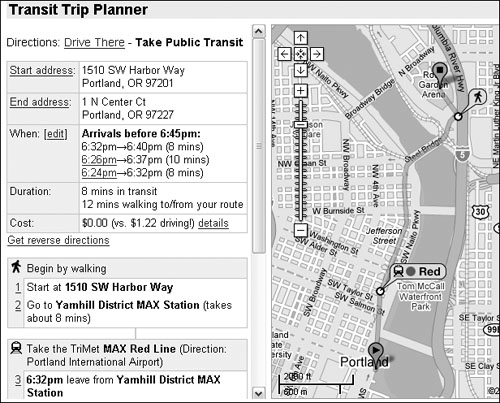
One interesting feature of the Transit Trip Planner is a comparison of the cost of driving versus taking public transportation. In the example, driving cost is estimated at $1.22, while the route planned costs $0.00. The trip cost is based on the average mileage for the shortest route between the endpoints multiplied by the IRS business cost allowance for mileage of $.445 per mile.
If you decide to drive to the game after all, click the Drive There link at the top of the browser window to see a list of driving directions courtesy of Google Maps.
You can watch little icons representing taxis and shuttles stuck in traffic using Google Ride Finder. Although that may not be the most scintillating event to watch, the very fact that you can watch it is remarkable.
Ride Finder offers a real-time view of the positions of public vehicles for hire in a number of U.S. cities, ranging from Austin, Texas, to Washington, D.C.
Suppose you are working late and decide that you want to take a taxi home from the office. Rather than calling the service and waiting in the lobby, follow these steps to check out the location of vehicles in Ride Finder:
Open the Ride Finder program at http://labs.google.com/ridefinder. The product opens in a browser window containing three parts: a Search field for typing a location, a map showing pins in locations that are tracked, and a list of cities linked to the map.
Select the city in which you are traveling by clicking the pin on the map, clicking the link in the list, or typing the name in the Search field and clicking Search.
Zoom into the map using the navigation tool at the upper left of the map, and position the area in which you are looking for transportation. The example in Figure 40.11 shows the collection of shuttles available at the Baltimore-Washington International Airport.
Click the Update Vehicle Locations link on the page below the map to see a trend in movement of vehicles—or nonmovement in the case of a traffic snarl.

Some Google Labs tools are designed to make browsing and searching simpler and more targeted. The Web Accelerator, for example, uses a number of methods for increasing the speed of page loading. After you find your speedy results, check out Google Notebook for storing snippets of information and other data for future reference.
Cross-Ref
Read about other desktop and browser enhancements such as Google Desktop in Chapter 11, the Google Pack in Chapter 30, and the Google Toolbar in Chapter 31.
Google Web Accelerator uses Google’s computer network to make pages load faster and shows you how much time you have saved. The Web Accelerator is a download, and there’s nothing to do manually once it is installed. Download the file from http://webaccelerator.google.com.
Caution
The Web Accelerator doesn’t make an appreciable difference in downloading pages for dial-up users, nor does it speed up HTTPS pages for security reasons. Finally, don’t expect to speed up large downloads like streaming video or MP3 files.
The Web Accelerator tool works in several ways, including these:
Sending page requests through dedicated Web Accelerator traffic servers
Storing copies of frequently used pages for quick access
Scanning for and downloading updates to Web pages rather than the entire page
Compressing data before downloading to your computer
Prefetching pages in advance
Managing your Internet connection’s function to reduce delays
The list of actions appears to infringe on your personal security, and it does to some extent in order for the tool to work—for example, prefetching pages that you haven’t asked for. In order for the Web Accelerator tool to work, it must create a cache on your hard drive, and it works in many ways like your ISP.
When you restart your browser after installation, you find a small toolbar added to the interface, as shown in Figure 40.12. The toolbar uses a speedometer icon to indicate that it is active, and it displays the amount of time that has been saved since the tool was installed or the cache cleared.
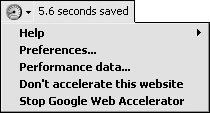
Change the way the Web Accelerator works on specific sites or in general. Click the down arrow on the Web Accelerator toolbar to open the drop-down menu, and then do any of these things:
Choose Don’t Accelerate this Website to exclude the page you are viewing from the tool’s function. When you view a page that is excluded, the speedometer icon is shown in grayscale.
Choose Stop Google Web Accelerator to prevent the tool from operating. When you stop the program, the icon appears as a pale gray circle without its speedometer indicator.
Choose Performance Data from the menu, or click the time indicator shown on the tool to open a Web page showing the data from your Web Accelerator cache. You can reset the counter on this page.
Choose Preferences to open the Preferences in a Web page. You can specify how pages are cached, whether to use prefetching, and the list of sites to exclude from the tool’s operation. Select Clear History in the preferences to clear the Web Accelerator cache.
Note
At the time of this writing, Google Web Accelerator was designed for automatic installation on Firefox 1.0 and Internet Explorer 5.5 and newer browsers. For other Windows browsers, the HTTP connections must be configured manually.
You can find the Web Accelerator in Internet Explorer by choosing View ![]() Toolbars
Toolbars ![]() Google Web Accelerator. In Firefox, choose Tools
Google Web Accelerator. In Firefox, choose Tools ![]() Extensions to find the toolbar listed in the Extensions dialog box.
Extensions to find the toolbar listed in the Extensions dialog box.
Many times, Web browsing is done for a specific purpose, such as searching for information on a particular topic or researching products before purchasing. Organizing the information you gather as you conduct your research can be difficult, and sometimes you don’t have the information when you need it.
Google Notebook is designed to make researching and organizing information simpler as well as portable. Google Notebook is a browser extension that you download and install before use.
Follow these steps to install and open Google Notebook:
Log in to your Google Account. In order to use Google Notebook, you must have a Google Accounts username and password.
Open the page at www.google.com/notebook.
Read the Terms of Service information, and click Agree and Download if you are using Firefox. For Internet Explorer, click the appropriate link on the page to locate and download the extension.
Close and reopen your browser to install the extension. When it is active, you see an icon and Open Notebook displayed at the lower-right edge of the browser window on the status bar.
To open the mini Google Notebook window, click Open Notebook on the status bar, as shown in Figure 40.13.

You can add content to the Notebook, referred to as clippings, in two ways:
Right-click the text, image, or link you want to clip, and choose Note this (Google Notebook).
When using Google for searches, right-click the link, image, or other search result and choose Note this (Google Notebook).
The mini Google Notebook window that pops up from the status bar is handy for storing clips as you capture them, but it’s not designed for organizing your clippings. Instead, use the full-page view. Either click the Actions button on the mini Google Notebook window and choose Go to full page view, or log in through www.google.com/notebook.
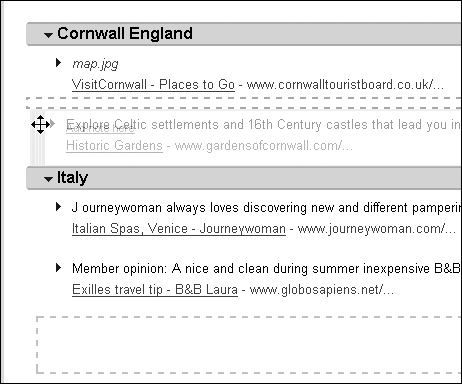
In full-page view, you can organize the clippings, add notes and comments, use section headings, and so on. Some of the common actions are shown in Figure 40.14 and include these:
Rename the notebook: By default, a notebook is named My Notebook. To change the name, click the Actions down arrow at the upper right of the browser window and choose Rename this Notebook from the drop-down list. In the field that opens, type the new name and press Enter.
Use section headings: By default, all contents are collected into one group. To add a section, click the first listing you want to appear under the section heading. Then click the Actions down arrow, and choose Add section heading from the drop-down list. Type a name for the heading, and click off the field to add the heading.
Reorganize content: Drag a clipping from one heading to another, as shown in Figure 40.14.
Delete content: Select a note or section on the Notebook page, and click Delete when the link appears at the upper-right edge of the note. If you have multiple notebooks, select the notebook. Click the Actions down arrow, and choose Delete this notebook from the drop-down menu.
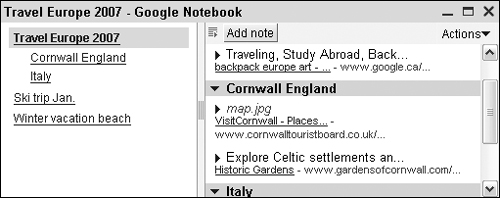
After you are working in the browser, the mini Google Notebook displays a list of your notebooks. Open the mini Google Notebook, and click Actions. Choose Show Notebook list to open the set of notebooks you are storing, as shown in Figure 40.15. Click a notebook’s name to list its contents.
Two up-and-coming offerings from Google Labs are designed to enrich the material accessible to your site’s users by offering specialized types of search options. Related Links offers links to information related to your content. Google Co-op lets you configure and host your own search engine.
A Related Links unit is included on your Web site to provide links to information targeted to your site’s content—hence the product name. Visitors can access content including video, news, pages, and searches.
Note
Related Links doesn’t generate revenue for your site, and it isn’t related to AdSense. You don’t need to be an AdSense publisher to use Related Links.
The Related Links program is located at www.google.com/relatedlinks. Follow these steps to produce a Related Links product for your Web site:
On the main page for the Related Links product, read the Terms of Service and click Get Related Links to open the formatting options.
Choose the features you want to display in the Related Links unit:
Specify a size: Sizes range from a leaderboard that can hold three types of links to a small rectangle that can display two links.
Select the link type: Choose from Searches, News, Videos, and Web Pages. You can choose two or three, depending on the size of the link selected. Specify which link type to use as the default as well.
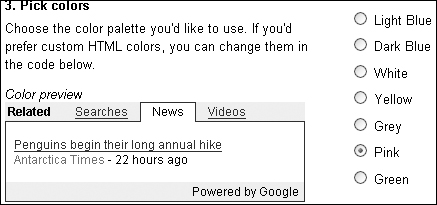
Choose a color palette: Click one of the color options, and view the color preview, as shown in Figure 40.16.
Click the code within the code box at the bottom of the browser window to automatically select it.
Copy the code, and paste it into your Web page. If you want, customize the colors and size of the object to match your site’s color scheme and layout.
If you want to add more links using different configurations, follow the steps again and make alternate choices, or configure the code yourself if you are comfortable working with JavaScript.
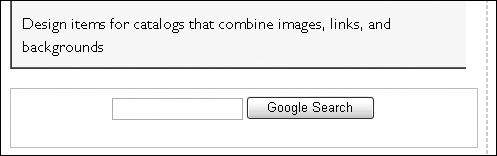
Some Related Links may not display as you anticipate for a number of reasons. Common reasons for display issues include a site that doesn’t allow JavaScript, content that doesn’t relate to available materials, or a site that doesn’t comply with the program’s guidelines. As shown in Figure 40.17, another reason that a Related Links block may not display content is when the page is new and hasn’t yet been crawled.
One product recently released into the Google Labs is Google Co-op. With Google Co-op, you can create a custom search engine for your Web site. Unlike the Related Search tool, you can generate income for your site using the custom search in conjunction with AdSense for search.
Google Co-op offers three options for customizing searches, both from the user and the Webmaster perspectives:
Create your own search engine.
Use subscribed links to integrate your information into user’s search results.
Label sites with topics to improve the quality of Web searches in general. Contributors sign up to contribute to a topic area, and then search for sites to include as their favorites. Refer to www.google.com/coop/topics/ for information and a link to the current topic list.
To create the engine, follow these steps:
Open the Custom Search Engine page at www.google.com/coop/cse/overview.
Click Create a Search Engine to open the first page of the wizard. On this page, type a name for your search engine, a description, and keywords. List the sites to search, or use your own site.
Click to accept the Terms of Service, and then click Next to view the next screen.
Type search terms into the text field, and click Search. Results appear in a window.
To make changes to the contents of your engine and consequently the likely search results, click back to Step 1 to make changes and repeat Step 3. Continue modifying your search engine’s content as necessary.
Click Finish. Your search engine is ready for further use. For example, you can do these things:
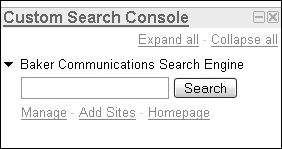
Add it to the Google home page, as shown in Figure 40.18.
Download and use the code to include an Add to Google button on your Web site to allow users to include your search engine on their Google home page. The code for the button is available from the Search Engine’s control panel.
On the WEB
Go to www.google.com/coop/cse/examples/Latest to view and experiment with some featured search engines.
A Subscribed Link is used to provide customized information that is displayed as part of a user’s search results, such as the example shown in Figure 40.19.

A Subscribed Link can be generated in three ways:
Use a basic link: A basic link is built through a wizard interface. Although it is the simplest type of link to build, it also is the least flexible.
Upload a feed file: Upload a data file from your disk to the Google servers in XML, RSS, or TSV formats. The uploaded file method is best for content that changes infrequently.
Submit a feed file URL: For data that is updated regularly, specify the URL for a feed file that can be in XML, RSS, or TSV file formats. The file is recrawled and reflects the changes in your data in the Subscribed Link output.
Refer to the Google Co-op Web site for more information and instruction on designing and using the feed files.
Sometimes, you may come across what seems to be a bargain on an item for which you hadn’t been searching and hadn’t researched. To find out if you have a real bargain in your hands, check out the product via your mobile phone or device and Froogle.
Cross-Ref
Read Chapter 8 for information about Froogle and Chapter 28 for Google Mobile.
You can use Froogle Mobile if your phone or device supports Wireless Markup Language (WML), an XML-based language that was developed for wireless applications and that complies with Wireless Application Protocol (WAP 1.2).
To check out competing prices for your bargain product online, follow these steps:
Load Froogle on your phone’s browser from http://wml.froogle.com.
Type the search term in the field, and click Search Froogle.
Check the results using the phone’s keypad arrows; sort by price or best match using the links at the bottom of the search results.
Proceed with your bargain purchase, or say “Thank you for your time” and leave the premises.
A few more products developing in the Google Labs are designed for searching. Some are fairly obvious in their function, while seeing how others are put to use will be interesting. These are some of the products to watch:
Google Glossary: You won’t see anything loaded into your browser or download anything to use Google Glossary. Instead, redefine how you search for content using definitions. You can search for words, phrases, and acronyms. In the browser window, type “define [term]” and click Search. Your search returns list dictionary links and definitions.
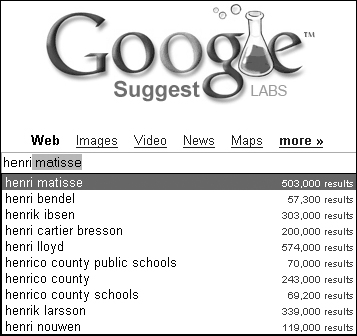
Google Suggest: Open the Google Suggest browser from the Google Labs listing, at http://labs.google.com. As you search, suggested keywords are added and change as the entered text changes, such as in the example shown in Figure 40.20. Google Suggest is available in English and Japanese.
Google Sets: Open the Google Sets browser from the Google Labs listing at http://labs.google.com. Type the names of some items in the fields, and click either Large Set or Small Set (15 items or fewer) to generate a set of terms that likely are extensions to the terms you typed in the example set. It is an interesting experiment.
One product direction emerging from Google Labs scans the millions upon millions of searches and offers trends based on specific terms. Two products currently in the lab are Google Trends and Google Music Trends.
What’s new and interesting in consumer electronics? Or fishing poles? Or steamer trunks? Find out using Google Trends, a feature that automatically reviews aggregate data and calculates trends based on a percentage. That is, how many searches have looked for the terms you typed compared to the total number of searches conducted in a specific time period? The results are based on a sample of the total number of searches conducted and displayed as a search-volume graph, as shown in Figure 40.21.
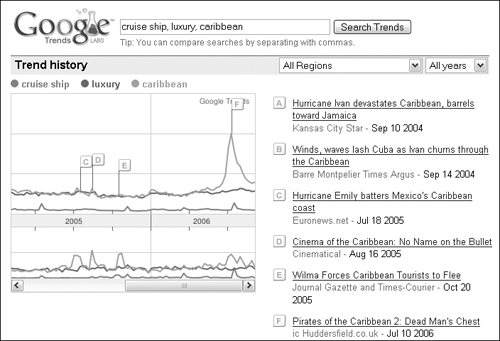
The graph also displays a news-reference graph that shows the number of times your search terms appeared in Google News stores. Spikes in volume result in a news story from the time of the spike. The story is automatically selected from Google News. Below the news reference graph are listed the top cities, regions, and languages for the first search term you used.
Use these rules and tips when using Google Trends:
Compare up to five terms separated by commas.
Include and exclude search terms using common search operators, such as (−) to exclude returns containing a particular term.
Find an exact term by enclosing your search results in quotation marks.
Restrict your returns to a specific time frame or region by choosing options from the drop-down boxes in the upper-right corner of the results page.
The results shown by city are ranked by a search ratio, as shown in Figure 40.22. A sample of all searches in the listed cities is compared to the number of searches conducted for your first search term. The Regions and Languages searches work in the same way as the Cities searches.

Google Music Trends is a way to examine global tastes in music, at least among those using Google Talk. Music Trends is a voting system whereby each time you share your music status online through a music engine, you are voting for the music you are playing. The larger the pool of participants, logically, the more accurately the musical tastes are profiled.
Cross-Ref
Music Trends is a feature of Google Talk, the subject of Chapter 20.
To participate in Google Music Trends, you must configure several settings and tools, including these:
Download and install Google Talk, available at www.google.com/talk.
Indicate that you have one of the supported music players, including iTunes, Winamp, Windows Media Player, or Yahoo Music Engine.
Opt in to the Music Trends system. On Google Talk, click Settings to open the Settings dialog box, and click Audio in the column at the left of the dialog box. In the Audio settings, select Share music listening history with Google Music Trends.
Share your music status in Google Talk. Click the Status down arrow, and choose Show Current Music Track from the Available or Busy section, as shown in Figure 40.23.
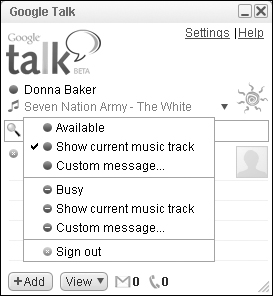
The music status is automatically updated each time your player starts a new song. When the music stops, the status displays the default Available or Busy message. Change the status to an Available or Busy message to stop contributing data to the Music Trends results.
The Google Music Trends results are updated every night. At the time of this writing, Music Trends are shown for ten countries. Votes from participants not living in one of the listed countries are included in the All Countries grand totals.
View the results at www.google.com/trends/music. From the results page, you can do these things:
Click a song’s title or artist to open the entries in Google’s Music Search, a service providing links to online music stores where you can buy the track or album.
Filter the trend results. Click the Genre down arrow, and choose an option from the available list. Not all countries filter by genre. Click the Country down arrow, and choose a country from the drop-down list. You can also filter by both country and genre, as shown in Figure 40.24.

In this final chapter, you’ve literally been all over the map. Starting on a distant planet, you saw how Google Mars is developing as a repository of information and imagery. From outer space to urban space, Google Transit and Google Ride Finder are two applications under development that are aimed at making getting around your part of the world simpler. Although restricted to a number of specific markets at the present time, the data and user feedback being collected will help expand the service over time and make it a useful tool.
Searching and browsing for information isn’t an easy task! Some of the new products in the Google Labs are designed to make your browsing experiences easier. To keep track of search results and notes for future reference, Google Notebook offers a replacement for the multiple stickies stuck around your monitor or all over your bulletin board.
Specialized searches are a Google specialty, and they continue to develop. Related Links is a tool you can add to your Web site that offers sophisticated options for visitors to your site for further investigation. Accessible Search generates filtered search results listing Web sites that are likely to be used by users working with screen readers and other assistive devices, based on Google Co-op technology. Google Co-op offers means to develop your own custom search engines.
And what is to be done with all that data? Google offers two types of trend tracking described in this chapter. Evaluate trends in searching sorted by categories such as city and date, and track music trends for a specific group using Google Music Trends.