
Appendix. Extra Practice Mermaid Splash—Art
Octavia the mermaid is on the run after her cover is blown. Ten years as a mermaid spy gathering information on the jellyfish and turtles down the drain. She now needs to get back to base, but sea creatures are chasing her, determined to stop her because she knows too much. How long can Octavia, shown in figure 1, stay alive?
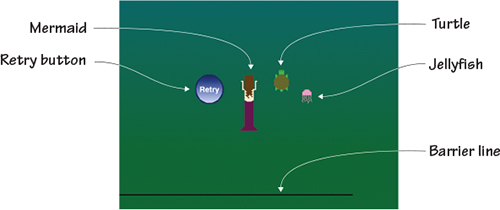
Figure 1. A game of Mermaid Splash requires a single backdrop, a mermaid, turtle, jellyfish, retry button, and barrier line.
Mermaid Splash is a racing game like Midway’s 1983 arcade game Spy Hunter. They’re both vertical-scrolling (the mermaid swims up instead of the screen side-scrolling to the right) action games. In Spy Hunter, the player raced a car up an endless roadway, trying to take out the enemy’s cars either with weapons or by knocking them off the road. Mermaid Splash leans away from the pixelated violence and instead requires Octavia to dodge the randomly generating jellyfish and turtles as she swims forward. But both games share the same ending, which is no ending. Both the road in Spy Hunter and ocean lane in Mermaid Splash continue forever.
Perspective is one of two art lessons. Mermaid Splash is your first top-down game; the player looks down on the action rather than looking at it from the side, therefore you won’t draw the mermaid’s face because the player will be looking down at her back. Mermaid Splash is also a perfect time to look at capturing movement in still images. Still drawings don’t move (unless you’re at Hogwarts), but even before the game begins, the viewer can tell that the mermaid and jellyfish are moving due to small details in the way they are drawn. Moreover, this will also be the first game where parts of the sprite will move—the mermaid’s arms will rotate as she swims.
In this section, you will learn
- How to show movement in art
- How to create moving parts on a sprite
- How to blend two colors together
- How to choose perspective for an image
You’ll start off making the ocean backdrop, which blends shades of blue and green together.
Prepping the backgrounds
Like School Escape, Mermaid Splash requires only one backdrop that appears to endlessly scroll. The backdrop blends two colors using the second color square in the Color Toolbar.
Making the ocean backdrop
Have you ever flown over the ocean in an airplane or seen a photo of the water taken from above? The water isn’t a uniform color, as shown in figure 2.
Figure 2. The water looks blue in some places and green in others.
There are dark spots and light spots depending on the space below the surface. Sometimes the water looks blue and other times it looks green. The ocean backdrop captures that top-down perspective by blending blue and green together.
Open the Backdrop Art Editor and get ready to make the ocean backdrop:
- Select the darkest green paint sample square and the Paint Bucket tool.
- Click the gradient tool in the Color Toolbar, shown in figure 3, which should currently show the color on the thumbnail image fading from green to white.
Figure 3. You can set two different colors using the squares in the Color Toolbar.
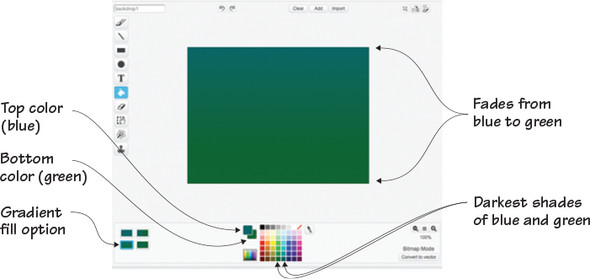
- Move to the two squares to the left of the paint sample square box marked with “Top color” and “Bottom color” in figure 3. Click the white, bottom square (green in figure 3), which will flip it to the top position.
- Select the darkest greenish-blue paint sample square. You should now see blue on the top square and green on the bottom square, as in figure 3.
- Click anywhere on the canvas to spill the blended paint.
Prior to this point, the gradient tool always faded into white because the second square’s default color is white. By setting a color for the second square, you were able to create a blended ocean color for the finished backdrop, shown in figure 4. You can experiment with other color choices—such as choosing two shades of blue, or moving from the darker navy blue to the greenish-blue. The two colors are less important than the blending because you want the player to feel as if they’re looking at the ocean from above.
Figure 4. The completed ocean backdrop is a beautiful blend of blue and green.

Learn It: Gaming Perspective
Every video game has a set perspective, which is a fancy way of describing the relationship between the eye and the action. Set an apple on a table. First bend down and look at it, straight ahead. That’s a side-view perspective. Now stand up and hover over the apple from above. That’s a top-down perspective. Pick up the apple and you can see it from the first-person point-of-view (in gaming, this would be a game where you’re “looking” through the character’s eyes as if you’re in the game), or have someone else hold the apple and look at it over their shoulder from a few feet away, and you have a third-person point-of-view. Those aren’t the only perspectives used in designing games, but they’re a good starting point. Mermaid Splash uses a top-down view, also known as a bird’s eye view (because it would be the point-of-view of a bird flying above). This gives the player the ability to see the big picture. Take a look back at the games in this book. How would changing the perspective change the game play? What if you were looking down at the bowl in Salad Catch instead of peering at it from the side? What if you were looking at the ghosts through the wizard’s eyes in Wizards vs. Ghosts instead of getting the third-person perspective? When designing a game, think about the various possible perspectives and go with the most interesting angle.
Prepping the main sprites
There are three main sprites you need to make for Mermaid Splash: Octavia the mermaid, the turtle, and the jellyfish. All will be drawn as if you’re viewing them from above. Before you begin making the new sprites, get rid of the default cat currently on the Stage.
Making the mermaid
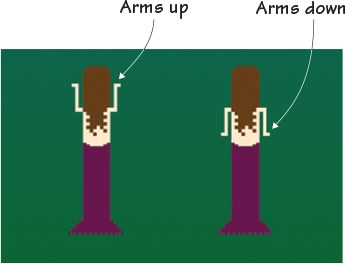
The player controls a car in Spy Hunter, but in Mermaid Splash, they control Octavia, shown in figure 5, making her swim left and right as she dodges the jellyfish and turtles.
Figure 5. There will only be one mermaid, but you will make two versions, with the arms up and down.
Open the Art Editor to make the mermaid:
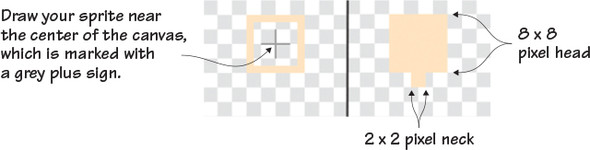
- Select a skin tone and the Paintbrush tool. Zoom in to 800%.
- Draw an eight-by-eight-pixel head close to the plus sign in the center of the canvas. Fill in the center of the square using
the Paint Bucket tool. Make sure it’s set for the solid fill. At the bottom of the square, make a two-by-two-pixel neck, shown
in figure 6.
Figure 6. The head and neck should be drawn close to the center of the canvas.
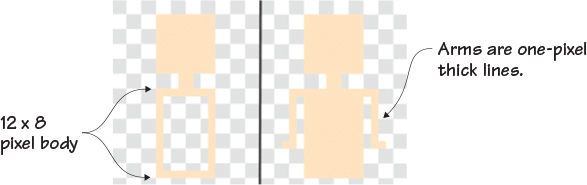
- Make a rectangle under the neck that is twelve by eight pixels for the torso. Fill in the center using the Paint Bucket tool.
- Make two pixels off either side of the top of the rectangle for the shoulders. Make the arm go down another seven pixels from
the outer end, and then go out a single pixel either to the left or right, as in figure 7.
Figure 7. The body is a rectangle and the arms are two lines.
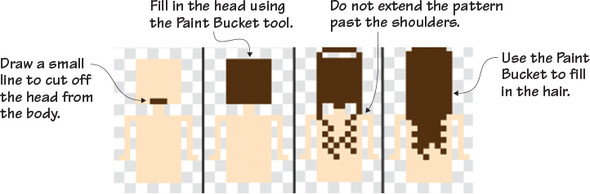
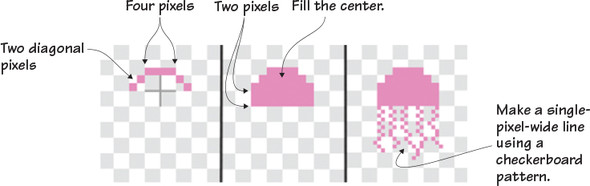
- Select a hair color and cut off the base of the head from the rest of the body by placing four pixels across the top of the neck. Use the Paint Bucket tool to fill in the rest of the square head with the hair color.
- Draw a random design for the hair that captures movement. Tangle the line by making a checkerboard pattern of pixels, but
make sure the pattern doesn’t extend over the side of the shoulders as it goes down the back. (This will be important in a
moment.) Dome the top of the head by making a single pixel above and then a horizontal line across, as shown in figure 8. Fill in the empty spaces in the hair using the Paint Bucket tool.
Figure 8. Make a pattern for the hair but keep it inside the shoulders.
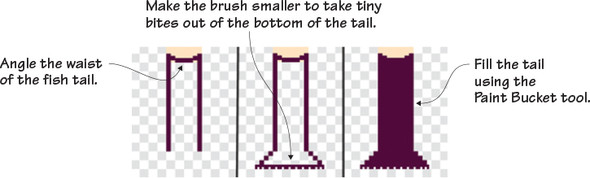
- Choose a color for the fish tail. (I went with magenta to provide contrast with the water.) Angle the top of the tail near the waist by extending a pixel or two over the skin tone area and then working down diagonally so the horizontal line covers four pixels and rests under the bottom of the torso rectangle.
- Starting at the top left side of the fish tail, go down 22 pixels. Then continue diagonally four pixels to the left. Create the same lines on the right side of the body and then connect the two ends of the fish tail at the bottom with a horizontal line.
- Switch to the transparent paint sample square and use the slider to place the Paintbrush on its smallest setting. Take tiny
bites out of the bottom of the tail—every other pixel—as shown in figure 9. Return to the color you used for the fish tail and fill in the center using the Paint Bucket tool.
Figure 9. Make the brush size smaller to take tiny bites out of the bottom of the tail.
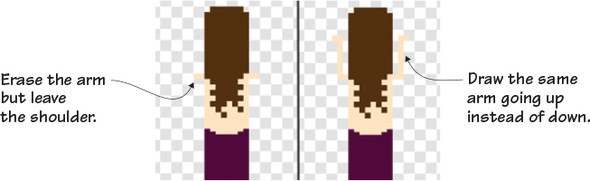
- Go to the Costumes tab in the Block Menu and duplicate the existing mermaid by using the stamp icon from the Grey Toolbar on the mermaid thumbnail image on the tab. A second version of the mermaid should appear on the tab. Place the blue box around the second version and return to the Art Editor.
- Use the Eraser tool to remove the mermaid’s arms up to the shoulders, as shown in figure 10. Draw the arms a second time (returning the Paintbrush tool to its normal size), going up seven pixels and then out one.
Figure 10. Keep the shoulders and draw the arms going in the opposite direction.
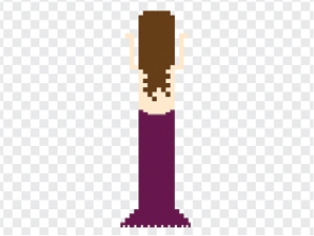
You now have the finished mermaid, shown in figure 11. Rename the sprite Mermaid in the Sprite Zone. Why do you need two costumes for the mermaid? This is the first sprite that will have “moving” parts. The arms of the mermaid will rotate between being up or down by alternating between the two versions of the sprite. By coding the switch to go back and forth quickly, the mermaid will appear as if she is swimming through the water. You can do this trick with any sprite, including tilting the wand on the wizard in Wizards vs. Ghosts or Buffy’s legs as she runs over the sand in Beach Blast.
Figure 11. The completed mermaid sprite
Learn It: Capturing Movement
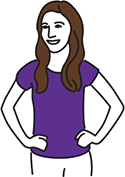
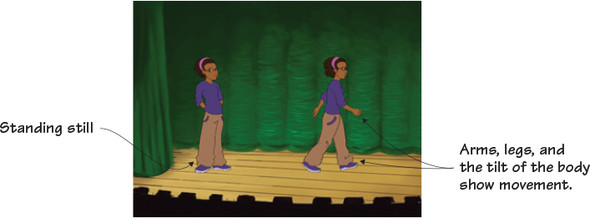
How do you know the mermaid is swimming? One clear sign is her hair. Instead of hanging in a straight line, the hair is tangled to show that it’s floating in the water behind her. You’ll similarly make the tentacles on the jellyfish curl as if they’re propelling him through the water. Think about how you know whether a person in a drawing is standing still or moving. Look at figure 12. The girl on the left is standing still. Her legs are straight, and her arms are folded behind her back in a position one normally would hold if they weren’t moving. The girl on the right is walking off the stage. Her legs are apart, as if drawn mid-stride. Her arms are pumping and her body is slightly tilted to show movement. These small details give the viewer a lot of information.
Figure 12. How do you know that the girl on the left is standing still while the girl on the right is walking?
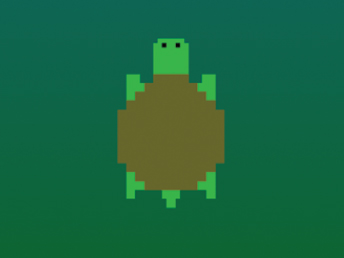
Making the turtle
The turtle is one of two enemies, and he will swim around the ocean, trying to catch the mermaid. You’re seeing the turtle in figure 13 from above; therefore the arms and legs will be visible because he is swimming. If he were standing, only the shell would be visible, because the arms and legs would be tucked beneath him.
Figure 13. The boxy turtle’s legs and arms give the illusion of swimming.
Make a new sprite and return to the Art Editor:
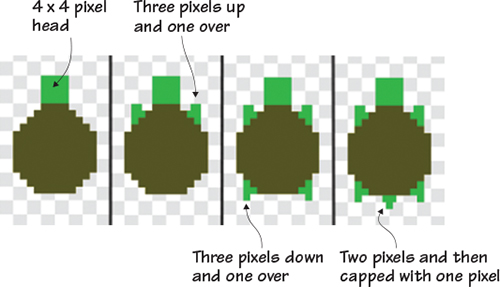
- Select an olive green for the shell and the Paintbrush tool. Remain zoomed in to 800%.
- Make a four-pixel horizontal line. Continue the right side at a diagonal for three pixels and then make a fourth diagonal
pixel and launch into a vertical line, six pixels long. Next make two diagonal pixels to the left, and then make a third pixel
that will lead into a six-pixel horizontal line. Repeat the pattern on the left side of the shell so it matches the right
side of the shell. The top of the shell should be slightly smaller than the bottom, as in figure 14. Fill the center of the shell using the Paint Bucket tool.
Figure 14. Draw the shell close to the center of the canvas.

- Switch to a bright green and make a four-by-four-pixel head extending from the top of the shell.
- Move to the diagonal pixels on the top left side of the shell and use them as a guide for making a three-pixel vertical line
followed by a single pixel to the side (like a letter T), as shown in figure 15. This will be repeated in all four “corners” of the shell, with each limb three pixels in length and one additional pixel
to the side. Draw a tail at the bottom of the shell by making two side-by-side pixels capped by a single pixel.
Figure 15. The four limbs are splayed out because he’s swimming.
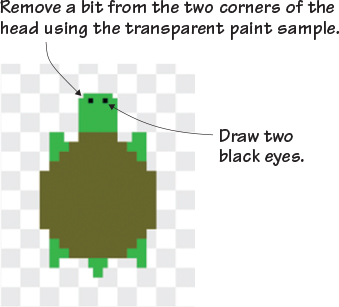
- Select the black paint sample square and use the slider to set the Paintbrush tool on its smallest setting. Draw two single pixels as eyes near the top of the head.
- Switch to the transparent paint sample square and navigate to the top left corner of the turtle’s head. Click once to remove
the corner of the head, as shown in figure 16. You need to use the transparent paint rather than the Eraser tool to remove such a small amount of the pixel. Repeat on
the right side of the head, too.
Figure 16. Use the transparent paint sample to shape the head.
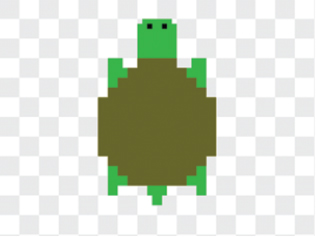
The turtle in figure 17 is complete. Rename the sprite Turtle in the Sprite Zone.
Figure 17. The completed turtle sprite
Making the jellyfish
The jellyfish in figure 18 are the mermaid’s other enemies, and they serve the same purpose as the other cars in Spy Hunter—to attack the main character. The jellyfish’s tentacles trail behind him because the jellyfish is in motion.
Figure 18. The jellyfish’s tentacles are made using the Paintbrush tool on the smallest setting.
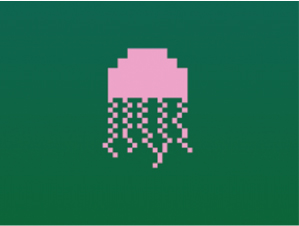
To make the jellyfish, open a new sprite and go to the Art Editor:
- Select any shade of pink and the Paintbrush tool. Make sure the Paintbrush is on its default setting. Keep the canvas zoomed in to 800%.
- Make a four-pixel horizontal line. Extend the line diagonally two pixels on either side. Make two more pixels going down from the last diagonal pixel and connect the bottom of the jellyfish body. Fill the center using the Paint Bucket tool.
- Use the slider to set the Paintbrush tool to its smallest setting. Beginning on the far left side of the bottom, draw the
tentacles extending downward, about 12 pixels in length, but vary the size to make each tentacle unique. Use a checkerboard
pattern, sometimes mixing things up by going two pixels or more in one direction or mixing the checkerboard pattern with a
few vertical pixels. You should be able to make five tentacles extending off the bottom of the jellyfish, as shown in figure 19.
Figure 19. The jellyfish has a simple domed head and five tentacles.
The completed jellyfish, shown in figure 20, once again uses the Paintbrush tool on its smallest setting. By changing the size of the brush, you can add fine details to a sprite. The tentacles trail behind the jellyfish to show movement, taking into account the top-down perspective. Don’t forget to rename the sprite Jellyfish in the Sprite Zone.
Figure 20. The completed jellyfish sprite

Prepping the odds and ends
Like Dribble, Mermaid Splash has an extra sprite in the odds and ends: a retry button. Additionally, you need to make your good friend the barrier line before you can code your game.
Making the retry button
You don’t always need to click the green flag to start a new game. You can add a button like the one in figure 21 into your game that will pop up at the end and give the player a chance to restart the action. This type of prompt encourages more game play.
Figure 21. The retry button allows the player to restart the game without needing to click the green flag.

Open a new sprite and go to the Art Editor to make the retry button:
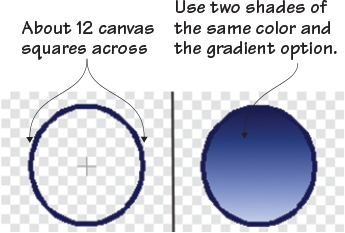
- Choose the navy blue paint sample square and the Circle tool. Remain zoomed in to 800% on the canvas.
- Draw a circle in the center of the canvas that is about 12 canvas squares across.
- Switch to the Paint Bucket tool and select the gradient option. You are going to keep the top square in the Color Toolbar
set to the navy blue and the bottom square to a lighter blue. This will make the range of blues (figure 22) when you click anywhere in the circle.
Figure 22. Draw a circle and then fill it with the Paint Bucket tool, using two colors with the gradient option.
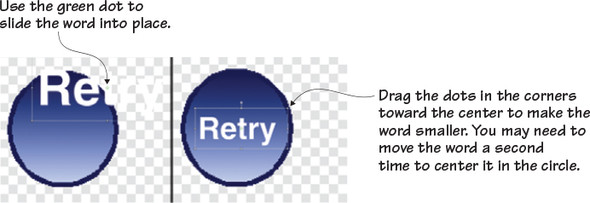
- Select the white paint sample square and click the Text tool. Type Retry anywhere on the screen. You will be able to move the word afterward.
- Click anywhere on the screen (once) to set the word, and you’ll see a box around the word. Use the green bubble in the center
to drag it into the circle. If the word is too big to fit in the circle, resize it by dragging the white dots in the corner
of the box toward the center. (If it’s too small, you could go the opposite way and drag the white dots outward.) You may
need to use the green bubble a second time to center the word in the middle of the bubble, as in figure 23.
Figure 23. You can write the word anywhere and then use the green bubble in the middle to move it.
The retry button (figure 24) is complete. Rename it Retry Button in the Sprite Zone and get ready to make one last odds-and-ends sprite.
Figure 24. The completed retry button sprite

Making the barrier line
It’s your old friend, the barrier (or bottom) line, shown in figure 25. Once again, draw it at the bottom of the canvas.
Figure 25. The barrier line at the bottom of the screen
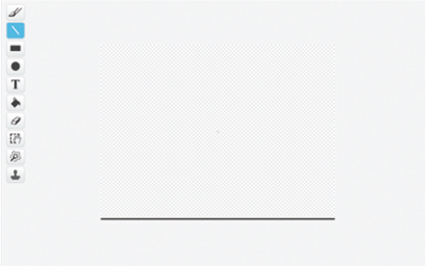
Make a new sprite and draw the barrier line:
- Select the black paint sample square and Line tool. Zoom out to 100%.
- Draw a line that starts at the bottom left corner of the canvas and ends at the bottom right corner. Hold down the Shift key on the keyboard as you drag your mouse to make the line completely straight.
Make sure you rename this last sprite Barrier Line in the Sprite Zone.
Preparing to code
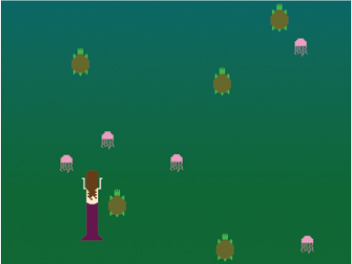
This racing game has a main character (Octavia the mermaid) and two enemies (the turtle and jellyfish) as well as odds and ends that will enable the game to run. In the next section, you’ll shrink the Sprite Zone by combining the two enemies into one powerful sprite.
Play with the game
You got to make a few choices this game, such as the design for the mermaid’s hair or the color of her tail, but it’s time to put that artistic energy to the test with a few challenges.
Challenge
If you have a waterproof doll in your house, fill up the sink or bathtub with water and drop her in. Drag her around and observe the hair—how do you know the doll is in motion versus still? Memorize the movement of her hair and then create it on the screen. Double points if you also slightly change the mermaid’s hair in the second costume so it swishes back and forth as her arms go up and down.
Challenge
Make the tail move as you did the arms. In the second costume for the mermaid, make a small change to the tail so it looks like it is wiggling back and forth each time she swims forward.
Challenge
Add ripple lines around the mermaid’s body to show movement. Ripple lines are often used in comic books to indicate movement without taking up a large amount of space.
What did you learn?
Movement is well covered in physics, mostly because everything on earth moves—even mountains shift ever so slightly over time, due to plates below the surface of the earth, but obviously also people, animals, cars, and baseballs. Even the earth itself rotates. The study of motion—the change in the position of an object—is a big part of physics and the laws of mechanics.
Physicists look at causes for movement (because something needs to set a stationary object into motion), but artists look at ways of capturing movement. Doing so means looking at things like the way muscles tense and stretch while a person runs, or figuring out how to blur a ball moving through the air so it’s clear to the viewer that the object has been thrown and isn’t levitating on the field. Art borrows information gained from other scientists in fields such as kinesiology (the study of body movement), aerodynamics (the study of how objects move through the air), and biology (the study of living things).
Pause for a moment and think about everything you learned in this section:
- How to capture the way the ocean looks from above when gazing down with a bird’s eye view
- How to show that a person (okay, mermaid) or animal is in motion
- How to consider the angle or point-of-view when drawing an object
- How to tweak the mermaid sprite and make multiple costumes in order to create the illusion of movement
- How to remove parts of pixels using the transparent paint sample and the smallest setting on the Paintbrush tool
In the next section, you’ll combine the turtle and jellyfish into a single sprite called Animals. In doing so, you can generate more randomness in your game when it comes to spawning enemies—and do it with fewer scripts. You’ll also make the mermaid’s arms move by coding the game to switch between the two costumes. At the end of the section—your last game section!—you’ll have a racing game called Mermaid Splash.