
Chapter 12. Making a single-screen platformer
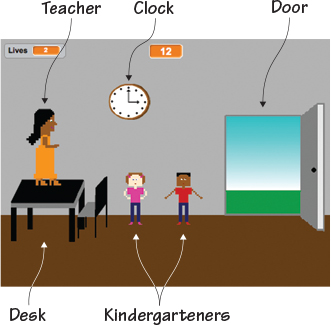
Ms. Finebean is late for her brother’s wedding. This teacher knew it would be a tight squeeze to get from her school to the ceremony on time, so she came to school already dressed up. Now she needs to navigate her way out of the school, except there are 30 clingy kindergarteners, shown in figure 12.1, in her way.
Figure 12.1. A game of School Escape requires a single backdrop, a teacher, four variations of kindergarteners, a clock, a desk, and a door to the outside world.
School Escape is a single-screen side-scrolling platformer. Although it will look as if Ms. Finebean is racing across the screen, leaping onto her desk and over students, the main sprite will be running in place while the other sprites move toward her. This is how Nintendo’s 1985 hit Super Mario Bros operates. Mario looks as if he is running forward to jump onto the brick platforms in order to collect coins and flowers and move over the Goombas (which are, strangely enough, mushrooms with legs), but it’s really the platforms, backgrounds, and sprites coming at Mario, who can only jump up and down.
Drawing the sprites for this game means thinking about shadows and how they add realism to even cartoonish drawings. Although you’ve worked on adding shading to objects, for this game you’re going to think about the way light interacts with objects beyond the surface.
In this chapter, you will learn
- How to add shadows to make objects look more realistic
- How to tweak a single sprite so it looks like multiple sprites
- How to use shadows to show the direction of the light source
You’ll start off making a simple backdrop because you want the focus to be on the sprites in the foreground and not the background scene.
Prepping the backgrounds
You’re back to making a single game backdrop. The goal is to make the background simple so that it doesn’t distract from the sprites, such as the desk and kindergarteners.
Making the school backdrop
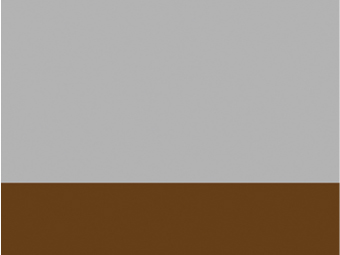
This backdrop will not technically move like the sprites in front of it, so it’s important not to put decorations on the walls, such as school posters or windows, that would break the illusion. You’re looking for something simple, such as figure 12.2.
Figure 12.2. The brown floor and grey wall keep the focus on the sprites in the foreground.

Open the Backdrop Art Editor and get ready to make the school backdrop:
- Select the medium brown paint sample square and click the Line tool.
- Draw a horizontal line about one-third up from the bottom. Use the Paint Bucket tool to fill the bottom of the Stage.
- Switch to a medium grey paint sample square and fill the top portion of the Stage.
Your backdrop should look like the empty school hallway background in figure 12.3.
Figure 12.3. The completed school backdrop is a drab, empty hallway.
Prepping the main sprites
There are five main sprites you need to make for School Escape: a clock, a door, a desk, Ms. Finebean, and a single kindergartener who will be tweaked to turn into at least four students. Delete the default cat sprite before you begin.
Making the clock
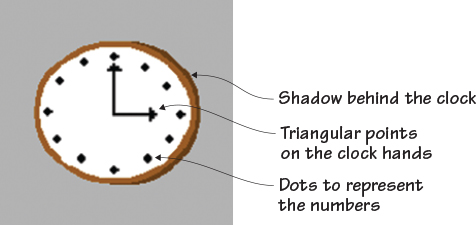
Super Mario Bros has its fireball power-up, and School Escape its clock, shown in figure 12.4, which buys the player more time.
Figure 12.4. The clock stands out from the wall due to the shadow behind it.
Open the Art Editor to make the clock:
- Zoom in to 400%. Choose the darkest brown paint sample square and the Circle tool.
- Draw a circle on the canvas that is 12 grey-and-white squares across.
- Switch to a lighter shade of brown in the paint sample squares and draw a second circle above and to the left of the first circle.
- Use the dot in the center of the second circle to drag it until it is touching the inside line of the first circle on the right side, as in figure 12.5.
Figure 12.5. The darker circle should be visible on the right side after the second circle is moved into place.

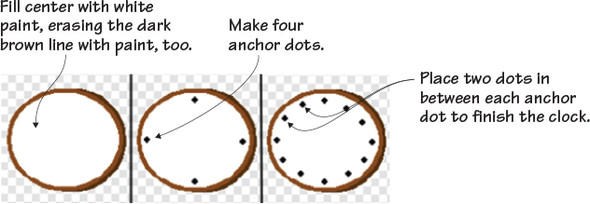
- Select the white paint sample square and fill in the inside of the light brown circle using the Paint Bucket tool, erasing the curved line from the dark brown circle with the white paint.
- Switch to the black paint sample square and make four dots in the spaces for 12, 3, 6, and 9 on a clock.
- Fill in the remaining dots, placing two in between the anchor dots already on the clock face, as shown in figure 12.6.
Figure 12.6. Using anchor dots makes it easier to space the “numbers” on the clock.
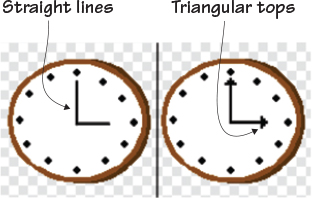
- Click the Line tool and draw two lines, one shorter than the other, extending in two directions from the center of the clock.
- Return to the Paintbrush tool and make a triangle on the end of each line by making a line of five dots, topped by a line
of three dots, topped by a line of one dot, like figure 12.7.
Figure 12.7. The clock is completed with two hands topped by triangular pointers.
The clock is now complete, as shown in figure 12.8. The technique of drawing double circles and erasing part of the line is an easy way to produce a drawing that looks three-dimensional due to the shadow. Go to the Sprite Zone and rename this sprite Clock.
Figure 12.8. The completed clock sprite

Learn It: Shadows
Shadow is what happens when a ray of light meets a solid object. It can’t go through it, so it makes a darker version of the object on the surface it couldn’t reach. Look around the room you’re in and note a shadow. This shouldn’t be difficult unless you’re sitting in the dark! Now examine the shadow. It’s not one solid shade, is it? There are darker parts to the shadow and lighter parts. That’s because light isn’t hitting the object only in one place, which means there are multiple shadows that overlap. A two-dimensional object can’t cast a shadow because it isn’t a solid shape. By adding a shadow behind an object in a drawing, you’re telling the viewer they should consider it a three-dimensional shape. The shadows you’ll make for this game will all be a single shade, but if you want to add even more realism, make the color fade slightly on the edges.
Making the door
The door in figure 12.9 only appears at the end of the game, and it’s Ms. Finebean’s escape hatch. Reach that door and the game ends.
Figure 12.9. The door provides high contrast with the boring hallway.

Start a new sprite to make the door:
- Keep the Art Editor zoomed in to 400%.
- Choose a dark grey paint sample square and the Square tool.
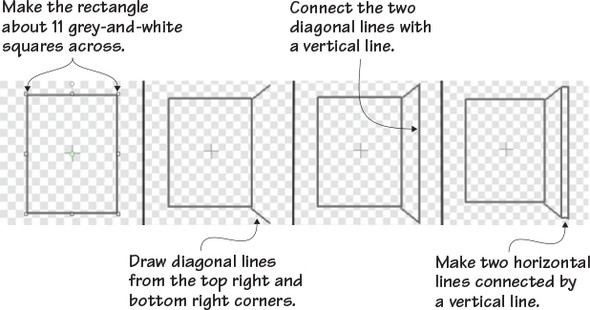
- Draw a vertical rectangle outline about 11 grey-and-white squares across, and then make two diagonal lines from the top and bottom right corners of the rectangle.
- Connect the two diagonal lines with a vertical line, and finally make two tiny horizontal lines to extend the ends of the
diagonal lines, connecting these horizontal lines with another vertical line, as in figure 12.10.
Figure 12.10. Build the outline for the door in four steps.
- Fill the sideways trapezoid door with dark grey paint using the Paint Bucket tool.
- Switch to a light grey and fill the outer edge of the door. The two greys used on the door should straddle the medium grey
used for the wall (see figure 12.11).
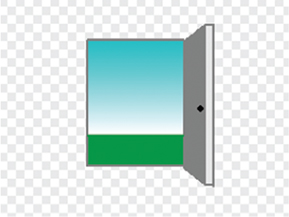
Figure 12.11. The inside of the door is dark because it’s away from the interior light. The edge of the door is light because it’s facing the interior light.
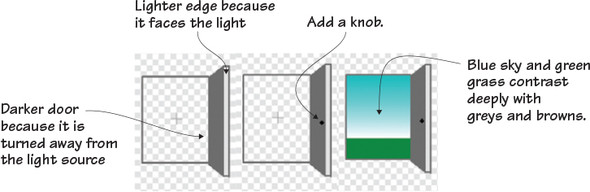
- Add a single black pixel with the Paintbrush tool for the knob.
- Choose a bright green paint sample square and draw a line across the door opening, a quarter of the way up from the bottom. Fill the bottom section with the green paint using the Paint Bucket tool.
- Fill the top section of the door opening with a blue, using the gradient tool so the color fades as it moves closer to the “grass,” as shown in figure 12.11.
The finished door in figure 12.12 visually pops because it contains bright colors compared to the drab hallway. Make sure you go to the Sprite Zone and rename this sprite Door.
Figure 12.12. The completed door sprite
Making the desk
The desk shown in figure 12.13 serves as the actual platform in School Escape. Ms. Finebean can jump onto and hang out on the desk. This is your first multilevel game where the player character can either be on the ground or standing on a platform off the floor.
Figure 12.13. The desk is a platform that Ms. Finebean can use to sail over the kindergarteners’ heads.

Start a new sprite to make the desk:
- Keep the Art Editor zoomed in to 400%.
- Choose the black paint sample square and click the Line tool.
- Draw a parallelogram, about 22-by-8 grey-and-white canvas squares.
- Use the Paint Bucket tool to fill the center of the parallelogram.
- Return to the Line tool and pick a dark grey from the paint sample squares. Draw a second parallelogram on the right side of the desk by drawing two vertical lines downward from either corner and connecting them along the open edge.
- Draw a rectangle against the bottom edge of the parallelogram, as shown in the bottom picture of figure 12.14.
Figure 12.14. Two parallelograms and a rectangle form the top of the desk.

- Fill the grey parallelogram and rectangle using the Paint Bucket tool.
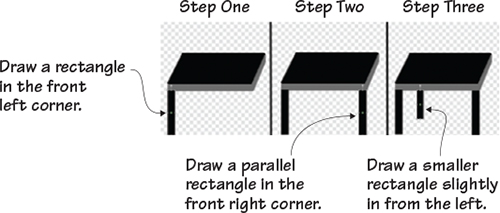
- Return to the black paint sample square and click the Square tool. Make sure the Square tool is on its solid and not outline
setting. You’re going to draw three rectangles, as shown in figure 12.15. The first one extends down from the front left corner (and is about 12 grey-and-white squares long). The second one extends
down from the front right corner. The third one is smaller and is positioned slightly in from the left side.
Figure 12.15. The legs of the desk are carefully positioned rectangles.
- Draw the final leg of the desk (another black rectangle) so that the top right corner of the rectangle touches the edge of
the grey side of the desk, as shown in figure 12.16. This leg currently blocks the grey area, but you will switch back to the Line tool and the grey paint sample square to cover up the part that overlaps with the
grey section. You may need to temporarily zoom in to 800% to see the space clearly.
Figure 12.16. Add the final leg and clean up the side of the desk.

- Begin the chair to the right of the desk with a grey parallelogram. Make a second, black parallelogram overlapping the grey parallelogram by using the right edge of the first parallelogram.
- Fill in the black parallelogram first, covering up the short, grey line that runs through it. Fill in the grey parallelogram second, including the black section on the left side that is part of the desk.
- Draw four vertical black lines extending down from the four corners of the chair, much in the same way that you made the desk
legs. Check your work against figure 12.17.
Figure 12.17. The chair is a series of parallelograms and lines.

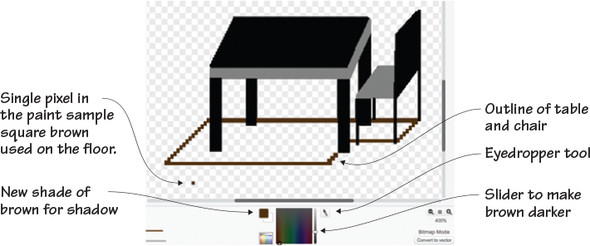
- Move to the bottom of the desk and choose the darkest brown paint sample square. Use the Paintbrush tool to make a single pixel anywhere on the canvas. Because you used the darkest brown to make the floor, you need the shadow to be slightly darker to be visible. You will use this single dot of paint to set the color for the darker shadow.
- Open the rainbow box and use the Eyedropper tool to set the color to that single, dark brown pixel on the canvas. Use the
slider on the right side to slightly darken the brown, as shown in figure 12.18.
Figure 12.18. Place a single brown pixel on the canvas so you can use the Eyedropper tool to set the base brown before using the slider to make it darker.
- Using the Paintbrush tool, make an outline of brown square dots, starting with the back right leg of the chair, as shown in figure 12.18.
- Fill in the center using the Paint Bucket tool.
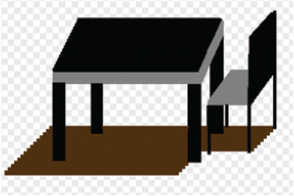
You now have a shadow under the desk, as shown in figure 12.19. You can erase the single pixel you placed on the canvas to set the shade of brown and rename the sprite Desk in the Sprite Zone.
Figure 12.19. The dark brown shadow under the desk will appear on the lighter brown floor.
Making the teacher
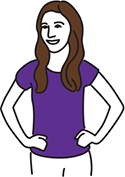
Ms. Finebean, shown in figure 12.20, is your Mario, jumping up on desks, collecting clocks, and sailing over the heads of kindergarteners, all while wearing a fancy dress and high heels because she’s headed to her brother’s wedding.
Figure 12.20. Ms. Finebean is the “Mario” in this Super Mario-like game.

Start a new sprite to make the teacher:
- Choose a skin tone and click the Paintbrush tool. Make an eight-by-eight-pixel square and fill the center using the Paint Bucket tool.
- Return to the Paintbrush tool and navigate to the right side of the square. Make a two-pixel horizontal line about midway
down the side of the square. Top it with one pixel to make the nose. Navigate to the bottom of the square and center a two-by-four-pixel
rectangle underneath the square for the neck, as shown in figure 12.21.
Figure 12.21. Ms. Finebean is shown in profile.

- Select a color for Ms. Finebean’s dress. (I went with orange. Choose any color except brown or black.) Make the sleeve of
the dress using the Paintbrush tool. Extending from the base of the neck, make two-pixel vertical lines on either side and
connect them with a two-pixel horizontal line at the neck. Make the horizontal line slightly higher than the top of the vertical
line, as shown in figure 12.22.
Figure 12.22. Because Ms. Finebean is in profile, you only need to draw the strap of the dress right now.

- Return to the skin tone color and draw the arm. The top of the arm is two pixels thick and three pixels down until you get to the elbow. Once the arm changes direction, it’s only one pixel thick and five pixels across. Stagger the line above to make the two-pixel hand, as shown in figure 12.22.
- Select the dress color again and move back to the strap. Extend the dress down another two pixels. To make the dress fan out, add a diagonal pixel (the pixel in the front may be blocked by the arm, so imagine where it would be and continue the dress as if it is there) and then continue the dress as vertical lines, in both the back and front of the dress, for 11 pixels.
- Make a diagonal pixel at the bottom of the dress on either side followed by a pixel underneath it. Connect those two lines
with a horizontal line that runs along the bottom of the dress. Fill in the center of the dress with the Paint Bucket tool.
You can see the finished dress in figure 12.23.
Figure 12.23. The bell-shaped dress can be any color.
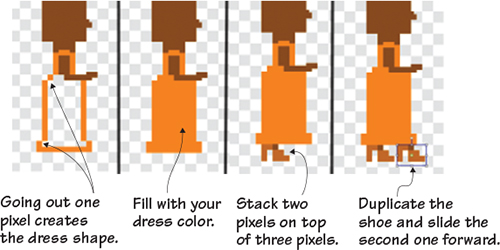
- Draw the shoes by using the Paintbrush tool. Again, choose any color except brown or black. Draw a three-pixel vertical line at the bottom of the shoe. At the top of the line, make a single pixel to the right. Make a diagonal pixel and follow that with a second pixel to the right. Finish the shoe by making a three-pixel line underneath the two-pixel line, aligning them on the left side. You can close off the single empty pixel between the shoe and the bottom of the dress with the skin tone color.
- Use the Duplicator tool to make a copy of the shoe. Once it is outlined and copied, slide the new version forward so it’s in front of the original shoe. Zoom in and make sure you only copied the shoe and didn’t accidentally copy the bottom of the dress with it. See figure 12.23.
- Choose a hair color and begin at the top right side of the head. Make seven diagonal pixel dots using the Paintbrush tool. Start a verticle line with a single pixel down to touch the bottom of the head.
- Extend the vertical line three more pixels until you reach the strap of the dress. Continue the line diagonally three more pixels.
- Switch directions and make a two-pixel diagonal line moving up (to form a V shape at the end of her hair) and then start moving
back toward the skull, drawing three more pixels to get to the base of the head, and then outlining the head until you reach
the front again. Fill in the hair using the Paint Bucket tool. See figure 12.24.
Figure 12.24. The hair can be any style, but this simple design adds to the illusion of movement when Ms. Finebean begins running.

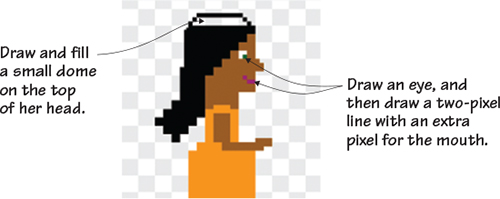
- Make a small dome at the top of her head, as in figure 12.25, using two diagonal pixels connected by a horizontal line. Fill in the space inside the dome using the Paint Bucket tool.
Return to the Paintbrush tool to make the four-pixel white of her eye, a one-pixel dot for the color of her eye, and a two-pixel line for the mouth, turning up at the end with a single pixel, also shown in figure 12.25.
Figure 12.25. Doming the top of the head makes Ms. Finebean look more realistic.
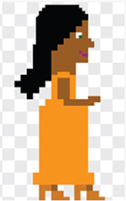
Ms. Finebean, shown in figure 12.26, is complete! Make sure you rename her Teacher in the Sprite Zone to make coding her easier in the next chapter.
Figure 12.26. The completed teacher sprite
Making the kindergarteners
Ms. Finebean has a large class of kindergarteners blocking her path, but you’re not going to have to draw each individual one. Instead, you’re going to make one and then make a few small tweaks to the “costume” in order to make it look like many different students. The students in figure 12.27 are all the same sprite, with changes to hair, clothing, and skin tone to make it look like lots of different students. Part of the duplicating will take place in this chapter, though you’ll also use a coding technique so a random kindergartener pops up each time a new clone is generated.
Figure 12.27. Ms. Finebean will need to jump over the kindergarteners to get out of the building.

Start a new sprite to make the first kindergartener. Remember, you’re making many students, so the color choices you make for the original sprite can be changed with each new “costume” you make for the sprite:
- Select a skin tone color and click the Paintbrush tool. Make an eight-by-eight-pixel square and fill in the center using the Paint Bucket tool. Additionally, make a two-by-two-pixel square centered at the bottom of the head.
- Choose a shirt color and draw a two-pixel horizontal line underneath the neck. Make a single diagonal pixel up from either side of the horizontal line.
- Extend the single pixel to the left (or right on the right side of the neck) by three more pixels. Continue the lines vertically
from the end on either side, three more pixels, as shown in figure 12.28.
Figure 12.28. The head and sleeves of the shirt come together with a few pixels.

- Continue the shirt, as shown in figure 12.29, making the sleeve opening a three-pixel vertical line followed by two pixels to the right and five pixels down. Fill the
center of the shirt using the Paint Bucket tool.
Figure 12.29. A boxy shirt and pants complete the student’s body.
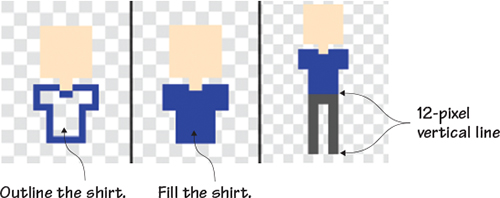
- Choose a new color for the pants. The top of the pants are a 6-by-2-pixel horizontal line, and the legs of the pants are a 12-by-2-pixel vertical line, as shown in figure 12.29.
- Switch back to the skin tone color and draw arms extending out of each sleeve. You can make these arms in any position and should change them with each student.
- Pick a hair color and add a simple hairline to the top of the head. Again, you will change the style and hair color with each “costume,” so keep it simple and have fun.
- Draw a white pixel for each eye and then use the slider to set the brush on the smallest setting. Fill in one corner of the
square with an eye color. Similarly, make a two-pixel line for the mouth (still on the smallest setting), as shown in figure 12.30. Additionally, give your sprite a pair of shoes by making a horizontal line at the bottom of the pants, or go fancy and construct
shoes out of diagonal pixels.
Figure 12.30. Be creative with the student. You can choose any hair and eye colors you want.

You now have a single student, but you need many students. Start by renaming the sprite Student in the Sprite Zone.
Duplicate the sprite by using the Duplicator tool from the Grey Toolbar and open this new version of the sprite in the Art Editor. It’s time to use the Paint Bucket tool to change the colors.
You can see in figure 12.31 that the student on the left and the student on the right are essentially the same sprite. All I did was change the t-shirt, pants, shoe, eye, and hair color using the Paint Bucket tool. I added a few extra pixels of hair to give her a different style, as well as two pixelated hair bows.
Figure 12.31. The single sprite will look like four different students with small tweaks.

Feel free to change the position of the arms, draw designs on the clothes, and change everything from skin tone to hair color. In fact, do this two more times until you have four students, named Student, Student2, Student3, and Student4, in the Sprite Zone. In the next chapter, you’ll combine them into a single sprite.
Preparing the code
Like your last platformer, this game requires a lot of sprites (even though it doesn’t contain any odds and ends). You need obstacles (kindergarteners), power-ups (clocks), and platforms (desks) in order to give the teacher a virtual obstacle course to face between the start of the game and the end of the game: the door.
Play with the game
You already did a lot of creative thinking with this game because you got to set everything from dress colors to hairstyles. But there are still more things you can do to make your game unique.
Challenge
The desk and clock both have shadows, but the kindergarteners and Ms. Finebean are shadowless. Can you add shadows to the wall behind the students (hint: the shadow will be attached to the sprite) or on the floor behind Ms. Finebean?
Challenge
The door also doesn’t contain a shadow. Walk to the nearest door in your home or school and look for the shadow. Can you recreate that shadow on the screen and make it part of the sprite?
Challenge
Can you add dithering to Ms. Finebean’s hair to make it look as if it’s reflecting the light? How can you show that the teacher’s hair is made up of individual strands instead of one clump?
What did you learn?
If you’ve taken geometry, you know that shadows play a big role in the measurement of every shape. A shadow shows the volume—or internal space—of an object, cast on the wall behind it as the solid object gets in the way of the light beam. Think about it this way: measuring how much liquid can fit inside a glass is finding out its volume. If you shine a light on that same cup, you’re going to see the volume of the cup in shadow form behind it. Many times when you’re studying geometry, you’ll see the shape in your textbook drawn with the shadow behind it to show that it is a three-dimensional (as opposed to flat, two-dimensional) object.
Pause for a moment and think about everything you learned in this chapter:
- How to take a single student sprite and tweak it to make it look like multiple, unique kindergarteners
- How to add shadows to show that an object has volume or is three-dimensional
- How to show the direction of the light by using shadows
All your kindergarteners are currently their own sprites. In the next chapter, you’re going to learn how to combine all these sprites into a single sprite, code the game so it randomly chooses one of those students to throw onto the teacher’s path, and even get the teacher to be able to jump up and land on a surface. At the end of the chapter, you’ll have a fun, single-screen platformer called School Escape.