
Chapter 3. Meeting Scratch’s key blocks through important coding concepts

You want to make the games, right? I know. I want to jump straight to the game making too. But I also know that learning key computer science ideas first will make that whole game-making thing a lot easier. It will help you jump into the coding in this book, help you design your own games in the future, and even help you learn another coding language, such as Python or JavaScript. The ideas covered in this chapter apply to every programming language and every game you’ll ever make.
Think of this chapter as the first day of school, and you’re meeting your new classmates—except your classmates happen to be computer science concepts instead of humans. As you build the games and put these ideas into practice, you’ll get to know them better. In fact, you’ll re-meet these eight computer science ideas in every game you make in this book, so you’ll know them quite well by the last chapter.
Here’s what you’ll encounter in this chapter:
- How to use the eight most common blocks you’ll need to build games, and how these eight common blocks are tied to key computer science concepts
- How to make eight mini scripts to see computer science in action
You’ll find all the blocks you need to meet in the center Block Menu. What are the eight most commonly used blocks, and what do they do inside a game? See table 3.1.
Table 3.1. The eight most commonly used game-making blocks
|
Name of block |
Where you’ll find It |
What it looks like |
What it can do |
|---|---|---|---|
| When Flag Clicked | Events menu | Tells the program when it should run | |
| Change X by 10 | Motion menu | Moves sprite on the screen | |
| If/Then | Control menu |  |
Triggers action if condition is met |
| Forever | Control menu |  |
Makes action continue in a loop |
| Variable | Data menu | Tracks points in a game | |
| Touching Color | Sensing menu | Triggers action when two sprites touch | |
| Create Clone of Myself | Control menu | Duplicate sprites mid-game | |
| Broadcast Message | Events menu | Allows separate scripts to communicate |
Important
Make sure to clear your workspace of practice scripts at the end of each section either by using File > New in the Grey Toolbar or by clicking the top block in the script (usually When Flag Clicked), dragging all the blocks together to the Block Menu, and releasing the mouse button.
Let’s start with a nice, clean default workspace. Go to File > New in the Grey Toolbar so the Scratch cat returns to your Stage, ready to do everything you instruct him to do with your code.
Ready to get started?
Starting a program with the When Flag Clicked block
The first block to meet is the When Flag Clicked block, in the Events block menu. Yes, you saw this block back in chapter 1, but now it’s time to talk about how important it is for all the scripts you’ll make in your games. This block, like the similar When Space Key Pressed block, tells the program the action that is required to get the program to run. It sets an “on” switch that the player can trigger (in this case, by clicking the green flag above the Stage) when they are ready to play the game. You’ll use it to create a small script that makes the sprite move 100 steps to the right, as shown in figure 3.1.
Figure 3.1. The cat moves 100 steps to the right each time the green flag above the Stage is clicked. At 100 spaces per click, he can cross the Stage in four clicks of the green flag.

Finding your program’s on switch
When Flag Clicked may seem like a self-explanatory block, but it’s worth talking about because every script in the game needs its own on switch.
Try putting a Move 10 Steps block in the Script Area and then clicking the green flag above the Stage. What happens? Nothing, right? The cat can’t move because the script doesn’t have an on switch. All scripts—yes, every individual script in your game—need a way to start.
Scripting with the When Flag Clicked block
Let’s build that small script that tells the sprite to walk 100 steps to the right, as the cat is doing in figure 3.2. You saw this script in chapter 1, but you need to understand what this block accomplishes.
Figure 3.2. Every program, including one that moves the cat 100 spaces, begins with an on switch.
To use the When Flag Clicked block
- Navigate to the Block Menu and click the Events block option.
- Click and drag a When Flag Clicked block and release it anywhere in the Script Area.
- Switch to the Motion block menu and click the Move 10 Steps block.
- Drag the Move 10 Steps block underneath the When Flag Clicked block and snap the two blocks together. Remember, if the two blocks aren’t touching, the program will try to run but nothing will happen.
- Change the 10 in the center of the block to 100 by typing inside the white bubble on the block.
The two blocks in figure 3.3 form a complete script. Click the green flag above the Stage. What happens to the cat sprite? You should see it move to the right.
Figure 3.3. A script using the When Flag Clicked block
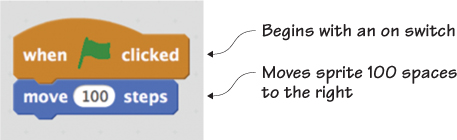
This script in figure 3.3 is simple, but illustrates the idea that all scripts need a starting point. It begins with a When Flag Clicked block. That tells Scratch that you want the program to start when the green flag above the Stage is clicked. The next block (Move 100 Steps) tells Scratch what you want to have happen after the green flag is clicked: you want the sprite you programmed to move 100 spaces to the right. It will move the cat every time the green flag is clicked.
Fix It: Your Program Won’t Start!
Oh no! Your program won’t start. If your game won’t run when you test it out, your trouble-shooting starting point is to look at each of your scripts and make sure they each have a block that triggers the code to run, such as the When Flag Clicked block or the When Space Key Pressed block. If not, add one and see if that fixes your problem.
Setting location with X and Y coordinates
In the last script, you asked Scratch to move the cat 100 steps, but these “steps” are actually coordinate spaces. Coordinates tell a program where the sprite is on the screen.
Many scripts use coordinates to position or move sprites, but coordinates aren’t only a common part of computer programming. You’ve encountered X coordinates in math if you’ve ever jumped around on a number line. In figure 3.4, you can see how 100 steps and 100 coordinate spaces are the same thing in Scratch. Each time you click the green flag above the Stage, the cat moves 100 steps, meaning 100 coordinate spaces.
Figure 3.4. The cat jumps ahead 100 coordinate spaces each time the green flag is clicked.

Coordinates are used in every area of STEAM, from grids in art to map making. Coordinates are how you state the exact location of a place or object.
Finding the sprite’s location with X and Y coordinates
All programming languages use math (in this case, coordinate numbers) to tell the program what you want it to do. This makes sense because math is a constant; 2 + 2 always equals 4.
Scratch can understand a command such as “move the cat sprite 10 coordinates to the right” (which is clearly math-related), but it can’t understand a command such as “move the cat sprite near the house.” What house? Unless you assign the house a mathematical location, Scratch has no clue where that house is on the screen.
Your directions—where you want sprites to move or where you want objects to be positioned—all need to be described numerically in your program.
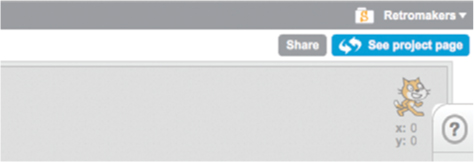
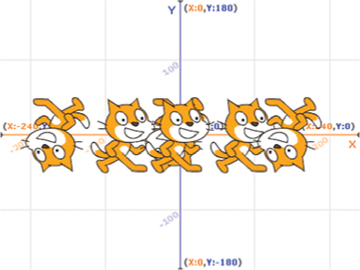
In the top right corner of the Script Area is a tiny picture of the sprite you’re currently programming (the cat) and two letters (X and Y) next to a number, as in figure 3.5.
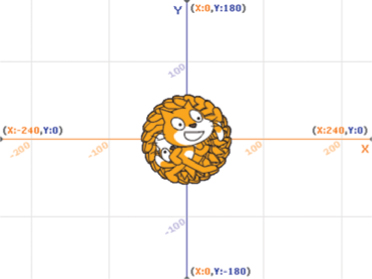
Figure 3.5. The top right corner of the Script Area shows the sprite and its X and Y coordinate position. X: 0 and Y: 0 is the center of the Stage.
Click the cat on the Stage and drag it around the Stage. The numbers next to the X and Y are changing, constantly logging the cat’s new location.
The Stage is a grid constructed out of horizontal (X) and vertical (Y) lines, called the X-axis and Y-axis. Every location on the Stage can be plotted on those lines, which are its X and Y coordinates. In fact, you can see where those lines are on the Stage by using Scratch’s grid backdrop, which shows the axis lines.
To use the grid backdrop
- Go to the Sprite Zone. Navigate to the left sidebar of the Sprite Zone underneath the words New Backdrop.
- Click the first icon of the painting to bring up a pop-up window with the Scratch backdrop library.
- Scroll to the bottom and choose the option XY-Grid. Click OK.
You should now see horizontal and vertical lines behind the cat, as in figure 3.6, along with numbers where they intersect, such as 100 or –100. This is an open grid, only showing every hundredth coordinate. Ten coordinates or 10 steps is 1/10th of one of those squares on the grid. In order to have the cat move the length of one square on that grid, you need to program the cat to move 100 steps.
Figure 3.6. The XY-Grid backdrop
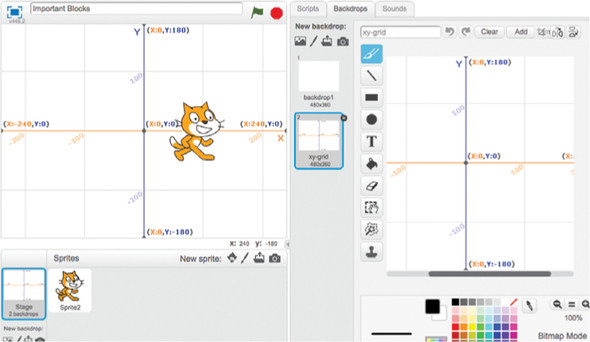
X coordinates run from left to right. Y coordinates run up and down. The dot in the center of the screen where the lines meet is zero for both the X and Y coordinates, which is why the numbers in figure 3.5 show X and Y both set to zero (0). The cat sprite begins each new project in the center of the Stage:
- Positive numbers on the X coordinate (such as 10) move your sprite to the right.
- Positive numbers on the Y coordinate (such as 10) move your sprite up.
- Negative numbers on the X coordinate (such as –10) move your sprite to the left.
- Negative numbers on the Y coordinate (such as –10) move your sprite down.
Scripting with the Change X by 10 block
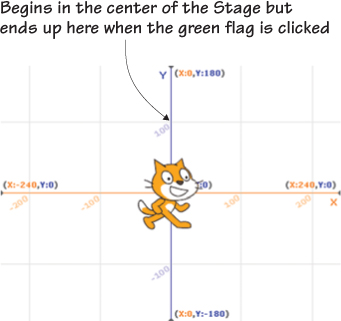
Let’s build a small script that tells the sprite to go to a certain place on the screen. The cat in figure 3.7 is currently in the center of the Stage, but the script you’ll write will send the cat to a new position when the green flag is clicked—namely, 100 coordinate spaces toward the top of the Stage.
Figure 3.7. Send the cat 100 coordinate spaces above the center of the Stage.
To get your workspace ready to program the cat
- Click the Scripts tab in the Block Menu in order to get back to the blocks.
- Navigate down to the Sprite Zone and make sure the blue box is around the cat sprite.
You won’t need to do this every time, but you do right now because Scratch is still in the backdrop menu.
Now you’re ready to get started. To use the Set Y to 0 block
- In the Block Menu, click Events.
- Click and drag a When Flag Clicked block into the Script Area.
- In the Block Menu, click Motion.
- Click and drag a Set Y to 0 block into the Script Area and snap it onto the When Flag Clicked block.
- Change the 0 inside the block to 100.
Once again, the two blocks in figure 3.8 form a complete script. Now click the green flag above the Stage.
Figure 3.8. A script using the Set Y to 100 block

Fix It: Your Sprite isn’t Moving
Wait a second! Your cat isn’t moving even though you wrote a program. When things don’t go according to plan with your program, chances are you didn’t program the correct sprite. Did you check that the blue box was around the cat in the Sprite Zone? Because you added a backdrop before you started this script, Scratch switched the programming focus to that new backdrop. But you don’t want the Stage to do the action; you want the cat to be the one moving to the new coordinate position! Troubleshoot programs that don’t run according to plan by making sure the scripts are assigned to the correct sprite. You can check all the scripts assigned to a sprite by clicking the sprite in the Sprite Zone and then looking at the scripts in the Script Area.
The cat will go directly to the 100th coordinate slot on the Y-axis (or Y line). This is the type of program you’ll use to position a sprite on the Stage at the beginning of a game.
Answer This: How Do You Position the Cat 100 Spaces Below Center?
you know how to move a sprite up, but can you figure out how to make the cat move down?
place a minus sign in front of the number (–100) to indicate that it is a negative number. Remember, negative numbers move the sprite to the left and down. Positive numbers move the sprite to the right and up.
You can also change the X and Y position of the sprite at the same time. To move the cat diagonally, swap out the Set Y to 100 block for two blocks: a Change X by 10 block and a Change Y by 10 block. Snap them underneath the When Flag Clicked block, one on top of the other, as shown in figure 3.9. Change the 10 in the X block to –20 to move the cat 20 coordinate spaces to the left, but keep the 10 in the Y block to move the cat 10 coordinate spaces up. The cat will move diagonally when you click the green flag because it is moving to the left and up at the same time.
Figure 3.9. A script that changes both the X and Y position at the same time

Clear the script from the Script Area but keep the grid backdrop for the rest of the games in this chapter because it will help you to see the position of your sprite on the screen.
Fix It: Steps and Coordinates
In this case, the Move 10 Steps block and the Change X by 10 block accomplish the same thing. One block has a plain-English way of stating the instruction but is dependent on the direction the sprite is facing (move 10 steps), and the other has a mathematical way of stating the instruction (change the current X coordinate number by 10). Both do the same task of moving the sprite 10 spaces to the right and illustrate an important point: sometimes there is more than one way to accomplish the same task in programming, and the code choices are up to the programmer.
Using a conditional statement
You encounter conditional statements every day. Conditional statements state what first needs to be true for something to happen. For instance, your parents might say, “If you eat your vegetables, then you can have dessert.” A condition is set. In order to get dessert, the vegetables need to be eaten. You know what you need to do if you want a piece of chocolate cake: eat your carrots.
How will your parents know if you’ve eaten your vegetables? They’ll look on your plate. If the carrots are still there, the condition hasn’t been met, and you won’t proceed to dessert. If the carrots are not there (and I hope you’re not hiding them under the table!), then you’ll move to the next step: getting dessert.
Computers work in the same way.
Finding conditions to set in your game
You can set a condition in a game, such as “If the cat sprite is touching something red, then make it stop moving.” The program checks the cat sprite, as it’s doing in figure 3.10.
Figure 3.10. Is the cat touching a red pixel? Look at his foot.

Red pixels make up the outer edge of the rainbow. If the cat is touching the red band of the rainbow, the game will stop the cat from moving. But if the cat sprite is not touching that part of the rainbow, the game will have the cat keep moving until the condition is met.
How do you know if you are setting up a condition? It almost always begins with an If statement when you talk about the game aloud.
Scripting with the If/Then block
Conditional statements are set using the If/Then block. Let’s build a script that notes where the sprite is on the screen and makes something happen when it moves past a certain point. In this case, you’re going to have the cat stop moving when it moves past the X coordinate position of 50, marked on the backdrop in figure 3.11.
Figure 3.11. The cat will stop moving when it crosses over the X coordinate position of 50, marked by the red line.

- Click the Events block menu and grab a When Flag Clicked block. Drag it into the Script Area to begin your script.
- Switch to the Control block menu.
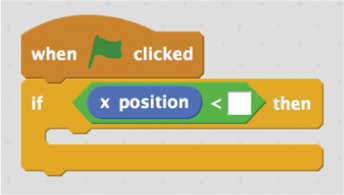
- Drag an If/Then block to the Script Area and snap it to the When Flag Clicked block. There is a similar-looking If/Then/Else block option, but you want the If/Then block.
- Click the Operators block menu and choose the Square < Square block.
- Place the Square < Square block inside the empty hexagonal space on the If/Then block, as in figure 3.12.
Figure 3.12. Placing the Square < Square block inside the hexagonal space in the If/Then block

- Click the Motion block menu and scroll to the bottom of the menu.
- Choose the X Position block and drag it inside the left square in the Operators block. This means that you’ve nested a Motion
block in an Operators block in a Control block, as in figure 3.13.
Figure 3.13. The X Position block inside the left square of the Operators block
- Type the number 50 in the right square of the Operators block.
- Scroll up in the Motion block menu and click and drag a Move 10 Steps block into the Script Area, placing it inside the open mouth of the If/Then block.
Figure 3.14 shows a slightly more complicated script than you’ve made up until this point. Click the green flag above the Stage a few times and see what happens when the cat sprite moves too far to the right side of the Stage.
Figure 3.14. The If/Then block sets up a condition that only allows the sprite to move 10 coordinate spaces to the right if the X position is less than 50.
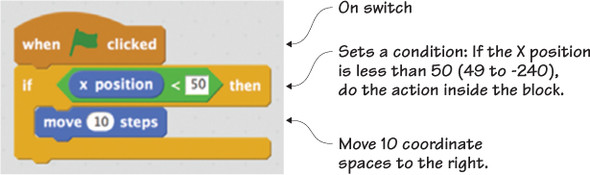
Once the cat’s X position is 50 or higher, it no longer meets the condition, so the cat stops moving. If you want to try running this program again, drag the cat back toward the left side of the Stage.
Putting conditional statements into your game means that Scratch needs to constantly be evaluating whether or not the statement is true or the condition has been met. That means that by using a single block, you’ve set a lot of computational energy to work. This is a common way of making things happen in games, and you’ll find that each computer language has its own unique way of writing conditional statements.
Learn It: Less Than (<), Greater Than (>), and Equal (=)
A common practice in computer programming is to set up conditions that use operators, asking the computer to solve what amounts to a quick math problem as it runs. Three common Operators blocks are the Square < Square (less than), Square = Square (equal), and Square > Square (greater than), all seen in figure 3.15.
Figure 3.15. Three types of Operators blocks used in Scratch
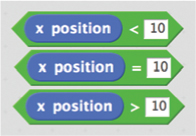
These three Operators blocks allow for three different situations. In the first block, the statement is true if the sprite is in an X position less than 10. In the middle block, the statement is true if the sprite has an X position equal to 10. In the last block, the statement is true if the sprite has an X position greater than 10.
Making loops
Sometimes you want an action to happen once. Other times you want the action to happen over and over again. A loop is used when you want a piece of code to run until either a condition is met or the red stop sign above the Stage is clicked. For instance, you could make your cat spin round and round, as in figure 3.16, just by putting the blue Motion block inside the yellow Forever block.
Figure 3.16. The Forever block in the script makes the cat continue turning without needing to click the green flag over and over again.

Finding places to use loops
There are a few loop blocks used in Scratch, all found in the Control block menu. The most common and flexible one is the Forever block. If you place other blocks inside a yellow Forever block, Scratch will repeat those actions over and over again.
Think about times when you would want an action to occur without needing player input, such as having the cat continue to move without needing to continuously click the green flag. Loops allow you to set up a situation once and have it run over and over again, bringing fluidity to the sprite’s movement on the screen.
Scripting with the Forever block
Any blocks you put inside the Forever block will continue their action without you needing to click the green flag above the Stage more than once to get the loop started. Let’s make that small script that will cause your cat sprite to spin indefinitely. See figure 3.17.
Figure 3.17. The cat is spinning so quickly due to the Forever block repeating the action over and over again that it looks like there are dozens of cats.
To use a Forever block
- Navigate to the Events block menu and click and drag a When Flag Clicked block to the Script Area. Release the block near the top of the workspace.
- Switch to the Control block menu. Drag a Forever block to the Script Area and snap it to the When Flag Clicked block.
- Click the Motion block menu and choose a Turn 15 Degrees block. Put this blue block inside the Forever block, as seen in figure 3.18.
Figure 3.18. This loop using the Forever block causes the cat to spin in a circle.
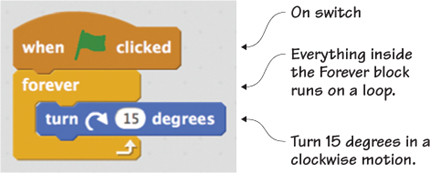
When you click the green flag above the Stage, your sprite will start spinning like a pinwheel. A circle is 360 degrees, so 15 degrees would be turning 1/24 of a circle. The action looks smooth because Scratch doesn’t pause between each 15 degree turn.
The example script consists of only three blocks, but with a single click of a button, it can run forever.
Using variables
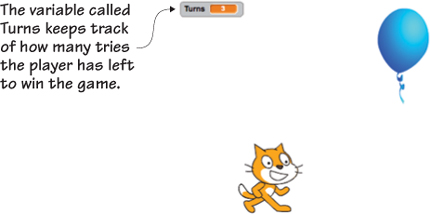
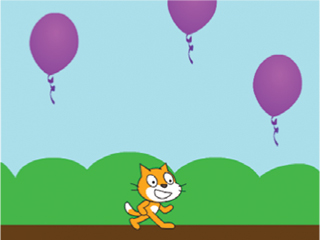
A variable is a way of tracking information. That information, called a value, can be a number, word, or true/false condition. For instance, let’s say you make a game and you want to give the player three chances to have the cat catch a balloon. Each time the cat misses the balloon, the game deducts a turn. To keep track of how many times the player has tried to catch the balloon, you could make a variable called Turns and give it a value of 3, meaning the player has 3 chances to catch the falling balloon. Each time the player misses the balloon, the value of the variable Turns decreases by 1. When the value hits 0, the game ends.
Check out the orange bubble at the top of the Stage in figure 3.19 showing that the player has three turns. That balloon is pretty far away from the cat. Do you think it will make it across the Stage in time?
Figure 3.19. Variables are useful for keeping track of information inside a game.
You could also create a variable called Score and have the value of that variable increase by 1 every time the player gains another point. I like to imagine variables as empty boxes, ready to hold any number, word, or true/false value I place inside.
Finding types of variables
A game may have multiple variables at the same time. For instance, it may be tracking how many lives the player has with a variable called Lives while simultaneously tracking how many points the player has earned with a second variable called Score. It may even have variables assigned to objects in the game so Scratch can know whether or not the sprite “picked up” a tool or a jewel. Anything you want to track in the game uses a variable.
Variables can have three types of values, as shown in table 3.2.
Table 3.2. The three types of values
|
Type of value |
Example of value |
|---|---|
| Numerical | 3 |
| Word (or string) | Diamond |
| True/False (or Boolean) | True |
The variable in figure 3.19 has a numerical value. The variable starts the game with a value of 3, which means that the player has 3 tries. A variable can also have a word value, called a string in programming. A string is any word you could assign an object, such as having a variable called Jewel and having the value either be diamond, ruby, sapphire, or emerald. Diamond, ruby, sapphire, and emerald are all strings. A variable can also have a true/false value, called a Boolean in programming. You’ll read more about these in the next section when you learn about Touching blocks.
Scripting with the Variable block
Programming the falling balloon part would make this script a little complicated, so let’s simplify the idea and build a script that uses a variable called Lives and have it deduct a life every time the cat sprite reaches the right side of the Stage. See figure 3.20.
Figure 3.20. Oh no! The variable Lives goes from 3 to 2 when the cat hits the right wall.

Variables don’t exist in Scratch until you create one. Once created, Scratch gives variables an initial numerical value of zero (0). You can change that value to be anything you want—numerical, string, or Boolean.
Before you begin, you need to create the variable. To create a variable block
- Navigate to the Block Menu and click Data.
- Click Make a Variable. This will cause a pop-up window to open.
- Give your variable a name, such as Lives. Leave it For All Sprites. Click OK.
You should see your variable in two places: inside the Data block menu and as a little box in the top left corner of the Stage.
Now you need to use your variable and give it a value. To use a variable block
- Click the Events block menu and drag a When Flag Clicked block into the Script Area.
- Switch to the Data block menu and choose a Set Lives to 0 block. Click and drag it under the When Flag Clicked block in the Script Area until they snap together.
- Change the value in the Set Lives to 0 block to 3 in order to give the player 3 lives.
- Return to the Block Menu, choose Control, and grab a Forever block. Snap that underneath the Set Lives to 0 block.
- Switch to the Motion block menu and click and drag a Move 10 Steps block inside the Forever block.
- Go back to Control and move an If/Then block underneath the Move 10 Steps block inside the Forever block.
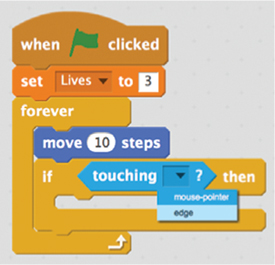
- Click the Sensing block menu and drag a Touching block to the If/Then block. Drop it inside the empty, hexagonal space in
the If/Then block. Open the drop-down menu in the new block by clicking inside its box, as seen in figure 3.21, and click Edge so that the block now says Touching Edge.
Figure 3.21. The drop-down menu that comes with the Touching block from the Sensing menu
Finally, you need the script to delete a life whenever the sprite hits the wall. To deduct a life, continue filling the If/Then block:
- Open the Data block menu and choose the Change Lives by 1. Drag it inside the If/Then block in the Script Area.
- Change the value from 1 to –1 in order to deduct (instead of add) a life.
- Switch to the Motion block menu and grab a Set X to 0 block. Snap it underneath the Change Lives by –1 block inside the If/Then block. Change the value from 0 to –200 to send your sprite back to the left side of the Stage, because the –200 X coordinate is the far left side of the Stage.
You can see the completed script in figure 3.22. This is your first long script, and it completes a complex task. When you click the green flag above the Stage, the cat should move toward the right. When it touches the right wall, it should bounce back toward the left side of the Stage while simultaneously deducting a life. Because you didn’t set an end point, you should see your life count move from 3 into the negative numbers.
Figure 3.22. The script deducts a life every time the sprite touches the wall.
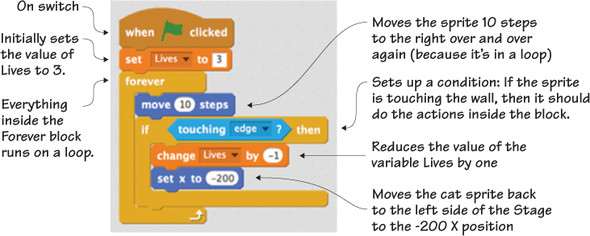
You’ll notice every time you restart your game by clicking the green flag again, the value of Lives resets to 3. This is an important step. If you don’t set that value at the start of the game, it will continue wherever the last player left off. It wouldn’t be a fun game if the first player used up the three lives and every other player that came after that started with less than zero lives!
But the Set Lives to 3 block comes before the Forever block because it’s something you only want to have happen once per game, right when the game begins. Everything inside the Forever block is something you want to have happen throughout the game.
Talking about variables leads directly into another place where you can use true/false or Boolean statements: touching blocks.
Using Booleans
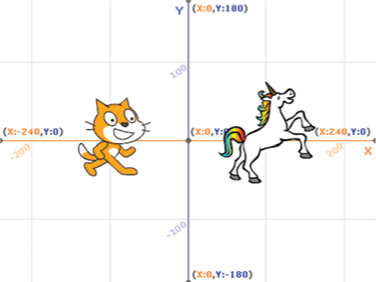
As I mentioned earlier, a Boolean is a fancy programming term for a true/false statement. For instance, what if you add a unicorn sprite, and you want to check whether or not your cat sprite is touching the unicorn sprite, as shown in figure 3.23? It either is touching (true) or it isn’t touching (false)—it can’t both be touching and not touching the unicorn at the same time, right?
Figure 3.23. You can use Booleans in a script to figure out whether two sprites are touching.
You can set up conditionals with Booleans so Scratch will keep checking whether a statement is true or false. If it’s true, it will do one thing, and if it’s false, it will not do that action.
Finding uses for Booleans
It’s easy to see why programmers like to use true/false statements. There is no grey area: either the cat is (true) or is not (false) doing the action established in the script, such as touching another sprite or touching the edge of the Stage.
Nowhere is this easier to see than when using the Touching Color blocks. The Touching Color blocks provide an easy way to see Booleans in action. If the sprite is touching even one pixel of a set color, the statement is true. If the sprite isn’t touching the color, the statement is false. You can set certain actions to run if the statement is true.
Scripting with Touching blocks and Booleans
Let’s make a script that looks at whether or not the cat is touching an apple sprite. If it is touching the apple, it will say, “Yum!” for two seconds, as in figure 3.24.
Figure 3.24. The cat says “Yum!” when it touches the black outline of the apple. If any part of the cat sprite is touching any part of the apple outline, the script will work.

To add a new apple sprite from Scratch’s premade sprite library
- Navigate to the Sprite Zone. Click the little head icon next to New Sprite on the Top Toolbar, as you did in chapter 1 when adding the bananas.
- Choose the apple sprite by double-clicking the picture.
- Set up the Stage by dragging the cat sprite toward the left side of the screen and the apple toward the right side of the
screen, as in figure 3.25.
Figure 3.25. Setting up the Stage with the cat on the left and the apple on the right

The apple is surrounded by a black outline, which means in this script (because the cat is moving tiny amounts each time), the cat sprite will touch black pixels before it ever gets to the red pixels inside the black outline.
Fix It: The Sprite Touches the wrong color
Uh-oh—have you made this mistake? The biggest mistake Scratchers make when setting the Touching Color block is to skip over the outline and use the overall color of the object, such as red for the apple. The sprite may touch the outline before it touches any internal color depending on the script, so note the color of the outline, too. Make the outline of any sprites that you make one uniform color instead of many colors if you’re going to use a Touching Color block in your game.
Before you begin writing your program, check that the blue box is around the cat in the Sprite Zone. If not, you’re programming the apple!
To use the Touching Color block
- Navigate to the Events block menu and click and drag the When Flag Clicked block into the Script Area. Release it near the top of the workspace.
- Go into the Control block menu and choose the Repeat Until block. It has an empty, hexagonal space in the block. Snap this block underneath the When Flag Clicked block.
- Click the Sensing block menu and choose the Touching Color block. It will not have the name of a color listed, but instead has a square that contains a paint sample.
- Set the color by clicking the tiny square inside the block so the cursor arrow changes into a hand. Move the hand to the Stage and click anywhere on the apple’s outline so that the square turns black. Once the color is set, the hand will disappear and turn back to an arrow.
- Return to the Block Menu and click Motion. Choose the Move 10 Steps block and place it inside the Repeat Until block.
- Go to the Control block menu and choose an If/Then block. Place it inside the Repeat Until block, underneath the Move 10 Steps block.
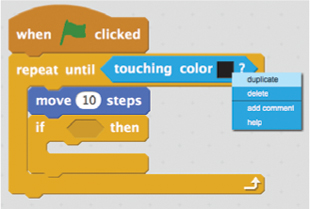
- Duplicate the Touching Color block by either right-clicking the block (on a PC) or control-clicking the block (on a Mac).
A pop-up window will give you the option to duplicate your block, as seen in figure 3.26. Choose Duplicate and slide the copy of the Touching Color block inside the empty hexagonal space in the If/Then block.
Figure 3.26. Duplicating a piece of code within a script That repeating action is moving 10 spaces to the right.
- Switch to the Looks block menu and grab a Say Hello for 2 Secs block. Put it inside the If/Then block.
- Change the word Hello! to Yum! by erasing and typing inside the small text window on the block.
Test the script shown in figure 3.27 by clicking the green flag above the Stage. When the cat touches the apple, it says “Yum!” for two seconds.
Figure 3.27. If the cat is touching any black pixel on the screen, it will say, “Yum!”
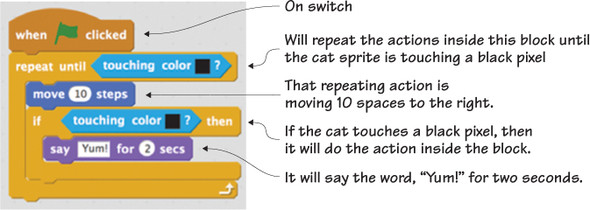
It looks like the cat on the Stage can see the apple and exclaims, “Yum!” when it gets beside it. All this is done behind the scenes with Booleans and Touching Color blocks.
If there had been numerous other sprites on the Stage, all of which had black pixel outlines, the cat wouldn’t have known whether it was touching the apple or a different sprite. Keep that in mind as you make tweaks to sprites in this book or build future games.
Learn It: Think Like a Coder
Sometimes you need to get up from the computer and do other things with your day, but that doesn’t mean you can’t keep thinking like a coder. Look around you and you’ll see your world is full of Booleans, or true/false situations, where something either is or isn’t. Make your life into a video game by looking for all the true/false moments. For instance, set a conditional while you eat breakfast: if my plate is empty, then breakfast is over. Now keep checking your plate. If it’s empty, the condition is true. If you still have some toast in front of you, the condition is false. Practice thinking in Booleans to come up with creative video game ideas to use in the future.
You can get rid of the apple sprite (as well as your last script) by clicking the scissor icon in the Grey Toolbar and clicking either the apple on the Stage or in the Sprite Zone. Why do you need to clear the Stage? Because you’re about to get a lot of cats popping up on the screen.
Cloning sprites
I’ll let you in on a little secret: programmers love to find shortcuts to lessen their workload. If you’ve ever played a fixed shooter that has you blowing apart space rocks or played a reflex-testing game like Tetris, which has you guiding falling shapes, you’ve seen cloning in action. Cloning allows the programmer to make a few varieties of enemy—in those examples, space rocks or colorful shapes—and then have the computer generate more copies as the game goes on, like all the falling balloons in figure 3.28.
Figure 3.28. The falling balloons are generating mid-game using cloning. You only need to make one sprite. Scratch will keep reproducing new copies with a cloning script.
Although you can make a duplicate of a sprite before a game begins using the stamp icon in the Grey Toolbar, cloning is about generating a new version of the sprite while the game is in action by writing it into the code.
Finding sprites to clone mid-game
This will be your first time making multiple scripts work together in order to perform an action. Cloning always requires at least two scripts that work together. The first script creates the clone. The second script uses the clone.
For instance, you may create one balloon for your game and then create a first script that tells Scratch to generate clones of the balloon mid-game. Next you have to create a second script that tells Scratch how to use those clones. Maybe you’ll have them drop from the sky, one every second. In games, you may have many scripts assigned to the same sprite, each running one small part of what the sprite can do, so this is excellent practice for the games ahead.
You can clone any sprite, which means you can even create multiple copies of the cat mid-game. In fact, let’s make a script that does that.
Scripting with Cloning blocks
This two-part script is going to fill your screen with identical cats. The first script will duplicate a new cat sprite every second. The second script will make those cats march to the left or right. Watch out! The Stage is about to get very crowded, as it is in figure 3.29.
Figure 3.29. The cats keep duplicating and marching across the Stage in a two-part cloning script.
To clone a sprite during a game
- Click the Events menu, choose the When Flag Clicked block, and drag it to the Script Area. Release it near the top of the workspace.
- Go into Control and grab a Forever block. Snap the Forever block directly under the When Flag Clicked block.
- Scroll down the Block Menu and click the Create Clone of Myself block. Drag it inside the Forever block.
- Scroll up and choose the Wait 1 Secs block, and place that under the Create Clone of Myself block inside the Forever block.
The first script is complete. It’s now time to start the second script, which will be placed right underneath the first script in the Script Area:
- Begin a second script by leaving a small space between the first script and the second script. In the Control block menu, choose a When I Start as a Clone block and drag it to the Script Area.
- Click a Forever block and snap it underneath the When I Start as a Clone block in the workspace.
- Switch to the Motion block menu.
- Slide a Move 10 Steps block inside the Forever block.
- Slide an If on Edge, Bounce block underneath the Move 10 Steps block inside the Forever block.
Now click the green flag above the Stage and you should see dozens of cats march across the screen as a new one is added every second. Compare your scripts to the ones in figure 3.30.
Figure 3.30. The completed clone scripts work together to create an infinite number of cats.
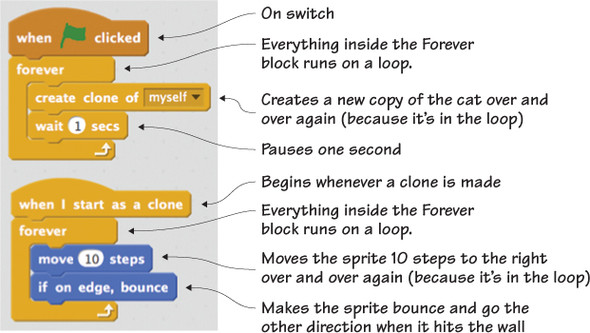
Why insert a one-second delay into the program? That small pause will make a space between the clones so you’ll be able to see each individual version of the cat rather than having them all mash together on top of one another.
These two scripts will work together indefinitely because no end condition has been set. That means if you start this program and walk away, you’ll return to a thick line of cat sprites on your Stage.
Congratulations! You now have a screen full of cats, but you can also use this script to make games more exciting while making your workload a bit smaller.
Answer This: How Can You Keep the Cats from Flipping Upside Down?
those upside-down cats are probably feeling a bit sick hanging in midair. Why are some cats upside-down and others are right-side-up?
when the cat reaches the right or left side of the screen, it bounces off the edge and switches direction. Rather than twist around, your cat hits the edge and flips over before it continues back in the other direction and generates again. If you want your cats to remain right-side-up, navigate to the Sprite Zone and click the lowercase i in the top left corner of the blue box around the sprite. That will open the pop-up menu seen in figure 3.31. Next to Rotation Style, click the straight left-and-right arrow instead of the curved arrow. To exit the pop-up menu, click the blue arrow in the top left corner of the box. Now click the green flag. Do your cats remain right-side-up?
Figure 3.31. Click the i to change how your sprite moves.

You just made two scripts work together to make and use cloned sprites. The final script in this chapter will allow you to make unrelated scripts communicate with one another.
Broadcasting messages
Have you ever been in a relay race where you are passed a baton and begin to run? Scratch has a way of sending messages between two unrelated scripts so one script can pass a virtual baton to the other script and tell it to run. For instance, a broadcasting script could be used to track the number of tries left in the variable Lives. When it reaches zero, it sends the second script a message to flash the Game Over sprite on the screen, as shown in figure 3.32.
Figure 3.32. You can use broadcasting to send a Game Over message when the player uses up all of the lives.

Finding a message to broadcast
Broadcasting allows two scripts to speak to one another by letting the first script tell the second script (or more) that it’s time to spring into action.
This is different from the way the two cloning scripts worked together. With cloning, an action happens that sets off another action, almost like dominos. In broadcasting, you set up one script to send the other script a message that it is time to begin without the first script making or doing anything.
You’ll once again make two scripts. The second script won’t do anything until it gets the signal from the first script. Then the second script will spring into action.
Scripting with the Broadcasting block
A cat walks up to a bear. When the cat reaches a certain point on the Stage, the first script will broadcast a message to the second script to spring into action, and the bear will call out, “Hello!” It’s a friendly bear, as you can see in figure 3.33.
Figure 3.33. The bear sprite calls out “Hello!” to the cat when it passes over a certain point on the Stage.

So what is happening behind the scenes in Scratch? Script One tells the cat to (1) start walking. In fact, it sticks that walking command inside a loop so it keeps happening until a condition is met. And what is that condition? To do something when (2) the cat reaches the middle of the screen. That something is to send a message, which is the virtual baton being passed to the next script. Script Two receives that broadcasted message and begins going through a series of actions. Well, really, one action: that friendly bear says “Hello!” once it receives the message sent from the first script saying that the second script is ready to run. If you didn’t set it up this way, the bear may be calling out, “Hello!” before the cat is nearby. And then how would the cat know that this is a friendly bear?
This example needs two sprites, and you’ll need to be careful that you’re programming the correct sprite. The sender is the cat, and the receiver is the bear.
Before you begin, you’ll need to add a second sprite to the Stage. Navigate to the Sprite Zone and click the head icon next to New Sprite. Double-click the bear sprite. Now set up your Stage by dragging your cat to the left side of the Stage and your bear to the right side of the Stage. Now you’re ready to program the cat. Make sure the blue box is around the cat in the Sprite Zone.
To make your first script
- Navigate to the Events block menu and choose a When Flag Clicked block. Drag it over to the Script Area.
- Click Control, choose the Forever block, and place it under the When Flag Clicked block.
- Switch to the Motion block menu and click and drag the Change X by 10 block to the Script Area. Place it inside the Forever block.
- Change back to the Control block menu and choose an If/Then block that goes under the Change X by 10 block inside the Forever block.
- Go to the Operators block menu and choose a Square > Square block. Place it inside the empty hexagonal space in the If/Then block.
- Return to Motion and scroll down until you find the X Position block. Slide it into the left square on the Square > Square block. Type a zero (0) in the right square.
- Navigate back to Events and choose a Broadcast Message1 block. Open the drop-down menu and click New Message. Type Hello in the pop-up window.
- Go back to Control and slide a Wait 1 Secs block underneath the Broadcast Hello block. Change the 1 to a 3. This will put a pause into the script so it will be easier to see the bear say hello.
The completed first script in figure 3.34 sets when the cat sprite will send out the message.
Figure 3.34. The first script broadcasts a message once the cat passes the center point on the Stage.

Now the bear needs to receive the message. Switch to programming the bear by clicking the bear in the Sprite Zone.
Fix It: Your Script DISAPPEARED!
Watch out! Looking in your Script Area and seeing it empty may cause you a moment of panic, but don’t worry. Your scripts are safe and sound; they’re attached to a different sprite. The Script Area only shows the scripts applied to the sprite chosen in the Sprite Zone. When you click the bear, the script for the cat disappears. Click the cat, and the script reappears. If you ever have a script disappear, click each of the sprites in the Sprite Zone and check the Script Area. Chances are your script isn’t gone; it’s attached to a different sprite.
- Navigate to the Events menu and choose a When I Receive Hello block. Drag it into the Script Area and release it near the top of the workspace.
- Click Looks and drag the Say Hello! for 2 Secs block. Snap it underneath the When I Receive Hello block.
In figure 3.35, you can see the completed receiving broadcasting script. Click the green flag above the Stage. What happens when the cat starts moving?
Figure 3.35. The brief receiving script has the bear say “Hello!”

These two scripts interact with one another to make the bear say “Hello!”when the cat crosses over the middle of the Stage. The first script sends the message, but it does more than that. It monitors where the cat is on the Stage, checking its X position to see if it is more than 0. It has instructions to send the message to the other script once the cat passes the center of the Stage, because 0 is the midway point on the X-axis. You should also see the cat slow down and move in small jumps after it gets to the midway point due to the Wait 3 Secs block, which you inserted so you could see the bear’s script. It’s not just pausing sending the message—it’s pausing the cat’s movement. It still moves 10 steps, but only every 3 seconds after it passes the midway point on the Stage.
And what is the bear’s script? It’s pretty simple. The first block, When I Receive Hello, is the receiver block. It’s like the baton being put in the bear’s hand and telling him it’s his turn. It starts the action attached to this second on switch: to say “Hello!” for two seconds.
The ability to send messages between scripts means you can create some pretty complicated games in Scratch.
Learning in action
Welcome to the world of computer science. You learned eight computer science concepts in a single chapter. You’ll explore these ideas in depth through the rest of the book as you make games. Getting comfortable with these ideas is important because they’re the foundation for every coding language, from Scratch to Ruby to Java and beyond. Understanding them in Scratch will help you springboard later on into the larger programming world.
Challenge
Make sure you understand these coding concepts by making your own example scripts in the style of the exercises in this chapter. Can you make a simple conditional statement? Figure out a use for a variable? Set up directions to run in a loop?
Pause for a moment to think about how much you’ve already learned:
- How to set a starting point for your program so it can run
- How to find a sprite’s X and Y coordinates to know its location on the Stage
- How to write conditional statements so you can have actions happen at a certain moment
- How to create loops to keep pieces of code running indefinitely
- How to build variables so you can track information
- How to understand Booleans and how important true/false statements are for programming
- How to make clones of sprites in the middle of a game
- How to broadcast messages between two scripts
You’ll use all these programming elements in the games that appear in this book. In fact, let’s get started with the first game, a two-player ball-and-paddle game called Breakfast Wars. Yes, it’s time to conclude all the preparatory work that you accomplished in the chapters of part one, “Setting up the arcade,” and move onto part two, “Turning on the machines.” For the next two chapters, you’ll learn how to make a game with step-by-step instructions and a lot of reminders. Ready to put this computer science knowledge to work?