
Chapter 11. Using X and Y coordinates to make a simple platformer

In 1982 the world met Pitfall Harry, and the great platformer tradition was born. Activision’s game has a little pixel man jumping over rolling barrels, landing on crocodile heads to cross lakes, and climbing down ladders to get to a second, underground level that runs parallel to the main level of the game but contains scorpions that can stop Harry in his tracks. Jumping, landing, racing, and collecting are the hallmarks of the platformer genre. Think of Pitfall as a jumping puzzle game or video obstacle course—one that would challenge even an American Ninja Warrior. Harry has to leap over rattlesnakes and land on the other side. He leaps over holes in the ground, leaps up to grab onto a vine, and leaps over the scorpions when he’s underground. He’s also racing against a clock to collect treasure. Harry only has 20 minutes to collect all the gold and silver bars or diamond rings scattered across the game.
Beach Blast is a simple platformer, so you’re not going to focus on time limits or treasure collecting in this game (though you will in the next platformer, School Escape). Instead you’ll focus on a single idea shared by every platformer on the market, from Pitfall to Leo’s Fortune to Geometry Dash: simulated gravity.
What happens when you jump up? You don’t hang out in the air, looking around until you force yourself back down. Gravity instantly starts pulling you back toward the ground after liftoff. You need to program gravity into video games so that what goes up will eventually come down, as seen in figure 11.1.
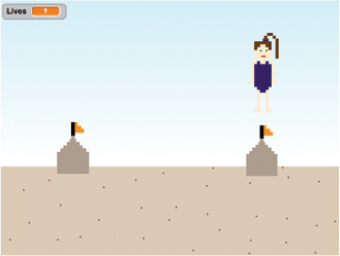
Figure 11.1. In Beach Blast, Buffy has to run down the beach, jumping over sandcastles and moving crabs and swinging over a water hazard on a vine.
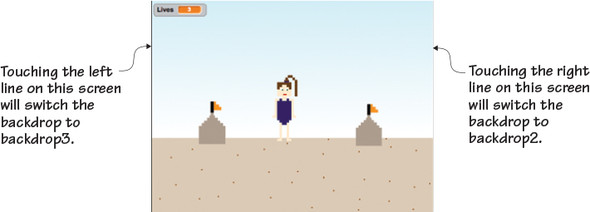
X and Y coordinates are the stars of Beach Blast, noting where Buffy is on the screen and bringing her back down to the ground every time she jumps. Beach Blast is also a side-scroller, which means Buffy can run to the side and she won’t hit the end of the Stage. Instead, she’ll keep on going as the game scrolls out in that direction. You’ll accomplish this by having the backdrop change every time Buffy touches the left or right side of the Stage.
One last thing to consider with Pitfall, which is a mark of any good game, is that the skills you’ll need on the harder levels are all learned and practiced on the easier levels. Jumping, for instance, has lower stakes on the first Pitfall screen because the obstacles are rolling barrels, which remove points but don’t remove lives. Once the player has gotten a chance to practice jumping over barrels, Pitfall ups the stakes by making Pitfall Harry have to sail over deadly obstacles. Finally, once players have gotten the hang of jumping, they’ll have to jump and land precisely on the crocodiles to avoid being eaten or time their jumps to sail over the disappearing and reappearing sand pit.
As you make Beach Blast, think about that game design idea, allowing players to learn new skills on easier boards as you plan extra backdrops and obstacles into your game. For instance, programming Beach Blast follows this same step-by-step learning process, having players jump over sandcastles (stationary), crabs (moving), and finally onto the vine (definitely moving and the dismount needs to be well timed). If you insert new obstacles and backdrops, make sure to order them so the player can become comfortable with the mechanics of the game before the difficulty level goes up.
In this chapter, you will learn
- How to design a side-scrolling platformer
- How to switch between backdrops to give the illusion of continuous movement
- How to simulate gravity
- How to make enemies that move side-to-side
This simple platformer will teach you everything you need to know in order to make more complicated platformers in the future. Ready to start coding?
Preparing to program
It’s time for your pre-coding ritual. Get your sprites and the Stage ready for Beach Blast.
Missing sprites
If you skipped chapter 10, either return to it and finish it or go to the Manning site and download the background and sprites for Beach Blast. The directions for importing are the same as chapter 5. You should have Buffy, a sandcastle, a crab, a vine, two side barrier lines, and three beach-themed backgrounds.
Preparing the Stage
I used the Grow tool in the Grey Toolbar to increase the size of Buffy (20 clicks), the castle (25 clicks), and the crab (12 clicks). Then we duplicated both the crab and the sandcastle, as shown in figure 11.2.
Figure 11.2. You should have a second sprite called Crab2 and one called Castle2.

Switch the background to backdrop1 (the basic beach backdrop) by clicking the thumbnail in the Sprite Zone and making sure the blue box is around the first backdrop on the Costumes tab. Position the two sandcastles on either side of the Stage, about an inch from the left or right wall. Look at figure 11.3 to see the Stage layout.
Figure 11.3. Only the sandcastles need to be positioned on backdrop1.

Programming Beachy Buffy
Beachy Buffy is the player character—the sprite on the screen controlled by the player. The player controls all of her actions using the arrow keys, and she has ten scripts to enable her to run, jump, fall, and grab the vine: a movement script, a falling velocity script, a falling script, a jumping script, a positioning script, a life deduction script, a background changing script, a zipline dismount script, and a two-part grabbing vine script. All scripts in this section are applied to Buffy, so go put the blue box around Buffy in the Sprite Zone and don’t move the blue box until you program the sandcastles in the next section. Remember, the names or values on your blocks may differ slightly from time to time, so use the completed script images to make sure you chose the correct block.
Making a movement script
Buffy can’t jump at the moment, but she also can’t even run back and forth along the sand, as in figure 11.4.
Figure 11.4. Buffy needs to be able to run left and right over the sand.

Let’s enable Buffy to run left and right:
- Start with a When Flag Clicked (Events) block.
- Snap a Forever (Control) block underneath to start a loop.
- Place two If/Then (Control) blocks inside the Forever block.
- Slide two Key Space Pressed (Sensing) blocks into the empty hexagonal spaces of the If/Then blocks to set the conditions.
- Change the top Key Space Pressed block to Left Arrow using the drop-down menu. Change the bottom Key Space Pressed block to Right Arrow.
- Slide a Change X by 10 (Motion) block inside each of the If/Then blocks. Change the first Change X by 10 block to –5. Change the second Change X by 10 block to 5.
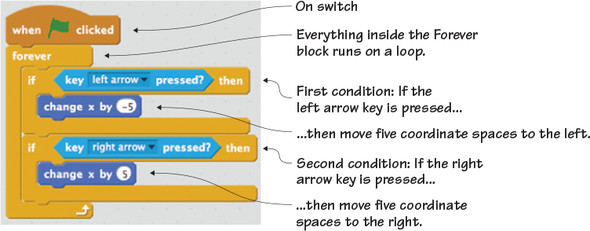
Your script should look like the script in figure 11.5, and it will move Buffy five coordinate spaces to the left or right whenever the arrow keys are pressed. You don’t want Buffy to move too quickly and accidentally run into a sandcastle, so five coordinate spaces at a time is a perfect speed.
Figure 11.5. The movement script allows Buffy to run left and right when the arrow keys are pressed.
Making a falling velocity script
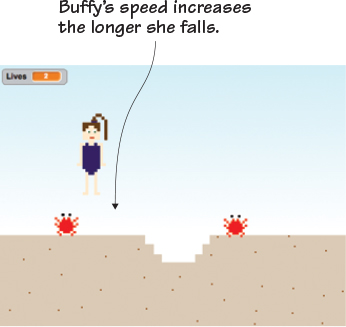
Simulating gravity is tricky. What happens to an object as it falls? It picks up speed. That includes people, like Beachy Buffy, as seen in figure 11.6.
Figure 11.6. After a jump, Buffy’s speed will increase the closer she gets to the sand.
Answer This: What is Velocity?
what is velocity?
what happens when you jump? Go ahead, get up from your chair and jump. Your feet leave the ground and now there is a Y coordinate marking your feet’s location in the air. But wait, you don’t hang in the air indefinitely. You start falling back toward the ground. You fall faster than you rise due to gravity. That is your velocity—the speed at which your body (or, in the case of a game, the sprite) is moving in a certain direction. Your Y velocity is how fast the person (or sprite) is falling within the Y coordinate, which is directionally up or down.
This first of three simulated gravity scripts sets the changing rate at which Buffy will fall:
- Start with a When Flag Clicked (Events) block.
- Snap a Forever (Control) block underneath to start a loop.
- Place an If/Then (Control) block inside the Forever block.
- Slide a Not (Operators) block into the empty hexagonal space of the If/Then blocks to set a condition. This is what will happen if something is not true. If the statement is true, this script won’t run. But if the statement is not true, whatever action you place inside the If/Then block will happen.
- Drag a Touching Color (Sensing) block and place it inside the space on the Not block.
- Change the color inside the Touching Color block square to the color of the sand. The condition is now if Beachy Buffy is not touching the sand.
- Create a variable (Data) called yVelocity. Unclick the variable so it doesn’t show up on the Stage.
Answer This: Why Use Strange Capitalization for the yVelocity Variable?
why make the y lowercase but the word Velocity uppercase?
programmers often write multi-word variables in something called camelcase, mostly because your words will start to resemble the humps of a camel. The first letter or word is always lowercase (in this example, y). The first letter of the next word is uppercase (in this example, Velocity). If there were more words smushed together to make this variable, all the other words would always start with an uppercase letter, too.
- Drag a Change yVelocity by 1 (Data) block and place it inside the If/Then block. Change the number to –0.5.
If Buffy is not touching the sand—if her feet are in the air—then she will start to fall, with her speed increasing by half of a coordinate each loop. The script in figure 11.7 will work together with Buffy’s falling script.
Figure 11.7. The falling velocity script mimics how gravity affects an object or a person, like Buffy.

Making a falling script
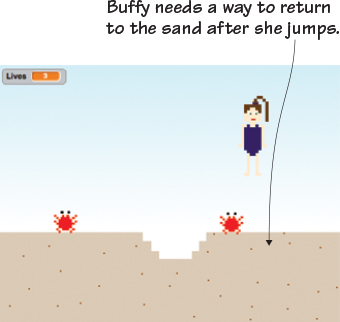
You now know how Buffy’s speed will incrementally increase as she falls, but you haven’t written a script that allows her to return to the sand, as in figure 11.8.
Figure 11.8. Buffy needs to be able to get back down to the ground once she is in the air.
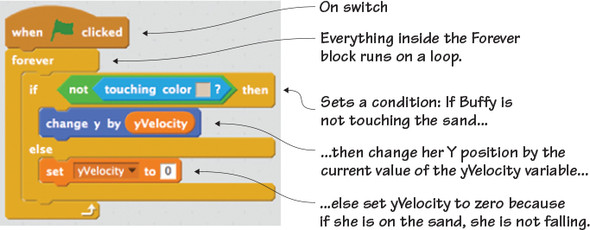
This script will allow Buffy to fall if she jumps up in the air:
- Start with a When Flag Clicked (Events) block.
- Snap a Forever (Control) block underneath to start a loop.
- Place an If/Then/Else (Control) block inside the Forever block. This is a new type of conditional statement. It not only tells what will happen if a condition is met; it also states what will happen if a condition is not met, setting a second possible action.
- Slide a Not (Operators) block inside the empty hexagonal space on the If/Then block.
- Add a Touching Color (Sensing) block to the empty space on the Not block and once again change the color square to the color of the sand. The condition is if Buffy is not touching the sand.
- Place a Change Y by 10 (Motion) block inside the If section of the If/Then/Else block.
- Slide a yVelocity variable (Data) block into the number bubble on the Change Y by 10 block, as seen in figure 11.9. This will make the Y position change by the current value of the variable, which will always be increasing by a half coordinate
each loop thanks to the Falling Velocity script. It means the longer Buffy falls, the faster she will fall, like in real life.
Figure 11.9. Put the variable inside the number bubble of the Change Y by 10 block.

- Add a Set yVelocity to 0 (Data) block inside the Else section of the If/Then/Else block. If Buffy is touching the sand, set the value of the variable yVelocity to zero (0) because she isn’t falling.
That final instruction is true whether Buffy has stopped falling or hasn’t fallen at all. Anytime Buffy is on the sand, the Else portion in figure 11.10 will be true, and anytime Buffy is in the air, the If portion is true.
Figure 11.10. The falling script allows Buffy to fall back to the sand after she jumps in the air.
Making a jumping script
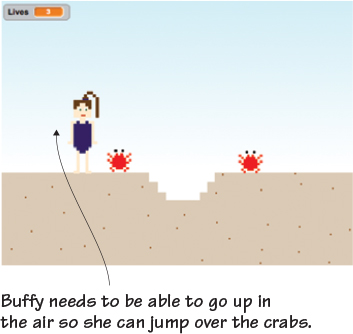
Buffy can return to the sand (falling script) and even have her body move in a realistic manner (falling velocity), but right now, her body can’t get up in the air so those two other scripts can kick into action. She is stuck on the sand, as in figure 11.11.
Figure 11.11. Buffy needs to be able to jump off the sand so she can sail over the obstacles.
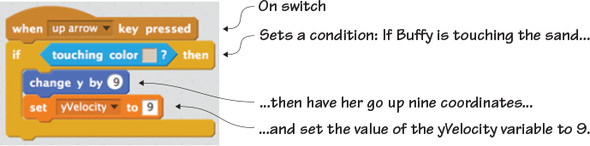
Make a script that will allow Buffy to jump off the sand.
- Start with a When Space Key Pressed (Events) block. Change the key to Up Arrow using the drop-down menu on the block.
- Place an If/Then (Control) block underneath to start a conditional.
- Slide a Touching Color (Sensing) block to the empty space on the If/Then block. Change the color square to the color of the sand. The condition is if Buffy is touching the sand.
- Position a Change Y by 10 (Motion) block inside the If/Then block. Change the number to 9 because you want Buffy to go nine
coordinates into the air each time the up arrow is pressed.
Fix It: Buffy Can’t Jump Over the Crabs!
Until you run the game, you won’t know whether the nine coordinates in Step Four will be enough to take Buffy over the crabs and sandcastles. In the future, you may need to increase this number if it’s not high enough, or you can decrease it to make it even harder for Buffy to sail over obstacles.
- Snap a Set yVelocity to 0 (Data) block underneath the Change Y by 9 block. This will change the value of the yVelocity variable to 9.
Check the script in figure 11.12. You’ll notice that the yVelocity variable is now set to a positive number (9) rather than a negative number. This is because you want Buffy to have the ability to leave the sand and go up. It’s working with the motion block to bring Buffy nine coordinate spaces into the air (because positive numbers go up), versus having Buffy receive conflicting information about where her body should go. This script works in harmony with the last two scripts to perform an action.
Figure 11.12. The jumping script gives Buffy a way to leave the ground.
Learn It: X and Y Coordinates
Geocaching is a game where people hide caches (usually a small box containing tiny toys or a log book) around the world and give the coordinates for the cache. Players can plug those coordinates into a GPS device and try to find the treasure. Similarly, Letterboxing is a game where people hide caches and write clues for the treasurer seeker, talking about things they’ll see along the way such as a tree or a bridge. Using latitude and longitude coordinates is an exact way of giving directions; using landmarks is not because the landscape may change over time. Scratch likes exact directions, programmed into a game using X and Y coordinates. Scratch can’t understand directions like “jump over the sand-castle,” though it can understand “go up nine coordinates, go to the right five coordinates, and then go down nine coordinates.” Going geocaching can help you to build better Scratch games because working with GPS coordinates will help you to think about the Stage in X and Y coordinates.
Making a positioning script
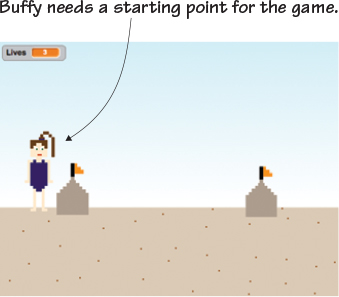
You have three backdrops, but which one will be on the screen when the game begins? Moreover, Buffy needs a starting point, a place to stand when the game begins, as in figure 11.13. Finally, you need to determine how many chances the player will get.
Figure 11.13. Buffy begins the game to the left of the first sandcastle.
This script ensures that Buffy begins on the first backdrop and gets three chances:
- Start with a When Flag Clicked (Events) block.
- Snap a Switch Backdrop to Backdrop3 (Looks) block underneath to set the proper backdrop to be on the screen when the game opens. Use the drop-down menu to change the option to backdrop1.
- Add a Set X to 0 (Motion) block to the chain, changing the number to –180 to send Buffy to the left side of the Stage when the game opens. –240 is the left-most point on the Stage, so –180 is a centimeter or so from the edge.
- Make a variable in Data called Lives. This will be the chances the player has to reach the end of the game. Move the variable bubble on the Stage to the top left corner.
- Place a Set Lives to 0 (Data) block at the bottom. Change the number to 3 to give the player three chances.
The script in figure 11.14 sets three important elements at the beginning of the game: the backdrop, Buffy’s position, and the number of chances.
Figure 11.14. The positioning script sets three elements of the game opening.

Making a life deduction script
Currently Buffy can touch the obstacles, such as the sandcastle or the crab, and nothing happens, as in figure 11.15.
Figure 11.15. Buffy needs to lose a “life” every time she touches an obstacle.

This script removes a “life” every time Buffy touches a sandcastle, crab, or water obstacle. It’s a long script, so check your work against the examples:
- Start with a When Flag Clicked (Events) block.
- Snap a Forever (Control) block underneath to start a loop.
- Drag four If/Then (Control) blocks inside the Forever block to set up four conditionals.
- Place a Touching Color (Sensing) block in the empty hexagonal space of the top If/Then block. Change the color square to the color of the water on backdrop3. Remember, you will need to switch to the backdrop if you’re not currently on backdrop3 to grab the color and return to programming Buffy.
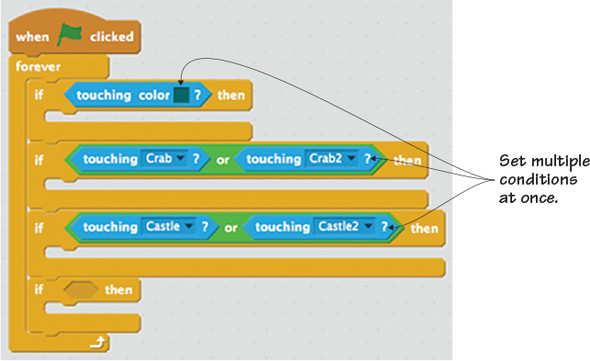
- Slide a Hexagon or Hexagon (Operators) block into each of the empty hexagonal spaces in the second and third If/Then blocks.
- Grab four Touching (Sensing) blocks and place them inside the four empty spaces of the Hexagon or Hexagon blocks. Use the
drop-down menus to set the options in the first two Touching blocks to Crab and Crab2. Set the options in the second two Touching
blocks to Castle and Castle2, as in figure 11.16.
Figure 11.16. Set three conditions at the same time.
- Place a Change Lives by 1 (Data) inside the first If/Then block. Change the number to –1 because you want to deduct a life if Buffy goes in the water.
- Snap a Go to X/Y (Motion) block underneath, though still inside, the If/Then block. Change the X to –180 and the Y to 50. –180 sends Buffy back to the left side of the Stage, and 50 sends Buffy to the top of the sand, though you may need to play with those numbers.
- Add a Wait 1 Secs (Control) block underneath the stack of blocks inside the If/Then block. This pause will ensure that only one life is removed.
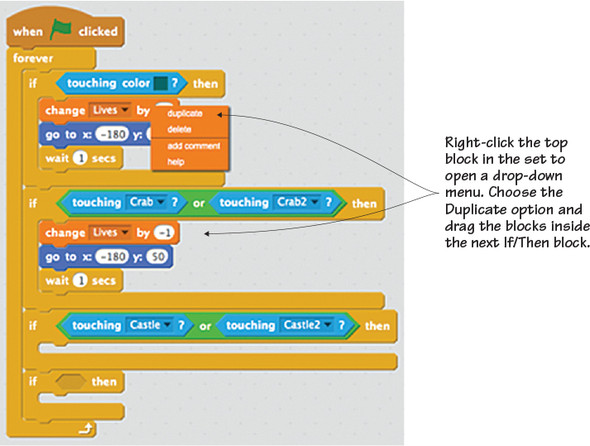
- Duplicate the three-block script inside the first If/Then block by right clicking (or Control + Clicking) the top Change Lives
by –1 block. Choose Duplicate and drag the new three-block set inside the second If/Then block. Do this a second time and
place the three-block set inside the third If/Then block, as in figure 11.17.
Figure 11.17. Duplicate the first three-block set and place it inside the other If/Then blocks.
- Place a Square = Square (Operators) inside the final empty hexagonal space in the bottom If/Then block.
- Slide a Lives (Data) variable into the left square and type the number zero (0) into the right square.
- Drag a Stop All (Control) block inside the final If/Then block to stop all the scripts if the value of the Lives variable equals zero.
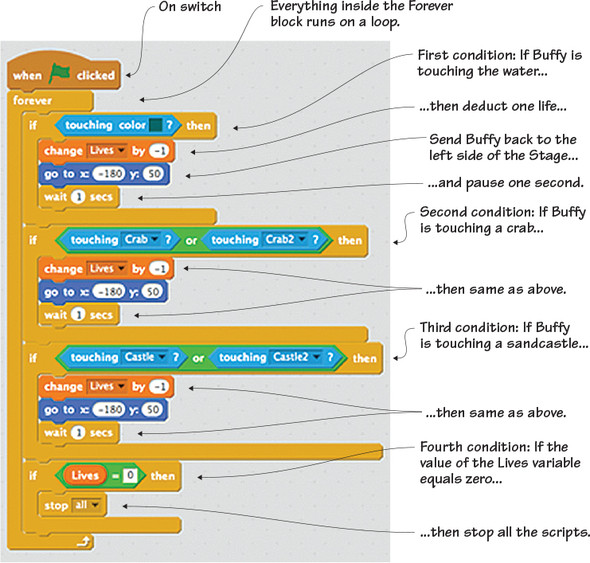
This long script is done! Look at figure 11.18 to make sure all your blocks are in the correct places.
Figure 11.18. The life deduction script sets up multiple situations where Buffy can lose one of her lives.
Making the background changing script
Buffy can currently run to the left or right, but nothing happens when she touches a wall, as you can see in figure 11.19.
Figure 11.19. The backdrop needs to switch when Buffy touches either edge of the Stage.

This script will cause the backdrops to change whenever Buffy runs to the edge of the Stage. It’s another long script, so check your work along the way:
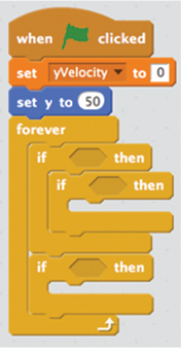
- Start with a When Flag Clicked (Events) block.
- Place a Set Lives to 0 (Data) block underneath and use the drop-down menu to change the option to yVelocity. Keep the number at zero (0) because you don’t want Buffy to begin the game falling!
- Add a Set Y to 0 (Motion) block next and change the number to 50 to place Buffy on top of the sand. You may need to play with this number later.
- Snap a Forever (Control) block next to start a loop.
- Slide two If/Then (Control) blocks into the Forever block. Then place a third If/Then block inside the top If/Then block,
as in figure 11.20.
Figure 11.20. Three conditions are set inside the Forever loop block.
- Place a Touching (Sensing) block inside the empty hexagonal space of the first, external If/Then block. Use the drop-down menu to set it to the Right Line, because the actions will happen if Buffy touches the right side of the Stage.
- Put a Square = Square (Operators) block in the empty hexagonal space of the internal If/Then block. (Look at figure 11.21 if you’re confused about placement.)
Figure 11.21. Certain actions will happen if Buffy hits the right wall while holding the vine.
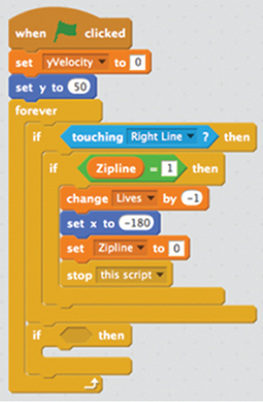
- Make a variable in Data called Zipline. This will track whether the vine is in use during the game. Uncheck the box because you don’t want the variable to be visible on the Stage.
- Place a Zipline (Data) variable in the left square and type a 1 in the right square. In this case, the value of 1 means true, or on.
- Slide a Change Zipline by 1 (Data) block inside the internal If/Then block. Use the drop-down menu to change the option to Lives and change the number to –1, because you want the game to deduct a life if Buffy is still holding onto the vine when she reaches the right wall.
- Add a Set X to 0 (Motion) block to the chain inside the If/Then block, changing the number to –180 to return Buffy to the left side of the Stage.
- Snap a Set Zipline to 0 (Data) block to the chain and keep everything as is because you want the zipline to be turned off (or zero) if Buffy hits the right wall.
- Complete this section with a Stop All (Control) block. Use the drop-down menu to set it to This Script, as in figure 11.21.
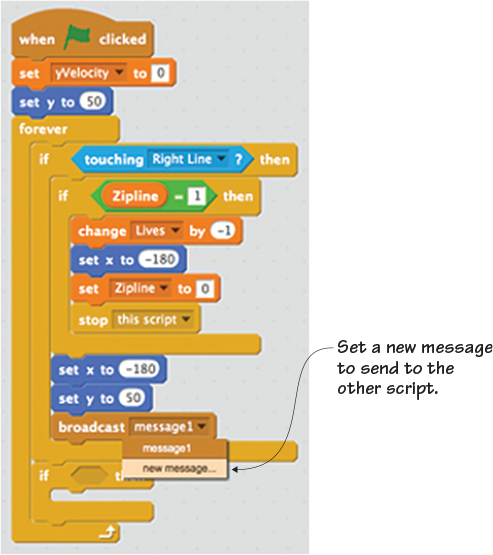
- Place a Set X to 0 (Motion) block underneath the internal If/Then block but inside the top If/Then block. Change the number to –180 to send Buffy to the left side of the Stage.
- Add a Set Y to 0 (Motion) block to the chain and change the number to 50 to place Buffy on top of the sand.
- Put a Broadcast Message (Events) block at the bottom of the chain inside the If/Then block. Use the drop-down menu to choose
New Message, as in figure 11.22. Call this message Right.
Figure 11.22. Set a new message called Right that will broadcast if Buffy touches the right wall.
- Fill in the final If/Then block by placing a Touching (Sensing) block in the empty hexagonal space. Use the drop-down menu to choose Left Line. This is what will happen if Buffy touches the left side of the Stage.
- Place a Set X to 0 (Motion) block inside the If/Then block and change the number to 180 to send Buffy to the right side of the Stage.
- Slide a Set Y to 0 (Motion) block underneath but still inside the If/Then block and change the number to 50 to send Buffy to the top of the sand.
- Add a Broadcast Message (Events) block and use the drop-down menu to set a new message called Left.
Figure 11.23. This complicated background changing script sends a message to switch backdrops.
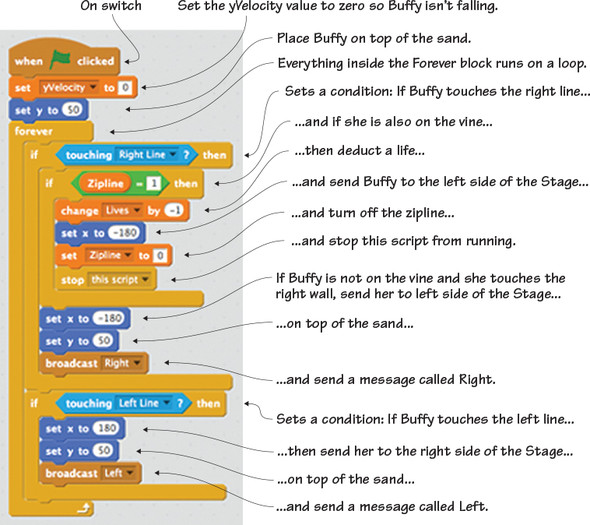
Figure 11.23 shows the completed script. Because you are a seasoned Scratch programmer, you know that you still need to make a receiver script to catch the message that this script sends out to the game. That receiver script will change the backdrop once it receives this broadcasted message that Buffy has touched the left or right wall. Additionally, this script sets actions to occur if Buffy happens to touch the right wall while she’s holding onto the vine. They’re all negative actions because Buffy is supposed to drop off the vine when she reaches the other side of the water obstacle.
Making the zipline dismount script
Soon you’ll code Buffy to jump up so she can catch the zipline or vine, as she’s done in figure 11.24, but before that happens, you need to make it so she can drop off the zipline. You know from the last script that bad things happen if she’s still holding onto the zipline when she touches the right wall.
Figure 11.24. Buffy needs to drop off the vine once she is across the water.

This script will allow Buffy to release the vine after she is past the water obstacle:
- Start with a When Space Key Pressed (Events) block. Change the key to Down Arrow using the drop-down menu on the block.
- Snap a Set Y to 0 (Motion) block underneath. Change the number to 50 to send Buffy back to the sand after she drops off the vine.
- Add a Set Zipline to 0 (Data) block. Keep it as is because you want the zipline to be set to off, or false, which is indicated by the zero (0) and means Buffy isn’t on the vine.
Look at figure 11.25 to see if you have your blocks in the same order.
Figure 11.25. The completed zipline dismount script lets Buffy drop off the vine.

Making the two-part vine grabbing script
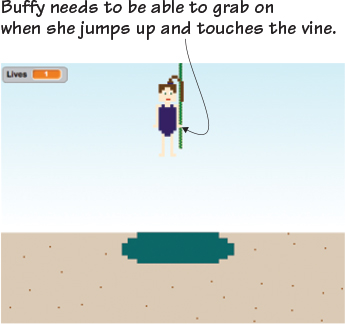
The last script gave Buffy the ability to drop off the vine after she gets over the water, but you also need to give Buffy the ability to grab onto the zipline when she jumps up. Currently, she can keep jumping and touching the zipline, but she isn’t able to grab it as she can in figure 11.26.
Figure 11.26. Write a script that will allow Buffy to grab onto the vine.
The first part of this script detects whether Buffy has touched the vine. The second part allows Buffy to grab and remain on the zipline until you want her to drop off:
- Start with a When Flag Clicked (Events) block.
- Slide a Forever (Control) block underneath to start a loop.
- Place an If/Then (Control) block inside the Forever block to set up a condition.
- Add a Touching (Sensing) block inside the empty hexagonal space on the If/Then block. Use the drop-down menu to set it to Vine.
- Grab a Broadcast Message (Events) block and place it inside the If/Then block. Use the drop-down menu to make a new message called Zipline.
- Place a Wait 1 Secs (Control) block underneath the Broadcast Zipline block inside the If/Then block. Change the number to .0001, because you only want it to be a fraction of a second.
The first part of this script checks if Buffy is on the vine. If she is touching the vine, it broadcasts a message to the second part of the script to keep her on the vine. Check the first part of the script in figure 11.27 and get ready to write the second part of the script.
Figure 11.27. The first part of the grabbing vine script detects whether Buffy has touched the zipline.

The second part of the script is written separately as a new script, but these two parts work in tandem (together) with each other. The second script keeps Buffy on the vine until the player presses the down arrow to return to the sand:
- Start with a When I Receive Left (Events) block. Use the drop-down menu to change the message to Zipline. This script receives the message sent by the last script and knows that Buffy has touched the vine. It is ready to spring into action.
- Snap a Go to X/Y (Motion) block underneath.
- Go to Data and make two variables, one called zipX and one called zipY. These two variables will allow the vine to continuously change its X and Y position and move over the water. Uncheck both variables so they don’t show up on the Stage.
- Slide a zipX (Data) variable into the number bubble for the X coordinate on the Go to X/Y block. Place a Circle – Circle (Operators)
block in the number bubble for the Y coordinate, as shown in figure 11.28. Add a zipY (Data) variable in the left circle, and type the number 10 in the right circle so Buffy will be holding the vine
a little under its center.
Figure 11.28. Place a Circle – Circle block in the number bubble for the Y coordinate so Buffy is dangling 10 coordinates under the current value of the zipY variable, which will be set when you program the vine.

- Add two Set zipY to 0 (Data) blocks to the chain, one on top of the other. Use the drop-down menu to change the first block to yVelocity. Keep the number at zero (0) because you do not want Buffy to start falling. Use the drop-down menu to change the second block to Zipline. Change the number to 1, which means that the zipline is true, or on, because it’s in use.
The second part of the vine grabbing script is complete. Check your work against figure 11.29 and breathe a huge sigh of relief. You’ve finished programming Beachy Buffy.
Figure 11.29. The completed second part of the vine grabbing script keeps Buffy on the zipline.

Programming the sandcastle
Beach Blast has stationary sandcastle obstacles, which are like Pitfall’s flickering fires. Buffy has to jump over them to get to the next backdrop. A single script powers the sandcastles. To program them, make sure the blue box is around the first sandcastle in the Sprite Zone.
Making a show or hide script
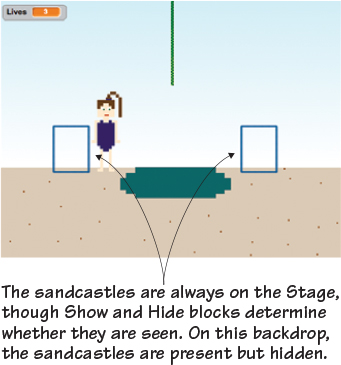
The sandcastles are always on the screen, though you can only see them on certain backdrops. They appear when Buffy is running on the basic beach backdrop, and they disappear when Buffy runs into the other two scenes. They are still technically on the screen, though they are hidden, as you can see from the empty squares that appear on the Stage in figure 11.30 whenever I click the sandcastles in the Sprite Zone.
Figure 11.30. The sandcastles are always there, though you can only see them on certain backdrops.
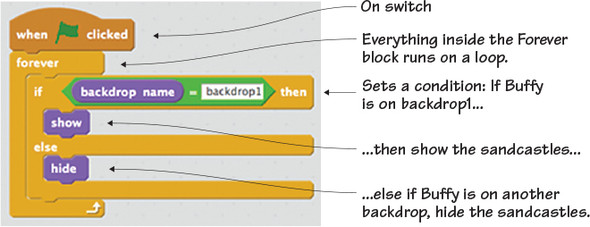
This script will cause them to appear or disappear depending on the backdrop:
- Start with a When Flag Clicked (Events) block.
- Place a Forever (Control) block underneath to start a loop.
- Position an If/Then/Else (Control) block inside the Forever block.
- Slide a Square = Square (Operators) into the empty hexagonal space on the If/Then block. Place a Backdrop Name (Looks) block in the left square, and type backdrop1 (lowercase and without spaces) in the right square. The condition is if backdrop1 is on the screen.
- Place a Show (Looks) block inside the If section of the If/Then block.
- Slip a Hide (Looks) block inside the Else section of the If/Then block.
The script in figure 11.31 sets up a simple condition: if backdrop1 is on the screen, the sandcastles will be visible, or else if it’s any other backdrop, the sandcastles will be hidden.
Figure 11.31. The completed show or hide script makes the sandcastles appear and disappear.
Duplicating the show or hide script
There are two sandcastles in the game, but you don’t need to build the script a second time. Instead, apply the script to the other sandcastle by clicking the When Flag Clicked block and dragging all the blocks (they should move as a set) to the Sprite Zone. Hover over the other sandcastle sprite, as in figure 11.32, and release the mouse button.
Figure 11.32. Drag the script and hover over the other sand-castle in the Sprite Zone.
The script should now appear in both sandcastle sprites’ Script Areas. Click back and forth between the two sprites in the Sprite Zone and check the Script Area to make sure the same script is in both places.
Programming the crabs
Beach Blast has two snapping crabs that run back and forth along the sand, similar to the scorpions in Pitfall. You only need to write these scripts for one crab, and then you will transfer them to the other crab using the hover method. Make sure the blue box is around the first crab in the Sprite Zone, and keep it on the crab for both scripts in this section. The crab requires two scripts: a similar show or hide script as used with the sandcastles and a movement script.
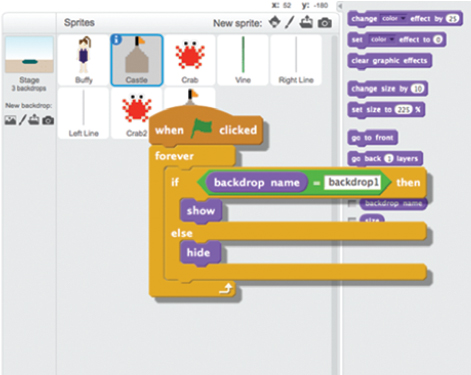
Tweaking the show or hide script
The same script that you used to show or hide the sandcastles also works with the crabs, which remain on the screen but are only seen on backdrop2 (as opposed to the sandcastles which are seen on backdrop1). Rather than remake the script, go to either sandcastle sprite and drag the script into the first crab in the Sprite Zone.
The script needs to be tweaked in order to show the crabs at the correct time. Change backdrop1 to backdrop2, as in figure 11.33.
Figure 11.33. Changing backdrop1 to backdrop2 makes the crabs appear at the correct time.
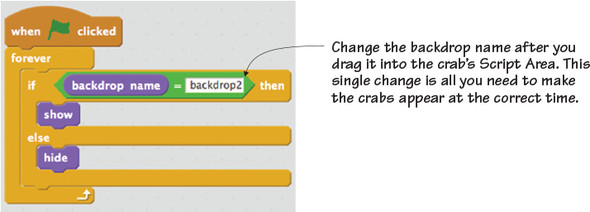
Once you’ve made this change, drag this tweaked script and hover over the second crab in the Sprite Zone. Release and check that both crabs have the same script, showing backdrop2 as the condition.
Making a movement script
Now that Buffy can jump over stationary sandcastles, it’s time to give her a harder obstacle—moving crabs, as seen in figure 11.34.
Figure 11.34. The crabs move back and forth next to the hole.
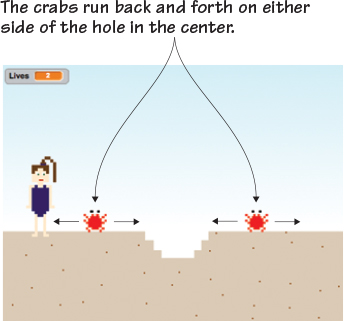
The crabs move back and forth on either side of the hole. Remember, the crabs are technically on the screen at all times, though you can only see them on backdrop2. This script will program the crabs to only move when you are on the crab’s backdrop. You can code either crab sprite because you will duplicate and tweak the code for the other sprite:
- Start with a When Flag Clicked (Events) block.
- Snap a Forever (Control) block underneath to start a loop.
- Place an If/Then (Control) block inside the Forever block.
- Slide a Square = Square (Operators) block into the empty hexagonal space of the If/Then block. Put a Backdrop Name (Looks) block in the left square, and type backdrop2 in the right square.
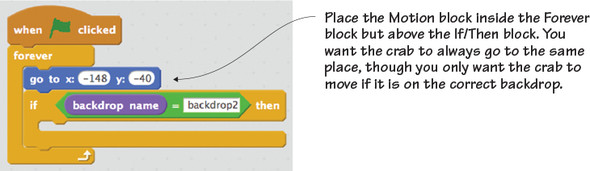
- Put a Go to X/Y (Motion) block inside the Forever block above the If/Then block, as in figure 11.35. You will need to play with these numbers later, but for now, set the X position to –148 and the Y position to –40 so the
crab is on top of the sand to the left of the hole.
Figure 11.35. Place the Go to X/Y block above the condition so it happens all the time.
- Stack two Repeat 10 (Control) blocks inside the If/Then block. Change both values to 20 so the action repeats 20 times.
- Place a Move 10 Steps (Motion) block inside each Repeat 20 block. Change the top Move 10 Steps block to 5 and the bottom Move 10 Steps block to –5. This will make the crab move 20 five-step increments to the right and then switch and move 20 five-step increments to the left, over and over again.
That’s the entire script. Check your work against figure 11.36.
Figure 11.36. The completed movement script makes the crabs a difficult obstacle.

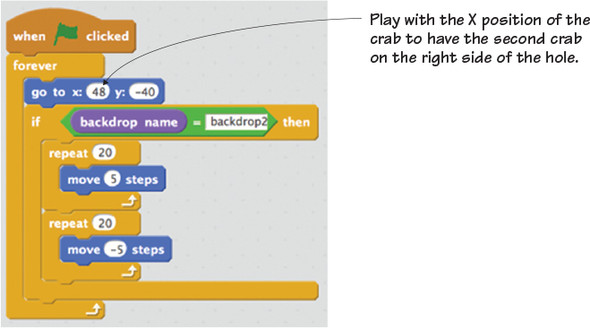
One crab is now to the left of the hole, moving back and forth when Buffy is on backdrop2. But what about the second crab? You’re going to use the hover method to drop the script into the second crab’s Script Area and then tweak a single number to place it on the right side of the hole.
By turning the –148 into a 48, as seen in figure 11.37, the second crab turns up to the right of the hole, making a true obstacle course for Buffy. You may need to tweak that number again when you start troubleshooting the game, but for now, you should have the two scripts in both crabs in the Sprite Zone.
Figure 11.37. Tweak the X position of the crab to send the second crab to the right of the hole.
Programming the vine
The obstacle sprites are out of the way, but now you need to program a tool that will take you over the pool of water. The water is drawn on the backdrop, but the vine is a sprite that moves.
According to David Crane, the maker of Pitfall, the vine is a one-pixel sprite that has its angle constantly computed by the game. The position of that sprite keeps changing due to some fancy math going on behind the scenes in the game. To simplify the code, your vine for Beach Blast is not going to swing back and forth diagonally. Instead it will move horizontally the moment Beachy Buffy jumps out and grabs it.
Make sure the blue box is around the vine in the Sprite Zone, and keep it on the vine for all scripts in this section. The vine requires three scripts: a starter script, a positioning script, and a movement script.
Making a starter script
Like the sandcastles and crabs, the vine is always on the screen, but you can only see it on the water backdrop (backdrop3), as shown in figure 11.38.
Figure 11.38. The vine dangles from the top center of the Stage and is visible on backdrop3.

This script hides the vine if Buffy is not on backdrop3, and shows the vine dangling from the top center of the Stage if she is on the water background:
- Start with a When Flag Clicked (Events) block.
- Snap a Set zipY to 0 (Data) block underneath and use the drop-down menu to change the option to Zipline. Leave the number at zero (0), because you are setting the zipline to false, or off.
- Add a Hide (Looks) block to the chain to make the vine invisible on the screen.
- Place a Forever (Control) block underneath to start a loop.
- Slide an If/Then/Else (Control) block and an If/Then (Control) block inside the Forever block, one on top of the other, as
in figure 11.39.
Figure 11.39. Add two conditional blocks inside the loop block.

- Drag a Square = Square (Operators) block into each of the conditional blocks’ empty hexagonal spaces.
- Place a Backdrop Name (Looks) block into the left square of the Square = Square block on the If/Then/Else block and type backdrop3 in the right square. The first condition is if Buffy is on backdrop3.
- Place a Zipline (Data) block in the left square of the Square = Square block on the If/Then block and type 0 in the right square. The second condition is if the zipline is off, or false.
- Slip a Show (Looks) block inside the If section of the If/Then/Else block. If Buffy is on backdrop3, you want the vine to be visible.
- Put a Set zipY to 0 (Data) block in the Else section of the If/Then/Else block. Use the drop-down menu to change the option to Zipline and keep the number at 0, which in this case means off, or false.
- Snap a Hide (Looks) block underneath the Set Zipline to 0 block, because if Buffy is not on backdrop3, you want the vine to continue to hide.
- Put a Set X to 0 (Motion) block inside the If/Then block. This sends the vine to the center of the Stage.
Check your script against figure 11.40 before you move on to positioning the vine.
Figure 11.40. The completed starter script either shows or hides the vine.

Making a positioning script
The last script sent the vine to the center of the Stage, over the water, but the vine isn’t a stationary object like the sandcastles. The vine moves during the game, as shown in figure 11.41.
Figure 11.41. The vine moves over the water, changing its position.

This script will track where the vine is on the screen and make that X position or Y position the value of the zipX or zipY variable. For instance, when the vine is at X:55, the value of zipX is 55:
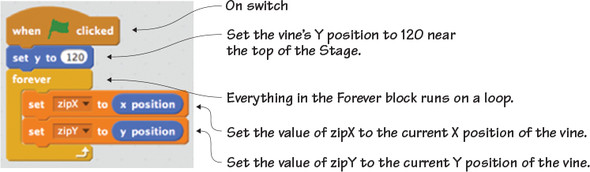
- Start with a When Flag Clicked (Events) block.
- Snap a Set Y to 0 (Motion) block underneath and change the number to 120 to place the vine near the top of the Stage. You may need to tweak this number later.
- Place a Forever (Control) block next to start a loop.
- Slide two Set zipY to 0 (Data) blocks inside the Forever block. Use the drop-down menu to change the top block to zipX.
- Put an X Position (Motion) block inside the number space on the Set zipX to 0 block, as shown in figure 11.42. Put a Y Position block in the number space on the Set zipY to 0 block.
Figure 11.42. You can always place blocks inside any space where you can type a number.
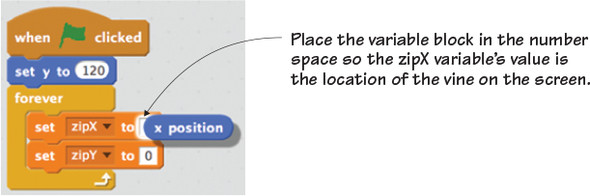
The script in figure 11.43 is now complete and will keep checking the position of the vine and setting the value of the zipX and zipY variables according to where it is on the screen. This is important to know because Buffy needs to move with the vine, so the value of those variables will affect where Buffy is on the screen, too.
Figure 11.43. The completed positioning script tracks where the vine is on the screen.
Making a movement script
But wait! The vine can’t move yet as it’s doing in figure 11.44, so that last script has nothing to track.
Figure 11.44. The vine needs to be able to move over the water when Buffy turns it on by touching it.

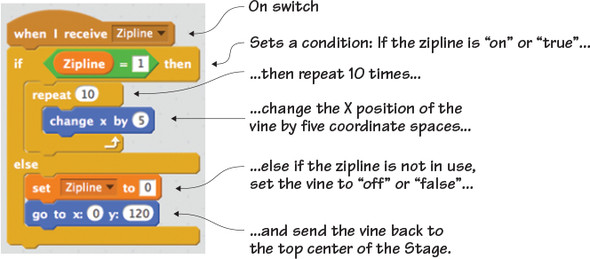
This script will make the vine move over the water hazard and keep going until it reaches the right side of the Stage or Buffy jumps off:
- Start with a When I Receive Left (Events) block. Use the drop-down menu to change the option to Zipline. This script kicks into action when it receives the Zipline message.
- Snap an If/Then/Else (Control) block underneath to set a condition.
- Place a Square = Square (Operators) block in the empty hexagonal space of the If/Then/Else block. Put a Zipline (Data) variable in the left square and type 1 in the right square to indicate that the value is on, or true.
- Slide a Repeat 10 (Control) block inside the If section of the If/Then/Else block.
- Put a Change X by 10 (Motion) block inside the Repeat 10 block. Change the 10 to a 5 because 10 will move too quickly for Buffy to drop off once she is across the water.
- Slide a Set zipY to 0 (Data) block into the Else section and use the drop-down menu to change the option to Zipline. Keep the number at zero (0) to indicate off, or false.
- Put a Go to X/Y (Motion) block under the Set Zipline to 0 block. Make the X:0 and the Y:120. This will send the vine back to the top center of the Stage when it is not in use.
Does your script look like the one in figure 11.45?
Figure 11.45. The completed movement script allows the vine to slide to the right.
All the sprites have been programmed, but you still have a few odds and ends to cover before you can begin troubleshooting the game.
Programming the odds and ends
Although you’re accustomed to having a barrier line at the bottom of the Stage, this game uses barrier lines on the left and right sides of the Stage to help the background change as Buffy runs across the screen. Additionally, you’ll need to write two short programs for the backdrops themselves to ensure the correct one pops up when Buffy runs to the left or right side of the Stage.
Making a line positioning script
The left and right lines need to be placed on the left and right sides of the Stage to ensure that they’re in the correct positions, as seen in figure 11.46. Start with the Left Line (and make sure the blue box is around it in the Sprite Zone).
Figure 11.46. The lines are against the far left and far right sides of the Stage.
Make the usual, brief positioning script in order to send the left line (that was drawn on the far left side of the canvas) into the proper position:
- Start with a When Flag Clicked (Events) block.
- Add a Forever (Control) block underneath to start a loop.
- Snap a Go to X/Y (Motion) block and make sure both numbers are set to zero (0), as in figure 11.47, to send the center of the sprite to the center of the Stage.
Figure 11.47. The completed positioning script sends the line to the correct place.

You need to use the hover method to send this script to the other line, too. Drop this script into the Right Line sprite in the Sprite Zone and check that this tiny script appears in both places before you move on to programming the backdrops. Both values should still be set to zero (0).
Making a previous backdrop script
Although you’ve tucked code into the backdrop before, these two scripts will be a little different. In order to write a program that applies to all the backdrops, navigate to the Sprite Zone and make sure the blue box is around the thumbnail of the backdrop (marked Stage) on the far left side of the Sprite Zone. You should see a blank Script Area open up on the right side of the screen. This is where you’ll be dragging your blocks.
You need to write a program that allows Buffy to return to the previous backdrop if she runs to the left. If she’s on the crab backdrop (backdrop2) and she runs to the left, she will find herself again on the sandcastle backdrop (backdrop1):
- Start with a When I Receive Left (Events) block. This script kicks into gear when it receives the Left message.
- Snap a Switch Backdrop to Backdrop3 (Looks) block.
- Place a Circle – Circle (Operators) block into the drop-down menu space on the Switch Backdrop block, as in figure 11.48.
Figure 11.48. Place the Operators block into the drop-down menu space.

- Slide a Backdrop # (Looks) block into the left circle. Type a 1 into the right circle. This means that Scratch will check the number of the backdrop Buffy is currently on and subtract one backdrop. If she’s on backdrop3, she’ll go to backdrop2.
The script in figure 11.49 switches the backdrop if Buffy goes to the left. But what happens if she goes to the right?
Figure 11.49. This previous backdrop script changes the backdrop if Buffy runs to the left.

Making a next backdrop script
Making the backdrop switch when Buffy goes to the left required a little workaround script with a real-time subtraction problem. Making the backdrop switch when Buffy goes to the right is a little easier due to an included Scratch block that allows for backdrop switches:
- Start with a When I Receive Left (Events) block. Use the drop-down menu to change the option to Right. This script kicks into gear when it receives the Right message.
- Snap a Next Backdrop (Looks) block underneath.
That’s it! Figure 11.50 shows the final script. It’s time to play Beach Blast.
Figure 11.50. Use Scratch’s built-in backdrop switching block to move forward.

Learn It: Types of Platformers
There are two types of platformers: multi-screen platformers and single-screen platformers. Pitfall is a multi-screen platformer. When you move Pitfall Harry, he switches screens—256 of them, to be exact. Making a game like Pitfall on Scratch means making a lot of backgrounds. Super Mario Bros is a single-screen platformer. When you move Mario, he’s running in place and the screen is moving. Don’t worry, you’ll get a chance to try your hand at a single-screen platformer with School Escape.
Troubleshooting your game
The first time I played my version of the game, the crabs were floating in the sky! It’s difficult to know the exact X and Y positions of sprites, especially if you didn’t draw your crabs in the center of the canvas. The first step will be to center both of your crabs. Turn back to chapter 9 if you need a reminder of how to center sprites. If your crabs are still above the sand, tweak their Y position so they can be running along the surface. Any sprite positioned with code can be helped by centering.
The second problem encountered was a layering issue with the vine. Buffy could grab on, but she couldn’t drop off. If you run into this problem, navigate Buffy to backdrop3 by running to the left after starting the game. Click the stop sign above the Stage to stop the game, and click the vine, moving it slightly so it becomes the top layer.
The third possible issue is tweaking the values in various blocks, such as the Y-position of Buffy’s feet on the sand at 50, or the placement of the vine at 120. Look back at all the times you were told to play with the value and adjust the numbers. Although I didn’t need to adjust any values, you may want Buffy to jump higher or for the vine to hang lower.
Learning in action
X and Y coordinates featured heavily in Beach Blast. You even made variables that will track the X and Y coordinates of the vine, ensuring that Buffy can travel with the vine, over the water. You can always check a sprite’s X and Y by touching your mouse pointer to the sprite and looking at the X and Y position listed under the Stage.
Play with the code
Pitfall has 256 screens. Beach Blast only has 3. Expanding the game means hours of play.
Challenge
Create new backdrops. You won’t need to write any additional code, though you will need to add obstacles to these backdrops for Buffy to jump over. You can either use the same obstacles or create other objects or animals found on the beach.
Challenge
Right now, Buffy always regenerates on the left side of the current backdrop. Can you figure out a way to use a variable that will have Buffy start from the left side or the right side depending upon where she lost a turn on the Stage?
Challenge
Create another character, either by drawing them on the backdrop or making a sprite. Have Buffy win the game by reaching this character on the last screen.
Challenge
Add a points system to the game. Make shell sprites and scatter them through the game. Every time Buffy collects one, it adds to her overall score. You can also make obstacles that will remove points, such as stepping on a towel or running into a beach umbrella.
Challenge
Play with the difficulty level of the game. You can change the height that Buffy can jump to make getting over sandcastles harder or easier. You can place obstacles such as the sandcastles closer together, and you can play with the speed at which the vine moves or Buffy runs to make the game more challenging. If you add more levels by adding more backdrops, you may also want to make the obstacles more difficult, such as increasing the speed or range of the crabs.
What did you learn?
Before you jump back to running down the beach, take a moment to reflect which common computer science ideas from chapter 3 were used in this game:
- Using an on switch for every script in the game, including using receiver hat blocks to kick into gear when they get a broadcasted message
- Setting X and Y coordinates to simulate gravity and enable Buffy to jump
- Writing If/Then/Else conditional statements to account for two possible situations
- Creating loops to have the crabs run back and forth
- Building variables to track the location of the vine
- Using Booleans to make true or false statements to detect whether Buffy is on the zipline
- Broadcasting messages between scripts to switch backdrops
Another seven out of eight common programming ideas! Additionally, in Beach Blast you learned
- How to simulate gravity so jumping and falling looks realistic
- How to make enemies or obstacles that move back and forth
- How to turn true or false statements into ones or zeros
- How to use variables to track a moving sprite
- How to make a multi-screen platformer
Pitfall influenced Super Mario Bros, so it’s fitting that you will use everything you learned in this platformer to make a single-screen platformer called School Escape. If you’re ready to start making your player character teacher jump onto desks and over kindergarteners, turn the page.