
Appendix. Extra Practice Mermaid Splash—Coding

Sometimes videogames are there to bring the player into the world of their favorite stories or movies, like Atari’s Star Wars game or E.T. the Extra-Terrestrial. That was supposed to be the case with Spy Hunter. It was going to be a video game adaptation of the James Bond world, but Bally Midway couldn’t get the license.
What you get instead is an endless racing game where the player has to drive among other cars while remaining on the road, saving the good guys and destroying the bad ones. The car can pop into a weapons truck and get more supplies, including guns and missiles.
There has always been violence in video games. Some people think that’s a good thing because it’s a way of processing anger without having real consequences. Others think it’s a bad thing that turns people more violent because they observe it on the screen. We decided to leave the beaten path of violence and make a game like Spy Hunter that doesn’t involve a single gun, and we challenge you to think outside the box when designing your games and consider how you can be creative instead of repeating old video game clichés.
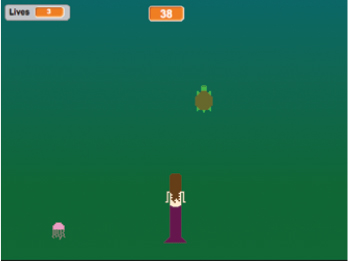
Mermaid Splash is a racing game, swapping out a car for a mermaid. Unlike Spy Hunter, with its narrow road lined by grass on either side, the whole screen is the ocean and fair game for Octavia the mermaid to stay in-bounds. Instead of shooting at enemy cars, Octavia needs to dodge the jellyfish and turtles shown in figure 1. The ocean is endless, and the game is similar to School Escape in that it creates that endlessness by giving the illusion of movement without having Octavia move.
Figure 1. In Mermaid Splash, Octavia needs to swim forward, dodging jellyfish and turtles. The counter at the top tracks Octavia’s distance covered.
Driving and racing games are still popular today, though most games have switched from the old third-person, top-down perspective to a first-person perspective to give the player the sensation that they are the one driving the car. Think about which gaming perspective is more challenging and interesting as you start designing your own racing games.
Part of being a programmer is writing scripts that do a lot without taking up a lot of space. In this game, you’ll learn how to combine similar sprites in order to reduce the number of scripts while keeping the same number of obstacles.
In this section, you will learn
- How to design a racing game, whether it uses a mermaid or a car
- How to make a vertical scroller
- How to add sprite animation
- How to add a retry button to restart a game
- How to use Booleans to determine whether a game is “on” or “off”
- How to combine sprites with the same overall purpose in the game
Eleven scripts will help you make your first racing game—and the last game in this book. By the time you hit the last page of this section, you’ll know how to make seven different kinds of games.
Preparing to program
It’s time for your pre-coding ritual. Get your sprites and the Stage ready for Mermaid Splash.
Missing sprites
If you skipped the previous section, go back and finish it or go to the Manning site and download the background and sprites for Mermaid Splash. The directions for importing are the same as in chapter 5. You should have Octavia the mermaid, a turtle, jellyfish, retry button, barrier line, and the ocean background.
Combining the animals
You need to combine the turtle and jellyfish into a single sprite. Navigate to the Sprite Zone and click the jellyfish. Open the Costumes tab in the Block Menu and drag the sprite from the Costumes tab into the turtle sprite in the Sprite Zone. Make sure the jellyfish transferred into the turtle sprite by clicking the turtle sprite and looking at the Costumes tab to make sure there are two costumes. Rename this combined sprite Animals, as shown in figure 2. Delete the single jellyfish sprite.
Figure 2. Combine the sprites and set up the Stage before you begin coding.

Preparing the stage
All the sprites are their original size and have not been enlarged or shrunk. Drag the mermaid to the center of the Stage, a centimeter from the bottom (see figure 2). Move the retry button to the center of the Stage. Everything else will be positioned with code.
Programming the mermaid
The mermaid is the equivalent of the car in Spy Hunter. Hopefully, seeing a mermaid instead of a vehicle will help you get creative with your future racing games. The player will be able to move the sprite back and forth along the bottom of the Stage using the arrow keys in order to dodge the jellyfish and turtles. The sprite itself will move, too, because it’s a coded animation. Her arms will move up and down, as if doing the butterfly stroke to propel herself through the water. Octavia has four scripts: a movement script, animation script, hiding script, and distance script. All scripts in this section are applied to Octavia, so go put the blue box around the mermaid sprite in the Sprite Zone and don’t move the blue box until you program the animals (jellyfish and turtle) in the next section. Remember, the names or values on your blocks may differ slightly from time to time, so use the completed script images to make sure you chose the correct block.
Making the movement script
Octavia the mermaid needs to get away from the jellyfish and turtles trying to catch her (figure 3), but currently she can’t move.
Figure 3. The movement script slides the mermaid left or right when the player presses the arrow keys.

This script allows the player to move the mermaid left and right at the bottom of the screen:
- Start with a When Flag Clicked (Events) block.
- Click Data and make a variable. Name it Distance and drag the variable to the top center of the Stage. Right-click (or Control-click) the box and change it to the large readout.
- Drag a Set Distance to 0 (Data) block and snap it under the starter block to reset the counter to zero at the beginning of every game.
- Slide a Forever (Control) block onto the chain to start a loop.
- Stack two If/Then (Control) blocks on top of one another inside the Forever block.
- Place a Key Space Pressed (Sensing) block into each of the empty hexagonal spaces on the If/Then blocks to set the condition. Use the drop-down menu to change the top block to Left Arrow and the bottom block to Right Arrow.
- Place a Change X by 10 (Motion) block inside each of the If/Then blocks. Change the top one to –5 to move the sprite 5 coordinates to the left, and the bottom one to 5 to move the sprite 5 coordinates to the right.
The mermaid won’t be able to move on the Y-axis (though it will look as though she is swimming forward), but she will be able to move back and forth along the X-axis with the script in figure 4.
Figure 4. The completed movement script allows the mermaid to move along the X-axis.

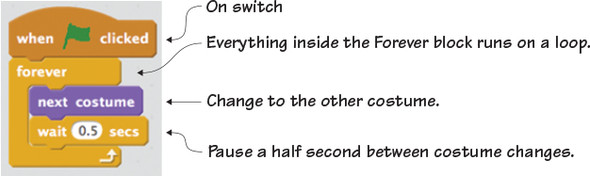
Making an animation script
The mermaid’s arms are down by her sides in figure 5, but that doesn’t look realistic if she’s swimming forward.
Figure 5. The mermaid’s arms look as if she is doing the butterfly stroke.

This script will make the mermaid sprite quickly switch between her two costumes, one with her arms up and one with her arms down, giving the illusion of swimming:
- Start with a When Flag Clicked (Events) block.
- Snap a Forever (Control) block underneath to start a loop.
- Place a Next Costume (Looks) block inside the Forever block so the sprite switches to the other costume.
- Add a Wait 1 Secs (Control) block underneath the Next Costume block (and still inside the Forever block). Change the number to 0.5 to give a tiny delay between switching costumes to make her arms move at a realistic speed.
The small script in figure 6 animates the mermaid sprite.
Figure 6. The animation script causes the mermaid’s arms to move.
Making a hiding script
Every sprite will be on the screen the whole time, though sometimes the sprite will be visible and sometimes it will be hidden. In the case of the mermaid sprite, you want her to be hidden (as she is in figure 7) when the retry button is on the screen at the end of the game.
Figure 7. The mermaid is hidden on the screen when the player can see the retry button.

This script hides the mermaid when the retry button comes on the screen at the end of the game, though the jellyfish and turtles will still be visible for a short period of time:
- Start with a When Flag Clicked (Events) block.
- Place a Forever (Control) block underneath to start a loop.
- Put an If/Then/Else (Control) block inside the Forever block to state two possible actions depending on whether the condition is true.
- Slide a Square = Square (Operators) block into the empty hexagonal space in the If/Then block.
- Click Data and make another variable. Name it currentlyPlaying, writing the variable in camel case. Uncheck the variable so it doesn’t appear on the screen.
- Place a currentlyPlaying variable (Data) in the left square and type 1 in the right square to indicate true, or on.
- Place a Show (Looks) block in the If/Then portion of the If/Then/Else block and place a Hide (Looks) block in the Else portion.
The condition is if currentlyPlaying is true, then show the mermaid—meaning, the game is on, so the mermaid should be visible. Or else, if the game is not on, the mermaid should be hidden. You can see the completed script in figure 8.
Figure 8. The completed hiding script makes the mermaid invisible when the game is over.

If you need a brief review of Booleans, turn back to chapter 3, or return to the game Dribble where you used zero (0) to indicate false/off/no and 1 to indicate true/on/yes.
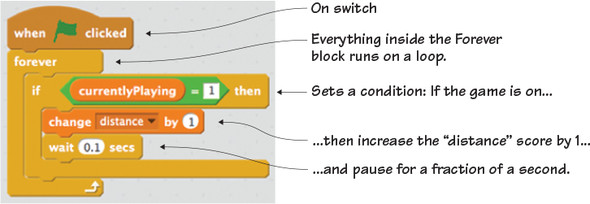
Making a distance script
It wouldn’t be an interesting game if you had no clue how well you did dodging the jellyfish and turtles. The score in this game, shown in figure 9, is tallied by the distance covered by the mermaid as she swims.
Figure 9. The score in this game is how far the mermaid can swim before the game ends.
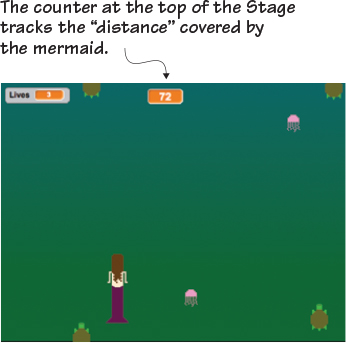
This script increases the player’s distance score by 10 every second, which means the player has been moving for 7.2 seconds and has gone 72 feet in the score above:
- Start with a When Flag Clicked (Events) block.
- Add a Forever (Control) block underneath to start a loop.
- Place an If/Then (Control) block inside the Forever block to set a condition.
- Slide a Square = Square (Operators) block inside the empty hexagonal space on the If/Then block. Place a currentlyPlaying variable (Data) block inside the left square and type a 1 in the right square to indicate that the condition is if the game is on.
- Put a Change currentlyPlaying by 1 (Data) block inside the If/Then block. Use the drop-down menu to get to Distance and keep the number as is. You want the value of the distance variable to increase by 1 each loop if the game is running.
- Snap a Wait 1 Secs (Control) block under the Change Distance by 1 block (still inside the If/Then block). Change the amount to 0.1 so the value of the distance variable increases by 1 every tenth of a second.
The completed script in figure 10 shows how the score is tallied in the game.
Figure 10. The completed distance script tracks how far the mermaid has gone.
The mermaid is now done and it’s time to turn your attention toward her enemies: the jellyfish and turtles.
Programming the animals
The jellyfish and turtles, the enemies who are trying to catch Octavia, are like the other cars in Spy Hunter. You’ve combined them into a single sprite, which means that you only need to write scripts in one place and they’re applied to both enemies. This is a trick that will add variety to your game while lessening the chance that the various sprites will have conflicting scripts. The animals have four scripts: a hiding script, cloning script, movement script, and zigzag script. Make sure the blue box is around the animals in the Sprite Zone and keep it on the animals sprite for all four scripts. It doesn’t matter which costume is showing in the Sprite Zone thumbnail.
Making a hiding script
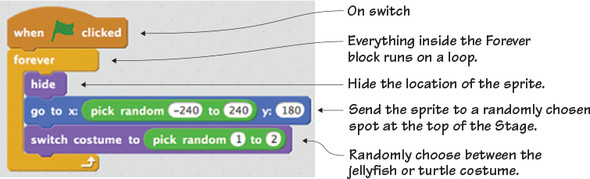
It would be a quick game if the player could always predict where the enemy will spawn. It becomes a much more difficult game when the location of the enemy, as shown in figure 11, is hidden:
Figure 11. The location of the enemy is hidden at the top of the Stage.

This script hides the location of the sprite and randomly generates a copy—switching between the two possible costumes—anywhere along the X-axis.
- Start with a When Flag Clicked (Events) block.
- Snap a Forever (Control) block underneath to start a loop.
- Place a Hide (Looks) block inside the Forever block to conceal the sprite’s location.
- Add a Go to X/Y (Motion) block underneath (still inside the Forever block). You want the location to be randomly chosen so it’s a new place each time. Place a Pick Random 1 to 10 (Operators) block into the number bubble for the X-coordinate. Change the numbers to –240 to 240 to indicate anywhere from left to right. Type 180 in the number bubble for the Y-coordinate for the top of the Stage.
- Add a Switch Costume to Costume2 (Looks) block inside the Forever block. Place a Pick Random 1 to 10 (Operators) block inside the drop-down menu space listing Costumes2. Change the numbers to 1 to 2. There are two costume choices, and this means that Scratch will choose one of the two at random.
Figure 12 shows the whole script. The enemy goes to a random, hidden location at the top of the Stage and either wears the jellyfish or turtle costume.
Figure 12. The completed hiding script conceals the location of the sprite.
Making a cloning script
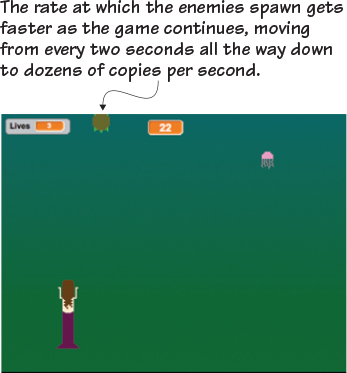
How often should the enemies spawn? If they come too slowly, the game becomes boring, but if they spawn too quickly, the game becomes impossible to win. The solution is a script that has the rate in which the enemies clone increase over time, as shown in figure 13.
Figure 13. The enemies begin spawning more frequently as the game continues.
This script will set the initial values for a few variables at the start of the game—such as giving the player three chances—and then tells Scratch how frequently the enemies should spawn:
- Start with a When Flag Clicked (Events) block.
- Click Data and make two variables. Name the first one Speed and uncheck the box so it doesn’t appear on the Stage. Name the second one Lives and drag the box to the top left corner of the Stage.
- Snap three Set Lives to 0 blocks underneath the When Flag Clicked block. Use the drop-down menu to change the first option to speed and type the number 2 in the box, because you want the enemies to begin spawning at a rate of every 2 seconds. Keep the second block set to Lives, but type the number 3 in the box because you want to give the player 3 chances. Set the third block to currentlyPlaying and type the number 1, because the game turns “on” when the game begins.
- Place a Forever (Control) block underneath to start a loop.
- Slide an If/Then (Control) block inside the Forever block. Place a Square = Square (Operators) block inside the empty hexagonal space. Fill the left square with the currentlyPlaying variable (Data) and fill the right square with a 1. The condition is if the game is “on.”
- Slide a Repeat 10 (Control) block inside the If/Then block. Change the number to a 5 because the actions inside will repeat 5 times before a change is made.
- Place a Wait 1 Secs (Control) block inside the Repeat 5 block. Place a speed variable (Data) inside the number space on the Wait 1 Secs block. Scratch will wait for the value of the speed variable in seconds. Currently, it’s set to 2 (from the earlier block in this script), so it will wait 2 seconds. But that time amount will change during the game.
- Snap a Create Clone of Myself (Control) block under the Wait Speed Secs (still inside the Repeat 5) block. Every two seconds (for now) Scratch will create a clone of the sprite.
- Place a Change Lives by 1 (Data) block underneath the Repeat 5 block (but still inside the If/Then block). Change the option to Speed and the number to –0.1.
That final block, shown in figure 14, tells Scratch to reduce the time between new enemies spawning by a tenth of a second every five sprites. The game will subtly get harder the longer it goes on.
Figure 14. The completed cloning script tells the enemies how quickly to come.

Making the movement script
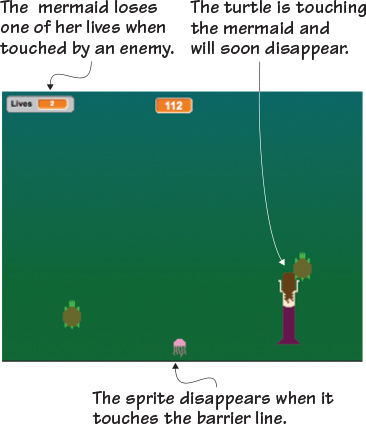
The animals are swimming through the water but not bothering the mermaid. What happens if the jellyfish or turtles touch the mermaid, as in figure 15, or the animal reaches the barrier line at the bottom?
Figure 15. Changes occur if the jellyfish or turtle touches the mermaid or the barrier line.
This script will tell Scratch what to do if either animal touches the mermaid or the barrier line:
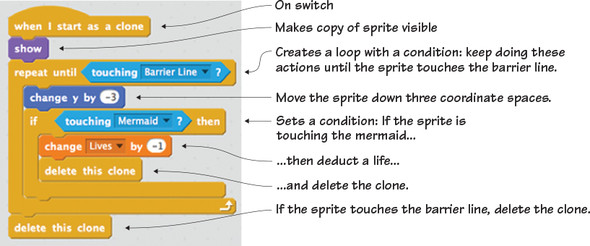
- Start with a When I Start as a Clone (Control) block. This script only runs once the animal sprite has been cloned.
- Add a Show (Looks) block underneath to make the clone visible.
- Snap a Repeat Until (Control) block next. Fill the empty hexagonal space with a Touching Mouse-Pointer (Sensing) block. Use the drop-down menu to change the option to Barrier Line. The actions inside will keep happening unless the sprite is touching the bottom of the Stage.
- Slide a Change Y by 10 (Motion) block inside the Repeat Until Touching Barrier Line block. Change the number to –3 to move the sprite down 3 coordinate spaces.
- Place an If/Then (Control) block underneath the Change Y by –3 block (still inside the Repeat Until block). Slide a Touching Mouse-Pointer (Sensing) block into the empty hexagonal space. Use the drop-down menu to change the option to Mermaid.
- Put a Change Speed by 1 (Data block) inside the If/Then block. Change the option to Lives on the drop-down menu, and type the number –1. You want to remove a life, not give a life, if the sprite touches the mermaid.
- Add a Delete This Clone (Control) block under the Change Lives by –1 block (inside the If/Then). This will remove the copy of the sprite.
- Add a second Delete This Clone (Control) block under the whole script to also make the clone delete if it touches the barrier line.
Figure 16 shows what will happen if the sprite touches the mermaid or the barrier line.
Figure 16. The completed movement script shows two ways the sprite will be deleted from the game.
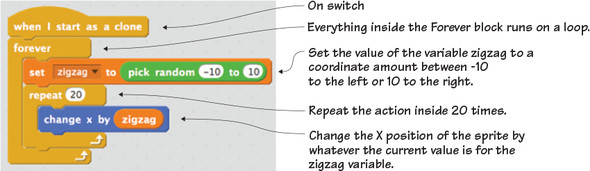
Making the zigzag script
Currently, the animals are falling in a straight line. Even when they start coming quickly, it will still be a fairly easy game. Making them move in a random, zigzag line, as shown in figure 17, will make it harder to know where the jellyfish or turtle will go next.
Figure 17. The jellyfish and turtles have unpredictable movements.
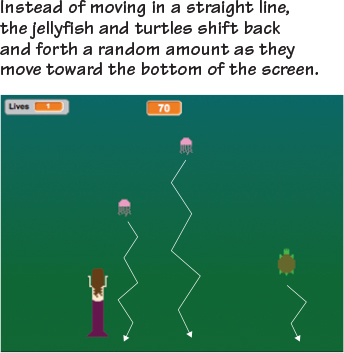
The jellyfish and turtles will move randomly down the Stage, though it looks as if the mermaid is swimming past her enemies due to the top-down perspective:
- Start with a When I Start as a Clone (Control) block. This script only runs once the animal sprite has been cloned.
- Snap a Forever (Control) block underneath to start a loop.
- Click Data and make a new variable called zigzag. Uncheck the variable so it doesn’t appear on the Stage. Add a Set Zigzag to 0 (Data) block inside the Forever block. Put a Pick Random 1 to 10 (Operators) block in the number space on the Set Zigzag to 0 block. Change the numbers to –10 to 10 to randomly send the sprite between 10 coordinate spaces to the left or right.
- Place a Repeat 10 (Control) block underneath (still inside the Forever block) and change the number to 20 to have the action inside repeat 20 times.
- Add a Change X by 10 (Motion) block inside the Repeat 20 block. Place a zigzag variable (Data) inside the number space.
The jellyfish and turtles will change their X-position by a random amount, between 10 spaces to the left or right. Scratch will keep randomly generating the amount, so it will be impossible to predict where the animal will go with the script shown in figure 18. From the top-down perspective, it will look as though Octavia is swimming past her unpredictable enemies, and the enemies will look as if they are lunging at the mermaid.
Figure 18. The completed zigzag script moves the sprite a random amount to the left or right.
Programming the odds and ends
The retry button appears at the end of the game, and it allows the player to restart the game without clicking the green flag again. The barrier line serves the same purpose it always serves, to establish the bottom of the Stage.
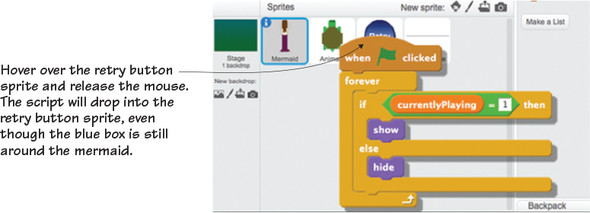
Making a retry button showing script
When your game begins, you don’t want to see the retry button (figure 19).
Figure 19. The retry button is only visible at the end of the game.

This script will show or hide the button depending on whether the game is on or off. You don’t need to write a script; you can borrow and tweak a script you’ve already written.
Navigate to the mermaid and drag her hiding script (remember to click and drag the top block in the script to make all the blocks move together) over to the retry button’s sprite in the Sprite Zone, as shown in figure 20. Release the script, and then make sure the blue box is around the retry button in the Sprite Zone so you can tweak the script.
Figure 20. Drag and drop the script into the other sprite to save yourself coding time.
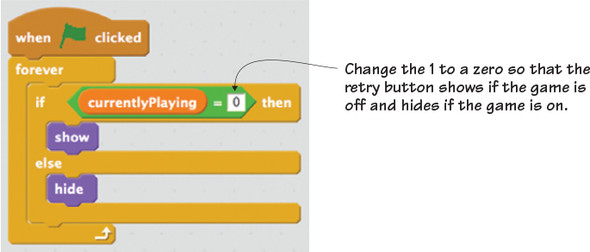
Instead of having the game “on,” which is indicated by the 1 in the If currentlyPlaying = 1 block, turn the game “off” by typing zero (0). Now the script (shown in figure 21) states that if the game is off, the retry button should show, and if it’s on, the retry button should hide.
Figure 21. Tweak the 1 and turn it into a zero (0) to indicate that the game is off.
Making a retry button game resetting script
There’s another option that invites the player to try again beyond leaving them a note to reclick the green flag each time they want to play. In figure 22, the cursor is about to click that retry button in the center of the screen, which will start the game over.
Figure 22. When the retry button is clicked, four variables reset or change.

The retry button always pops up when the game ends. Make sure the blue box is still around the retry button in the Sprite Zone:
- Start with a When This Sprite Clicked (Events) block. This script only runs when the sprite has been clicked on the Stage. This is your first time using this block.
- Add four Set Zigzag to 0 (Data) blocks and stack them under the When This Sprite Clicked block. Use the drop-down menu to change the first block to currentlyPlaying and the number to 1 (because it turns the game back on), the second block to Distance and the number to zero (0), to reset the points in the game, the third block to Speed and the number to 2 (to reset the initial spawning rate for the enemies), and the fourth block to Lives and the number to 3 (to give the player 3 more chances).
Figure 23 shows the whole script.
Figure 23. The game resetting script brings the player back to the starting values for the variables.

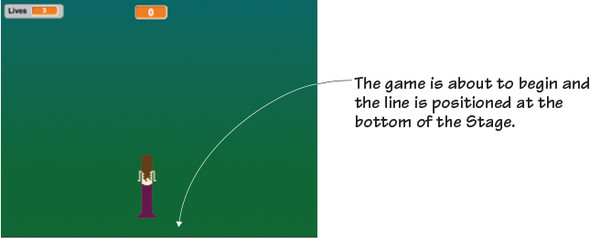
Making the line’s game ending script
Right now the game will continue, even if the player goes into negative lives. You need to set a stopping point so the game will turn off. You also need to write a script to send the line into position, as shown in figure 24.
Figure 24. The line goes to the bottom of the Stage with code, and conditions are set for game over.
This last script applies to the line, so place the blue box around the barrier line in the Sprite Zone:
- Start with a When Flag Clicked (Events) block.
- Add a Forever (Control) block underneath to start a loop.
- Place a Go to X/Y (Motion) block inside the Forever block and change both numbers to zero (0). This will send the center of the sprite to the center of the Stage.
- Slide an If/Then (Control) block underneath the Go to X/Y block (still inside the Forever block). Place a Square = Square (Operators) block into the empty hexagonal space. Fill the left square with a Lives variable (Data) and fill the right square with a zero (0). The condition is if the player has run out of lives.
- Snap a Set currentlyPlaying to 0 (Data) block inside the If/Then block. The zero means the game is off.
Figure 25 shows the whole script that turns off the game when the player runs out of lives.
Figure 25. The completed game ending script positions the line and tells the game when to end.

Troubleshooting your game
It’s time to play your game. Ours worked perfectly on the first try, but you may run into some bugs with your game. Whenever you run into bugs, first check that your sprites are centered. Open each sprite in the Art Editor and center it using the tool in the top right corner of the canvas. Next, make sure the mermaid is on the top layer. Click the mermaid on the Stage and move her a tiny bit to ensure she is the top sprite.
You may notice the enemies still falling, even after Octavia disappears and the retry button appears on the screen. This is not a glitch: all enemies that already spawned will continue to move through the water after the game is over, though new ones won’t continue to spawn.
Learning in action
There was one Boolean that kept popping up over and over in this game, used with the currentlyPlaying variable. Sometimes the value of the variable was 1, which means true or on, and sometimes the value was zero (0), which means false or off. This is the black and white nature of programming: either the game is on or the game is off, which means either the Boolean is true or the Boolean is false. It can’t be a little bit of both at the same time.
Play with the code
Like School Escape, Octavia the mermaid can keep swimming indefinitely because she isn’t really swimming forward. You can make the game even harder by working in some of the following challenges.
Challenge
Octavia can swim anywhere on the screen and still be in-bounds. What if you redesign the backdrop to create a watery road for Octavia to follow? You’ll have to determine the width of the lane and code in what will happen if Octavia leaves the boundaries and swims off the road.
Challenge
Create a few more enemies and either combine them under the Animals sprite, tweaking the code, or give them their own separate scripts so they behave differently from the jellyfish and turtles. What if there is a fish that randomly appears, and if she grabs it, it shoots her forward an extra 20 feet? Or a seashell she can collect that protects her from the enemies for 30 seconds?
Challenge
Play with the zigzagging range to make the game even harder. What if the jellyfish can unexpectedly zoom across the screen and touch the mermaid, even if she’s on the other side? It makes for a dangerous passage.
Challenge
Make the mermaid tilt left and right as she moves to the left and right. Can you write a script that slightly rotates the mermaid as she moves, so the left arrow tilts the mermaid a few degrees and the right arrow tilts her in the opposite direction?
What did you learn?
Before you return to helping Octavia make her escape, take a moment to reflect which common computer science ideas from chapter 3 were used in this game:
- Using an on switch for every script in the game, including the new When This Sprite Clicked block
- Setting X and Y coordinates to make the jellyfish and turtles randomly zigzag left and right
- Making If/Then conditional statements to turn the game off when the player runs out of lives
- Writing loops to have the mermaid switch between two costumes to create the illusion of swimming
- Using variables to generate a random zigzag movement in the enemies
- Creating Booleans to have a retry button pop up when the game turns off
- Cloning to generate enemies in the games
This final game uses seven out of eight common programming ideas! Additionally, in Mermaid Splash you learned
- How to add a retry button to invite continued game play
- How to make an object unexpectedly zigzag on the screen
- How to make an endless racing game
- How to write code that makes it look as if one (or more) parts of the sprite are moving
- How to limit the number of scripts you need to write by combining enemies into one sprite
We hope you enjoyed this extra game, but it’s time to return to the book and catch up on how you can join the larger Scratch community.