
Chapter 13. Using arrays and simulating gravity in a single-screen platformer

Before Donkey Kong, games had goals, but the player didn’t know their motivation or how they had ended up in the situation. Donkey Kong changed that by giving the player a story with a beginning, middle, and end that unfolded as the player moved from level to level, usually in the form of cutscenes, videos that occur before or after a level to pause the gameplay and give information. That story starred a little plumber known as Mario.
Yes, our friend, Mario, that you know from Super Mario Bros, started out as a carpenter at a construction site, climbing ladders in Donkey Kong to save his girlfriend who was stolen by a giant gorilla. Nintendo brought back Mario for Mario Bros and then Super Mario Bros, turning him into a plumber who needs to jump up on brick platforms or slide down pipes in order to save Princess Toadstool from the evil Bowser. Mario can only run to the right. That’s because Super Mario Bros is a single-screen platformer.
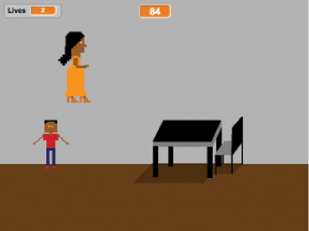
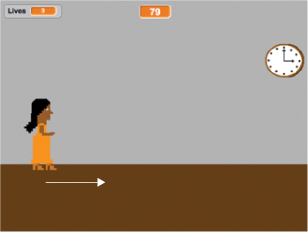
Single-screen platformers may look and perform similarly to multiscreen platformers like Pitfall, but there is a key difference. In Pitfall or Beach Blast, the player character (Pitfall Harry or Beachy Buffy) is moving from screen to screen, interacting with the other sprites on each screen. In Super Mario Bros or School Escape, seen in figure 13.1, the player character remains in the same X position, though they can jump up and down to change their Y position. The sprites in the game roll toward them whenever the player presses the right arrow. It looks as if Mario or the teacher is running, but the player character is staying in place while the objects move toward them.
Figure 13.1. In School Escape, Ms. Finebean needs to sail over the heads of students, jumping off of desks and grabbing clocks as she runs out of school.
To understand the mechanics of a single-screen platformer, it may help to imagine the character standing at the end of a conveyer belt. The belt only moves when the person marches in place. If the person stops moving, all the objects on the conveyer belt (as well as the belt itself) stop moving, and if the person marches in place, the items on the conveyer belt move toward them.
In School Escape, the teacher’s X position is on the left side of the Stage. As the player presses the right arrow to “move” the teacher, the desk sprites (platforms) and kindergarteners (obstacles) generate and slide toward the teacher. It looks as if the teacher is moving, but it’s the other sprites that are sliding across the screen, moving toward the left when the player presses the right arrow and stopping whenever the teacher pauses.
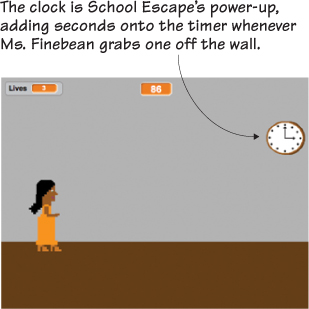
This game also introduces a common video game item: a power-up. Power-ups are items in games that the player can use to increase their chance of success or give them additional abilities. In School Escape, the power-up is a clock that players can jump up and grab in order to buy more time to reach the exit door because, yes, School Escape is also your first timed game.
To accomplish all this, School Escape uses lists, which are also known in coding as arrays. Lists allow the game to track multiple values for a single variable. It helps that Scratch calls them lists instead of arrays because you can think of them as you would any list: it’s a place to write down information you want to remember and use later. In this case, the lists contain the X-positions for where we want students and desks to appear.
In this chapter, you will learn
- How to design a single-screen scrolling platformer
- How to add power-ups into a game
- How to set a timer to affect gameplay
- How to store values in a list
- How to jump up and land on objects using simulated gravity
With fewer scripts, you’re going to make a much more complicated platformer. Take everything you learned in Beach Blast and apply it forward to create your own Super Mario-like School Escape.
Preparing to program
It’s time for your pre-coding ritual. Get your sprites and the Stage ready for School Escape.
Missing sprites
If you skipped chapter 12, either go back and complete it or go to the Manning site and download the background and sprites for School Escape. The directions for importing are the same as in chapter 5. You should have Ms. Finebean, four students, the clock, the desk, the door, and the hallway background.
Combining the kindergarteners
You need to combine all your students into a single kindergartener. Navigate to the Sprite Zone and click Student2. Open the Costumes tab in the Block Menu and drag the sprite from the Costumes tab into the Student sprite in the Sprite Zone. Make sure that Student2 transferred into the Student sprite by clicking the Student sprite and looking at the Costumes tab. You should see two costumes, as in figure 13.2.
Figure 13.2. The steps to take to combine multiple “costumes” into a single sprite. There is a single student sprite, but it can look four different ways.
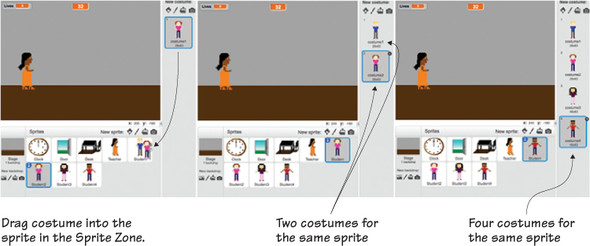
Repeat this step two more times for Student3 and Student4 until all four versions of the student are seen in the Costumes sidebar when you click the Student sprite. Once all the sprites are combined into a single sprite, you can delete the original copies of the Student2, Student3, and Student4 sprites.
Fix It: I Accidentally Deleted a Sprite!
What happens if you delete a sprite by accident? Don’t worry, you can get it back. Navigate to the Edit menu in the Grey Toolbar and choose the Undelete option. You’ll see the sprite you deleted return to the Sprite Zone.
Preparing the Stage
You’ll need to resize a few sprites to have your code match our code. Use the Grow tool in the Grey Toolbar to enlarge the door (29 clicks), teacher (14 clicks), and student (4 clicks). The clock and desk are already the correct size.
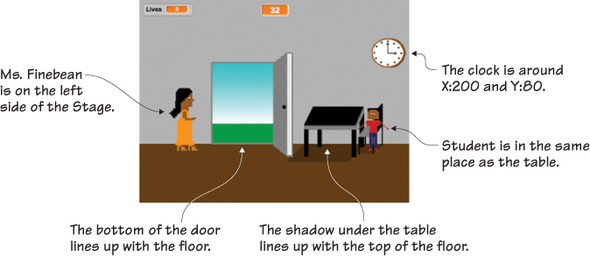
Drag Ms. Finebean to the left side of the Stage, a centimeter from the edge. Place the clock sprite near the top third of the Stage on the far right side, around the X:200 and Y:80 position. (Check the bottom of the Stage as you move the clock to see the position. The clock doesn’t need to be perfectly on those numbers; they’re just a guide.)
Place the desk on the right side of the Stage, lining up the shadow with the top of the floor, and place the student sprite in the same place as the desk. Make sure neither sprite touches the wall. Finally, position the door in the middle of the Stage, also lining up the bottom of the door with the wall. All sprites should be in the same places as the ones in figure 13.3.
Figure 13.3. Position the sprites on the Stage.
Download the list
Even if you made your own sprites, you will need to download two lists from the Manning site, https://www.manning.com/books/helloscratch. These lists tell Scratch all the times you want the desk or kindergarteners to appear in the game. The lists are long, and instead of asking you to type in these values, we’ve made lists that you can import into your game.
Go to the Manning site and download the two .txt files (deskpositions.txt and kindergarteners.txt). You now need to create two blank lists in Scratch in order to import these .txt files into your game.
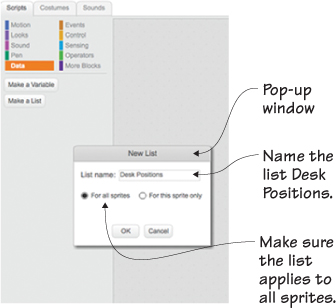
Go to Data and click Make a List. Name this list Desk Positions, as seen in figure 13.4, and create it For All Sprites.
Figure 13.4. Make an empty, new list and name it Desk Positions.
Make a second list and call it Kindergarteners. Keep both lists checked for the time being so you can see them on the Stage. Right-click (or control-click if you’re on a Mac) the Desk Positions list on the Stage. A pop-up window will give you a few options, including Import, as seen in figure 13.5. Choose Import and navigate to where you’ve saved the deskpositions.txt file on your computer.
Figure 13.5. Right-click the empty list and import the .txt file.

You should see 14 values appear in the previously empty Desk Positions list. Do the same thing for the Kindergarteners list, importing the kindergartener.txt file into the empty list. You should see 30 values appear in the previously empty Kindergarteners list, as in figure 13.6. Leave the lists on the screen for the time being, through you can uncheck the lists before you play so they’re not visible on the Stage.
Figure 13.6. The values on the list will fill once you import the .txt files.

Programming Ms. Finebean
The teacher, Ms. Finebean, is the equivalent of Mario in Super Mario Bros. She’s the player character that the player controls, making her jump over students and onto desks, grabbing clocks along the way. She has five scripts: a movement script, jumping script, falling velocity script, falling script, and desk detection script. All scripts in this section are applied to Ms. Finebean, so go put the blue box around the Teacher sprite in the Sprite Zone and don’t move the blue box until you program the kindergarteners in the next section. Remember, the names or values on your blocks may differ slightly from time to time, so use the completed script images to make sure you chose the correct block.
Making a movement script
Ms. Finebean needs to escape from school, but she can’t move forward, as shown in figure 13.7.
Figure 13.7. Even though Ms. Finebean won’t be moving, it will look as if she is running toward the right when you press the right arrow key.
This script will make it look as if Ms. Finebean is running toward the right whenever the right arrow is pressed. In reality, Ms. Finebean will be remaining in the same place, and this script sends the desks and kindergarteners toward her to give the illusion of movement:
- Start with a When Flag Clicked (Events) block.
- Click Data and make two variables. The first is called scrollX, and the second is called Lives. scrollX will track Ms. Finebean’s X-position, and Lives will set the number of chances Ms. Finebean has to reach the door without running into a kindergartener. Uncheck the scrollX variable, but leave the Lives variable checked, and drag the box to the top left side of the Stage.
- Drag two Set Lives to 0 (Data) blocks and set them underneath the When Flag Clicked block. Change the top option to scrollX using the drop-down menu, but keep the number at 0 because zero is the variable’s starting point. Leave the bottom option as Lives but change the number to 3 to give Ms. Finebean 3 chances.
- Snap a Forever (Control) block underneath to start a loop.
- Place an If/Then (Control) block inside the Forever block.
- Slide a Key Space Pressed (Sensing) block into the empty hexagonal space on the If/Then block to set the condition.
- Change the option in the Key Space Pressed block to Right Arrow using the drop-down menu so the game emulates Ms. Finebean moving right when the arrow is pressed.
- Slide a Change Lives by 1 (Data) block and place it inside the If/Then block. Use the drop-down menu to change the option to scrollX, but keep the number at 1, because you want the value of scrollX to go up by one every time the right arrow is pressed.
- Add a Wait 1 Secs (Control) block under the Change scrollX by 1 block. Change the number to a small number such as .001. You want to ensure that the game doesn’t glitch and increase the value of scrollX by more than 1 each time, which would make the sprites in the game move too quickly.
Check your script against the one in figure 13.8.
Figure 13.8. The completed movement script makes it look as if Ms. Finebean is moving.

Ms. Finebean’s X-position isn’t going to change, but you’ll make it look like it’s changing using the scrollX variable. This variable is tracking her virtual position, imagining her X-position increasing by 1 every time the right arrow is pressed. Get it? Ms. Finebean is always on the left side of the screen, but this value pretends her X-position is 1, 2, 3, and so on until she hits the thousands. When she reaches a certain X-position, different things will happen, such as a desk spawning or the door appearing. In this way, Ms. Finebean can technically run infinitely to the right, even though there are only 480 X-coordinate points (–240 to 240) if she is moving across the Stage. And different things happen, such as a student moving toward her, when she reaches a certain virtual point, because the value of scrollX has increased from the right arrow being pressed.
Answer This: Why Does ScrollX Need to Change by 1?
could you play with the number and make scrollX change by 2 or 3 each time to make Ms. Finebean run faster?
technically, yes, but you need to hit every value on the list, and that can only happen if scrollX increases one digit at a time. For instance, what if you set the desk to spawn when scrollX is 303, which means that Ms. Finebean is at her virtual X:303? If the value of scrollX jumps two “coordinates” at a time, she’ll move from 302 to 304 without ever hitting that 303 value. Keep the number at 1 in order to use every value on the list.
Making the jumping script
Ms. Finebean needs to be able to go over the kindergarteners instead of mowing them down while she runs down the hall. She also needs to be able to jump up and grab the clocks, as in figure 13.9, to gain more time.
Figure 13.9. Ms. Finebean jumps up in order to grab the clocks, land on desks, and leap over students.

This script will enable Ms. Finebean to leave the ground and jump into the air:
- Start with a When Space Key Pressed (Events) block. Use the drop-down menu to change the option to Up Arrow.
- Snap an If/Then (Control) block underneath to set a condition.
- Place a Hexagon or Hexagon (Operators) block inside the empty hexagonal space. Fill each of those hexagons with two Touching Color (Sensing) blocks.
- Change the left Touching Color block to the brown you used for the floor. Change the right Touching Color block to the black you used for the top of the desk. The condition is if the teacher is touching the floor or the desk.
- Slide a Change Y by 10 (Motion) block inside the If/Then block. Change the number to 100 so she will go up 100 coordinates each time the up arrow is pressed.
- Make a new variable in Data. Call it yVelocity and uncheck the variable so it isn’t visible on the Stage.
- Snap a Set yVelocity to 0 (Data) block underneath the Change Y by 100 block inside the If/Then block. Change the zero (0) to a 7.
If the up arrow is pressed and Ms. Finebean is either on the floor or on a desk (meaning, she’s not already up in the air), she will go up 100 coordinates, and at the same time the velocity variable will kick in so she starts falling a tiny bit as she’s rising. This will give her a smooth arc. Look at the completed script in figure 13.10.
Figure 13.10. The completed jumping script enables Ms. Finebean to go up.

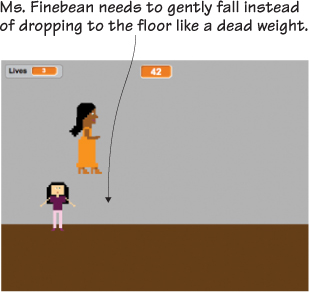
Making a falling velocity script
Once Ms. Finebean is in the air, she needs to fall realistically, floating back down to the ground smoothly, as she is doing in figure 13.11. This script will mimic a falling person’s velocity, having her speed up the closer she gets to the ground so she floats back down instead of dropping like a dead weight.
Figure 13.11. Ms. Finebean needs to fall realistically.
To make the falling velocity script
- Start with a When Flag Clicked (Events) block.
- Snap a Forever (Control) block under the When Flag Clicked block to start a loop.
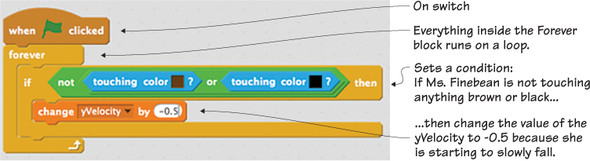
- Place an If/Then (Control) block inside the Forever block to set a condition.
- Slide a Not (Operators) block into the empty hexagonal space on the If/Then block. Place a Hexagon or Hexagon (Operators) block into the empty hexagonal space on the Not block.
- Fill the two empty hexagons with two Touching Color (Sensing) blocks. Change the left block color to the brown you used for the floor. Change the right block color to the black you used for the desk.
- Place a Change yVelocity by 0 (Data) block inside the If/Then block. Change the number to –0.5 in order to have the rate of falling slowly increase over time.
You’ve set a condition in the script in figure 13.12: if the teacher is not touching the floor or the desk—meaning, she’s in the air—then change the value of the yVelocity variable to –0.5. This means that Ms. Finebean’s speed will increase by a half a coordinate as she falls.
Figure 13.12. The completed falling velocity script creates realistic movement.
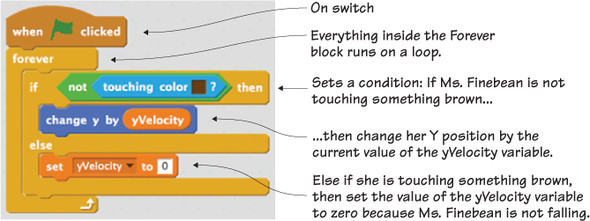
Making a falling script
Ms. Finebean can go up, and you’ve set how she’ll fall when she starts moving downward. Now it’s time to make a script that will allow Ms. Finebean to fall, as in figure 13.13.
Figure 13.13. Ms. Finebean needs to start falling back down if her feet are not touching the brown floor.
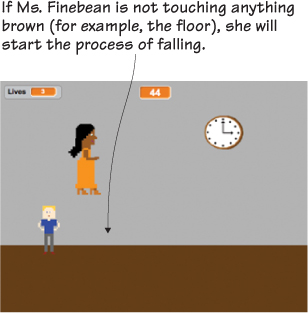
This script will allow Ms. Finebean to start falling when she reaches the peak height:
- Start with a When Flag Clicked (Events) block.
- Snap a Forever (Control) block under the When Flag Clicked block to start a loop.
- Place an If/Then/Else (Control) block inside the Forever block to set a condition.
- Slide a Not (Operators) block into the empty hexagonal space on the If/Then block, and then place a Touching Color (Sensing) block inside the Not block. Change the color to the brown you used for the floor. The condition is if Ms. Finebean is not touching the floor.
- Place a Change Y by 10 (Motion) block inside the If/Then portion of the If/Then/Else block. Add a yVelocity variable (Data) into the number bubble on the Change Y by 10 block. This means the Y-position of Ms. Finebean will change based on the current value of the yVelocity variable.
- Put a Set yVelocity to 0 (Data) block inside the Else portion of the If/Then/Else block. The other possibility is that if Ms. Finebean is not not touching the floor (meaning, she is touching), then the value of the yVelocity variable will be set to zero (0), because Ms. Finebean is on the ground and not falling.
Look at the script in figure 13.14. Does your work match the image?
Figure 13.14. The completed falling script allows Ms. Finebean to fall if her feet have left the ground.
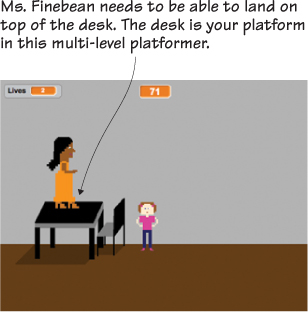
Making a desk detection script
Currently, if Ms. Finebean tries to jump on a desk, she’ll go straight through it. You want the teacher to be able to land on the desk and run across it in order to use the height to leap over nearby kindergarteners, as in figure 13.15.
Figure 13.15. You want Ms. Finebean to land on—and not go through—the desks.
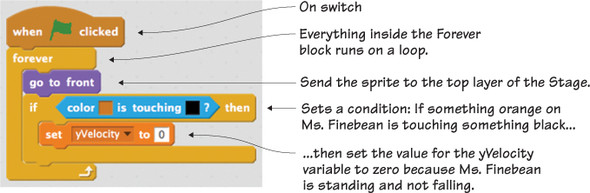
This script will recognize when Ms. Finebean has landed on the desk:
- Start with a When Flag Clicked (Events) block.
- Snap a Forever (Control) block under the When Flag Clicked block to start a loop.
- Slide a Go to Front (Looks) block inside the Forever block to send the teacher to the top layer on the Stage.
- Place an If/Then (Control) block under the Go to Front block (also inside the Forever block) to set a condition.
- Put a Color is Touching (Sensing) block inside the empty hexagonal space of the If/Then block. Notice that this is a little different from the usual Touching Color block. Change the color in the first square to the color of Ms. Finebean’s shoes (in my case, orange), and change the color in the second square to the top of the desk (in my case, black).
- Grab a Set yVelocity to 0 block and put it inside the If/Then block.
The condition is if the teacher’s shoe is touching the top of the desk, set the yVelocity variable to zero (0). This is an important script because you created a script earlier that said that if Ms. Finebean wasn’t touching the ground, then she should be falling. This script changes that by creating a condition—standing on the desk—where Ms. Finebean isn’t touching the ground, but you don’t want her falling. Look at figure 13.16 to check your script.
Figure 13.16. The desk detection script knows when Ms. Finebean has landed on top of the desk.
Ms. Finebean is ready to go. It’s now time to code the students.
Programming the kindergarteners
The kindergarteners are the obstacle in School Escape, similar to the Goombas and Koopa Troopas in Super Mario Bros. Unlike those obstacles, you’ll want to jump over the students rather than land on the students and squash them. The students have five scripts: a list adding script, cloning script, movement script, game stopping script, and pause movement script. Make sure the blue box is around the student in the Sprite Zone, and keep it on the student for all five scripts. It doesn’t matter which costume is showing in the Sprite Zone thumbnail.
Learn It: Lists
As mentioned earlier, a list is Scratch’s name for an array, which is a collection of data. Think about lists as actual shopping lists. When you go to the store, you write down all the items you want to remember to purchase, one item on each line. For example, you may name your list Grocery Items and then start listing out what you need: (1) Apples, (2) Bread, (3) Milk. When you go to the store, you look down the list and put each item in your basket. A Scratch list works the same way. You give it a name (for instance, Kindergarteners) and then write out the information you want to remember and track in an ordered list. In the case of the Kindergarteners list, you’re tracking a list of numbers: 10, 60, 110, and so on. Those numbers are virtual points in the game—times when you want a kindergartener to appear on the Stage. Scratch will know that it’s time to throw a student in Ms. Finebean’s path because it will keep checking to see whether the value of the scrollX variable (which goes up by one every time the right arrow is pressed) matches one of the items on the list. When they match, it will spawn a clone of the student sprite. You’ll see a student when the scrollX variable equals 10, 60, 110, and so on.
Making a list adding script
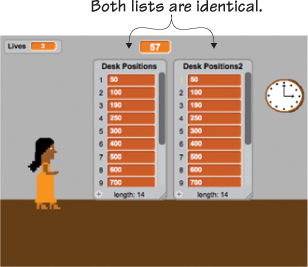
You currently have your imported list that states when each kindergartener should spawn. Yet when you go to play the game, the values will begin deleting off the list after they’re used. To solve this problem, you need to generate a second, identical list, as seen in figure 13.17, at the beginning of every game so the values will be deleted from the list copy instead of the original list.
Figure 13.17. The original list will remain untouched, and values will be deleted from the copy.

This script enables you to play round after round of the game because the original list will always be intact, even though other scripts will delete values from the duplicate list:
- Start with a When Flag Clicked (Events) block.
- Go to Data and create a new variable called #ofKindergarteners. You will use this variable to refer to an item on the list. When the value of #ofKindergarteners is 1, it will be looking at the first value on the list. Uncheck the variable.
- Click Make a List and make a new list called Kindergarteners2. This will be your list copy of the original Kindergarteners list. You can uncheck this new list.
- Snap a Set #ofKindergarteners to 0 (Data) block under the When Flag Clicked block. Change the value to 1 so this variable will line up with the first item on the Kindergarteners2 list.
- Slide a Delete 1 of Kindergartener2 (Data) block under the Set #ofKindergarteners to 1 block and use the drop-down menu to change 1 to All. This will remove the values from the Kindergarteners2 list while keeping the identical, original Kindergarteners list intact.
- Grab a Repeat 10 (Control) block and add it to the chain of blocks. Change the number to 30 because you have 30 items on your list.
- Place an Add Thing to Kindergarteners2 (Data) block inside the Repeat 30 block. Next slide an Item 1 of Kindergarteners2 block
inside the space that says Thing on the Add Thing to Kindergarteners2 block, as seen in figure 13.18.
Figure 13.18. Add the block inside the drop-down menu space on the Add Thing to Kindergarteners2 block.
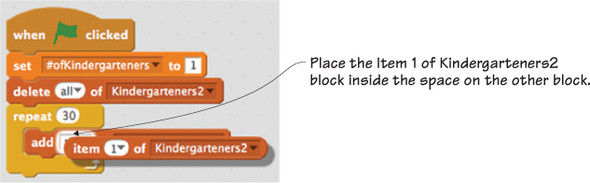
- Slip a #ofKindergarteners (Data) variable into the number bubble on the Item 1 of Kindergarteners2 block. Now you need to tackle the drop-down menus. Change the line so it reads Add Item #ofKindergarteners of Kindergarteners to Kindergarteners2.
- Drag a Change #ofKindergarteners by 1 (Data) block underneath that long block, inside the Repeat 30 block.
There will be 30 loops, one for each item on the original list, and in each loop the script will add an item from the Kindergarteners list to the Kindergarteners2 list. It knows to move to the second, third, and fourth item (and so on) due to that #ofKindergarteners variable. When that variable equals 2, it copies the second item on the list. When that variable equals 3, it copies the third item on the list, and so on. The script in figure 13.19 stops running once all the items are duplicated from the original list onto the list copy.
Figure 13.19. The completed list adding script creates a copy of the original list.
Making a cloning script
You have a duplicate of your list, but it’s currently hanging out as a group of numbers. It’s time to put those numbers into action and have a kindergartener generate, as in figure 13.20, every time a number on the list matches up with the value of the scrollX variable, which marks the virtual location of Ms. Finebean.
Figure 13.20. The game looks at the values on the list and clones a student every time one of those values matches the value of the scrollX variable.
To make the cloning script
- Start with a When Flag Clicked (Events) block.
- Snap a Hide (Looks) block underneath the starter block.
- Place a Forever (Control) block next to form a loop.
- Slide an If/Then (Control) block inside the Forever block to set a condition.
- Put a Square = Square (Operators) block inside the empty hexagonal space on the If/Then block. In the left square, place a scrollX (Data) variable block. In the right square, place an Item 1 of Kindergarteners2 (Data) block. So the condition is if the value of scrollX equals the value of the item on the Kindergarteners2 list.
- Put a Go to X/Y (Motion) block inside the If/Then block. You don’t need to change the values (even if they differ a bit from
the ones in figure 13.21), because you want them to be the current position of the student on the Stage.
Figure 13.21. The Pick Random block goes inside the Switch Costume block in order to have it randomly choose one of the four options each time.

- Drag a Switch Costume to Costume4 (Looks) block and place it underneath the Motion block.
- Slide a Pick Random 1 to 10 (Operators) block inside the drop-down menu currently stating Costume4, as in figure 13.21. Change those numbers to 1 to 4 to stand for the four versions of the student sprite. This means Scratch will randomly use one of the four options each time it spawns a kindergartener on the Stage.
- Add a Create Clone of Myself (Control) block next (still inside the If/Then block), to generate the student.
- Place a Delete 1 of Kindergartener2 (Data) block to complete that chain, which removes each individual value from the Kindergartener2 list after it’s been used.
Four things will happen if the value of the scrollX variable matches an item on the Kindergartener2 list, as seen in the completed script in figure 13.22: (1) a student will appear on the Stage, (2) the student will be standing where you positioned her when setting up the Stage, (3) the student will take the form of one of four possible options, and (4) that item will be deleted off the Kindergartener2 list.
Figure 13.22. The completed cloning script puts a random kindergartener in Ms. Finebean’s path.

Making a movement script
There are students on the Stage, but they need to move toward Ms. Finebean (even though it will look as if it’s Ms. Finebean moving forward to reach the students). See figure 13.23.
Figure 13.23. The students move toward Ms. Finebean when the right arrow is pressed.

This script will make the students move, but it will also tell Scratch what should happen when the students reach the edge of the Stage or if a student touches the teacher:
- Start with a When I Start as a Clone (Control) block.
- Snap a Show (Looks) block underneath, to make the sprite visible on the Stage.
- Add a Forever (Control) block to form a loop.
- Stack three If/Then (Control) blocks inside the Forever block to set three conditions.
- Add a Key Space Pressed (Sensing) block to the empty space on the first If/Then block. Change the option to Right Arrow using the drop-down menu. Add a Touching Mouse-Pointer (Sensing) block to the empty space on the second If/Then block. Change the option to Edge using the drop-down menu. Add a Touching Mouse-Pointer (Sensing) block to the empty space on the third If/Then block. Change the option to Teacher using the drop-down menu. You now have three possible conditions.
- Put a Change X by 10 (Motion) block inside the first If/Then block. Change the number to –5 because you want the student to move 5 coordinates to the left.
- Place a Delete This Clone (Control) block inside the second If/Then block to remove the sprite when it reaches the far left side of the Stage.
- Place a Change #ofKindergarteners by 1 (Data) block inside the third If/Then block. Use the drop-down menu to change the option to Lives, and type –1 in the bubble, because you want to remove a chance each time the teacher lands on a student.
- Add a Delete This Clone (Control) block underneath the Changes Lives by –1 block inside the third If/Then block.
The completed movement script in figure 13.24 states what will happen if the right arrow is pressed (the student will move to the left), the student reaches the end of the Stage (they’ll disappear), or if the student touches the teacher (the player will lose one of their three chances, and the sprite will disappear).
Figure 13.24. The completed movement script makes it look as if Ms. Finebean is moving toward the student when it’s the student moving toward Ms. Finebean!

Making a game stopping script
School Escape would be an easy game if you had unlimited chances to reach the door. Giving Ms. Finebean three chances, as seen in figure 13.25, makes it harder to get to that ultimate goal.
Figure 13.25. Ms. Finebean gets three chances to reach the door and escape.
This script ends the game when Ms. Finebean runs out of lives because she has landed on three kindergarteners:
- Start with a When Flag Clicked (Events) block.
- Add a Forever (Control) block underneath to start a loop.
- Slide an If/Then (Control) block inside the Forever block to set a condition.
- Put a Square = Square (Operators) block into the empty hexagonal space on the If/Then block. Place a Lives (Data) variable in the left square and type zero (0) in the right square.
- Slide a Stop All (Control) block inside the If/Then block.
In figure 13.26, if the value of the Lives variable equals zero (0), all scripts stop.
Figure 13.26. The completed game stopping script ends the game when you run out of chances.

Making a pause movement script
When Ms. Finebean runs up against a desk, she stops moving as if she has hit a solid object. But the kindergarteners keep coming, as in figure 13.27. This ruins the illusion that it’s Ms. Finebean running across the Stage instead of moving in place while everything comes to her.
Figure 13.27. This script troubleshoots a potential problem of having kindergarteners continue to move even when Ms. Finebean is up against the desk.
This script tells the kindergarteners to stop moving if Ms. Finebean is touching the side of the desk:
- Start with a When I Receive Message1 (Events) block. Name this message Move Back using the New Message options from the drop-down menu. This script only runs if it receives the Move Back message that you’ll broadcast when you write your desk scripts.
- Add a Change X by 10 (Motion) block underneath. Change the number to 5. Because the kindergartener is normally moving 5 coordinates to the left (–5), you’ll counter that with 5 coordinates to the right (5) to keep it in the same spot.
- Snap a Change #ofKindergarteners by 1 (Data) block. Use the drop-down menu to choose scrollX and change the number to –1. Since scrollX increases by 1 each time, you’re countering it by changing it by –1 to keep the scrollX value in the same place.
Figure 13.28 shows the completed touching desk script.
Figure 13.28. The completed pause movement script keeps the kindergarteners from moving.

Programming the desks
Super Mario Bros has brick walls that Mario can walk on to get over the Goombas below. School Escape has desks. Ms. Finebean can jump up on the desks and use them to launch herself over the kindergarteners. The desks have three scripts: a list adding script, cloning script, and movement script—all similar to the kindergarteners. Keep the blue box around the desk for all three scripts in this section.
Making a list adding script
Like the Kindergarteners list, you want the original list of desk positions to remain untouched so you can play this game over and over again. This script will generate a second copy of the Desk Positions list by importing the items into the second list, as seen in figure 13.29.
Figure 13.29. Scratch will delete values from the list copy rather than the original list.
This script enables you to play round after round of the game because the original list will always be intact and other scripts will delete values from the duplicate list:
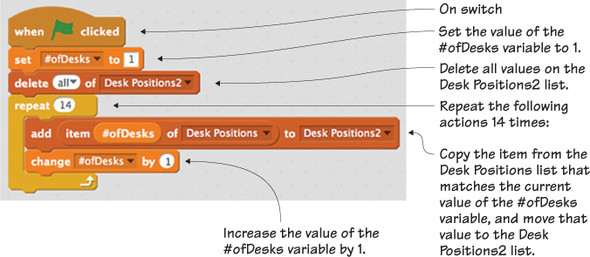
- Start with a When Flag Clicked (Events) block.
- Go to Data and create a new variable called #ofDesks. You will use this variable to refer to an item on the list. When the value of #ofDesks is 1, it will be looking at the first value on the list. Uncheck the variable.
- Click Make a List and make a new list called Desk Positions2. This will be your list copy of the original Desk Positions list. You can uncheck this new list.
- Snap a Set #ofDesks to 0 (Data) block under the When Flag Clicked block. Change the value to 1 so this variable will line up with the first item on the Desk Positions2 list.
- Slide a Delete 1 of Desk Positions2 (Data) block under the Set #ofDesks to 1 block and use the drop-down menu to change the 1 to All. This will remove the values from the Desk Positions2 list while keeping the identical, original Desk Positions list intact.
- Grab a Repeat 10 (Control) block and add it to the chain of blocks. Change the number to 14 because you have 14 items on your list.
- Place an Add Thing to Desk Positions2 (Data) block inside the Repeat 14 block. Next, slide an Item 1 of Desk Positions2 block inside the space that says Thing on the Add Thing to Desk Positions2 block.
- Slip a #ofDesks (Data) variable into the number bubble on the Item 1 of Desk Positions2 block. Now you need to tackle the drop-down menus. Change the line so it reads: Add Item #ofDesks of Desk Positions to Desk Positions2.
- Drag a Change #ofDesks by 1 (Data) block underneath that long block, inside the Repeat 14 block.
This time there will be 14 loops, one for each item on the original list. The script in figure 13.30 operates in the exact same way as the list adding script for the kindergarteners.
Figure 13.30. The completed list adding script keeps the original list intact while creating a second version that will be used during the game.
Making a cloning script
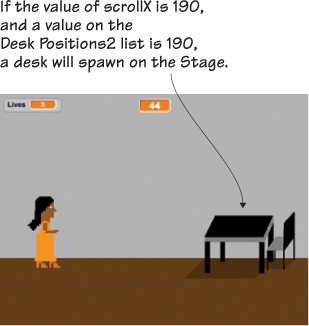
The desk continues to operate like the kindergarteners, spawning—as seen in figure 13.31—whenever the value of scrollX matches one of the items on the Desk Positions2 list.
Figure 13.31. Exactly like the Kindergarteners list, the game compares the value of scrollX with the items on the list and spawns a sprite when the two numbers match.
To make the cloning script
- Start with a When Flag Clicked (Events) block.
- Snap a Hide (Looks) block underneath the starter block.
- Place a Forever (Control) block next to form a loop.
- Slide an If/Then (Control) block inside the Forever block to set a condition.
- Put a Square = Square (Operators) block inside the empty hexagonal space on the If/Then block. In the left square, place a scrollX (Data) variable block. In the right square, place an Item 1 of Desk Positions2 (Data) block. The condition is if the value of scrollX equals the value of the item on the Desk Positions2 list.
- Add a Create Clone of Myself (Control) block next (inside the If/Then block) to generate the desk.
- Place a Delete 1 of Desk Positions2 (Data) block to complete that chain, which removes each individual value from the Kindergartener2 list after it has been used.
The script in figure 13.32 is a little shorter than the kindergartener cloning script because there’s only one desk, whereas there are four possible students who can show up on the Stage.
Figure 13.32. The completed cloning script puts a desk in Ms. Finebean’s path.

Answer This: Why Do You Need to Delete Items From the List?
it makes sense to create a clone of the list in order to make the game playable again and again, but why do you also need to delete the values from the duplicate list?
if you don’t delete the values, every time a person plays the game, it will generate a new list, growing it from 14 items to 28 items to 42 items until later players are dealing with hundreds of desks at a time! By deleting values, you’re not only playing the current game but you’re setting up another game to be able to begin after the current game is done.
Making a movement script
Like the kindergarteners, the desks will also move toward Ms. Finebean, starting near the right side of the Stage and moving toward the left. Desks, like the one in figure 13.33, will also create the illusion that it’s Ms. Finebean running to the desks rather than the other way around.
Figure 13.33. The desk moves toward Ms. Finebean when the right arrow is pressed.

This script will make the desk move, plus it will tell Scratch what should happen if the desk is not touching the teacher but is touching the side of the Stage, or if the teacher is up against the side of the desk:
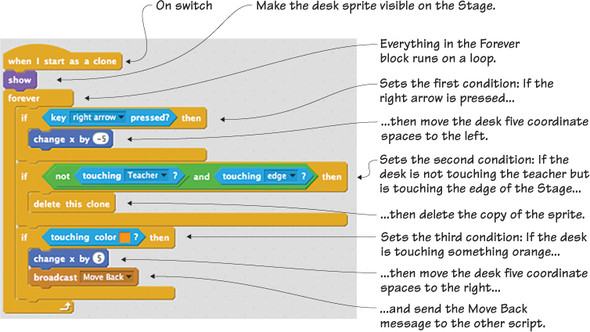
- Start with a When I Start as a Clone (Control) block.
- Snap a Show (Looks) block underneath to make the sprite visible on the Stage.
- Add a Forever (Control) block to form a loop.
- Stack three If/Then (Control) blocks inside the Forever block to set three conditions.
- Add a Key Space Pressed (Sensing) block to the empty space on the first If/Then block. Change the option to Right Arrow using the drop-down menu.
- Put a Change X by 10 (Motion) block inside the first If/Then block. Change the number to –5 because you want the desk to move 5 coordinates to the left.
- Add a Hexagon and Hexagon (Operators) block to the empty space on the second If/Then block. Place a Not (Operators) block in the left hexagon. Put a Touching Mouse-Pointer (Sensing) block into both of the currently empty hexagons. Change the first option to Teacher using the drop-down menu. Change the second option to Edge using the drop-down menu.
- Place a Delete This Clone (Control) block inside the second If/Then block to remove the sprite when it reaches the far left side of the Stage as long as the teacher isn’t currently standing on top of the desk.
- Add a Touching Color (Sensing) block to the empty space on the third If/Then block. Change the color to the shade you used for the teacher’s dress. You now have three possible conditions.
- Place a Change X by 10 (Motion) block inside the third If/Then block. Change the number to 5. Remember, the desk is currently moving five coordinates to the left, so this will move it five coordinates to the right and keep it in the same place.
- Add a Broadcast Move Back (Events) block underneath the motion block while still inside the third If/Then block.
The completed movement script in figure 13.34 states what will happen if the right arrow is pressed (the desk moves to the left), if the desk reaches the edge of the Stage as long as the teacher isn’t currently on top of the desk (the desk disappears), or if the teacher is standing against the desk (stop moving and send a message to the other script).
Figure 13.34. The completed movement script makes it look as if Ms. Finebean is moving toward the desk when it’s the desk moving toward Ms. Finebean!
Programming the clocks
The clocks are the power-ups in your game—the collectable sprites that make the player character better able to tackle the obstacles in the game. In this case, the clocks add 10 additional seconds onto the timer, buying the player more time to reach the door. The clocks have four scripts: a cloning script, timer script, movement script, and pause movement script. Place the blue box around the clock sprite in the Sprite Zone and keep it there for all four scripts.
Learn It: Power-Ups
The first power-up came in the game Pac-Man. The little yellow guy travels around the board eating up the dots and trying to avoid the ghosts. But in all four corners of the board are white circles that make Pac-Man invincible for a few seconds when he gobbles one of the power-up pellets. He can travel through ghosts and eat them instead of the other way around. Power-ups are items in a game that give the player a super ability, add time on a clock, or restore health. These items are usually collectable, like the mushrooms that cause Mario to grow or the flowers that give him firepower. Some can be used indefinitely through multiple levels of the game, and others expire after a set amount of time. Think about ways to work power-ups into your games to make the games more exciting. In fact, a fun exercise would be to go back through the older games in this book and see if there are power-ups you could add, like a shell in Beach Blast that gives Buffy the ability to run through crabs without being pinched.
Making a cloning script
Like the kindergarteners and desks, the clocks in figure 13.35 need to pop up at the correct time so Ms. Finebean can grab them as she runs down the hall.
Figure 13.35. The clocks add seconds on to the timer.
Unlike obstacles or platforms, you want the appearance of power-ups to be special. You’ll make it a rare occurrence by programming that fact into the script. This script contains a cool new block: the mod block.
The mod block divides the two numbers you give it and prints out the remainder. In the script below, you will give it the current value of scrollX (which is always changing) and divide it by 100. Scratch will do that math problem on the fly and determine the remainder. You’re going to use that remainder to set a condition: when the remainder equals zero, something will happen. If the math problem yields any remainder other than zero, nothing will happen:
- Start with a When Flag Clicked (Events) block.
- Slide a Hide (Looks) block underneath so the sprite is invisible on the Stage.
- Snap a Forever (Control) block next to start a loop.
- Add a Go to X/Y (Motion) block inside the Forever block. Even if your values are different slightly from the ones in figure 13.36, you don’t need to change the values because they should be automatically set for where you originally dragged the clock
on the Stage.
Figure 13.36. The completed cloning script places a clock on the screen at a random moment.

- Place an If/Then (Control) block under the Go to X/Y block (still inside the Forever block), and then place another If/Then (Control) block inside the first If/Then block.
- Slide a Square = Square (Operators) block into the empty hexagonal space on the outer If/Then block. Put a Circle Mod Circle (Operators) block into the left square. Type 0 (zero) in the right square. But wait! You need to fill the mod block. Place a scrollX variable (Data) in the left circle and type 100 in the right circle. The condition is if the value of scrollX is divided by 100 and yields no remainder.
- Place a Square = Square (Operators) block in the empty hexagonal space of the inner If/Then block. Add a Pick Random 1 to 10 (Operators) block in the left square and type 1 in the right square. If the first condition is true, this second condition kicks in: a random number between 1 and 10 is chosen, and if that number matches 1, something happens.
- Slide a Create Clone of Myself (Control) block inside the inner If/Then block. Add a Wait 1 Secs (Control) block underneath it (still inside the same If/Then block). Change the number to 2 to give a slightly longer delay.
If the first and second conditions are both true, the clock will spawn on the wall. This means that it will be a rare, random occurrence because the two conditions in figure 13.36 need to line up for this event to happen.
Making a timer script
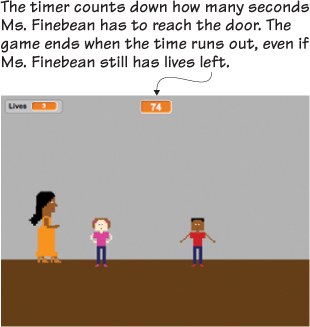
Currently Ms. Finebean can run forever, which means that if she can get her jumps right, she will always reach the door. You can make the game harder by giving her a limited amount of time by placing a timer on the screen, like the one in figure 13.37, that counts down how many seconds she has to reach the door or have the game end.
Figure 13.37. The counter at the top of the screen allows the player to know how much time they have left.
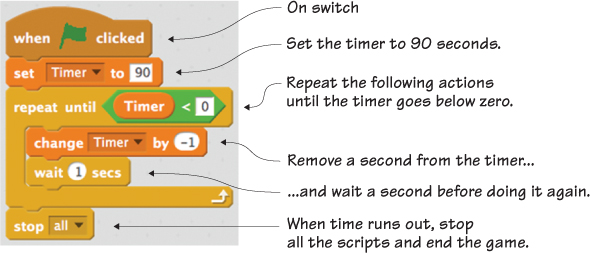
To make the timer script
- Start with a When Flag Clicked (Events) block.
- Go to Data and make a new variable. Name it Timer. Drag the box to the top center of the Stage and right-click (or Control-click) it, choosing the large readout. Drag a Set Timer to 0 (Data) block and snap it under the When Flag Clicked block. Change the number to 90 to give the player 90 seconds.
- Add a Repeat Until (Control) block. Place a Square < Square (Operators) block in the empty hexagonal space. Put a Timer variable (Data) in the left square. Type a zero (0) in the right square. The actions you place inside this block will repeat until the value of the Timer variable is less than 0.
- Put a Change Timer by 1 (Data) block inside the Repeat Until block. Change the number to –1 to deduct a number each time.
- Slide a Wait 1 Secs (Control) block under the Change Timer by –1 block (still inside the Repeat Until block). For the first time, the Wait 1 Secs block isn’t providing a delay to troubleshoot a possible glitch. You want the timer amount to go down one number every second. This time-based block is serving as an actual timer in this script.
- Place a Stop All (Control) block at the bottom of the script, underneath the Repeat Until block. This means that all scripts will stop and the game will end when the value of the Timer variable is less than zero (0).
Check your script against the one in figure 13.38.
Figure 13.38. The completed timer script places a time obstacle into the game.
Creating a movement script
Like the kindergarteners and desks, the clock needs to move toward the teacher (as it is doing in figure 13.39), though it will look as though the teacher is running toward the clock.
Figure 13.39. The movement script makes the clock move toward Ms. Finebean.
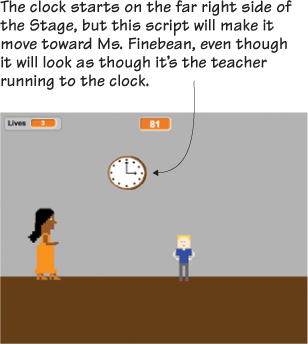
This script is similar to the one you used for the kindergarteners, and it will move the clock as well as tell Scratch what should happen when the clock reaches the edge of the Stage or if the teacher touches the clock:
- Start with a When I Start as a Clone (Control) block.
- Snap a Show (Looks) block underneath to make the sprite visible on the Stage.
- Add a Forever (Control) block to form a loop.
- Stack three If/Then (Control) blocks inside the Forever block to set three conditions.
- Add a Key Space Pressed (Sensing) block to the empty space on the first If/Then block. Change the option to Right Arrow using the drop-down menu. Add a Touching Mouse-Pointer (Sensing) block to the empty space on the second If/Then block. Change the option to Edge using the drop-down menu. Add a Touching Mouse-Pointer (Sensing) block to the empty space on the third If/Then block. Change the option to Teacher using the drop-down menu. You again have three possible conditions.
- Put a Change X by 10 (Motion) block inside the first If/Then block. Change the number to –5 because you want the clock to move 5 coordinates to the left.
- Place a Delete This Clone (Control) block inside the second If/Then block to remove the sprite when it reaches the far left side of the Stage.
- Place a Change Timer by 1 (Data) block inside the third If/Then block. Change the number to 10 because you want to add 10 seconds each time the teacher grabs the clock.
- Add a Delete This Clone (Control) block underneath the Change Timer by 10 block inside the third If/Then block.
The completed movement script in figure 13.40 states what will happen if the right arrow is pressed (the clock will move to the left), the clock reaches the end of the Stage (it will disappear), or if the teacher touches the clock (the timer will add 10 seconds, and the sprite will disappear).
Figure 13.40. The completed movement script sets up three possible conditions for the clock.

Making a pause movement script
The clock will keep coming toward Ms. Finebean as long as the right arrow is pressed, but there’s one situation when you don’t want the clock to keep moving: when Ms. Finebean is leaning against a desk, as in figure 13.41.
Figure 13.41. The clock needs to stop moving when Ms. Finebean is against the desk.
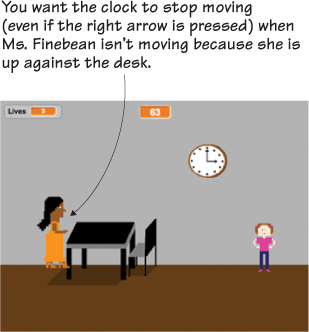
This script stops the clock from moving when this situation happens so you can keep up the illusion that it is Ms. Finebean who is running forward rather than reality—all the objects are coming toward Ms. Finebean:
- Start with a When I Receive Move Back (Events) block. This script only runs if it receives the Move Back message that you broadcasted from the desk script.
- Add a Change X by 10 (Motion) block underneath. Change the number to 5. Because the clock is normally moving 5 coordinates to the left (–5), you’ll counter that with 5 coordinates to the right (5) to keep it in the same spot.
Figure 13.42 shows the whole script.
Figure 13.42. The completed pause movement script stops the clock from moving.

Programming the door
The door is like the flagpole and castle at the end of each level of Super Mario Bros. It’s the exit into the next level, though in this case, it’s the end point for the game. There are two scripts that power the door: a cloning script and a game stopping script. Keep the blue box around the door sprite in the Sprite Zone for both scripts.
Making a cloning script
Like the kindergarteners, desks, and clocks, the door needs to appear at a certain time. The door in figure 13.43 signals the end of the game.
Figure 13.43. The door appears after Ms. Finebean has “run” the equivalent of 1,420 coordinates.

This script will tell Scratch to put the door on the screen at a certain time:
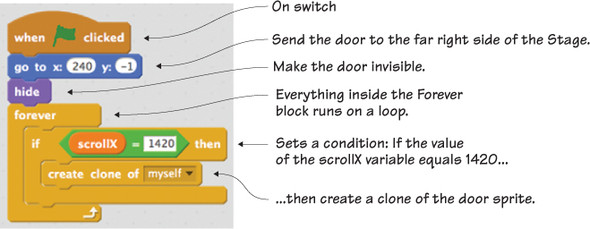
- Start with a When Flag Clicked (Events) block.
- Snap a Go to X/Y (Motion) block underneath the starter block. Don’t worry if your values are slightly different. The block will show where you placed your door when you were setting up the Stage.
- Add a Hide (Looks) block next to make the door invisible for the time being.
- Place a Forever (Control) block at the bottom of the chain to create a loop.
- Slide an If/Then (Control) block inside the Forever block to set a condition. Place a Square = Square (Operators) block inside the empty hexagonal space. Put the scrollX variable (Data) in the left square. Type 1420 in the right square. When the value of the scrollX variable equals 1420, something will happen.
- Put a Create Clone of Myself (Control) block inside the If/Then block. This means the door will spawn when the scrollX variable reaches a value of 1420.
Check your work against figure 13.44.
Figure 13.44. The completed cloning script tells the door when it should appear on the screen.
Creating a game stopping script
There are three ways for the game to end: run out of lives, run out of time, or reach the door, as in figure 13.45.
Figure 13.45. Ms. Finebean walks through the door and ends the game.
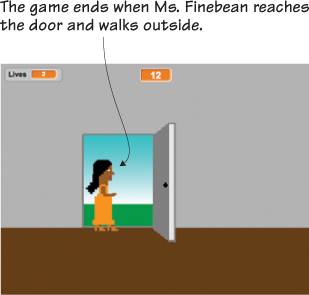
This script moves the door toward Ms. Finebean, but it also states what will happen when the teacher walks through the door.
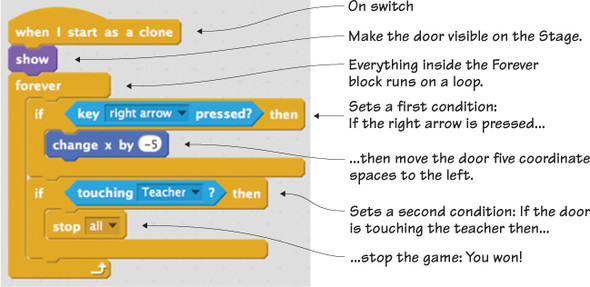
- Start with a When I Start as a Clone (Control) block.
- Snap a Show (Looks) block underneath to make the sprite visible on the Stage.
- Add a Forever (Control) block to form a loop.
- Stack two If/Then (Control) blocks inside the Forever block to set two conditions.
- Add a Key Space Pressed (Sensing) block to the empty space on the first If/Then block. Change the option to Right Arrow using the drop-down menu. Add a Touching Mouse-Pointer (Sensing) block to the empty space on the second If/Then block. Change the option to Teacher using the drop-down menu.
- Put a Change X by 10 (Motion) block inside the first If/Then block. Change the number to –5 because you want the door to move 5 coordinates to the left.
- Place a Stop All (Control) block inside the second If/Then block to end the game.
That’s it! The last script in figure 13.46 officially ends the game.
Figure 13.46. The game stopping script ends the game when the teacher reaches the door.
Troubleshooting the game
Try playing your version of School Escape. Ours worked perfectly on the first try, but you may run into some bugs with your game. Whenever you run into bugs, first check that your sprites are centered. Open each sprite in the Art Editor and center it using the tool in the top right corner of the canvas.
Next, make sure the teacher is on the top layer. She should be on the top layer because you coded it into the game, but it can’t hurt to click the teacher on the Stage and move her a tiny bit to ensure she is the top sprite.
Learning in action
There are many variables in this game, including a few that create the illusion of movement by counting upward as the right arrow is pressed and using that value to stand in place of an X-coordinate. But there are also lists, which are similar to variables in the sense that they are tracking information, though in the case of lists, there are multiple items. Lists (also known as arrays) are an important part of programming—not only in Scratch but in every form of coding, from storing your friends list on a social media site to tracking a character’s inventory in a game.
Play with the code
Single-screen platformers are already pretty complicated, but you can still kick it up a notch by trying out some of these challenges.
Challenge
The lists contain 30 (Kindergarteners) or 14 (Desk Positions) items. You can add more items to the list so that students or desks spawn more frequently. You can also lengthen the game by adding to the end of the list, though make sure you also tweak the value that spawns the door or the player will exit the game before they reach the later items.
Challenge
Play with the timer and the clocks, not only rewarding or removing different time amounts, but also creating other reasons to deduct time. If Ms. Finebean stands on a desk, should it remove a few seconds? If she jumps over a kindergartener, should it add a second back on the timer?
Challenge
Add new obstacles. What if she has to jump over lunch boxes or book bags? Use the code in the game to tweak it for additional sprites.
Challenge
What if the door leads to the next level just as the flagpole in Super Mario takes the player to another screen? How could you design multiple single-screen platformers to hook together into one game?
What did you learn?
Before you return to helping Ms. Finebean get to her brother’s wedding, take a moment to reflect on which common computer science ideas from chapter 3 were used in this game:
- Using an on switch for every script in the game, including using receiver hat blocks to kick into gear when they get a broadcasted message
- Setting X- and Y-coordinates to make it look as if Ms. Finebean is moving toward the sprites
- Writing If/Then conditional statements to make things happen if Ms. Finebean is against the desk
- Creating loops to have a timer tick down
- Using variables to help you bring items from the original list to the duplicate list
- Creating Booleans with the mod block to have an action occur only if two conditions are true
- Cloning to create all the obstacles, platforms, and power-ups in the game
- Broadcasting messages to stop sprite movement whenever Ms. Finebean is against the desk
Another game that uses eight out of eight common programming ideas! Additionally, in School Escape you learned
- How to use lists to make the kindergarteners and desks spawn at the right moment
- How to use the mod block to add even more randomness into your game
- How to add a timer into a game
- How to simulate movement without having a sprite move
After you enjoy a few more rounds of jumping over kindergarteners, allow Ms. Finebean to get to her wedding and turn the page.
Congratulations! You are officially a game maker with five games under your belt. But wait! What if you want a little more practice before you finish off this book? Once again, we created a set of extra practice chapters that push these eight core coding concepts a little farther. In the racing game Mermaid Splash, you’ll make the sprite’s arms look as if they’re swimming as she moves through the water, dodging jellyfish and turtles.
If you’re reading the print version, this extra practice can be downloaded at the Manning site, or you can register your book and download a free e-book version that contains the extra practice. If you’re reading the e-book version, this extra practice is at the back of the book.
But you may be ready to move on. You have internalized eight core concepts of computer science and can probably recite them in your sleep. The final chapter will help you take a leap into the Scratch community, design new games, and maybe even turn your eye to other coding languages.