
Malware Triage
We find malicious software, or malware, during many incidents that we investigate. Most people call any program that an attacker uses to their advantage, including publicly available tools, “malware.” However, calling all programs an attacker uses “malware” is not really a good idea because the term is too generic. We always seek to further categorize the malware, based on its high-level functionality. We use terms such as “backdoor,” “password hash dumper,” “privilege escalator,” and “port redirector.” Understanding and labeling what the malware does, from a high level, provides us with a better picture of what the attacker is attempting to accomplish. Without that understanding, the term “malware” has little meaning.
So as you might guess, the first question in our mind when we find malware is, “What does the malware do?” Without an answer to this question, you will have a hard time categorizing the malware or gaining insight into what the attacker is trying to accomplish. This chapter covers basic malware triage techniques that should help you get an answer to that question. We cover malware handling, setting up a triage environment, static analysis, and dynamic analysis. This chapter does not cover malware analysis in depth because many other great resources, such as the book Practical Malware Analysis (No Starch Press, 2012), are available. Instead, we focus on what is most likely to help you, the incident responder, quickly get answers during an incident.
Keep in mind that your team should define what it intends to gain from the analysis of each file that is reviewed. Intelligence generated should be actionable; otherwise, the process simply wastes time. The results can help generate indicators of compromise that can be used to sweep a larger population of systems. In other situations, the IR team can learn about the attackers’ methods, techniques, or motivations. If you don’t have actionable intelligence after analysis is complete, you should reassess how the analysis is being performed or whether it is necessary.
We feel compelled to warn you early in this chapter about the danger of performing triage on malware. Handling and performing any type of analysis on malware or unknown files is risky! You may accidentally or unknowingly infect your computer or others, possibly leading to extensive damage. Although the tips we present in this chapter should help protect you from accidental infection, there is no guarantee. Whenever we discuss performing analysis or looking at malware in this book, it’s given that the actions are always taking place in a safe environment, such as an isolated virtual machine. Proceed at your own risk! |
MALWARE HANDLING
Now that you’ve been warned about the danger of handling malware and unknown files, let’s cover a few tips you’ll want to consider to help prevent mishaps and enhance the triage process. You should consider these tips, along with your organization’s guidance and your own common sense, to establish a malware-handling protocol. The protocol should address all aspects of dealing with malware, from before you do anything with suspected malware files, to final storage or disposition after the case is closed. This includes safety, documentation, distribution, and access to malicious sites.
Safety
We normally take two main categories of steps to help decrease the likelihood that we will infect our systems with malware:
1. Use a virtual environment for triage. Never open or triage suspected malware on your primary operating system. Rather, you should configure and use an isolated virtual or physical environment.
a. Create a virtual machine with the operating system of your choice, load all the analysis software and tools you need, and create a known clean snapshot. A snapshot preserves the state of the virtual machine as a sort of checkpoint. You can revert to the checkpoint at any time.
b. Keep your virtualization software updated.
c. Ideally, you should disable “convenience” features such as drag and drop and clipboard sharing. Only use those features when the virtual machine is in a known clean state.
d. Ensure that the virtual environment is isolated. You may configure isolated virtual networks to simulate connectivity or services, but the virtual machine should have no access to networks you want to keep clean. Do not allow the virtual machine access to the Internet, unless you have reverted to a known clean snapshot. To update software in the VM, most virtualization software allows you to drag and drop files from the host into the guest environment.
e. Once analysis is complete, immediately revert the virtual machine back to the known clean starting state.
2. Make configuration and process changes. There are a number of configuration and process changes we make to greatly decrease the likelihood we will infect a system with malware:
a. Use a modern version of your primary operating system.
b. Ensure your system is fully patched and updated, including third-party software.
c. Disable preview views, such as the Preview pane in Windows Explorer. It’s possible that even just a preview of a file could cause an infection.
d. Disable autorun or automount features.
e. Prominently label media used to transport suspected malware. USB flash drives are convenient to use, but are difficult to prominently label due to their size. A more ideal solution would be to use a CD that is labeled with a large, bold font that is red in color and clearly indicates the media contains suspected malicious software. Also include a file listing with MD5 so the contents can be verified.
f. Handle suspected malware while logged on as a non-privileged user.
g. Add an underscore to the end of suspected malware file extensions. For example change the extension “.exe” into “.exe_” to help prevent accidental execution or opening. In Apple OS X, you will also need to change the file type property to prevent accidental opening by the native app.
h. Store all suspected malware and malware archives in a directory that denies execution and only allows access to a non-privileged user.
i. Always store suspected malware in a password-protected and encrypted archive, such as ZIP or RAR. Use a common password such as “infected”; not to protect the contents, but to prevent accidental execution or deletion. Protecting against accidental deletion may not sound important, but security software, such as antivirus, may delete malware without prompting to ask.
j. Do not access suspected malware unless you are operating in a virtual machine or other isolated analysis environment. The only exceptions are to initially save the file to your hard drive, compute an MD5, create the storage archive, and transfer the archive to your analysis environment. We even recommend avoiding the computation of a checksum or viewing strings unless you are in the triage environment. You should develop the natural habit of only working with malware in the triage environment.
Documentation
Handing someone a malware sample and saying “figure this out” is not the ideal way to approach malware analysis. Investigators should pass on details that will help the malware triage process, and the malware analysts should question the investigators when the details are lacking. When handling malware, you should always be sure to document or pass along details related to the context. Here are some useful questions to think about when documenting the context:
• How was the file identified? For example, did a security product, such as antivirus, alert on the file? Or did an investigator locate the file through some analysis? If so, what led them to it?
• What was the operating system version, including patch level and address width (sometimes called “bittedness”), 32 bit or 64 bit?
• What was the original file name and the directory the malware was found in? Also include the MD5 or other appropriate checksum (SHA256, for example).
• Based on the checksum, is the file “known”—meaning, is it part of a database of cataloged files?
• Are other files present that may be related due to proximity in location or time?
• Do forensic artifacts or other investigative findings suggest what the malware might be (for example, relevant network findings such as ports or protocols)?
• If the malware is believed to be persistent, is there evidence of what the persistence mechanism is?
• When looking at a timeline, did you see any items, such as files or registry keys, that were created/modified/accessed around the time of installation or the time(s) of suspected use?
• What other types of malware have been found on the investigation?
• Has the investigation uncovered evidence of attribution to any particular threat?
• Is there evidence that the attacker is actively using the malicious software? Is there evidence that the incident is ongoing?
Some of these questions may seem unrelated or too simplistic to be useful, but they provide contextual facts that cannot be determined through analysis of the malware. In some cases, these facts may greatly reduce the triage time. We’ve learned the hard way that failing to document context proves to be a costly mistake.
Distribution
We find that many organizations routinely provide malware not only to their antivirus vendors, but also to other trusted parties or even to public websites. When you are in the middle of a crisis and you are looking for answers, it’s hard to resist the help these avenues may provide. In many cases, you have no choice. But we suggest that you pause to consider the possible negative consequences of providing malware to anyone outside of your organization.
You might be thinking to yourself, what sort of negative consequences could there possibly be? Consider that many attacks are a cat-and-mouse game. Once the attacker knows your hand, they are more likely to change what they are doing. In this case, you have potentially let them know you discovered their malware. Additional considerations may include the following:
• In targeted attacks, malware may contain information that clearly identifies your organization. The information may even consist of usernames and passwords to authenticate to internal proxy servers to gain Internet access, for example. Do you want this information in the hands of whomever you provide a copy of the malware? Or to whomever they provide it? Most, if not all, malware triage sites are run by, or have information-sharing contracts with, AV vendors. Are you comfortable with the chance that the public may be able to conclude that your organization has suffered a breach, based on information in the malware?
• If an antivirus or other security vendor creates a signature or countermeasure that is automatically deployed, will that disrupt your investigation or remediation plans? We find that most security vendor countermeasures that are focused on individual pieces of malware are incomplete and often cannot contain the entire problem—this type of partial fix will commonly alert the attacker that someone is on to them and, in the long run, causes additional work for you.
• Does your organization have disaster recovery plans in place and have proven effective through testing? If the attacker learns they’ve been discovered, it is possible they will decide to take some destructive action. Your organization should consider what the impact of that would be and whether you are prepared to recover from it.
We are not recommending to keep malware to yourself—we are simply pointing out that you must weigh the risk and considerations. When you provide malware to outside parties, be sure that it is done on your terms, after appropriate consideration and preparation.
Accessing Malicious Sites
Imagine this situation: you are examining a system that was infected with malware. You are reviewing the timeline, and see that the user browsed to a website you don’t recognize just prior to the creation of the malware. What do you do next? Maybe you check out the website from your work computer? Or perhaps try to “hack them back”? Believe it or not, that is exactly what we have seen a number of organizations do. It happens enough that we would be remiss to leave this point out: in general, you should not access malicious sites. There are several reasons, some of which can affect your organization, and some of which may affect other organizations:
• You may infect your computer, leading to many bad things.
• You may tip off the attackers.
• You may identify yourself as a target.
• The “malicious site” may just be another victim.
• You may disrupt the operations of good guys.
• You may be breaking the law. We’ve seen some organizations feel they were justified in using credentials they observed the attacker use to gain access to other systems on the Internet. In most cases, that is probably not a good idea.
Some organizations decide that these risks do not apply to them, or that they have mitigated the risk. Some mitigation steps we hear about are using a proxy network such as Tor, accessing the site from home (this just transfers the risk), and some other reason. In only very rare cases, one of those steps may be appropriate. In general, these are serious concerns you should weigh before accessing a potentially malicious site. Once you take action, it cannot be undone. And if you do take action, be sure to have an established process for authorizing the action and recording the date and time you performed the action.
A quick way to lose your security clearance and open up yourself, and possibly your corporation, to criminal prosecution and/or civil liability is to try and “hack back” (which includes attempting to identify and/or delete “your” information from other, possibly compromised, servers). Report your concerns to law enforcement and/or coordinate through legal counsel with associated domain owners to resolve the situation. Attempting to take matters into your own hands can have incredibly adverse consequences. |
One bright line that should be kept in mind here is if credentials are involved. If your team monitored an outbound connection that used credentials (an FTP account, for example) and decided to retrieve the files that were transferred, they would be committing a felony under the Computer Fraud and Abuse Act (18 USC sec 1030) in the United States. This applies regardless of purpose, even if you are going after your own data that was stolen. Most IT security people who promote the idea of ‘taking the attack to the attackers’ have little experience in IR or legal matters and should have minimal influence on your response.
TRIAGE ENVIRONMENT
As we mentioned in the section on malware safety, you should only perform malware triage in a designated and appropriately configured triage environment. We consider two main environments appropriate for triage: physical systems on an isolated (air-gapped) physical network, and virtual systems on an isolated (via software configuration) virtual network. Let’s briefly talk about the pros and cons of each, and then move into setting up our preferred environment.
Let’s look at a physical environment first. By “physical environment,” we mean one where your analysis is performed in an operating system that is running directly on the hardware (no virtualization). Along with the systems, you’ll need some networking gear, such as an Ethernet switch and cabling, as well as keyboards, monitors, and mice. You will also need a place to set up the equipment. Access to the equipment should be restricted, so wandering network administrators don’t attempt to “fix” anything. Then you will need a way to schedule use of the resources. Finally, you will need a way to restore systems to a known state after each analysis session. In a few organizations, setting up an environment like this is a piece of cake—the hardware, software, and space is readily available. However, we think that most organizations are looking for a more economical approach. The remainder of this chapter will only discuss virtual triage environments.
In a virtual environment, you perform your analysis within a virtual machine. A virtual machine is requires virtualization software and a physical system to host the environment, typically an employee’s computer. This configuration does not require additional physical hardware or space, although you may want to upgrade your memory or hard drive capacity if they are low. An advantage to this configuration is that it is very flexible—you can easily add, remove, or reconfigure virtual systems and networks. It also eliminates resource contention because each individual performing malware triage can configure their own personal environment. It’s easy to return a virtual environment to a known good state with snapshots, which facilitates experimentation and eliminates cross-contamination between cases. A potential drawback that was mentioned earlier is that in rare conditions, malware can behave differently when in a virtual environment versus a physical environment. In those situations, you may experience difficulty performing triage or misinterpret functionality based on the fact that you are in a virtual environment. Most of those instances can be dealt with on a case-by-case basis. The bottom line is that we think using a virtual environment is likely the most convenient and economical way to perform malware triage and analysis. Keep in mind, however, that physical hardware may be required in some situations—sometimes malware executes differently on physical hardware versus virtual systems. So even though your organization may not perform malware triage in a physical environment, it might be worth exploring what it would take to temporarily set one up for the cases when you might need one.
We sometimes hear comments to the effect of “you should not use a virtual environment to analyze malware because the malware might function differently in a virtual machine.” Although this may be true for some malware, it is not really that common. Think about the extensive use of virtualization in the IT world today. Some organizations not only have their server environment virtualized, but their desktop environment as well. If malware didn’t work correctly in virtual environments, the creators would be severely limiting their effectiveness. For the purposes of malware triage, we do not concern ourselves with the issue of malware running differently in a virtual machine. If you suspect malware might be “virtual aware,” a seasoned malware analyst can help. Dealing with virtual-aware malware is normally quite easy for them. |
Setting Up a Virtual Environment
The first step in setting up a virtual environment is to select the virtualization technology you will use. A number of products, both free and paid, are available. Vendors such as VMware, Microsoft, Parallels, Citrix, and Oracle all have several virtualization offerings. Some solutions require dedicated hosts, which is not ideal. We prefer to use VMware Workstation, because it provides a good balance between useful features and cost. Particularly, the ability to create and restore “snapshots,” as well as configure multiple isolated virtual networks, is very convenient. Oracle’s VirtualBox is a good free option. It doesn’t have as many nice features as VMware, but it’s constantly improving. Because technology changes over time, here are some general considerations to keep in mind when selecting and configuring a virtual environment:
• Support for both modern and old versions of operating systems.
• Support for different architectures (for example, x86 and ARM).
• Support for a snapshot concept, so changes can easily be reverted.
• Protection mechanisms, so infected VMs cannot cause damage outside of the virtual environment, such as isolated networking.
• Convenience features, such as easy methods to transfer files between host and guest. Keep in mind that you should only use such features while the machine is in a clean state.
We commonly use Microsoft Windows XP as our triage environment for Windows-based malware. After installing operating system patches and triage applications, you should create a snapshot of the virtual machine. A snapshot saves the state of the virtual machine, which you can use to revert to a known clean state. You should revert to a clean state at the beginning of each triage session.
Once you’ve set up your environment, we can get down to business—triaging the suspected malware. Static and dynamic analysis are the two types of malware triage analysis methods we will cover. In the following sections, we cover the basics of using each of these two methods. Be sure to familiarize yourself with both methods, because sometimes one yields much better results than the other.
STATIC ANALYSIS
One of two general categories of malware analysis is called static analysis. During this type of analysis, we examine a file using methods that do not execute the code. This type of analysis normally provides a quick assessment of the basic capabilities of an executable. However, because code can be quite complex, using this method in a triage situation usually falls short of revealing the full detail of what a program does.
What Is That File?
Now that you have a safe environment to examine files, it’s time to get your hands dirty. During an investigation, we frequently identify a number of files that we’re interested in taking a closer look at. Sometimes we may have solid contextual evidence that suggests a file is malicious. Other times, a file is of interest for a reason that’s less factual and more intuition. There are also many sources of malware, including forensic analysis, live response, antivirus systems, network monitoring solutions, and so on. One of the first challenges you may encounter is determining the general nature of a file and getting it into a state that provides you useful information. Let’s talk a little bit about what we mean by this.
Malware comes in many shapes and sizes. It’s important to realize that a file’s name or extension does not determine its purpose. For example, executable files do not necessarily have an “exe” extension, and files with an “exe” extension are not necessarily executable. Also, malware is not always a directly executable file. What we mean by “directly executable” is that the operating system can load instructions directly from the file and the CPU can natively run them. For example, scripts for interpreted languages such as Python and Visual Basic are not directly executable—other programs are used to convert these scripts into something the CPU can execute. Shared libraries are another example, but they are slightly different in this context from interpreted language scripts. Shared libraries typically contain code that the CPU can execute, but they must be loaded by another program first. And some malware is “packed”—essentially, compressed or encrypted. In still other scenarios, some of the systems that capture and preserve malware (antivirus or security products) will encode the malware into a proprietary format to prevent execution. These and other factors can add up to significant roadblocks in trying to determine what a file is and what it does.
Looking Up Information
One effective way to save a lot of time when trying to accomplish something is to cheat. OK, so we’re not advocating that you really cheat—just that you appropriately use the results of someone else’s good work. There are a number of known file databases that have cataloged millions of files that other organizations have examined. Why not use them before investing your own time performing analysis?
When you’re researching a file, the most common way to be sure you are referring to the exact file you have is to use a cryptographic hash. Although a file name may be useful to search for, the hash uniquely identifies the contents of the file. A common hash algorithm used to identify files is the Message-Digest Algorithm 5 (MD5) hash. Newer families of algorithms, such as Secure Hash Algorithm 1 (SHA1) and SHA2, are also available, although not all services use SHA hashes yet. The main difference between these hash algorithms is that the SHA hashes are more robust and have a much smaller chance of a hash collision—a situation where the same hash value is produced for two different files. Don’t get too worried about it, though—the chance this issue would affect an investigation is extremely low.
You will need a hash tool to generate an MD5 hash of a file. Unix-based operating systems normally have one or more hash tools built in. Common executable names are md5, md5sum, sha1sum, and so on. Windows does not provide native hash tools, so you will have to download one. If you have the Cygwin environment installed, the common hash tools are included. Finally, you can use a third-party tool such as md5deep, DigestIT2004, or WinMD5.
GO GET IT ON THE WEB
md5deep md5deep.sourceforge.net
DigestIT2004 www.colonywest.us/digestit
WinMD5 www.winmd5.com
Once you have hashes computed, it’s time to look up information. The most well-known resources are Bit9’s FileAdvisor, VirusTotal, ThreatExpert, and the National Software Reference Library (NSRL) from the U.S. National Institute of Standards and Technology (NIST). A good first step whenever examining an unknown file might be to search one of these databases:
GO GET IT ON THE WEB
FileAdvisor fileadvisor.bit9.com
VirusTotal www.virustotal.com
ThreatExpert www.threatexpert.com
NSRL www.nsrl.nist.gov
Bit9’s FileAdvisor search is free to use, but restricts the number of queries you can perform in a day. If you have a high query requirement, you will need to contact Bit9 for solutions. VirusTotal and ThreatExpert provide searching capabilities for more than just hashes—you can query on file names and other attributes related to malware or files you find. They also provide more comprehensive results, sometimes including detailed analysis of the malware. The NSRL database is free to download; however, no query capability is provided by NIST. SANS provides a public NSRL lookup service, although it only allows you to submit a single hash at a time. An alternative is to download the database files and perform searches against them using a tool such as GREP. If you expect to perform a large number of searches, that method is not practical. Instead, you should consider loading the NSRL files into a database, creating indexes on the hash columns, and performing basic SQL queries. Another NSRL search solution, named nsrlquery, is publicly available and provides a client-server search model. If you are not interested in setting up a server, there is a publicly available one at the time we wrote this book, run by a company named Kyrus. You can read more about the nsrlquery tool on their website.
GO GET IT ON THE WEB
SANS hash lookup isc.sans.edu/tools/hashsearch.html
Nsrlquery tool nsrlquery.sourceforge.net
Kyrus public nsrlquery server information www.kyrus-tech.com/nsrlookup-service-beta
It’s also worth searching for hashes through popular search engines, such as Google. Be careful about interpreting the results, however. Many times, individuals without a computer security background or the necessary experience will post information that can lead you to a false conclusion. Some file names or other strings you may find in malware occur frequently, but are not inherently related to malware. Also keep in mind that some attackers customize malware for each victim, so even though the malware might be well known, the exact hash may not be.
Performing manual lookups of hashes does not scale well. However, in most investigations, you should not need to look up many hashes at any one point in time. If you have hundreds of files to examine, there are probably other methods you should use to reduce what you need to look at.
File Headers
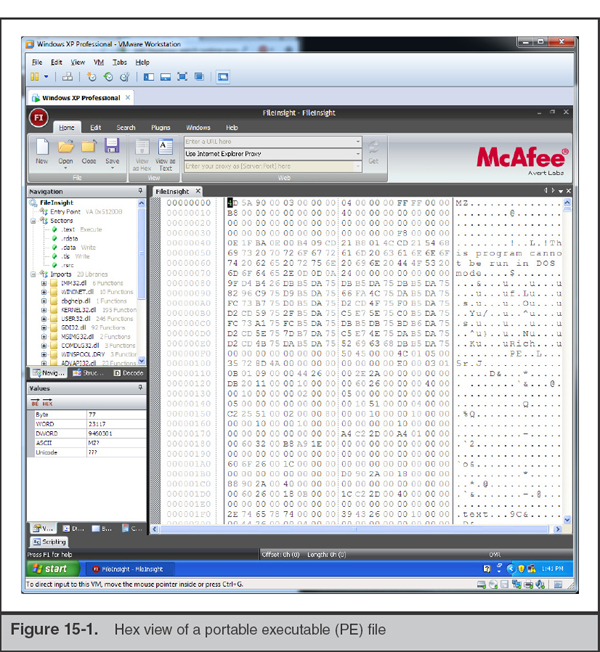
A file “header” is a small number of bytes at the very beginning of the file that can help identify what the file is. A file header is sometimes referred to as a “magic number.” The number of bytes that are part of the file header varies by file type, but it’s common that you can identify what a file is based on the first 16 bytes of data. For example, if you come across a file that starts with the two bytes 0x4D5A (“MZ”), you know the file is probably an executable that may run on a Microsoft operating system. Some tools are available that can help you identify what a file is, and we cover two of them in this section: a good hex editor, such as FileInsight from McAfee, and the “file” command.
Normally the first step we take when triaging an unknown file is to open it up in a good hex editor and inspect the file header. FileInsight from McAfee is our free editor of choice, and 010 Editor is our paid editor of choice, although many other good options exist.
GO GET IT ON THE WEB
010 Editor www.sweetscape.com/010editor
As you gain experience examining files, you will begin to quickly notice patterns. For example, if the file you open begins with “MZ,” has “PE” somewhere around hex offset 80 to 100, and has the strings “.text”, “.data”, “.rsrc”, or similar around hex offset 1F0, those are all characteristics of a portable executable (PE) file. Using a hex editor, you will quickly notice those strings by just scanning through the initial data displayed in the hex view (see Figure 15-1).
If you are interested in reading about all the gory details of the PE format, Microsoft has a specification document available on their Microsoft Developer Network (MSDN) website:
GO GET IT ON THE WEB
If you expected the file to be an executable, but you do not see those strings, the file may not be an executable. Or perhaps it has been mangled or encoded in some way. You will have to try another technique, such as using the “file” command, to attempt to find out what the file is.
The file command originated in the Unix world, and is not a native part of Windows. It relies on a “magic” file that provides a list of “magic numbers.” Magic numbers are sequences of bytes typically in the header but may include footers that identify specific file types. To use the file command in our Windows triage VM, we install a Unix-like environment called Cygwin. Cygwin provides a fairly comprehensive Unix-like environment, including a BASH shell with many common Unix commands such as cut, sed, awk, less, vi, and file.
GO GET IT ON THE WEB
When you install Cygwin, be sure to select the “file” package, because it is not installed by default. Once you have the command on your system, it’s quite easy to use—just specify the name of the file to examine. For example, if you want to take a look at all the files in the C:Windows directory, you would run the following command:
The full output of that command is long, but here are some snippets that illustrate the usefulness of the file command in identifying files based on their header:

And here is the output from a selection of files in the C:Windowssystem32 directory:

As you can see, the output of the file command is pretty useful. Sometimes, however, the tool cannot determine what the file is. In those cases, it will normally display a generic type, such as “data” or “ASCII text.” In some rare cases, the file command incorrectly identifies the type. The file command might say “ASCII text,” when the file is actually compressed data that is in an unrecognized format that happens to contain ASCII text at the beginning of the file. So although the file command is normally quite useful, it’s not always correct. You should validate its findings through manual inspection or another technique.
Sometimes a hex editor and the file command do not provide any useful information. When a file is unrecognized by common databases, you may have to do some research. If you see a unique string or sequence of hex bytes at the beginning of the file, there may be useful information on the Internet. Use a popular search engine to search for those strings or hex byte sequences, and you may get lucky and find a good resource. For example, maybe you have a file named ufile.bin, and the file command produces the following output:
That output is not very helpful, so we would move on to a hex editor to look at the file header. Taking a look at the file in FileInsight, we see the data shown in Figure 15-2 at the beginning of the file.

You should immediately notice the string “$SDI0001”. However, it probably doesn’t ring a bell … at least, it doesn’t with me. So we search for “$SDI0001” in our favorite search engine. The title of the first hit returned is “SDI file format specification – Boot from LAN – reboot.pro,” and links to a blog post at http://reboot.pro/4182/. The information suggests the file is actually a boot image. The site has some detailed information about a file whose magic signature is $SDI0001, and it seems to match the rest of the data in the ufile.bin file. The post even includes C-style struct definitions that outline what each part of the header contains. In this case, the file was not malicious at all—it was a copy of the firmware image for a wireless router. We were able to quickly track down what the file was, and with relatively minimal effort.
Strings
Examining the strings within a file is a simplistic but sometimes very effective method to learn more about a file. We normally do this with a tool that strips away any nonprintable characters and only shows blocks of text that are of a certain minimum length. In the Unix world, the tool is appropriately named “strings,” and is native in most flavors of Unix. Windows has no native equivalent; however, Cygwin provides the strings command, and you can also use third-party tools, such as the iDefense malcode analyst pack or the Microsoft SysInternals strings tool. An important consideration is choosing a tool that supports more than just the ASCII encoding scheme. Unicode is a common string representation format, and any decent strings tool must be able to show both ASCII and Unicode strings.
GO GET IT ON THE WEB
Malcode analyst pack github.com/dzzie/MAP
SysInternals strings technet.microsoft.com/en-us/sysinternals/bb897439.aspx
Let’s take a look at a file using strings to determine what it is. We downloaded the lab examples that are part of the book Practical Malware Analysis. In this case we are looking at Lab03-02.dll. If we run the Cygwin file command, we get the following output:
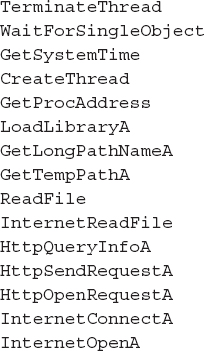
Based on the headers, it seems like this file is a standard 32-bit Windows DLL. If the file is not packed and the author did not take measures to obfuscate functionality, strings should be helpful. One of the first things you may notice if you run strings on a binary file is that there are many irrelevant strings. Here are a few strings that appear at the beginning of the file I am looking at:

The strings at the beginning of a Windows executable normally contain section names and other strings related to PE headers. These strings are usually not helpful, especially when they contain common section names such as “.text” and “.data”. Next, there will usually be a number of random strings until you come to an area containing strings that spell standard API function names. These strings normally indicate the API calls that were referenced in the executable’s source code, some of which may suggest functionality of the malware. For example, the strings for this file contained ReadFile, which suggests this executable may read from a local file. Also, the strings InternetConnectA and InternetReadFile suggest this executable may make a network connection to a system. If you are unfamiliar with a function name, the Microsoft Developer Network has extensive documentation.
MSDN msdn.microsoft.com
Next, you will likely see additional random strings, until you get to an area of legible text that may contain strings that are more unique to the code that the malware author wrote. These strings may help to clarify previous findings, such as the InternetConnectA string. Research on MSDN shows that InternetConnectA requires a parameter that specifies the server name to connect to. Therefore, in the strings of the file, you may find an IP address or domain name of a server. Although this is not always true (sometimes the parameter is obfuscated or dynamically generated), it is always good to keep an eye out. In this example, I found the following strings in the file:
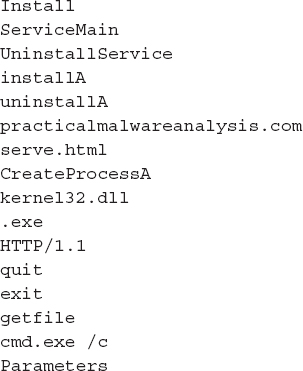

• The malware is hard-coded to connect to a specific host. As we mentioned earlier, we were expecting to see a server name that might be used as part of the InternetConnectA call. We see that the string “practicalmalwareanalyis.com” appears in the listing, as well as the name of an HTML page (serve.html). It’s possible this means the malware connects to practicalmalwareanalyis.com and requests serve.html.
• The malware installs itself as a Windows service. There are strings within the file that are commonly associated with Windows services, including Parameters, Type, DisplayName, as well as the standard Windows registry path for services.
• The malware may provide download and shell capabilities. The string “cmd /c” is typically associated with running command-line commands. The strings getfile and CreateProcessA suggest the malware may be able to download and execute an attacker-specified file.
Although many seasoned reverse engineers may laugh at making such conclusions through strings analysis, in reality this type of analysis is usually fairly helpful. An experienced investigator can make fairly accurate deductions based on a strings analysis. Just remember that strings never reveal the entire picture, and may sometimes be intentionally misleading.
Be aware that malware writers sometimes take steps to obfuscate strings within malware. Just because you don’t see a specific string present within the code does not mean it isn’t there. The malware author may also insert strings that are intended to mislead you. You should not place too much confidence in string interpretation. Strings can be very suggestive, but the logic and code paths are more important. |
Sometimes we run across scripts or other malware that contains multiple levels of encoding. The encoding usually serves two main purposes: to avoid detection and to obfuscate functionality. This is very common in webshells. Take, for example, the following PHP code:

The code might seem harmless at first glance. A novice investigator may never realize they need to decode that statement to find out what is really going on. If we base64 decode the string JF9HRVRbInNlY3JldENvbW1hbmQiXQ==, we get $_GET[“secretCommand”]. Replacing the base64_decode function in the PHP code with this text, we now have the following code:

This PHP code is likely a serious problem. The code will execute whatever PHP commands are sent via the HTTP POST parameter named secretCommand. That could be any PHP code—including the exec command, which would run commands in a normal shell on the server. Just imagine if that one eval line was slipped into a large PHP file—something on the order of, say, 1,000 lines of PHP code. It would likely go unnoticed by both the application maintainers and the investigators.
Portable Executable Files
Because most malware is an executable program of some type, we’d like to cover some additional information on examining a portable executable (PE). If you discover a PE, you should inspect it further using a tool that specializes in parsing the PE format and presenting additional information. There are many varieties of PEs, and some present a significant analysis challenge. You will want to discover those challenges sooner rather than later so you can manage the triage process. For example, it’s good to know if a PE is packed, uses encryption algorithms, or perhaps what compiler created the binary. A popular program we use for this purpose is PEiD.
GO GET IT ON THE WEB
If we look at the Lab03-02.dll_file from the previous section, PEiD tells us the file was compiled with Microsoft Visual C++ 6.0 DLL (see Figure 15-3). This information is basic, but provides a general picture of the file we are dealing with.

Running the additional Kanal crypto plugin detects the use of the BASE64 encoding algorithm, as shown in Figure 15-4.

In some cases, we need to examine more detail of the PE. A number of tools can parse the major PE data structures and provide a view of the information. Two common tools we use are PeView and CFF Explorer.
Both PeView and CFF Explorer provide an in-depth display of PE data structures. You can see and explore the major PE sections, view the PE compile time, see the standard PE characteristics, view import and export tables, and many other PE data structures. PeView provides a more basic interface, but does a better job of making certain data fields more human readable, such as compile time. CFF Explorer provides a more comprehensive view of a PE that works with 32- and 64-bit files, as well as .NET binaries. CFF Explorer also includes the ability to extract resources, view dependencies, and edit fields (see Figure 15-5).

GO GET IT ON THE WEB
PeView wjradburn.com/software
CFF Explorer www.ntcore.com/exsuite.php
Dependency Walker www.dependencywalker.com
Packed Files
If an executable file contains only a few intelligible strings, or a very low number of imports, the file may be packed. A packed file is an executable that has been run through an additional process, usually to compress or obfuscate the code. The process significantly changes the content of the file, but retains the same functionality. The altered file can contain any combination of compression, encryption, encoding, anti-disassembly, and other obfuscation techniques. These obfuscation techniques, including how the new format is decoded, can be quite complex. To accomplish the change, the packing process typically stores the original code in a new format and inserts wrapper code that performs decoding. Some common packers are UPX, Aspack, PeCompact, Petite, and Armadillo. Let’s take a look at how you might be able to deal with a packed file.
Some packers are open source, and therefore unpackers are readily available. A good first step is to try and determine the type of packer used. In some cases, PEiD will detect the packer type. If PEiD indicates the file is packed with UPX, you can simply download the UPX tool to unpack the file. It’s worth doing some quick research on the packer type that PEiD detects to see if there is a simple way to deal with it. For example, there are a few packers that some PE analysis tools can unpack, like PE Explorer’s capability to unpack UPX, Upack, and NSPack. Most other packers, however, will require additional work with a debugger.
During malware triage, you can use a debugger to attempt to unpack a file. A number of debuggers can dump a loaded file, sometimes providing wholly or partially unpacked data. This technique will not be able to deal with all packers, but can get at least partial results in many cases. Even though the intent is to not let the malware execute, only run the debugger within your safe environment.
You may have noticed that this section is on static analysis, but here we are executing the malware. Although this step is technically in the dynamic category, the sole purpose is to unpack the executable for further static analysis. We will not observe the execution to determine functionality at this point in time. |
Let’s walk through an example using Lab03-01.exe from Practical Malware Analysis. We’ll use a debugger named OllyDbg, a common debugger used to perform this technique. You will also need a plugin called OllyDump, available on the OpenRCE website.
GO GET IT ON THE WEB
OllyDbg download www.ollydbg.de
OllyDbg plugins www.openrce.org/downloads/browse/OllyDbg_Plugins
Download OllyDbg and the OllyDump plugin, and extract them into the same directory. Then run OLLYDBG.EXE, and the main OllyDbg window should open. Double-check that the OllyDump plugin was loaded by opening the Plugins menu and seeing if OllyDump appears in the list (see Figure 15-6).
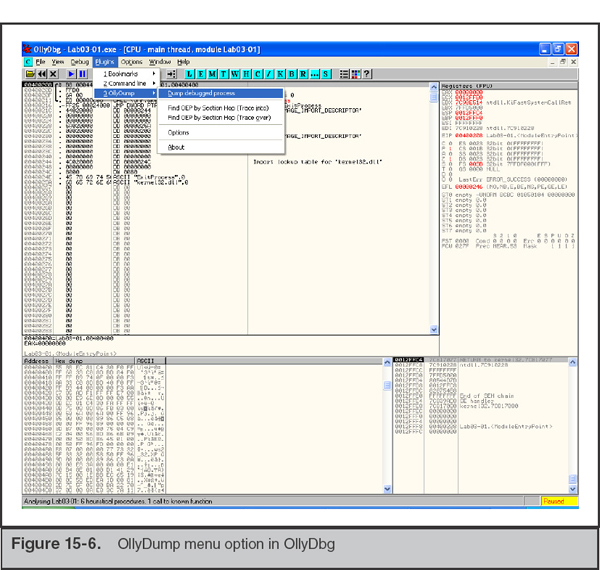
Now, go to File | Open and open the file you suspect is packed. OllyDbg will load the file in a paused state. Sometimes just loading the file is enough to get unpacked data. Go to Plugins | OllyDump | Dump Debugged Process. Leave all options at their defaults and click Dump (see Figure 15-7).

Save the file and then examine its contents using a strings application. Compare what you see in the file you just saved against what is present in the original file. If the strings are the same, the file was probably not unpacked by just loading it. We’ll have to try the next step—letting the debugger run the file. Select Debug | Run from the menu. The program will attempt to run normally.
There are a number of things that can go wrong at this point—the execution may crash, the program may detect you are using a debugger and exit, or the program may not even run. Whatever happens, wait for the execution to terminate, as indicated in the lower-right corner of status bar, and then perform a dump through Plugins | OllyDump | Dump Debugged Process. Save the dump to a new file, and as before, compare the strings contained in that file with the original.
If neither of these steps succeeds, you will need to get assistance from someone who is more experienced in reverse engineering malware. They will be able to try more advanced techniques, which may include inspecting the code, setting breakpoints, jumping over code, or modifying code in order to obtain an unpacked version of the file. If you have time, you should look over their shoulder; a number of techniques are not hard to perform with a little practice, but they are beyond the scope of this book.
The second general category of malware analysis is called dynamic analysis. During this type of analysis, system monitoring is put in place and the malware is executed. Ideally, this type of analysis should confirm any findings from static analysis, and will reveal new facts about the malware. Sometimes dynamic analysis is quite challenging, mainly from difficulties in getting the malware to properly execute. When the malware does execute, however, you will normally discover more information in a shorter amount of time as compared to static analysis.
You can perform dynamic analysis by either using an automated analysis tool or manually performing the analysis on your own. Automated tools can save time and do not require a specialized skill set, but are not always successful in producing useful output. Manual analysis requires that you have skills using monitoring tools, but provides you with more flexibility to get malware to properly execute.
Because it may be difficult to uncover all functionality by just executing a malware sample, dynamic analysis has its limitations as well. For example, malware does not necessarily include usage information, and may require “passwords” on the command line to enable certain code execution paths. Think of some well-known word processing applications; just because you can run the application does not mean you are aware of, can find, or can use all of its functionality.
Automated Dynamic Analysis: Sandboxes
Automated dynamic analysis tools, or sandboxes, are very simple to use. You input the malware sample, and after some analysis period the system provides an analysis report. A number of publicly available sandboxes can be used, with GFI Sandbox being one of the more popular options. This solution also allows you to submit a malware sample for free on their website. Using this free service is a great way to learn more about automated dynamic analysis solutions, but may not always be the right solution for day-to-day work. Optionally, you can bring their services in house, but that is likely to be cost prohibitive for most organizations.
GO GET IT ON THE WEB
GFI Sandbox www.threattrack.com
At the company we work for, we do not regularly use any publicly available sandboxes. There are three primary reasons for this, some of which you may want consider when deciding to use a sandbox. The first is that we have non-disclosure agreements with our customers. We cannot decide, on our own, to submit customer data to a third party for analysis. You may be in a similar position, but perhaps for legal, policy, regulatory, or contractual reasons. The second reason is that, more often than not, automated analysis does not provide us with the answers we need. For example, knowing that a malware sample creates a registry key or a file is a good start, but it is more important to know why and how it is used. Third is that the sandbox solutions are slow to evolve. You are likely to be faced with very significant numbers of new malware families that may require changes in the automated analysis workflow. Without ownership and control of the sandbox, you wait for the software’s developers to manage a new feature. We ended up building our own custom in-house automated analysis solution. We’re able to continuously tweak that solution to more effectively execute malware and provide us with data points that are important to us.
Manual Dynamic Analysis
Manual dynamic analysis requires a general understanding of how the operating system loads and executes programs, as well as some skill in the use of monitoring tools, such as Microsoft’s Process Monitor. Performing the dynamic analysis manually allows for greater flexibility, but it can also be very time consuming. Because this chapter is about malware triage, we are primarily concerned with getting accurate information in the shortest amount of time. Given that, we will not explore any advanced techniques for dynamic analysis, such as using OllyDbg to step through and analyze assembly code. Instead, we stick to topics that we find are likely to provide “quick wins.”
Getting Malware to Run
As we’ve mentioned in prior sections, sometimes a major challenge to dynamic analysis is getting the malware to execute. One of the best ways to help determine how to execute a malware sample is to understand the context in which it was found. As part of the investigative process, the individuals who initially discovered the malware should have documented the context. If that was not provided, you should ask the parties involved in handling the malware to provide it. Without that context, it may be difficult, if not impossible, to execute the malware.
Most of the malware samples we deal with are Win32-based PE binaries. The common binary forms are executables with an “.exe” extension and dynamic linked libraries with a “.dll” extension. During malware triage, we run executables by entering the file name in a command prompt and pressing ENTER. Although you could double-click the file in Windows Explorer, we prefer not to let Explorer handle file associations and possibly take some unwanted action. For a DLL, the method to load it depends on what it was designed for. You may be able to load the DLL using rundll32, which loads a DLL:
In some cases, a DLL that is a backdoor may have an export that installs the malware in a persistent fashion. It’s useful to examine the export names and see if anything stands out. Perhaps you came across a sample that contains an export named “Deploy.” In that case, you could try running the following command:
This command would load the DLL and call the function named Deploy. This may or may not work, but it’s usually a good idea to try function names that suggest they would lead to discovering useful information about the malware. In other cases involving DLLs, the file may be designed to be loaded by a specific service, such as by Winlogon, to replace the standard Microsoft Graphical Identification and Authentication (GINA) DLL. In those cases, you will need to reconfigure your virtual machine to match the changes the attacker made to a victim system. Sometimes this may be quite difficult to figure out through analysis of the DLL. If static analysis and contextual information from the infected systems do not help, you will have to find assistance or perform your own research to move forward.
Runtime Monitoring
Once you successfully execute or load the malware, you will want to monitor any actions it takes. Common events we are interested in are process creation, file creation or changes, registry key creation or changes, and network activity. The goal of monitoring these events is so you develop a general sense of what the malware is doing and generate leads. For example, if malware creates a file, you should follow up by inspecting the content of a file that was created. Once you have followed up on the leads generated through the monitoring process, you should have a good picture of what the malware does.
The first step is to choose a monitoring tool or set of tools. Ideally, the monitoring tool should provide a method to filter and log collected data. One of the best free tools available is Microsoft’s Process Monitor. Process Monitor is a newer tool that combines the features of at least four separate older tools from SysInternals into one. Process Monitor will monitor process, file, registry, and network activity and allows you to filter events based on many different criteria. For example, you can create a filter that only monitors events from a process with a specific name or in a specific path.
GO GET IT ON THE WEB
Microsoft Process Monitor technet.microsoft.com/en-us/sysinternals/bb896645.aspx
Once you have Process Monitor on your system, it’s time to move on to the next step—monitoring a process. When you start Process Monitor, it will immediately begin logging events. You will want to stop the capture by either clicking the magnifying glass menu icon, selecting File | Capture Events, or pressing CTRL-E. Then clear the display by selecting Edit | Clear Display or clicking the “Clear” icon, which is the second icon to the right of the magnifying glass. Now we’re ready to configure Process Monitor to track only the process we are interested in.
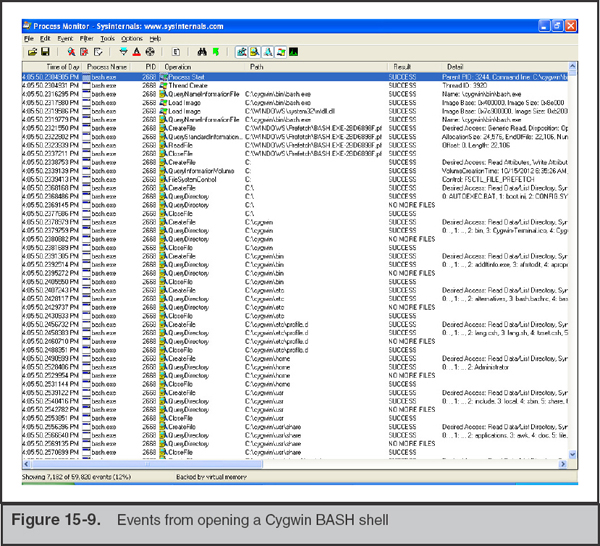
Normally we start out by filtering events based on the process name, which is the file name of the malware. To bring up the filter window, select Filter | Filter … from the menu. In the case of suspected malware named bash.exe, we would create a new filter for “Process Name is bash.exe.” Select Process Name from the first pull-down and then enter bash.exe in the third text box. Then click Add. The filter window should now have an entry on top with a green checkmark next to it, as shown in Figure 15-8.

Then click on OK to save the filter. Process Explorer will not capture events from additional processes the malware launches because we are filtering based on the file name. However, we will see that a process was created and can add or modify filters, so Process Explorer captures everything we’re interested in.
Now that a filter is set, it’s time to activate monitoring and execute the suspicious file. Select File | Capture Events to begin monitoring. Continue to execute the file and keep an eye on the Process Monitor window for events, because they should appear immediately and look similar to what is shown in Figure 15-9.
If events are not displayed right away, you should double-check the filter and ensure that Process Monitor is in capture mode. Our experience is that Process Monitor is a very reliable tool, and normally when we experience an issue it’s due to some mistake we’ve made.
Once Process Monitor is scrolling events, you will probably notice there are hundreds, if not thousands or even tens of thousands, of events. It’s not a good use of time to review them all, so you will have to use a technique to select some subset that you will initially examine. There is a column in the Process Monitor display named Operation. This column shows the system calls made by the monitored program. We typically look for operations that are more likely to lead us to discover important information about the malware. Without better leads, the WriteFile, RegCreateKey, and RegSetKey operations are good starting points. These operations are related to writing data to a file, and creating and writing data to registry keys. You can find these operations by either filtering for those operations or by manually scrolling through events.
You may notice that there are many CreateFile operations—don’t misinterpret that as actual file creation. CreateFile is used to create or open a file handle. So in many cases, the CreateFile operation is being used to read a file. |
As you develop leads to investigate further, you may need some additional tools that collect more detailed information about specific items. We’d like to point out three tools specifically: two are for collecting more information about running processes and one is for capturing network traffic. There are many more tools on the market that may help; we’re just providing a few examples of tools we commonly use.
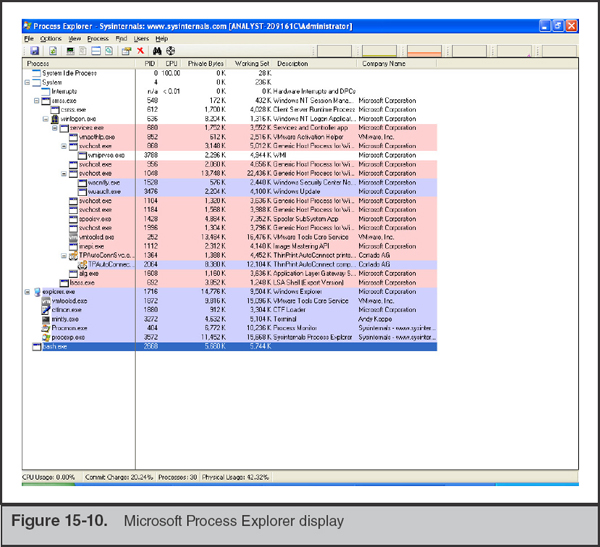
The two process-related tools are Microsoft’s Process Explorer and Handle tools. Process Explorer provides a hierarchical tree view of running processes, including many details of runtime parameters (see Figure 15-10).
One particularly useful feature is the ability to search process handles for a string. For example, you may discover that a keylogger is recording data to a file named keylog.txt, but you do not know what process is writing to it. You can use Process Explorer to search handles (Find | Find Handle or DLL) from all processes for the file name keylog.txt to determine what process has the file open (see Figure 15-11).

Handles is a command-line-based tool that displays all handles from all processes. Handles is sometimes useful when you are searching for any handle that looks suspicious, such as files open in user profile temporary directories.
GO GET IT ON THE WEB
Microsoft Process Explorer technet.microsoft.com/en-us/sysinternals/bb896653.aspx
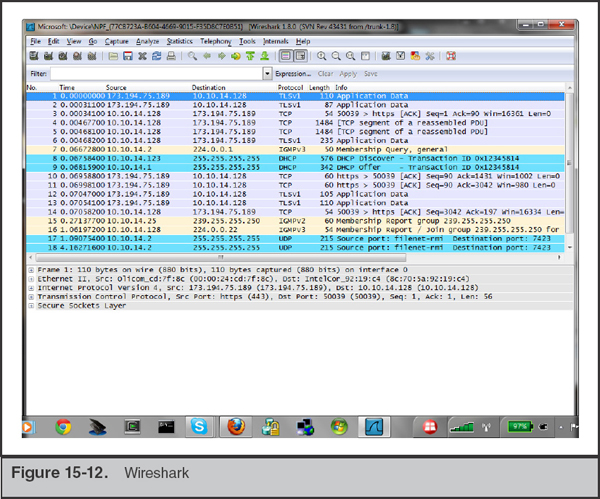
The third tool is the Wireshark network capture and protocol analysis application (see Figure 15-12). If you discover the malware you are analyzing attempts to make network connections, you may want to use Wireshark, discussed in Chapter 9, to capture and analyze the traffic.
GO GET IT ON THE WEB
Wireshark www.wireshark.org
As you gain experience with dynamic analysis, you will probably discover additional tools and techniques that were not covered in this chapter. If that happens, great! We successfully bootstrapped your malware triage skills!
In most incidents, attackers employ malware or other tools to accomplish their mission. Understanding what these tools do will help enable you to determine what the attackers are doing and how you might respond. This chapter presented basic static and dynamic analysis methods that we think will help you quickly identify and determine the functionality of suspected malware. And even if those techniques don’t work well, we’ve covered practices that should help to keep you and your network safe while you try.
1. What are the primary differences between static and dynamic analysis techniques? What are the advantages of each?
2. In building a safe triage environment, what are some common configuration choices you should make? If you were to create such an environment, what utilities would you prepare for use in both a static and a dynamic analysis environment?
3. On a system you are investigating, you discover a file that you suspect is malware. How would you proceed to safely obtain a copy of the malware and place it in your triage environment? Address investigating both a live system and a forensic image of a hard drive.
4. Given the following information, describe what you would do next to determine more about a file you are looking at:
a. An MD5 hash lookup in major databases comes up negative.
b. Antivirus scans do not indicate a threat.
c. The file contains few legible strings, most of which are uninformative.
5. You are performing dynamic analysis of a file in Windows, and the output from Process Monitor shows:
a. The malware calls the SetWindowsHookEx function.
b. A file named bpk.dat is created in the user’s application data temporary folder.
c. The file is written to at a seemingly random interval, but appears to happen more often when the system is in use.
d. You inspect the file content and find unreadable binary data.
..................Content has been hidden....................
You can't read the all page of ebook, please click here login for view all page.