
Chapter 10
Writing Files
WHAT YOU WILL LEARN IN THIS CHAPTER
- The principles of reading and writing files
- How you obtain a file channel for a file
- How you create a buffer and load it with data
- What view buffers are and how you use them
- How you use a channel object and buffer objects to write data to a file
In this chapter, you look at ways to write binary or character data to a file. The mechanisms for writing binary data are different from those for writing character data. You’ll be writing both types of files in this chapter and reading them back in the next.
If you are new to programming file operations, there are a couple of things about how they work that may not be apparent to you and can be a source of confusion, so I’ll clarify these before I go any further. If you already know how input and output for disk files work, you can skip this section.
First, let’s consider the nature of a file. After you have written data to a file, what you have is just a linear sequence of bytes. The bytes in a file are referenced by their offset from the beginning, so the first byte is byte 0, the next byte is byte 1, the third byte is byte 2, and so on through to the end of the file. If there are n bytes in a file, the last byte is at offset n −1. There is no specific information in the file about how the data originated or what it represents unless you explicitly put it there. Even if there is, you need to know that there is information that tells you how the data is formatted, and read and interpret the data accordingly.
For example, if you write a series of 25 binary values of type int to a file, it contains 100 bytes. Nothing in the file indicates that the data consists of 4-byte integers so there is nothing to prevent you from reading the data back as 50 Unicode characters or 10 long values followed by a string, or any other arbitrary collection of data items that corresponds to 100 bytes. Of course, the result is unlikely to be very meaningful unless you interpret the data in the form in which it was originally written. This implies that to read data from a file correctly, you need to have prior knowledge of the structure and format of the data that is in the file.
The form of the data in the file may be recorded or implied in many ways. For example, one way that the format of the data in a file can be communicated is to use a standardized file name extension for data of a particular kind, such as .java for a Java source file or .jpg for a graphical image file or .wav for a sound file. Each type of file has a predefined structure, so from the file extension you know how to interpret the data in the file. Of course, another way of transferring data so that it can be interpreted correctly is to use a generalized mechanism for communicating data and its structure, such as XML. XML files also express form through the file extension .xml. You’ll learn more about XML and how to write and read XML files in the last two chapters of the book.
You can access an existing file to read it or write it in two different ways, described as sequential access or random access. The latter is sometimes referred to as direct access. Sequential access to a file is quite straightforward and works pretty much as you would expect. Sequential read access involves reading bytes from the file starting from the beginning with byte 0. Of course, if you are interested only in the file contents starting at byte 100, you can just read and ignore the first 100 bytes. Sequential write access involves writing bytes to the file starting at the beginning if you are replacing the existing data or writing a new file, and writing bytes starting at the end if you are appending new data to an existing file.
The term random access is sometimes misunderstood initially. Just like sequential access, random access is just a way of accessing data in a file and has nothing to do with how the data in the file is structured or how the physical file was originally written. You can access any file randomly for reading and/or writing. When you access a file randomly, you can read one or more bytes from the file starting at any point. For example, you could read 20 bytes starting at the 13th byte in the file (which is the byte at offset 12, of course) and then read 50 bytes starting at the 101st byte or any other point that you choose. Similarly, you can update an existing file in random access mode by writing data starting at any point in the file. In random access mode, the choice of where to start reading or writing and how many bytes you read or write is entirely up to you. You just need to know the offset for the byte where a read or write operation should start. Of course, for these to be sensible and successful operations, you have to have a clear idea of how the data in the file is structured.
WARNING First a note of caution: Before running any of the examples in this chapter, be sure to set up a separate directory for storing the files that you are using when you are testing programs. It’s also not a bad idea to back up any files and directories on your system that you don’t want to risk losing. But of course, you do back up your files regularly anyway — right?
WARNING The old adage “If anything can go wrong, it will,” applies particularly in this context, as does the complementary principle “If anything can’t go wrong, it will.” Remember also that the probability of something going wrong increases in proportion to the inconvenience it is likely to cause.
The Files class provides three ways for you to access a file to write it:
- The newOutputStream() method opens or creates a file specified by a Path object. The method returns a reference to an unbuffered OutputStream object encapsulating the file. If you wrap this OutputStream object in a BufferedOutputStream object, you are able to use the write() method for the buffered stream object to write binary data to the file efficiently.
- The newBufferedWriter() method opens or creates a file specified by a Path object for writing in text mode. The BufferedWriter object that the method returns provides an efficient way to write textual data to a file.
- The newByteChannel() method opens a file specified by a Path object that can be accessed at random for writing and/or reading. The data written or read can be binary or textual data.
The Files class also defines two static write() methods that can write either a byte[] array to a file or an Iterable set of lines as characters. I’ll concentrate on the three possibilities in the above list because these are the most useful. Let’s start by exploring how you can write a file using an OutputStream object in more detail.
WRITING A FILE VIA AN OUTPUT STREAM
The newOutputStream() method in the Files class expects the first argument to be a Path object encapsulating the path to the file to be written. You can supply one or more optional arguments to specify open options for the file from the java.nio.file.StandardOpenOption enumeration. These determine how the file is opened and where the data goes when you write to it. You can use the options presented in Table 10-1 in this context.
TABLE 10-1: Output Options Defined by the StandardOpenOption Enumeration
| OPTION | DESCRIPTION |
| CREATE | Create a new file if the file does not already exist. |
| CREATE_NEW | Create a new file, but fail the operation if the file already exists. |
| DELETE_ON_CLOSE | Delete the file when the stream is closed. This is primarily for use with work files that are only required during execution of your program. |
| APPEND | Write new data to the end of the file. |
| TRUNCATE_EXISTING | Truncate the existing file length to 0 so new data is written from the beginning, overwriting any previous data. |
| WRITE | Open the file for write access. |
The enumeration also defines the following constants, as presented in Table 10-2.
TABLE 10-2: Output Options Defined by the StandardOpenOption Enumeration
| OPTION | DESCRIPTION |
| READ | Opens the file for read access. |
| SPARSE | Provides a hint to improve efficiency for file systems that support sparse files. |
| SYNC | Requires that all file updates are written synchronously to the storage device. This causes the return from the write method to wait until all data and metadata have been written to the storage device. This is to ensure the integrity of files in the event of a system crash. |
| DSYNC | This has the same effect as SYNC but only in relation to file data, not metadata. |
You use the READ option in the next chapter.
If you don’t specify any arguments to the newOutputStream() method after the first, the default options in effect are WRITE, CREATE, and TRUNCATE_EXISTING. This means that by default a new file is created if it doesn’t already exist, and if it does exist, the contents are overwritten. Here’s how you can open a file specified by a Path object fileOut to append data to it if it already exists:
OutputStream fileOut = Files.newOutputStream(path, CREATE, APPEND);
The WRITE option is inferred because the method only creates OutputStream objects. Of course, it would be better to use a BufferedOutputStream object to write the file because this would make the output operations more efficient. You can create one like this:
Path file = Paths.get("D:/Junk/fibonnaci.bin");
BufferedOutputStream fileOut = new BufferedOutputStream(
                                  Files.newOutputStream(file, CREATE, APPEND));
To create a buffered stream, you just pass the OutputStream object returned by the newOutputStream() method to the BufferedOutputStream constructor.
The newOutputStream() method can throw an IOException if an error occurs so it needs to be called in a try block. The stream classes implement the AutoCloseable interface so you can use a try block with resources to automatically close any stream when you are done with it.
A BufferedOutputStream object provides two write() methods:
- write(int b) writes a single byte, b, to the internal buffer,.
- write(byte[] b, int offset, int length) writes length bytes from the byte array, b, starting at index position offset to the internal buffer.
- Both methods can throw IOException. The internal buffer is automatically flushed (written to the stream) when it is full. You can also call the flush() method explicitly to have the buffer contents written to the stream.
Note that flushing the stream does not guarantee that the data is written to the file at that point. Flushing the stream hands over the data to the output operation provided by your operating system and this has its own internal buffers. You see later in this chapter how you can force data to be written to the file.
TRY IT OUT: Writing a File via a Buffered Stream
This example generates some binary integer values and writes them to a file:
import java.nio.file.*;
import java.nio.*;
import java.io.*;

public class StreamOutputToFile {

  public static void main(String[] args) {
    final int count = 50;                           // Number of values
    long[] fiboNumbers = {0L,0L};                   // Array of 2 elements
    int index = 0;                                 // Index to fibonumbers
    ByteBuffer buf = ByteBuffer.allocate(count*8); // Buffer for output
    LongBuffer longBuf = buf.asLongBuffer();       // View buffer for type long
    Path file = Paths.get(System.getProperty("user.home")).
                         resolve("Beginning Java Stuff").resolve("fibonnaci.bin");
    try {
      // Create parent directory if it doesn't exist
      Files.createDirectories(file.getParent());
    } catch(IOException e) {
      System.err.println("Error creating directory: " + file.getParent());
      e.printStackTrace();
      System.exit(1);
    }
    System.out.println("New file is: " + file);

    try(BufferedOutputStream fileOut =
                       new BufferedOutputStream(Files.newOutputStream(file))){
      // Generate Fibonacci numbers in buffer
      for(int i = 0 ; i < count ; ++i) {
        if(i < 2)
          fiboNumbers[index] = i;
        else
          fiboNumbers[index] = fiboNumbers[0] + fiboNumbers[1];
        longBuf.put(fiboNumbers[index]);
        index = ++index%2;
      }
    // Write the numbers to the file
    fileOut.write(buf.array(), 0, buf.capacity());
    System.out.println("File written.");
    } catch(IOException e) {
      System.err.println("Error writing file: " + file);
      e.printStackTrace();
    }
  }
}
StreamOutputToFile.java
This example generates 50 Fibonacci numbers and writes them to the fibonacci.bin file. The only output if everything works as it should is the file path and a message confirming the file has been written.
NOTE If you have not come across Fibonacci numbers before, they are not as dull and uninteresting as they might seem. Fibonacci numbers relate to the way many plants grow their leaves and petals and the way spiral seashells grow,. They are even behind the relationship between the height and width of classical buildings.
TIP Don’t be too hasty deleting this or other files that you create later in this chapter, as you reuse some of them in the next chapter when you start exploring how to read files.
How It Works
The first three statements in main() set up the variables you need to generate the Fibonacci numbers. The first two Fibonacci numbers are 0 and 1. All subsequent numbers are the sum of the preceding two numbers. The program stores the last two numbers in the fiboNumbers array. The index variable is used to access this array to store the most recent number.
As the numbers are generated, they are stored in a buffer before they are written to the file. The ByteBuffer object, buf, is created with a capacity to store count numbers. We create a view buffer, longBuf, from buf to make it easy to store the numbers directly in the buffer. Type long is appropriate here because Fibonacci numbers grow quite rapidly. I’ll be explaining buffers in more detail later in this chapter, but for the moment, a view buffer allows you to treat a buffer that contains bytes as a sequence of values of some other type, type long in this case. Ultimately you have to write a sequence of long values (or values of any other type) to a file as bytes, so this enables you set up the long values in a buffer, then treat them as bytes when you need to write them to the file.
The file object specifies an absolute path to the fibonacci.bin file in the "Beginning Java Stuff" directory in your home directory. Your home directory is specified by the system property value corresponding to the key "user.home". The try block that follows the creation of the path object is there to ensure that the directory that is to contain the file exists, or will be created if it doesn’t. The createDirectories() method creates a directory together with all directories in the path when necessary; if the directory already exists, it does nothing.
The try block with resources creates the BufferedOutputStream object for the file between the parentheses so it is flushed and closed automatically. Because no options are specified for the newOutputStream() method, the file is created when necessary, and the file is always written from the beginning, overwriting any existing contents. This implies that if you run the example more than once, you still end up with the same file contents.
The Fibonacci numbers are created in the loop. As each number is created, it is stored in the fiboNumbers array and then written to longBuf, which is an overlay of buf. The put() method automatically increments the current position in the buffer, ready for the next value to be written. The value of index is incremented modulo 2, so it flips between 0 and 1. This has the effect that each number that is generated is stored in the array always replacing the oldest value of the two.
After all the numbers have been written to longBuf, the contents of buf are converted to a byte[] array and written to the file. You can verify that the file has been written by inspecting it and checking the file properties. It should be 400 bytes.
The example writes values of just one type to the file but you can easily deal with sets of values of different fundamental types. You do this with the third mechanism for writing files that you try out later in this chapter. First, you can learn a bit more about using a Writer object to write to a file.
The static newBufferedWriter() method in the Files class returns a java.io.BufferedWriter object that you can use to write to a file. A BufferedWriter can only write character data to a file. A BufferedWriter has an internal buffer that ensures that strings and even single characters can be written efficiently.
The first argument to the newBufferedWriter() method is a Path object identifying the file path and the second is a java.nio.charset.Charset object that defines a charset. As I explained at the beginning of this chapter, ultimately you are always writing bytes to a file, whatever the type of the original data, and a charset determines how Unicode characters are mapped to the sequences of bytes that are written to the file. There are a range of standard charsets available with Java that offer different mappings for Unicode characters and to create a Charset object for one of these, you just pass the name of the standard charset as a string to the static forName() method in the Charset class. You can also obtain the default charset for the current Java virtual machine by calling the static defaultCharset() method. The charset you use when you write a file determines what bytes are written for each Unicode character and of course, when you read a file, you must use the charset that was used when the file was written. In examples that use charsets I use the "UTF-16" charset, which is the character encoding for the Java language.
You can optionally specify additional arguments to the newBufferedWriter() method that determine how the file is opened. These are the same options that you saw with the newOutputStream() method and with the same default options set if you don’t specify any.
Here’s how you could create a BufferedWriter object for a file:
Path file = Paths.get("D:/Junk/proverbs.txt");
BufferedWriter fileOut = Files.newBufferedWriter(
                             file, Charset.forName("UTF-16"), CREATE, APPEND);
This creates the file if it doesn’t already exist and data is appended to the end of the file if it does exist.
A BufferedWriter object has the methods shown in Table 10-3.
TABLE 10-3: BufferedWriter Methods
| METHOD | DESCRIPTION |
| write( | Writes length characters from the string s starting at position offset. |
| write( | Writes length characters from the chars array starting at position offset. |
| write( int c) | Write a single character, c. |
| newLine() | Writes a newline character as defined by the line.separator system property. You should use this method rather than including a ' ' character in the text when you need a line separator in the output. |
| flush() | Flushes the stream causing all data in the internal buffer to be written to the file. |
| close() | Closes the stream after flushing it. After the stream has been closed, attempts to write or flush the stream will throw an IOException. |
All the BufferedWriter object methods mentioned here throw an IOException if an I/O error occurs.
Because a BufferedWriter object can only write strings or single characters, any numerical data must be converted to a string before you can write it to the file. Because all the wrapper classes for the fundamental types provide toString() methods, this presents no particular difficulty.
Of course, strings are inherently variable in length so you need to consider how data written by a BufferedWriter is going to be read. You either need to record information about the length of strings within the data or make sure there are separator characters that you can use to determine where each data item ends. Let’s try an example.
TRY IT OUT: Writing a File Using a Buffered Writer
In this example, you write a series of strings to a file:
import java.io.*;
import java.nio.file.*;
import java.nio.charset.Charset;

public class WriterOutputToFile {
  public static void main(String[] args) {
    String[] sayings = {"A nod is as good as a wink to a blind horse.",
                        "Least said, soonest mended.",
                        "There are 10 kinds of people in the world, " +
                        "those that understand binary and those that don't.",
                        "You can't make a silk purse out of a sow's ear.",
                        "Hindsight is always twenty-twenty.",
                        "Existentialism has no future.",
                        "Those who are not confused are misinformed.",
                        "Better untaught that ill-taught."};

    Path file = Paths.get(System.getProperty("user.home")).
                       resolve("Beginning Java Stuff").resolve("Sayings.txt");
    try {
      // Create parent directory if it doesn't exist
      Files.createDirectories(file.getParent());
    } catch(IOException e) {
      System.err.println("Error creating directory: " + file.getParent());
      e.printStackTrace();
      System.exit(1);
    }
    try(BufferedWriter fileOut = Files.newBufferedWriter(
                                      file, Charset.forName("UTF-16"))){
      // Write saying to the file
      for(int i = 0 ; i < sayings.length ; ++i) {
        fileOut.write(sayings[i], 0, sayings[i].length());
        fileOut.newLine();                          // Write separator
      }
    System.out.println("File written.");
    } catch(IOException e) {
      System.err.println("Error writing file: " + file);
      e.printStackTrace();
    }
  }
}
WriterOutputToFile.java
The only output is the file path and confirmation that the file was written.
How It Works
As in the previous example, the directory to contain the file is the "Beginning Java Stuff" directory in your home directory and you make sure the directory does exist. The BufferedWriter class implements the AutoCloseable interface so we create the object in a try block with resources. Each element in the sayings array is written to the file in the loop using the write() method. The default options are in effect for the BufferedWriter object, WRITE, CREATE, and TRUNCATE_EXISTING, so a new file is created if it doesn’t already exist and any file contents are overwritten. A newline character is written to the file by calling the newLine() method after each saying. This allows the sayings to be separated when the file is read.
The third method for writing files involves the use of channels. A channel is a mechanism for transferring data to and from an external source using buffers. Using a channel is considerably more powerful and flexible than using an output stream or a writer so I will spend more time on this than the first two. However, there’s something I need to explain before you can use a channel to write file.
All the data that you write to a file using a channel starts out in one or more buffers in memory. Similarly, when you read from a file using a channel, the data from the file ends up in one or more buffers and you access it from there. The Java library provides an extensive range of capabilities for working with buffers, and these are essential when using the newByteChannel() route to writing a file. I will explain the various ways in which you can create and use buffers before getting into writing files using channels.
All the classes that define buffers have the abstract java.nio.Buffer class as a base. The Buffer class therefore defines the fundamental characteristics common to all buffers. Each buffer class type can store a sequence of elements of a given type, and you can create buffers to hold any primitive data type except for type boolean. Thus, you create different types of buffers to store byte values, char values, short values, int values, long values, float values, or double values. The classes in Table 10-4 in the java.nio package define these buffers.
TABLE 10-4: Classes for Buffers
| CLASS | DESCRIPTION |
| ByteBuffer | A buffer that stores values of type byte. You can also store the binary values of any of the other primitive types in this buffer, except for type boolean. Each binary value that you store occupies a number of bytes in the buffer determined by the type — values of type char or short occupy 2 bytes, int values occupy 4 bytes, and so on. |
| CharBuffer | A buffer that stores only values of type char. |
| ShortBuffer | A buffer that stores only values of type short. |
| IntBuffer | A buffer that stores only values of type int. |
| LongBuffer | A buffer that stores only values of type long. |
| FloatBuffer | A buffer that stores only values of type float. |
| DoubleBuffer | A buffer that stores only values of type double. |
I keep repeating “except for type boolean” every so often, so I better address that. There is no buffer type that provides for type boolean values, but, of course, you may actually want to record some boolean values in a file. In this case, you have to devise a suitable alternative representation. You could use integer values 0 and 1, or perhaps strings "true" and "false", or even characters 't' and 'f'. You could even represent each boolean value as a single bit and pack eight of them at a time into a single byte, but this is likely to be worthwhile only if you have a lot of them. Which approach you choose depends on what is most convenient in the context in which you are using the boolean values.
Although you have seven different classes defining buffers, you use only buffers of type ByteBuffer to read or write data. The other types of buffers in the table above are called view buffers, because they are usually created as views of an existing buffer of type ByteBuffer. The view buffers provide an easy way to get data items of various types into or out of a ByteBuffer. You see how a little later in this chapter.
Buffer Capacity
The capacity of a buffer is the maximum number of values it can contain, not the number of bytes — unless, of course, it stores elements of type byte. The capacity of a buffer is fixed when you create it and cannot be changed subsequently. You can obtain the capacity for a buffer object as a value of type int by calling the capacity() method that it inherits from the Buffer class. Figure 10-1 shows the capacities of different buffers when each occupies the same amount of memory.

Of course, for a buffer that stores bytes, the capacity is the maximum number of bytes it can hold, but for a buffer of type DoubleBuffer, for example, which stores double values, the capacity is the maximum number of values of type double you can put in it. Values in a buffer are indexed from zero, so the index position for referencing values in a buffer runs from 0 to capacity-1.
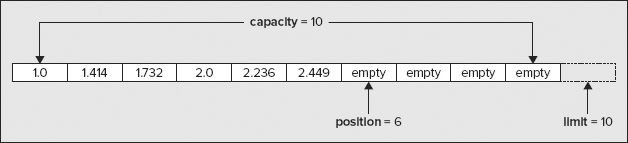
Buffer Position and Limit
A buffer also has a limit and a position, both of which affect data transfer operations to or from the buffer. In the case of a ByteBuffer, the position and limit control read and write operations executed by a channel using the buffer.
The position is the index position of the next buffer element that is available to be read or written. This may sound a little strange, but keep in mind that a ByteBuffer can be for file input or output and you can transfer values into and out of other types of buffer.
Consider a couple of examples. With a ByteBuffer that you are using for file output, the position identifies the location in the buffer of the next byte to be written to the file. For a ByteBuffer used for file input, the position identifies where the next byte that is read from the file is stored in the buffer. When you transfer one or more values into a DoubleBuffer or an IntBuffer using methods available for that purpose, the position indicates where the first value is stored in the buffer. When you are extracting values from a buffer, the position indicates the location of the first value to be extracted.
The limit is the index position in a buffer of the first value that should not be read or written. Thus, elements can be read or written starting with the element at position and up to and including the element at limit-1. Thus if you want to fill a buffer, the position must be at zero because this is where the first data item goes, and the limit must be equal to the capacity because the last data item has to be stored at the last element in the buffer, which is capacity-1.
You use the position and limit for a ByteBuffer to determine what bytes in the buffer are involved in a read or write operation executed by a channel — I’ll discuss using a channel later in this chapter, once I have finished with buffers. How the position and limit affect I/O operations is easier to understand if you take a specific example. First consider an operation that writes data from the buffer to a file. This is illustrated in Figure 10-2.

When a file write operation is executed by a channel using a given ByteBuffer, elements from the buffer are written to the file starting at the index specified by the position. Successive bytes are written to the file up to, and including, the byte at index position limit-1. Thus with the buffer shown in Figure 10-2, 60 bytes are written to the file. When you want to write all the data from a buffer, you should set the buffer position to 0 and the limit to the buffer capacity. In this case the limit is an index value that is one beyond the index value for the last byte in the buffer, so limit-1 refers to the last byte.
For a read operation, data that is read from the file is stored in a ByteBuffer starting at the byte at the index given by the buffer’s position. Assuming that the end of the file is not reached before all the bytes are read, bytes continue to be read up to and including the byte at the index limit-1. Thus, the number of bytes read is limit-position, and the bytes are stored in the buffer from the byte at position up to and including the byte at limit-1.
As I said at the beginning of this section, the position and limit are involved when you load data into a buffer before writing it to a file or retrieving data from it after reading from a file. This applies for any type of buffer. The position specifies where the next value is inserted in a buffer or retrieved from it. As you see later, the position is usually automatically incremented to point to the next available position when you insert or extract values in a buffer. The limit acts as a constraint to indicate where the data in a buffer ends, a bit like an end-of-file marker. You cannot insert or extract elements beyond the position specified by the limit.
Because a buffer’s position is an index, it must be greater than or equal to zero. You can also deduce that it must also be less than or equal to the limit. Clearly, the limit cannot be greater than the capacity of a buffer. Otherwise, you could be trying to write elements to positions beyond the end of the buffer. However, as you have seen, it can be equal to it. These relationships can be expressed as the following:
0 <Symbol>≤</Symbol> position <Symbol>≤</Symbol> limit <Symbol>≤</Symbol> capacity
As a general rule, if your code attempts to do things directly or indirectly that result in these relationships being violated, an exception is thrown.
When you create a new buffer that is not a view buffer, its capacity is fixed at the value that you specify. It also has a position of zero and its limit is set to its capacity. When you create a view buffer from an existing ByteBuffer, the contents of the view buffer start at the current position for the ByteBuffer. The capacity and limit for the view buffer are set to the limit for the original buffer, divided by the number of bytes in an element in the view buffer. The limit and position for the view buffer are subsequently independent of the limit and position for the original buffer.
Setting the Position and Limit
You can set the position and limit for a buffer explicitly by using the methods that are defined in the Buffer class, shown in Table 10-5.
TABLE 10-5: Methods that Set Position and Limit for a Buffer
| METHOD | DESCRIPTION |
| position( int newPosition) | Sets the position to the index value specified by the argument. The new position value must be greater than or equal to zero, and not greater than the current limit; otherwise, an exception of type IllegalArgumentException is thrown. If the buffer’s mark is defined (I explain the mark in the next section) and greater than the new position, it is discarded. |
| limit( int newLimit) | Sets the limit to the index value specified by the argument. If the buffer’s position is greater than the new limit it is set to the new limit. If the buffer’s mark is defined and exceeds the new limit, it is discarded. If the new limit value is negative or greater than the buffer’s capacity, an exception of type IllegalArgumentException is thrown. |
Both of these methods return a reference of type Buffer for the object for which they were called. This enables you to chain calls to these methods together in a single statement. For example, given a buffer reference buf, you could set both the position and the limit with this statement:
buf.limit(512).position(256);
This assumes the capacity of the buffer is at least 512 elements. If you are explicitly setting both the limit and the position, you should always choose the sequence in which you set them to avoid setting a position that is greater than the limit. If the buffer’s limit starts out less than the new position you want to set, attempting to set the position first results in an IllegalArgumentException being thrown. Setting the limit first to a value less than the current position has a similar effect. If you want to avoid checking the current limit and position when you want to reset both, you can always do it safely like this:
buf.position(0).limit(newLimit).position(newPosition);
Of course, the new position and limit values must be legal; otherwise, an exception is still thrown. In other words, newPosition must be non-negative and less than newLimit. To be 100 percent certain that setting a new position and limit is going to work, you could code it something like this:
if(newPosition >= 0 && newLimit > newPosition) {
  buf.position(0).limit(newLimit).position(newPosition);
} else {
  System.err.println("Illegal position:limit settings."
          + "Position: " + newPosition + " Limit: "+ newLimit);
}
You can determine whether there are any elements between the position and the limit in a buffer by calling the hasRemaining() method for the buffer:
if (buf.hasRemaining()) {              // If limit-position is >0
  System.out.println("We have space in the buffer!");
}
You can also find out how many values can currently be accommodated by using the remaining() method. For example:
System.out.println("The buffer can accommodate " + buf.remaining() +
                               " more elements.");
Of course, the value returned by the remaining() method is the same as the expression buf.limit()-buf.position().
Creating Buffers
None of the classes that define buffers have public constructors available. Instead, you use a static factory method to create a buffer. You typically create a buffer object of type ByteBuffer by calling the static allocate() method for the class. You pass a value of type int as an argument to the method that defines the capacity of the buffer — the maximum number of bytes that the buffer must accommodate. For example:
ByteBuffer buf = ByteBuffer.allocate(1024); // Buffer of 1024 bytes capacity
When you create a new buffer using the allocate() method for the buffer class, it has a position of zero, and its limit is set to its capacity. The buffer that the preceding statement creates therefore has a position of 0 and has a limit and capacity of 1024.
You can also create other types of buffers in the same way. For example:
// Buffer stores 100 float values
FloatBuffer floatBuf =  FloatBuffer.allocate(100);
This creates a buffer with a capacity to store 100 values of type float. Because each element occupies 4 bytes, the data in this buffer occupies 400 bytes. The buffer’s initial position is 0, and its limit and capacity is 100. Note that this is not a view buffer, but an independent buffer to store float values.
In practice, you are unlikely to want to create buffers other than ByteBuffer objects by calling the static allocate() method because you cannot use them directly for I/O operations. You usually create a ByteBuffer object first and then create any view buffers that you need from the byte buffer.
Creating View Buffers
You can use a ByteBuffer object to create a buffer of any of the other types I have introduced and the new buffer shares all or part of the memory that the original ByteBuffer uses to store data. Such a buffer is referred to as a view buffer because it provides a view of the contents of the byte buffer as elements of another data type. Data is always transferred to or from a file as a series of bytes, but it typically consists of data values of a mix of types other than type byte. A view buffer therefore has two primary uses: for loading data items that are not of type byte into a ByteBuffer prior to writing it to a file, and for accessing data that has been read from a file as values that are other than type byte.
You could create a view buffer of type IntBuffer from a ByteBuffer object like this:
ByteBuffer buf = ByteBuffer.allocate(1024);    // Buffer of 1024 bytes capacity
IntBuffer intBuf = buf.asIntBuffer();          // Now create a view buffer
The content of the view buffer, intBuf, that you create here start at the byte buffer’s current position, which in this case is zero because it is newly created. The remaining bytes in buf are effectively shared with the view buffer. At least, the maximum number of them that is a multiple of 4 , because intBuf stores elements of type int that require 4 bytes each. The view buffer has an initial position of 0 and has a capacity and limit of 256. This is because 256 elements of type int completely fill the 1024 bytes remaining in buf. If you had allocated buf with 1023 bytes, then intBuf would have mapped to 1020 bytes of buf and would have a capacity and limit of 255.
You could now use this view buffer to load the original buffer with values of type int. You could then use the original byte buffer to write the int values to a file. As I said at the outset, view buffers have a similar role when you are reading a file. You would have a primary buffer of type ByteBuffer into which you read bytes from a file, and then you might access the contents of the ByteBuffer through a view buffer of type DoubleBuffer to enable you to retrieve the data that is read from the file as values of type double.
The ByteBuffer class defines the methods for creating view buffers for a byte buffer object shown in Table 10-6.
TABLE 10-6: Methods to Create View Buffers
| METHOD | DESCRIPTION |
| asCharBuffer() | Returns a reference to a view buffer of type CharBuffer |
| asShortBuffer() | Returns a reference to a view buffer of type ShortBuffer |
| asIntBuffer() | Returns a reference to a view buffer of type IntBuffer |
| asLongBuffer() | Returns a reference to a view buffer of type LongBuffer |
| asFloatBuffer() | Returns a reference to a view buffer of type FloatBuffer |
| asDoubleBuffer() | Returns a reference to a view buffer of type DoubleBuffer |
| asReadOnlyBuffer() | Returns a reference to a read-only view buffer of type ByteBuffer |
In each case, the view buffer’s contents start at the current position of the original byte buffer. The position of the view buffer itself is initially set to zero, and its capacity and limit are set to the number of bytes remaining in the original byte buffer divided by the number of bytes in the type of element that the view buffer holds. Figure 10-3 illustrates a view buffer of type IntBuffer that is created after the initial position of the byte buffer has been incremented by 2, possibly after inserting a value of type char into the byte buffer.

You can create as many view buffers from a buffer of type ByteBuffer as you want, and they can overlap or not as you require. A view buffer always maps to bytes in the byte buffer starting at the current position. You frequently want to map several different view buffers to a single byte buffer so that each provides a view of a different segment of the byte buffer in terms of a particular type of value. Figure 10-4 illustrates this situation.

The diagram illustrates a byte buffer with a view buffer of type IntBuffer mapped to the first 8 bytes, and a view buffer of type CharBuffer mapped to the last 12 bytes. All you need to do to achieve this is to ensure that the position of the byte buffer is set appropriately before you create each view buffer.
Duplicating and Slicing Buffers
You can duplicate any of the buffers that I have discussed by calling the duplicate() method for the buffer. The method returns a reference to a buffer with the same type as the original, and which shares the contents and memory of the original buffer. The duplicate buffer initially has the same capacity, position, and limit as the original. However, although changes to the contents of the duplicate are reflected in the original, and vice versa, the position and limit for the original buffer and the duplicate are independent of one other. One use for a duplicate buffer is when you want to access different parts of a buffer’s contents concurrently. You can retrieve data from a duplicate buffer without affecting the original buffer in any way.
Thus a duplicate buffer is not really a new buffer in memory. It is just a new object that provides an alternative route to accessing the same block of memory that is being used to buffer the data. The duplicate() method returns a reference of a new object of the same type as the original, but has no independent data storage. It merely shares the memory that belongs to the original buffer object but with independent position and limit values.
You can also slice any of the buffers you have seen. Calling the slice() method for a buffer returns a reference to a new buffer object of the same type as the original that shares the elements that remain in the original buffer. Slicing a buffer is illustrated in Figure 10-5.

A buffer produced by the slice() method maps to a part of the original buffer starting at the element at its current position, up to and including the element at limit-1. Of course, if the position of the original buffer object is zero and the limit is equal to the capacity, the slice() method effectively produces the same result as the duplicate() method — that is, the buffer memory is shared. Slicing a buffer gives you access to the data in a given part of a buffer through two or more separate routes, each with its own independent position and limit.
Creating Buffers by Wrapping Arrays
You can also create a buffer by wrapping an existing array of the same type as the buffer elements by calling one of the static wrap() methods. This method creates a buffer that already contains the data in the array. You saw earlier that you can create a ByteBuffer object by wrapping an array of type byte[].
When you create a buffer by wrapping an array, the buffer object does not have memory of its own to store the data. The buffer is backed by the array that you have used to define it, so modifications to the values in the buffer alters the array, and vice versa. The capacity and limit for the buffer are set to the length of the array, and its position is zero.
You can also wrap an array to create a buffer so that the position and limit correspond to a particular sequence of elements in the array. For example:
String saying = "Handsome is as handsome does.";
byte[] array = saying.getBytes();      // Get string as byte array
ByteBuffer buf = ByteBuffer.wrap(array, 9, 14);
This creates a buffer by wrapping a byte array, but the position and limit are set using the second and third argument. The second and third arguments to the wrap() method specify the subsection of the array that is to be read or written next. This is illustrated in Figure 10-6.

The buffer’s capacity is array.length and the position is set to the value of the second argument, 9. The third argument specifies the number of buffer elements that can be read or written so this value is added to the position to define the limit. If either the second argument value or the sums of the second and third argument values do not represent legal index values for the array, then an exception of type IndexOutOfBoundsException is thrown.
You can also wrap arrays of values of a primitive type to create a buffer of the corresponding type. For example:
long[] numbers = { 1L, 1L, 2L, 3L, 5L, 8L, 13L, 21L, 34L, 55L, 89L};
LongBuffer numBuf = LongBuffer.wrap(numbers);
The buffer of type LongBuffer that you create here has a capacity of array.length, which is 11. The buffer position is set to 0 and the limit is set to the capacity. In a similar manner you can create buffers from arrays of any of the other primitive types with the exception of type boolean. Creating buffers other that ByteBuffer objects in this way is of little value with channel operations because you cannot use then directly in I/O operations.
Marking a Buffer
You use the mark property for a buffer to record a particular index position in the buffer that you want to be able to return to later. You can set the mark to the current position by calling the mark() method for a buffer object that is inherited from the Buffer class. For example:
buf.mark(); // Mark the current position
This method also returns a reference of type Buffer so you could chain it with the methods for setting the limit and position:
buf.limit(512).position(256).mark();
This sets the mark to 256, the same as the position, which is set after the limit has been set to 512.
After a series of operations that alter the position, you can reset the buffer’s position to the mark that you have set previously by calling the reset() method that is inherited from the Buffer class:
buf.reset(); // Reset position to last marked
If you have not set the mark, or if it has been discarded by an operation to set the limit or the position, the reset() method throws an exception of type InvalidMarkException. The mark for a view buffer operates independently of the mark for the buffer from which it was created.
You probably don’t need to mark a buffer most of the time. The sort of situation where you could use it is where you are scanning some part of a buffer to determine what kind of data it contains — after reading a file, for example. You could mark the point where you started the analysis, and then return to that point by calling reset() for the buffer when you have figured out how to handle the data.
Buffer Data Transfers
Of course, before you can write the contents of a buffer to a file, you must load the buffer with the data. Methods for loading data into a buffer are referred to as put methods. Similarly, when you have read data from a file into a buffer, you use the buffer’s get methods to retrieve the data.
Two kinds of operations transfer data values to or from a buffer.
- A relative put or get operation transfers one or more values starting at the buffer’s current position. In this case, the position is automatically incremented by the number of values transferred.
- In an absolute put or get operation, you explicitly specify an index for the position in the buffer where the data transfer is to begin. In this case the buffer’s position is not updated, so it remains at the index value it was before the operation was executed.
Transferring Data into a Buffer
The ByteBuffer class and all the view buffer classes have two put() methods for transferring a single value of the buffer’s type to the buffer. One is a relative put() method that transfers an element to a given index position in the buffer, and the other is an absolute put method that places the element at an index position that you specify as an argument. All the buffer classes also have three relative put() methods for bulk transfer of elements of the given type. Let’s consider the put() methods for a ByteBuffer object that are shown in Table 10-7 as an example.
TABLE 10-7: ByteBuffer Class put() Methods
| METHOD | DESCRIPTION |
| put(byte b) | Transfers the byte specified by the argument to the buffer at the current position and increments the position by 1. An exception of type BufferOverflowException is thrown if the buffer’s position is not less than its limit. |
| put(int index, byte b) | Transfers the byte specified by the second argument to the buffer at the index position specified by the first argument. The buffer position is unchanged. An exception of type IndexOutOfBoundsException is thrown if the index value is negative or greater than or equal to the buffer’s limit. |
| put(byte[] array) | Transfers all the elements of array to this buffer starting at the current position. The position is incremented by the length of the array. An exception of type BufferOverflowException is thrown if there is insufficient space in the buffer to accommodate the contents of the array. |
| put(byte[] array, | Transfers bytes from array[offset] to array[offset+length-1] inclusive to the buffer. If there is insufficient space for them in the buffer, an exception of type BufferOverflowException is thrown. |
| put(ByteBuffer src) | Transfers the bytes remaining in src to the buffer. This is src.remaining() elements from the buffer src from its position index to limit-1. If there is insufficient space to accommodate these, then an exception of type BufferOverflowException is thrown. If src is identical to the current buffer — you are trying to transfer a buffer to itself,; in other words — , an exception of type IllegalArgumentException is thrown. |
Each of these methods returns a reference to the buffer for which it was called. If the buffer is read-only, any of these methods throws an exception of type ReadOnlyBufferException. You see how a buffer can be read-only when I discuss using view buffers in more detail. Each buffer object that stores elements of a given primitive type — CharBuffer, DoubleBuffer, or whatever — has put() methods analogous to those for ByteBuffer, but with arguments of a type appropriate to the type of element in the buffer.
The ByteBuffer class has some extra methods that enable you to transfer binary data of other primitive types to the buffer. For example, you can transfer a value of type double to a buffer of type ByteBuffer with either of the methods in Table 10-8.
TABLE 10-8: ByteBuffer Methods that Transfer double Values
| METHOD | DESCRIPTION |
| putDouble(double value) | Transfers the double value specified by the argument to the buffer at the current position and increments the position by 8. If there are fewer than 8 bytes remaining in the buffer, an exception of type BufferOverflowException is thrown. |
| putDouble(int index, double value) | Transfers the double value specified by the second argument to the buffer starting at the index position specified by the first argument. The buffer’s position is unchanged. If there are fewer than 8 bytes remaining in the buffer, an exception of type BufferOverflowException is thrown. If index is negative or the buffer’s limit is less than or equal to index + 7, the method throws an exception of type IndexOutOfBoundsException. |
Note that these provide for transferring only single values. If you want to transfer an array of values you must use a loop. Similar pairs of methods to the preceding are defined in the ByteBuffer class to transfer values of other primitive types. These are the methods putChar(), putShort(), putInt(), putLong(), and putFloat(), each of which transfers a value of the corresponding type. Like the other put() methods you have seen, these all return a reference to the buffer for which they are called. This is to enable you to chain the calls for these methods together in a single statement if you want. For example:
String text = "Value of e = ";
ByteBuffer buf = ByteBuffer.allocate(text.length()+ sizeof(Math.E));
buf.put(text.getBytes()).putDouble(Math.E);
buf.rewind();               // Reset the current position to zero
Here, you write the string to the buffer by converting it to bytes by calling its getBytes() method and passing the result to the put() method for the buffer. The put() method returns a reference to the buffer, buf, so you use that to call the putDouble() method to write the 8 bytes for the double value, Math.E, to the buffer. Of course, putDouble() also returns a reference to buf, so you can chain further calls together in the same statement if you wish. Here the buffer capacity has been allocated so that it exactly accommodates the data to be loaded, so the capacity is 21 bytes. Each time you call the put() method for a buffer, the position is moved to the next available position in the buffer. To write the data to the buffer, the position must be set to where the contents to be written start. Calling the rewind() method for a buffer resets the position to zero.
The putDouble() method writes the 8-byte binary double value to the buffer, so you are not going to be able to read this very easily by inspecting the file. If you want to write the value of Math.E as characters, you could use the following code:
String text = "Value of e = ";
String eValue = Double.toString(Math.E);
ByteBuffer buf = ByteBuffer.allocate(text.length()+ eValue.length());
buf.put(text.getBytes()).put(eValue.getBytes()).rewind();
Now you have the double value written as a string of bytes. The toString() method in the Double class converts the double value to a string. Note that you can chain the rewind() call for the buffer, too.
Note that you are transferring the string characters to the buffer as bytes in the local character encoding in the previous code fragment, not as Unicode characters. To transfer them as the original Unicode characters, you could code the operations like this:
String text = "Value of e = ";
char[] array = text.toCharArray();       // Create char[] array from the string
ByteBuffer buf = ByteBuffer.allocate(2*array.length);
// Now use a loop to transfer array elements one at a time
for (char ch : array) {
  buf.putChar(ch);
}
Here you use a collection-based for loop to write the elements of the array that you create from text to the buffer.
Retrieving Data from a Buffer
A ByteBuffer object provides get() methods to retrieve data from a buffer that are analogous to the put() methods. You use the get() methods after data has been read into a buffer from an external source and you apply these in the next chapter when you read files. There are four get() method overloads in the ByteBuffer class, as shown in Table 10-9.
TABLE 10-9: ByteBuffer get() Methods
| METHOD | DESCRIPTION |
| get() | This extracts and returns the byte from the current buffer position and increments the position. |
| get(int index) | Returns the byte at index position index. |
| get(byte[] bytes) | Retrieves bytes.length bytes from the buffer, starting at position 0. The buffer position is incremented by bytes.length. A reference to the current buffer is returned. The method throws BufferUnderflowException if there are fewer than bytes.length bytes available from the buffer. |
| get(byte[] bytes, int offset, int length) | Retrieves length bytes from the buffer starting at the current buffer position and stores them in the bytes array starting at index position offset. The buffer position is incremented by length. A reference to the current buffer is returned. The method throws BufferUnderflowException if there are fewer than length bytes available, or IndexOutOfBoundsException if the values of offset and/or length result in an illegal array index. |
Because the last two methods return a reference to the buffer, you can chain calls together to extract data into two or more arrays in a single statement. Each of the view buffer classes have essentially the same four get() methods available for extracting data items of the type that the buffer holds. The ByteBuffer class also has extraction methods for data items that parallel the put methods for fundamental types of data. These are getChar(), getInt(), getLong(), getFloat(), and getDouble(). Each of these comes in two versions, — one without a parameter that retrieves the item at the current position and the other with an index parameter of type int that retrieves the item at the specified position.
Using View Buffers
View buffers are intended to make it easier to transfer data elements of various basic types to or from a ByteBuffer. The only slightly tricky part is that you have to keep track of the position for the original ByteBuffer object yourself when you use a view buffer because operations with the view buffer do not update the position for the backing byte buffer. You could do what the previous code fragment does using view buffers:
String text = "Value of e";
ByteBuffer buf = ByteBuffer.allocate(50);   // The original byte buffer
CharBuffer charBuf = buf.asCharBuffer();    // Create view buffer
charBuf.put(text);                          // Transfer string via view buffer

// Update byte buffer position by the number of bytes we have transferred
buf.position(buf.position() + 2*charBuf.position());

buf.putDouble(Math.E);                      // Transfer binary double value
Putting data into a view buffer with a relative put() operation updates only the position of the view buffer. The position for the backing ByteBuffer is unchanged, so you must increment it to account for the number of bytes occupied by the Unicode characters that you have written. Because you transfer the eight bytes for the constant Math.E directly using buf, the position in buf is incremented by 8 automatically. Of course, it’s essential that you update the buffer’s position to account for the characters you have transferred before you transfer the floating-point value. If you don’t, you overwrite the first 8 bytes of the character data.
Preparing a Buffer for Output to a File
You have seen that a buffer starts out with its position set to 0 — the first element position — and with its limit set to the capacity. The state of a view buffer reflects the state of the byte buffer from which it is created. Suppose you create a byte buffer with the following statement:
ByteBuffer buf = ByteBuffer.allocate(80);
You can now create a view buffer from this byte buffer that you can use to store values of type double with the statement:
DoubleBuffer doubleBuf = buf.asDoubleBuffer();
The view buffer’s initial state is shown in Figure 10-7.

The limit is automatically set to the capacity, 10, so it points to the position that is one beyond the last value. You could load six values of type double into this buffer with the following statements:
double[] data = { 1.0, 1.414, 1.732, 2.0, 2.236, 2.449 };
doubleBuf.put(data);         // Transfer the array elements to the buffer
The put() operation automatically increments the position for the view buffer. Now the buffer is shown in Figure 10-8.
The position and limit values are now set to values ready for more data to be added to the buffer. The value of position points to the first empty element, and limit points to one beyond the last empty element. Of course, the position for the backing ByteBuffer is still in its original state, but you can update that to correspond with the data you have loaded into the view buffer with the statement:
buf.Position(8*doubleBuf.Position());
If you now want to write the data you have in the byte buffer to a file, you must change the values for position and limit in the byte buffer to identify the elements that are to be written. A file write operation writes data elements starting from the element in the buffer at the index specified by position, and up to and including the element at the index limit-1. To write the data to the file, the limit for the byte buffer needs to be set to the current position, and the position needs to be set back to zero. You could do this explicitly using the methods you have seen. For example:
buf.limit(buf.position()).rewind(0);
This first sets the limit to the byte referenced by the current position and then resets the position back to the first byte, byte 0. You could call the position() method with the argument 0 instead of calling rewind(). However, you don’t need to specify the operation in such detail. The Buffer class conveniently defines the flip() method that does exactly this, so you would normally set up the buffer to be written to a file like this:
buf.flip();
The flip() method returns the buffer reference as type Buffer, so you can chain this operation on the buffer with others in a single statement. So, after you have loaded your byte buffer with data, don’t forget to flip it before you write it to a file. If you don’t, your data is not written to the file, but garbage might well be. If you loaded the data using a view buffer, you also have to remember to update the byte buffer’s position before performing the flip.
The clear() method sets the limit to the capacity and the position to zero, so it restores these values to the state they had when the buffer was created. This doesn’t reset the data in the buffer though. The contents are left unchanged. If you want to reset the data you must transfer new data to the buffer. You typically call the clear() method when you want to reuse a buffer, either to load new data into it ready to be written, or to read data into it from a channel. The rewind() method simply resets the position to zero, leaving the limit unchanged. This enables you to reread the data that is in the buffer. The clear() and rewind() methods are defined in the base class Buffer, and both return a reference to the buffer of type Buffer, so you can chain these operations with others that are defined in the Buffer class.
Now you have a rough idea of how you can work with buffers, let’s investigate how you can apply this knowledge to writing files.
WRITING A FILE USING A CHANNEL
The java.nio.channels.FileChannel class encapsulates a file channel and a FileChannel object provides a connection to a file for writing and/or reading. A channel is simply a path for data to flow to or from an external device. The FileChannel class provides the most flexible and powerful way to read, write, or both read and write a file. To write to a file using a channel, you assemble the data that you want to transfer in one or more buffers, and then write the contents of the buffers to the file. Reading a file is the inverse of this process and you learn more about this in the next chapter. The methods that a FileChannel object provides for reading and writing files are declared in channel interfaces that the FileChannel class implements. All these interfaces are defined in the java.nio.channels package.
Channel Interfaces
The channel interfaces are related as illustrated in the hierarchy shown in Figure 10-9.
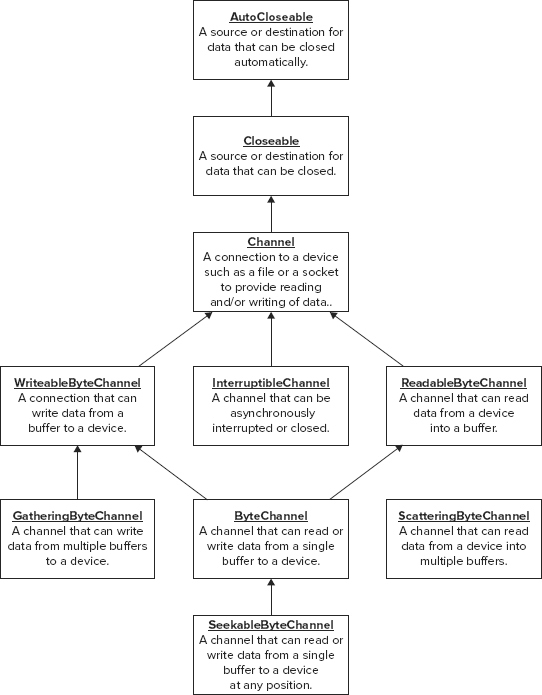
Each arrow points from a given interface to an interface that it extends. The ReadableByteChannel interface provides for reading from a file into a single ByteBuffer and the WritableByteChannel provides for writing the contents of a ByteBuffer to a file. The ByteChannel interface simply combines the operations specified by the ReadableByteChannel and WritableByteChannel interfaces without declaring any additional methods. The ScatteringByteChannel interface extends the ReadableByteChannel interface by adding methods that allow data to be read and distributed among several separate buffers in a single operation. The GatheringByteChannel interface adds methods to those of the WritableByteChannel interface to permit writing from a number of separate buffers in a single operation.
The SeekableByteChannel interface provides the most comprehensive set of methods for file operations providing random access to a file for both reading and writing.
The InterruptibleChannel interface is implemented by classes encapsulating channels for network sockets and other interruptible devices; I concentrate on file operations in this book, so I won’t discuss this interface further.
Channel Operations
The channel interfaces all extend a common interface, java.nio.channels.Channel, which declares two methods:
- The close() method, which closes a channel
- The isOpen() method, which tests the state of the channel, returning true if it is open and false otherwise
Because the channel interfaces all extend the AutoCloseable interface, all channel objects can be closed automatically if you create them in a try block with resources. The methods that each channel interface in the hierarchy declares are as follows:
ReadableByteChannel interface:
- int read(ByteBuffer input): Reads bytes from a channel into the input buffer and returns the number of bytes read, or −1 if the end of the stream is reached.
WritableByteChannel interface:
- int write(ByteBuffer output): Writes bytes from the output buffer to the channel and returns the number of bytes written.
- ByteChannel interface: This interface just inherits methods from the ReadableByteChannel and WritableByteChannel interfaces. No additional methods are declared.
SeekableByteChannel interface:
- long position(): Returns the current position for the channel that corresponds to the current file position.
- SeekableByteChannel position(long new)): Sets the channel’s position and thus the position in the file to new.
- int read(ByteBuffer buf): Reads bytes from the channel into buf and returns the number of bytes read, or −1 if the channel has reached the end of the stream.
- int write(ByteBuffer buf): Writes the contents of buf to the channel and returns the number of bytes written.
- SeekableByteChannel truncate(long size): Truncates the file to which the channel is connected to size bytes and returns a reference to the channel to permit chaining method calls. If size is greater than the current size then the file is not modified.
- long size(): Returns the number of bytes in the file to which the channel is attached.
ScatteringByteChannel interface:
- int read(ByteBuffer[] inputs): Reads bytes from the channel into the array of buffers inputs and returns the number of bytes read or −1 if the end of the stream is reached.
- int read(ByteBuffer[] inputs, int offset, int length): Reads bytes from the channel into length buffers from the array inputs starting with the buffer inputs[offset].
GatheringByteChannel interface:
- int write(ByteBuffer[] outputs): Writes bytes from the array of buffers outputs to the channel, and returns the number of bytes written.
- int write(ByteBuffer[] outputs, int offset, int length): Writes bytes to the channel from length buffers from the array outputs starting with the buffer outputs[offset].
All of these methods can throw exceptions of one kind or another, and I go into details on these when you come to apply them. Note that a channel works only with buffers of type ByteBuffer. Other kinds of buffers do exist as you know, but you can’t use them directly with the read() and write() methods for a channel.
Obtaining a Channel for a File
To obtain a channel for a file, you call the static newByteChannel() method from the Files class. The first argument is a Path object that encapsulates the file path. The second argument specifies an EnumSet of options from the java.nio.file.StandardOpenOption enumeration that you have already seen. This set of options specifies how you want to work with the file. You used an EnumSet object to hold enum constants in the previous chapter when you implemented walking a file tree, and you learn about the details of the EnumSet class in Chapter 14.
The newByteChannel() method returns a FileChannel object as a reference of type java.nio.channels.SeekableByteChannel. However, ideally you should store the reference returned by the newByteChannel() method in a variable of the interface type that suits what you want to do with the channel and that corresponds with the options you have set. For example, if you are simply writing a file, use WritableByteChannel as the variable type that holds the reference returned by the newByteChannel() method or if you are reading a file use ReadableByteChannel.
NOTE Although the newByteChannel() method returns a reference to an object of type FileChannel, you cannot store the reference directly in a variable of this type. You can only store the reference as type SeekableByteChannel, or one of the interface types that the SeekableByteChannel interface extends. To store the reference as type FileChannel, you must explicitly cast it to that type.
The following statements create a channel:
Path file = Paths.get("D:Junkmydata.txt");
WritableByteChannel fileOut = Files.newByteChannel(
                          file, EnumSet.of(WRITE,  CREATE, TRUNCATE_EXISTING));
This creates a channel that can write the file specified by the file path. If the file does not exist, it is created and any existing contents are overwritten. The newByteChannel() method can throw several exceptions:
- IllegalArgumentException if you supply an invalid set of options.
- FileAlreadyExistsException if you specify the CREATE_NEW option and the file already exists.
- IOException if an I/O error occurs.
The method can also throw SecurityException if access to the file is prevented by a security manager.
Channel Write Operations
The WritableByteChannel interface declares a single method, write() that returns the number of bytes written as type int. The argument is a ByteBuffer object containing the bytes to be written to the file. A channel write() operation can throw any of the following exceptions:
- ClosedChannelException: Thrown if the channel is closed.
- AsynchronousCloseException: Thrown if another thread closes the channel while the write operation is in progress.
- ClosedByInterruptException: Thrown if another thread interrupts the current thread while the write operation is in progress.
- IOException: Thrown if some other I/O error occurs.
The first three are subclasses of IOException, which must be caught, so you generally put the write() method call in a try block. Typically this beis a try block with resources in which you create the channel so you get the close() method called automatically. If you want to react specifically to one or other of first three exceptions, you need to add a catch block for that specific type. Otherwise, you can just include a single catch block for type IOException to catch all four types of exception.
Let’s try a simple example.
TRY IT OUT: Creating a Channel and Writing to a File
This example creates a file and uses a channel to write some text to it:
import static java.nio.file.StandardOpenOption.*;
import java.nio.channels.WritableByteChannel;
import java.io.IOException;
import java.nio.ByteBuffer;
import java.util.EnumSet;
import java.nio.file.*;

public class TryChannel {

  public static void main(String[] args) {
    String[] sayings = {
     "The more you plan the luckier you get.",
     "The time to complete a project is the time " +
           "one person would need to complete it " +
           "multiplied by the number of people on the project.",
     "If at first you don't succeed, remove any evidence that you tried.",
     "A clever person solves problems, a wise person avoids them.",
     "Death is nature's way of telling you to slow down.",
     "A hen is an egg's way of making other eggs.",
     "The earlier you begin coding the later you finish.",
     "Anything you can't understand is intuitively obvious."};

    String separator = System.lineSeparator();

    Path file = Paths.get(System.getProperty("user.home")).
                   resolve("Beginning Java Stuff").resolve("MoreSayings.txt");
    try {
      // Create parent directory if it doesn't exist
      Files.createDirectories(file.getParent());
    } catch(IOException e) {
      System.err.println("Error creating directory: " + file.getParent());
      e.printStackTrace();
      System.exit(1);
    }
    System.out.println("New file is: " + file);

    ByteBuffer buf = null;                       // Buffer to hold a saying
    try(WritableByteChannel channel =
                       Files.newByteChannel(file, EnumSet.of(CREATE, WRITE))){

      // Write sayings to the file
      for(String saying : sayings) {
        // Saying & separator in buffer
        buf = ByteBuffer.wrap((saying + separator).getBytes());
        channel.write(buf);
      }
      System.out.println("File written.");
    } catch (IOException e) {
      e.printStackTrace();
    }
  }
}
TryChannel.java
The file path will be created in your user home directory.
The only output is the file path and a message confirming that the file has been written, but you should be able to inspect the contents of the MoreSayings.txt file that is created in the Beginning Java Stuff directory. If you are using Microsoft Windows, Notepad does it.
How It Works
You obtain the newline separator for the system by calling the static lineSeparator() method in the System class. You append this to each string to separate the strings in the file. Defining the path and creating the directory if necessary is as you have seen before.
The FileChannel object is created in the try block using the static newByteChannel() method in the Files classed. The reference that is returned is stored as type WritableByteChannel because the options you specified determine that the file is only opened for writing. Storing the reference as a WritableByteChannel reference restricts the methods available to just the write() method that the WritableByteChannel interface declares.
The data to be written to the file has to be in a ByteBuffer object to allow it to be written by the channel. The getBytes() method in the String class converts the characters in a string to bytes using the default Charset for your environment. You apply this method in the loop to each string from the sayings array with a line separator appended to it. The static wrap() method in the ByteBuffer class creates a buffer that wraps the bytes from the byte array that you pass as the argument.
The write() method for the FileChannel object writes the contents of the buffer to the file. When the try block ends, the close() method for the channel is called automatically to close the channel and release the resources associated with it, including the file.
You have used only the simplest write() method for a FileChannel object to write all the data contained in a single ByteBuffer object to a file. Write operations can be more complicated in three ways:
1. You can arrange that only part of the data in a ByteBuffer is written to the file.
2. You can use write() methods declared in the GatheringByteChannel interface that write data from multiple buffers to a file in a single operation.
3. You can write to random position in a file.
Let’s explore each of these possibilities in a little more detail.
Writing Part of a Buffer to a File
So far you have not been concerned with the buffer’s limit and position in the examples. As you know, a buffer’s position and limit determines the number of bytes written to the file when the write() method executes. Bytes are written starting with the byte at the buffer’s current position. The number of bytes written is limit-position, which is the number returned by the remaining() method for the buffer object. The write() method that writes a single buffer returns the number of bytes that were actually written as a value of type int.
Let’s try an example that shows how the buffer’s position and limit change during operations with the buffer.
TRY IT OUT: Buffer State during a Channel Write
You write the string "Garbage in, garbage out " to a file with the name charData.txt in the Junk directory. If you want to write to a file that is different from the example, just change the path accordingly. Here is the code:
import static java.nio.file.StandardOpenOption.*;
import java.nio.file.*;
import java.nio.channels.*;

import java.util.EnumSet;
import java.io.IOException;
import java.nio.ByteBuffer;

public class BufferStateTrace {
  public static void main(String[] args) {
    String phrase = "Garbage in, garbage out.
";

    Path file = Paths.get(System.getProperty("user.home")).
                      resolve("Beginning Java Stuff").resolve("charData.txt");
    try {
      // Make sure we have the directory
      Files.createDirectories(file.getParent());
    } catch (IOException e) {
      e.printStackTrace();
      System.exit(1);
    }
    System.out.println("New file is: " + file);

    try (WritableByteChannel channel = Files.newByteChannel(file,
                                                 EnumSet.of(WRITE, CREATE))) {
      ByteBuffer buf = ByteBuffer.allocate(1024);
      System.out.printf(
 "
New buffer:           position = %1*2d   Limit = %2*4d   capacity = %3*4d",
                                  buf.position(), buf.limit(), buf.capacity());
      // Load the data into the buffer
      for(char ch : phrase.toCharArray())
        buf.putChar(ch);
      System.out.printf(
 "
Buffer after loading: position = %1*2d   Limit = %2*4d   capacity = %3*4d",
                                  buf.position(), buf.limit(), buf.capacity());
      buf.flip();                  // Flip the buffer ready for file write
      System.out.printf(
 "
Buffer after flip:    position = %1*2d   Limit = %2*4d   capacity = %3*4d",
                                  buf.position(), buf.limit(), buf.capacity());
      channel.write(buf);         // Write the buffer to the file channel
      buf.flip();
      channel.write(buf);         // Write the buffer again to the file channel
      System.out.println("
Buffer contents written to the file - twice.");
    } catch (IOException e) {
      e.printStackTrace();
    }
  }
}
BufferStateTrace.java
The program produces some command-line output to trace what is going on with the buffer. After you have compiled and run this program, you should see the following output following the file path:
New buffer:           position =  0   Limit = 1024   capacity = 1024
Buffer after loading: position = 50   Limit = 1024   capacity = 1024
Buffer after flip:    position =  0   Limit =   50   capacity = 1024
You can inspect the contents of the file charData.txt using a plaintext editor. They should look something like the following:
G a r b a g e i n , g a r b a g e o u t . G a r b a g e i n , g a r b a g e o u t .
There are spaces between the characters in the output because the file contents are displayed as 8-bit characters and you are writing Unicode characters to the file where 2 bytes are written for each character in the original string. Your text editor might represent the first of each byte pair as something other than spaces, or possibly not at all, as they are bytes that contain zero. You might even find that your plaintext editor displays only the first 'G'. If so, try to find another editor. If you are using the NetBeans editor, it can display the file contents correctly. If you run the example more than once, the phrase is appended to the file again for each execution of the program.
How It Works
In the try block, you call the static createDirectories() method in the Files class to ensure that the directory is there. This method creates the directory and any subdirectories that are necessary and does nothing if the entry already exists. You then call newByteChannel() in the Files class for the file path to create a channel for the file. Because you have specified the CREATE option, the method creates the file if it does not exist. Specifying the WRITE and APPEND options opens the file for writing with new data being added to the end of the file.
Next, you create a buffer with a capacity of 1024 bytes and output the position, limit, and capacity values for the buffer. You then call putChar() for the buffer object, buf, in a loop, to copy the characters from the array that you create by calling toCharArray() for the String object. The output that follows shows that the buffer position has been changed as a result.
Calling flip() for the buffer object causes the position to be reset to zero and the limit to be set to the end of the data in the buffer, as the next line of output shows.
The FileChannel class has a size() method that returns the length of the file, in bytes, as a value of type long. You could try this out by adding the following statement immediately after the statement that writes the buffer to the channel:
System.out.println("
The file contains " + ((FileChannel)channel).size() + " bytes.");
You have to cast reference in the channel variable to type FileChannel in order to call the size() method. You should see that 50 bytes are written to the file each time, because phrase contains 25 characters. The size() method returns the total number of bytes in the file, so the number grows by 100 each time you run the program.
File Position
The position of a file is the index position of where the next byte is to be read or written in the file. The first byte in a file is at position zero so the value for a file’s position is the offset of the next byte from the beginning. Don’t confuse the file position with the position for a buffer that I discussed earlier — the two are quite independent.
When you write the contents of a buffer to a file using a channel, the byte at the buffer’s current position is written to the file at the file’s current position. This is illustrated in Figure 10-10.
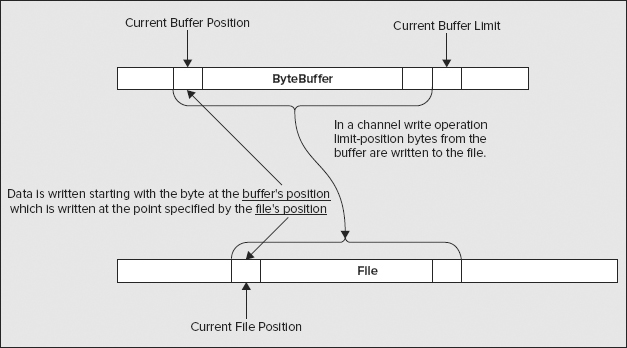
The file channel object keeps track of the current position in the file. If you created the file stream to append to the file by using a FileOutputStream constructor with the append mode argument as true then the file position recorded by the channel for the file starts out at the byte following the last byte. Otherwise, the initial file position is the first byte of the file. The file position is generally incremented by the number of bytes written each time you write to the file. There is one exception to this. The SeekableByteChannel interface declares a write() method that does what is presented in Table 10-10.
TABLE 10-10: SeekableByteChannel write() Method
| METHOD | DESCRIPTION |
| write(ByteBuffer buf, long position) | This writes the contents of the buffer, buf, to the file at the position specified by the second argument, and not the file position recorded by the channel. Bytes from the buffer are written starting at the buffer’s current position, and buf.remaining() bytes are written. This does not update the channel’s file position. |
This method can throw any of the following exceptions:
- IllegalArgumentException: Thrown if you specify a negative value for the file position.
- NonWritableChannelException: Thrown if the file was not opened for writing.
- ClosedChannelException: Thrown if the channel is closed.
- ClosedByInterruptException: Thrown if another thread interrupts the current thread while the write operation is in progress.
- IOException: Thrown if any other I/O error occurs.
You might use this version of the write() method in a sequence of writes to update a particular part of the file without disrupting the primary sequence of write operations. For example, you might record a count of the number of records in a file at the beginning. As you add new records to the file, you could update the count at the beginning of the file without changing the file position recorded by the channel, which would be pointing to the end of the file where new data is to be written.
A FileChannel object has two versions of the position() method. The position() method without a parameter returns the file position as type long. It is of type long to provide for large files that could contain more than two billion bytes. You can also set the file position by calling the position() method with an argument of type long that specifies a new position. This sets the file’s position to the new value. For example, if you have a reference to a file channel stored in a variable outputChannel, you could alter the file position with the following statements:
try {
  outputChannel.position(fileChannel.position() - 100L);
} catch (IOException e) {
  e.printStackTrace();
}
This moves the current file position back by 100 bytes. This could be because you have written 100 bytes to the file and want to reset the position so you can rewrite it. The call to the position() method should normally be in a try block because it can throw an exception of type IOException if an I/O error occurs.
You can set the file position beyond the end of the file. If you then write to the file, the bytes between the previous end of the file and the new position contain junk values. If you try to read from a position beyond the end of the file, an end-of-file condition is returned immediately.
Using a View Buffer to Load a Byte Buffer
The code in the previous example is not the only way of writing the string to the buffer. You could have used a view buffer, like this:
    ByteBuffer buf = ByteBuffer.allocate(1024);
    CharBuffer charBuf = buf.asCharBuffer();
    charBuf.put(phrase);                 // Transfer string to buffer
    buf.limit(2*charBuf.position());     // Update the byte buffer limit
You can then write the contents of buf to the channel as in the example.
Transferring the string via a view buffer of type CharBuffer is much simpler. The only fly in the ointment is that the backing ByteBuffer has no knowledge of any data you put in the view buffer. The position for buf is still sitting firmly at zero with the limit set as the capacity, so flipping it won’t set it up ready to write to the channel. However, all you have to do is set the limit for buf to correspond to the number of bytes that you transferred to the view buffer.
Of course, if you were writing the file for use by some other program, writing Unicode characters could be very inconvenient if the other program environment did not understand it. In this case you would write the data as bytes in the local character encoding, as you did in the first example in this chapter.
Writing Varying Length Strings to a File
It is very often the case that you want to write strings of different lengths to a file using a channel. In this case, if you want to recover the strings from the file, you need to provide some information in the file that allows the beginning and/or end of each string to be determined. A BufferedReader has a readLine() method that enables strings that are separated by line separators to be read easily, but a channel deals with mixed character and binary data so you don’t have that luxury.
One possibility is to write the length of each string to the file immediately preceding the string itself. This tells you how many characters there are in a string before you read it. You can use a view buffer to do this. Let’s see how that might work in an example.
TRY IT OUT: Writing Multiple Strings to a File
This example just writes a series of useful proverbs to a file:
import static java.nio.file.StandardOpenOption.*;
import java.nio.file.*;
import java.nio.channels.*;

import java.util.EnumSet;
import java.io.IOException;
import java.nio.ByteBuffer;

public class WriteProverbs {
  public static void main(String[] args) {
    String[] sayings = {
      "Indecision maximizes flexibility.",
      "Only the mediocre are always at their best.",
      "A little knowledge is a dangerous thing.",
      "Many a mickle makes a muckle.",
      "Who begins too much achieves little.",
      "Who knows most says least.",
      "A wise man sits on the hole in his carpet."
    };

    Path file = Paths.get(System.getProperty("user.home")).
                      resolve("Beginning Java Stuff").resolve("Proverbs.txt");
    try {
      // Make sure we have the directory
      Files.createDirectories(file.getParent());
    } catch (IOException e) {
      e.printStackTrace();
      System.exit(1);
    }
    System.out.println("New file is: " + file);

    // The buffer must accommodate the longest string
    // so we find the length of the longest string
    int maxLength = 0;
    for (String saying : sayings) {
      if(maxLength < saying.length())
        maxLength = saying.length();
    }

    // The buffer length must hold the longest string
    // plus its length as a binary integer
    // Each character needs 2 bytes and an integer 4 bytes
    ByteBuffer buf = ByteBuffer.allocate(2*maxLength + 4);

    try (WritableByteChannel channel = Files.newByteChannel(
                                 file, EnumSet.of(WRITE, CREATE, APPEND))) {

     for (String saying : sayings) {
        buf.putInt(saying.length()).asCharBuffer().put(saying);
        buf.position(buf.position() + 2*saying.length()).flip();
        channel.write(buf);            // Write the buffer to the file channel
        buf.clear();
      }
      System.out.println("Proverbs written to file.");
    } catch (IOException e) {
      e.printStackTrace();
    }
  }
}
WriteProverbs.java
When you execute this, it should produce the following rather terse output following the file path specification:
Proverbs written to file.
You can check the veracity of this assertion by inspecting the contents of the file with a plain text editor. Of course, the length values look strange because they are binary integer values, not characters.
How It Works
You create a String array, sayings[], that contains seven proverbs. The same ByteBuffer object is used to write all of the strings so it must be large enough to hold the characters from the longest string plus a 4-byte binary integer value for the length of the string.
The strings are written to the file in the for loop in the try block that creates the WritableByteChannel object. You put the length of each proverb in the buffer using the putInt() method for the ByteBuffer object. You then use a view buffer of type CharBuffer to transfer the string to the buffer. The contents of the view buffer, charBuffer starts at the current position for the byte buffer. This corresponds to the byte immediately following the string length value because the putInt() method increments the buffer position.
Transferring the string into the view buffer causes only the view buffer’s position to be updated. The byte buffer’s position is still pointing at the byte following the binary string length value where the first character of the string was written. You therefore have to increment the position for the byte buffer by twice the number of characters in the string before flipping it to make it ready to be written to the file.
The first time you run the program, the file doesn’t exist, so it is created. You can then look at the contents. If you run the program again, the same proverbs are appended to the file, so there is a second set. Alternatively, you could modify the sayings[] array to contain different proverbs the second time around. Each time the program runs, the data is added at the end of the existing file.
After writing the contents of the byte buffer to the file, you call its clear() method to reset the position to zero and the limit back to the capacity. This makes it ready for transferring the data for the next proverb on the next iteration. Remember that it doesn’t change the contents of the buffer, though.
Using a Formatter Object to Load a Buffer
You saw the java.util.Formatter class when I introduced the printf() method that you can use with the System.out stream object in Chapter 8. The Formatter class defines a constructor that accepts a reference of type java.lang.Appendable as an argument, and because the PrintStream and PrintWriter classes implement the Appendable interface, you can construct a Formatter object that formats data into these objects. The CharBuffer class also implements the Appendable interface so you can create a Formatter object that formats data into a view buffer of type CharBuffer. Here’s how you might create a Formatter object ready for use with a view buffer:
ByteBuffer buf = ByteBuffer.allocate(1024);   // Byte buffer
CharBuffer charBuf = buf.asCharBuffer();      // View buffer
Formatter formatter = new Formatter(charBuf); // Formatter to write view buffer
You can now use the format() method for the Formatter object to format data values into the view buffer charBuf. Recall that the format() method works just like printf()— with the first argument being a format string and the arguments that follow specifying the data values to be formatted. Of course, writing data into the view buffer leaves the backing byte buffer’s limit unchanged, so you must update this to reflect the data that is now in the buffer before attempting to write the buffer’s contents to the channel. You can see how this works with a simple example.
TRY IT OUT: Using a Formatter Object to Load a Buffer
Here’s the code to use a Formatter object to prepare the data to be written to a file:
import static java.nio.file.StandardOpenOption.*;
import java.nio.file.*;                         // Files  and Path
import java.nio.channels.WritableByteChannel;
import java.nio.*;                             // ByteBuffer and CharBuffer
import java.util.*;                            // Formatter and EnumSet
import java.io.IOException;

public class UsingAFormatter {
  public static void main(String[] args) {
    String[] phrases = {"Rome wasn't burned in a day.",
                        "It's a bold mouse that sits in the cat's ear.",
                        "An ounce of practice is worth a pound of instruction."
                       };
    String separator = System.lineSeparator();      // Get line separator
    Path file = Paths.get(System.getProperty("user.home")).
                      resolve("Beginning Java Stuff").resolve("Phrases.txt");
    try {
      // Make sure we have the directory
      Files.createDirectories(file.getParent());
    } catch (IOException e) {
      e.printStackTrace();
      System.exit(1);
    }
    System.out.println("New file is: " + file);

    try (WritableByteChannel channel = Files.newByteChannel(
                                 file, EnumSet.of(WRITE, CREATE, APPEND))) {

      ByteBuffer buf = ByteBuffer.allocate(1024);
      CharBuffer charBuf = buf.asCharBuffer(); // Create a view buffer
      System.out.println("Char view buffer:");
      System.out.printf("position = %2d  Limit = %4d  capacity = %4d%n",
                       charBuf.position(),charBuf.limit(),charBuf.capacity());

      Formatter formatter = new Formatter(charBuf);

      // Write to the view buffer using a formatter
      int number = 0;                          // Proverb number
      for(String phrase : phrases) {
        formatter.format("Proverb%2d: %s%s", ++number, phrase, separator);
        System.out.println("
View buffer after loading:");
        System.out.printf("position = %2d  Limit = %4d  capacity = %4d%n",
                       charBuf.position(), charBuf.limit(),charBuf.capacity());

        charBuf.flip();                        // Flip the view buffer
        System.out.println("View buffer after flip:");
        System.out.printf("position = %2d  Limit = %4d  length = %4d%n",
                          charBuf.position(),charBuf.limit(),charBuf.length());

        buf.limit(2*charBuf.length());         // Set byte buffer limit

        System.out.println("Byte buffer after limit update:");
        System.out.printf("position = %2d  Limit = %4d  length = %4d%n",
                           buf.position(),buf.limit(), buf.remaining());

        channel.write(buf);                    // Write buffer to the channel
        System.out.println("Buffer contents written to file.");
        buf.clear();
        charBuf.clear();
      }
    } catch (IOException e) {
       e.printStackTrace();
    }
  }
}
UsingAFormatter.java
With this example I got the following output after the path for the file:
Char view buffer:
position =  0  Limit =  512  capacity =  512

View buffer after loading:
position = 41  Limit =  512  capacity =  512
View buffer after flip:
position =  0  Limit =   41  length =   41
Byte buffer after limit update:
position =  0  Limit =   82  length =   82
Buffer contents written to file.

View buffer after loading:
position = 58  Limit =  512  capacity =  512
View buffer after flip:
position =  0  Limit =   58  length =   58
Byte buffer after limit update:
position =  0  Limit =  116  length =  116
Buffer contents written to file.

View buffer after loading:
position = 66  Limit =  512  capacity =  512
View buffer after flip:
position =  0  Limit =   66  length =   66
Byte buffer after limit update:
position =  0  Limit =  132  length =  132
Buffer contents written to file.
You can inspect the contents of the file with a plain text editor. Remember that the data is written as Unicode characters.
How It Works
You first create an array of three strings that are written to the file. You can add more to the array if you like. I kept it at three to keep the volume of output down. You’ve seen the first part of the code that sets up the path and channel before, so I’m going straight to where the buffer is loaded.
You set up the byte buffer and a view buffer holding characters with the statements:
    ByteBuffer buf = ByteBuffer.allocate(1024);
    CharBuffer charBuf = buf.asCharBuffer();
After outputting the state of the view buffer charBuf, you create the Formatter object that you use to load the buffer:
Formatter formatter = new Formatter(charBuf);
The format() method for this Formatter object writes data to charBuf.
After defining the number variable that stores the proverb sequence number, you load the buffer and write to the file in a for loop like this:
    for(String phrase : phrases) {
       // Load the buffer...
       // Write the buffer to the file...
     }
This loop iterates over each of the strings in the phrases array. You load a proverb from phrases into the view buffer with the statement:
formatter.format("Proverb%2d: %s%s", ++number, phrase, separator);
This transfers the incremented value of number followed by the string, phrase, and a separator character formatted according to the first argument to the format() method. The separator character is useful in separating records when the file is read. Executing this statement updates the position for the view buffer, but not the byte buffer.
You flip the view buffer with the statement:
charBuf.flip(); // Flip the view buffer
Flipping the view buffer sets its limit as the current position and resets its position to 0. The length() method for the view buffer returns the number of characters in the buffer, which is limit-position. You could obtain the same result by calling the remaining() method that the CharBuffer class inherits from the Buffer class. You update the limit for the byte buffer with this statement:
buf.limit(2*charBuf.length()); // Set byte buffer limit
Because each Unicode character occupies 2 bytes, the statement sets the byte buffer limit to twice the number of characters in charBuf.
With the byte buffer set up ready to be written to the channel, you write the data to the file with the statement:
channel.write(buf); // Write buffer to the channel
You now need to reset the limit and position for both the byte buffer and the view buffer to be ready for the next proverb to be written. The following two statements do this:
        buf.clear();
        charBuf.clear();
Calling the clear() method for a buffer sets the buffer’s position back to 0 and its limit to the capacity.
This example looks a little more complicated than it really is because of all the statements tracing the states of the buffer. If you delete these, you find the code is quite short.
The output shown for this example was produced on a Microsoft Windows system where a newline is written as two characters, CR and LF. If you are using Linux or other operating systems that represent a newline as a single NL character, the values for position after the buffer has been loaded by the Formatter object are less.
Direct and Indirect Buffers
When you allocate a byte buffer by calling the static allocate() method for the ByteBuffer class, you get an indirect buffer. An indirect buffer is not used by the native I/O operations, which have their own buffers. Data to be written to a file has to be copied from your indirect buffer to the buffer that the native output routine uses before the write operation can take place. Similarly, after a read operation the data is copied from the input buffer used by your operating system to the indirect buffer that you allocate.
Of course, with small buffers and limited amounts of data being read, using an indirect buffer doesn’t add much overhead. With large buffers and lots of data, it can make a significant difference, though. In this case, you can use the allocateDirect() method in the ByteBuffer class to allocate a direct buffer. The JVM tries to make sure that the native I/O operation makes use of the direct buffer, thus avoiding the overhead of the data copying process. The allocation and de-allocation of a direct buffer carries its own overhead, which might outweigh any advantages gained if the buffer size and data volumes are small.
You can test whether a buffer object encapsulates a direct buffer by calling its isDirect() method. This returns true if it is a direct buffer and false otherwise.
You could try this out by making a small change to the WriteProverbs example. Just replace the statement
ByteBuffer buf = ByteBuffer.allocate(2*maxLength + 4);
with the following two statements:
    ByteBuffer buf = ByteBuffer.allocateDirect(2*maxLength + 4);
    System.out.println("Buffer is "+ (buf.isDirect()?"":"not")+"direct.");
This outputs a line telling you whether the program is working with a direct buffer or not. If it is, it will produce the following output:
Buffer is direct.
Proverbs written to file.
Writing Numerical Data Using a Channel
Let’s see how you could set up the primes-generating program from Chapter 4 to write the primes to a file instead of outputting them to the command line. You base the new code on the MorePrimes version of the program. Ideally, you could add a command-line argument to specify how many primes you want. This is not too difficult. Here’s how the code starts off:
import static java.lang.Math.ceil;
import static java.lang.Math.sqrt;
import static java.lang.Math.min;

public class PrimesToFile {
  public static void main(String[] args) {
    int primesRequired = 100;                    // Default prime count
    if (args.length > 0) {
      try {
        primesRequired = Integer.valueOf(args[0]).intValue();
      } catch (NumberFormatException e) {
        System.out.println("Prime count value invalid. Using default of "
                           + primesRequired);
      }
      // Method to generate the primes...
      // Method to create the file path...
      // Method to write the file...
    }
  }
}
Here, if you don’t find a command-line argument that you can convert to an integer, you just use a default count of 100. The static import statements enable you to use the static methods in the Math class that you need for the calculation without qualifying their names.
You can now generate the primes with code similar to that in Chapter 4 as follows:
  // Calculate enough primes to fill the array
  private static long[] getPrimes(long[] primes) {
    primes[0] = 2L;                                // Seed the first prime
    primes[1] = 3L;                                // and the second
    // Count of primes found - up to now, which is also the array index
    int count = 2;
    // Next integer to be tested
    long number = 5L;

    outer:
    for (; count < primes.length ; number += 2) {

      // The maximum divisor we need to try is square root of number
      long limit = (long)ceil(sqrt((double)number));

      // Divide by all the primes we have up to limit
      for (int i = 1; i < count && primes[i] <= limit; ++i)
        if (number % primes[i] == 0L)              // Is it an exact divisor?
          continue outer;                          // yes, try the next number

      primes[count++] = number;                    // We got one!
    }
    return primes;
  }
PrimesToFile.java
Here’s how the method to create the file path looks:
  // Create the path for the named file in the specified directory
  // in the user home directory
  private static Path createFilePath(String directory, String fileName) {
    Path file = Paths.get(System.getProperty("user.home")).
                      resolve(directory).resolve(fileName);
    try {
      // Make sure we have the directory
      Files.createDirectories(file.getParent());
    } catch (IOException e) {
      e.printStackTrace();
      System.exit(1);
    }
    System.out.println("New file is: " + file);
    return file;
  }
PrimesToFile.java
Now all you need to do is add the code to write the primes to the file. Let’s put this into a working example.
TRY IT OUT: Writing Primes to a File
This program splits the primes calculation, the creation of the file path, and the operations to write the file, into separate methods. Here’s the complete example, with the method that writes the file shown shaded:
import static java.lang.Math.ceil;
import static java.lang.Math.sqrt;
import static java.lang.Math.min;
import static java.nio.file.StandardOpenOption.*;
import java.nio.file.*;
import java.nio.channels.*;
import java.nio.*;
import java.util.*;
import java.io.IOException;

public class PrimesToFile {
  public static void main(String[] args) {
    int primesRequired = 100;                    // Default count
    if (args.length > 0) {
      try {
        primesRequired = Integer.valueOf(args[0]).intValue();
      } catch (NumberFormatException e) {
        System.out.println("Prime count value invalid. Using default of "
                           + primesRequired);
      }
    }

      long[] primes = new long[primesRequired];    // Array to store primes

      getPrimes(primes);                           // Calculate the primes
      Path file = createFilePath("Beginning Java Stuff", "primes.bin");
      writePrimesFile(primes, file);               // Write the file
  }

  // Calculate enough primes to fill the array
  private static long[] getPrimes(long[] primes) {
    primes[0] = 2L;                                // Seed the first prime
    primes[1] = 3L;                                // and the second
    // Count of primes found - up to now, which is also the array index
    int count = 2;
    // Next integer to be tested
    long number = 5L;

    outer:
    for (; count < primes.length ; number += 2) {

      // The maximum divisor we need to try is square root of number
      long limit = (long)ceil(sqrt((double)number));

      // Divide by all the primes we have up to limit
      for (int i = 1; i < count && primes[i] <= limit; ++i)
        if (number % primes[i] == 0L)              // Is it an exact divisor?
          continue outer;                          // yes, try the next number

      primes[count++] = number;                    // We got one!
    }
    return primes;
  }

  // Create the path for the named file in the specified directory
  // in the user home directory
  private static Path createFilePath(String directory, String fileName) {
    Path file = Paths.get(System.getProperty("user.home")).
                      resolve(directory).resolve(fileName);
    try {
      // Make sure we have the directory
      Files.createDirectories(file.getParent());
    } catch (IOException e) {
      e.printStackTrace();
      System.exit(1);
    }
    System.out.println("New file is: " + file);
    return file;
  }
  // Write the array contents to file
  private static void writePrimesFile(long[] primes, Path file) {
    final int BUFFERSIZE = 100;                  // Byte buffer size
    try (WritableByteChannel channel = Files.newByteChannel(
                                         file, EnumSet.of(WRITE, CREATE))) {
      ByteBuffer buf = ByteBuffer.allocate(BUFFERSIZE);
      LongBuffer longBuf = buf.asLongBuffer();   // View buffer for type long
      int primesWritten = 0;                 // Count of primes written to file
      while (primesWritten < primes.length) {
        longBuf.put(primes,                  // Array to be written
                    primesWritten,           // Index of 1st element to write
                    min(longBuf.capacity(), primes.length - primesWritten));
        buf.limit(8*longBuf.position());     // Update byte buffer position
        channel.write(buf);
        primesWritten += longBuf.position();
        longBuf.clear();
        buf.clear();
      }
      System.out.println("File written is " +
                                    ((FileChannel)channel).size() + " bytes.");
    } catch (IOException e) {
      e.printStackTrace();
    }
  }
PrimesToFile.java
If you don’t supply the number of primes you want as a command-line argument, this program produces the following output:
File written is 800 bytes.
This looks reasonable because you wrote 100 values of type long as binary data and they are 8 bytes each. I ran the program with 150 as the command-line argument.
How It Works
You call the three methods that calculate the primes, create the file path, and write the file in sequence:
      getPrimes(primes);                           // Calculate the primes
      Path file = createFilePath("Beginning Java Stuff", "primes.bin");
      writePrimesFile(primes, file);               // Write the file
You could condense the three statements into one:
writePrimesFile(
     getPrimes(primes), createFilePath("Beginning Java Stuff", "primes.bin"));
The references returned by the getPrimes() and createFilePath() methods are the arguments to the writePrimesFile() method. This doesn’t improve the readability of the code though, so there’s no advantage gained by this.
The code to calculate the primes and to create a Path object for the specified directory and file name in the user home directory is essentially what you have seen previously so I won’t repeat the discussion of these.
Because you don’t specify that you want to append to the file when you create the channel object, the file is overwritten each time you run the program.
You create the ByteBuffer object with a capacity of 100 bytes. This is a poor choice for the buffer size as it is not an exact multiple of 8 — so it doesn’t correspond to a whole number of prime values. However, I chose this value deliberately to make the problem of managing the buffer a bit more interesting. You can change the buffer size by changing the value specified for BUFFERSIZE.
The primes are transferred to the buffer through a view buffer of type LongBuffer. You obtain this from the original byte buffer, buf, by calling its asLongBuffer() method. Because this buffer is too small to hold all the primes, you have to load it and write the primes to the file in a loop.
The primesWritten variable counts how many primes have been written to the file, so you use this to control the while loop that writes the primes. The loop continues as long as primesWritten is less than the number of elements in the primes array. The number of primes that the LongBuffer object can hold corresponds to longBuf.capacity(). You can transfer this number of primes to the buffer as long as there is that many left in the array still to be written to the file, so you transfer a block of primes to the buffer like this:
        longBuf.put(primes,                    // Array to be written
                    primesWritten,             // Index of 1st element to write
                    min(longBuf.capacity(), primes.length - primesWritten));
The first argument to the put() method is the array that is the source of the data, and the second argument is the index position of the first element to be transferred. The third argument is the capacity of the buffer as long as there is more than that number of primes still in the array. If there is less than this number on the last iteration, you transfer primes.length-primesWritten values to the buffer.
Because you are using a relative put operation, loading the view buffer changes the position for that buffer to reflect the number of values transferred to it. However, the backing byte buffer that you use in the channel write operation still has its limit and position unchanged. You therefore set the limit for the byte buffer with the statement:
buf.limit(8*longBuf.position());
Each prime occupies 8 bytes, so multiplying the position value for the view buffer by 8 gives you the number of bytes occupied in the primary buffer. You then go ahead and write that buffer to the file and increment primesWritten by the position value for the view buffer, because this corresponds to the number of primes that were written. Before the next iteration, you call clear() for both buffers to reset their positions and limits to their original states — to 0 and the capacity, respectively. When you have written all the primes, the loop ends and you output the length of the file. The channel closes automatically because it was created within the try block with resources.
Because this file contains binary data, you will not want to view it except perhaps for debugging purposes.
Writing Mixed Data to a File
Sometimes, you might want to write more than one kind of binary data to a file. You might want to mix integers with floating-point values with text for example. The text might be descriptive information about each floating-point value, and there could be an integer sequence number. Generally you will want to write floating-point data as binary because the character representation of a value may not be accurate and of course it often makes sense to write text as text.
One way to do this is to use multiple view buffers. You can get an idea of how this works by outputting some text along with each binary prime value in the previous example. Rather than taking the easy route by just writing the same text for each prime value, let’s add a character representation of the prime value preceding each binary value. You add something like "prime = nnn" ahead of each binary value.
The first point to keep in mind is that if you ever want to read the file successfully, you can’t just dump strings of varying lengths in it. You would have no way to tell where the text ended and where the binary data began. You have to either fix the length of the string so you know how many bytes are characters when you read the file, or you must provide data in the file that specifies the length of the string. Let’s therefore choose to write the data corresponding to each prime as three successive data items:
1. A count of the length of the string as binary value (it would sensibly be an integer type, but you’ll make it type double because you need the practice).
2. The string representation of the prime value "prime = nnn", where obviously the number of digits vary.
3. The prime as a binary value of type long.
The basic prime calculation does not change at all, so you need only update the shaded method in the previous example that writes the file.
The basic strategy is to create a byte buffer and then create a series of view buffers that map the three different kinds of data into it. A simple approach would be to write the data for one prime at a time, so let’s try that first. Setting up the channel is the same, but it is better to change the file extension to .txt so you can look at it as a text file.
Path file = createFilePath("Beginning Java Stuff", "primes.txt");
Changing the file extension to .txt also differentiates it from the original binary file that you wrote with the previous version so you retain both. You will use of both files when you are looking into file read operations in the next chapter, so don’t delete them.
The byte buffer has to be large enough to hold the double value that counts the characters in the string, the string itself, plus the long value for the prime. The original byte buffer with 100 bytes capacity is plenty big enough so let’s go with that. You need to create three view buffers from the byte buffer, one that holds the double value for the count, one for the string, and one for the binary prime value, but you have a problem, which is illustrated in Figure 10-11.
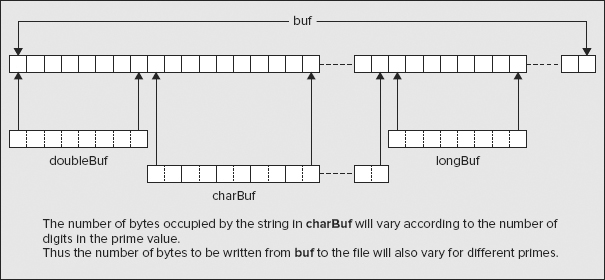
Because the length of the string depends on the number of decimal digits in the value of each prime, you don’t know where it ends. This implies you can’t map the last buffer, longBuf, to a fixed position in the byte buffer, buf. You are going to have to set this buffer up dynamically inside the file-writing loop after you figure out how long the string for the prime is. You can set up the first two view buffers outside the loop, though:
    DoubleBuffer doubleBuf = buf.asDoubleBuffer();
    buf.position(8);
    CharBuffer charBuf = buf.asCharBuffer();
The first buffer that holds the string length as type double, maps to the beginning of the byte buffer, buf. The view buffer into which you place the string needs to map to the position in buf immediately after the space required for the double value — 8 bytes from the beginning of buf, in other words. Remember that the first element in a view buffer maps to the current position in the byte buffer. Thus, you can just set the position for buf to 8 before creating the view buffer, charBuf. All that you need to add is the loop that loads up the first two view buffers, the code to create the third view buffer and load it, and the code to write the file. Let’s put the whole thing together as a working example.
TRY IT OUT: Using Multiple View Buffers
The code for the loop is shaded in the following complete program:
import static java.lang.Math.ceil;
import static java.lang.Math.sqrt;
import static java.lang.Math.min;
import static java.nio.file.StandardOpenOption.*;
import java.nio.file.*;
import java.nio.channels.*;
import java.nio.*;
import java.util.*;
import java.io.IOException;

public class PrimesToFile2 {
  public static void main(String[] args) {
    int primesRequired = 100;                    // Default count
    if (args.length > 0) {
      try {
        primesRequired = Integer.valueOf(args[0]).intValue();
      } catch (NumberFormatException e) {
        System.out.println("Prime count value invalid. Using default of "
                           + primesRequired);
      }
    }

      long[] primes = new long[primesRequired];    // Array to store primes

      getPrimes(primes);                           // Calculate the primes
      Path file = createFilePath("Beginning Java Stuff", "primes.txt");
      writePrimesFile(primes, file);               // Write the file
  }

  // getPrimes() method as in the previous example...

  // createFilePath() method as in the previous example...

  // Write the array contents to file
  private static void writePrimesFile(long[] primes, Path file) {
    final int BUFFERSIZE = 100;                  // Byte buffer size
    try (WritableByteChannel channel = Files.newByteChannel(
                                         file, EnumSet.of(WRITE, CREATE))) {
      ByteBuffer buf = ByteBuffer.allocate(BUFFERSIZE);
      DoubleBuffer doubleBuf = buf.asDoubleBuffer();
      buf.position(8);
      CharBuffer charBuf = buf.asCharBuffer();
      LongBuffer longBuf = null;
      String primeStr = null;

      for (long prime : primes) {
        primeStr = "prime = " + prime;               // Create the string
        doubleBuf.put(0,(double)primeStr.length());  // Store the string length
        charBuf.put(primeStr);                       // Store the string
        buf.position(2*charBuf.position() + 8);      // Position for 3rd buffer
        longBuf = buf.asLongBuffer();                // Create the buffer
        longBuf.put(prime);                    // Store the binary long value
        buf.position(buf.position() + 8);      // Set position after last value
        buf.flip();                             // and flip
        channel.write(buf);                    // Write the buffer as before

        buf.clear();
        doubleBuf.clear();
        charBuf.clear();
      }
      System.out.println("File written is " +
                                    ((FileChannel)channel).size() + " bytes.");
    } catch (IOException e) {
      e.printStackTrace();
    }
  }
}
PrimesToFile2.java
With the default number of primes to be generated, this example should produce the following output following the file path:
File written is 3742 bytes.
NOTE If you run the example to generate a given number of primes and then run it again, the file is overwritten. Of course, if you generate fewer primes when you rerun the program, the file size does not go down!
How It Works
I’m discussing only the body of the collection-based for loop that iterates over the elements in the primes array because that’s the new functionality in the example. It is shown in bold.
You create the string first because you need to know its length so you can put the length in the buffer first. You insert the length as type double in the view buffer, doubleBuf. You then put the string into charBuf as this buffer already maps to the position starting 8 bytes along from the start of buf. Next, you update the position in buf to the element following the string. This enables you to map longBuf to the correct position in the byte buffer. After creating the third view buffer, longBuf, you load the prime value. You then update the position for buf to the byte following this value. This is the position as previously set plus 8. Finally, you flip buf to set the position and limit for writing, and then write the contents of buf to the file channel.
If you inspect the file with a plain text editor you should get an idea of what is in the file. You should be able to see the Unicode strings separated by the binary values you have written to the file. Of course, the binary value doesn’t look particularly meaningful when viewed as characters.
This example writes the file one prime at a time, so it’s not going to be very efficient. It would be better to use a larger buffer and load it with multiple primes. Let’s explore how you might do that with another version of the program.
TRY IT OUT: Multiple Records in a Buffer
You load the byte buffer using three different view buffers repeatedly to put data for as many primes into the buffer as you can. The basic idea is illustrated in Figure 10-12.

I’m just showing the new code that replaces the code in the previous example here. This is the code that allocates the buffers and writes the file:
// import statements as before...

public class PrimesToFile3 {
  public static void main(String[] args) {
    int primesRequired = 100;                    // Default count
    if (args.length > 0) {
      try {
        primesRequired = Integer.valueOf(args[0]).intValue();
      } catch (NumberFormatException e) {
        System.out.println("Prime count value invalid. Using default of "
                           + primesRequired);
      }
    }

      long[] primes = new long[primesRequired];    // Array to store primes

      getPrimes(primes);                           // Calculate the primes
      Path file = createFilePath("Beginning Java Stuff", "primesAgain.txt");
      writePrimesFile(primes, file);               // Write the file
  }

  // getPrimes() method as in the previous example...

  // createFilePath() method as in the previous example...

  // Write the array contents to file
  private static void writePrimesFile(long[] primes, Path file) {
    final int BUFFERSIZE = 1024;              // Buffer size in bytes - bigger!
    try (WritableByteChannel channel = Files.newByteChannel(
                                         file, EnumSet.of(WRITE, CREATE))) {
      ByteBuffer buf = ByteBuffer.allocate(BUFFERSIZE);
      String primeStr = null;
      int primesWritten = 0;

      while (primesWritten < primes.length) {
        while (primesWritten < primes.length) {
          primeStr = "prime = " + primes[primesWritten];
          if ((buf.position() + 2*primeStr.length() + 16) > buf.limit()) {
            break;
          }
          buf.asDoubleBuffer().put(0, (double)primeStr.length());
          buf.position(buf.position() + 8);
          buf.position(buf.position()
                              + 2*buf.asCharBuffer().put(primeStr).position());
          buf.asLongBuffer().put(primes[primesWritten++]);
          buf.position(buf.position() + 8);
        }
        buf.flip();
        channel.write(buf);
        buf.clear();
      }
      System.out.println("File written is " +
                                    ((FileChannel)channel).size() + " bytes.");
    } catch (IOException e) {
      e.printStackTrace();
    }
  }
}
PrimesToFile3.java
You should get the same output about the file size as for the previous example here.
How It Works
In the writePrimesFile() method, you first create a byte buffer with a capacity of 1024 bytes. All the view buffers are created inside the inner while loop. Both loops end when the value of primesWritten, which counts the number of primes written to the file, reaches the length of the primes array. The inner loop loads up the buffer and the outer loop writes the contents of the buffer to the file.
The first step in the inner loop is to create the prime string. This makes it possible to check whether there is enough free space in the byte buffer to accommodate the string plus the two binary values — the string length as type double and the binary prime value of type long that together require 16 bytes. If there isn’t enough space, the break statement is executed so the inner loop ends, and the channel writes the buffer contents to the file after flipping it. After the buffer has been written, the buffer’s clear() method is called to reset the position to 0 and the limit to the capacity.
When there is space in the byte buffer, the inner loop loads the buffer starting with the statement:
buf.asDoubleBuffer().put(0, (double)primeStr.length());
This creates a view buffer of type DoubleBuffer and calls its put() method to transfer the length of the string to the buffer. You don’t save the view buffer reference because you need a different view buffer on the next iteration — one that maps to the position in the byte buffer following the data that you are transferring for the current prime.
The next statement increments the position of the byte buffer by the number of bytes in the string length value. You then execute the statement:
        buf.position(buf.position()
                       + 2*buf.asCharBuffer().put(primeStr).position());
This statement is a little complicated so let’s dissect it. The expression for the argument to the position() method within the parentheses executes first. This calculates the new position for buf as the current position, given by buf.position(), plus the value resulting from the expression:
2*buf.asCharBuffer().put(primeStr).position()
The subexpression, buf.asCharBuffer(), creates a view buffer of type CharBuffer. You call the put() method for this buffer to transfer primeStr to it, and this returns a reference to the CharBuffer object. You use this reference to call the put() method for the CharBuffer object to transfer the string. You use the reference that the put() method returns to call the position() method for the CharBuffer object, which returns the buffer position after the string has been transferred, so multiplying this value by 2 gives the number of bytes occupied by the string in buf. Thus, you update the position for buf to the point following the string that you transfer to the buffer.
The last step in the inner loop is to execute the following statements:
        buf.asLongBuffer().put(primes[primesWritten++]);
        buf.position(buf.position() + 8);
The first statement here transfers the binary prime value to the buffer via a view buffer of type LongBuffer and increments the count of the number of primes written to the file. The second statement updates the position for buf to the next available byte. The inner while loop then continues with the next iteration to load the data for the next prime into the buffer. This continues until there is insufficient space for data for another prime, whereupon the inner loop ends, and the buffer is written to the file in the outer loop.
Writing from Multiple Buffers
I will introduce one further file channel output capability before you try reading a file — the ability to transfer data to a file from several buffers in sequence in a single write operation. This is called a gathering-write operation. The advantage of this capability is that it avoids the necessity to copy information into a single buffer before writing it to a file. A gathering-write operation is one side of what are called scatter-gather I/O operations. You look into the other side — the scattering-read operation — in the next chapter.
A file channel has two methods declared by the GatheringByteChannel interface that performs gathering-write operations from an array of ByteBuffer objects:
- write(ByteBuffers[] buffers)): Writes bytes from each of the buffers in the buffers array to the file in sequence, starting at the channel’s current file position.
- write(ByteBuffers[] buffers,int offset, int length): Writes data to the file starting at the channel’s current file position from buffers[offset] to buffers[offset + length −1] inclusive and in sequence.
Both methods can throw the same exceptions as the write method for a single ByteBuffer object. The second of these methods can also throw an IndexOutOfBoundsException if offset or offset+length-1 is not a legal index value for the buffers array.
The data that is written from each buffer to the file is determined from that buffer’s position and limit, in the way you have seen. One obvious application of the gathering-write operation is when you are reading data from several different files into separate buffers, and you want to merge the data into a single file. You can also use multiple buffers, each with its own view buffer where necessary, as an alternative to multiple views of a single ByteBuffer. You can see how it works by using yet another variation on the primes-writing program.
TRY IT OUT: The Gathering Write
In this example, you set up the string length, the string itself, and the binary prime value in separate byte buffers. You also write the prime string as bytes in the local encoding.
Here’s the code:
import static java.lang.Math.ceil;
import static java.lang.Math.sqrt;
import static java.nio.file.StandardOpenOption.*;
import java.nio.file.*;
import java.nio.channels.*;
import java.nio.*;
import java.util.*;
import java.io.IOException;

public class GatheringWrite {
  public static void main(String[] args) {
    int primesRequired = 100;                    // Default count
    if (args.length > 0) {
      try {
        primesRequired = Integer.valueOf(args[0]).intValue();
      } catch (NumberFormatException e) {
        System.out.println("Prime count value invalid. Using default of "
                           + primesRequired);
      }
    }

      long[] primes = new long[primesRequired];    // Array to store primes

      getPrimes(primes);                           // Calculate the primes
      Path file = createFilePath(
                         "Beginning Java Stuff", "GatheringWritePrimes.txt");
      writePrimesFile(primes, file);               // Write the file
  }

  // getPrimes() method as in the previous example...

  // createFilePath() method as in the previous example...

  // Write the array contents to file
  private static void writePrimesFile(long[] primes, Path file) {
    try (GatheringByteChannel channel =
         (FileChannel)(Files.newByteChannel(file, EnumSet.of(WRITE, CREATE)))){
      ByteBuffer[] buffers = new ByteBuffer[3];   // Array of buffer references
      buffers[0] = ByteBuffer.allocate(8);        // To hold a double value
      buffers[2] = ByteBuffer.allocate(8);        // To hold a long value

      String primeStr = null;
      for (long prime : primes) {
        primeStr = "prime = " + prime;
        buffers[0].putDouble((double) primeStr.length()).flip();

        // Create the second buffer to accommodate the string
        buffers[1] = ByteBuffer.allocate(primeStr.length());
        buffers[1].put(primeStr.getBytes()).flip();

        buffers[2].putLong(prime).flip();
        channel.write(buffers);
        buffers[0].clear();
        buffers[2].clear();
      }
      System.out.println("File written is " +
                                    ((FileChannel)channel).size() + " bytes.");
    } catch (IOException e) {
      e.printStackTrace();
    }
  }
}
GatheringWrite.java
When you execute this with the default of 100 primes generated, it should produce the following output about the file size:
File written is 2671 bytes.
The length of the file is considerably less than before, because you are writing the string as bytes rather than Unicode characters. The part of the code that is different is shown shaded and I’ll concentrate on explaining that.
How It Works
This time you want the channel variable to be stored as type GatheringByteChannel because that interface declares the gathering write methods. To do this you must first cast the SeekableByteChannel reference that the newByteChannel() method returns to type FileChannel. This is necessary because the SeekableByteChannel interface does not implement the GatheringByteChannel interface, as you can see if you refer to Figure 10-9. Of course, you could also store the reference in a variable of type FileChannel, which would make all the methods in the class available.
You use three byte buffers — one for the string length, one for the string itself, and one for the binary prime value:
ByteBuffer[] buffers = new ByteBuffer[3]; // Array of buffer references
You create a ByteBuffer[] array with three elements to hold references to the buffers that you need. The buffers to hold the string length and the prime value are fixed in length so you are able to create those straightaway to hold 8 bytes each:
    buffers[0] = ByteBuffer.allocate(8);         // To hold a double value
    buffers[2] = ByteBuffer.allocate(8);         // To hold a long value
Because the string length can vary, you have to create the buffer that holds the string dynamically. You do this inside the for loop that iterates over all the prime values you have in the primes array.
After assembling the prime string as primeStr, you transfer the length of this string to the first buffer in the array:
buffers[0].putDouble((double) primeStr.length()).flip();
Note that you are able to flip the buffer in the same statement after the data value has been transferred, so it is set up ready to be written to the file. This uses the buffer reference that the putDouble() method returns to call flip().
Next, you create the buffer to accommodate the string, load the byte array equivalent of the string, and flip the buffer:
      buffers[1] = ByteBuffer.allocate(primeStr.length());
      buffers[1].put(primeStr.getBytes()).flip();
All of the put() methods for the byte buffers you are using in this example automatically update the buffer position, so you can flip each buffer as soon as the data is loaded. As an alternative to allocating this byte buffer directly to accommodate the byte array from the string, you could call the static wrap() method in the ByteBuffer class that wraps a byte array. You could achieve the same as the previous two statements with the following single statement:
buffers[1] = ByteBuffer.wrap(primeStr.getBytes());
The wrap() method creates a buffer with a capacity that is the same as the length of the array with the position set to zero and the limit to the capacity. Consequently, you don’t need to flip the buffer — it is already in a state to be written.
The third buffer in the array holds the binary prime value:
buffers[2].putLong(prime).flip();
This is essentially the same mechanism as you used to load the first buffer in the array. Here, you use putLong() to store the prime value and call flip() using the reference that is returned.
The three buffers are ready, so you write the array of buffers to the file like this:
channel.write(buffers);
This applies the gathering-write operation to write the contents of the three buffers in the buffers array to the file.
Finally, you ready the first and third buffers for the next iteration by calling the clear() method for each of them:
      buffers[0].clear();
      buffers[2].clear();
Of course, the second buffer is re-created on each iteration, so there’s no need to clear it. Surprisingly easy, wasn’t it?
FORCING DATA TO BE WRITTEN TO A DEVICE
A write() method for a channel returns when the write operation is complete, but this does not guarantee that the data has actually been written to the file. Some of the data might still reside in the native I/O buffers in memory. If the data you are writing is critical and you want to minimize the risk of losing it in the event of a system crash, you can force completion of all outstanding output operations to a file that were previously executed by the channel by calling the force() method for the FileChannel object. The argument to force() is a boolean value, false specifying that only the data needs to be forced to the storage device and true specifying both data and metadata must be written. You could use it like this:
try( ... create the channel object... ) {
  ...
  for(...) {
    //Write to the channel...
    outputChannel.force(true);               // Force output to the file
    // ...
  }
} catch (IOException e) {
  e.printStackTrace();
}
Here, critical data is being written to a file in a loop. Calling the force() method after each write operation minimizes the risk of data loss in the event of a system crash. The force() method throws a ClosedChannelException if the channel is closed, or an IOException if some other I/O error occurs. Note that the force() method guarantees only that all data is written for a local storage device. If the ultimate destination for the data you are writing using the channel is a storage device elsewhere on a network, you have no direct way to guarantee that the data gets written to the device.
Only one write operation can be in progress for a given file channel at any time. If you call write() while a write() operation that was initiated by another thread is in progress, your call to the write() method blocks until the write that’s in progress has been completed.
In this chapter, you explored the most important facilities for writing basic types of data to a file. The static methods in the Files class create the objects you need for writing files. You now have acquired knowledge of what you need to be able to write files. Reading files is the subject of the next chapter. Writing and reading objects is a little different from regular file input and output, which you learn about in Chapter 12.
EXERCISES
You can download the source code for the examples in the book and the solutions to the following exercises from www.wrox.com.
1. Implement a new version of the example that writes proverbs to a file that writes the proverbs to one file using a Writer and the length of each proverb to a separate file using an OutputStream object.
2. Write a program that creates an integer array of date values containing month, day, and year as integers for some number of dates (10, say, so the integer array is two-dimensional with 10 rows and 3 columns). The program should write a file with a string representation of each date written as Unicode characters. For example, the date values 3,2,1990 would be written to the file as 2nd March 1990. Make sure that the date strings can be read back, either by using a separator character of some kind to mark the end of each string or by writing the length of each string before you write the string itself.
3. Extend the previous example to write a second file at the same time as the first, but containing the month, day, and year values as binary data. You should have both files open and be writing to both at the same time.
4. Write a program that, for a given String object defined in the code, writes strings to a file in the local character encoding (as bytes) corresponding to all possible permutations of the words in the string. For example, for the string the fat cat, you would write the strings the fat cat, the cat fat, cat the fat, cat fat the, fat the cat, and fat cat the to the file, although not necessarily in that sequence. (Don’t use very long strings; with n words in the string, the number of permutations is n!, so a string with 10 words has 3,628,800 permutations!).

• WHAT YOU LEARNED IN THIS CHAPTER
| TOPIC | CONCEPT |
| Channels | A FileChannel object encapsulates a connection to a file for reading or writing or both. |
| Obtaining a Channel for a File | A FileChannel object for a file is obtained by calling the static newByteChannel() method in the Files class with a Path object that encapsulates the file path as the first argument. The reference to the object is returned as type SeekableByteChannel. |
| Channel Interfaces | The FileChannel class implements several channel interfaces including WritableByteChannel that declares the write() method that you use to write to a channel, ReadableByteChannel that declares the read() method that you use to read from a channel, and SeekableByteChannel that extends the other two interfaces and declares further methods. The GatheringWriteChannel and GatheringReadChannel interfaces declare methods that work with arrays of buffers. |
| Random Access to a File | The SeekableByteChannel interface provide the capability for writing to any position in a file. |
| File Position | A file has a position value that indicates the index position in the file where the next byte is written or read. A FileChannel object keeps track of the current file position and enables you to modify it. The position for a file is independent of the position for a buffer. |
| Buffers | A buffer contains data to be written to a file or data that has been read from a file. Only ByteBuffer objects can be used directly in file I/O operations using a channel. |
| Data in a Buffer | A buffer’s position is the index position of the first item of data in the buffer to be written or read. A buffer’s limit specifies the index position of the first data item in the buffer that is not to be written or read. |
| View Buffers | A view buffer is a buffer that allows the data in a backing byte buffer to be viewed as being of a particular basic type. |
| Transferring Data to and from a Buffer | You insert data into a buffer using its put() methods and retrieve data from it using its get() methods. Relative get() and put() methods increment the buffer’s position, whereas absolute get() and put() methods do not. |
| Writing a Buffer to a Channel | You write the contents of a ByteBuffer object to a file using a write() method belonging to the FileChannel object for the file. |
| Data Transfer between a Buffer and a Channel | The amount of data transferred between a buffer and a channel in an I/O operation is determined by the buffer’s position and limit. Data is read or written starting at the file’s current position. |
