
Chapter 5
Defining Classes
WHAT YOU WILL LEARN IN THIS CHAPTER
- What a class is, and how you define a class
- How to implement class constructors
- How to define class methods
- What method overloading is
- What a recursive method is and how it works
- How to create objects of a class type
- What packages are and how you can create and use them
- What access attributes are and how you should use them in your class definitions
- What nested classes are and how you use them
In this chapter you explore the heart of the Java language: classes. Classes specify the objects you use in object-oriented programming. These form the basic building blocks of any Java program, as you saw in Chapter 1. Every program in Java involves classes because the code for a program can appear only within a class definition.
You explore the details of how a class definition is put together, how to create your own classes, and how to use classes to solve your own computing problems. And in the next chapter, you build on this to look at how object-oriented programming helps you work with sets of related classes.
As you saw in Chapter 1, a class is a prescription for a particular kind of object — it defines a new type. You use the definition of a class to create objects of that class type — that is, to create objects that incorporate all the components specified as belonging to that class.
NOTE In case that’s too abstract, look back to the previous chapter where you used the String class. The String class is a comprehensive definition for a String object, with all the operations you are likely to need specified. Whenever you create a new String object, you are creating an object with all the characteristics and operations specified by the class definition. Every String object has all the methods that the String class defines built in. This makes String objects indispensable and string handling within a program easy.
The String class lies toward one end of a spectrum in terms of complexity in a class. The String class is intended to be usable in any program. It includes facilities and capabilities for operating on String objects to cover virtually all circumstances in which you are likely to use strings. In most cases your own classes won’t need to be this elaborate. You will typically be defining a class to suit your particular application, and you will make it as simple or complex as necessary. Some classes, such as a Plane or a Person, for example, may well represent objects that can potentially be very complicated, but the application requirements may be very limited. A Person object might just contain a name, address, and phone number, for example, if you are just implementing an address book. In another context, such as in a payroll program, you might need to represent a Person with a whole host of properties, such as age, marital status, length of service, job code, pay rate, and so on. How you define a class depends on what you intend to do with objects of your class.
In essence, a class definition is very simple. There are just two kinds of things that you can include in a class definition:
- Fields: These are variables that store data items that typically differentiate one object of the class from another. They are also referred to as data members of a class.
- Methods: These define the operations you can perform for the class — so they determine what you can do to, or with, objects of the class. Methods typically operate on the fields — the data members of the class.
The fields in a class definition can be of any of the primitive types, or they can be references to objects of any class type, including the one that you are defining.
The methods in a class definition are named, self-contained blocks of code that typically operate on the fields that appear in the class definition. Note, though, that this doesn’t necessarily have to be the case, as you might have guessed from the main() methods you have written in all the examples up to now.
Fields in a Class Definition
An object of a class is also referred to as an instance of that class. When you create an object, the object contains all the fields that were included in the class definition. However, the fields in a class definition are not all the same — there are two kinds.
One kind of field is associated with the class and is shared by all objects of the class. There is only one copy of each of these kinds of fields no matter how many class objects are created, and they exist even if no objects of the class have been created. This kind of variable is referred to as a class variable because the field belongs to the class and not to any particular object, although as I’ve said, all objects of the class share it. These fields are also referred to as static fields because you use the static keyword when you declare them.
The other kind of field in a class is associated with each object uniquely — each instance of the class has its own copy of each of these fields, each with its own value assigned. These fields differentiate one object from another, giving an object its individuality — the particular name, address, and telephone number in a given Person object, for example. These are referred to as non-static fields or instance variables because you specify them without using the static keyword, and each instance of a class type has its own independent set.
Because this is extremely important to understand, let’s summarize the two kinds of fields that you can include in your classes:
- Non-static fields, also called instance variables: Each object of the class has its own copy of each of the non-static fields or instance variables that appear in the class definition. Each object has its own values for each instance variable. The name instance variable originates from the fact that an object is an instance or an occurrence of a class, and the values stored in the instance variables for the object differentiate the object from others of the same class type. You declare an instance variable within the class definition in the usual way, with a type name and a variable name, and it can have an initial value specified.
- Static fields, also called class variables: A given class has only one copy of each of its static fields or class variables, and these are shared between and among all the objects of the class. Each class variable exists even if no objects of the class have been created. Class variables belong to the class, and they can be referenced by any object or class method, not just methods belonging to instances of that class. If the value of a static field is changed, the new value is available equally in all the objects of the class. This is quite different from non-static fields, where changing a value for one object does not affect the values in other objects. A static field must be declared using the keyword static preceding the type name.
Look at Figure 5-1, which illustrates the difference between class variables and instance variables.

Figure 5-1 shows a schematic of a class, Sphere, that has one class variable, PI, and four instance variables, radius, xCenter, yCenter, and zCenter. Each of the objects, globe and ball, has its own set of variables with the names radius, xCenter, yCenter, and zCenter, but both share a single copy of the class variable PI.
Why would you need two kinds of variables in a class definition? The instance variables are clearly necessary because they store the values that distinguish one particular object from another. The radius and the coordinates of the center of the sphere are fundamental to determining how big a particular Sphere object is, and where it is in space. However, although the variable PI is a fundamental parameter for every sphere — to calculate the volume, for example — it would be wasteful to store a value for PI in every Sphere object because it is always the same. As you know, it is also available from the standard class Math so it is somewhat superfluous in this case, but you get the general idea. So, one use for class variables is to hold constant values such as π that are common to all objects of the class.
Another use for class variables is to track data values that are common to all objects of a class and that need to be available even when no objects have been defined. For example, if you want to keep a count of how many objects of a class have been created in your program, you could define a variable to store the count of the number of objects as a class variable. It would be essential to use a class variable, because you would still want to be able to use your count variable even when no objects have been declared.
Methods in a Class Definition
The methods that you define for a class provide the actions that can be carried out using the variables specified in the class definition. Analogous to the variables in a class definition, there are two varieties of methods — instance methods and class methods. You can execute class methods even when no objects of a class exist, whereas instance methods can be executed only in relation to a particular object, so if no objects exist, you have no way to execute any of the instance methods defined in the class. Again, like class variables, class methods are declared using the keyword static, so they are sometimes referred to as static methods. You saw in the previous chapter that the valueOf() method is a static member of the String class.
Because static methods can be executed when there are no objects in existence, they cannot refer to instance variables. This is quite sensible if you think about it — trying to operate with variables that might not exist is bound to cause trouble. In fact the Java compiler won’t let you try. If you reference an instance variable in the code for a static method, it doesn’t compile — you just get an error message. The main() method, where execution of a Java application starts, must always be declared as static, as you have seen. The reason for this should be apparent by now. Before an application starts execution, no objects exist, so to start execution, you need a method that is executable even though there are no objects around — a static method therefore.
The Sphere class might well have an instance method volume() to calculate the volume of a particular object. It might also have a class method objectCount() to return the current count of how many objects of type Sphere have been created. If no objects exist, you could still call this method and get the count 0.
NOTE Note that although instance methods are specific to objects of a class, there is only ever one copy of each instance method in memory that is shared by all objects of the class, as it would be extremely expensive to replicate all the instance methods for each object. A special mechanism ensures that each time you call a method the code executes in a manner that is specific to an object, but I’ll defer explaining how this is possible until a little later in this chapter.
Apart from the main() method, perhaps the most common use for static methods is when you use a class just as a container for a bunch of utility methods, rather than as a specification for a set of objects. All executable code in Java has to be within a class, but lots of general-purpose functions you need don’t necessarily have an object association — calculating a square root, for example, or generating a random number. The mathematical functions that are implemented as class methods in the standard Math class are good examples. These methods don’t relate to class objects at all — they operate on values of the primitive types. You don’t need objects of type Math; you just want to use the methods from time to time, and you can do this as you saw in Chapter 2. The Math class also contains some class variables containing useful mathematical constants such as e and π.
Accessing Variables and Methods
You may want to access fields and methods that are defined within a class from outside it. It is considered bad practice to make the fields available directly but there can be exceptions to this — you’ll find some in the standard libraries. You’ll see later that it is possible to declare class members with restrictions on accessing them from outside, but let’s cover the principles that apply where the members are accessible. I’ll consider accessing static members — that is, static fields and methods — and instance members separately.
You can access a static member of a class using the class name, followed by a period, followed by the member name. With a class method you also need to supply the parentheses enclosing any arguments to the method after the method name. The period here is called the dot operator. So, if you want to calculate the square root of π you can access the class method sqrt() and the class variable PI that are defined in the Math class as follows:
double rootPi = Math.sqrt(Math.PI);
This shows how you call a static method — you just prefix it with the class name and put the dot operator between them. You also reference the static data member, PI, in the same way — as Math.PI. If you have a reference to an object of a class type available then you can also use that to access a static member of the class because every object always has access to the static members of its class. You just use the variable name, followed by the dot operator, followed by the member name.
Of course, as you’ve seen in previous chapters, you can import the names of the static members of the class by using an import statement. You can then refer to the names of the static members you have imported into your source file without qualifying their names at all.
Instance variables and methods can be called only using an object reference, because by definition they relate to a particular object. The syntax is exactly the same as I have outlined for static members. You put the name of the variable referencing the object followed by a period, followed by the member name. To use a method volume() that has been declared as an instance method in the Sphere class, you might write:
double ballVolume = ball.volume();
Here the variable ball is of type Sphere and it contains a reference to an object of this type. You call its volume() method, which calculates the volume of the ball object, and the result that is returned is stored in the variable ballVolume.
Final Fields
You can declare a field in a class to be final, which means that the field cannot be modified by the methods in the class. You can provide an initial value for a final field when you declare it. For example:
final double PI = 3.14;
If you don’t provide an initial value for a final field when you declare it, you must initialize it in a constructor, which you learn about a little later in this chapter.
To define a class you use the keyword class followed by the name of the class followed by a pair of braces enclosing the details of the definition. Let’s consider a concrete example to see how this works in practice. The definition of the Sphere class that I mentioned earlier could be:
class Sphere {
  static final double PI = 3.14;       // Class variable that has a fixed value
  static int count = 0;                // Class variable to count objects

  // Instance variables
  double radius;                       // Radius of a sphere

  double xCenter;                      // 3D coordinates
  double yCenter;                      // of the center
  double zCenter;                      // of a sphere

  // Plus the rest of the class definition...
}
You name a class using an identifier of the same sort you’ve been using for variables. By convention, though, class names in Java begin with a capital letter, so the class name is Sphere with a capital S. If you adopt this approach, you will be consistent with most of the code you come across. You could enter this source code and save it as the file Sphere.java. You add to this class definition and use it in a working example a little later in this chapter.
You may have noticed that in the examples in previous chapters the keyword public in this context preceded the keyword class in the first line of the class definition. The effect of the keyword public is bound up with the notion of a package containing classes, but I’ll defer discussing this until a little later in this chapter when you have a better idea of what makes up a class definition.
The keyword static in the first line of the Sphere class definition specifies the variable PI as a class variable rather than an instance variable. The variable PI is also initialized with the value 3.14. The keyword final tells the compiler that you do not want the value of this variable to be changed, so the compiler checks that this variable is not modified anywhere in your program. Obviously, this is a very poor value for π. You would normally use Math.PI — which is defined to 20 decimal places, close enough for most purposes.
NOTE Whenever you want to make sure that a variable will not be modified, you just need to declare the variable with the keyword final. By convention, variables that are constants have names in capital letters.
You have also declared the next variable, count, using the keyword static. All objects of the Sphere class have access to and share the one copy of count and the one copy of PI that exist. You have initialized the variable count to 0, but because you have not declared it using the keyword final, you can change its value.
The next four variables in the class definition are instance variables, as they don’t have the keyword static applied to them. Each object of the class has its own separate set of these variables, storing the radius and the coordinates of the center of the sphere. Although you haven’t put initial values for these variables here, you can do so if you want. If you don’t specify an initial value, a default value is assigned automatically when the object is created. Fields of numeric types are initialized with zero, fields of type char are initialized with ’u0000,’ and fields that store class references or references to arrays are initialized with null.
There has to be something missing from the definition of the Sphere class — there is no way to set the value of radius and the other instance variables after a particular Sphere object is created. There is nothing to update the value of count either. Adding these things to the class definition involves using methods, so the next step is to understand how a method is put together.
You have been producing versions of the main() method since Chapter 1, so you already have an idea of how a method is constructed. Nonetheless, I’ll go through how you define methods from the beginning to make sure everything is clear.
Let’s start with the fundamental concepts. A method is a self-contained block of code that has a name and has the property that it is reusable — the same method can be executed from as many different points in a program as you require. Methods also serve to break up large and complex calculations that might involve many lines of code into more manageable chunks. You execute a method by calling it using its name, and the method may or may not return a value when its execution finishes. Methods that do not return a value are always called in a statement that just specifies the call. Methods that do return a value are usually called from within an expression, and the value that is returned by such a method is used in the evaluation of the expression. If a method that returns a value is called by itself in a statement — in other words, not in an expression — then the value it returns is discarded.
The basic structure of a method is shown in Figure 5-2.

When you specify the return type for a method, you are defining the type for the value that is returned by the method when you execute it. The method must always return a value of this type. To define a method that does not return a value, you specify the return type as void. Something called an access attribute can optionally precede the return type in a method definition, but I’ll defer looking into this until later in this chapter.
The parameters to a method appear in its definition between the parentheses following the method name. These specify what information is to be passed to the method when you execute it, and the values that you supply for the parameters when you call a method are described as arguments. The parameter names are used in the body of the method to refer to the corresponding argument values that you supply when you call the method. Your methods do not have to have parameters specified. A method that does not require any information to be passed to it when it is executed has an empty pair of parentheses after the name.
Returning from a Method
To return a value from a method when its execution is complete you use a return statement. For example
return return_value; // Return a value from a method
After executing the return statement in a method, the program continues from the point where the method was called. The value return_value that is returned by the method can be any expression that produces a value of the type specified for the return value in the declaration of the method. Methods that return a value — that is, methods declared with a return type other than void — must always finish by executing a return statement that returns a value of the appropriate type. Note, though, that you can put several return statements within a method if the logic requires this. If a method does not return a value, you can just use the keyword return by itself to end execution of the method:
return; // Return from a method
For methods that do not return a value, falling through the closing brace enclosing the body of the method is equivalent to executing a return statement.
The Parameter List
The parameter list appears between the parentheses following the method name. This specifies the type of each value that can be passed as an argument to the method, and the variable name that is used in the body of the method to refer to each argument value passed to the method when it is called. The difference between a parameter and an argument is sometimes confusing because people often, incorrectly, use them interchangeably. I try to differentiate them consistently, as follows:
- A parameter has a name and a type and appears in the parameter list in the definition of a method. A parameter defines the type of value that can be passed to the method when it is called.
- An argument is a value that is passed to a method when it is executed, and the value of the argument is referenced by the parameter name during execution of the method. Of course, the type of the argument value must be consistent with the type specified for the corresponding parameter in the definition of the method.

This is illustrated in Figure 5-3.
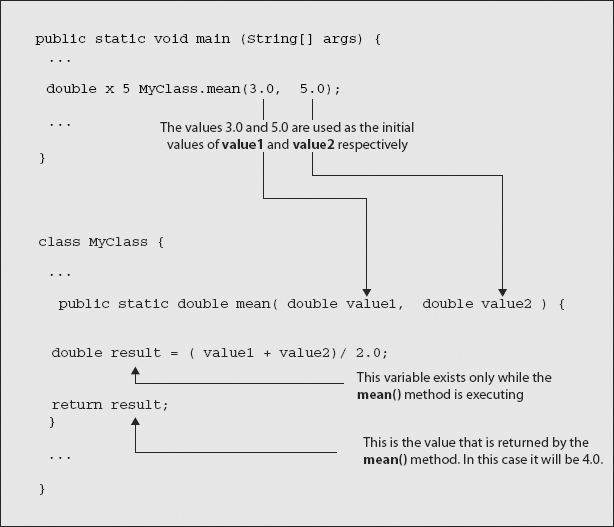
In Figure 5-3 you have the definition of a method mean(). The definition of this method appears within the definition of the class MyClass. You can see that the method has two parameters, value1 and value2, both of which are of type double. The parameter names are used to refer to the arguments 3.0 and 5.0, respectively, within the body of the method when it is called by the statement shown. Because this method has been defined as static, you can call it only using the class name.
When you call the mean() method from another method (from main() in this case, but it could be from some other method), the values of the arguments that you pass are the initial values assigned to the corresponding parameters before execution of the body of the method begins. You can use any expression you like for an argument when you call a method, as long as the value it produces is of the same type as the corresponding parameter in the definition of the method. With the method mean(), both parameters are of type double, so both argument values must always be of type double.
The method mean() defines the variable result, which exists only within the body of the method. This variable is newly created each time you execute the method and is destroyed when execution of the method ends. All the variables that you declare within the body of a method are local to the method, and are only around while the method is being executed. Variables declared within a method are called local variables because they are local to the method. The scope of a local variable is as I discussed in Chapter 2, from the point at which you declare it to the closing brace of the immediately enclosing block, and local variables are not initialized automatically. If you want your local variables to have initial values, you must supply the initial value when you declare them.
How Argument Values Are Passed to a Method
You need to be clear about how the argument values are passed to a method; otherwise, you may run into problems. In Java, all argument values are transferred to a method using what is called the pass-by-value mechanism. Figure 5-4 illustrates how this works.

Pass-by-value just means that for each argument value that you pass to a method, a copy of the value is made, and it is the copy that is passed to the method and referenced through the parameter name, not the original variable. This implies that if you use a variable of any of the primitive types as an argument, the method cannot modify the value of this variable in the calling program. In the example shown in Figure 5-4, the change() method modifies the copy of i that is created automatically and referenced using the parameter name j. Thus, the value of j that is returned is 11, and this is stored in the variable x when the return from the method executes. However, the original value of i remains at 10.
NOTE Although the pass-by-value mechanism applies to all types of arguments, the effect for objects is different from that for variables of the primitive types. A method can change an object that is passed as an argument. This is because a variable of a class type contains a reference to an object, not the object itself. Thus, when you use a variable of a class type as an argument to a method, a copy of a reference to the object is passed to the method, not a copy of the object itself. Because a copy of a reference still refers to the same object, the parameter name used in the body of a method refers to the original object that was passed as the argument.
Final Parameters
You can specify any of the parameters for a method as final. This has the effect of preventing modification of any argument value that is substituted for the parameter when you call the method. The compiler checks that your code in the body of the method does not attempt to change any final parameters. Because the pass-by-value mechanism makes copies of values of the basic types, final really makes sense only when it is applied to parameters that are references to class objects, as you see later on. Specifying a parameter of a method as final prevents accidental modification of the object reference that is passed to the method, but it does not prevent modification of the object itself.
Another important use for the final keyword is for declaring classes or methods as final, and you learn more about this in Chapter 6.
Defining Class Methods
You define a class method by adding the keyword static to its definition. For example, the class Sphere could have a class method to return the value stored in the static variable count:
class Sphere {
  // Class definition as before...

  // Static method to report the number of objects created
  static int getCount() {
    return count;                           // Return current object count
  }
}
This method needs to be a class method because you want to be able to get at the count of the number of objects that exist even when it is zero. You can amend the Sphere.java file to include the definition of getCount().
NOTE Remember that you cannot directly refer to any of the instance variables in the class within a static method. This is because a static method can be executed when no objects of the class have been created, and therefore no instance variables exist.
Accessing Class Data Members in a Method
An instance method can access any of the data members of the class, just by using the appropriate name. Let’s extend the class Sphere a little further by adding a method to calculate the volume of a Sphere object:
class Sphere {
  static final double PI = 3.14;       // Class variable that has a fixed value
  static int count = 0;                // Class variable to count objects

  // Instance variables
  double radius;                       // Radius of a sphere

  double xCenter;                      // 3D coordinates
  double yCenter;                      // of the center
  double zCenter;                      // of a sphere

  // Static method to report the number of objects created
  static int getCount(){
    return count;                      // Return current object count
  }

  // Instance method to calculate volume
  double volume() {
    return 4.0/3.0*PI*radius*radius*radius;
  }

  // Plus the rest of the class definition...
}
You can see that the volume() method is an instance method because it is not declared as static. It has no parameters, but it does return a value of type double — the calculated volume. The method uses the class variable PI and the instance variable radius in the volume calculation — this is the expression 4.0/3.0*PI*radius*radius*radius (corresponding to the formula (4/3)πr3 for the volume of a sphere) in the return statement. The value that results from this expression is returned to the point where the method is called for a Sphere object.
You know that each object of the class has its own separate set of instance variables, so how is an instance variable for a particular object selected in a method? How does the volume() method pick up the value of a radius variable for a particular Sphere object?
The Variable this
Every instance method has a variable with the name this that refers to the current object for which the method is being called. The compiler uses this implicitly when your method refers to an instance variable of the class. For example, when the method volume() refers to the instance variable radius, the compiler inserts the this object reference so that the reference is equivalent to this.radius. The return statement in the definition of the volume() method is actually the following:
return 4.0/3.0*PI*this.radius*this.radius*this.radius;
The statement actually refers to the radius field for the object referenced by the variable this. In general, every reference to an instance variable is in reality prefixed with this. You could put it in yourself, but there’s no need, the compiler does it for you. In fact, it is not good practice to clutter up your code with this unnecessarily. However, there are occasions where you have to include it, as you will see.
When you execute a statement such as
double ballVolume = ball.volume();
where ball is an object of the class Sphere, the variable this in the method volume()refers to the object ball, so the instance variable radius for the ball object is used in the calculation.
NOTE I mentioned earlier that only one copy of each instance method for a class exists in memory, even though there may be many different objects. You can see that the variable this allows the same instance method to work for different class objects. Each time an instance method is called, the this variable is set to reference the particular class object to which it is being applied. The code in the method then relates to the specific members of the object referred to by this.
You have seen that there are four different potential sources of data available to you when you write the code for a method:
- Arguments passed to the method, which you refer to by using the parameter names
- Data members, both instance variables and class variables, which you refer to by their names
- Local variables that you declare in the body of the method
- Values that are returned by other methods that are called from within the method
The names of variables that are declared within a method are local to the method. You can use a name for a local variable or a parameter in a method that is the same as that of an instance variable. If you find it necessary or convenient to do this then you must use the name this when you refer to the data member of the class from within the method. The variable name by itself always refers to the variable that is local to the method, not the instance variable.
For example, suppose you want to add a method to change the radius of a Sphere object to a new radius value that is passed as an argument. You could code this as:
void changeRadius(double radius) {
  // Change the instance variable to the argument value
  this.radius = radius;
}
In the body of the changeRadius() method, this.radius refers to the instance variable, and radius by itself refers to the parameter. No confusion in the duplication of names exists here. It is clear that you are receiving a radius value as a parameter with the name radius and storing it in the radius variable for the class object.
Initializing Data Members
You have seen how you were able to supply an initial value for the static members PI and count in the Sphere class with the following declaration:
class Sphere {
  static final double PI = 3.14;     // Class variable that has a fixed value
  static int count = 0;             // Class variable to count objects

  // Rest of the class...
}
You can also initialize ordinary non-static data members in the same way. For example:
class Sphere {
  static final double PI = 3.14;       // Class variable that has a fixed value
  static int count = 0;                // Class variable to count objects

  // Instance variables
  double radius = 5.0;                 // Radius of a sphere

  double xCenter = 10.0;               // 3D coordinates
  double yCenter = 10.0;               // of the center
  double zCenter = 10.0;               // of a sphere

  // Rest of the class...
}
Now every object of type Sphere starts out with a radius of 5.0 and has the center at the point (10.0, 10.0, 10.0).
Some things can’t be initialized with a single expression. For example, if you have a large array as a data member that you want to initialize, with a range of values that required some kind of calculation, this could be a job for an initialization block.
Using Initialization Blocks
An initialization block is a block of code between braces that is executed before an object of the class is created. There are two kinds of initialization blocks:
- A static initialization block is a block defined using the keyword static and is executed once when the class is loaded. A static initialization block can initialize only static data members of the class.
- A non-static initialization block is executed for each object that is created and thus can initialize instance variables in a class.
This is easiest to understand by considering a working example.
TRY IT OUT: Using an Initialization Block
Let’s define a simple class with a static initialization block first of all:
class TryInitialization {
  static int[] values = new int[10];             // Static array  member

  // Initialization block
  static {
    System.out.println("Running initialization block.");
    for(int i = 0 ; i < values.length ; ++i) {
      values[i] = (int)(100.0*Math.random());
    }
  }

  // List values in the array for an object
  void listValues() {
    System.out.println();                        // Start a new line
    for(int value : values) {
      System.out.print(" " + value);             // Display values
    }
    System.out.println();                        // Start a new line
  }

  public static void main(String[] args) {
    TryInitialization example = new TryInitialization();
    System.out.println("
First object:");
    example.listValues();

    example = new TryInitialization();
    System.out.println("
Second object:");
    example.listValues();
  }
TyInitialization.java
When you compile and run this, you get identical sets of values for the two objects — as might be expected because the values array is static:
Running initialization block.

First object:

 40 97 88 63 58 48 84 5 32 67

Second object:

 40 97 88 63 58 48 84 5 32 67
How It Works
The TryInitialization class has a static member, values, that is an array of 10 integers. The static initialization block is the code
  static {
    System.out.println("Running initialization block.");
    for(int i = 0 ; i < values.length ; ++i) {
      values[i] = (int)(100.0*Math.random());
    }
  }
This initializes the values array with pseudo-random integer values generated in the for loop. The output statement in the block is there just to record when the initialization block executes. Because this initialization block is static, it is only ever executed once during program execution, when the class is loaded.
The listValues() method provides you with a means of outputting the values in the array. The print() method you are using in the listValues() method works just like println(), but without starting a new line after displaying the output, so you get all the values on the same line.
In main(), you generate an object of type TryInitialization and then call its listValues() method. You then create a second object and call the listValues() method for that. The output demonstrates that the initialization block only executes once, and that the values reported for both objects are the same.
Because the values array is a static member of the class, you could list the element’s values through a static method that would not require any objects to have been created. Try temporarily adding the keyword static to the declaration of the listValues() method in the class:
  static void listValues() {
    System.out.println();                        // Start a new line
    for(int value : values) {
      System.out.print(" " + value);             // Display values
    }
    System.out.println();                        // Start a new line
  }
You can now call the method using the class name, so add two extra statements at the beginning of main():
    System.out.println("
No object:");
    TryInitialization.listValues();
If you compile and execute the program with these changes, you get an additional record of the values in the values array. You still get the output from calling listValues() using the two object references. Every object has access to the static members of its class. Of course, the values in the output are different from the previous execution because they are pseudo-random values.
If you restore the program to its original state, and then delete the static modifier before the initialization block and recompile and run the program again, you get the output along the lines of the following:
Running initialization block.

First object:

 66 17 98 59 99 18 40 96 40 21

Running initialization block.

Second object:

 57 86 79 31 75 99 51 5 31 44
Now you have a non-static initialization block. You can see from the output that the values are different for the second object because the non-static initialization block is executed each time an object is created. In fact, the values array is static, so the array is shared between all objects of the class. You could demonstrate this by amending main() to store each object separately and calling listValues() for the first object after the second object has been created. Amend the main() method in the program to read as follows:
  public static void main(String[] args) {
    TryInitialization example = new TryInitialization();
    System.out.println("
First object:");
    example.listValues();
    TryInitialization nextexample = new TryInitialization();
    System.out.println("
Second object:");
    nextexample.listValues();

    example.listValues();
  }
While you have demonstrated that this is possible, you do not normally want to initialize static variables with a non-static initialization block.
As I said at the outset, a non-static initialization block can initialize instance variables, too. If you want to demonstrate this, you just need to remove the static modifier from the declaration of values and compile and run the program once more.
You can have multiple initialization blocks in a class, in which case they execute in the sequence in which they appear. The static blocks execute when the class is loaded, and the non-static blocks execute when each object is created. Initialization blocks are useful, but you need more than that to create objects properly.
When you create an object of a class, a special kind of method called a constructor is always invoked. If you don’t define any constructors for your class, the compiler supplies a default constructor in the class, which does nothing. The default constructor is also described as the no-arg constructor because it requires no arguments to be specified when it is called. The primary purpose of a constructor is to provide you with the means of initializing the instance variables uniquely for the object that is being created. If you are creating a Person object with the name John Doe, then you want to be able to initialize the member holding the person’s name to "John Doe". This is precisely what a constructor can do. Any initialization blocks that you have defined in a class are always executed before a constructor.
A constructor has two special characteristics that differentiate it from other class methods:
- A constructor never returns a value, and you must not specify a return type — not even of type void.
- A constructor always has the same name as the class.
To see a practical example you could add a constructor to the Sphere class definition:
class Sphere {
  static final double PI = 3.14;       // Class variable that has a fixed value
  static int count = 0;                // Class variable to count objects

  // Instance variables
  double radius;                       // Radius of a sphere

  double xCenter;                      // 3D coordinates
  double yCenter;                      // of the center
  double zCenter;                      // of a sphere

  // Class constructor
  Sphere(double theRadius, double x, double y, double z) {
    radius = theRadius;              // Set the radius

    // Set the coordinates of the center
    xCenter = x;
    yCenter = y;
    zCenter = z;
    ++count;                         // Update object count
  }

  // Static method to report the number of objects created
  static int getCount() {
    return count;                      // Return current object count
  }

  // Instance method to calculate volume
  double volume() {
    return 4.0/3.0*PI*radius*radius*radius;
  }
}
The definition of the constructor is in boldface type in the preceding code. As you can see, the constructor has the same name as the class and has no return type specified. A constructor can have any number of parameters, including none. The default constructor has no parameters, as is indicated by its alternative description — the no-arg constructor. In this case the Sphere class constructor has four parameters, and each of the instance variables is initialized with the value of the appropriate parameter. Here’s a situation where you might have used the name radius for the parameter, in which case you would need to use the keyword this to refer to the instance variable of the same name. The last action of the constructor is to increment the class variable count by 1, so that count accumulates the total number of objects created.
The Default Constructor
As I said, if you don’t define any constructors for a class, the compiler supplies a default constructor that has no parameters and does nothing. Before you defined a constructor for the Sphere class, the compiler would have supplied one, defined like this:
Sphere() {
}
It has no parameters and no statements in its body so it does nothing — except enable you to create an object of type Sphere, of course. The object created by the default constructor has fields with their default values set. If you have defined any non-static initialization blocks within a class, they are executed each time any constructor executes, immediately before the execution of the code in the body of the constructor. Whenever you create an object, a constructor is called. When you have not defined any constructors for a class, the default constructor is called each time you create an object of that class type.
Note that if you define a constructor of any kind for a class, the compiler does not supply a default constructor. If you still need a no-arg constructor — and you will find many occasions when you do — you must define it explicitly in addition to the other constructors in the class.
Creating Objects of a Class
When you declare a variable of type Sphere with the following statement
Sphere ball; // Declare a variable
no constructor is called because no object is created. All you have created at this point is the variable ball, which can store a reference to an object of type Sphere, if and when you create one. Figure 5-5 shows this.
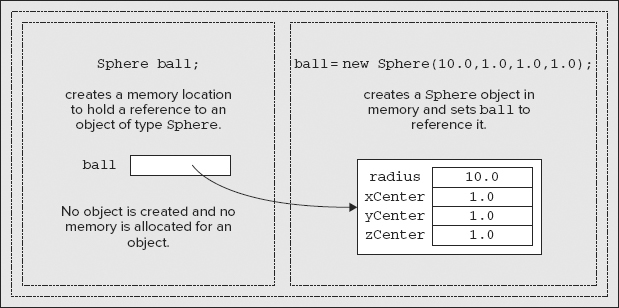
Recall from the discussion of String objects and arrays that the variable and the object it references are distinct entities. To create an object of a class you must use the keyword new followed by a call to a constructor. To initialize ball with a reference to an object, you could write:
ball = new Sphere(10.0, 1.0, 1.0, 1.0); // Create a sphere
Now you have a Sphere object with a radius of 10.0 located at the coordinates (1.0, 1.0, 1.0). The object is created in memory and occupies a sufficient number of bytes to accommodate all the data necessary to define the object. The variable ball records where in memory the object is — it acts as a reference to the object. This is illustrated in Figure 5-5.
Of course, you can do the whole thing in one step with the following statement:
Sphere ball = new Sphere(10.0, 1.0, 1.0, 1.0); // Create a sphere
This declares the variable ball and defines the Sphere object to which it refers.
You can create another variable that refers to the same object as ball:
Sphere myBall = ball;
Now the variable myBall refers to the same object as ball. You still have only one object, but you have two different variables that reference it. You could have as many variables as you like referring to the same object.
As I mentioned earlier, the separation of the variable and the object has an important effect on how objects are passed to a method, so let’s look at that in more detail.
Passing Objects to a Method
When you pass an object as an argument to a method, the mechanism that applies is called pass-by-reference, because a copy of the reference contained in the variable is transferred to the method, not a copy of the object itself. The effect of this is shown in Figure 5-6.

Figure 5-6 presumes that you have defined a method, changeRadius(), in the class Sphere, that alters the radius value for an object, and that you have a method change() in some other class that calls changeRadius(). When the variable ball is used as an argument to the method change(), the pass-by-reference mechanism causes a copy of the contents of ball to be made and stored in s. The variable ball just stores a reference to the Sphere object, and the copy contains that same reference and therefore refers to the same object. No copying of the actual object occurs. This is a major plus in terms of efficiency when passing arguments to a method. Objects can be very complex, involving a lot of instance variables. If objects themselves were always copied when passed as arguments, it could be very time-consuming and make the code very slow.
Because the copy of the reference from ball refers to the same object as the original, when the changeRadius() method is called, the original object is changed. You need to keep this in mind when writing methods that have objects as parameters because this is not always what you want.
In the example shown, the method change() returns the modified object. In practice, you probably want this to be a distinct object, in which case you need to create a new object from s. You see how you can write a constructor to do this a little later in this chapter.
NOTE Remember that this only applies to objects. If you pass a variable of a primitive type, such as int or double to a method for example, a copy of the value is passed. You can modify the value passed as much as you want in the method, but it doesn’t affect the original value.
The Lifetime of an Object
The lifetime of an object is determined by the variable that holds the reference to it — assuming there is only one. If you have the declaration
Sphere ball = new Sphere(10.0, 1.0, 1.0, 1.0); // Create a sphere
then the Sphere object that the variable ball refers to dies when the variable ball goes out of scope, which is at the end of the block containing this declaration. Where an instance variable is the only one referencing an object, the object survives as long as the instance variable owning the object survives.
NOTE A slight complication can arise with objects, though. As you have seen, several variables can reference a single object. In this case, the object survives as long as a variable still exists somewhere that references the object.
As you have seen before, you can reset a variable to refer to nothing by setting its value to null. If you write the statement
ball = null;
the variable ball no longer refers to an object, and assuming there is no other variable referencing it, the Sphere object that it originally referenced is destroyed. Note that while the object has been discarded, the variable ball still continues to exist and you can use it to store a reference to another Sphere object. The lifetime of an object is determined by whether any variable anywhere in the program still references it.
The process of disposing of dead objects is called garbage collection. Garbage collection is automatic in Java, but this doesn’t necessarily mean that objects disappear from memory straight away. It can be some time after the object becomes inaccessible to your program. This won’t affect your program directly in any way. It just means you can’t rely on memory occupied by an object that is done with being available immediately. For the most part it doesn’t matter; the only circumstances where it might be is if your objects were very large, millions of bytes, say, or you were creating and getting rid of very large numbers of objects. In this case, if you are experiencing problems you can try to call the static gc() method that is defined in the System class to encourage the Java Virtual Machine (JVM) to do some garbage collecting and recover the memory that the objects occupy:
System.gc();
This is a best efforts deal on the part of the JVM. When the gc() method returns, the JVM has tried to reclaim the space occupied by discarded objects, but there’s no guarantee that it has all been recovered. There’s also the possibility that calling the gc() method may make things worse. If the garbage collector is executing some preparations for recovering memory, your call undoes that and in this way slows things up.
To put what you know about classes to use, you can use the Sphere class in an example.
You will be creating two source files. In a moment you will create the file CreateSpheres.java, which contains the definition of the CreateSpheres class that has the method main() defined as a static method. As usual, this is where execution of the program starts. The other file is the Sphere.java file, which contains the definition of the Sphere class that you have been assembling. The Sphere class definition should look like this:
class Sphere {
  static final double PI = 3.14;       // Class variable that has a fixed value
  static int count = 0;                // Class variable to count objects

  // Instance variables
  double radius;                       // Radius of a sphere

  double xCenter;                      // 3D coordinates
  double yCenter;                      // of the center
  double zCenter;                      // of a sphere
  // Class constructor
  Sphere(double theRadius, double x, double y, double z) {
    radius = theRadius;                // Set the radius

    // Set the coordinates of the center
    xCenter = x;
    yCenter = y;
    zCenter = z;
    ++count;                           // Update object count
  }

  // Static method to report the number of objects created
  static int getCount() {
    return count;                      // Return current object count
  }

  // Instance method to calculate volume
  double volume() {
    return 4.0/3.0*PI*radius*radius*radius;
  }
}
Directory "CreateSpheres"
Both files need to be in the same directory or folder — I suggest you name the directory Create Spheres. Then copy or move the latest version of Sphere.java to this directory.
TRY IT OUT: Using the Sphere Class
Enter the following code for the file CreateSpheres.java and place it in the Create Spheres directory:
class CreateSpheres {
  public static void main(String[] args) {
    System.out.println("Number of objects = " + Sphere.getCount());

    Sphere ball = new Sphere(4.0, 0.0, 0.0, 0.0);       // Create a sphere
    System.out.println("Number of objects = " + ball.getCount());

    Sphere globe = new Sphere(12.0, 1.0, 1.0, 1.0);     // Create a sphere
    System.out.println("Number of objects = " + Sphere.getCount());

    // Output the volume of each sphere
    System.out.println("ball volume = " + ball.volume());
    System.out.println("globe volume = " + globe.volume());
  }
Directory "Create Spheres"
This file should be in the same directory as the file containing the Sphere class definition. Compile the source files and then run CreateSpheres, and you should get the following output:
Number of objects = 0
Number of objects = 1
Number of objects = 2
ball volume = 267.94666666666666
globe volume = 7234.559999999999
This is the first time you have run a program involving two source files. If you are using the JDK compiler, then compile CreateSpheres.java with the current directory as Create Spheres using the command
javac CreateSpheres.java
The compiler finds and compiles the Sphere.java source file automatically. If all the source files for a program are in the current directory then compiling the file containing a definition of main()compiles all the source files for the program.
Note that by default the .class files generated by the compiler are stored in the current directory — that is, the directory containing your source code. If you want the .class files stored in a different directory then you can use the -d option with the Java compiler to specify where they should go. For example, to store the class files in a directory called C:classes, you type:
javac -d C:/classes CreateSpheres.java
How It Works
The Sphere class definition includes a constructor that creates objects, and the method volume() to calculate the volume of a particular sphere. It also contains the static method getCount() you saw earlier, which returns the current value of the class variable count. You need to define this method as static because you want to be able to call it regardless of how many objects have been created, including the situation when there are none.
The method main() in the CreateSpheres class puts the Sphere class through its paces. When the program is compiled, the compiler looks for a file with the name Sphere.class. If it does not find the .class file, it looks for Sphere.java to provide the definition of the class Sphere. As long as this file is in the current directory, the compiler is able to find it and compile it.
The first thing the program does is call the static method getCount(). Because no objects exist, you must use the class name to call it at this point. You then create the object ball, which is a Sphere object, with a radius of 4.0 and its center at the origin point (0.0, 0.0, 0.0). You call the getCount() method again, this time using the object name. This demonstrates that you can call a static method through an object. You create another Sphere object, globe, with a radius of 12.0. You call the getCount() method again, this time using the class name. Static methods like this are usually called using the class name. After all, the reason for calling this particular method is to find out how many objects exist, so presumably you cannot be sure that any objects exist at that point. A further reason to use the class name rather than a reference to an object when calling a static method is that it makes it quite clear in the source code that it is a static method that is being called. You can’t call a non-static method using the class name.
The program finally outputs the volume of both objects by calling the volume() method for each, from within the expressions, specifying the arguments to the println() method calls.
Java enables you to define several methods in a class with the same name, as long as each method has a unique set of parameters. Defining two or more methods with the same name in a class is called method overloading.
The name of a method together with the types and sequence of the parameters form the signature of the method; the signature of each method in a class must be distinct to allow the compiler to determine exactly which method you are calling at any particular point. The return type has no effect on the signature of a method. You cannot differentiate between two methods just by the return type. This is because the return type is not necessarily apparent when you call a method. For example, suppose you write a statement such as:
Math.round(value);
Although the preceding statement is pointless because it discards the value that the round() method produces, it does illustrate why the return type cannot be part of the signature for a method. The compiler has no way to know from this statement what the return type of the method round() is supposed to be. Thus, if there were several different versions of the method round(), and the return type were the only distinguishing aspect of the method signature, the compiler would be unable to determine which version of round() you wanted to use.
You will find many circumstances where it is convenient to use method overloading. You have already seen that the Math class contains two versions of the method round(), one that accepts an argument of type float and the other that accepts an argument of type double. You can see now that method overloading makes this possible. It would be rather tedious to have to use a different name for each version of round() when they both do essentially the same thing. The valueOf() method in the String class is another example. There is a version of this method for each of the basic types. One context in which you regularly need to use overloading is when you write constructors for your classes, which will I explain now.
Multiple Constructors
Constructors are methods that can be overloaded, just like any other method in a class. In most situations, you want to generate objects of a class from different sets of initial defining data. If you just consider the Sphere class, you could conceive of a need to define a Sphere object in a variety of ways. You might well want a constructor that accepted just the (x, y, z) coordinates of a point, and have a Sphere object created with a default radius of 1.0. Another possibility is that you may want to create a default Sphere with a radius of 1.0 positioned at the origin, so no arguments would be specified at all. This requires two constructors in addition to the one you have already written. Let’s try it.
TRY IT OUT: Multiple Constructors for the Sphere Class
I suggest you put the files for this example in the Create Spheres 2 directory. The code for the extra constructors is as follows:
class Sphere {
  // First Constructor and variable declarations
  ...
  // Construct a unit sphere at a point
  Sphere(double x, double y, double z) {
    xCenter = x;
    yCenter = y;
    zCenter = z;
    radius = 1.0;
    ++count;                           // Update object count
  }

  // Construct a unit sphere at the origin
  Sphere() {
    xCenter = 0.0;
    yCenter = 0.0;
    zCenter = 0.0;
    radius = 1.0;
    ++count;                           // Update object count
  }

  // The rest of the class as before...
}
Directory "Create Spheres 2"
The statements in the default constructor that set three fields to zero are not really necessary, as the fields are set to zero by default. They are there just to emphasize that the primary purpose of a constructor is to enable you to set initial values for the fields.
If you add the following statements to the CreateSpheres class, you can test out the new constructors:
public class CreateSpheres {
  public static void main(String[] args) {
    System.out.println("Number of objects = " + Sphere.getCount());

    Sphere ball = new Sphere(4.0, 0.0, 0.0, 0.0);            // Create a sphere
    System.out.println("Number of objects = " + ball.getCount());

    Sphere globe = new Sphere(12.0, 1.0, 1.0, 1.0);          // Create a sphere
    System.out.println("Number of objects = " + Sphere.getCount());

    Sphere eightBall = new Sphere(10.0, 10.0, 0.0);
    Sphere oddBall = new Sphere();
    System.out.println("Number of objects = " + Sphere.getCount());

    // Output the volume of each sphere
    System.out.println("ball volume = " + ball.volume());
    System.out.println("globe volume = " + globe.volume());
    System.out.println("eightBall volume = " + eightBall.volume());
    System.out.println("oddBall volume = " + oddBall.volume());
  }
}
Directory "Create Spheres 2"
Now the program should produce the following output:
Number of objects = 0
Number of objects = 1
Number of objects = 2
Number of objects = 4
ball volume = 267.94666666666666
globe volume = 7234.559999999999
eightBall volume = 4.1866666666666665
oddBall volume = 4.1866666666666665
How It Works
When you create a Sphere object, the compiler selects the constructor to use based on the types of the arguments you have specified. So, the first of the new constructors is applied in the first statement that you added to main(), as its signature fits with the argument types used. The second statement that you added clearly selects the last constructor, as no arguments are specified. The other additional statements are there just to generate some output corresponding to the new objects. You can see from the volumes of eightBall and oddBall that they both are of radius 1 — in both instances the result is the value of 4π/3.
It is the number and types of the parameters that affect the signature of a method, not the parameter names. If you want a constructor that defines a Sphere object at a point, by specifying the diameter rather than the radius, you have a problem. You might try to write it as:
  // Illegal constructor!!!
  // This WON'T WORK because it has the same signature as the original!!!
  Sphere(double diameter, double x, double y, double z) {
    xCenter = x;
    yCenter = y;
    zCenter = z;
    radius = diameter/2.0;
    ++count;
  }
If you add this method to the Sphere class and recompile, you get a compile-time error. This constructor has four arguments of type double, so its signature is identical to the first constructor that you wrote for the class. This is not permitted — hence the compile-time error. When the number of parameters is the same in two overloaded methods, at least one pair of corresponding parameters must be of different types.
Calling a Constructor from a Constructor
One class constructor can call another constructor in the same class in its first executable statement. This can often save duplicating a lot of code. To refer to another constructor in the same class, you use this as the method name, followed by the appropriate arguments between parentheses. In the Sphere class, you could have defined the constructors as:
class Sphere {
  // Construct a unit sphere at the origin
  Sphere() {
    radius = 1.0;
    // Other data members will be zero by default
    ++count;                    // Update object count
  }

// Construct a unit sphere at a point
  Sphere(double x, double y, double z)
  {
    this();                    // Call the constructor with no arguments
    xCenter = x;
    yCenter = y;
    zCenter = z;
  }

  Sphere(double theRadius, double x, double y, double z) {
    this(x, y, z);              // Call the 3 argument constructor
    radius = theRadius;         // Set the radius
  }
  // The rest of the class as before...
}
In the constructor that accepts the point coordinates as arguments, you call the default constructor to set the radius and increment the count of the number of objects. In the constructor that sets the radius, as well as the coordinates, you call the constructor with three arguments to set the coordinates, which in turn call the constructor that requires no arguments.
Duplicating Objects Using a Constructor
When you were looking at how objects were passed to a method, you came across a requirement for duplicating an object. The need to produce an identical copy of an object occurs surprisingly often.
Suppose you declare a Sphere object with the following statement:
Sphere eightBall = new Sphere(10.0, 10.0, 0.0);
Later in your program you want to create a new object newBall, which is identical to the object eightBall. If you write
Sphere newBall = eightBall;
this compiles okay, but it won’t do what you want. You might remember from my earlier discussion that the variable newBall references the same object as eightBall. You don’t have a distinct object. The variable newBall, of type Sphere, is created but no constructor is called, so no new object is created.
Of course, you could create newBall by specifying the same arguments to the constructor as you used to create eightBall. In general, however, it may be that eightBall has been modified in some way during execution of the program, so you don’t know that its instance variables have the same values — for example, the position might have changed. This presumes that you have some other class methods that alter the instance variables. You could provide the capability for duplicating an existing object by adding a constructor to the class that accepts an existing Sphere object as an argument:
// Create a sphere from an existing object
Sphere(final Sphere oldSphere) {
  radius = oldSphere.radius;
  xCenter = oldSphere.xCenter;
  yCenter = oldSphere.yCenter;
  zCenter = oldSphere.yCenter;
  ++count;                                       // Increment the object count
}
This works by copying the values of the instance variables of the Sphere object that is passed as the argument to the corresponding instance variables of the new object. Thus the new object that this constructor creates is identical to the Sphere object that is passed as the argument.
Now you can create newBall as a distinct object by writing:
Sphere newBall = new Sphere(eightBall); // Create a copy of eightBall
The next section recaps what you have learned about methods and constructors with another example.
You will create a program to do some simple 2D geometry. This gives you an opportunity to use more than one class. You will define two classes, a class that represents point objects and a class that represents line objects; you will then use these to find the point at which two lines intersect. You can put the files for the example in a directory or folder with the name Try Geometry. Quite a few lines of code are involved, so you will put it together piecemeal and get an understanding of how each piece works as you go.
TRY IT OUT: The Point Class
You first define a basic class for point objects:
import static java.lang.Math.sqrt;

class Point {
  // Coordinates of the point
  double x;
  double y;

  // Create a point from coordinates
  Point(double xVal, double yVal) {
    x = xVal;
    y = yVal;
  }

  // Create a point from another Point object
  Point(final Point oldPoint) {
    x = oldPoint.x;                    // Copy x coordinate
    y = oldPoint.y;                    // Copy y coordinate
  }

  // Move a point
  void move(double xDelta, double yDelta) {
    // Parameter values are increments to the current coordinates
    x += xDelta;
    y += yDelta;
  }

  // Calculate the distance to another point
  double distance(final Point aPoint) {
    return sqrt((x - aPoint.x)*(x - aPoint.x) + (y - aPoint.y)*(y - aPoint.y));
  }

  // Convert a point to a string
  public String toString() {
    return Double.toString(x) + ", " + y;    // As "x, y"
  }
Directory "Try Geometry"
You should save this as Point.java in the directory Try Geometry.
How It Works
This is a simple class that has just two instance variables, x and y, which are the coordinates of the Point object. At the moment you have two constructors. One creates a Point object from a coordinate pair passed as arguments of type double, and the other creates a new Point object from an existing one.
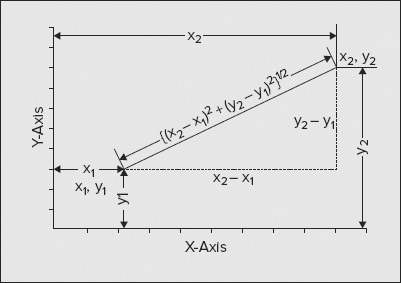
Three methods are included in the class. You have the move() method, which moves a Point to another position by adding an increment to each of the coordinates. You also have the distance() method, which calculates the distance from the current Point object to the Point object passed as the argument. This uses the Pythagorean theorem to compute the distance, as shown in Figure 5-7.
Finally, you have a toString() method, which returns a string representation of the coordinates of the current point. If a class defines the toString() method and an object of that class is used as an operand of the string concatenation operator +, the method is called to represent the object as a string. The compiler automatically inserts a call to toString() when necessary. For example, suppose thePoint is an object of type Point, and you write the statement:
System.out.println("The point is at " + thePoint);
The toString() method is automatically invoked to convert the object referenced by the variable thePoint to a String, and the resultant string is appended to the String literal. You have specified the toString() method as public, as this is essential here for the class to compile. I will defer explanations as to why this is necessary until a little later in this chapter.
Note how you use the static toString() method defined in the Double class to convert the x value to a String. The compiler inserts a call to the same method automatically for the y value, as the left operand of the + operation is a String object. Note that you could equally well have used the valueOf() method in the String class. In this case the statement would be written like this:
return String.valueOf(x) + ", " + y; // As "x, y"
TRY IT OUT: The Line Class
You can use Point objects in the definition of the class Line:
class Line {
  Point start;                           // Start point of line
  Point end;                             // End point of line

  // Create a line from two points
  Line(final Point start, final Point end) {
    this.start = new Point(start);
    this.end = new Point(end);
  }

  // Create a line from two coordinate pairs
  Line(double xStart, double yStart, double xEnd, double yEnd) {
    start = new Point(xStart, yStart);   // Create the start point
    end = new Point(xEnd, yEnd);         // Create the end point
  }

  // Calculate the length of a line
  double length() {
    return start.distance(end);          // Use the method from the Point class
  }

  // Convert a line to a string
  public String toString() {
    return "(" + start+ "):(" + end + ")";  // As "(start):(end)"
  }                                         // that is, "(x1, y1):(x2, y2)"
Directory "Try Geometry"
You should save this as the file Line.java in the Try Geometry directory.
How It Works
You shouldn’t have any difficulty with this class definition, as it is very straightforward. The Line class stores two Point objects as instance variables. There are two constructors for Line objects — one accepting two Point objects as arguments and the other accepting the (x, y) coordinates of the start and end points. You can see how you use the variable this to differentiate the class instance variables, start and end, from the parameter names in the constructor.
Note how the constructor that accepts Point objects works:
  // Create a line from two points
  Line(final Point start, final Point end) {
    this.start = new Point(start);
    this.end = new Point(end);
  }
With this implementation of the constructor, two new Point objects are created that are identical to, but independent of, the objects passed to the constructor. If you don’t think about what happens, you might be tempted to write it as:
  // Create a line from two points - a poor implementation!
  Line(final Point start, final Point end) {
    this.start = start;                // Dependent on external object!!!
    this.end = end;                    // Dependent on external object!!!
  }
The important thing to note here is that the way the constructor is implemented could cause problems that might be hard to track down. In this version of the constructor no new points are created. The start and end members of the object refer to the Point objects that are passed as arguments. The Line object is implicitly dependent on the Point objects that are used to define it. If these were changed outside the Line class, by using the move() method, for example, this would “silently” modify the Line object. You might consciously decide that this is what you want, so the Line object continues to be dependent on its associated Point objects. The rationale for this in a drawing package, for example, might be that this would allow a point to be moved, and all lines based on the point would also be moved accordingly. However, this is different from allowing such interdependencies by accident. In general, you should take care to avoid creating implicit dependencies between objects unless they are what you intended.
In the toString() method for the Line class, you are able to use the Point objects directly in the formation of the String representation of a Line object. This works because the Point class also defines a toString() method.
You’ve now defined two classes. In these class definitions, you’ve included the basic data that defines an object of each class type. You’ve also defined some useful methods for operating on objects, and added constructors for a variety of input parameters. Note how the Point class is used in the definition of the Line class. It is quite natural to define a line in terms of two Point objects, and the Line class is much simpler and more understandable than if it were defined entirely in terms of the individual x and y coordinates. To further demonstrate how classes can interact, and how you can solve problems directly, in terms of the objects involved, let’s devise a method to calculate the intersection of two Line objects.
Creating a Point from Two Lines
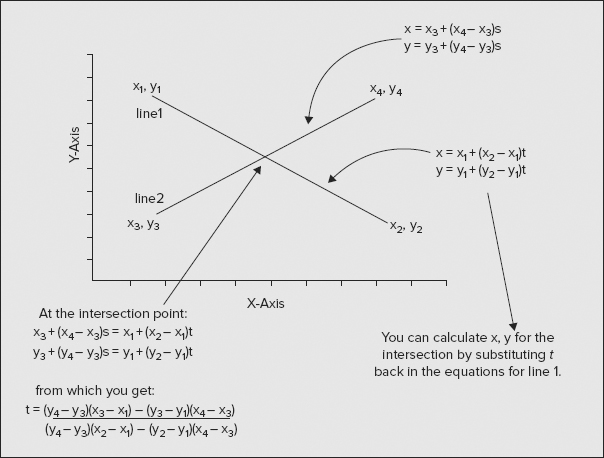
You can add the method to determine the point of intersection between two lines to the Line class. Figure 5-8 illustrates how the mathematics works out.
You can ignore the mathematics if you want to, as it is not the most important aspect of the example. If you are willing to take the code in the new method on trust, then skip to the next “Try It Out” section. On the other hand, you shouldn’t find it too difficult if you can still remember what you did in high school math.
One way to get the intersection of two lines is to use equations such as those shown in Figure 5-8. These are called parametric equations because they use a parameter value (s or t) as the variable for determining points on each line. The parameters s and t vary between 0 and 1 to give points on the lines between the defined start and end points. When a parameter s or t is 0 the equations give the coordinates of the start point of a line, and when the parameter value is 1 you get the end point of the line.
Where two lines intersect, the equations for the lines must produce the same (x, y) values, so, at this point, the right-hand sides of the equations for x for the two lines must be equal, and the same goes for the equations for y. This gives you two equations in s and t, and with a bit of algebraic juggling you can eliminate s to get the equation shown for t. You can then replace t in the equations, defining line 1 to get x and y for the intersection point.
TRY IT OUT: Calculating the Intersection of Two Lines
You can use these results to write the additional method you need in the Line class. Add the following code to the class definition in Line.java:
// Return a point as the intersection of two lines
Point intersects(final Line line1) {
  Point localPoint = new Point(0, 0);

  double num = (end.y - start.y)*(start.x - line1.start.x) -
               (end.x - start.x)*(start.y - line1.start.y);

  double denom = (end.y - start.y)*(line1.end.x - line1.start.x) -
                 (end.x - start.x)*(line1.end.y - line1.start.y);

  localPoint.x = line1.start.x + (line1.end.x - line1.start.x)*num/denom;
  localPoint.y = line1.start.y + (line1.end.y - line1.start.y)*num/denom;

  return localPoint;
}
Directory "Try Geometry"
Because the Line class definition refers to the Point class, the Line class can’t be compiled without the other being available. When you compile the Line class, the compiler compiles the other class, too.
How It Works
The intersects() method is called for one Line object and takes another Line object as the argument. In the code, the local variables num and denom are the numerator and denominator in the expression for t in Figure 5-8. You then use these values to calculate the x and y coordinates for the intersection point.
WARNING If the lines are parallel, the denominator in the equation for t is zero, something you should really check for in the code. For the moment you ignore it and end up with coordinates that are Infinity if it occurs.
Note how you get at the values of the coordinates for the Point objects defining the lines. The dot notation for referring to a member of an object is just repeated when you want to reference a member of a member. For example, for the object line1, the expression line1.start refers to the Point object at the beginning of the line. Therefore, line1.start.x refers to its x coordinate, and line1.start.y accesses its y coordinate.
Now you have a Line class defined that you can use to calculate the intersection point of two Line objects. You need a program to test the code out.
TRY IT OUT: The TryGeometry Class
You can exercise the two classes you have defined with the following code in the method main():
public class TryGeometry {
  public static void main(String[] args) {
    // Create two points and display them
    Point start = new Point(0.0, 1.0);
    Point end = new Point(5.0, 6.0);
    System.out.println("Points created are " + start + " and " + end);


    // Create two lines and display them
    Line line1 = new Line(start, end);
    Line line2 = new Line(0.0, 3.0, 3.0, 0.0);
    System.out.println("Lines created are " + line1 + " and " + line2);

    // Display the intersection
    System.out.println("Intersection is " + line2.intersects(line1));

    // Now move the end point of line1 and show the new intersection
    end.move(1.0, -5.0);
    System.out.println("Intersection is " + line1.intersects(line2));
  }
Directory "Try Geometry"
Save the TryGeometry.java file in the Try Geometry directory along with the other two class files, Point.java and Line.java. The program produces the following output:
Points created are 0.0, 1.0 and 5.0, 6.0
Lines created are (0.0, 1.0):(5.0, 6.0) and (0.0, 3.0):(3.0, 0.0)
Intersection is 1.0, 2.0
Intersection is 1.0, 2.0
How It Works
You first create two Point objects, which you use later in the program to create the object line1. You then display the points using the println() method. The toString() method that you defined in the Point class is used automatically to generate the String representation for each Point object.
After creating line1 from the two points, you use the other constructor in the Line class to create line2 from two pairs of coordinates. You then display the two lines. The toString() member of the Line class is invoked here to create the String representation of each Line object, and this in turn calls the toString() method in the Point class.
The next statement calls the intersects() method from the line2 object and returns the Point object at the intersection of the two lines, line1 and line2, as part of the argument to the println() method that outputs the point. As you see, you are not obliged to save an object when you create it. Here you just use it to create the string to be displayed. After the output statement has executed, the intersection point object is discarded.
You use the move() method in the class Point to modify the coordinates of the object end that you used to create line1. You then get the intersection of the two lines again, this time calling the intersects() method from line1. The output demonstrates that line1 is independent of the object end, as moving the point has made no difference to the intersection.
If you change the constructor in the Line class to the earlier version that does not create new Point objects to define the line, you can run the example again to see the effect. The output is:
Points created are 0.0, 1.0 and 5.0, 6.0
Lines created are (0.0, 1.0):(5.0, 6.0) and (0.0, 3.0):(3.0, 0.0)
Intersection is 1.0, 2.0
Intersection is 2.0, 1.0
Changing the end object now alters the line, so you get a different intersection point for the two lines after you move the end point. This is because the Line object, line1, contains references to the Point objects defined in main(), not references to independent Point objects.
The methods you have seen so far have been called from within other methods, but a method can also call itself. A method that calls itself is described as a recursive method, and the process is referred to as recursion. You can also have indirect recursion where a method A calls another method B, which in turn calls the method A. Clearly you must include some logic in a recursive method so that it eventually stops calling itself if the process is not to continue indefinitely. You can see how this might be done with a simple example.
You can write a method that calculates integer powers of a variable — in other words, evaluate xn, or x*x...*x where x is multiplied by itself n times. You can use the fact that you can obtain xn by multiplying xn — 1 by x. To put this in terms of a specific example, you can calculate 24 as 23 multiplied by 2, and you can get 23 by multiplying 22 by 2, and 22 is produced by multiplying 21 by 2.
TRY IT OUT: Calculating Powers
Here is the complete program, including the recursive method power():
public class PowerCalc {
  public static void main(String[] args) {
    double x = 5.0;
    System.out.println(x + " to the power 4 is " + power(x,4));
    System.out.println("7.5 to the power 5 is " + power(7.5,5));
    System.out.println("7.5 to the power 0 is " + power(7.5,0));
    System.out.println("10 to the power -2 is " + power(10,-2));
  }

  // Raise x to the power n
  static double power(double x, int n) {
    if(n > 1)
      return x*power(x, n-1);          // Recursive call
    else if(n < 0)
      return 1.0/power(x, -n);         // Negative power of x
    else
      return n == 0 ? 1.0 : x;         // When n is 0 return 1, otherwise x
  }
PowerCalc.java
This program produces the following output:
5.0 to the power 4 is 625.0
7.5 to the power 5 is 23730.46875
7.5 to the power 0 is 1.0
10 to the power -2 is 0.01
How It Works
The power() method has two parameters, the value x and the power n. The method performs four different actions, depending on the value of n:
| n > 1 | A recursive call to power() is made with n reduced by 1, and the value that is returned is multiplied by x. This is effectively calculating xn as x times xn — 1. |
| n < 0 | x— n is equivalent to 1/xn so this is the expression for the return value. This involves a recursive call to power() with the sign of n reversed. |
| n = 0 | x0 is defined as 1, so this is the value returned. |
| n = 1 | x1 is x, so x is returned. |
As a rule, you should use recursion only where there are evident advantages in the approach, as recursive method calls have quite of lot of overhead. This particular example could be more easily programmed as a loop, and it would execute much more efficiently. You could also use the Math.pow() method to produce the result. One example of where recursion can be applied very effectively is in the handling of data structures such as trees. Unfortunately these don’t make convenient illustrations of how recursion works at this stage of the learning curve because of their complexity.
Before you can dig deeper into classes, you need to take an apparent detour to understand what a package is in Java.
Packages are implicit in the organization of the standard classes as well as your own programs, and they influence the names you can use for classes and the variables and methods they contain. Essentially, a package is a uniquely named collection of classes. The primary reason for grouping classes in packages is to avoid possible name clashes with your own classes when you are using prewritten classes in an application. The names used for classes in one package do not interfere with the names of classes in another package or your program because the class names in a package are all qualified by the package name. Thus, the String class you have been using is in the java.lang package, so the full name of the class is java.lang.String. You have been able to use the unqualified name because all the classes in the java.lang package are always available in your program code; there’s an implicit import statement in effect for all the names in the java.lang package. If you happened to have defined a class of your own with the name String, using the name String would refer to your class, but you could still use the library class that has the same name by using its full name in your code, java.lang.String.
Every class in Java is contained in a package, including all those you have defined in the examples. You haven’t seen many references to package names so far because you have been implicitly using the default package to hold your classes, and this doesn’t have a name.
All of the standard classes in Java are contained within a set of packages, and each package contains classes that are related in some way. The package that contains most of the standard classes that you have used so far is called java.lang, so called because the classes in this package provide Java language–related support. You haven’t seen any explicit reference to java.lang in your code either, because this package is automatically available to your programs. Things are arranged this way because some of the classes in java.lang, such as String, are used in every program. If you use a class from the other packages containing standard classes, you need either to use the fully qualified name of the class or to explicitly import the full class name into your program.
Packaging Up Your Classes
Putting one of your classes in a named package is very simple. You just add a package statement as the first statement in the source file containing the class definition. Note that it must always be the first statement. Only comments or blank lines are allowed to precede the package statement. A package statement consists of the keyword package followed by the package name and is terminated by a semicolon. If you want the classes in a package to be accessible outside the package, you must declare the class using the keyword public in the first line of your class definition. Class definitions that aren’t preceded by the keyword public are accessible only from methods in classes that belong to the same package.
For example, to include the Line class in a package called Geometry, the contents of the file Line.java needs to be:
package Geometry;

public class Line {
  // Details of the class definition
}
Each class that you want to include in the package Geometry must contain the same package statement at the beginning, and you must save all the files for the classes in the package in a directory with the same name as the package, that is, Geometry. Note the use of the public keyword in the definition of the Line class. This makes the class accessible generally. If you omit the public keyword from the class definition, the class is accessible only from methods in classes that are in the Geometry package.
Note that you also need to declare the constructors and methods in the class as public if you want them to be accessible from outside of the package. I return to this in more detail a little later in this chapter.
Packages and the Directory Structure
Packages are actually a little more complicated than they appear at first sight, because a package is intimately related to the directory structure in which it is stored. You already know that the definition of a class with the name ClassName must be stored in a file with the name ClassName.java, and that all the files for classes within a package PackageName must be included in a directory with the name PackageName. You can compile the source for a class within a package and have the .class file that is generated stored in a different directory, but the directory name must still be the same as the package name.
As you are aware from the existence of the java.lang package that contains the String class, a package can have a composite name that is a combination of two or more simple names. You can specify a package name as any sequence of names separated by periods. For example, you might have developed several collections of classes dealing with geometry, perhaps one that works with 2D shapes and another with 3D shapes. In this case you might include the class Sphere in a package with the statement
package Geometry.Shapes3D;
and the class for circles in a package using the statement
package Geometry.Shapes2D;
In this situation, the files containing the classes in the Geometry.Shapes3D packages are expected to be in the directory Shapes3D and the files containing the classes in the Geometry.Shapes2D packages are expected to be in the directory Shapes2D. Both of these directories must be subdirectories of a directory with the name Geometry. In general, you can have as many names as you like separated by periods to identify a package, but the package name must reflect the directory structure in which the package is stored.
Compiling a Package
Compiling the classes in a package can be a bit tricky unless you are clear on how you go about it. I’ll describe what you need to do assuming you are using the JDK under Microsoft Windows. The path to the package directory must be explicitly made known to the compiler in the value that is set for CLASSPATH, even when the current directory is the one containing the package. The easiest way to specify CLASSPATH is by using the -classpath option when you invoke the compiler.
The path to the package directory is the path to the directory that contains the package directory, and therefore does not include the package directory itself. For example, if you have stored the source files for classes that are in the Geometry package in the directory with the path C:Beg Java StuffGeometry then the path to the Geometry directory is C:Beg Java Stuff. Many beginners mistakenly specify the path as C:Beg Java StuffGeometry, in which case the package is not found.
As I said, you can tell the compiler about the path to your package by using the -classpath option on the command line. Assuming that the Geometry directory is a subdirectory of C:Beg Java Stuff, you could compile the Line.java source file with the command:
javac -classpath "C:Beg Java Stuff" Line.java
The command must be executed with Geometry as the current directory. This results in both the Line.java and Point.java files being compiled because Line.java refers to the other class. Because the directory in the path contains spaces, you have to enclose the path string between double quotes.
If the Point and Line classes were not interrelated, you could still compile the two source files or, indeed, any number of source files, in the Geometry package with the following command:
javac -classpath "C:Beg Java Stuff" *.java
Accessing a Package
How you access a package when you are compiling a program that uses the package depends on where you have put it. There are a couple of options here. The first, but not the best, is to leave the .class files for the classes in the package in the directory with the package name.
Let’s look at that before going on to the second possibility.
With the .class files in the original package directory, either the path to your package must appear in the string that has been set for the CLASSPATH environment variable, or you must use the -classpath option on the command line when you invoke the compiler or the interpreter. This overrides the CLASSPATH environment variable if it happens to be set. Note that it is up to you to make sure that the classes in your package are in the right directory. Java does not prevent you from saving a file in a directory that is quite different from that appearing in the package statement. Of the two options here, using the -classpath option on the command line is preferable, because it sets the classpath transiently each time and can’t interfere with anything you do subsequently. In any event, you can explore both possibilities.
If you elect to use the CLASSPATH environment variable, it needs to contain only the paths to your packages. The standard packages that are supplied with Java do not need to be considered, as the compiler and the interpreter can always find them.
Of course, you can have as many paths as you want defined in CLASSPATH. They just need to be separated by semicolons under Windows. If you are using Windows 7 then you can create and set environment variables through the Advanced system settings option in the dialog that you can access by selecting System in Control Panel.
Under Linux, the mechanism to set CLASSPATH depends on the shell you are using, so check the documentation for it.
If you are using the JDK, you can always specify where your packages can be found by using the -classpath option when you execute the Java compiler or the interpreter. This has the advantage that it applies only for the current compilation or execution, so you can easily set it to suit each run. The command to compile MyProgram.java defining the classpath to include C:MySource and C:MyPackages would be:
javac -classpath "C:MySource;C:MyPackages" MyProgram.java
The compiler will find files in the current directory without specifying a period in the classpath as long as the files are not in a package. The directory containing the package directory must appear in the classpath. If you don’t set the classpath, or you set it incorrectly, Java is not able to find the classes in any new packages you might create. If you omit the period from the -classpath string when executing your program, you get a message to the effect that main() cannot be found and your program does not run.
Another way to make your packages available after you have compiled them is by making them extensions to the set of standard packages.
Using Extensions
Extensions are .jar files stored within the ext directory that is created when you install the JDK. The default directory structure that is created is shown in Figure 5-9.

The classes and packages in the .jar archives that you place in the ext directory are automatically accessible when you compile or run your Java programs without the need to set the CLASSPATH environment variable or use the -classpath command-line option. When you create a .jar file for a package, you need to make sure that you add the .class files with the directory structure corresponding to the package name — you can’t just add the .class files to the archive. For example, suppose you want to store the Geometry package in an archive. Assuming you have already compiled the package and the current directory contains the package directory, you can use the following command to create the archive:
C:Beg Java Stuff>jar cvf Geometry.jar Geometry*.class
This creates the archive Geometry.jar and adds all the .class files that are in the Geometry directory to it. All you now need to do to make the package available to any program that needs it is to copy it to the ext directory in the JDK directory hierarchy shown in Figure 5-9.
The jar utility does a lot more than I have described here. If you want to know more about what it can do, look into the “Tools and Utilities” section of the JDK documentation.
Adding Classes from a Package to Your Program
You used the import statement frequently in examples but nonetheless I’m describing it here from the ground up. Assuming they have been defined with the public keyword, you can add all or any of the classes in a named package to the code in your program by using an import statement. You can then reference the classes that you make available to your program through the import statement just by using the class names. For example, to make available all the classes in the package Geometry.Shapes3D to a source file, you just need to add the following import statement to the beginning of the file:
import Geometry.Shapes3D.*; // Include all classes from this package
The keyword import is followed by the specification of what you want to import. The wildcard *, following the period after the package name, selects all the classes in the package, rather like selecting all the files in a directory. Now you can refer to any public class in the package just by using the class name. Again, the names of other classes in your program must be different from the names of the classes in the package. Importing all the names in a package is not an approach you should adopt generally as it defeats the primary objective of putting classes in packages. It’s usually better to import just the names from a package that your code references.
If you want to add a particular class rather than an entire package, you specify its name explicitly in the import statement:
import Geometry.Shapes3D.Sphere; // Include the class Sphere
This includes only the Sphere class in the source file. By using a separate import statement for each individual class from the package, you ensure that your source file includes only the classes that you need. This reduces the likelihood of name conflicts with your own classes, particularly if you are not fully familiar with the contents of the package and it contains a large number of classes.
NOTE The * can be used only to select all the classes in a package. You can’t use Geometry.* to select all the packages in the Geometry directory.
Packages and Names in Your Programs
A package creates a self-contained environment for naming your classes. As I’ve said, this is the primary reason for having packages in Java. You can specify the names for classes in one package without worrying about whether the same names have been used elsewhere. Java makes this possible by treating the package name as part of the class name — actually as a prefix. This means that the class Sphere in the package Geometry.Shapes3D has the full name Geometry.Shapes3D.Sphere. If you don’t use an import statement to incorporate the class in your program, you can still make use of the class by referring to it using its full class name. If you needed to do this with the class Sphere, you might declare a variable with the statement:
Geometry.Shapes3D.Sphere ball = new Geometry.Shapes3D.Sphere(10.0, 1.0, 1.0, 1.0);
Although this is rather verbose and certainly doesn’t help the readability of the program, it does ensure you have no conflict between this class and any other Sphere class that might be part of your program. You can usually contrive that your class names do not conflict with those in the commonly used standard Java packages, but in cases where you can’t manage this, you can always fall back on using fully qualified class names. Indeed, on some occasions, you have to do this. This is necessary when you are using two different classes from different packages that share the same basic class name.
Importing Static Class Members
As you have seen in some of the examples, you can import the names of static members of a class from a named package into your program. This enables you to reference such static members by their simple unqualified names. In the Sphere class that you developed earlier in this chapter, you could have used the constant PI that is defined in the Math class by using its fully qualified name, Math.PI, in the definition of the volume method:
  double volume() {
    return 4.0/3.0*Math.PI*radius*radius*radius;
  }
This obviates the need for the static member of the Sphere class with the name PI and would provide a much more accurate definition of the value of π.
However, the Math prefix to the name PI doesn’t really add to the clarity of the code, and it would be better without it. You can remove the need for prefixing PI with the Math class name by importing the PI member name from the Math class:
import static java.lang.Math.PI;

class Sphere {
  // Class details as before...
  double volume() {
    return 4.0/3.0*PI*radius*radius*radius;
  }
}
It is clear what PI means here and the code is not cluttered up with the class name prefix.
You can also import all the static members of a class using * notation. For example:
import static java.lang.Math.*; // Import all static members of the Math class
With this statement at the beginning of a source file, you can refer to any of the static members of the Math class without qualifying them with the class name. Thus you can use methods such as sqrt(), abs(), random(), and so on, without the need for the Math prefix to the method names. Of course, using the * notation to import all the static names in a class does increase the risk of clashes between the names you are importing and the names you define in your code.
Note that the import statement, and that includes its use for importing static members of a class, applies only to classes that are defined in a named package. This is particularly relevant in the context of static import. If you want to import the names of a static member of a class that you define then you must put the definition of a class in a named package. You cannot import the names of static members of a class that is defined in the default package that has no name. The class name in a static import statement must always be qualified with its package name.
Standard Packages
All of the standard classes that are provided with Java are stored in standard packages. There is a substantial and growing list of standard packages but some of the ones you may hear about most frequently are found in Table 5-1.
TABLE 5-1: Java Standard Packages
| PACKAGE | DESCRIPTION |
| java.lang | Contains classes that are fundamental to Java (e.g., the Math class) and all of these are available in your programs automatically. You do not need an import statement to include them. |
| java.nio.file | Contains classes supporting file I/O in conjunction with the classes in the java.io package. This package is new in JDK 7. |
| java.awt | Contains classes that support Java’s graphical user interface (GUI). Although you can use these classes for GUI programming, it is almost always easier and better to use the alternative Swing classes. |
| javax.swing | Provides classes supporting the “Swing” GUI components. These are not only more flexible and easier to use than the java.awt equivalents, but they are also implemented largely in Java with minimal dependency on native code. |
| java.awt.event | Contains classes that support event handling. |
| java.awt.geom | Contains classes for drawing and operating with 2D geometric entities. |
| javax.swing.border | Classes to support generating borders around Swing components. |
| javax.swing.event | Classes supporting event handling for Swing components. |
| java.applet | Contains classes that enable you to write applets — programs that are embedded in a web page. |
| java.util | Contains classes that support a range of standard operations for managing collections of data, accessing date and time information, and analyzing strings. |
The standard packages and the classes they contain cover an enormous amount of ground, so even in a book of this size it is impossible to cover them all exhaustively. There are now many more classes in the standard packages than there are pages in this book. However, you will apply some classes from all of the packages in the preceding table, plus one or two others besides, in later chapters of the book.
Standard Classes Encapsulating the Primitive Data Types
You saw in the previous chapter that you have classes available that enable you to define objects that encapsulate values of each of the primitive data types in Java. These classes are:
| Boolean | Character | Byte |
| Short | Integer | Long |
| Float | Double |
These are all contained in the package java.lang along with quite a few other classes, such as the String and StringBuffer classes that you saw in Chapter 4. Each of these classes encapsulates a value of the corresponding primitive type and includes methods for manipulating and interrogating objects of the class, as well as a number of very useful static methods that provide utility functions for the underlying primitive types.
Converting between Primitive Type Values and Strings
Each class provides a static toString() method to convert a value of the corresponding primitive type to a String object, as you saw in the last chapter. There is also a non-static toString() method in each class that returns a String representation of a class object.
Conversely, there are methods to convert from a String object to a primitive type. For example, the static parseInt() member in the Integer class accepts a String representation of an integer as an argument and returns the equivalent value as type int. An alternative version of this method accepts a second argument of type int that specifies the radix to be used when interpreting the string. This enables you to parse strings that are hexadecimal or octal values, for example. If the String object cannot be parsed for any reason, if it contains invalid characters, for example, the method throws an exception of type NumberFormatException. All the standard classes encapsulating numerical primitive types and the Boolean class define static methods to parse strings and return a value of the corresponding primitive type. You have the methods parseShort(), parseByte(), parseInt(), and parseLong() in the classes for integer types, parseFloat() and parseDouble() for floating-point classes, and parseBoolean() for Boolean.
The classes for primitive numerical types and the Boolean class defines a static method valueOf() that converts a string to an object of the class type containing the value represented by the string. If the string does not represent a valid value, NumberFormatException is thrown. The method for the Boolean class returns a Boolean object with the value true if the string is equal to true ignoring case. Any other string results in false being returned.
WARNING At the time of writing, the methods, such as parseInt(), for converting strings to numerical values throw an exception of type NumberFormatException if the string to be parsed contains underline characters, even though underlines are legal in numerical literals. This is regarded as a bug so it may well be fixed by the time you are reading this. If not, you can always write a method to remove underlines from any string that is to be converted to a numerical value.
Converting Objects to Values
Each class encapsulating a primitive data value also defines a xxxValue() method (where xxx is the corresponding primitive type name) that returns the value that is encapsulated by an object as a value of the corresponding primitive type. For example, if you have created an object number of type Double that encapsulates the value 1.14159, then the expression number.doubleValue() results in the value 1.14159 as type double.
Primitive Class Constants
The classes that wrap numerical primitive types each contain the static final constants MAX_VALUE and MIN_VALUE that define the maximum and minimum values that can be represented. The floating-point classes also define the constants POSITIVE_INFINITY, NEGATIVE_INFINITY, and NaN (it stands for Not a Number, as it is the result of 0/0), so you can use these in comparisons to test whether such values have arisen during calculations. Alternatively, you can test floating-point values with the static methods isInfinite() and isNaN() — you pass your variable as an argument, and the methods return true for an infinite value or the NaN value, respectively. There are also non-static versions for use with an object of the class type. Remember that an infinite value can arise without necessarily dividing by zero. Any computation that results in an exponent that is too large to be represented produces either POSITIVE_INFINITY or NEGATIVE_INFINITY.
Many other operations are supported by these classes, so it is well worth browsing the JDK documentation for them. In particular, the Character class defines a large number of static methods for testing and classifying characters.
Autoboxing Values of Primitive Types
Circumstances can arise surprisingly often where you want to pass values of a primitive type to a method that requires the argument to be a reference to an object. The compiler supplies automatic conversions of primitive values to the corresponding class type when circumstances permit this. This can arise when you pass a value of type int to a method where the parameter type is type Integer, for example. Conversions from a primitive type to the corresponding class type are called boxing conversions, and automatic conversions of this kind are described as autoboxing.
The compiler also inserts unboxing conversions when necessary to convert a reference to an object of a wrapper class for a primitive type such as double to the value that it encapsulates. The compiler does this by inserting a call to the xxxValue() method for the object. You can see this in action in the following little example.
TRY IT OUT: Autoboxing in Action
This program is contrived to force boxing and unboxing conversions to occur:
public class AutoboxingInAction {
  public static void main(String[] args) {
    int[] values = { 3, 97, 55, 22, 12345 };

    // Array to store Integer objects
    Integer[] objs = new Integer[values.length];

    // Call method to cause boxing conversions
    for(int i = 0 ; i < values.length ; ++i) {
      objs[i] = boxInteger(values[i]);
    }

    // Use method to cause unboxing conversions
    for(Integer intObject : objs) {
      unboxInteger(intObject);
    }
  }

  // Method to cause boxing conversion
  public static Integer boxInteger(Integer obj) {
    return obj;
  }

  // Method to cause unboxing conversion
  public static void unboxInteger(int n) {
    System.out.println("value = " + n);
  }
AutoboxingInAction.java
This example produces the following output:
value = 3
value = 97
value = 55
value = 22
value = 12345
How It Works
You have defined the boxInteger() method with a parameter type of type Integer. When you call this method in the first for loop in main(), you pass values of type int to it from the values array. Because the boxInteger() method requires the argument to be a reference to an object of type Integer, the compiler arranges for autoboxing to occur by inserting a boxing conversion to convert the integer value to an object of type Integer. The method returns a reference to the object that results, and you store this in the Integer[] array objs.
The second for loop in main() passes each reference to an Integer object from the objs array to the unboxInteger() method. Because you have specified the method parameter type as type int, the method cannot accept a reference to an object of type Integer as the argument directly. The compiler inserts an unboxing conversion to obtain the value of type int that the object encapsulates. This value is then passed to the method, and you output it.
Autoboxing is particularly useful when you need to insert values of primitive types into a collection — you learn about the collection classes that are available in the class libraries in Chapter 14, but you see more on boxing and unboxing conversions in Chapter 13.
CONTROLLING ACCESS TO CLASS MEMBERS
I have not yet discussed in any detail how you control the accessibility of class members from outside the class — from a method in another class in other words. You know that you can refer to any of the static members of the same class in the code for a static class method, and a non-static method can refer to any member of the same class. The degree to which variables and methods within one class are accessible from other classes is a bit more complicated. It depends on what access attributes you have specified for the members of a class, whether the classes are in the same package, and whether you have declared the class as public. This is why you had to understand packages first.
Using Access Attributes
Let’s start by considering classes that are in the same package. Within a given package, any class has direct access to any other class name in the same package — for declaring variables or specifying method parameter types, for example — but the variables and methods that are members of that other class are not necessarily accessible. The accessibility of these is controlled by access attributes. The name of a class in one package can be accessed from a class in another package only if the class to be accessed is declared as public. Classes not declared as public can be accessed only by classes within the same package.
You have four possibilities when specifying an access attribute for a class member, and each possibility has a different effect overall. The options you have for specifying the accessibility of a variable or a method in a class are found in Table 5-2.
TABLE 5-2: Access Attributes for a Class Member
| ATTRIBUTE | PERMITTED ACCESS |
| No access attribute | From methods in any class in the same package. |
| public | From methods in any class anywhere as long as the class has been declared as public. |
| private | Accessible only from methods inside the class. No access from outside the class at all. |
| protected | From methods in any class in the same package and from any subclass anywhere. |
The table shows you how the access attributes you set for a class member determine the parts of the Java environment from which you can access it. I will discuss subclasses in the next chapter, so don’t worry about these for the moment. I will describe how and when you use the protected attribute then. Note that public, private, and protected are all keywords. Specifying a member as public makes it completely accessible, and at the other extreme, making it private restricts access to members of the same class.
This may sound more complicated than it actually is. Figure 5-10 shows the access allowed between classes within the same package.
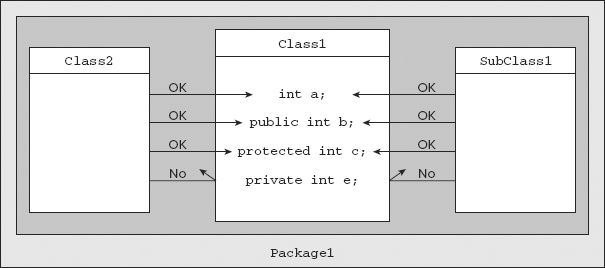
Within a package such as package1 in Figure 5-11, only the private members of the class Class1 can’t be directly accessed by methods in other classes in the same package. If you declare a class member to be private, it can be accessed only by methods in the same class.
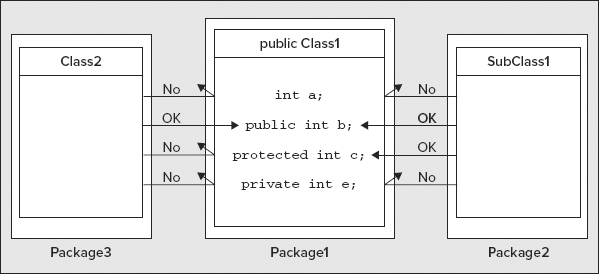
As I said earlier, a class definition must have an access attribute of public if it is to be accessible from outside the package that contains it. Figure 5-11 shows the situation where the classes seeking access to the members of a public class are in different packages.
Here access is more restricted. The only members of Class1 that can be accessed from an ordinary class, Class2, in another package, are those specified as public. Keep in mind that the class Class1 must also have been defined with the attribute public for this to be the case. A class that is not defined as public cannot be accessed at all from a class in another package.
From a subclass of Class1 that is in another package, the members of Class1 without an access attribute cannot be reached, and neither can the private members — these can never be accessed externally under any circumstances.
Specifying Access Attributes
As you probably gathered from the diagrams in the previous section, to specify an access attribute for a class member, you just add the appropriate keyword to the beginning of the declaration. Here is the Point class you saw earlier, but now with access attributes defined for its members:
TRY IT OUT: Accessing the Point Class
Make the following changes to your Point class. If you save it in a new directory, do make sure Line.java is copied there as well. It is useful later if they are in a directory with the name Geometry.
import static java.lang.Math.sqrt;

public class Point {
  // Create a point from its coordinates
  public Point(double xVal, double yVal) {
    x = xVal;
    y = yVal;
  }

  // Create a Point from an existing Point object
  public Point(final Point aPoint) {
    x = aPoint.x;
    y = aPoint.y;
  }

  // Move a point
  public void move(double xDelta, double yDelta) {
    // Parameter values are increments to the current coordinates
    x += xDelta;
    y += yDelta;
  }

  // Calculate the distance to another point
  public double distance(final Point aPoint) {
    return sqrt((x - aPoint.x)*(x - aPoint.x)+(y - aPoint.y)*(y - aPoint.y));
  }

  // Convert a point to a string
  public String toString() {
    return Double.toString(x) + ", " + y;    // As "x, y"
  }

  // Coordinates of the point
  private double x;
  private double y;
}
Directory "Geometry"
The members have been resequenced within the class, with the private members appearing last. You should maintain a consistent ordering of class members according to their access attributes, as it makes the code easier to follow. The ordering adopted most frequently is for the most accessible members to appear first and the least accessible last, but a consistent order is more important than the particular order you choose.
How It Works
Now the instance variables x and y cannot be accessed or modified from outside the class, as they are private. The only way these can be set or modified is through methods within the class, either with constructors or the move() method. If it is necessary to obtain the values of x and y from outside the class, as it might well be in this case, a simple function does the trick. For example
public double getX() {
  return x;
}
Couldn’t be easier really, could it? This makes x freely available, but prevents modification of its value from outside the class. In general, such methods are referred to as accessor methods and usually have the form getXXX(). Methods that allow a private data member to be changed are called mutator methods and are typically of the form setXXX(), where a new value is passed as an argument. For example:
public void setX(double inputX) {
  x = inputX;
}
It may seem odd to use a method to alter the value of a private data member when you could just make it public. The main advantage of using a method in this way is that you can apply validity checks on the new value that is to be set and prevent inappropriate values from being assigned. Of course, if you really don’t want to allow the value of a private member to be changed, you don’t include a mutator method for the class.
Choosing Access Attributes
As you can see from the table of access attributes, all the classes you have defined so far have had members that are freely accessible within the same package. This applies both to the methods and the variables that were defined in the classes. This is not good object-oriented programming practice. As I said in Chapter 1, one of the ideas behind objects is to keep the data members encapsulated so they cannot be modified by all and sundry, even from other classes within the same package. On the other hand, the methods in your classes that provide the operations you want to allow with objects of the class type generally need to be accessible. They provide the outside interface to the class and define the set of operations that are possible with objects of the class. Therefore, in the majority of situations with simple classes (i.e., no subclasses), you should be explicitly specifying your class members as either public or private, rather than omitting the access attributes.
Broadly, unless you have good reasons for declaring them otherwise, the variables in a public class should be private and the methods that are called from outside the class should be public. Even where access to the values of the variables from outside a class is necessary, you don’t need to make them public or leave them without an access attribute. As you’ve just seen, you can provide access quite easily by adding a simple public method to return the value of a data member.
Of course, there are always exceptions:
- For classes in a package that are not public, and therefore not accessible outside the package, it may sometimes be convenient to allow other classes in the package direct access to the data members.
- If you have data members that have been specified as final so that their values are fixed and they are likely to be useful outside the class, you might as well declare them to be public.
- You may well have methods in a class that are intended to be used only internally by other methods in the same class. In this case you should specify these as private.
- In a class like the standard class Math, which is just a convenient container for utility functions and standard data values, you should make everything public.
All of this applies to simple classes. You see in the next chapter, when you look at subclasses, that there are some further aspects of class structure that you must take into account.
Using Package and Access Attributes
Let’s put together an example that uses a package that you create. You could put the Point and Line classes that you defined earlier in package with the name Geometry. You can then write a program that imports these classes and tests them. You should already have the Geometry directory set up if you followed my suggestion with the previous example.
TRY IT OUT: Packaging Up the Line and Point Classes
The source and .class files for each class in the package must be in a directory with the name Geometry. Remember that you need to ensure the path to the directory (or directories if you are storing .class files separately) Geometry appears in the CLASSPATH environment variable setting before you try to compile or use either of these two classes. You can best do this by specifying the -classpath option when you run the compiler or the interpreter.
To include the class Point in the package, the code in Point.java is changed to:
package Geometry;

import static java.lang.Math.sqrt;
public class Point {

  // Create a point from its coordinates
  public Point(double xVal, double yVal) {
    x = xVal;
    y = yVal;
  }

  // Create a Point from an existing Point object
  public Point(final Point aPoint) {
    x = aPoint.x;
    y = aPoint.y;
  }

    // Move a point
  public void move(double xDelta, double yDelta) {
    // Parameter values are increments to the current coordinates
    x += xDelta;
    y += yDelta;
  }

  // Calculate the distance to another point
  public double distance(final Point aPoint) {
    return sqrt((x - aPoint.x)*(x - aPoint.x)+(y - aPoint.y)*(y - aPoint.y));
  }

  // Convert a point to a string
  public String toString() {
    return Double.toString(x) + ", " + y;    // As "x, y"
  }

  // Retrieve the x coordinate
  public double getX() {
    return x;
  }

  // Retrieve the y coordinate
  public double getY() {
    return y;
  }

  // Set the x coordinate
  public void setX(double inputX) {
    x = inputX;
  }

  // Set the y coordinate
  public void setY(double inputY) {
    y = inputY;
  }

  // Coordinates of the point
  private double x;
  private double y;
}
Directory "Geometry"
Note that you have added the getX(), getY(), setX(), and setY() methods to the class to make the private data members accessible.
The Line class also needs to be amended to make the methods public and to declare the class as public. You have to change its intersects() method so that it can access the private data members of Point objects using the set...() and get...() methods in the Point class. The code in Line.java, with changes highlighted, is:
package Geometry;

public class Line {

  // Create a line from two points
  public Line(final Point start, final Point end) {
    this.start = new Point(start);
    this.end = new Point(end);
  }

  // Create a line from two coordinate pairs
  public Line(double xStart, double yStart, double xEnd, double yEnd) {
    start = new Point(xStart, yStart);   // Create the start point
    end = new Point(xEnd, yEnd);         // Create the end point
  }

  // Calculate the length of a line
  public double length() {
    return start.distance(end);          // Use the method from the Point class
  }

  // Return a point as the intersection of two lines -- called from a Line object
  public Point intersects(final Line line1) {

    Point localPoint = new Point(0, 0);

    double num = (end.getY() - start.getY()) * (start.getX()-line1.start.getX())
               - (end.getX() - start.getX()) * (start.getY() - line1.start.getY());

    double denom = (end.getY() - start.getY()) * (line1.end.getX() - line1.start.getX())
                 - (end.getX() - start.getX()) * (line1.end.getY() - line1.start.getY());

    localPoint.setX(line1.start.getX() + (line1.end.getX() -
                                          line1.start.getX())*num/denom);
    localPoint.setY(line1.start.getY() + (line1.end.getY() -
                                          line1.start.getY())*num/denom);

    return localPoint;
  }

  // Convert a line to a string
  public String toString() {
    return "(" + start+ "):(" + end + ")";  // As "(start):(end)"
  }                                         // that is, "(x1, y1):(x2, y2)"

  // Data members
  Point start;                              // Start point of line
  Point end;                                // End point of line
}
Directory "Geometry"
Here you have left the data members of the class without an access attribute so they are accessible from the Point class, but not from classes outside the Geometry package.
How It Works
The package statement at the beginning of each source file defines the package to which the class belongs. Remember, you still have to save it in the correct directory, Geometry. Without the public attribute, the classes are not available to classes outside the Geometry package.
Because you have declared the data members in the class Point as private, they are not accessible directly. You have added the methods getX(), getY(), setX(), and setY() to the Point class to make the values accessible to any class that needs them.
The static import statement that you added earlier for the sqrt() method in the Math class enables the distance() method to access the sqrt() method without using the Math qualifier.
The Line class hasn’t been updated since the earlier example, so you first have to sort out the access attributes. The two instance variables are declared as before, without any access attribute, so they can be accessed from within the package but not from classes outside the package. This is an occasion where exposing the data members within the package is very convenient, and you can do it without exposing the data members to any classes using the package. And you have updated the intersects() method to reflect the changes in accessibility made to the members of the Point class.
You can now write the program that is going to import and use the package that you have just created.
TRY IT OUT: Testing the Geometry Package
You can create a succession of points and create a line joining each pair of successive points in the sequence. You can then calculate the total line length.
import Geometry.*;    // Import the Point and Line classes

public class TryPackage {
  public static void main(String[] args) {
    double[][] coords = { {1.0, 0.0}, {6.0, 0.0}, {6.0, 10.0},
                          {10.0,10.0}, {10.0, -14.0}, {8.0, -14.0}};
    // Create an array of points and fill it with Point objects
    Point[] points = new Point[coords.length];
    for(int i = 0; i < coords.length; i++)
      points[i] = new Point(coords[i][0],coords[i][1]);

    // Create an array of lines and fill it using Point pairs
    Line[] lines = new Line[points.length - 1];
    double totalLength = 0.0;                      // Store total line length here
    for(int i = 0; i < points.length - 1; i++) {
      lines[i] = new Line(points[i], points[i+1]); // Create a Line
      totalLength += lines[i].length();            // Add its length
      System.out.println("Line " + (i+1) + ' ' + lines[i] +
                         "  Length is " + lines[i].length());
    }
    // Output the total length
    System.out.println("
Total line length = " + totalLength);
  }
}
Directory "TryPackage"
You should save this as TryPackage.java in the directory TryPackage. If the path to your Geometry directory on a PC running Windows is C:PackagesGeometry, you can compile this with the following command:
javac -classpath "C:Packages" TryPackage.java
This assumes the current directory is the one containing the TryPackage.java file, which is the TryPackage directory if you followed my suggestion. The -classpath option specifies the directory containing your Geometry package. Without this the compiler is not able to find the classes in the Geometry package, and the compilation fails.
After you have a successful compilation, you can execute the program with the following command:
java -classpath ".;C:Packages" TryPackage
Here -classpath includes a period for the current directory. Without it, the program will not execute because TryPackage will not be found. When the program executes, you should see the following output:
Line 1 (1.0, 0.0):(6.0, 0.0)   Length is 5.0
Line 2 (6.0, 0.0):(6.0, 10.0)   Length is 10.0
Line 3 (6.0, 10.0):(10.0, 10.0)   Length is 4.0
Line 4 (10.0, 10.0):(10.0, -14.0)   Length is 24.0
Line 5 (10.0, -14.0):(8.0, -14.0)   Length is 2.0

Total line length = 45.0
How It Works
This example is a handy review of how you can define arrays and also shows that you can declare an array of objects in the same way as you declare an array of one of the basic types. The dimensions of the array of arrays, coords, are determined by the initial values that you specified between the braces. The number of values within the outer braces determines the first dimension. Each of the elements in the array is itself an array of length two, with each pair of element values enclosed within their own braces.
Because there are six sets of these, you have an array of six elements, each of which is itself an array of two elements. Each of these elements corresponds to the (x,y) coordinates of a point.
NOTE You can see from this that you could create an array of arrays with each row having a different number of elements. The number of initializing values that appear between each inner pair of braces determines the length of each row, so the rows could all be of different lengths in the most general case.
You declare an array of Point objects with the same length as the number of (x,y) pairs in the coords array. This array is filled with Point objects in the for loop, which you create using the pairs of coordinate values from the coords array.
Because each pair of Point objects defines a Line object, you need one less element in the lines array than you have in the points array. You create the elements of the lines array in the second for loop using successive Point objects and accumulate the total length of all the line segments by adding the length of each Line object to totalLength as it is created. On each iteration of the for loop, you output the details of the current line. Finally, you output the value of totalLength, which in this case is 45.
Note that the import statement in TryPackage.java adds the classes from the Geometry package to your program. These classes can be added to any application using the same import statement. You might like to try putting the classes in the Geometry package in a .jar file and try it out as an extension. Let’s look at one other aspect of generating your own packages — compiling just the classes in the package without any program that makes use of them. You can try this out on the Geometry package if you delete the Line.class and Point.class files from the package directory.
You can compile just the classes in the Geometry package with the following command:
javac -classpath "C:Packages" Geometry/*.java
This compiles both the Line and Point classes so you should see the .class files restored in the Geometry directory. The files to be compiled are specified relative to the current directory as Geometry/*.java. Under Microsoft Windows this could equally well be Geometry*.java. This specifies all files in the Geometry subdirectory to the current directory. Unless the current directory is the one containing the classes in the package, the classpath must contain the path to the package directory; otherwise, the compiler is not able to find the package.
All the classes you have defined so far have been separate from each other — each stored away in its own source file. Not all classes have to be defined like this. You can put the definition of one class inside the definition of another class. The inside class is called a nested class. A nested class can itself have another class nested inside it, if need be.
When you define a nested class, it is a member of the enclosing class in much the same way as the other class members. A nested class can have an access attribute just like other class members, and the accessibility from outside the enclosing class is determined by the attributes in the same way:
public class Outside {

  // Nested class
  public class Inside {
    // Details of Inside class...
  }

  // More members of Outside class...
}
Here the class Inside is nested inside the class Outside. The Inside class is declared as a public member of Outside, so it is accessible from outside Outside. Obviously, a nested class should have some specific association with the enclosing class. Arbitrarily nesting one class inside another would not be sensible. The enclosing class here is referred to as a top-level class. A top-level class is a class that contains a nested class but is not itself a nested class.
The nested class here has meaning only in the context of an object of type Outside. This is because the Inside class is not declared as a static member of the class Outside. Until an object of type Outside has been created, you can’t create any Inside objects. However, when you declare an object of a class containing a nested class, no objects of the nested class are necessarily created — unless of course the enclosing class’s constructor creates them. For example, suppose you create an object with the following statement:
Outside outer = new Outside();
No objects of the nested class, Inside, are created. If you now want to create an object of the type of the nested class, you must refer to the nested class type using the name of the enclosing class as a qualifier. For instance, having declared an object of type Outside, you can create an object of type Inside as follows:
Outside.Inside inner = outer.new Inside(); // Define a nested class object
Here you have created an object of the nested class type that is associated with the object outer that you created earlier. You are creating an object of type Inside in the context of the object outer. Within non-static methods that are members of Outside, you can use the class name Inside without any qualification, as it is automatically qualified by the compiler with the this variable. So you could create a new Inside object from within a method of the object Outside:
Inside inner = new Inside(); // Define a nested class object
This statement is equivalent to:
this.Inside inner = this.new Inside(); // Define a nested class object
All this implies that a static method cannot create objects of a non-static nested class type. Because the Inside class is not a static member of the Outside class, such a member could refer to an object that does not exist — which would be an error if there are no Inside objects extant in the context of an Outside object. Because Inside is not a static member of the Outside class, if a static method in the Outside class tried to create an object of type Inside directly, without first invoking an object of type Outside, it would be trying to create an object outside of that object’s legitimate scope — an illegal maneuver.
Further, because the Inside class is not a static member of the Outside class, it cannot in turn contain any static data members itself. Because Inside is not static, it cannot act as a freestanding class with static members — this would be a logical contradiction.
You typically use nested classes to define objects that at least have a strong association with objects of the enclosing class type, and often there is a tight coupling between the two. A further use for nested classes is for grouping a set of related classes under the umbrella of an enclosing class. You use this approach in examples later on in the book.
Static Nested Classes
To make objects of a nested class type independent of objects of the enclosing class type, you can declare the nested class as static:
public class Outside {
  public static class Skinside {
    // Details of Skinside
  }

  // Nested class
  public class Inside {
    // Details of Inside class...
  }
  // More members of Outside class...
}
Now with Skinside inside Outside declared as static, you can declare objects of this nested class type independent from any objects of type Outside, and regardless of whether you have created any Outside objects or not. For example:
Outside.Skinside example = new Outside.Skinside();
This is significantly different from what you needed to do for a non-static nested class. Now you must use the nested class name qualified by the enclosing class name as the type for creating the object. Thus, the name of a static nested class exists within the context of the outer class and therefore the nested class name is qualified by the enclosing class name. Note that a static nested class can have static members, whereas a non-static nested class cannot. A class containing both a static and a non-static nested class is illustrated in Figure 5-12.
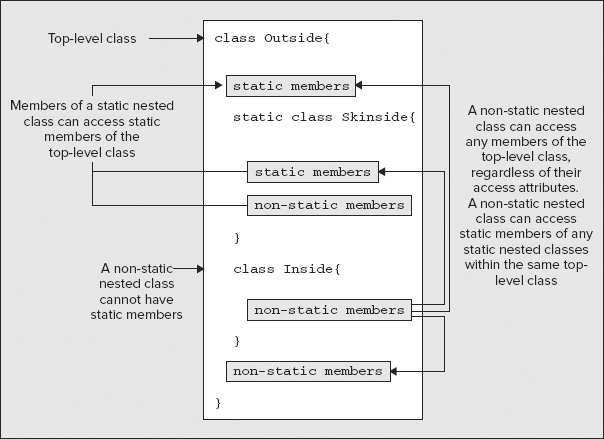
If the preceding discussion seems a bit confusing in the abstract, you can get a better idea of how a nested class works in practice with a simple example. You create a class MagicHat that defines an object containing a variable number of Rabbit objects. You put the definition for the class Rabbit inside the definition of the class MagicHat, so Rabbit is an example of a nested class. The basic structure of MagicHat.java is:
public class MagicHat {
  // Definition of the MagicHat class...

  // Nested class to define a rabbit
  static class Rabbit {
    // Definition of the Rabbit class...
  }
}
Here the nested class is defined as static because you want to be able to have static members of this class. You will see a little later in the chapter how it might work with a non-static nested class.
TRY IT OUT: Rabbits out of Hats
Let’s add the details of the MagicHat class definition:
import java.util.Random;                         // Import Random class

public class MagicHat {
  static int maxRabbits = 5;                     // Maximum rabbits in a hat
  static Random select = new Random();           // Random number generator

  // Constructor for a hat
  public MagicHat(String hatName) {
    this.hatName = hatName;                      // Store the hat name
    rabbits = new Rabbit[1+select.nextInt(maxRabbits)]; // Random rabbits

    for(int i = 0 ; i < rabbits.length ; ++i) {
      rabbits[i] = new Rabbit();                 // Create the rabbits
    }
  }

  // String representation of a hat
  public String toString() {
    // Hat name first...
    String hatString = "
" + hatName + " contains:
";

    for(Rabbit rabbit : rabbits) {
      hatString += "   " + rabbit;               // Add the rabbits strings
    }
    return hatString;
  }

  private String hatName;                        // Name of the hat
  private Rabbit rabbits[];                        // Rabbits in the hat

  // Nested class to define a rabbit
  static class Rabbit {
    // Definition of the Rabbit class...
  }
}
Directory "TryNestedClass"
You can save the source file in a new directory, TryNestedClass. Instead of the old Math.random() method that you have been using up to now to generate pseudo-random values, you are using an object of the class Random that is defined in the java.util package. An object of type Random has a variety of methods to generate pseudo-random values of different types, and with different ranges. The method nextInt() that you are using here returns an integer that is zero or greater, but less than the integer value you pass as an argument. Thus, if you pass the length of an array to it, it generates a random index value that is always legal for the array size.
You can now add the definition of the Rabbit class. When you create a Rabbit object, you want it to have a unique name so you can distinguish one Rabbit from another. You can generate unique names by selecting one of a limited set of fixed names and then appending an integer that is different each time the base name is used. Here’s what you need to add for the Rabbit class definition:
public class MagicHat {

  // Definition of the MagicHat class - as before...

  // Nested class to define a rabbit
  static class Rabbit {
    // A name is a rabbit name from rabbitNames followed by an integer
    static private String[] rabbitNames = {"Floppsy", "Moppsy",
                                           "Gnasher", "Thumper"};
    static private int[] rabbitNamesCount = new int[rabbitNames.length];
    private String name;                         // Name of the rabbit

    // Constructor for a rabbit
    public Rabbit() {
      int index = select.nextInt(rabbitNames.length);  // Get random name index
      name = rabbitNames[index] + (++rabbitNamesCount[index]);
    }

    // String representation of a rabbit
    public String toString() {
      return name;
    }
  }
}
Directory "TryNestedClass"
Note that the constructor in the Rabbit class can access the select member of the enclosing class, MagicHat, without qualification. This is possible only with static members of the enclosing class — you can’t refer to non-static members of the enclosing class here because there is no object of type MagicHat associated with it.
You can use the following application class to try out the nested class:
public class TryNestedClass {
  static public void main(String[] args) {
    // Create three magic hats and output them
    System.out.println(new MagicHat("Gray Topper"));
    System.out.println(new MagicHat("Black Topper"));
    System.out.println(new MagicHat("Baseball Cap"));
  }
}
Directory "TryNestedClass"
You should save this source file in the same directory as MagicHat.java. When I ran the program, I got the following output:
Gray Topper contains:
   Floppsy1   Moppsy1   Gnasher1   Floppsy2   Thumper1

Black Topper contains:
   Moppsy2   Gnasher2   Floppsy3   Floppsy4

Baseball Cap contains:
   Moppsy3
You are likely to get something different.
How It Works
Each MagicHat object contains a random number of Rabbit objects. The constructor for a MagicHat object stores the name of the hat in its private member hatName and generates a Rabbit array with at least one, and up to maxRabbits, elements. This is done with the expression 1+select.nextInt(maxRabbits). Calling nextInt() with the argument maxRabbits returns a value that is from 0 to maxRabbits-1, inclusive. Adding 1 to this results in a value from 1 to maxRabbits, inclusive. The array so created is then filled with Rabbit objects.
The MagicHat class also has a toString() method that returns a String object containing the name of the hat and the names of all the rabbits in the hat. This assumes that the Rabbit class also has a toString() method defined. You are able to use the toString() implicitly in an output statement when you create and display MagicHat class objects.
The base names that you use to generate rabbit names are defined in the static array rabbitNames[] in the Rabbit class. The count for each base name, which you append to the base name to produce a unique name for a rabbit, is stored in the static array rabbitNamesCount[]. This has the same number of elements as the rabbitNames array, and each element stores a value to be appended to the corresponding name in the rabbitNames array. The Rabbit class has the data member name to store a name that is initialized in the constructor. A random base name is selected from the rabbitNames[] array using an index value from 0 up to one less than the length of this array. You then append the current count for the name incremented by 1, so successive uses of any base name, such as Gnasher, for example, produce names Gnasher1, Gnasher2, and so on. The toString() method for the class returns the name for the Rabbit object.
The main() method in TryNestedClass creates three MagicHat objects and outputs the string representation of each of them. Putting the object as an argument to the println() method calls the toString() method for the object automatically, and the String object that is returned is output to the screen.
If you look at the .class files that are produced by the compiler, the Rabbit class has its own file with the name MagicHat*Rabbit.class. Thus the name of the nested Rabbit class is qualified with the name of the class that contains it, MagicHat.
Using a Non-Static Nested Class
In the previous example, you could make the Rabbit class non-static by deleting the keyword static from its definition. However, if you try that, the program no longer compiles and runs. The problem is the static data members rabbitNames and rabbitNamesCount in the Rabbit class. You saw earlier that a non-static nested class cannot have static members, so you must find an alternative way of dealing with names if you want to make Rabbit a non-static nested class.
You could consider making these arrays non-static. This has several disadvantages. First, each Rabbit object would have its own copy of these arrays — an unnecessary duplication of data. A more serious problem is that the naming process would not work. Because each object has its own copy of the rabbitNamesCount array, the names that are generated are not going to be unique.
The answer is to keep rabbitNames and rabbitNamesCount as static, but put them in the MagicHat class instead. Let’s see that working.
TRY IT OUT: Accessing the Top-Level Class Members
You need to modify the class definition to the following:
public class MagicHat {
  static int maxRabbits = 5;                     // Maximuum rabbits in a hat
  static Random select = new Random();           // Random number generator
  static private String[] rabbitNames = {"Floppsy", "Moppsy",
                                         "Gnasher", "Thumper"};
  static private int[] rabbitNamesCount = new int[rabbitNames.length];

  // Constructor for a hat
  public MagicHat(final String hatName) {
    this.hatName = hatName;                      // Store the hat name
    rabbits = new Rabbit[1+select.nextInt(maxRabbits)]; // Random rabbits

    for(int i = 0 ; i < rabbits.length ; ++i) {
      rabbits[i] = new Rabbit();                 // Create the rabbits
    }
  }

  // String representation of a hat
  public String toString() {
    // Hat name first...
    String hatString = "
" + hatName + " contains:
";

    for(Rabbit rabbit : rabbits) {
      hatString += "   " + rabbit;               // Add the rabbits strings
    }
    return hatString;
  }
  private String hatName;                        // Name of the hat
  private Rabbit rabbits[];                      // Rabbits in the hat

  // Nested class to define a rabbit
  class Rabbit {
    private String name;                         // Name of the rabbit

    // Constructor for a rabbit
    public Rabbit() {
      int index = select.nextInt(rabbitNames.length);  // Get random name index
      name = rabbitNames[index] + (++rabbitNamesCount[index]);
    }

    // String representation of a rabbit
    public String toString() {
      return name;
    }
  }
}
Directory "TryNestedClass2"
I put this version in the new folder TryNestedClass2. The only changes are the deletion of the static keyword in the definition of the Rabbit class and the movement of data members relating to rabbit names to the MagicHat class. You can run this with the same version of TryNestedClass, and it should produce output much the same as before.
How It Works
Although the output is much the same, what is happening is distinctly different. The Rabbit objects that are created in the MagicHat constructor are now associated with the current MagicHat object that is being constructed. The Rabbit() constructor call is actually this.Rabbit().
Using a Nested Class Outside the Top-Level Class
You can create objects of an inner class outside the top-level class containing the inner class. As I discussed, how you do this depends on whether the nested class is a static member of the enclosing class. With the first version of the MagicHat class, with a static Rabbit class, you could create an independent rabbit by adding the following statement to the end of main():
System.out.println("An independent rabbit: " + new MagicHat.Rabbit());
This Rabbit object is completely free — there is no MagicHat object to contain and restrain it. In the case of a non-static Rabbit class, things are different. Let’s try this using a modified version of the previous program.
TRY IT OUT: Free-Range Rabbits (Almost)
You can see how this works by modifying the main() method in TryNestedClass to create another MagicHat object, and then create a Rabbit object for it:
static public void main(String[] args) {
  // Create three magic hats and output them
  System.out.println(new MagicHat("Gray Topper"));
  System.out.println(new MagicHat("Black Topper"));
  System.out.println(new MagicHat("Baseball Cap"));
  MagicHat oldHat = new MagicHat("Old hat");          // New hat object
  MagicHat.Rabbit rabbit = oldHat.new Rabbit();       // Create rabbit object
  System.out.println(oldHat);                         // Show the hat
  System.out.println("
New rabbit is: " + rabbit);   // Display the rabbit
}
Directory "TryNestedClass3"
I put this in the TryNestedClass3 folder. The output that I got was as follows:
Gray Topper contains:
 Thumper1

Black Topper contains:
 Moppsy1 Thumper2 Thumper3

Baseball Cap contains:
 Floppsy1 Floppsy2 Thumper4

Old hat contains:
 Floppsy3 Thumper5 Thumper6 Thumper7 Thumper8

New rabbit is: Thumper9
How It Works
The new code first creates a MagicHat object, oldHat, which has its own rabbits. You then use this object to create an object of the class MagicHat.Rabbit. This is how a nested class type is referenced — with the top-level class name as a qualifier. You can only call the constructor for the nested class in this case by qualifying it with a MagicHat object name. This is because a non-static nested class can refer to members of the top-level class — including instance members. Therefore, an instance of the top-level class must exist for this to be possible.
Note how the top-level object is used in the constructor call. The object name qualifier goes before the keyword new, which precedes the constructor call for the inner class. This creates an object, rabbit, in the context of the object oldHat. This doesn’t mean oldHat has rabbit as a member. It means that if top-level members are used in the inner class, they are the members for oldHat. You can see from the example that the name of the new rabbit is not part of the oldHat object, although it is associated with oldHat. You could demonstrate this by modifying the toString() method in the Rabbit class to:
public String toString() {
  return name + " parent: "+hatName;
}
If you run the program again, you see that when each Rabbit object is displayed, it also shows its parent hat.
Local Nested Classes
You can define a class inside a method — where it is called a local nested class. It is also referred to as a local inner class because a non-static nested class is often referred to as an inner class. You can create objects of a local inner class only locally — that is, within the method in which the class definition appears. This is useful when the computation in a method requires the use of a specialized class that is not required or used elsewhere. A good example is listeners for events that arise as a result of user interaction with an application. You learn about listeners in Chapter 18.
A local inner class can refer to variables declared in the method in which the definition appears, but only if they are final.
In this chapter you learned the essentials of defining your own classes. You can now create your own class types to fit the context of the problems you are dealing with. You will build on this in the next chapter to enable you to add more flexibility to the operations on your class objects by learning how to realize inheritance.
EXERCISES
You can download the source code for the examples in the book and the solutions to the following exercises from www.wrox.com.
1. Define a class for rectangle objects defined by two points: the top-left and bottom-right corners of the rectangle. Include a constructor to copy a rectangle, a method to return a rectangle object that encloses the current object and the rectangle passed as an argument, and a method to display the defining points of a rectangle. Test the class by creating four rectangles and combining these cumulatively to end up with a rectangle enclosing them all. Output the defining points of all the rectangles you create.
2. Define a class, mcmLength, to represent a length measured in meters, centimeters, and millimeters, each stored as integers. Include methods to add and subtract objects, to multiply and divide an object by an integer value, to calculate an area resulting from the product of two objects, and to compare objects. Include constructors that accept three arguments — meters, centimeters, and millimeters; one integer argument in millimeters; one double argument in centimeters; and no arguments, which creates an object with the length set to zero. Check the class by creating some objects and testing the class operations.
3. Define a class, tkgWeight, to represent a weight in tons, kilograms, and grams, and include a similar range of methods and constructors as the previous example. Demonstrate this class by creating and combining some class objects.
4. Put both the previous classes in a package called Measures. Import this package into a program that calculates and displays the total weight of the following: 200 carpets — size: 4 meters by 2 meters 9 centimeters, that weigh 1.25 kilograms per square meter; and 60 carpets — size: 3 meters 57 centimeters by 5 meters, that weigh 1.05 kilograms per square meter.
• WHAT YOU LEARNED IN THIS CHAPTER
| TOPIC | CONCEPT |
| Class Definitions | A class definition specifies the variables and methods that are members of the class. |
| Class Files | Each class must be saved in a file with the same name as the class, and with the extension .java. |
| Class Variables | Class variables are declared using the keyword static, and one instance of each class variable is shared among all objects of a class. |
| Instance Variables | Each object of a class has its own instance variables — these are variables declared in the class without using the keyword static. |
| Static Methods | Methods that are specified as static can be called even if no class objects exist, but a static method cannot refer to instance variables. |
| Non-Static Methods | Methods that are not specified as static can access any of the variables in the class directly. |
| Recursive Methods | Recursive methods are methods that call themselves. |
| Class Member Access | Access to members of a class is determined by the access attributes that are specified for each of them. These can be public, private, protected, or nothing at all. |
| Packages | Classes can be grouped into a package. If a class in a package is to be accessible from outside the package, the class must be declared using the keyword public. |
| Package Members | To designate that a class is a member of a package, you use a package statement at the beginning of the file containing the class definition. |
| Using a Package Member | To add classes from a package to a file, you use an import statement immediately following any package statement in the file. |
| Nested Classes | A nested class is a class that is defined within the definition of another class. Objects of a nested class type can be created only in the context of an object of the outer class type. |
| Creating Static Nested Class Objects | Objects of a static nested class type can be created independently, but the static nested class name must be qualified by the outer class name. |
