
Chapter 21
Filing and Printing Documents
WHAT YOU WILL LEARN IN THIS CHAPTER:
- How to use the JFileChooser class
- How to save a sketch in a file as objects
- How to implement the Save As menu mechanism
- How to open a sketch stored in a file and integrate it into the application
- How to create a new sketch and integrate it into the application
- How to ensure that the current sketch is saved before the application is closed or a new sketch is loaded
- How printing in Java works
- How to print in landscape orientation rather than portrait orientation
- How to implement multipage printing
- How to output Swing components to your printer
In this chapter, you explore serializing and printing documents in an application, and you add these capabilities as the finishing touches to the Sketcher program. Neither serialization nor printing are available to an untrusted applet for security reasons, so everything I cover in this chapter applies only to applications and trusted applets. Although you have already covered serialization in Chapter 12, you’ll find that there is quite a difference between understanding how the basic methods for object input and output work and applying them in a practical context.
The Sketcher program can be considered to be a practical application only if you can save sketches in a file and retrieve them later — in other words, you need to implement serialization for a SketcherModel object and use that to make the File menu work. Ideally, you want to be able to write the model for a sketch to a file and be able to read it back at a later date and reconstruct exactly the same model object. The basics are already in place. You have declared that the SketcherModel class and the Element class, and therefore its subclasses implement the Serializable interface. You now need to make sure that the other conditions for serialization are met; namely that all the fields in the classes meet the requirements of serialization, too.
Implementing Serialization
For a class to be serializable, all its data members must be either serializable or declared as transient. If this is not the case, then an exception of type NotSerializableException is thrown when you try to serialize an object. To avoid this, you must trawl through the data members of the SketcherModel class and make sure they either implement the Serializable interface or are declared as transient.
You cannot assume that objects of a standard class type are serializable, because some most definitely are not. It’s a fairly quick fishing trip though, because the SketcherModel class has only one data member — the linked list of elements that make up the sketch. If the SketcherModel object is to be serializable, you simply need to make sure the elements field is serializable.
Serializing the List of Elements
If you look through the JDK documentation, you’ll see that the LinkedList<> generic class implements the Serializable interface, so all you need to worry about are the elements you store in the list.
Class fields of any of the basic types are always serializable. The data members of our Element class that are object references are of types java.awt.Color, java.awt.Point, and java.awt.Rectangle. You can verify from the JDK documentation that all three classes are serializable, so our Element class is serializable. Now you need to look at the subclasses of Element.
Subclasses of Element inherit the implementation of the Serializable interface, so they are all declared to be serializable by default. All of the concrete classes in the java.awt.geom package that implement the java.awt.Shape interface are already serializable, as is the java.awt.Font field in the Element.Text class. All the other fields in the classes that define sketch elements are of basic types. This means that all the sketch element types are serializable without any further effort on your part, so writing a sketch to a file is going to be fairly trivial.
BASIC INFRASTRUCTURE FOR SAVING SKETCHES
Putting in place the graphical user interface functionality for saving a sketch on disk and reading it back from a file is significantly more work than implementing serialization for the model. The logic of opening and saving files so as not to lose anything accidentally can get rather complex. Before you get into that, there are some fundamental points that need to be addressed.
For starters, a sketch doesn’t have a name. You should at least make provision for assigning a file name to a sketch, and maybe displaying the name of the current sketch in the title bar of the application window. You also need ways to record the file name for a sketch and the directory where it is stored. Let’s name that sketch first.
Assigning a Document Name
The sketch is going to have a name, and because you intend to store it somewhere, let’s define a default directory to hold sketches. Add the following lines to the end of the SketcherConstants class that you defined in the Constants package:
  public final static Path DEFAULT_DIRECTORY =
             Paths.get(System.getProperty("user.home")).resolve("Sketches");
The default directory for storing sketches is the Sketches directory in your user.home directory. If you want to store your sketches in a different directory, set the definition of DEFAULT_DIRECTORY to suit your needs. The file extension .ske to identify sketches is also arbitrary. You can change this if you prefer to use a different extension.
You should store information related to saving a sketch, and the application window object is a suitable repository for it, so add the following data members to the SketcherFrame class definition:
  private String frameTitle;                  // Frame title
  private Path currentSketchFile;             // Current sketch file on disk
The frameTitle member records the basic title for the Sketcher application window. You append the file name for the sketch to it when there is one and display the result in the title bar. The currentSketchFile object is only non-null when a sketch has been saved. The value for the currentSketchFile member is set by the event handling for the File menu items as follows:
- The New menu item event sets it to null.
- The Save menu item event sets it to the path for the file where the sketch was saved if it was not previously saved. It leaves the member unchanged if the sketch was previously saved.
- The Save As menu item event sets it to the path where the sketch was saved.
- The Open menu item event sets it to the path for the file that was read.
You can add import statements to SketcherFrame.java that cover Path and other types you use for file I/O:
import java.nio.file.*;
import java.io.*;
Validating the Directory for Sketches
You must make sure that DEFAULT_DIRECTORY exists. If it doesn’t exist, you need to create it so sketches can be saved. You can add the following method to the SketcherFrame class to do this:
  private void checkDirectory(Path directory) {
    if(Files.notExists(directory)) {
        JOptionPane.showMessageDialog(null,
                            "Creating directory: " + directory,
                            "Directory Not Found",
                            JOptionPane.INFORMATION_MESSAGE);
        try {
          Files.createDirectories(directory);
        } catch(IOException e) {
          e.printStackTrace();
          JOptionPane.showMessageDialog(null,
              "Cannot create: " + directory + ". Terminating Sketcher.",
              "Directory Creation Failed",
              JOptionPane.ERROR_MESSAGE);
          System.exit(1);
        }
    }
  }
Directory "Sketcher 1 saving a sketch to a file"
You have seen this sort of code for ensuring a directory exists back in Chapter 9. This method checks whether the directory passed as the argument exists. If it doesn’t, it pops an information dialog telling the user the directory is created. The first argument to the showMessageDialog() method is null because the SketcherFrame object has not been created when the checkDirectory() method is called from the SketcherFrame constructor. The null argument causes a default frame to be used to position the dialog window.
It is possible that the createDirectories() method could fail and throw an exception. In this case, another message dialog is displayed and the stack trace is recorded on the command line before terminating Sketcher. You can test that this all works and see what the stack trace looks like by specifying a string for DEFAULT_DIRECTORY that is not a valid path.
You can call the new method from the constructor with the following code:
  public SketcherFrame (String title, Sketcher theApp) {
    checkDirectory(DEFAULT_DIRECTORY);
    setTitle(title);                                     // Set the window title
    frameTitle = title;                              // Remember original title
    // Rest of the code in the constructor as before...
  }
Directory "Sketcher 1 saving a sketch to a file"
After calling the method that verifies the directory is available, you record the window title in frameTitle.
When you close Sketcher, there should be a means of checking whether the sketch needs to be saved. Otherwise, it is all too easy to close the application and lose the brilliant sketch that you have spent many hours crafting. Checking whether the sketch needs to be saved isn’t difficult. You just need to record the fact that the model has changed.
Recording Changes to a Sketch
To provide the means of recording whether or not a sketch has been changed, you can add a boolean field to the SketcherFrame class that you set to true when the SketcherModel object changes and set to false when it is in a new and original condition — as is the case when it has just been loaded or saved in a file. Add the following data member definition to the SketcherFrame class:
private boolean sketchChanged = false; // Model changed flag
Directory "Sketcher 1 saving a sketch to a file"
This sort of variable is sometimes referred to as a “dirty" flag for the model because it records when something has been done to sully the pristine state of the model data. The flag is false by default because the sketch is empty and therefore unchanged by definition. Any change that the user makes to the model should result in the flag being set to true, and whenever the model is written to a file, the flag should be reset to false. By checking the state of this flag you can avoid unnecessary Save operations while the sketch in memory remains unchanged.
You already have in place the means to signal changes to a sketch because the SketcherModel class has Observable as a base class. As you know, an Observable object can automatically notify any registered Observer objects when a change takes place. All you need to do is to make the SketcherFrame class implement the Observer interface and register the application window as an observer of the sketch object:
public class SketcherFrame  extends JFrame implements ActionListener, Observer {
  // Constructor and other methods as before...
  // Method called by SketcherModel object when it changes
  public void update(Observable o, Object obj) {
    sketchChanged = true;
  }

  // Rest of the class as before...
}
Directory "Sketcher 1 saving a sketch to a file"
The update() member of SketcherFrame will be called by the sketch object whenever the sketch changes in some way. You record the change by setting sketchChanged to true. This implies that the sketch in its current state has not been saved, and when the sketch is saved, you must set sketchChanged back to false.
The Observer interface and the Observable class are defined in the java.util package, so you must import the class names into the SketcherFrame.java file with the following statement:
import java.util.*;
You can register the application window as an observer for the SketcherModel object by adding one statement to the createGUI() method in the Sketcher class:
  private void creatGUI() {
  // Code as before...
    sketch = new SketcherModel();                // Create the model
    view = new SketcherView(this);               // Create the view
    sketch.addObserver(view);                    // Register view with the model
    sketch.addObserver(window);               // Register window with the model
    window.getContentPane().add(view, BorderLayout.CENTER);
    window.setVisible(true);
  }
The window field in the Sketcher object stores a reference to the application window. Whenever an element is added to the sketch, or deleted from it, the application window object is notified. You can now press ahead with serializing the model for a sketch.
Handling File Menu Events
To support the menu items in the File menu, you must add some code to the actionPerformed() method in the FileAction class. This single method definition supports events for all of the items in the File menu. You need to figure out what action originated the event.
You know how to do this because you have done it before in the ColorAction class. All the FileAction references are stored as members of the SketcherFrame object. All you need to do is compare the this reference with each of the FileAction references. An outline of the actionPerformed() method in the FileAction class looks like this:
public void actionPerformed(ActionEvent e) {
  if(this == saveAction) {
    // Code to handle file Save operation...

  } else if(this == saveAsAction) {
    // Code to handle file Save As operation...

  } else if(this == openAction) {
    // Code to handle file Open operation...

  } else if(this == closeAction) {
    // Code to handle close operation...

  } else if(this == newAction){
    // Code to handle file New operation...

  } else if(this == printAction) {
    // Code to handle Print operation...

  } else if(this == exitAction) {
    // Code to handle Exit operation...

  }
}
It really could not be much simpler. You have one if or else-if block for each action, and you develop the code for these one by one.
Many of these operations involve dialogs. In particular you should get at the file system and display the list of directories and files to choose from, for an Open operation for instance. It sounds like a lot of work, and it certainly would be, if it weren’t for a neat facility provided by the javax.swing.JFileChooser class.
The JFileChooser class in the javax.swing package provides an easy-to-use mechanism for creating file dialogs for opening and saving files. The JFileChooser class is slightly out of kilter with the new I/O capability in that it uses java.io.File objects to encapsulate file paths, rather than java.nio.file.Path objects that you use with the new I/O. A File object encapsulates an absolute or relative path string for a file or directory, similar to a Path object. Producing Path objects from File objects and vice versa is very easy, so having to work with both File and Path objects doesn’t represent a problem.
You can use a single object of this class to create all the file dialogs you need, so you can add a member to the SketcherFrame class now to store a reference to a JFileChooser object that you create in the constructor:
private JFileChooser fileChooser; // File chooser dialog
There are several JFileChooser constructors, but I’m discussing only a couple of them here. The default constructor creates an object with the current directory as the default directory, but that won’t quite do for our purposes. What you want in the first instance is for the default directory to be the one specified by the DEFAULT_DIRECTORY path that you defined in the SketcherConstants class. There is no JFileChooser constructor that accepts a Path object reference, so you use the constructor that accepts an argument of type String that specifies the directory that the dialog displays initially. You can call the toString() method for DEFAULT_DIRECTORY to get the path as a String and pass that to the constructor that accepts a String reference to specify the directory. Add the following statement to the SketcherFrame constructor, following the statements that you added earlier that verified DEFAULT_DIRECTORY actually existed on the hard drive:
fileChooser = new JFileChooser(DEFAULT_DIRECTORY.toString());
The dialog that the fileChooser object encapsulates displays the contents of the directory specified by DEFAULT_DIRECTORY. The dialog has two buttons, one to approve a selection from the directory contents and the other to cancel the dialog. You can now use the fileChooser object to implement the event handling for the File menu. During use of the dialog, the user may well change the current directory to something else. As long as you are using the same JFileChooser object to display the dialogs for choosing a file, the current directory is remembered between displaying one file chooser dialog and the next.
There are a considerable number of methods in the JFileChooser class, so rather than trying to discuss them all, which would take many pages of text and be incredibly boring, I’m leaving you to explore these at your leisure and will just introduce the ones that you can apply to Sketcher to support the File menu.
Displaying a File Save Dialog
In most cases you’ll want to display a modal file save dialog when the Save menu item or toolbar button is selected. As luck would have it, the JFileChooser class has a showSaveDialog() method that does precisely what you want. All you have to do is call the method with a reference to the Component object that is the parent for the dialog to be displayed as the argument. The method returns a value indicating how the dialog was closed. You could display a save dialog in a method for a FileAction object with the following statement:
int result = fileChooser.showSaveDialog(SketcherFrame.this);
This automatically creates a file save dialog with the SketcherFrame object as parent, and with Save and Cancel buttons. The SketcherFrame.this notation is used to refer to the this member for the SketcherFrame object from within a method of an inner class object of type FileAction. Just to remind you, you reference the this variable for an outer class object from a non-static inner class object by qualifying this with the outer class name. The file chooser dialog is displayed centered in the parent component, which is the SketcherFrame object here. If you specify the parent component as null, the dialog is centered on the screen. This also applies to all the other methods I discuss that display file chooser dialogs.
Displaying a File Open Dialog
When you need a file open dialog, you can call the showOpenDialog() member of a JFileChooser object. Don’t be fooled here, though. A save dialog and an open dialog are essentially the same. They differ only in minor details — the title bar and one of the button labels. The sole purpose of both dialogs is simply to enable the user to select a file — for whatever purpose. If you want to be perverse, you could pop up a save dialog to open a file and vice versa!
You can also display a customized dialog from a JFileChooser object. Although it’s not strictly necessary for the Sketcher application — the standard file dialogs are quite adequate — you adopt a custom approach so you get some experience of using a few more JFileChooser methods.
You display a custom dialog by calling the showDialog() method for the JFileChooser object supplying two arguments. The first argument is the parent component for the dialog window, and the second is the approve button text — the approve button being the button that you click to expedite the operation rather than cancel it. You could display a dialog with an Open button with the following statement:
int result = fileChooser.showDialog(SketcherFrame.this, "Open");
If you pass null as the second argument here, the button text is whatever was set previously — possibly the default. The value that the method returns can be one of three constants that are defined in the JFileChooser class:
- APPROVE_OPTION if the approve button was clicked
- CANCEL_OPTION if the cancel button was clicked
- ERROR_OPTION if an error occurred or if the dialog window was closed
You can compare the value that showDialog() returns with these constants to determine how the dialog was closed.
Customizing a File Chooser Dialog
Before you display a custom dialog, you would normally do a bit more customizing of what is to be displayed by the dialog. You use the following JFileChooser methods to customize the dialogs for Sketcher:
- setDialogTitle(String text): Sets the String object that you pass as the argument as the dialog’s title bar text.
- setApproveButtonText(String text): Sets the String object that you pass as the argument as the approve button label.
- setApproveButtonToolTipText(String text): Sets the String object that you pass as the argument as the approve button tooltip.
- addChoosableFileFilter(FileFilter filter): Filters the file list using the file filter you supply as the argument.
- setSelectedFile(File file):Sets file as the file preselected when the dialog opens.
Contents of the File List
You can set a file chooser dialog to display files, directories, or both. You determine what is displayed in a dialog by calling the setFileSelectionMode() method. The argument must be one of the int constants FILES_ONLY, DIRECTORIES_ONLY, and FILES_AND_DIRECTORIES that are defined as static members of the JFileChooser class. FILES_ONLY is the default selection mode. The getFileSelectionMode() method returns the current selection mode.
By default a user can select only one file or directory, but you can allow multiple selections to be made from the list in the file dialog if you call the setMultiSelectionEnabled() method for your JFileChooser object with the argument true.
Preselecting a File
If you want the dialog to have a particular file selected when it opens, you pass a java.io.File object to the setSelectedFile() method for the JFileChooser object. This will preselect the file in the file list if the file already exists, and inserts the file name in the file name field if it doesn’t. You can create a File object from a Path object by calling its toFile() method. If you have enabled multiple selections in the dialog, you can pass an array of File objects to the setSelectedFiles() method to have several files preselected when the dialog opens.
Updating the File List
The file list is created when you create the JFileChooser object, but naturally files may be added or deleted over time, and when this occurs you need to reconstruct the file list in the dialog object. Calling the rescanCurrentDirectory() method before you display the dialog does this for you. You can change the current directory at any time by passing a File object specifying the directory you want to make current to the setCurrentDirectory() method.
Filtering the File List
You can supply a file filter for the sketch files. The default file filter in a JFileChooser object accepts any file or directory, but you can add one or more filters of your own to select a subset of the files in the current directory. A file filter object is of a type that has the javax.swing.filechooser.FileFilter class as a superclass. The FileFilter class declares two methods, both of which are abstract, so your file filter class must implement them:
- The accept(File file) method: Returns true if the file represented by file is accepted by the file filter and returns false otherwise.
- The getDescription() method: Returns a String object that describes the filter — “Sketch files," for example.
The JFileChooser class works with File objects rather than Path objects, so the filter has to work with File objects, too.
You limit the files in the list in the dialog to display only the files you want by calling the addChoosableFileFilter() method, with an object of your file filter class as the argument.
You can define your own file filter class for use with the Sketcher program as follows:
import javax.swing.filechooser.FileFilter;
import java.io.File;

public class ExtensionFilter extends FileFilter {
  public ExtensionFilter(String ext, String descr) {
    extension = ext.toLowerCase();         // Store the extension as lower case
    description = descr;                   // Store the description
  }

  public boolean accept(File file) {
    return(file.isDirectory() || file.getName().toLowerCase().endsWith(extension));
  }

  public String getDescription() {
    return description;
  }

  private String description;              // Filter description
  private String extension;                // File extension
}
Directory "Sketcher 1 saving a sketch to a file"
Add the ExtensionFilter.java source file to the Sketcher program directory. The accept() method determines whether or not a file is displayed in a file chooser list. A file is accepted if either of the operands for the || operator in the method evaluates to true. The isDirectory() method for a File object returns true if the object represents a directory and not a file. This is the first operand for the || operator, so all directories are displayed in the list by this filter. The second operand is true when the extension for a file path in the File object is extension. The getName() method for a File object is the equivalent of the getFileName() method for a Path object; it returns the name of the file as a String object without the root path. After converting it to lowercase, calling endsWith() for the String object results in true if the string ends with the argument extension, so all files with that extension are included in the list.
To identify a filter for files with the extension .ske, you could add a field to the SketcherFrame class:
  private ExtensionFilter sketchFilter = new ExtensionFilter(
                                            ".ske", "Sketch files (*.ske)");
Directory "Sketcher 1 saving a sketch to a file"
You use this object when you implement file operations for a sketch.
NOTE There is a java.io.FileFilter interface that is easily confused with the javax.swing.filechooser.FileFilter class, especially if you make use of * to import all the names in a package.
Querying a File Chooser Dialog
You obviously need to be able to discover which file or directory the user selected in the dialog. When the dialog is closed with the approve button, you can call getSelectedFile() for the dialog object. This returns the file as a File object. You don’t need it for Sketcher, but if you have enabled multiple selections in the dialog, calling the getSelectedFiles() method for the dialog object returns an array of File objects corresponding to the selected files.
That’s enough detail on the JFileChooser class for now. Let’s return to what you need to implement in Sketcher for File menu operations.
You need to implement the capability to respond to events for the Save, Save As, and New menu items in the File menu. Although these are independent operations, they have quite a lot of function in common. Where a dialog is required, it is a JFileChooser dialog customized to the requirements of a given operation. Let’s implement a customized file dialog capability in Sketcher first of all.
Creating a Customized File Dialog
You can add a method to the SketcherFrame class to display a customized file dialog and return a String object encapsulating the path for the file that has been selected:
  // Display a custom file dialog
  private Path showDialog(String dialogTitle,
                          String approveButtonText,
                          String approveButtonTooltip,
                          ExtensionFilter filter,
                          Path file) {              // Current file path - if any
    fileChooser.setDialogTitle(dialogTitle);
    fileChooser.setApproveButtonText(approveButtonText);
    fileChooser.setApproveButtonToolTipText(approveButtonTooltip);
    fileChooser.setFileSelectionMode(JFileChooser.FILES_ONLY);
    fileChooser.addChoosableFileFilter(filter);      // Add the filter
    fileChooser.setFileFilter(filter);               // and select it

    fileChooser.rescanCurrentDirectory();
    Path selectedFile = null;
    if(file == null) {
      selectedFile = Paths.get(
               fileChooser.getCurrentDirectory().toString(), DEFAULT_FILENAME);
    } else {
      selectedFile = file;
    }
    fileChooser.setSelectedFile(selectedFile.toFile());

    // Show the file save dialog
    int result = fileChooser.showDialog(this, null);
    return (result == JFileChooser.APPROVE_OPTION) ?
                    Paths.get(fileChooser.getSelectedFile().getPath()) : null;
Directory "Sketcher 1 saving a sketch to a file"
The method requires five arguments to customize the dialog — the dialog title, the button label, the button tooltip, the file filter object, and the Path object representing the file path for the current sketch. Each of the options is set using the methods for the JFileChooser object that I discussed earlier. The last argument is used to select a file from the file list initially. If the last argument is null, a file with the default file name is selected. The showDialog() method returns null if no file was selected when the dialog closes.
Note that you reconstruct the file list for the dialog by calling the rescanCurrentDirectory() method before you display the dialog. This is to ensure that you always display an up-to-date list of files. If you didn’t do this, the dialog would display the list of files that were in the directory when you created the JFileChooser object. Any subsequent changes to the contents of the directory would not be taken into account.
The value that is returned by the showDialog() member of the JFileChooser object indicates whether or not the approve button was selected. If it was, you return the Path object corresponding to the File object that the dialog returns. Otherwise, you return null. A method that calls your showDialog() method to display the dialog can determine whether or not a file was chosen by testing the return value for null.
You can now use this method when you implement handling of a Save menu item action event. A save operation is a little more complicated than you might imagine at first sight, so let’s consider it in a little more detail.
Implementing the Save Operation
If sketchChanged is false when a Save event occurs, either the sketch is new and unchanged, or it has not been changed since it was last saved; in either case, you do nothing. What happens in a Save operation when sketchChanged is true depends on whether the current sketch has been saved before.
You have to consider two basic possibilities: The current sketch has been previously saved, or it hasn’t. Let’s elaborate on what needs to happen for each case:
1. The current sketch has been saved previously, indicated by currentSketchFile being non-null:
- Save the sketch immediately using the file path that is in currentSketchFile.
- Set sketchChanged to false.
- End the operation.
2. The current sketch has never been saved, indicated by currentSketchFile being null:
- Display the file chooser dialog.
- If the dialog returns null when it closes, end the operation.
- If a non-null File reference is returned from the dialog, check whether the selected file exists:
a. If the file does not exist:
- Save the sketch with the selected file path.
- Record the file path in currentSketchFile.
- Set sketchChanged to false.
b. If the file does exist:
- Display a dialog asking if the file is to be overwritten.
- If NO, end the operation.
- If YES, write the sketch with the selected path, record the path in currentSketchFile, set sketchChanged to false.
All the complications arise with a new sketch that has never been saved. You can package up these checks for when you need to save and for when you should display the dialog in another method in the SketcherFrame class. You can call it saveOperation() and make it a private member of the SketcherFrame class:
  // Save the sketch if it is necessary
  private void saveOperation() {
    if(!sketchChanged) {                      // If the sketch is unchanged...
      return;                                 // ... do nothing
    }

    if(currentSketchFile != null) {           // If the sketch has been saved...
      if(saveSketch(currentSketchFile)) {     // .. just save it.
        sketchChanged = false;                // Write successful
      }
      return;
    }

    // Here, the sketch was never saved...
    Path file = showDialog("Save Sketch",      // ...so display Save dialog
                           "Save",
                           "Save the sketch",
                           sketchFilter,
                           Paths.get(DEFAULT_FILENAME));
    if(file == null) {                         // No file selected...
      return;                                 // ... so we are done.
    }

    file = setFileExtension(file, "ske");       // Make sure extension is .ske

    if(Files.exists(file) &&                   // If the path exists and...
         JOptionPane.NO_OPTION ==             // .. NO selected in dialog...
              JOptionPane.showConfirmDialog(
                                  this,
                                  file.getFileName() + " exists. Overwrite?",
                                  "Confirm Save As",
                                  JOptionPane.YES_NO_OPTION,
                                  JOptionPane.WARNING_MESSAGE)) {
            return;                           // ...do nothing
    }
    if(saveSketch(file)) {                     // Save the sketch
        currentSketchFile = file;              // Save successful
        setTitle(frameTitle + " - " + currentSketchFile);  // Update title bar
        sketchChanged = false;                // Sketch now unchanged
    }
  }
Directory "Sketcher 1 saving a sketch to a file"
You first check the sketchChanged flag. If the flag is false, either the sketch is empty or it hasn’t been changed since the last save. Either way, there’s no point in writing the sketch to disk, so you return immediately.
If the sketchChanged flag is true, you check the reference stored in currentSketchFile. If it is not null, then you just call the saveSketch() method to write the sketch to the file specified by currentSketchFile — you will implement the saveSketch() method in a moment. You don’t need to update the title bar here because it already shows the sketch file path.
The sketch was never saved if currentSketchFile is null, in which case you display the file chooser dialog with the default file name selected. If the showDialog() method returns null, then the dialog was closed without choosing a file so you end the save operation.
You also need to check whether the file exists. If it does, you want to give the user the option not to overwrite it with the current sketch. The condition tested in the if looks rather complicated, but this is primarily due to the plethora of arguments in the showConfirmDialog() call. You can break the condition down into its component parts quite easily. The condition comprises two logical expressions separated by the && operator. So if both expressions are true then you execute a return. The first expression results in false if file does not exist, so if this is the case, you return immediately.
When file references a file that already exists, , the second expression in the if is evaluated, otherwise it isn’t. The second expression is true if the value returned from the showConfirmDialog() method is JOptionPane.NO_OPTION. The confirm dialog just warns of the overwrite potential, so if JOptionPane.NO_OPTION is returned, then the user has elected not to overwrite the file.
Remember that if the left operand for the && operator is false , then the right operand is not evaluated. This means that the showConfirmDialog() method is called only when file references a file that already exists. Thus if the NO option is chosen in the dialog, the return is executed and the sketch is not saved. If the YES option is selected, then you don’t execute the return statement in the if block, but you continue to execute the code that follows, which calls saveSketch() with file as the argument. After successfully saving the sketch, you update currentSketchFile to contain the new file path, set sketchChanged to false because the sketch has not yet been changed relative to the file contents, and record the path for the current sketch file in the title bar for the application window.
If showDialog() returns a non-null reference, the path should end in .ske. It won’t if the user keys a new name for the file in the dialog without the .ske extension. The user might have added their own extension, in which case you want to leave it as it is. However, if the path string does not end in .ske and there is no other extension (indicated by the presence of a period in the file name), you should append .ske. You achieve this by calling the following method:
  // Set the extension for a file path
  private Path setFileExtension(Path file, String extension) {
    StringBuffer fileName = new StringBuffer(file.getFileName().toString());
    if(fileName.indexOf(extension) >= 0) {
      return file;
    }
    int index = fileName.lastIndexOf(".");
    if(index < 0) {                                      // No extension
      fileName.append(".").append(extension);             // so append one
    }
    return file.getParent().resolve(fileName.toString());
  }
If there is no extension, .ske is appended. If there is an extension, check if it is .ske or some other choice of the user. In either case we leave it as it is. You could have done this easily with inline code, but this method is more general and is useful later. Add this method definition to the SketcherFrame class.
Writing a Sketch to a File
Writing a sketch to a file just involves making use of what you learned about writing objects to a file. You have already made sure that a SketcherModel object is serializable, so you can write the sketch to an ObjectOutputStream with the following method in the SketcherFrame class:
  // Write a sketch to file path file
  private boolean saveSketch(Path file) {
  try (ObjectOutputStream out = new ObjectOutputStream(
                   new BufferedOutputStream(Files.newOutputStream(file)))) {
      out.writeObject(theApp.getModel());   // Write the sketch to the stream
    } catch(IOException e) {
      System.err.println(e);
      JOptionPane.showMessageDialog(this,
                                    "Error writing a sketch to " + file,
                                    "File Output Error",
                                    JOptionPane.ERROR_MESSAGE);
      return false;                 // Serious error - file not written
    }
    return true;
  }
Directory "Sketcher 1 saving a sketch to a file"
The saveSketch() method writes the current SketcherModel object to the object output stream that you create from the Path object that is passed to it. It returns true if the write was successful and false if there was a problem. This enables the calling program to determine whether or not the file was written.
If an error occurs, an exception of type IOException is thrown, in which case you write the exception to the standard error output stream for diagnostic purposes and pop up a dialog indicating that an error has occurred. You assume that the user might want to retry the operation, so you just return false from the method rather than terminating the application.
You can now put together the code that handles the Save menu item event.
TRY IT OUT: Saving a Sketch
The code to initiate handling the Save menu item event goes in the actionPerformed() method of the FileAction inner class. You have done all the real work by implementing the saveOperation() and saveSketch() methods, so it amounts to just one statement:
          public void actionPerformed(ActionEvent e) {
      if(this == saveAction) {
        saveOperation();
        return;
// else if blocks as before...
  }
Directory "Sketcher 1 saving a sketch to a file"
You can recompile Sketcher and run it again. The Save menu item and toolbar button should now be working. When you select either of them, you should get the dialog displayed in Figure 21-1, as long as you have created a sketch to save. Note that you cannot save a new empty sketch because it is unchanged.
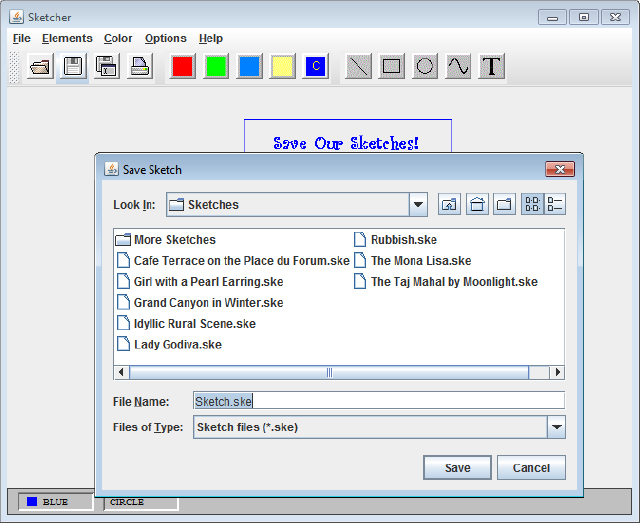
All the buttons in the dialog are fully operational. Go ahead and try them out, and then save the sketch using the default name. Next time you save the sketch, the dialog doesn’t appear. Be sure to check out the button tooltips.
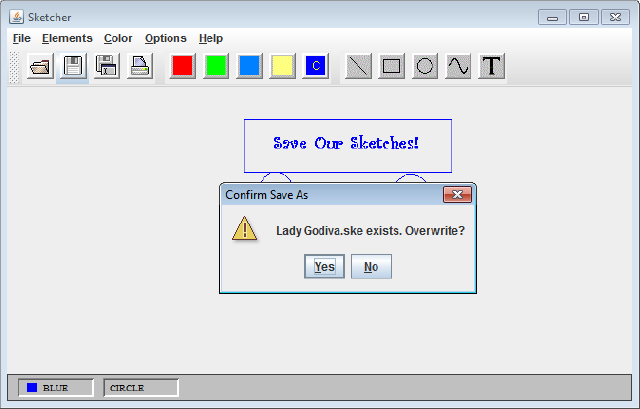
After you have created a few sketch files, you should get the warning shown in Figure 21-2 if you attempt to overwrite an existing sketch file with a new one.
You can now save any sketch in a file — regardless of its complexity — with protection against accidentally overwriting existing files. I hope you agree that the save operation was relatively easy to implement.
How It Works
When the event is for the saveAction object, the actionPerformed() method calls the saveOperation() method that you defined in the SketcherFrame class. This carries out the save operation that writes the SketcherModel object to a file.
The file filter sketchFilter that you create and pass to the showDialog() method is added to the list of available filters in the JFileChooser object by passing a reference to the addChoosableFileFilter() method. You set this filter as the one in effect by calling the setFileFilter() method. The JFileChooser object checks each file in the file list by passing each File object to the accept() method for the file filter object that is in effect. The new file filter you have created returns true only for directories, or files with the extension .ske, so only those files are displayed in the dialog. The description of the filter is obtained by the JFileChooser object calling the getDescription() method for the Sketcher FileFilter object, and this description is displayed in the dialog.
Of course, the available list of file filters includes the “accept all" filter that is there by default. You might want to suppress this in some situations, and there is a method defined in the JFileChooser class to do this:
files.setAcceptAllFileFilter(false); // Remove 'all files' filter
Of course, passing an argument of true to this method restores the filter to the list. You can also discover whether the “all files" filter is in effect for the dialog by calling the isAcceptAllFileFilterUsed() method that returns true if it is, or false if it isn’t.
You can also remove specific FileFilter objects from the list maintained by the JFileChooser object. This enables you to adapt a JFileChooser object to suit circumstances at different points in a program. To remove a filter, just pass a FileFilter reference to the removeChoosableFileFilter() method for your file chooser object. For example:
files.removeChoosableFileFilter(sketchFilter); // Removes our filter
This would remove the filter you have defined for Sketcher files.
Implementing the Save As Operation
For Save As operations, you always want to display a save dialog, regardless of whether the file has been saved before, and ignoring the state of the sketchChanged flag. Apart from that and some cosmetic differences in the dialog itself, the operation is very similar to the Save menu item event handling. With the showDialog() method that you have added to the SketcherFrame class, the implementation becomes quite easy.
TRY IT OUT: File Save As Operations
You can do the trivial bit first. The code in the else if block in the actionPerformed() method in the FileAction class for this operation is:
     else if(this == saveAsAction) {
       saveAsOperation();
       return;
     }
Directory "Sketcher 2 with Save As capability"
Now the bit with more meat — the implementation of the saveAsOperation() method in the SketcherFrame class:
  private void saveAsOperation() {
    Path file = showDialog("Save Sketch As",
                           "Save",
                           "Save the sketch",
                           sketchFilter,
                           currentSketchFile == null ?
                           Paths.get(DEFAULT_FILENAME): currentSketchFile);

     if(file == null) {                                  // No file selected...
       return;                                          // ...so we are done.
     }

    file = setFileExtension(file, "ske");                 // Make sure extension is .ske

    if(Files.exists(file) &&
          !file.equals(currentSketchFile) &&
            JOptionPane.NO_OPTION ==                    // Overwrite warning
              JOptionPane.showConfirmDialog(this,
                                  file.getFileName() + " exists. Overwrite?",
                                  "Confirm Save As",
                                  JOptionPane.YES_NO_OPTION,
                                  JOptionPane.WARNING_MESSAGE)) {
      return;                                           // No file selected
    }

    if(saveSketch(file)) {                               // Save the sketch
      currentSketchFile = file;                          // Save successful
      setTitle(frameTitle + " - " + currentSketchFile); // Update title bar
      sketchChanged = false;                            // Sketch now unchanged
    }
  }
Directory "Sketcher 2 with Save As capability"
If you recompile Sketcher with these additions, you have a working Save As option on the File menu.
How It Works
You have a fancy expression as the last argument to the showDialog() method. This is because the Save As operation could be used with a sketch that has been saved previously or with a sketch that has never been saved. The expression passes currentSketchFile as the argument if it is not null and creates a new Path object as the argument from the default file name if currentSketchFile is null. If you get a Path object back from the showDialog() method that is null, you know there was no file selected by the user, so you are done.
If file is not null you must check for a potential overwrite of an existing file, and if there is a conflict you must ask the user if he wants to continue. This is the case if the selected file exists and is also different from currentSketchFile. In this instance you want to display a YES/NO dialog warning of this. Checking whether the file exists, whether it is the same as the current file, and displaying the dialog, are all carried out in the if expression. If they are all true you just return from the method. The three checks are combined with && operators, so from left to right the first check that results in false results in false for the whole expression, and prevents subsequent operands from being evaluated.
If the selected file does not exist, or if it exists but is not the same as the current file, or if it exists and is the same as the current file and YES was selected in the warning dialog, you want to write the sketch to the file. Thus if any of the three operands are false, you save the current sketch in the file.
Because you can record sketches in files, you are ready to look at implementing the operation for the Open menu item where you read them back.
Implementing the File Open Operation
Supporting the file open operation is in some ways a little more complicated than save. You have to consider the currently displayed sketch, first of all. Opening a new sketch replaces it, so does it need to be saved before the file open operation? If it does, you must deal with that before you can read a new sketch from the file. Fortunately, most of this is already done by the saveOperation() method that you have implemented in the SketcherFrame class. You just need to add a prompt for the save operation when necessary. You could put this in a checkForSave() method that you can implement in the SketcherFrame class as:
    // Prompt for save operation when necessary for File Open
    public void checkForSave() {
      if(sketchChanged && JOptionPane.YES_OPTION ==
              JOptionPane.showConfirmDialog(this,
                               "Current file has changed. Save current file?",
                               "Confirm Save Current File",
                               JOptionPane.YES_NO_OPTION,
                               JOptionPane.WARNING_MESSAGE)) {
        saveOperation();
      }
    }
Directory "Sketcher 3 opening sketch files"
This method will be useful outside the SketcherFrame class a little later on, so you have defined it as a public member of the class. If the sketchChanged flag is true, the expression that is the right operand for the && operator is evaluated. This pops up a confirmation dialog to verify that the sketch needs to be saved. If it does, you call the saveOperation() method to do just that. Of course, if sketchChanged has the value false, the right operand to the && operator is not evaluated, and so the dialog isn’t displayed.
When you get to the point of reading a sketch from the file, some further complications arise. You must replace the existing SketcherModel object and its view in the application with a new SketcherModel object and its view.
With those few thoughts, you should be ready to make it happen.
TRY IT OUT: Implementing the Open Menu Item Operation
The file open process is similar to a save operation, but instead of writing the file, it reads it. You add another helper method, openSketch(), to the SketcherFrame class that does the reading, given a Path object identifying the source of the data. Using this method, the code to handle the Open menu item event in the actionPerformed() method for the FileAction class is:
      } else if(this == openAction) {
        // Save current sketch if we need to
        checkForSave();

        // Now open a sketch file
        Path file = showDialog(
                           "Open Sketch File",        // Dialog window title
                           "Open",                    // Button label
                           "Read a sketch from file",  // Button tooltip text
                           sketchFilter,              // File filter
                           null);                     // No file selected
        if(file != null) {                             // If a file was selected
          if(openSketch(file)) {                       // ...then read it
            currentSketchFile = file;                  // Success!
            setTitle(frameTitle + " - " + currentSketchFile);
            sketchChanged = false;
          }
        return;
        }
      }
Directory "Sketcher 3 opening sketch files"
You can implement the openSketch() method in the SketcherFrame class as follows:
  // Method for opening a sketch file and creating the model
  public boolean openSketch(Path file) {
    try (ObjectInputStream in = new ObjectInputStream(
                        new BufferedInputStream(Files.newInputStream(file)))){
      theApp.insertModel((SketcherModel)in.readObject());
      currentSketchFile = file;
      setTitle(frameTitle+" - "+currentSketchFile);   // Update the window title
      sketchChanged = false;                          // Status is unchanged
    } catch(Exception e) {
      System.err.println(e);
      JOptionPane.showMessageDialog(this,
                                    "Error reading a sketch file.",
                                    "File Input Error",
                                    JOptionPane.ERROR_MESSAGE);
      return false;
    }
    return true;
  }
Directory "Sketcher 3 opening sketch files"
This method returns true if the file read operation is successful and returns false if an error occurs. You pass the SketcherModel object that is read from the file to a new method in the Sketcher class, insertModel(). This method has to replace the current sketch with the new one that is passed as the argument.
You can implement the insertModel() method in the Sketcher class like this:
  // Insert a new sketch model
  public void insertModel(SketcherModel newSketch) {
    sketch = newSketch;                               // Store the new sketch
    sketch.addObserver(view);                         // Add the view as observer
    sketch.addObserver(window);                       // Add the app window as observer
    view.repaint();                                   // Repaint the view
  }
Directory "Sketcher 3 opening sketch files"
After you have loaded the new model, you update the window title bar and record the status as unchanged in the SketcherFrame object. If you compile Sketcher once more, you can give the file open operation a workout. The Open dialog should be as shown in Figure 21-3.
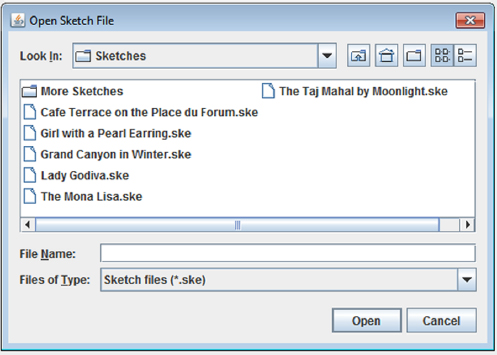
Don’t forget to try out the tooltip for the Open button.
How It Works
After dealing with saving the current sketch in the actionPerformed() member of the FileAction class, you call the showDialog() method that you defined in the SketcherFrame class to display a file open dialog. The showDialog() method is all-purpose — you can put any kind of label on the button or any title in the title bar, so you can use it to display all of the dialogs you need for file operations.
If a file was chosen in the dialog that was displayed by the actionPerformed() method, you pass the Path object that the showDialog() returns to the openSketch() member of the SketcherFrame object to read a new sketch from the file. The openSketch() method creates an ObjectInputStream object from the Path object that was passed to it, and reads a SketcherModel object from the stream by calling the readObject() method. The object returned by the readObject() method has to be cast to the appropriate type — SketcherModel in this case.
You pass this SketcherModel object to the insertModel() method for the application object. This replaces the current sketch reference in the sketch member of the application object with a reference to the new sketch, and then sets the view and the application window as observers. Calling repaint() for the view object displays the new sketch. The paint() method for the view object obtains a reference to the current model by calling the getModel() member of the application object, which returns the reference to the new model.
Starting a New Sketch
The File ⇒ New menu item simply starts a new sketch. This is quite similar to the open operation, except that you must create an empty sketch rather than read a new one from disk. The processes of checking for the need to save the current sketch and inserting the new SketcherModel object into the application are the same.
TRY IT OUT: Implementing the New Operation
You need to place the code to create a new empty sketch in the else-if block corresponding to the newAction object event. This is in the actionPerformed() method in the FileAction inner class:
      else if(this == newAction) {
        checkForSave();
        theApp.insertModel(new SketcherModel());    // Insert new empty sketch
        currentSketchFile = null;                   // No file for it
        setTitle(frameTitle);
        sketchChanged = false;                      // Not changed yet
        return;
      }
Directory "Sketcher 4 creating a new sketch"
With this addition to Sketcher you can create a new sketch.
How It Works
All the saving of the existing sketch is dealt with by the checkForSave() method that you added to the SketcherFrame class. The new part is the last five lines of the highlighted code. You call the SketcherModel constructor to create a new empty sketch, and pass it to the insertModel() method for the application object. This inserts the new sketch into the application and gets the view object to display it. You then update the data members of the window that record information about the file for the current sketch and its status. You also set the sketchChanged flag to false, as it’s an empty sketch.
Preventing Data Loss on Close
At the moment, the application shuts down immediately when you click the window close icon. This means you could lose hours of work in an instant if you forget to save the sketch. But the solution is very simple. You just need to get the event handler for the window closing event to call the checkForSave() method for the window object.
TRY IT OUT: Prompting for Save on Close
To implement this you can use the WindowListener object for the application window that you have already added in the Sketcher class. This listener receives notification of events associated with opening and closing the window, as well as minimizing and maximizing it. You just need to add some code to the body of the windowClosing() method for the listener. You require one extra line in the Sketcher class definition:
// Handler class for window events
  class WindowHandler extends WindowAdapter {
    // Handler for window closing event
    public void windowClosing(WindowEvent e) {
      window.checkForSave();
    }
  }
Directory "Sketcher 5 checking for save on close and exit"
This ensures that a sketch is not lost when you click on the close icon for the application window.
How It Works
The WindowHandler class is a subclass of the WindowAdapter class. In the subclass you just define the methods you are interested in to override the empty versions in the adapter class. You saw in Chapter 18 that the WindowListener interface declares seven methods corresponding to various window events, but you need just the windowClosing() method.
Clearly, using the WindowAdapter class as a base saves a lot of time and effort. Without it you would have to define all seven of the methods declared in the interface in our class. Because the WindowHandler class is an inner class, its methods can access the fields of the Sketcher class, so the windowClosing() method can call the checkForSave() method for the window member of the Sketcher class object.
Now if you close the application window without having saved your sketch, you are prompted to save it.
Defining the WindowHandler inner class explicitly with just one method is not the only way to do this. You could use an anonymous class, as the method is so simple. If you removed the WindowHandler inner class from the Sketcher class, you could replace the statement that adds the window listener for the window object with the following statement:
    window.addWindowListener(new WindowAdapter() {   // Add window listener
                               public void windowClosing(WindowEvent e) {
                                 window.checkForSave();
                               }
                             }  );
This defines an anonymous class derived from the WindowHandler class in the expression that is the argument to the addWindowListener() method. The syntax is exactly the same as if you were defining an anonymous class that implements an interface. The class defines just one method, the windowClosing() method that you defined previously in the WindowHandler class.
This makes use of the code that you implemented for the save operation, packaged in the checkForSave() method. This does everything necessary to enable the sketch to be saved before the application window is closed. Defining methods judiciously makes for economical coding.
This still leaves you with the File ⇒ Close and File ⇒ Exit items to tidy up. Closing a sketch is not really any different from the File ⇒ New function, so you could implement it in exactly the same way. You could combine handling the closeAction event with the newAction event by changing the if-else block for newAction in the definition of actionPerformed() in the FileAction inner class to:
      } else if(this == newAction || this == closeAction){
        checkForSave();
        theApp.insertModel(new SketcherModel());     // Insert new empty sketch
        currentSketchFile  = null;                   // No file for it
        setTitle(frameTitle);
        sketchChanged = false;                       // Not changed yet
        return;
      } else if(this == printAction) {
Directory "Sketcher 5 checking for save on close and exit"
The Exit menu item terminates the application, so handling the event for this just involves calling checkForSave() to make sure the current sketch is not lost inadvertently:
      } else if(this == exitAction) {
        checkForSave();
        System.exit(0);
      }
Directory "Sketcher 5 checking for save on close and exit"
All but one of the file menu items are now operable. To complete the set you just need to get printing up and running.
Printing is always a messy business — inevitably so, because you have to worry about tedious details such as the size of a page, the margin sizes, and how many pages you’re going to need for your output. As you might expect, there are differences between the process for printing an image and printing text, but the basic mechanism is the same. You may have the added complication of several printers with different capabilities being available, so with certain types of documents you need to select an appropriate printer. The way through this is to take it one step at a time. Let’s understand the general principles first.
There are five packages dedicated to supporting printing capabilities in Java:
- javax.print: Defines classes and interfaces that enable you to determine what printers are available and what their capabilities are. It also enables you to identify types of documents to be printed.
- javax.print.attribute: Defines classes and interfaces supporting the definition of sets of printing attributes. For example, you can define a set of attributes required by a particular document when it is printed, such as color output and two-sided printing.
- javax.print.attribute.standard: Defines classes that identify a set of standard printing attributes.
- javax.print.event: Defines classes that identify events that can occur while printing and interfaces that identify listeners for printing events.
- java.awt.print: Defines classes and attributes for expediting the printing of 2D graphics and text.
The first four make up what is called the Print Service API. This allows printing on all Java platforms and has facilities for discovering and using multiple printers with varying capabilities. Because in all probability you have just a single printer available, I’m concentrating on explaining the classes and interfaces defined in the java.awt.print package that carry out print operations on a given printer, and stray into classes and interfaces from the other packages when necessary.
Four classes are defined in the java.awt.print package, and you use all of them eventually:
- PrinterJob objects: Control printing to a particular print service (such as a printer or fax capability).
- PageFormat objects: Define information about a page to be printed, such as its dimensions, margin sizes, and orientation.
- Paper objects: Define the size and printable area of sheets of paper.
- Book objects: Define a multipage documents where pages may have different formats and require different rendering processes.
The PrinterJob class drives the printing process. Don’t confuse this with the PrintJob class in the java.awt package — this is involved in the old printing process that was introduced in Java 1.1, and the PrinterJob class now supersedes this. A PrinterJob object provides the interface to a printer in your environment, and you use PrinterJob class methods to set up and initiate the printing process for a particular document. You start printing off one or more pages in a document by calling the print() method for the PrinterJob object.
You’ll get into the details of how you work with the other types of objects in the list a little later in this chapter.
There are three interfaces in the java.awt.print package:
- Printable : Implemented by a class to print a single page.
- Pageable: Implemented by a class to print a multipage document, where each page may be printed by a different Printable object. This allows pages in a document to have independent specifications, such as orientation and margin sizes.
- PrinterGraphics: Declares a method for obtaining a reference to the PrinterJob object for use in a method that is printing a page.
When you print a page, an object of a class that implements the Printable interface determines what is actually printed. Such an object is referred to as a page painter. Figure 21-4 illustrates the basics of how the printing process works.

The Printable interface defines only one method, print(), which is called by a PrinterJob object when a page should be printed, so this method prints a page. Note that I have mentioned two print() methods, one defined in the PrinterJob class that you call to starting the printing process and another declared in the Printable interface. You implement the latter in your class that is to do the printing legwork for a single page.
The printing operation that you must code when you implement the Printable interface works through a graphics context object that provides the means for writing data to your printer. The first argument passed to your print() method when it is called by a PrinterJob object is a reference of type Graphics that represents the graphics context for the printer. The object that it references is actually of type Graphics2D, which parallels the process you are already familiar with for drawing on a component. You use the methods defined in the Graphics and Graphics2D classes to print what you want, and the basic mechanism for printing 2D graphics or text on a page is identical to drawing on a component. The Graphics object for a printer implements the PrinterGraphics interface (not to be confused with the PrintGraphics interface in the java.awt package!) that declares just one method, getPrinterJob(). You call this method to obtain a reference to the object that is managing the print process. You do this if you need to call PrinterJob methods to extract information about the print job, such as the job name or the user name.
A class that implements the Pageable interface defines an object that represents a set of pages to be printed, rather than a single page. You would implement this interface for more complicated printing situations in which a different page painter may print each page using an individual PageFormat object. It’s the job of the Pageable object to supply information to the PrinterJob object about which page painter and PageFormat object should be used to print each page. The Pageable interface declares three methods:
- getNumberOfPages(): Returns the number of pages to be printed as type int, or the constant value UNKNOWN_NUMBER_OF_PAGES if the number of pages is not known. This constant is defined in the Pageable interface.
- getPageFormat(int pageIndex): Returns a PageFormat object describing the size and orientation of the page specified by the argument. An exception of type IndexOutOfBoundsException is thrown if the page does not exist.
- getPrintable(int pageIndex): Returns a reference to the Printable object responsible for printing the page specified by the argument. An exception of type IndexOutOfBoundsException is thrown if the page does not exist.
A Book object also encapsulates a document that consists of a number of pages, each of which may be processed individually for printing. The difference between this and an object of a class that implements the Pageable interface is that you can add individual pages to a Book object programmatically, whereas an object of a class that implements Pageable encapsulates all the pages. You look at how both of these options work later in this chapter.

Creating and Using PrinterJob Objects
Because the PrinterJob class encapsulates and manages the printing process for a given physical printer that is external to the Java Virtual Machine (JVM), you can’t create an object of type PrinterJob directly using a constructor. You obtain a reference to a PrinterJob object for the default printer on a system by calling the static method getPrinterJob() that is defined in the PrinterJob class:
PrinterJob printJob = PrinterJob.getPrinterJob(); // For the default printer
The printJob object provides the interface to the default printer and controls each print job that you send to it.
A printer is encapsulated by a javax.print.PrintService object, and you can obtain a reference of type PrintService to an object encapsulating the printer that is used by a PrinterJob object by calling its getPrintService() method:
PrintService printer = printJob().getPrintService();
You can query the object that is returned for information about the capabilities of the printer and the kinds of documents it can print, but I won’t divert down that track for the moment. One point you should keep in mind is that sometimes a printer may not be available on the machine on which your code is running. In this case the getPrintService() method returns null, so it’s a good idea to call the method and test the reference that is returned, even if you don’t want to obtain details of the printer.
If multiple print services are available, such as several printers or perhaps a fax capability, you can obtain an array of PrintService references for them by calling the static lookupPrintServices() method that is defined in the PrinterJob class. For example:
PrintService[] printers = PrinterJob.lookupPrintServices();
The printers array has one element for each print service that is available. If no print services are available, the array has zero length. If you want to select a specific printer for the PrinterJob object to work with, you just pass the array element corresponding to the print service of your choice to the setPrintService() method for the PrinterJob object. For example:
if(printers.length>0) {
  printJob.setPrintService(printers[0]);
}
The if statement checks that there are some print services before attempting to set the print service. Without this you could get an IndexOutOfBoundsException exception if the printers array has no elements. Of course, more realistically, you would use methods defined in the PrintService interface to query the printers, and use the results to decide which printer to use.
Displaying a Print Dialog
When you want to provide the user with control over the printing process, you can display a print dialog by calling the printDialog() method for a PrinterJob object. This method displays the modal dialog that applies to your particular print facility. There are two versions of the printDialog() method. The version without arguments displays the native dialog if the PrinterJob object is printing on a native printer, so I’m introducing that first and return to the other version later.
If the print dialog is closed using the button that indicates printing should proceed, the printDialog() method returns true; otherwise, it returns false. The method throws a java.awt.HeadlessException if there is no display attached to the system. Thus, to initiate printing, you can call the printDialog() method to put the decision to proceed in the hands of the user, and if the method returns true, call the print() method for the PrinterJob object to start printing. Note that the print() method throws a java.awt.print.PrinterException if an error in the printing system causes the operation to be aborted.
Of course, the PrinterJob object has no prior knowledge of what you want to print, so you have to call a method to tell the PrinterJob object where the printed pages are coming from before you initiate printing. The simplest way to do this is to pass a reference to an object of a class that implements the Printable interface to the setPrintable() method.
In Sketcher, the obvious candidate to print a sketch is the SketcherView object, and you could provide for the possibility of sketches being printed by making the SketcherView class implement the Printable interface. You could then set the source of the printed output by passing a reference to the view to the setPrintable() method for a PrinterJob object. You might consider the SketcherModel object to be a candidate to do the printing, but printing is really no more related to a sketch than plotting it or displaying it on the screen. The model is the input to the printing process, not the owner of it. It is generally better to keep the model dedicated to encapsulating the data that represents the sketch.
Starting the Printing Process
You can use what you now know about printing to add some code to the actionPerformed() method in the FileAction inner class to SketcherFrame. This handles the event for the printAction object:
      if(this == printAction) {
        // Get a printing object
        PrinterJob printJob = PrinterJob.getPrinterJob();
        PrintService printer = printJob.getPrintService();
        if(printer == null) {                    // See if there is a printer
          JOptionPane.showMessageDialog(SketcherFrame.this,
                                        "No default printer available.",
                                        "Printer Error",
                                        JOptionPane.ERROR_MESSAGE);
          return;
        }
        // The view is the page source
        printJob.setPrintable(theApp.getView());

        if(printJob.printDialog()) {             // Display print dialog

          try {                                  // and if true is returned...
            printJob.print();                    // ...then print
          } catch(PrinterException pe) {
            System.out.println(pe);
            JOptionPane.showMessageDialog(SketcherFrame.this,
                                          "Error printing a sketch.",
                                          "Printer Error",
                                          JOptionPane.ERROR_MESSAGE);
          }
        }
      } else if(this == exitAction) {
        checkForSave();
        System.exit(0);
      }
Directory "Sketcher 6 printing a sketch"
The code here obtains a PrinterJob object and, after verifying that there is a printer to print on, sets the view as the printable source. You don’t need access to the PrinterService object to print, but it’s one way of verifying that a printer is available. The expression for the second if displays a print dialog, and if the return value from the printDialog() method call is true, you call the print() method for the printJob object to start the printing process. This is one of two overloaded print() methods that the PrinterJob class defines. You look into the other one when you try out the alternative printDialog() method a little later in this chapter.
Two more import statements are needed in the SketcherFrame.java file:
import javax.print.PrintService;
import java.awt.print.*;
The SketcherFrame class still doesn’t compile at the moment because you haven’t made the SketcherView class implement the Printable interface yet.
Printing Pages
The object that you pass to the setPrintable() method is responsible for all the details of the printing process. The object class type must implement the Printable interface, which implies defining the print() method in the class. You can make the SketcherView class implement the Printable interface like this:
// Import statements as before...
import java.awt.print.*;

class SketcherView extends JComponent implements Observer, Printable {
  // Constructor code etc. as before...
  // Print the sketch on a local printer
  public int print(Graphics g,              // Graphics context for printing
                   PageFormat pageFormat,   // The page format
                   int pageIndex)           // Index number of current page
             throws PrinterException {
    // Code to do the printing...
  }

  // Rest of the class definition as before...
}
The code that you added to the actionPerformed() method in the FileAction inner class to SketcherFrame identified the SketcherView object to the PrinterJob object as responsible for executing the printing of a page. The PrinterJob object therefore calls the print() method that you have defined here for each page to be printed. This process starts when you call the print() method for the PrinterJob object that has overall control of the printing process.
You can see that the print() method in SketcherView can throw an exception of type PrinterException. If you identify a problem within your print() method code, the way to signal the problem to the PrinterJob object is to throw an exception of this type.
NOTE Keep in mind that you cannot assume that the PrinterJob object calls the print() method for your Printable object just once per page. In general, the print()method is likely to be called several times for each page because the output to the printer is buffered within the Java printing system, and the buffer is not necessarily large enough to hold a complete page. You don’t need to worry about this unduly. Just don’t build any assumptions into your code about how often print() is called for a given page.
Of course, the PrinterJob object in the actionPerformed() method code has no way of knowing how many pages need to be printed. When you call the PrinterJob object’s print() method, it continues calling the SketcherView object’s print() method until the value returned indicates there are no more pages to be printed. You can return one of two values from the print() method in the Printable interface — either PAGE_EXISTS, to indicate you have rendered a page, or NO_SUCH_PAGE when there are no more pages to be printed. Both constants are defined in the Printable interface. The PrinterJob object continues calling the print() method for the Printable object until the method returns the value NO_SUCH_PAGE. If you don’t make sure that the print() method returns this value at some point, you have an indefinite loop in the program.
Three arguments are passed to the print() method in the Printable interface. The first is the graphics context that you must use to write to the printer. The reference is to an object of type Graphics2D, so you typically cast it to this type before using it — just as you did within the paint() method for a component. In the print() method in the view class, you could draw the sketch on the printer with the following statements:
  public int print(Graphics g,              // Graphics context for printing
                   PageFormat pageFormat,   // The page format
                   int pageIndex)           // Index number of current page
                 throws PrinterException {
    Graphics2D g2D = (Graphics2D) g;
    paint(g2D);
    return PAGE_EXISTS;
  }
This works after a fashion, but you have more work to do before you can try this out. At the moment, it prints the same page over and over, indefinitely, so let’s take care of that as a matter of urgency!
The third argument to print() is an index value for the page. The first page in a print job has index value 0, the second has index value 1, and so on for as long as there are more pages to be printed. If you intend to print a sketch on a single page, you can stop the printing process by checking the page index:
  public int print(Graphics g,              // Graphics context for printing
                 PageFormat pageFormat,     // The page format
                 int pageIndex)             // Index number of current page
                 throws PrinterException {
    if(pageIndex > 0) {
      return NO_SUCH_PAGE;
    }
    Graphics2D g2D = (Graphics2D) g;
    paint(g2D);                             // Draw the sketch
    return PAGE_EXISTS;
  }
You want to print only one page, so if the value passed as the third parameter is greater than 0, you return NO_SUCH_PAGE to stop the printing process.
Although you won’t now print endlessly, you still won’t get the output formatted the way you want it. You must use the information provided by the second argument that is passed to the print() method, the PageFormat object, to position the sketch properly on the paper.
The PageFormat Class
The PageFormat reference that is passed as the second argument to the print() method provides details of the page size, the position and size of the printable area on the page, and the orientation — portrait or landscape.
Perhaps the most important pieces of information is where the top-left corner of the printable area (or imageable area to use the terminology of the method names) is on the page and its width and height, because this is the area you have available for printing your output. The printable area on a page is simply the area within the current margins that are defined for your printer. The position of the printable area is returned by the methods getImageableX() and getImageableY(). These return the x and y coordinates of the top-left corner of the printable area in user coordinates for the printing context as values of type double, which happen to be in units of 1/72 of an inch, which, as luck would have it, corresponds to a point — as in point size for a font. The width and height of the printable area are returned in the same units by the getImageableWidth() and getImageableHeight() methods for the PageFormat object.
The origin of the page coordinate system, the point (0,0), corresponds initially to the top-left corner of the paper. If you want the output to be placed in the printable area on the page, the first step is to move the origin of the graphics context that you use for writing to the printer to the position of the top-left corner of the printable area. Figure 21-5 illustrates the way you do this.

You know how to do this; it’s exactly what you have been doing in the draw() method for each of our element classes. You call the translate() method for the graphics context to move the origin for the user coordinate system. Here’s how this would work for the print() method in the SketcherView class:
  public int print(Graphics g,              // Graphics context for printing
                 PageFormat pageFormat,     // The page format
                 int pageIndex)             // Index number of current page
                 throws PrinterException {
    if(pageIndex>0) {
      return NO_SUCH_PAGE;
    }
    Graphics2D g2D = (Graphics2D) g;

    // Move origin to page printing area corner
    g2D.translate(pageFormat.getImageableX(), pageFormat.getImageableY());

    paint(g2D);                             // Draw the sketch
    return PAGE_EXISTS;
  }
Directory "Sketcher 6 printing a sketch"
Calling the translate() method for the Graphics2D object moves the user coordinate system so that the (0,0) point is positioned at the top-left corner of the printable area on the page.
Let’s see if that works in practice.
TRY IT OUT: Printing a Sketch
You should have added the code you saw earlier to the actionPerformed() method in the FileAction inner class to SketcherView to handle the Print menu item event, and added the code to SketcherView to implement the Printable interface. If you compile and run Sketcher, you should be able to print a sketch.
On my system, when I select the toolbar button to print, I get the dialog shown in Figure 21-6.
This is the standard dialog for my printer. You should get a dialog for your default printer. The dialog indicates that there are 9999 pages to be printed. Because you haven’t specified how many pages there are, the maximum is assumed. You only print the number of pages that the print() method allows though, and this should be 1.
How It Works
The code in the actionPerformed() method in the FileAction class executes when you click the toolbar button or menu item to print a sketch. This first displays the print dialog by calling the printDialog() method for the PrinterJob object that you obtain. Clicking the OK button causes the dialog to close and the print() method for the PrinterJob object to be called. This in turn causes the print() method in the SketcherView class to be called one or more times for each page that is to be printed, and once more to end the process. The number of pages that are printed is determined by the print() method in the SketcherView class. Only when this method returns the value NO_SUCH_PAGE does the PrinterJob object cease calling the method.
In the print() method in SketcherView, you adjust the origin of the user coordinate system for the graphics context so that its position is at the top-left corner of the printable area on the page. Only one page is printed because you return NO_SUCH_PAGE when the page index value that is passed to the print() method is greater than 0. Incidentally, if you want to see how many times the print() method is called for a page, just add a statement at the beginning of the method to output some trace information to the console.
I used the print facility to print the sketch shown in Figure 21-7, and frankly, I was disappointed.

The picture that I get printed on the paper is incomplete. The flowers and rocks to the right are not in in view, and that interesting cross between a rabbit and a cat is missing. I was hoping to see the picture in its full glory.
If you think about it, though, it’s very optimistic to believe that you could automatically get the whole sketch printed. First of all, neither the PrinterJob object nor the view object has any idea how big the sketch is. That’s a fairly fundamental piece of data if you want a complete sketch printed. Another consideration is that the sketch might be wider than it is high, and you are printing in portrait orientation. Moreover, in general parts of the sketch might be outside the screen area — when you draw a circle with the center close to the edge of the application window for instance. Let’s see how you might deal with some of these problems.
NOTE Note that material change to the Element subclasses cause problems in retrieving old sketches. Sketches that were serialized before the changes do not deserialize afterward, because the class definition you use to read the data is different from the class definition when you wrote it. You should always change the value of serialVersionUID when you change the class definition.
Printing the Whole Sketch
A starting point is to figure out the extent of the sketch. Ideally you need a rectangle that encloses all the elements in the sketch. It’s really surprisingly easy to get that. Every element has a getBounds() method that returns a java.awt.Rectangle object enclosing the element. As you saw in Chapter 17, the Rectangle class defines an add() method that combines the Rectangle object that you pass as the argument with the Rectangle object for which you called the method, and returns the smallest Rectangle object that encloses both; this is referred to as the union of the two rectangles. With these two bits of information and by accessing the elements in the list in the SketcherModel object, you can get a rectangle that encloses the entire sketch by implementing the following method in the SketcherModel class:
  // Get the rectangle enclosing an entire sketch
  Rectangle getModelExtent() {
    Rectangle rect = new Rectangle();                // An empty rectangle
    for(Element element : elements) {                // Go through the list
      rect.add(element.getBounds());                 // Expand union
    }
    if(rect.width == 0) {                            // Make sure width
      rect.width = 2;                                // is non-zero
    }
    if(rect.height == 0) {                           // and the height
      rect.height = 2;
    }
    return rect;
  }
Directory "Sketcher 7 printing the whole sketch"
Don’t forget to add an import statement for the Rectangle class name to the SketcherModel source file:
import java.awt.Rectangle;
Using the collection-based for loop to iterate over the elements in the list, you generate the union of the bounding rectangles for all the elements, so you end up with a rectangle that bounds everything in the sketch. A zero width or height for the rectangle is unlikely, but you want to be sure it can’t happen because you use these values as divisors later. A minimum width and height of 2 ensures that the rectangle has an interior.
You can see from Figure 21-8 how the rectangle returned by the getModelExtent() method is simply the rectangle that encloses all the bounding rectangles for the individual elements. If you visualize the origin of the user coordinate system being placed at the top-left corner of the printable area on the page, you can appreciate that a section of the sketch in the illustration is hanging out to the left outside the printable area. This can arise quite easily in Sketcher — when you are drawing a circle with the center close to either of the axes, for example, or if you move a shape so this is the case. You can avoid missing part of the sketch from the printed output by first translating the origin of the graphics context to the top-left corner of the printable area on the page and then translating the origin of the coordinate system to the top-left corner of rect.

The following code in the print() method in the SketcherView class does this:
  public int print(Graphics g,              // Graphics context for printing
                   PageFormat pageFormat,   // The page format
                   int pageIndex)           // Index number of current page
             throws PrinterException {
    if(pageIndex>0) {
      return NO_SUCH_PAGE;
    }
    Graphics2D g2D = (Graphics2D) g;
    // Get sketch bounds
    Rectangle rect = theApp.getModel().getModelExtent();

    // Move origin to page printing area corner
    g2D.translate(pageFormat.getImageableX(), pageFormat.getImageableY());
    g2D.translate(-rect.x, -rect.y);     // Move origin to rect top left
    paint(g2D);                             // Draw the sketch
    return PAGE_EXISTS;
  }
You get the rectangle bounding the sketch by calling the getModelExtent() method that you put together just now. You move the origin for the graphics context so that it corresponds to the top-left corner of the printable area on the page. You then use rect to position the new origin at the top-left corner of rect. You could have combined these two translations into one, but it’s better in this instance to keep them separate, first to make it easier to see what is going on, and second because you’ll later be adding some other transformations in between these translations. There is a potentially puzzling aspect to the second translation — why are the arguments to the translate() method negative to move the origin to the top-left corner of rect?
To understand this, it is important to be clear about what you are doing. It’s easy to get confused, so I’m taking it step by step. First of all, the paper is a physical entity with given dimensions, and its coordinate system just defines where each point ends up on the paper when you print something. Of course, you can move the coordinate system for the paper about, and you can scale or even rotate it to get something printed where you want. None of this affects what you are printing. If you have a rectangle object at (5,5) with a width of 20 and a height of 10, that is what it will always be, unless you change the object. You always print it at position (5,5). If you want this object to appear at the top-left corner of the paper then the coordinates of the top-left corner of the paper must be (5,5).
Now consider our sketch. The point (rect.x, rect.y) is the top-left corner of the rectangle bounding our sketch, the area you want to transfer to the page, and this point is fixed — you can’t change it. With the current paper coordinates at the top-left corner of the printable area, it might print something like that shown in Figure 21-9.

When you print a sketch you really want the point (rect.x, rect.y) to end up at the top-left corner of the printable area on the page. In other words, you have to move the origin of the coordinate system for the paper so that the point (rect.x, rect.y) in the new coordinate system is the top-left corner of the printable area. To do this you must move the origin to the new position shown in Figure 21-10.

A translation of the paper origin to the top-left corner of the printable area, followed by a translation of the new origin to point (-rect.x, -rect.y) makes the position (rect.x,rect.y) the top-left corner of the printable area on the paper.
You have the sketch in the right place on the page, but it won’t necessarily fit into the space available on the paper. You must scale the sketch so that it doesn’t hang out beyond the right side or below the bottom of the printable page area.
Scaling the Sketch to Fit
You saw earlier that you can get the width and height of the printable area on a page by calling the getImageableWidth() and getImageableHeight() methods for the PageFormat object that is passed to the print() method. You also have the width and height of the rectangle that encloses the entire sketch. This provides the information that you need to scale the sketch to fit on the page. There are a couple of tricky aspects that you need to think about, though. Figure 21-11 shows what happens when you scale up by a factor of 2, for example.

First, note that when you scale a coordinate system, a unit of length along each of the axes changes so things move relative to the origin as well as relative to one another. When you scale up with a factor greater than 1, everything moves away from the origin. You can see in Figure 21-11 how scaling up by a factor of 2 causes the dimensions of the rectangle to double, and the distances of the new rectangle from each of the axes are also doubled.
The reverse happens with scale factors less than 1. You want to make sure that you scale the sketch to fit the page while keeping its top-left corner at the top left of the printable area. This means that you can’t just apply the scaling factor necessary to make the sketch fit the page in the new coordinate system I showed in the previous illustration. If you were to scale with this coordinate system, the sketch would move in relation to the origin, away from it if you are scaling up, as is the case in Figure 21-11, or toward it if you are scaling down. As a consequence, the top-left corner of the sketch would no longer be at the top left of the printable area. Thus you must apply the scaling operation to make the sketch fit on the page after you have translated the paper origin to the top-left corner of the printable area, but before you translate this origin point to make the top-left corner of the sketch appear at the top-left corner of the printable area. This ensures that the sketch is scaled to fit the page, and the top-left corner of the sketch stays at the top-left corner of the printable area on the page and doesn’t move to some other point.
Secondly, you want to make sure that you scale x and y by the same factor. If you apply different scales to the x and y axes in the user coordinate system, the relative proportions of a sketch are not maintained and circles become ellipses and squares become rectangles.
You can calculate the scale factors you need to apply to get the sketch to fit within the printable area of the page with the following statements:
  // Calculate the x and y scales to fit the sketch to the page
  double scaleX = pageFormat.getImageableWidth()/rect.width;
  double scaleY = pageFormat.getImageableHeight()/rect.height;
You are using variables of type double for the scale factors here because the getImageableWidth() and getImageableHeight() methods return values of type double. The scale factor for the x-axis needs to be such that when you multiply the width of the sketch, rect.width, by the scale factor, the result is no greater than the width of the printable area on the page, and similarly for scaling the y-axis. Because you want to apply the same scale to both axes, you should calculate the minimum of the scale factors scaleX and scaleY. If you then apply this minimum to both axes, the sketch fits within the width and height of the page and is still in proportion.
TRY IT OUT: Printing the Whole Sketch
You just need to add some code to the print() method in SketcherView to calculate the required scale factor, and then use the scale() method for the Graphics2D object to apply the scaling transformation:
  public int print(Graphics g,            // Graphics context for printing
                 PageFormat pageFormat,   // The page format
                 int pageIndex)           // Index number of current page
                 throws PrinterException {
    if(pageIndex>0) {
      return NO_SUCH_PAGE;
    }
    Graphics2D g2D = (Graphics2D) g;
    // Get sketch bounds
    Rectangle rect = theApp.getModel().getModelExtent();

    // Calculate the scale to fit sketch to page
    double scaleX = pageFormat.getImageableWidth()/rect.width;
    double scaleY = pageFormat.getImageableHeight()/rect.height;

    // Get minimum scale factor
    double scale = Math.min(scaleX, scaleY);

    // Move origin to page printing area corner
    g2D.translate(pageFormat.getImageableX(), pageFormat.getImageableY());

    g2D.scale(scale, scale);           // Apply scale factor

    g2D.translate(-rect.x, -rect.y);      // Move origin to rect top left

    paint(g2D);                           // Draw the sketch
    return PAGE_EXISTS;
  }
Directory "Sketcher 7 printing the whole sketch"
If you compile and run Sketcher with these changes, you should now be able to print each sketch within a page.
How It Works
You calculate the scaling factors for each axis as the ratio of the dimension of the printable area on the page to the corresponding dimension of the rectangle enclosing the sketch. You then take the minimum of these two scale factors as the scale to be applied to both axes. As long as the scale transformation is applied before the translation of the top-left corner of rect to the top-left corner of the printable page area, one or other dimension of the sketch fits exactly within the printable area of the page.
The output is now fine, but if the width of the sketch is greater than the height, you waste a lot of space on the page. Ideally in this situation you should print with a landscape orientation rather than the default portrait orientation. Let’s see what possibilities you have for doing that.
Printing in Landscape Orientation
You can easily determine when a landscape orientation would be preferable by comparing the width of a sketch with its height. If the width is larger than the height, a landscape orientation makes better use of the space on the paper and you get a larger-scale picture.
You can set the orientation of the output in relation to the page by calling the setOrientation() method for the PageFormat object. You can pass one of three possible argument values to this method, which are defined within the PageFormat class (shown in Table 21-1):
TABLE 21-1: setOrientation() Method Arguments

In each case the long side of the paper is in the same orientation as the y-axis, but note that an Apple Macintosh landscape specification has the origin at the top-right corner of the page rather than the top-left or bottom-left.
You might think that you can incorporate LANDSCAPE orientation into the print() method in SketcherView by changing the PageFormat object:
  public int print(Graphics g,              // Graphics context for printing
                   PageFormat pageFormat,   // The page format
                   int pageIndex)           // Index number of current page
             throws PrinterException {
    if(pageIndex>0) {
      return NO_SUCH_PAGE;
    }
    Graphics2D g2D = (Graphics2D) g;

    // Get sketch bounds
    Rectangle rect = theApp.getModel().getModelExtent();

    // If the width is more than the height, set landscape - not effective!
    if(rect.width>rect.height) {
      pageFormat.setOrientation(pageFormat.LANDSCAPE);
    }

    // Rest of the code as before...
  }
Having set the orientation for the PageFormat object, the methods returning the coordinates for the position of the printable area, and the width and height all return values consistent with the orientation. Thus the width of the printable area is greater than the height if the orientation has been set to LANDSCAPE. Everything looks fine until you try it out. It just doesn’t work. The PageFormat object that is passed to the print() method here is a carrier of information — the information that the PrinterJob method used when it created the graphics context object. The coordinate system in the graphics context has already been set up with whatever paper orientation was set in the PageFormat object, and changing it here is too late. The solution is to make sure the PrinterJob object that controls the printing process works with a PageFormat object that has the orientation set the way that you want.
If you had known ahead of time, back in the actionPerformed() method in the FileAction inner class to SketcherFrame, you could have set up the PageFormat object for the print job before the print() method for the view object ever gets called. You can still do this by modifying the code that initiates printing in the actionPerformed() method like this:
    // Get a printing object
    PrinterJob printJob = PrinterJob.getPrinterJob();
    PrintService printer = printJob.getPrintService();
    if(printer == null) {
      JOptionPane.showMessageDialog(SketcherFrame.this,
                                    "No default printer available.",
                                    "Printer Error",
                                    JOptionPane.ERROR_MESSAGE);
      return;
    }
    PageFormat pageFormat = printJob.defaultPage();
    Rectangle rect = theApp.getModel().getModelExtent(); // Get sketch bounds

    // If the sketch width is greater than the height, print landscape
    if(rect.width>rect.height) {
      pageFormat.setOrientation(PageFormat.LANDSCAPE);
    }
    printJob.setPrintable(theApp.getView(), pageFormat);

    if(printJob.printDialog()) {                             // Display print dialog
      try {                                                  // and if true is returned...
        printJob.print();                                    // ...then print
      } catch(PrinterException pe) {
        System.out.println(pe);
        JOptionPane.showMessageDialog(SketcherFrame.this,
                                      "Error printing a sketch.",
                                      "Printer Error",
                                      JOptionPane.ERROR_MESSAGE);
      }
Directory "Sketcher 8 printing landscape automatically"
Calling the defaultPage() method for a PrinterJob object returns a reference to the default page for the current printer. You can then change that to suit the conditions that you want to apply in the printing operation and pass the reference to an overload of the setPrintable() method. The call to setPrintable() here makes the printJob object use the SketcherView object as the Printable object, and supplies the PageFormat object to be used when the print() method for the view is called. With this code you don’t need to worry about the orientation in the print() method for the Printable object. It is taken care of before print() ever gets called.
If you recompile and try printing a sketch that is wider than it is long, it should come out automatically in landscape orientation. Although everything works, there is a better way to implement printing. The PrinterJob and PrintService objects are re-created every time the event handler executes. This has a detrimental effect on the performance of the printing event handler in the FileAction class, and what’s more, it’s not necessary. You will fix this in the next section.
Improving the Printing Facilities
Of course, there are many situations where choosing the best orientation from a paper usage point of view might not be what the user wants. Instead of automatically setting landscape or portrait orientation based on the dimensions of a sketch, you could leave it to the user with a dialog to select the page setup parameters in the print dialog that you display. The mechanism for the user to set the job parameters is already in place in Sketcher. Clicking the Properties button on the dialog usually displays an additional dialog in which you can set the parameters for the print job, including whether the output is portrait or landscape. Whatever is set in the print dialog overrides the orientation that you determine programmatically in the actionPerformed() method in the FileAction class.
However, the printing facilities in Sketcher are not always implemented in this way for an application. The toolbar button and the File ⇒ Print menu item do exactly the same thing, but often it’s the menu item that pops a print dialog, and the toolbar button just initiates printing of the current document. Also, there’s often a separate menu item that enables the page to be set up for printing, independent of the process of printing a document. You can fix that without too much difficulty, though.
In the actionPerformed() method in the FileAction class, you need to be able to determine whether it was the toolbar button or the menu item that initiated the event. You can get a reference to the object that originated the event by calling the getSource() method for the ActionEvent object that is passed to the actionPerformed() method. You can easily check whether the source object is of type JButton. If it is, it’s the toolbar button that originated the event, and if it isn’t, it was the menu item.
You can now update the code in the actionPerformed() method in the FileAction inner class so you get the print dialog displayed only when the menu item is selected:
        // The view is the page source
        printJob.setPrintable(theApp.getView(), pageFormat);
        boolean printIt = true;

        // If it's not a toolbar button...
        if(!(e.getSource() instanceof JButton)) {
          printIt = printJob.printDialog();     // ...display the print dialog
        }
        if(printIt) {                           // If printIt is true...
          try {
            printJob.print();                      // ...then print
          } catch(PrinterException pe) {
            System.out.println(pe);
            JOptionPane.showMessageDialog(SketcherFrame.this,
                                          "Error printing a sketch.",
                                          "Printer Error",
                                          JOptionPane.ERROR_MESSAGE);
          }
        }
Directory "Sketcher 9 Printing landscape with toolbar and menu different"
The value of the printIt flag you have defined is true by default. It may be reset to false by the value returned by the printDialog() method, which is the case if the user cancels the dialog. The printDialog() method only gets called when the menu item caused the event for printing, not when the toolbar button is clicked.
If you’ve completed all the changes I’ve described, recompile Sketcher and run it again. You should now get different behavior depending on whether you use the toolbar button or the menu item for printing.
Implementing Page Setup
You can add a menu item to the File menu to provide for setting up the printer page. Because you are not going to add a toolbar button for this, you don’t need to use an Action object. Action objects carry more overhead than a simple component, so it’s best not to use them unless you need the capability they provide. Although this is somewhat inconsistent with the way you have created the rest of the File menu, you also see how you can combine both techniques.
Add the boldfaced code to the createFileMenu() method in the SketcherFrame class to create the JMenuItem object for the new printSetupItem menu item and add the menu item to the File menu:
  private void createFileMenu() {
    JMenu fileMenu = new JMenu("File");           // Create File menu
    fileMenu.setMnemonic('F'),                    // Create shortcut
    createFileMenuActions();                      // Create Actions for File menu item

    // Create print setup menu item
    JMenuItem printSetupItem = new JMenuItem("Print Setup...");
    printSetupItem.setToolTipText("Setup the page for the printer");
    printSetupItem.addActionListener(new ActionListener() {
                public void actionPerformed(ActionEvent e) {
                  // update the page format
                  pageFormat = printJob.pageDialog(pageFormat);
                }
    });
    // Construct the file drop-down menu
    fileMenu.add(newAction);                      // New Sketch menu item
    fileMenu.add(openAction);                     // Open sketch menu item
    fileMenu.add(closeAction);                    // Close sketch menu item
    fileMenu.addSeparator();                      // Add separator
    fileMenu.add(saveAction);                     // Save sketch to file
    fileMenu.add(saveAsAction);                   // Save As menu item
    fileMenu.addSeparator();                      // Add separator
    fileMenu.add(printAction);                    // Print sketch menu item
    fileMenu.add(printSetupItem);               // Print page setup menu item
    fileMenu.addSeparator();                      // Add separator
    fileMenu.add(exitAction);                     // Print sketch menu item
    menuBar.add(fileMenu);                        // Add the file menu
  }
Directory "Sketcher 10 with printer page setup"
The new menu item has a tooltip. The action events for the printSetupItem are handled by an anonymous class object. It references the printJob object to call its pageDialog() method, which displays a dialog for setting up the printed page. Data from the PageFormat object you supply as the argument is used to set the values in controls in the dialog. The PageFormat object that pageDialog() returns is stored in pageFormat. This is the updated PageFormat object if the user makes changes and selects the OK button, or the original object that was the argument if the dialog is canceled.
For the printJob and pageFormat objects to be accessible here, you can make them members of the SketcherFrame class, along with the PrintService object. Add the following class members to SketcherFrame:
  private PrinterJob printJob;                       // The current printer job
  private PageFormat pageFormat;                     // The printing page format
  private PrintService printer;                      // The printer to be used
Directory "Sketcher 10 with printer page setup"
You can initialize the first two fields in the SketcherFrame constructor. Add the following statements at the beginning of the code in the constructor:
    printJob = PrinterJob.getPrinterJob();           // Get a printing object
    pageFormat = printJob.defaultPage();             // Get the page format
    printer = printJob.getPrintService();            // Get the default printer
Directory "Sketcher 10 with printer page setup"
The fields concerned with printing are now accessible from anywhere in the SketcherFrame class code, including the inner classes such as the FileAction class.
You need to change the code in the actionPerformed() method in the FileAction class to make use of the fields you have just added to the SketcherFrame class. This involves deleting the first two statements in the block dealing with printAction events that initialize printJob and printService, and deleting the statement that follows the first if statement that creates the pageFormat object. These are all taken care of elsewhere now. You can also remove the statements that set the page orientation, because this is dealt with by the page dialog that is displayed when the “Print Setup...” menu item is clicked. The code now looks like this:
      } if(this == printAction) {
        // Get a printing object
        if(printer == null) {                        // See if there is a printer
          JOptionPane.showMessageDialog(SketcherFrame.this,
                                        "No default printer available.",
                                        "Printer Error",
                                        JOptionPane.ERROR_MESSAGE);
          return;
        }

        printJob.setPrintable(theApp.getView(), pageFormat);
        boolean printIt = true;

        // If it's not a toolbar button
        if(!(e.getSource() instanceof JButton)) {
          printIt = printJob.printDialog();          // ...display the print dialog
        }

        if(printIt) {                                // If printIt is true...
          try {
            printJob.print();                        // ...then print
          } catch(PrinterException pe) {
            System.err.println(pe);
            JOptionPane.showMessageDialog(SketcherFrame.this,
                                          "Error printing a sketch.",
                                          "Printer Error",
                                          JOptionPane.ERROR_MESSAGE);
          }
        }
      } else if(this == exitAction) {
        checkForSave();
        System.exit(0);
      }
Directory "Sketcher 10 with printer page setup"
On my system, the pageDialog() method displays the dialog shown in Figure 21-12.

As you can see, with my printer I can select the paper size and the source tray. I can also set the margin sizes as well as select portrait or landscape orientation. When the dialog is closed normally with the OK button, the method returns a new PageFormat object that incorporates the values set by the user in the dialog. If the Cancel button is used to close the dialog, the original reference that was passed as an argument is returned. The printing operations that are initiated in the actionPerformed() method in the FileAction class use the updated PageFormat object. You achieve this by passing pageFormat as the second argument to the overloaded setPrintable() method with two parameters. The first argument is the object that implements the Printable interface and thus carries out the printing, and the second is the PageFormat object that is to be used.
Using the Java Print Dialog
The overloaded version of the printDialog() method that I sidestepped earlier generates a Java-based print dialog instead of using the native dialog. This method requires a single argument of type PrintRequestAttributeSet. This interface type is defined in the javax.print.attribute package and declares methods for adding attributes relating to a print request to a set. These attributes specify things such as the number of copies to be printed, the orientation of the image on the paper, or the media or media tray to be selected for the print job. The HashPrintRequestAttributeSet class that is defined in the same package implements this interface and encapsulates a set of print request attributes stored as a hash map. It is useful if you can define a set of attributes that have some persistence in Sketcher so they can be carried forward from one print request to the next. You can add a member to store an initially empty set of print request attributes to the SketcherFrame class like this:
private HashPrintRequestAttributeSet printAttr = new HashPrintRequestAttributeSet();
Directory "Sketcher 11 using the Java print dialog"
There are other HashPrintRequestAttributeSet class constructors that create non-empty attribute sets, but this suffices for Sketcher. You need an import statement for the class in the SketcherFrame.java file:
import javax.print.attribute.HashPrintRequestAttributeSet;
Directory "Sketcher 11 using the Java print dialog"
Now that you have a print request attribute set object available, you can modify the code for printing in the actionPerformed() method in the FileAction inner class to use the Java print dialog:
        // Get a printing object
        if(printer == null) {                     // See if there is a printer
            JOptionPane.showMessageDialog(SketcherFrame.this,
                                          "No default printer available.",
                                          "Printer Error",
                                          JOptionPane.ERROR_MESSAGE);
            return;
        }

        // The view is the page source
        printJob.setPrintable(theApp.getView(), pageFormat);
        boolean printIt = true;

       // If it's not a toolbar button
        if(!(e.getSource() instanceof JButton)) {
          // ...display the print dialog
          printIt = printJob.printDialog(printAttr);
        }
        if(printIt) {                             // If printIt is true...
          try {
            printJob.print(printAttr);        // ...then print
          } catch(PrinterException pe) {
            System.err.println(pe);
            JOptionPane.showMessageDialog(SketcherFrame.this,
                                          "Error printing a sketch.",
                                          "Printer Error",
                                          JOptionPane.ERROR_MESSAGE);
          }
        }
Directory "Sketcher 11 using the Java print dialog"
Note that you also use an overloaded version of the print() method for the PrinterJob object to which you pass the print request attribute set. Thus the print operation uses whatever attributes were set or modified in the print dialog displayed by the printDialog() method.
As you are using print attributes when printing, you should make the page dialog that is displayed in response to the “Print Setup . . . ” menu item use them, too. There’s a slight complication in that the behavior of the pageDialog() method that has a parameter of type PrintRequestAttributeSet is different from that of the method with a parameter of type PageFormat when the Cancel button in the dialog is clicked. The former version returns null, whereas the latter version returns a reference to the PageFormat object that was passed as the argument. If you don’t take account of this, canceling the page setup dialog causes printing to fail, because the pageFormat field in SketcherFrame is set to null. You therefore must modify the code in the actionPerformed() method in the anonymous ActionListener class for the printSetupMenuItem menu item. This is in the createFileMenu() method in SketcherFrame:
                public void actionPerformed(ActionEvent e) {
                  PageFormat pf = printJob.pageDialog(printAttr);
                  if(pf != null) {
                    pageFormat = pf;          // update the page format
                  }
                }
              }
Directory "Sketcher 11 using the Java print dialog"
Now you update pageFormat only when the value returned by the pageDialog() method is not null.
If you run Sketcher with these changes you should see a dialog with three tabs when you print a sketch, similar to that shown in Figure 21-13.

Now you have the ability to set attributes on any of the tabs in the dialog, and the attributes are stored in the PrintAttr member of the SketcherFrame class that you passed to the printDialog() method. Because you also pass this reference to the print() method for the PrinterJob object, the print request is executed using these attributes. This is accomplished by passing a PageFormat object to the Printable object, which prints a page that has its size, orientation, and other attributes set from the print request attributes defined by PrintAttr. You can see that the page count has been set to 1 by default in this dialog. You can set attributes related to a print job and store them in the PrintRequestAttributeSet object that you pass to the printDialog() method. Let’s explore that a little further.
Setting Print Request Attributes Programmatically
Print request attributes are specifications of the kinds of options displayed in the dialog you just saw. They specify things like the number of copies, whether printing is in color or monochrome, the page margin sizes, and so on. Each print request attribute is identified by a class that implements the PrintRequestAttribute interface, and the javax.print.attributes.standard package defines a series of classes for standard print request attributes, as well as classes for other types of print attributes. There is a large number of standard classes for print request attributes, and I don’t have the space to go into the details of them all here. So I’m just picking one to show how you can query and set them.
All the classes that implement the PrintRequestAttribute interface are identified in the interface documentation. You can use the Copies class in the javax.print.attributes.standard package that specifies the number of printed copies to be produced.
You add an instance of the Copies class to your PrintAttr object to specify the number of copies to be printed, and this is displayed by the print dialog. You can create an object specifying the number of copies to be produced by extending the code relating to printer setup in the SketcherFrame constructor, like this:
    // Set up the printer and page format objects
    printJob = PrinterJob.getPrinterJob(); // Get a printing object
    pageFormat = printJob.defaultPage();   // Get the page format
    printer = printJob.getPrintService();  // Get the default printer
    Copies twoCopies = new Copies(2);
    if (printer.isAttributeCategorySupported(twoCopies.getCategory())) {
      printAttr.add(twoCopies);
    }
The argument to the Copies class constructor specifies the number of copies to be produced. Our object specifies just two copies, but you can go for more if you have the paper, the time, and the inclination.
Before you add this object to the print request attribute set, you verify that the printer does actually support the production of multiple copies. Obviously, it only makes sense to set an attribute for a printer that has the appropriate capability — you won’t be able to print in color on a monochrome printer, for instance. You can call the isAttributeCategorySupported() method for the PrintService object that you obtained from the PrinterJob object to do this.
The isAttributeCategorySupported() method requires an argument of type Class to identify the attribute category that you are querying, and you obtain this by calling the getCategory() method for the Copies object. If the attribute is supported, you add the twoCopies object to the set encapsulated by printAttr by calling its add() method.
You should add an import statement for the Copies class to SketcherFrame.java:
import javax.print.attribute.standard.Copies;
If you recompile and run Sketcher once more, the print dialog should come up with two copies set initially.
Of course, setting things such as margin sizes and page orientation once and for all for every page in a document might not be satisfactory in many cases. It is easy to imagine situations where you may want to print some pages in a document in portrait orientation while you need to print others, perhaps containing illustrations, in landscape orientation. You look at how you can handle that in Java next, but before going any further, delete the following code from the SketcherFrame constructor:
    Copies twoCopies = new Copies(2);
    if (printer.isAttributeCategorySupported(twoCopies.getCategory())) {
      printAttr.add(twoCopies);
    }
You can remove the import statement for the Copies class name, too.
Multipage Document Printing
If you need to print a document that contains several pages, you can allow for this possibility in the implementation of the print() method in the SketcherView class. The PrinterJob object continues to call this method until the value NO_SUCH_PAGE is returned. However, this won’t be convenient in every case. In a more complicated application than Sketcher, as well as having different page orientations, you might want to have different class objects printing different kinds of pages — rendering the same data as graphical or textual output, for instance. You can’t do this conveniently with just one class implementing the Printable interface. You also need something that is more flexible than just passing a class object that does printing to the PrinterJob object by calling its setPrintable() method.
The solution is to implement the Pageable interface in a class, and call the setPageable() method for the PrinterJob object instead of setPrintable(). The essential difference between the Printable and Pageable interfaces is that a Printable object is intended to encapsulate a single page to be printed, whereas a Pageable object encapsulates multiple pages. Each page that is to be printed by a Pageable object is encapsulated by a Printable object though.
Implementing the Pageable Interface
A class that implements the Pageable interface defines a set of pages to be printed. A Pageable object must be able to supply the PrinterJob object with a count of the number of pages for a job, a reference of type Printable for the object that is to print each page, plus a PageFormat object defining the format of each page. The PrinterJob object acquires this information by calling the three methods declared in the Pageable interface:
- int getNumberOfPages(): Returns the number of pages to be printed. If the number of pages cannot be determined, then the UNKNOWN_NUMBER_OF_PAGES constant that is defined in the Pageable interface should be returned.
- PageFormat getPageFormat(int pageIndex): Returns a PageFormat object for the page specified by the page index that is passed to it.
- Printable getPrintable(int pageIndex): Returns a reference to the object responsible for printing the page specified by the page index that is passed to it.
At the start of a print job that was initiated by a call to the setPageable() method for a PrinterJob object, the PrinterJob object calls the getNumberOfPages() method for the Pageable object to determine how many pages are to be printed. If you return the value UNKNOWN_NUMBER_OF_PAGES, then the process relies on a Printable object returning NO_SUCH_PAGE at some point to stop printing. It is therefore a good idea to supply the number of pages when it can be determined.
The PrinterJob object assumes each page in a print job is associated with a page index value, with page index values starting at 0. For each page index, the PrinterJob object calls the getPageFormat() method to obtain the PageFormat object to be used to print the page, and then calls getPrintable() for the Pageable object to obtain a reference to the Printable object that does the printing. Of course, just because you can supply a different Printable object for each page doesn’t mean that you must. You can use as many or as few as you need for your application, and control how different pages are printed by making the getPageFormat() method for the Pageable object return different PageFormat objects. Remember, though, that the print() method for a Printable object may be called more than once by the PrinterJob object to print a particular page, and the same page should be rendered each time the same page index is passed as an argument to the print() method, so you must not code the method in a way that presumes otherwise.
Creating PageFormat Objects
As you saw earlier, you can get the default PageFormat object for the print service you are using by calling the defaultPage() method for the PrinterJob object. You could use the default PageFormat class constructor to create an object that is portrait-oriented, but in this case you have no guarantee that the object is compatible with the current print service. A PageFormat object encapsulates information about the size of the paper and the margins in effect, so the object produced by the default constructor may not correspond with your printer setup. If you want to go this route, you can pass a reference to a PageFormat object to the validatePage() method for a PrinterJob object. For example:
// Object for current printer
PrinterJob printJob = PrinterJob.getPrinterJob();

// Validated page
PageFormat pageFormat = printJob.validatePage(new PageFormat());
Note that the validatePage() method does not return the reference that you pass as the argument. The method clones the object that was passed to it and returns a reference to the clone, which has been modified where necessary to suit the current printer. Because it does not modify the object in place, you always need to store the reference that is returned. This is obviously well suited to multipage printing because you can create a series of distinct PageFormat objects from the same argument.
Fundamentally, a PageFormat object encapsulates all the information needed to print on a page, as Figure 21-14 illustrates.

After you have a PageFormat object, you can modify the orientation of the page by calling its setOrientation() method as you know, the possible values for the argument being LANDSCAPE, PORTRAIT, or REVERSE_LANDSCAPE. The PageFormat class defines several methods to retrieve information about the paper — you have seen that you can get the position and size of the printable area on the page, for instance, by calling the getImageableX(), getImageableY(), getImageableWidth(), and getImageableHeight() methods. You also have getWidth() and getHeight() methods in the PageFormat class that return the overall width and height of the page, respectively. These are all properties of the paper itself, which is represented by an object of the java.awt.print.Paper class that is associated with a PageFormat object. You can also work with the Paper object for a PageFormat object directly.
Dealing with Paper
The Paper class encapsulates the size of the paper and the size and position of the printable area on the page. The default constructor for the Paper class creates an American letter-sized sheet with one-inch margins — the printable area being the area inside the margins. You can change the size of the paper by calling the setSize() method for the Paper object, as you see in a moment.
Rather than creating an independent Paper object, you would normally retrieve a reference to the Paper object for a PageFormat object by calling its getPaper() method. If you then want to change the size of the paper, or the printable area — the page margins, in other words — you can call the setSize() or the setImageableArea() method for the Paper object. You can restore the paper details by passing an object of type Paper back to the PageFormat object by calling its setPaper() method with a reference to the Paper object as the argument.
The setSize() method for a Paper object has two parameters of type double that specify the width and height of the paper in units of 1/72 of an inch. If you use A4 paper, you could specify the size of the paper for a PageFormat object with the following statements:
Paper paper = pageFormat.getPaper();
final double MM_TO_PAPER_UNITS = 72.0/25.4;                  // 25.4 mm to an inch
final double widthA4 = 210*MM_TO_PAPER_UNITS;
final double heightA4 = 297*MM_TO_PAPER_UNITS;
paper.setSize(widthA4, heightA4);
If you use letter size paper that is 8.5 by 11 inches, it’s somewhat simpler:
Paper paper = pageFormat.getPaper();
final double widthLetterSize = 72.0*8.5;
final double heightLetterSize = 72.0*11.0;
paper.setSize(widthLetterSize, heightLetterSize);
The setImageableArea() method expects you to supply four arguments of type double. The first two are the coordinates of the top-left corner of the printable area and the next two are the width and the height. All these values are in units of 1/72 of an inch. To set 20 mm margins on your A4 sheet you could write the following:
double marginSize = 20.0* MM_TO_PAPER_UNITS;                 // 20 mm wide
paper.setImageableArea(marginSize, marginSize,               // Top left
                       widthA4-2.0*marginSize,               // Width
                       heightA4-2.0*marginSize);             // Height
If you are printing on letter-size paper, a one-inch margin might be more appropriate, so you would write this:
double marginSize = 72.0;                                    // 1 inch wide
paper.setImageableArea(marginSize, marginSize,               // Top left
                       widthLetterSize-2.0*marginSize,       // Width
                       heightLetterSize-2.0*marginSize);     // Height
Of course, there’s no reason why a class that implements the Pageable interface cannot also implement Printable, so you could do this in Sketcher just to get a feel for the Pageable interface in action.
TRY IT OUT: Using the Pageable Interface
You just print two pages in a print job in Sketcher, a cover page with a title for the sketch plus the sketch itself, which may be portrait or landscape, of course. You could produce both pages in SketcherView, but to make it more interesting, let’s define a separate class to represent a Printable object for the cover page:
import java.awt.*;
import java.awt.geom.*;
import java.awt.print.*;
import java.awt.font.TextLayout;

public class SketchCoverPage implements Printable {
  public SketchCoverPage(String sketchName) {
    this.sketchName = sketchName;
  }

  // Print the cover page
  public int print(Graphics g,
                 PageFormat pageFormat,
                 int pageIndex)
                 throws PrinterException {
    // If it's page 0 print the cover page...
  }

  private String sketchName;
}
Directory "Sketcher 12 using the Pageable interface"
You will use the TextLayout class in the implementation of the print() method.
The name of the sketch to print on the cover page is passed to the SketchCoverPage constructor. Because the need has come up, you should add a getSketchName() method to the SketcherFrame class that supplies a reference to a String object containing the file name:
  // Method to return the name of the current sketch
  public String getSketchName() {
    return currentSketchFile == null ? DEFAULT_FILENAME.toString() :
                                       currentSketchFile.getFileName().toString();
  }
Directory "Sketcher 12 using the Pageable interface"
You can use this method when you create a SketchCoverPage object. The print() method in the SketchCoverPage class needs to recognize when it is being called to print the first page — that is, when the page index is zero — and then print the cover page. You could do whatever you like here to produce a fancy cover page, but I’m just putting the code to draw a line border inset from the page and put the sketch file name in the middle in a box. Here’s how you could do that:
  public int print(Graphics g,
                   PageFormat pageFormat,
                   int pageIndex)
             throws PrinterException {
    if(pageIndex > 0) {
      return NO_SUCH_PAGE;
    }
    Graphics2D g2D = (Graphics2D) g;
    float x = (float)pageFormat.getImageableX();
    float y = (float)pageFormat.getImageableY();

    GeneralPath path = new GeneralPath();
    path.moveTo(x+1, y+1);
    path.lineTo(x+(float)pageFormat.getImageableWidth()-1, y+1);
    path.lineTo(x+(float)pageFormat.getImageableWidth()-1,
                y+(float)pageFormat.getImageableHeight()-1);
    path.lineTo(x+1, y+(float)pageFormat.getImageableHeight()-1);
    path.closePath();

    g2D.setPaint(Color.red);
    g2D.draw(path);

    // Get a 12 pt bold version of the default font
    Font font = g2D.getFont().deriveFont(12.f).deriveFont(Font.BOLD);

    g2D.setFont(font);                    // Set the new font
    Rectangle2D textRect =
      new TextLayout(sketchName, font, g2D.getFontRenderContext()).getBounds();
    double centerX = pageFormat.getWidth()/2;
    double centerY = pageFormat.getHeight()/2;
    Rectangle2D.Double surround = new Rectangle2D.Double(
                                             centerX-textRect.getWidth(),
                                             centerY-textRect.getHeight(),
                                             2*textRect.getWidth(),
                                             2*textRect.getHeight());
    g2D.draw(surround);

    // Draw text in the middle of the printable area
    g2D.setPaint(Color.blue);
    g2D.drawString(sketchName, (float)(centerX-textRect.getWidth()/2),
                               (float)(centerY+textRect.getHeight()/2));
    return PAGE_EXISTS;
  }
Directory "Sketcher 12 using the Pageable interface"
To center the file name on the page, you need to know the width and height of the text string when it is printed. The getStringBounds() method in the Font class returns the rectangle bounding the string. The second argument is a reference to an object of type FontRenderContext that the getFontRenderContext() method for g2D returns. A FontRenderContext object contains all the information the getStringBounds() method needs to figure out the rectangle bounding the text when it is printed. This includes information about the size of the font as well as the resolution of the output device — the printer, in this case.
You can now implement the Pageable interface in the SketcherView class. You must add three methods to the class: getNumberOfPages(), which returns the number of pages to be printed; getPrintable(), which returns a reference to a Printable object that prints a page with a given index; and getPageFormat(), which returns a reference to a PageFormat object corresponding to a particular page:
// Import statements as before...

class SketcherView extends JComponent
                 implements Observer, ActionListener, Printable, Pageable {
  // Constructor and othe code as before...
  // Method to return page count - always two pages
  public int getNumberOfPages() {
    return 2;
  }

  // Method to return the Printable object that will render the page
  public Printable getPrintable(int pageIndex) {
    if(pageIndex == 0) {                         // For the first page
      // return the cover page
      return new SketchCoverPage(theApp.getWindow().getSketchName());
    } else {
      return this;
  }

  public PageFormat getPageFormat(int pageIndex) {
    // Code to define the PageFormat object for the page...
  }

  // Print the sketch on a local printer
  public int print(Graphics g,                       // Graphics context for printing
                   PageFormat pageFormat,            // The page format
                   int pageIndex)                    // Index number of current page
             throws PrinterException {
    // Code to test pageIndex must be removed...
    //if(pageIndex > 0) {
    //  return NO_SUCH_PAGE;
    //}    Graphics2D g2D = (Graphics2D) g;

    // Get sketch bounds
    Rectangle rect = theApp.getModel().getModelExtent();
    // Rest of the code as before...
  }

  // Plus the rest of the class as before...
}
Directory "Sketcher 12 using the Pageable interface"
The first two methods are already fully defined here. You always print two pages, the first page being printed by a SketchCoverPage object and the second page by the view object. The print() method should now print the page when called without testing the pageIndex value for zero. The page with index 0 is printed by the SketchCoverPage object.
Let’s see how you can produce the PageFormat object for a page. You should use the PageFormat object that’s stored as a field in the application window, so add a method to the SketcherFrame class to make it accessible from another class:
  // Method to return a reference to the current PageFormat object
  public PageFormat getPageFormat() {
    return pageFormat;
  }
Directory "Sketcher 12 using the Pageable interface"
To exercise some of the methods in the Paper class that I’ve discussed, you can arbitrarily double the size of the margins for the cover page but leave the margins for the other page at their default sizes. You can also set the cover page to landscape orientation, but leave the second page as whatever is set in the pageFormat field of the application object. Here’s the code for the getPageFormat() method in the SketcherView class that does that:
  public PageFormat getPageFormat(int pageIndex) {
    if(pageIndex == 0) {             // If it's the cover page...
                                     // ...make the margins twice the size
      // Create a duplicate of the current page format
      PageFormat pageFormat =
                     (PageFormat)(theApp.getWindow().getPageFormat().clone());
      Paper paper = pageFormat.getPaper();

      // Get top and left margins - x & y coordinates of top-left corner
      // of imageable area are the left & top margins
      double leftMargin = paper.getImageableX();
      double topMargin = paper.getImageableY();

      // Get right and bottom margins
      double rightMargin = paper.getWidth()-paper.getImageableWidth()-leftMargin;
      double bottomMargin = paper.getHeight()-paper.getImageableHeight()-topMargin;

      // Double the margin sizes
      leftMargin *= 2.0;
      rightMargin *= 2.0;
      topMargin *= 2.0;
      bottomMargin *= 2.0;

      // Set new printable area for the paper
      paper.setImageableArea(leftMargin, topMargin,
                           paper.getWidth() - leftMargin - rightMargin,
                           paper.getHeight() - topMargin-bottomMargin);

      pageFormat.setPaper(paper);                    // Restore the paper
      pageFormat.setOrientation(PageFormat.LANDSCAPE);
      return pageFormat;                             // Return the page format
    }
    // For pages after the first, use the object from the app window
    return theApp.getWindow().getPageFormat();
}
Directory "Sketcher 12 using the Pageable interface"
You don’t want to mess up the PageFormat object from the application window for use when you are printing the cover page, so you duplicate it by calling its clone() method. The PageFormat class specifically overrides the clone() method that it inherits from the Object class with a public member to allow a PageFormat object to be duplicated. The clone() method returns a reference of type Object, so you must cast it to the correct type.
The sizes for the left and top margins correspond to the values of the x and y coordinates of the top-left corner of the imageable area for the page, so you call the methods for the Paper object to retrieve these values. You calculate the size of the right margin by subtracting the width of the imageable area and the value for the left margin from the overall width of the page. You produce the value for the size of the bottom margin in a similar way. After doubling the margin sizes, you redefine the position and size of the imageable area for the Paper objects from these and then restore the modified Paper object in the PageFormat object.
If it’s not the cover page, you just return a reference to the PageFormat object that is stored in the application window object.
The last thing you need to do is alter the code in the actionPerformed() method for the inner class FileAction in SketcherFrame. You must replace the setPrintable() method call with a setPageable() call:
     } if(this == printAction) {
        // Get a printing object
        if(printer == null) {                    // See if there is a printer
            JOptionPane.showMessageDialog(SketcherFrame.this,
                                          "No default printer available.",
                                          "Printer Error",
                                          JOptionPane.ERROR_MESSAGE);
            return;
        }

        // The view is the page source
        printJob.setPageable(theApp.getView());
        boolean printIt = true;

        // If it's not the toolbar button...
        if(!(e.getSource() instanceof JButton)) {
          printIt = printJob.printDialog();   // ...display the print dialog
        }
        if(printIt) {                            // If printIt is true...
          try {
            printJob.print();                    // ...then print
          } catch(PrinterException pe) {
            System.err.println(pe);
            JOptionPane.showMessageDialog(SketcherFrame.this,
                                          "Error printing a sketch.",
                                          "Printer Error",
                                          JOptionPane.ERROR_MESSAGE);
          }
        }
      } else if(this == exitAction) {
        checkForSave();
        System.exit(0);
      }
Directory "Sketcher 12 using the Pageable interface"
This code is the earlier version that uses the printDialog() method without an argument to show the effect in this context. If you comment out the most recent code, you can try both versions by juggling the commented-out code. On my system, the print dialog now shows that pages numbered from 1 to 2 should be printed, courtesy of the Pageable interface implementation that you added to Sketcher. You can see my print dialog in Figure 21-15.

How It Works
The PrinterJob object now calls methods in the Pageable interface that you have implemented in the SketcherView class that defines the view object. The number of pages in the document is now determined by the getNumberOfPages() method, and the PageFormat and Printable objects are now obtained individually for each page.
If you switch the code back to using the printDialog() and print() methods with an argument of type PrintRequestAttributeSet, the print operation runs in the same way. The print attributes passed to the print() method do not override those specified in the PageFormat object returned by the getPageFormat() method for the Pageable object. If the attribute set passed to the print method includes attributes not determined by the Pageable object — such as a Copies attribute object — these have an effect on the printing process. Similarly, if you set the page orientation to landscape using the dialog displayed by the Print Setup menu item, the second page that contains the sketch prints in landscape orientation.
Printing Using a Book
A Book object is a repository for a collection of pages where the pages may be printed using different formats. The page painter for a page in a book is represented by a Printable object, and each Printable object within a book can print one or possibly several pages with a given format. Figure 21-16 shows an example of a Book object that uses three Printable objects to print a total of seven pages.
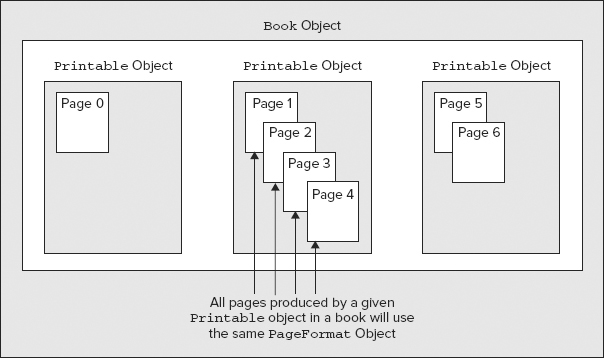
Because the Book class implements the Pageable interface, you print a book in the same way as you print a Pageable object. After you have assembled all the pages you want in a Book object, you just pass a reference to it to the setPageable() method for your PrinterJob object. Let’s take it from the top.
The Book class has only a default constructor and that creates an empty book. Thus, you create a book like this:
Book sketchBook = new Book();
You add a page to a book by calling the append() method for the Book object. There are two overloaded versions of append(): one to add a Printable object that represents a single page, and the other to add a Printable object that represents several pages. In the latter case, all the pages are printed using the same PageFormat object.
The first version of append() accepts two arguments: a reference to the Printable object and a reference to an associated PageFormat object. This means each page in a book can have its own formatting. Suppose you want to create a Book object for Sketcher, and the object would be created in the SketcherFrame object somewhere. You could add the cover page of a sketch just as in the previous example to the sketchBook object like this:
PageFormat pageFormat = pageFormat.clone();
Paper paper = pageFormat.getPaper();

double leftMargin = paper.getImageableX();     // Top left corner is indented
double topMargin = paper.getImageableY();      // by the left and top margins
double rightMargin = paper.getWidth()-paper.getImageableWidth()-leftMargin;
double bottomMargin = paper.getHeight()-paper.getImageableHeight()-topMargin;
leftMargin *= 2.0;                             // Double the left margin...
rightMargin *= 2.0;                            // ...and the right...
topMargin *= 2.0;                              // ...and the top...
bottomMargin *= 2.0;                           // ...and the bottom

paper.setImageableArea(leftMargin, topMargin,  // Set new printable area
                       paper.getWidth()-leftMargin-rightMargin,
                       paper.getHeight()-topMargin-bottomMargin);
pageFormat.setPaper(paper);                    // Restore the paper
sketchBook.append(new SketchCoverPage(theApp), pageFormat);
Apart from the first statement and the last statement that appends the Printable object that represents the page painter, all this code is essentially the same as the code in the previous example for creating the PageFormat object for the cover page.
To add the second page of the sketch to the Book object, you could write the following:
sketchBook.append(theApp.getView(), pageFormat);
The arguments to the append() method specify that the view object prints the page, and that the PageFormat object that should be used is the one stored in the pageFormat field in the SketcherFrame class.
Now that you have assembled the book containing the two pages for the print job, you can tell the PrinterJob object that you want to print the book:
printJob.setPageable(sketchBook); // The book is the source of pages
All you need to do is call the print() method for the PrinterJob object to start printing. To expedite printing, the PrinterJob object communicates with the Book object to get the number of pages to be printed and to get the page painter and page format appropriate to print each page. The total number of pages is returned by the getNumberOfPages() method for the Book object. In this case it always returns 2 because a printed sketch consists of just a cover page plus the sketch. A reference to the Printable object for a given page index is returned by the getPrintable() method for the Book object, and the PageFormat object for a given page index is returned by the getPageFormat() method. Obviously, in the case of Sketcher, using a Book object doesn’t offer much advantage over the Pageable object that you used in the previous example. In situations where you have more complex documents with a lot of pages with diverse formats, it can make things much easier.
You use the other version of append() for a Book object to add a given number of pages to a book that is produced by a single Printable object, and where all the pages have the same format. Here’s an example:
Book book = new Book();
book.append(painter, pageFormat, pageCount);
Here the painter argument is a reference of type Printable that prints pageCount pages all with the same format, pageFormat. A typical instance where you might use this might be a long text document. The document could consist of many pages, but they all are printed with the same page format. The view object for the document typically provides a method to figure out the number of pages that are necessary to output the document.
Printing Swing Components
Printing components is easier than you might think. Swing components are particularly easy to print because they already know how to draw themselves. You should not call a Swing component’s paint() method when you want to print it, though. Rendering of Swing components is buffered by default to improve the efficiency of displaying them but printing one by calling its paint() method adds a lot of unnecessary overhead to the printing operation. Instead you should call the print() method that is defined in the JComponent class. This renders the component directly to the graphics context that is passed as an argument, so there is no buffering of the output. The method automatically prints any child components that the component contains, so you need to call print() directly only for a top-level component.
The print() method for a Swing component that has JComponent as a base calls three protected methods to actually carry out the printing. The printComponent() method prints the component, the printBorder() method prints the component border, and the printChildren() method prints components that are children of the component. They each have a Graphics parameter.
If you want to customize how a Swing component is printed, you can subclass the component and override any or all of these. This doesn’t apply to a JFrame component, though. The JFrame class is a subclass of Frame and does not have JComponent as a superclass. However, you can still call the print() method for a JFrame component to print it. In this case it’s inherited from the Container class.
Let’s implement a capability to print the Sketcher application window to see how this can be done.
TRY IT OUT: Printing the Sketcher Window
You can set up a menu item for this in the createFileMenu() method in the SketcherFrame class:
  private void createFileMenu() {
    JMenu fileMenu = new JMenu("File");               // Create File menu
    fileMenu.setMnemonic('F'),                        // Create shortcut
    createFileMenuActions();                          // Create Actions for File menu item

    // Code to create print setup menu item...

    // Menu item to print the application window
    JMenuItem printWindowItem = new JMenuItem("Print Window");
    printWindowItem.addActionListener(new ActionListener() {
                public void actionPerformed(ActionEvent e) {
                  if(printer == null) {
                    JOptionPane.showMessageDialog(SketcherFrame.this,
                                               "No default printer available.",
                                               "Printer Error",
                                               JOptionPane.ERROR_MESSAGE);
                    return;
                  }
                  // The app window is the page source
                  printJob.setPrintable(SketcherFrame.this, pageFormat);
                  try {
                    printJob.print();
                  } catch(PrinterException pe) {
                    System.out.println(pe);
                    JOptionPane.showMessageDialog(SketcherFrame.this,
                                      "Error printing the application window.",
                                      "Printer Error",
                                      JOptionPane.ERROR_MESSAGE);
                  }
                }
    });

    // Construct the file drop-down menu
    // Code to add file menu items as before...
    fileMenu.addSeparator();                      // Add separator
    fileMenu.add(printAction);                    // Print sketch menu item
    fileMenu.add(printSetupItem);                 // Print page setup menu item
    fileMenu.add(printWindowItem);             // Print window menu item
    fileMenu.addSeparator();                      // Add separator
    fileMenu.add(exitAction);                     // Print sketch menu item
    menuBar.add(fileMenu);                        // Add the file menu
  }
Directory "Sketcher 13 printing the application window"
Note that you must qualify this in the actionPerformed() method. If you don’t, this refers to the anonymous class object, and not the SketcherFrame object.
The application window is responsible for printing the window because it is obviously best placed to do this, so you must make the SketcherFrame class implement the Printable interface. Change the first line of the class definition to the following:
public class SketcherFrame  extends JFrame
                         implements ActionListener, Observer, Printable {
Directory "Sketcher 13 printing the application window"
Now you can add the definition of the print() method to the SketcherFrame class:
  // Print the window
  public int print(Graphics g,
                   PageFormat pageFormat,
                   int pageIndex)
             throws PrinterException {

    if(pageIndex > 0)                          // Only one page page 0 to be printed
      return NO_SUCH_PAGE;

    // Scale the component to fit
    Graphics2D g2D = (Graphics2D) g;

    // Calculate the scale factor to fit the window to the page
    double scaleX = pageFormat.getImageableWidth()/getWidth();
    double scaleY = pageFormat.getImageableHeight()/getHeight();

    double scale = Math.min(scaleX,scaleY);    // Get minimum scale factor

    // Move paper origin to page printing area corner
    g2D.translate(pageFormat.getImageableX(), pageFormat.getImageableY());
    g2D.scale(scale,scale);                    // Apply the scale factor

    print(g2D);                              // Draw the component
    return PAGE_EXISTS;
  }
Directory "Sketcher 13 printing the application window"
The getWidth() and getHeight() methods you are calling here are inherited in the SketcherFrame class from the Component class, and they return the width and height of the window, respectively.
If you recompile and run Sketcher once more, the File ⇒ Print Window menu item should be operational.
How It Works
The menu operation and the printing mechanism function as I have already discussed. The SketcherFrame object is the page painter for the window, so the print() method is where it all happens. After checking the page index value and casting the Graphics reference passed to the method to Graphics2D, you calculate the scaling factor to fit the window to the page. The getWidth() and getHeight() methods inherited in our SketcherFrame class return the width and height of the window, respectively. You then apply the scale just as you did for printing a sketch. The coordinates of the top-left corner of the window are at (0, 0) so you can just print it once you have applied the scaling factor. Calling the inherited print() method with g2D as the argument does this.
I’m sure you have noticed that the output has deficiencies. The title bar and window boundary are missing. Of course, a JFrame object is a top-level window, and because it is derived from the Frame class, it is a heavyweight component with its appearance determined by its native peer, which is outside the Java code. The print() method for the JFrame object that you call to print the window does not include the peer elements of the window (peer elements are the native GUI elements). The printAll() method that the JFrame class inherits from the Component class does though. Modify the code in the print() method in SketcherFrame to call printAll() rather than print(), like this:
    printAll(g2D);                           // Draw the component
    return PAGE_EXISTS;
Directory "Sketcher 13 printing the application window"
Now you should get the whole application window printed.
In this chapter you have added full support for the File menu to the Sketcher application for both sketch storage and retrieval and for printing. You should find that the techniques that you have used here are readily applicable in other Java applications. The approach to saving and restoring a model object is not usually dependent on the kind of data it contains. Of course, if your application is a word processor, you have a little more work to do taking care that the number of lines printed on each page is a whole number of lines. In other words, you have to make sure you avoid having the top half of a line of text on one page and the bottom half on the next. There are other Java classes to help with that and I don’t really have the space to discuss them here, but look them up — the javax.swing.text package is a veritable gold mine for text handling!
If you have been following all the way with Sketcher, you now have an application that consists of well more than 1,500 lines of code, so you should be pretty pleased with yourself. And you’re not finished with Sketcher yet — you add the capability to export and import sketches in XML over the next two chapters.
EXERCISES
You can download the source code for the examples in the book and the solutions to the following exercises from wrox.com.
1. Modify the Sketcher program to print the title at the top of the page on which the sketch is printed.
2. Modify the printing of a sketch so that a solid black boundary line is drawn around the sketch on the page.
3. Modify Sketcher to print a single sketch laid out on four pages. The sketch should be enlarged to provide the best fit on the four pages without distorting circles — that is, the same scale should be applied to the x and y axes.
4. Use a Book object to print a cover page plus the sketch spread over four pages, as in the previous exercise.
• WHAT YOU LEARNED IN THIS CHAPTER
| TOPIC | CONCEPT |
| Serialization | You can implement the ability to write your model object to a file and read it back by making it serializable. |
| The JFileChooser Class | The JFileChooser class provides a generalized way for displaying a dialog to enable a file to be chosen. |
| Filtering a File List | You can limit the files that are displayed in a file chooser dialog by implementing a file filter. You can define you own file filter by subclassing the FileFilter class. |
| Printing | You initiate a printing operation by creating a PrinterJob object. This object encapsulates the interface to your printer and is used to manage the printing process. |
| Printers | A PrintService object encapsulates a printer and its capabilities. |
| Page Formatting | A PageFormat object defines the format for a page, and methods for this object provide information on the paper size and orientation, and the printable area on the page. |
| Paper | An object of type Paper defines the physical characteristics of a sheet of paper for the printer. |
| Print Dialogs | You can display a print dialog by calling the printDialog() method for a PrinterJob object. The no-argument version of printDialog() displays the native print dialog, whereas the version accepting a single argument of type PrintRequestAttributeSet displays a Java print dialog. |
| Printing a Page | Printing a page is always done by an object of a class that implements the Printable interface. You print a page by calling methods for the Graphics object passed to the print() method in the Printable interface by the PrinterJob object. |
| Printing Multiple Pages | You can manage multipage print jobs by implementing the Pageable interface in a class. This enables you to use different PageFormat objects to print different pages. |
| The Book Class | A Book object can encapsulate a series of pages to be printed. Each Printable object that is appended to a book prints one or more pages in a given format. |
